
HOBS
USER INSTRUCTIONS
GB - IE
CANDY HOOVER GROUP S.R.L. • Via Privata Eden Fumagalli • 20047 Brugherio Milano Italy
VARNÉ DESKY
NÁVOD POUŽITĺ
CZ
TABLES DE CUISSON
NOTICE D’EMPLOI
FR
UND BEDIENUNGSANLEITUNG
INSTALLATIONS
DE
ENCIMERAS
INSTRUCCIONES DE USO
ES
INSTRUKCJE
UŻYCIA I MONTAŻU
PL
OCAK
KULLANIM KLAVUZU
TR
NAVODILA ZA UPORABO
VGRADNJO IN PRIKLJUČITEV
SL
ВАРОЧНЫЕ ПОВЕРХНОСТИ
ИНСТРУКЦИЯ ПОЛЬЗОВАТЕЛЯ
RU
PIANI COTTURA
ISTRUZIONI PER L’USO
IT
PLACAS
INSTRUÇÕES DE UTILIZAÇÃO
PT
TŰZHELYLAPOK
HASZNÁLATI UTASÍTÁS
HU
PLITE
MANUAL DE UTILIZARE
RO

CONTENT
Safety Instuructions
1. Instructions For The Installer
1.1. Bulding In
1.2. Suitable Location
2. Electrical Connection (For U.K. Only)
2.1. Electrical Connection
2.2. Gas Connection (For U.K. Only)
2.3. Adapting The Hob To Different Types Of Gas
2.4. Regulating The Minimum Flame
3. Use Of Hob - User Instructions
3.1. Using The Gas Burner
3.2. Use Of Cooktop Electrical Plates
4. Maintenance and Cleaning
5. Aftercare
6. Protection Of The Environment
GB - IE
....................................................................05
..................................................06
................................................................................06
....................................................................06
....................................06
..............................................................06
..............................................06
.........................07
..............................................07
...............................................07
.............................................................07
............................................07
......................................................08
...................................................................................08
..............................................08
OBSAH
Bezpečnostní Pokyny
1. Pokyny pro instalatéra
1.1 Vestavba
1.2 Vhodné místo instalace
2.1. Připojení k elektrické síti
2.2. Připojení plynu
2.3. Změna varné desky na jiný druh plynu
2.4. Nastavení minimálního plamene
3. Použití varné desky
3.1. Použití plynového hořáku
3.2. Použití Elektrických Ploten
4. Údržba a čištění
5. Servis
6. Ochrana životního prostředí
CZ
..................................................................13
............................................................14
...................................................................................14
............................................................14
........................................................14
.........................................................................14
...................................15
.............................................15
.................................................................15
........................................................15
......................................................15
.......................................................................16
.........................................................................................16
...................................................16
CONTENU
Conseils De Sécurité
1. Installation
1.1 Encastrement
1.2. Caracteristiques Requises
2.1. Raccordement Electrique
2.2. Raccordement Gaz
2.3. Adapter La Table A Differents Types De Gaz
2.4. Reguler La Flamme Au Minimum
3. Utilisation De La Table
3.1. Using The Gas Burner
3.2. Manuel D'utilisation Des Pl Au Es Chauffantes Electriques
Sur Comptoirs
4. Maintenance Et Entretien
5. Assistance Technique
6. Protection De L'environnement
FR
...................................................................09
................................................................................10
..........................................................................10
......................................................10
........................................................10
.................................................................10
..........................11
...........................................11
.............................................................11
.............................................................11
................................................................................11
........................................................12
..............................................................12
.............................................12
INHALT
Sicherheitsvorschriften
1. Installationsanweisung
1.1 Einbau
1.2. Geeigneter Standort
2.1.Elektrischer Anschluss
2.2. Gasanschluss
2.3. Umstellung Auf Eine Andere Gasar
2.4. Einstellen Der Gasmindestzufuhrt
3. Bedienungsanleitung
3.1. Inbetriebnahme Der Brenner
3.2. Benutzung Der Elektrischen Kochlatten
4. Wartung Und Reinigung
5. Technischer Kundendienst
6. Umweltgerechte Entsorgung
DE
............................................................17
..........................................................18
......................................................................................18
...............................................................18
.............................................................18
.........................................................................18
........................................19
..........................................19
...............................................................19
..................................................19
......................................19
..........................................................20
.....................................................20
..................................................20
CONTENIDO
Instrucciones Para Un Uso Seguro
1. Instrucciones Para El Instalador
1.1 Integración
1.2 Ubicación Ideal
2.1 Conexión Eléctrica
2.2 Conexión Del Gas
2.3 Adaptación De La Placa A Distintos Tipos De Gas
2.4 Regulación De La Llama Mínima
3. Utilización De La Placa Instrucciones Para El Usuario
3.1 Utilización Del Quemador De Gas
3.2. Uso De La Cocina De Las Placas Eléctricas
4. Mantenimiento Y Limpieza
5. Servicio Técnico
6. Protección Del Medioambiente
ES
............................................21
...........................................22
...............................................................................22
.........................................................................22
...................................................................22
...................................................................22
.................23
.............................................23
........23
...........................................23
..........................23
.....................................................24
......................................................................24
...............................................24
SPIS TREŚCI
Instrukcje Bezpıieczeństwa
1. Instrukcje Dla Instalatora
1.1 Zabudowa
1.2 Odpowiednie Pomieszczenie
2.1 Podłączenie Do Sieci Elektrycznej
2.2 Podłączenie Do Gazu
2.3 Przystosowanie Płyty Do Różnych Rodzajów Gazu
2.4 Regulacja Płomienia Minimalnego
3. Użytkowanie Płyty - Instrukcje Dla Użytkownika
3.1 Używanie Palników Gazowych
3.2. Eksploatacja Kuchenek Z Płytami Elektrycznymi
4. Czyszczenie I Konserwacja
5. Obsługa Serwisowa
6. Ochrona Środowiska
PL
......................................................25
........................................................26
................................................................................26
...................................................26
..........................................26
..............................................................26
...............27
...........................................27
..................27
................................................27
...................27
.....................................................28
.................................................................28
...............................................................28
İÇİNDEKİLER
Güvenlik Uyarıları
1. Kurulum Talimatları
1.1. Ankastre Montaj
1.2. Uygun Yer Tespiti
2.1. Elektrik Bağlantısı
2.2. Gaz Bağlantısı
2.3. Ocağın Farklı Gaz Türlerine Uyarlanması
2.4. Minimum Alevin Ayarlanması
3. Ocak Kullanımı Kullanım Talimatları
3.1. Gazlı Ocak Gözlerinin Kullanımı
3.2. Elektrikli Isıtıcının Kullanımı
4. Bakim Ve Temizlik
5. Satış Sonrası Servis
6. Çevrenin Korunması
Garanti Belgesi
TR
.....................................................................29
................................................................30
......................................................................30
....................................................................30
...................................................................30
.........................................................................30
..............................30
.................................................31
.....................................31
............................................31
.....................................................31
.................................................................32
...............................................................32
..............................................................32
............................................................................33
СОДЕРЖАНИЕ
Правила Техники Безопасности
1. Инструкции по выполнению установки
1.1. Встраиваемые варочные поверхности
1.2. Выбор места для установки варочной поверхности
2. Подключение к электросети (только для Великобритании)
2.1. Подключение к электросети
2.2. Подключение к линии газоснабжения (только для Великобритании)
2.3. Адаптация варочной поверхности на другие типы газа
2.4. Регулировка минимального пламени
3. Инструкции по эксплуатации варочной поверхности
3.1 использование газовой конфорки
3.2. Руководство По Использованию Электрических Плит
4. Обслуживание и чистка
5. Послепродажное обслуживание
6. Защита окружающей среды
RU
....................................................34
.....................................35
.........................................35
........................35
.........35
.........................................................35
36
...................36
............................................36
...................36
..................................................36
.........................36
..............................................................37
.................................................37
........................................................37

Varnostna Navodıla
1. Vgradnja In Priključitev
1.1. Vgradnja
1.2. Ustrezen Prostor
2.1. Priključitev Na Električno Omrežje
2.2. Priključitev Plina
2.3. Prilagajanje Kuhalne Plošče Za Drugo Vrsto Plina
2.4. Nastavljanje Minimalnega Plamena Gorilnika
3. Uporaba Kuhalne Plošče Navodila Za Uporabnika
3.1. Uporaba Gorilnikov
3.2. Uporaba Električnih Kuhališč
4. Vzdrževanje In Čiščenje
5. Servisiranje
6. Protection De L'environnement
SL
...................................................................39
..........................................................40
.................................................................................40
.....................................................................40
..........................................40
......................................................................40
.................41
.........................41
..............41
.................................................................41
.....................................................41
...........................................................42
...............................................................................42
.............................................42
INDICE
Indicazioni Di Sicurezza
1. Istruzioni Per L'installatore
1.1. Installazione
1.2. Locazioni Consigliate
2.1. Connessione Elettrica
2.2. Connessione Gas
2.3. Adattare Il Piano Cottura Con Diversi Tipi Di Gas
2.4. Regolare Il Minimo Della Fiamma
3. Uso Del Piano - Istruzioni Utente
3.1. Uso Del Bruciatore Gas
3.2. Uso Dí Fornelli Con Le Piastre Elettriche
4. Manutenzione E Pulizia
5. Ripristino
6. Rispetto Dell'ambiente
IT
............................................................43
....................................................44
............................................................................44
..............................................................44
..............................................................44
...................................................................44
..................45
...........................................45
............................................45
..........................................................45
...................................45
...........................................................46
..................................................................................46
............................................................46
VSEBINA
ÍNDICE
Instruções De Segurança
1. Instruções Para O Instalador
1.1 Preparação
1.2 Localização Adequada
2.1. Ligação Eléctrica
2.2. Ligação À Rede De Gás
2.3. Adaptação Da Placa A Diferentes Tipos De Gás
2.4. Regulação Da Altura Mínima Da Chama
3. Utilização Da Placa Instruções Para O Utilizador
3.1. Como Utilizar O Queimador De Gás
3.2. Utilização Das Placas Eléctricas De Vitrocerâmica
4. Manutenção E Limpeza
5. Antes De Chamar A Assistência Técnica
6. Protecção Do Ambiente
PT
.........................................................47
.................................................48
...............................................................................48
.............................................................48
.....................................................................48
..........................................................48
....................49
................................49
................49
.......................................49
.....................49
............................................................50
...............................50
...........................................................50
Gas Type Tables .................................................................59-60-61
TARTALOMJEGYZÉK
Bıztonságı Utasítások
1. Utasítások a telepítő számára
1.1. Beépítés
1.2. Alkalmas helyszín
2. Elektromos bekötés (csak az Egyesült Királyságban)
2.1. Elektromos bekötés
2.2. Gázbekötés (csak az Egyesült Királyságban)
2.3. A tűzhelylap beállítása különböző gáztípusokhoz
2.4. A minimális lángméret beállítása
3. A tűzhelylap használata Felhasználói utasítások
3.1. A gázégő használata
3.2.
4. Karbantartás és tisztítás
5. Vevőszolgálat
6. Környezetvédelem
Önállóan Beépíthető Elektromos Főzőlap Használati
Útmutatója
HU
.................................................................51
.................................................52
..................................................................................52
....................................................................52
.........52
.................................................................52
.........................52
..................53
.............................................53
...............53
..............................................................53
......................................................................................53
..........................................................54
...........................................................................54
...................................................................54
CUPRINS
Instrucţıunı Prıvınd Sıguranţa
1. Instrucţiuni de Instalare
1.1. Incorporare
1.2. Amplasare
2. Conexiunea electrică (numai pentru G.B.)
2.1. Conexiunea electrică
2.2. Conectarea la gaz (numai pentru G.B.)
2.3. Adaptarea la diverse tipuri de gaz
2.4. Reglarea flăcării minime
3. Utilizarea plitei Instrucţiuni de utilizare
3.1. Utilizarea arzătoarelor
3.2.
4. Întreţinere şi curăţare
5. Service
6. Protejarea mediului
Utilizarea Plăcilor Electrice Pentru Aragaz
RO
.....................................................55
...........................................................56
..............................................................................56
................................................................................56
.............................56
..............................................................56
..................................56
...........................................57
..........................................................57
.................................57
.............................................................57
..............................57
..............................................................58
......................................................................................58
.................................................................58

04
accessible space
Figure 3
Min 10 mm
Sp.da 25 a 45 mm
Figure 2Figure 1
2
60 cm
2
240 cm
2
120 cm
2
180 cm
Figure 5Figure 4
1/2 GAS
CONICAL
C
AB
CYLINDRICAL
CONICAL
INJECTOR
Figure 6
Figure 7
Figure 8
Seal
Bracket
Figure 10 Figure 11
YES

05 GB
WARNING: The appliance and its accessible parts become hot during use. Care should be taken to avoid
touching heating elements.
• Children under 8 Year of age must be kept away from the appliance unless they are continuously
supervised.
• This appliance can be used by children aged from 8 years and above and persons with reduced
physical, sensory or mental capabilities or lack of experience and knowledge if they have been given
supervision or instruction concerning use of the appliance in a safe way and understand the hazards
involved.
• Children must not play with the appliance.
• Cleaning and user maintenance shall not be made by children without supervision
WARNING: Unattended cooking on a hob with fat or oil can be dangerous and may result in fire.
• NEVER try to extinguish a fire with water, but switch off the appliance and then cover flame e.g. with a lid
or a fire blanket.
WARNING: Danger of fire: do not store items on the cooking surfaces.
WARNING: If the surface is cracked, switch off the appliance to avoid the possibility of electric shock.
• Do not use a steam cleaner for cleaning operations.
• Any spillage should be removed from the lid before opening.
• The hob surface must be allowed to cool down before closing the lid.
• This appliance is not intended to be operated by means of an external timer or separate remote-control
system.
• The means for disconnection must be incorporated in the fixed wiring in accordance with the wiring
rules.
• The instructions state the type of cord to be used, taking into account the temperature of the rear surface
of the appliance.
• If the supply cord is damaged, it must be replaced by a special cord or assembly available from the
manufacturer or its service agent.
CAUTION: In order to avoid a hazard due to inadvertent resetting of the thermal cutout, this appliance
must not be supplied through an external switching device, such as a timer, or connected to a circuit that
is regularly switched on and off by the utility.
• This appliance must be installed in accordance with the regulations in force and only used in a well
ventilated space. Read the instructions before installing or using this appliance.
• "These instructions are only valid if the country symbol appears on the appliance. If the symbol does not
appear on the appliance, it is necessary to refer to the technical instructions which will provide the
necessary instructions concerning modification of the appliance to the conditions of use of the country".
• "Prior to installation, ensure that the local distribution conditions (nature of the gas and gas pressure)
and the adjustment of the appliance are compatible";
• "The adjustment conditions for this appliance are stated on the label (or data plate)";
• "This appliance is not connected to a combustion products evacuation device. It shall be installed and
connected in accordance with current installation regulations. Particular attention shall be given to the
relevant requirements regarding ventilation".
• The use of a gas cooking appliance results in the production of heat and moisture in the room in which it
is installed. Ensure that the kitchen is well ventilated: keep natural ventilation holes open or install a
mechanical ventilation device (mechanical extractor hood). Prolonged intensive use of the appliance
may call for additional ventilation, for example opening of a window, or more effective ventilation, for
example increasing the level of mechanical ventilation where present.
SAFETY INSTURUCTIONS

If an appliance is not fitted with a supply cord and a plug, or with other
means for disconnection from the supply mains having a contact
separation in all poles that provide full disconnection under
overvoltage category III conditions, the instructions shall state that
means for disconnection must be incorporated in the fixed wiring in
accordance with the wiring rules.
06 GB
1. INSTRUCTIONS FOR THE INSTALLER
The hob may be installed in any worktop which is heat resistant to a
temperature of 100°C, and has a thickness of 25-45 mm. The
dimensions of the insert to be cut out of the worktop are in shown in
Figure 2.
If the Hob is fitted next to a cabinet on either side, the distance
between the Hob and the cabinet must be at least 15 cm (see Figure
4); while the distance between the hob and the rear wall must be at
least 5,5 cm.
The distance between the hob and any other unit or appliance above it
(e.g. An extractor hood) must be no less than 70 cm (Figure 4).
When there is an accessible space between the built-in hob and the
cavity below, a dividing wall made of insulating material should be
inserted (wood or a similar material) (Figure 3).
Important - The diagram in figure 1 shows how the sealant should
be applied.
The Hob unit is fitted by attaching the Fixing Clamps supplied, using
the holes at the base of the unit.
If a hob of 60 cm is fitted above an oven which is not equipped with fan
cooling system it is recommended that openings are created within
the built in furniture to ensure correct air circulation.
The size of these openings must be at least 300 cm2 and placed as
shown in Figure 5.
When a 75 cm hob is fitted over a built in oven, the latter must be fan
cooled.
This appliance is not intended to be operated by means of an external
timer or separate remote-control system.
2. ELECTRICAL CONNECTION (FOR U.K. ONLY)
Warning - this appliance must be earthed
This appliance is designed for domestic use only. Connection to the
main supply must be made by a competant electrician, ensuring that
all current regulations concerning such installations are observed.
The appliance must only be connected to a suitably rated spur point, a
3 pin 13 amp plug/socket is not suitable. A double pole switch must be
provided and the circuit must have appropriate fuse protection.
Further details of the power requirement of the individual product will
be found in the users’ instruction and on the appliance rating plate. In
the case of built-in product you are advised, should you wish to use a
longer cable than the one supplied, that a suitably rated heat resistant
type must be used.
The wiring must be connected to the mains supply as follows:
CONNECT TO SPUR TERMINAL
Green & Yellow Wire Earth Connection
Blue Wire Neutral Connection
INSTALLING A DOMESTIC APPLIANCE CAN BE A COMPLICATED OPERATION WHICH IF NOT CARRIED OUT CORRECTLY, CAN SERIOUSLY
AFFECT CONSUMER SAFETY. IT IS FOR THIS REASON THAT THE TASK SHOULD BE UNDERTAKEN BY A PROFESSIONALLY QUALIFIED
PERSON WHO WILL CARRY IT OUT IN ACCORDANCE WITH THE TECHNICAL REGULATIONS IN FORCE. IN THE EVENT THAT THIS ADVICE IS
IGNORED AND THE INSTALLATION IS CARRIED OUT BY AN UNQUALIFIED PERSON, THE MANUFACTURER DECLINES ALL RESPONSIBILITY
FOR ANY TECHNICAL FAILURE OF THE PRODUCT WHETHER OR NOT IT RESULTS IN DAMAGE TO GOODS OR INJURY TO INDIVIDUALS.
1.1 BUILDING IN
1.2. SUITABLE LOCATION
Check the data on the rating plate, located on the outside of the unit, to
ensure that the supply and input voltage are suitable.
Before connection, check the earthing system.
By Law, this appliance must be earthed. If this regulation is not
complied with, the Manufacturer will not be responsible for any
damage caused to persons or property. If a plug is not already
attached, fit a plug appropriate to the load indicated on the rating plate.
The earth wire is coloured yellow/green. The plug should always be
accessible.
Where the Hob is connected direct to the electricity supply, a circuit
breaker must be fitted.
If the power supply cord is damaged this is to be replaced by a
qualified engineer so as to prevent any potential risk.
The earth wire ( green and yellow coloured ) must be at least 10 mm
longer than the live and neutral wires.
The section of the cable used must be of the correct size in relation to
the absorbed power of the hob.
Please check rating plate for the power details and ensure that the
power supply cord is of the type 3x0.75 mm² H05RR-F.
LIVE
EARTH
NEUTRAL
L
N
Power Cable
Brown Wire
Green/Yellow Wire
Blue Wire
Mains Supply
2.2. GAS CONNECTION
These instructions are for qualified personnel, installation of
equipment must be in line with the relevant national standard. (For
U.K. only: by law the gas installation\commissioning must be
carried out by a "Gas Safe" installer)
All work must be carried out with the electricity supply disconnected.
The rating plate on the hob shows the type of gas with which it is
designed to be used. Connection to the mains gas supply or gas
cylinder should be carried out after having checked that it is regulated
for the type of gas with which it will be supplied. If it is not correctly
regulated see the instructions in the following paragraphs to change
gas setting.
For liquid gas (cylinder gas) use pressure regulators which comply
with the relevant national standards.
Use only pipes,washers and sealing washers which comply with the
relevant national standards.
For some models a conic link is furnished to outfit for the installation in
the countries where this type of link is obligatory; in picture 8 it is
pointed out how to recognize the different types of links (CY =
cylindrical, CO = conic). In every case the cylindrical part of the link
has to be connected to the hob.
When connecting the hob to the gas supply via use offlexible hoses
please ensure that the maximum distance covered by the hose does
not exceed 2 metres.
This appliance must be installed in accordance with the regulations in
force and only used in a well ventilated space. Read the instructions
before installing or using this appliance.
A gas-powered cooking appliance produces heat and humidity in the
area in which it is installed. For this reason you should ensure good
ventilation either by keeping all natural air passages open or by
installing an extractor hood with an exhaust flue. Intensive and
prolonged use of the appliance may require extra ventilation, such as
the opening of a window or an increase in speed of the electric fan, if
you have one.
If a hood can not be installed, an electric fan should be fitted to an
outside wall or window to ensure that there is adequate ventilation.
The electric fan should be able to carry out a complete change of air in
the kitchen 3-5 times every hour. The installer should follow the
relevant national standards.
Brown Wire Live Connection
Note: We do not advocate the use of earth leakage devices with
electric cooking appliances installed to spur points because of the
«nuisance tripping» which may occur. You are again reminded that
the appliance must be correctly earthed, the manufacturer declines
any responsibility for any event occurring as a result of incorrect
electrical installation.
2.1. ELECTRICAL CONNECTION

07 GB
2.3. ADAPTING THE HOB TO DIFFERENT
TYPES OF GAS
To adapt the Hob for use with different types of gas, carry out the
following instructions:
•remove the grids and burners
•insert on hexagonal spanner (7 mm) into the burner support (Figure
7)
•Unscrew the injector and replace it with one suitable for the gas to be
used (see gas type table)
1)As illustrated, assemble parts in sequence:
A: 1/2 Male Adaptor Cylindirical
B: 1/2 Seal
C: 1/2 Female Gas Adaptor Conical-Cylindirical or
Cylindirical-Cylindirical
2)Tighten the joints with the spanner, remembering to twist the
pipes into position.
3)Attach fitting C to mains gas supply using rigid copper pipe or
flexible steel pipe.
IMPORTANT: carry out a final check for leaks on the pipe
connections using a soapy solution. NEVER USE A FLAME. Also,
make sure that the flexible pipe cannot come into contact with a
moving part of the cabinet (eg.adrawer) and that it is not situated
where it could be damaged.
Warning: If gas can be smelt in the vicinity of this appliance turn off the
gas supply to the appliance and call the engineer directly. Do not
search for a leak with a naked flame.
2.4. REGULATING THE MINIMUM FLAME
After lighting the burners, turn the control knob to the minimum setting
and then remove the knob (this can easily be removed by applying
gentle pressure).
Using a small «Terminal» type screwdriver the regulating screw can
be adjusted as in Figure 9. Turning the screw clockwise reduces the
gas flow, whilst turning it anticlockwise increases the flow – Use this
adjustment to obtain a flame of approximately 3 to 4 mm in length and
then replace the control knob.
When the gas supply available is LPG - the screw to set the idle flame
must be turned (clockwise) to the end stop.
When you have carried out the new gas regulation, replace the old gas
rating plate on your appliance with one (supplied with hob) suitable for
the type of gas for which it has been regulated.
3. USE OF HOB - USER INSTRUCTIONS
This appliance must only be used for the purpose for which it is
intended, domestic cooking, and any other use will be considered
improper and could therefore be dangerous. The Manufacturer will
not be responsible for any damage or loss resulting from improper
use.
3.1. USING THE GAS BURNER
To ignite the burners, place a lighted taper close to the burner, press in
and turn the control knob anti-clockwise.
If the burners have not been used for a couple of days, wait for a few
seconds before lighting the burner, this will allow any air present in the
pipes to escape.
For appliances fitted with electronic ignition carry out the following:
• push in and turn the knob anticlockwise to the ignition symbol.
• ignite the burner by pressing the sparker button.
For hobs fitted with automatic ignition simply push in and turn the knob
to the ignition symbol.
The ignition system will continue to generate sparks as long as the
control knob is being pressed.
If the burner has not ignited within 5 seconds, turn the knob to the 0
position and repeat the operation.
For smaller containers the gas burner should be regulated so that the
flame does not overlap the base of the pan. Vessels with a concave or
convex base should not be used.
WARNING: If a flame is accidentally extinguished, turn the knob
to the off position and do not attempt to re-ignite if for at least 1
minute.
If over the years the gas taps become stiff to turn it is necessary to
lubricate them.
Such operation must be carried out only by qualified Service
Engineers.
The flexible tube shall be fitted in such a way that it cannot come into
contact with a moveable part of the housing unit (e.g. a drawer) and
does not pass through any space where it may become crushed/
kinked or damaged in any way.
To prevent any potential damage to the hob please carry out the
installation following this sequence (picture 6):
Auxiliary Burner
Semi Rapid Burner
Rapid Burner
Burner Type
Ø pan / pot
(cm)
AUX
SR
R
12 - 18
18 - 24
24 - 26
Table A
Power
(kW)
G20/20 mbar
(Methane)
G30/28-30 mbar
(LPG)
1
1,7
2,7
95 I/h
162 I/h
257 I/h
73 g/h
124 g/h
196 g/h
For models fitted with a safety tap (which cuts-off the flow of gas if the
flame is accidentally extinguished) the burners are ignited and
described above, but care must be taken.
Prior to switching on the gas hob ensure that the burners and burner
caps are correctly placed within their position.
GENERAL ADVISE
For best results, use cooking vessels with a flat surface. The size of
the surface should match the gas burner side as follows. Table A.
Suitability of Cooking Pans (Figure 11)
Keep in mind that larger pans have larger heating surfaces.
This will help them to cook the food faster than pans with smaller heating
surfaces.
Always use pan sizes proportionate to the amount of the food to be
cooked. In order to prevent splashing, do not use very small pans,
especially for foods with excess liquid. If you use excessively large pans
for quick cooked foods, sausages and liquids will stick and residues will
remain attached to the pan after being emptied.
Closed pans and baking trays or moulds are suggested for cooking
sweets. Splashed sugar and juices from an open pan may stick to the
cooker surface and will be difficult to remove.
This is especially important for pans used for roasting or pressurized
cooking at high temperature.
Do not leave burners unattended without a pan or with an empty pan on
top.
Check the suitability of cooking pans with respect to the following criteria;
They should be heavy.
They should completely cover the burner surface; they may be a little
bigger but no smaller.
Base surfaces should be completely flat and fit well on the cooking
surface.
•For the best use of the electric hotplates and to minimize energy
consumption, only pans with smooth flat bases should be used. The size of
the pan should be as close as possible to the diameter of the hotplate, and
never smaller. The base of the pan should be dry and spillage should be
avoided. Empty pans must not be left on the plates, and the plates should
not be left switched on without a pan.
Turn the knob to the position for the required temperature of the hot plate.
The indicator light of the hot plate will come on and the hot plate will start to
heat.
When cooking is completed, turn the knob to the “ O” position. (Figure 10).
Do not leave the hot plate turned on without a pan on it. The diameter and
the base of the pan you use is critical. The maximum diameter of the pan
base is 14 cm and the base should be flat.
Leave the hot plate to heat up for 5 minutes before placing a pan on it the
first time you use it. This will allow the heat resistant coating of the plate to
harden due to burning.
Use a wet cloth and detergent for cleaning the hot plates. Do not remove
food residues from the hot plates with a knife or any other hard, sharp
object.
Turn on the hot plate for a few moments to dry it after cleaning. However, it
must never be left on for more than a few moments without a pan on top.
Position
Power (Watt)
Power (Watt)
Explanation
0
1
2
3
4
5
6
0
100 W
180 W
250 W
500 W
750 W
1000 W
0
135 W
220 W
300 W
850 W
1150 W
1500 W
Off
Heating
Cooking at low temperature
Cooking at low temperature
Cooking, Roasting, Boiling
Cooking, Roasting, Boiling
Cooking, Roasting, Boiling
3.2. USE OF COOKTOP ELECTRICAL PLATES

08 GB
4. MAINTENANCE AND CLEANING
Before cleaning the hob, ensure the appliance has cooled down.
Remove the plug from the socket or (if connected directly) switch off
the electricity supply.
Cleaning and user maintenance shall not be made by children without
supervision.
Never use abrasives, corrosive detergents, bleaching agents or
acids. Avoid any acid or alkaline substances (lemon, juice, vinegar
etc.) on the enamelled, varnished or stainless steel sections.
When cleaning the enamelled, varnished or chrome sections, use
warm soapy water or a non caustic detergent. For stainless steel use
an appropriate cleaning solution.
The burners can be cleaned with soapy water. To restore their original
shine, use a household stainless steel cleaner. After cleaning, dry the
burners and replace.
It is important the Burners are replaced correctly.
Chromed grids and burners
Chromed grids and burners have a tendency to discolour with use.
This does not jeopardize the functionality of the hob.
Our After Sales Service Centre can provide spare parts if required.
5. AFTERCARE
Before calling out a Service Engineer please check the following:
• that the plug is correctly inserted and fused;
• that the gas supply is not faulty.
If the fault cannot be detected:
Switch off the appliance and call the After Service Centre. DO NOT
TAMPER WITH THE APPLIANCE.
This appliance is marked according to the European
directive 2012/19/EU on Waste Electrical and
Electronic Equipment (WEEE). WEEE contains both
polluting substances (which can cause negative
consequences for the environment) and basic
components (which can be re-used). It is important to
have WEEE subjected to specific treatments, in order
to remove and dispose properly all pollutants, and
recover and recycle all materials.
Individuals can play an important role in ensuring that WEEE does not
become an environmental issue; it is essential to follow some basic
rules:
• WEEE shall not be treated as household waste.
• WEEE shall be handed over to the relevant collection points
managed by the municipality or by registered companies. In many
countries, for large WEEE, home collection could be present.
• When you buy a new appliance, the old one may be returned to the
retailer who has to collect it free of charge on a one-to-one basis, as
long as the equipment is of equivalent type and has the same
functions as the supplied equipment.
6. PROTECTION OF THE ENVIRONMENT
The Manufacturer will not be responsible for any inaccuracy resulting from
printing or transcript errors contained in this brochure. We reserve the right
to carry out modifications to products as required, including the interests of
consumption, without prejiudice to the characteristics relating to safety or
function.
Declaration of compliance: This equipment, in the parts intended to
come into contact with food, complies with the regulations laid down in
EEC directives 89/109.
Appliance complies with European Directives 2006/95/EC,
2004/108/EC and 2009/142/EC, and subsequent
amendments.
This appliance has been designed for non-professional, i.e. domestic, use.
Burner
BUILT IN HOBS
Type / reference
Flame failure device
Auxiliary burner ( AUX Ø 50 mm)
Electric Plate
Semirapid burner ( SR Ø 75 mm)
Rapid burner ( R Ø 100 mm)
Installed Gas Type / Power:
G 20/20 mbar (methane)
G 30/28-30 mbar (LPG)
Installation Class
Voltage / Frequency V / Hz
Electrical input power
Electric ignition
Product dimension
Table 1
Gas Power
4 gas
R /2SR / AUX
S60\HBGS S60\HBGN
1
1
-
2
1
7.1 kW
516 g/h
3
220-240 V / 50-60 Hz
15 W
YES
585 x 510
676 l/h
3 gas
R / SR / AUX / E
2
1
1
1
5.4 kW
393 g/h
3
220-240 V / 50-60 Hz
1500 W
YES
585 x 510
514 l/h
1
YES NO
S60\HBGS S60\HBGN
YES NO

AVERTISSEMENT: L'appareil et les parties accessibles deviennent chauds pendant l'utilisation. Des
précautions doivent être prises pour éviter de toucher les éléments chauffants.
• Les enfants de moins de 8 ans doivent être tenus à l'écart à moins d'être surveillés continuellement.
• Cet appareil n'est pas destiné à être utilisé par des personnes (y compris les enfants) dont les capacités
physiques, sensorielles ou mentales sont réduites, ou ayant un manque d'expérience et de
connaissances, à moins qu'elles n'aient été formées à l'utilisation de l'appareil, par une personne
responsable de leur sécurité.
• Les enfants ne doivent jouer avec l'appareil.
• Le nettoyage et l'entretien par l'utilisateur ne doit pas être fait par des enfants sans surveillance.
ATTENTION: La cuisson sans surveillance sur une plaque de cuisson avec de la graisse ou d'huile peut
être dangereuse et peut entraîner un incendie.
• Ne jamais tenter d'éteindre un incendie avec de l'eau, mais éteindre l'appareil, puis couvrir la flamme
par exemple avec un couvercle ou une couverture anti-feu.
AVERTISSEMENT: Danger d'incendie: ne pas stocker des éléments sur les surfaces de cuisson.
ATTENTION: Si la surface est fêlée, éteindre l'appareil pour éviter les risques de choc électrique.
• Ne pas utiliser de nettoyants vapeur pour le nettoyage.
• Tout liquide doivent être enlevé du couvercle avant ouverture.
• Il est recommandé de laisser refroidir la table de cuisson avant de refermer le couvercle.
• l'appareil n'est pas destiné à être utiliser avec une minuterie externe ou un système de contrôle à
distance.
• Un système de déconnexion doit être incorporé dans le compteur conformément aux règles de
câblage.
• Les instructions ndiquent le type de cordon à utiliser, en tenant compte de la température de la surface
arrière de l'appareil.
• Si le cordon d'alimentation est endommagé, il doit être remplacé par un cordon spécial disponible
auprès du fabricant ou de stations de dépannage agrées.
ATTENTION: Pour éviter tout danger dû à une réinitialisation accidentelle, cet appareil ne doit pas être
alimenté par un dispositif de commutation externe, comme une minuterie, ou connecté à un circuit qui est
régulièrement allumé et éteint par l'utilitaire.
• Cet appareil doit être installé en conformité avec la réglementation en vigueur et utilisé uniquement
dans un espace ventilé. Lisez les instructions avant d'installer ou utiliser cet appareil.
• Ces instructions ne sont valables que si le symbole du pays apparaît sur l'appareil. Si le symbole
n'apparaît pas sur l'appareil, il est nécessaire de se référer à la notice technique qui fournira les
instructions nécessaires concernant la modification de l'appareil selon les conditions d'utilisation du
pays.
• Avant l'installation, s'assurer que les conditions de distribution locale (la nature du gaz et la pression) et
le réglage de l'appareil sont compatibles"
• Les conditions de réglage de cet appareil sont indiqués sur l'étiquette (ou données de la plaque) ;
• "Cet appareil n'est pas relié à un dispositif d'évacuation des produits de combustion. Il doit être installé
et raccordé conformément aux règles d'installation en cours. Une attention particulière doit être
accordée aux exigences concernant la ventilation ".
• "Les résultats de la table gaz dans la production de chaleur depend de l'humidité dans la pièce dans
laquelle elle est installé Veiller à ce que la cuisine soit bien ventilée. Laissez les ouvertures de ventilation
naturelle ouvertes ou installez un dispositif de ventilation mécanique (hotte aspirante mécanique). Une
utilisation intensive prolongée de l'appareil peut faire appel à l'utilsation d'une ventilation
supplémentaire, par exemple d'ouverture d'une fenêtre, ou plus efficace de ventilation mécanique, par
exemple en augmentant le niveau de la ventilation mécanique présent
.
09 FR
CONSEILS DE SÉCURITÉ

1. INSTALLATION
Le meuble ou le support dans lequel doit être encastrée la table, ainsi
que les parois du meuble qui pourraient juxtaposer celui-ci, doivent être
d'une matière résistant à une température élevée (jusqu'à 100°C) et
d'une épaisseur comprise entre 25 et 45 cm.
Les dimensions d'encastrement sont indiquées sur le schéma 2.
Si la table est installée entre deux meubles de cuisine, la distance entre
la table et les meubles doit être au moins de 15 cm (voir schéma 4);
tandis que la distance entre la table et le mur du fond doit être au moins
de 5,5 cm. La distance entre la table et tout autre appareil ou meuble
situé au dessus (par exemple une hotte) doit être au moins de 70 cm
(voir schéma 4).
300 cm²
Si, en fonction de l'installation de la table, la partie inférieure de son
caisson se trouve à proximité d'une zone normalement accessible lors
de manipulations et/ou de rangements, placer une cloison (bois ou
similaire) pour éviter tous risques de brûlure ou de détérioration (schéma
3).
Attention : Lors de la mise en place, un soin particulier doit être
porté au joint entourant le bord de la table afin d'éviter toute
infiltration dans le meuble support (schéma 1).
Lors de la mise en place du joint sur la partie arrière, veiller à ne pas
obstruer les passages d'air nécessaires à la combustion.
Le caisson de la table est équipé en dessous de 4 emplacements prévus
pour recevoir les brides de fixation destinées à l'immobilisation de la table
sur le meuble. Placer les 4 brides de fixation de manière à ce que la table
de travail soit parfaitement plaquée au meuble.
Si une table de 60 cm de large est installée au-dessus d'un four qui n'est
pas équipé de ventilation tangentielle, il est recommandé de créer des
ouvertures dans le caisson de cuisine pour faire ainsi circuler l'air.
La taille de ces ouvertures doit être au moins de et placées
comme indiqué sur le schéma 5.
Si c'est une table de 75cm de large qui est installée au-dessus du four, ce
dernier doit être équipé d'une ventilation tangentielle.
l'appareil n'est pas destiné à être utiliser avec une minuterie externe ou
un système de contrôle à distance.
10 FR
La mise en place fonctionnelle des appareils ménagers dans leur environnement est une opération délicate qui, si elle n'est pas correctement
effectuée, peut avoir de graves conséquences sur la sécurité des consommateurs. Dans ces conditions, il est impératif de confier cette tâche à
un professionnel qui la réalisera conformément aux normes techniques en vigueur. Si malgré cette recommandation, le consommateur
réalisait lui-même l'installation, le constructeur déclinerait toute responsabilité en cas de défaillance technique du produit entraînant ou non
des dommages aux biens et/ou aux personnes.
1.1. ENCASTREMENT
1.2. CARACTERISTIQUES REQUISES
Cet appareil doit être installé en conformité avec la réglementation en
vigueur et utilisé uniquement dans un espace ventilé. Lisez les
instructions avant d'installer ou utiliser cet appareil.
Un appareil de cuisson alimenté par le gaz produit de la chaleur et de
l'humidité à l'endroit où il est installé. Pour cette raison, veuillez
assurer la bonne ventilation de la pièce en gardant des courants d'air
ou en installant une hotte.
Une utilisation intensive et prolongée de l'appareil peut requérir une
ventilation plus importante, telle que l'ouverture d'une fenêtre ou une
puissance d'aspiration plus intense de la VMC si vous en êtes
équipés.
S'il n'est pas possible d'installer une hotte, une VMC devrait être
installée sur un mur donnant sur l'extérieur ou sur une fenêtre.
La VMC devrait être en mesure d'apporter un changement complet de
l'air de la cuisine 3 à 5 fois par heure. L'installateur doit installer la VMC
conformément aux règles en vigueur dans le pays d'installation
PHASE
TERRE
NEUTRE
L
N
Câble
lectrique
d’alim
é
Fil Marron
Fil Vert/jaune
Fil Bleu
Alimentation
2.2. RACCORDEMENT GAZ
L'appareil doit être installé et raccordé conformément aux règles
En vigueur dans le pays d'installa-tion. Une attention
particulière sera accordée aux dispositions applicables en matière
De ventilation.
Tous les travaux d'installation doivent être effectués avec l'électricité
déconnectée.
La plaque signalétique sur la plaque indique le type de gaz qui doit
être utilisé. Le raccordement au réseau d'approvisionnement en gaz
cylindre doit être effectuée qu'après avoir vérifié qu'il est réglementé
pour le type de gaz avec lequel il sera distribué. S'il n'est pas
correctement réglementé, voir les instructions dans les paragraphes
suivants pour modifier les paramètres du gaz.
Pour le gaz liquide (bouteille de gaz), utiliser des régulateurs de
pression conformes aux normes en vigueur.
Utilisez uniquement des tuyaux, des rondelles et des rondelles
d'étanchéité conformes aux normes en vigueur.
Pour certains modèles un lien conique est fourni pour installation
l'appareil, dans les pays où ce type de lien est obligatoire ; sur le
schéma 8, il est indiqué comment reconnaître les différents types de
liens (CY = cylindrique, CO = conique). Dans tous les cas, la partie
cylindre du lien doit être connecté à la table.
Lorsque vous connectez la table de cuisson à l'alimentation du gaz via
l'utilisation de tuyaux flexibles, veuillez faire en sorte que la distance
maximum couverte par le tuyau ne dépasse pas 2 mètres.
Pour éviter tout dommage potentiel à la table de cuisson, veuillez
effectuer l'installation suivant les indications du schéma 6.
1) Comme illustré dans le schéma, assembler les pièces en
séquence :
Le tube flexible doit être installé de manière à ne pas entrer en contact
avec un élément mobile de la cuisine (par exemple un tiroir) et à ne
pas passer dans un espace pouvant être encombré.
2.1. RACCORDEMENT ELECTRIQUE
"L'installation recevant l'appareil cité en référence doit être
conforme à la norme en vigueur dans le pays
d'installation". Le constructeur décline toute responsabilité
en cas de non respect de cette disposition.
Vérifier les données sur la plaque signalétique, située à l'extérieur
de l'unité, pour assurer que l'alimentation et le voltage
conviennent.
Avant le branchement, vérifier le système de mise à la terre.
Attention : vérifier la continuité de la terre de l'installation
avant de procéder au raccordement. Notre responsabilité ne
saurait être engagée pour tout incident ou ses
conséquences éventuelles qui pourraient survenir à l'usage
d'un appareil non relié à la terre, ou relié à une terre dont la
continuité serait défectueuse.
Si une prise n'est pas déjà fournie, installer une prise appropriée
pour la charge indiquée sur la plaque signalétique.
La prise devrait toujours être accessible.
Le fil de terre est de couleur jaune / vert.
Lorsque la table de cuisson est reliée directement à
l'approvisionnement en électricité, un disjoncteur doit être
installé.
Si le cordon d'alimentation est endommagé, il doit être remplacé
par un technicien qualifié afin d'éviter tout risque potentiel.
Le fil de terre (couleur vert et jaune) doit être au moins 10mm plus
long que les fils de phase et neutre.
La section du câble utilisé doit être de la bonne taille par rapport à
la puissance absorbée de la table de cuisson.
Veuillez vérifier la plaque signalétique pour les détails de
puissance et veiller à ce que le cordon d'alimentation électrique
soit de type 3x0.75 mm² l'H05RR F.
Si l’appareil n'est pas muni d'un cordon d'alimentation et d'une prise,
ou d’un autre moyen assurant que l’appareil puisse être déconnecté
du réseau d'alimentation dans le cas d’un surtension répondant aux
conditions de catégorie III, il est nécessaire d’intégrer un système de
disjoncteur dans le câblage, conformément aux règles établies en la
matière.

2.3. ADAPTER LA TABLE A DIFFERENTS
TYPES DE GAZ
Pour adapter la table de cuisson à différents types de gaz, veuillez
exécuter les instructions suivantes:
• Enlever les grilles, chapeaux et corps de brûleurs
• Insérez une clé à pipe (7 mm) dans le support du brûleur (schéma 7)
• Dévisser le/les injecteurs et le/les remplacer par un/des injecteurs
adaptés au gaz à utiliser (voir le type de gaz préconisé sur la table)
• Visser le/les injecteurs à fond
• Régler la bague d'air
• Replacer les corps de brûleurs, le chapeau de brûleur et les grilles
2.4. REGULER LA FLAMME AU MINIMUM
Après l'allumage du brûleur, tourner le bouton de commande au
réglage minimum, puis enlever la manette de commande (ce qui
peut facilement être enlevé par appliquer une légère pression).
En utilisant un petit «Terminal » type tournevis, la vis de réglage peut
être ajustée (cf Schéma 9). En tournant la vis dans le sens des
aiguilles d'une montre, cela réduit le débit de la flamme, alors qu'en
tournant dans le sens inverse, cela l'augmente. Utilisez ce réglage
pour obtenir une flamme d'environ 3 à 4 mm de longueur, puis
replacer la manette de commande.
Lorsque l'approvisionnement en gaz disponible est du
butane/propane (gaz de bouteilles), la vis pour régler la flamme au
ralenti doit être tournée dans le sens des aiguilles d'une montre,
jusqu'à la butée.
Lorsque vous avez effectué la régulation du gaz, remplacer
l'ancienne plaque signalétique de votre appareil avec celle adaptée
au type de gaz installé (fournie avec plaque de cuisson).
3.1. USING THE GAS BURNER
Pour allumer les brûleurs, placez une flamme (allume-feu, allumette,
briquet etc…) près du brûleur, appuyez et tournez la manette de
commande.
Si les brûleurs n'ont pas été utilisés depuis quelques jours, attendre
quelques secondes avant d'allumer le brûleur, ce qui permettra l'air
éventuellement présent dans les tuyaux de s'échapper.
Pour les appareils équipés d'allumage électronique, effectuer les
opérations suivantes:
• Pousser et tourner la manette de commande sur le symbole
d'allumage.
• Allumer le brûleur en appuyant sur le bouton d'allumage
Pour les tables de cuisson équipées d'allumage électronique intégré,
il suffit de pousser et tourner le bouton sur le symbole d'allumage.
Le système d'allumage continuera à produire des étincelles aussi
longtemps que le robinet de gaz est actionné.
Si le brûleur ne s'enflamme pas dans les 5 secondes, tournez le
bouton vers la position 0 et répéter l'opération.
Pour les petites casseroles/poêles, le brûleur à gaz doit être réglé de
telle manière que la flamme ne chevauche pas le fond de la casserole.
Les récipients à fond concave ou convexe ne doivent pas être utilisés.
ATTENTION: Si un brûleur est accidentellement éteint, tournez le
bouton vers la position fermée et ne pas tenter de relancer
pendant au moins 1 minute.
Si au fil des années les robinets de gaz deviennent raides, il est
nécessaire de les lubrifier.
Cette opération doit être effectuée que par un technicien agréé.
11 FR
3. UTILISATION DE LA TABLE
Cet appareil ne doit être utilisé que pour des fins pour lesquelles il est
destiné : la cuisson domestique. Toute autre utilisation sera
considérée comme abusive et peut donc être dangereuse. Le
fabricant ne sera pas responsable pour tout dommage ou perte
découlant d'une utilisation abusive.
A: ½ Adaptateur Cylindrique mâle
B: ½ Obturation
C: ½ Adaptateur gaz Femelle conique-cylindrique ou cylindrique-
cylindrique.
2) Serrer les joints avec des clés à molette, pensez à placer les
tuyaux en position.
3) Fixer le raccord C au réseau d'approvisionne-ment en gaz à
l'aide tuyau rigide ou en acier flexi-ble.
IMPORTANT: effectuer une dernière vérification pour détecter
les fuites sur les raccords de tuyauterie en utilisant une solution
savonneuse. Ne jamais utiliser une flamme. Aussi, assurez vous
que le tuyau flexible ne peut pas entrer en contact avec une partie
mobile du meuble de cuisine (par exemple un tiroir) et qu'il ne se
trouve pas à un endroit où il pourrait être endommagé.
Attention: Si vous sentez des émanations de gaz en provenance de
l'appareil, coupez immédiatement l'alimentation en gaz et appelez
directement une personne qualifiée. Ne cherchez pas une fuite à
l'aide d'une flamme.
Ø casserole
(cm)
A
SR
R
12 - 18
18 - 24
24 - 26
GazPower
(kW)
G20/20 mbar
(Gaz de naturel:
Méthane)
G30/28-30 mbar
(Butane/Propane)
1
1,7
2,7
95 I/h
162 I/h
257 I/h
73 g/h
124 g/h
196 g/h
Table A
Type de brûleurs
Brûleur auxiliaire
Brûleur semi-rapide
Brûleur rapide
Pour les modèles équipés d'un robinet de sécurité par thermocouple
(qui coupe l'écoulement du gaz si la flamme est accidentellement
éteint), les brûleurs sont allumés et décrit ci-dessus, mais il faut
prendre soin de garder la manette de commandes enfoncée pendant
5 ou 6 secondes après que la flamme est allumée.
ATTENTION : Avant d'allumer la table gaz, veillez à ce que les
brûleurs et les chapeaux de brûleur soient correctement placés dans
leur position.
CONSEIL
Pour de meilleurs résultats, la taille de casseroles à fond plat doit
correspondre à la taille des brûleurs comme suit :
Placer le bouton sur la température voulue pour régler la température
de la plaque chauffante électrique. Le voyant lumineux s'allume et la
plaque chauffante électrique commence à se réchauffer.
Après la cuisson placer le bouton à la position "0" pour éteindre la
plaque chauffante électrique (Schéma 10). Ne laisser jamais allumer
la plaque chauffante électrique lorsqu'il y a un récipient dessus. Le
diamètre et la forme du fond du récipient utilisé a une très grande
importance. Le fond du récipient doit être plat et son diamètre ne doit
être supérieur à 14 cm. Avant de la première utilisation, avant d'y
placer un récipient, réchauffer la plaque chauffante électrique durant
5 minutes. Cette opération permettra l'endurcissement da la
couverture de la plaque chauffante électrique qui est résistante à la
haute température. Pour nettoyer les plaques chauffantes électriques
utiliser du chiffon mouillé et du détergent à vaisselle. N'essayer jamais
à enlever en grattant les restes des produits cuits sur les plaques
chauffantes à l'aide d'un couteau ou autres instruments aigus et durs.
Après le nettoyage des plaques chauffantes électriques laisser les
allumées pendant quelques minutes pour les faire sécher. Ne les
laisser jamais allumer plus de quelques minutes quand les surfaces
des plaques chauffantes électriques sont vides.
3.2. MANUEL D'UTILISATION DES PL AU ES
CHAUFFANTES ELECTRIQUES SUR COMPTOIRS
Position
Puissance (Watt)
Puissance (Watt)
Remarques
0
1
2
3
4
5
6
0
100 W
180 W
250 W
500 W
750 W
1000 W
0
135 W
220 W
300 W
850 W
1150 W
1500 W
Fermée
Réchauffage
Cuisson à basse température
Cuisson à basse température
Cuisson, Torréfaction, Ebullition
Cuisson, Torréfaction, Ebullition
Cuisson, Torréfaction, Ebullition
La conformité des récipients de cuisson
N'oubliez pas que des récipients plus grands ont des surfaces de
réchauffement plus larges.
Des grands récipients permettent une cuisson plus rapide par rapport
aux récipients ayant des petites surfaces de réchauffement.
Utiliser toujours des récipients qui sont conformes aux quantités des
plats à cuir. Pour que les plats ne se débordent pas, surtout pour la
cuisson des plats relativement liquides, n'utilisez pas des petits
récipients. En cas d'utilisation des grands récipients pour les plats
dont leurs cuissons sont rapides, la sauce du plat restera collée au
récipient et quand vous le transférez dans une assiette de service, les
restes du plat resteront aussi collés au fond du récipient.
(Schéma 11)

4. MAINTENANCE ET ENTRETIEN
Avant de nettoyer la table de cuisson, assurez-vous que cet appareil
est refroidi. Retirez la fiche de la prise ou (s'il est connecté
directement), éteindre l'alimentation d'électricité.
Le nettoyage et l'entretien par l'utilisateur ne doit pas être fait par des
enfants sans surveillance.
Ne jamais utiliser de produits abrasifs, de détergents corrosifs, agents
de blanchiment ou d'acides. Éviter les substances acides ou alcalines
(citron, jus, vinaigre etc…) sur l'émail ou l'acier.
Lors du nettoyage de l'émail, vernis ou des sections chromées,
utilisez de l'eau chaude savonneuse ou un détergent non corrosif.
Pour l'acier inoxydable, utilisez une solution de nettoyage appropriée.
Les brûleurs peuvent être nettoyés avec de l'eau savonneuse. Pour
restaurer leur éclat d'origine, utilisez un nettoyant ménager pour acier
inoxydable. Après nettoyage, séchez les brûleurs et les replacer.
Il est important que les brûleurs soient remplacés correctement
à leur position.
Grilles chromées et brûleurs
Les grilles chromées et les brûleurs ont tendance à foncer à
l'utilisation. Il s'agit d'un phénomène normal et inévitable, mais elle ne
compromet pas la fonctionnalité de la table de cuisson.
Si besoin, des pièces de rechange sont disponibles dans notre centre
de service après-vente.
5. ASSISTANCE TECHNIQUE
Avant d'appeler le Service d'Assistance Technique, vérifier les points
suivants:
• La prise est bien insérée ;
• L'approvisionnement en gaz n'est pas défectueux.
Si la panne ne peut être identifiée:
Éteignez l'appareil (ne pas l'utiliser) et appeler le Service d'Assistance
Technique.
Le présent appareil est marqué conformément à la
directive 2012/19/UE relative aux déchets
d'équipements électriques et électroniques
(DEEE). Les DEEE contiennent à la fois des
substances polluantes (qui peuvent avoir des
conséquences négatives sur l'environnement) et
des éléments de base (réutilisables). Il est important
de soumettre les DEEE à des traitements spécifiques,
en vue d'extraire et d'éliminer de façon appropriée toutes les
substances polluantes, puis de récupérer et recycler tous les
matériaux.
Chacun peut jouer un rôle important quant à la protection de
l'environnement contre les DEEE. Pour atteindre cet objectif, il est
impératif de suivre quelques règles élémentaires :
• Les DEEE ne doivent pas être traités comme des déchets
ménagers.
• Ils doivent être remis aux points de collecte appropriés gérés par la
municipalité ou par des sociétés immatriculées. Dans plusieurs pays,
il est possible de collecter à domicile les DEEE volumineux.
• Lorsque vous achetez un nouvel appareil, vous devez retourner
l'ancien au vendeur qui le récupère gratuitement, au cas par cas, à
condition que l'équipement soit de type équivalent et possède les
mêmes fonctions que celui fourni.
Déclaration de conformité: cet équipement, dans les parties
destinées à entrer en contact avec les aliments, est conforme
aux normes fixées par les directives CEE 89/109.
L'appareil est conforme aux directives européennes 2006/95/EC,
2004/108/EC et 2009/142/EC, et ses modifications ultérieures.
Le constructeur décline toute responsabilité concernant d'éventuelles
inexactitudes imputables à des erreurs d'impression ou de
transcription contenue dans cette notice. Le constructeur se réserve
le droit de modifier les produits en cas de nécessité, même dans
l'intérêt de l'utilisation, sans causer de préjudices aux caractéristiques
de fonctionnement de sécurité des appareils.
6. PROTECTION DE L'ENVIRONNEMENT
12 FR
Pour la cuisson des desserts, il est conseillé d'utiliser des récipients
fermés ou des récipients de four ou des moules de gâteaux. Dans des
récipients ouverts, la sauce sucrée pourrait débordée, donc le
nettoyage de la plaque chauffante électrique serait plus difficile
Ceci est surtout important pour des cuissons à haute température ou
des cuissons à pression (cocotte minute). Ne laissez jamais allumer le
chalumeau quand il n'y a pas de récipient dessus, ou quand il y a un
récipient vide.
Contrôlez la conformité des récipients selon les critères suivants :
Il faut qu'ils soient lourds.
Il faut qu'ils couvrent entièrement la surface du chalumeau (Ils
peuvent être un peu plus grands, jamais plus petits par rapport à la
surface du chalumeau) La surface du fond du récipient doit être plate
et doit se poser entièrement sur la surface de cuisson de la plaque
chauffante électrique.
Foyers
TABLES DE CUISSON
Table 1
4 gaz
R /2SR / AUX
S60\HBGS S60\HBGN
1
YES NO
1
-
2
1
7.1 kW
516 g/h
3
220-240 V / 50-60 Hz
15 W
YES
585 x 510
676 L/h
Modèle
Sécurité gaz par thermocouple
Brûleur auxiliaire(AØ 50 mm)
Plancha electrica
Brûleur semi-rapide(SR Ø 75 mm)
Brûleur rapide(R Ø 100 mm)
Type de gaz installé / Puissance :
Gaz Power
G 20/20 mbar (Gaz de naturel : Méthane)
G 30/28-30 mbar (Butane/Propane)
Classe d'installation
Voltage / Frequency V / Hz
Puissance électrique
Allumage électronique intégré
Dimensions appareil (LxP) mm
Cet appareil a été dessiné pour un usage non professionnel, usage domestique uniquement
3 gaz
R / SR / AUX / E
2
S60\HBGS S60\HBGN
YES NO
1
1
1
5.4 kW
393 g/h
3
220-240 V / 50-60 Hz
1500 W
YES
585 x 510
514 L/h
1

13 CZ
UPOZORNĚNÍ: Spotřebič a jeho přístupné části se během použití zahřívají. Nedotýkejte se topných
prvků.
• Děti do 8 let držte mimo dosah spotřebiče, pokud nejsou neustále pod dohledem.
• Tento spotřebič smí používat děti starší 8 let a osoby se sníženými fyzickými, senzorickými nebo
mentálními schopnostmi nebo bez dostatečných zkušeností, pokud jsou pod dohledem a byly poučeny o
použití spotřebiče a možném riziku.
• Nedovolte dětem hrát si se spotřebičem.
• Čištění a údržbu nesmí provádět děti bez dohledu.
UPOZORNĚNÍ: Vaření na desce s tuky a oleji bez dohledu je nebezpečné a může způsobit požár.
• NIKDY se nepokoušejte uhasit plamen vodou, vypněte spotřebič a poté překryjte plamen pokličkou
nebo protipožární přikrývkou.
UPOZORNĚNÍ: Pokud je povrch varné desky prasklý, spotřebič vypněte, abyste zabránili riziku
zasažení elektrickým proudem.
• K čištění nepoužívejte vysokotlaké parní čističe.
• Nečistoty z krytu odstraňte před otevřením.
• Varnou desku nechte před zavřením krytu vychladnout.
• Spotřebič nesmíte ovládat pomocí externího časovače nebo samostatného dálkového ovládání.
• Odpojovací zařízení musí být včleněno do napájení v souladu s platnými předpisy.
• Pokud je poškozený přívodní kabel, musíte jej vyměnit za speciální kabel dostupný u výrobce nebo
servisního technika.
UPOZORNĚNÍ: abyste zabránili nebezpečí z neúmyslného resetování tepelné pojistky, tento spotřebič
nesmíte napájet přes externí spínací zařízení, jako je časovač, nebo připojovat k obvodu, který se
pravidelně zapíná a vypíná elektrikářskou službou.
•Tento spotřebič musí být instalován v souladu s platnými předpisy a používat na dobře větraném místě.
Před instalací a použitím spotřebiče si přečtěte pokyny k použití.
• "Tyto pokyny platí pouze v případě, pokud je symbol země uvedený na spotřebiči. Pokud není, je nutné
prostudovat si technické instrukce, týkající se příslušných změn spotřebiče podle dané země".
• "Před instalací se ujistěte, zda místní napájecí podmínky (typ plynu a tlak plynu) a nastavení spotřebiče
odpovídají";
• "Podmínky nastavení tohto spotřebiče jsou uvedeny na výrobním štítku";
• "Tento spotřebič není připojený k systému odvodu spalin. Musí být instalován a připojován v souladu s
platnými instalačními předpisy. Zvyšte pozornost na příslušné požadavky týkající se ventilace".
• "Použití plynových varných spotřebičů způsobuje tvorbu tepla a vlhkosti v místnosti, kde je spotřebič
instalován. Ujistěte se, zda je kuchyň dobře větraná: udržujte přirozené větrací otvory volné nebo
instalujte mechanické větrací zařízení (odsavač par). Dlouhodobé intenzivní použití spotřebiče může
vyžadovat další větrání, například otevření dveří nebo okna, nebo efektivnější větrání, například
zvýšením úrovně mechanické ventilace".
UPOZORNĚNÍ: Riziko požáru: neskladujte žádné předměty na varné desce.
BEZPEČNOSTNÍ POKYNY

1. POKYNY PRO INSTALATÉRA
Varnou desku lze instalovat do pracovní desky, která je z teplu
odolného materiálu do 100°C a má tloušťku 25-45 mm. Rozměry
výřezu v pracovní desce jsou na obrázku 2.
Pokud je varná deska připevněná k nábytku na kterékoli straně,
vzdálenost mezi varnou deskou a nábytkem musí být nejméně 15 cm
(viz obrázek 4); zatímco vzdálenost mezi varnou deskou a zadní
stěnou musí být nejméně 5,5 cm.
Vzdálenost mezi varnou deskou a spotřebičem nad ní (např. odsavač
par) musí být nejméně 70 cm (obrázek 4).
Pokud není volný prostor mezi varnou deskou a skříňkou pod ní, je
nutné instalovat vhodné mezidno (dřevěné nebo z podobného
materiálu) (obrázek 3).
Důležité - Obrázek 1 znázorňuje aplikaci těsnění.
Varná deska se upevňuje pomocí dodaných upevňovacích svorek,
pomocí otvorů ve spodní části spotřebiče.
Pokud je 60 cm varná deska nad troubou, která není vybavená
chladicím ventilátorem, doporučujeme udělat větrací otvory v nábytku
pro zajištění správné ventilace.
Velikost otvorů musí být nejméně 300 cm2 a umístění podle obrázku
5.
Pokud je 75 cm varná deska nad troubou, musí být přidán chladicí
Ventilátor.
Spotřebič nesmíte ovládat pomocí externího časovače nebo
samostatného dálkového ovládání.
14 CZ
INSTALACE DOMÁCÍCH SPOTŘEBIČŮ MŮŽE BÝT SLOŽITÁ OPERACE, KTERÁ, POKUD NENÍ PROVEDENA SPRÁVNĚ, MŮŽE
VÁŽNĚ OHROZIT BEZPEČNOST UŽIVATELE. Z TOHOTO DŮVODU POŽÁDEJTE O INSTALACI KVALIFIKOVANÉHO
SERVISNÍHO TECHNIKA, KTERÝ INSTALACI PROVEDE PODLE PLATNÝCH PŘEDPISŮ. V PŘÍPADĚ NEOPRÁVNĚNÉ
INSTALACE VÝROBCE NENESE ŽÁDNOU ODPOVĚDNOST ZA TECHNICKÉ ZÁVADY VÝROBKU, KTERÉ MOHOU VÉST KE
POŠKOZENÍ VÝROBKU NEBO ZRANĚNÍ OSOB.
1.1 VESTAVBA
1.2 VHODNÉ MÍSTO INSTALACE
Tento spotřebič musí být instalován v souladu s platnými předpisy a
používat na dobře větraném místě. Před instalací a použitím
spotřebiče si přečtěte pokyny k použití.
PLynové spotřebiče produkují teplo a vlhkost v místě instalace. Z
tohoto důvodu musíte zajistit dostatečnou ventilaci udržením volných
přirozených otvorů nebo instalací odsavače.
Intenzivní a dlouhodobé použití spotřebiče může vyžadovat extra
ventilaci, jako je otevření okna nebo zvýšení výkonu ventilátoru,
pokud je.
Pokud nelze instalovat odsavač, je nutné instalovat ventilátor do
vnější stěny nebo okna. Elektrický ventilátor musí být schopný
vyměnit vzduch 3-5 násobku objemu kuchyně každou hodinu,
instalatér musí dodržovat platná pravidla.
2.1. PŘIPOJENÍ K ELEKTRICKÉ SÍTI
Zkontrolujte data na výrobním štítku, na vnější straně přístroje, pro
kontrolu, zda napětí odpovídá napětí elektrické sítě. Před připojením
zkontrolujte uzemnění. Tento spotřebič musí být uzemněný. Pokud
tuto podmínku nesplníte, výrobce nenese žádnou odpovědnost za
poškození spotřebiče nebo úrazy osob. Pokud přívodní kabel není
vybavený zástrčkou, připojte vhodnou zástrčku podle údajů na
výrobním štítku.
Uzemňovací systém je barevně označený žlutozelenou. Zástrčka
musí zůstat i po instalaci snadno přístupná.
Pokud je varná deska připojená přímo k elektrické síti, musíte
instalovat odpojovací zařízení. Pokud se poškodí přívodní kabel,
musí jej vyměnit kvalifikovaný servisní technik, aby se zabránilo
možnému nebezpečí.
Uzemňovací vodič (žlutozelený) musí být nejméně o 10 mm delší než
živý a neutrální vodič.Použijte vhodný kabel podle parametrů výkonu
trouby. Zkontrolujte výrobní štítek a ujistěte se, zda je přívodní kabel
typu 3x0.75 mm² H05RR-F.
Živý
Uzemnění
Neutrální
L
N
Přívodní
kabel
Hnědý vodič
Zelenožlutý vodič
Modrý vodič
Napájení
2.2. PŘIPOJENÍ PLYNU
Tyto pokyny jsou pro kvalifikovaného technika, instalace musí být v
souladu s národními předpisy.
Všechny práce se musí provádět při odpojeném napájení.
Výrobní štítek na varné desce definuje typ plynu, pro který je
navržená. Připojení k hlavní přípojce plynu nebo k plynové láhvi může
být provedeno po ověření, že je vhodný pro typ přiváděného plynu.
Pokud není správně regulovaný, viz pokyny v následujících
odstavcích pro úpravu nastavení.
Pro tekutý plyn (plyn v láhvi) použijte regulátor tlaku plynu vyhovující
mezinárodním standardům.
Některé modely jsou vybavené kónickou přípojkou pro instalace v
zemích, kde je tento typ povinný; v obrázku 8 je popsané jak rozeznat
různé typy spojů (CY = cylindrický, CO = kónický). V každém případě,
cylindrická část připojení musí být připojená k varné desce.
Pokud připojujete varnou desku k přípojce plynu pomocí ohebné
hadice, zajistěte, aby maximální délka hadice nepřesahovala 2 metry.
Abyste zabránili možnému nebezpečí, proveďte instalaci v
následujícím pořadí (obrázek 6):
1) Podle obrázku sestavte díly v pořadí:
A: 1/2 cylindrický adaptér,
B: 1/2 těsnění,
C: 1/2 kónický-cylindrický nebo cylindrickýcylindrický
adaptér plynu
2) Utáhněte spoje kleštěmi, umístěte trubky do správné pozice.
3) Připevněte díl C k hlavní přípojce plynu pomocí pevné měděné
trubky nebo ohebné ocelové trubky.
DŮLEŽITÉ: proveďte konečnou kontrolu těsnosti spojů pomocí
roztoku vody a saponátu. Nikdy nepoužívejte plamen. Také se
ujistěte, zda ohebná trubka není v kontaktu s pohyblivými díly
skříňky (např. šuplíkem) a není instalovaná v místě, kde se může
poškodit.
Upozornění: Pokud ucítíte plyn v okolí spotřebiče, okamžitě vypněte
přívod plynu a kontaktujte servisního technika. Nepokoušejte se najít
únik plynu pomocí plamene.
Flexibilní trubku je nutné připevnit tak, aby nepřišla do kontaktu s
pohyblivými díly skříňky (např.šuplíkem) a nepřecházela přes příliš
úzké prostory.
Pokud spotřebič není vybaven přívodním kabelem se zástrčkou, nebo
jiným typem odpojovacího ařízení nabízejícím odstup kontaktu v
odpojeném stavu podle požadavků proti přepětí III kategorie, musíte
uskutečnit toto připojení podle platných směrnic.

2.4. NASTAVENÍ MINIMÁLNÍHO PLAMENE
Po zapálení hořáků, otočte ovládacím knoflíkem na minimální
nastavení a poté sejměte ovládací knoflík (můžete jej sejmout
jemným potažením).
Pomocí malého šroubováku nastavte regulační šroub podle obrázku
9. Otočením šroubu ve směru hodinových ručiček snížíte plamen,
otočením proti směru hodinových ručiček plamen zvětšíte. Pomocí
tohoto nastavení nastavte plamen o délce přibližně 3 až 4 a poté
nasaďte ovládací knoflík.
Pokud je dodávaný plyn LPG (plyn v láhvích) - šroub pro nastavení
počátečního plamene musíte otočit ve směru hodinových ručiček do
konce.
Po dokončení nastavení plynu nahraďte výrobní štítek s typem plynu
za nový, podle instalovaného Plynu.
3.1. POUŽITÍ PLYNOVÉHO HOŘÁKU
K zapálení hořáků přiložte zdroj otevřeného plamene k hořáku,
stiskněte a otočte knoflíkem ovládání plynu proti směru hodinových
ručiček.
Pokud jste hořák nepoužívali několik dní, před zapálením počkejte
několik sekund, toto odstraní přítomný vzduch v trubkách.
Pro spotřebiče s elektrickým zapalováním proveďte následující kroky:
• stiskněte a otočte knoflík proti směru hodinových ručiček na symbol
zapálení.
• zapalte hořák stisknutím tlačítka jiskření.
Pro varné desky vybavené automatickým zapalováním pouze
stiskněte a otočte knoflík na symbol zapálení.
Systém zapalování opakuje jiskření, dokud držíte stisknutí ovládací
knoflík.
Pokud se hořák nezapálí do 5 sekund, otočte knoflík na pozici 0 a
postup opakujte.
Pro modely vybavené bezpečnostním ventilem (který vypne přívod
plynu v případě náhodného zhasnutí plamene) se hořák zapaluje
podle výše uvedeného postupu, ale knoflík musíte držet stisknutý 6
sekund po zapálení plamene.
UPOZORNĚNÍ:
Před zapnutím varné desky se ujistěte, zda jsou hořáky a víčka
hořáků správně nasazené.
VŠEOBECNÉ POKYNY
Pro nejlepší výsledky používejte nádobí s rovným dnem, které
vyhovují průměru hořáků. Tabulka A.
15 CZ
Pro menší nádoby nastavte plyn tak, aby plamen nepřesahoval za
okraj dna nádoby. Nepoužívejte nádoby s vypuklým dnem.
UPOZORNĚNÍ: Pokud plamen nečekaně zhasne, otočte
knoflíkem do pozice vypnuté a nepokousejte se jej zapalovat do
1 minuty.
Pokud se knoflík po letech použití otáčí těžko, je nutné jej namazat.
Tuto činnost smí provádět pouze kvalifikovaný technik.
3. POUŽITÍ VARNÉ DESKY
Tento spotřebič se musí používat pouze k účelům, pro které byl
navržený a to pro vaření v domácnosti. Jakékoli jiné použití je
nesprávné a může být nebezpečné. Výrobce nenese žádnou
odpovědnost za poškozené vyplývající z nesprávného použití tohoto
spotřebiče.
Typ hořáku
Tabulka A
Pomocný hořák
Půlrychlý hořák
Silný hořák
Ø pánev / pot
(cm)
A
SR
R
12 - 18
18 - 24
24 - 26
Výkon
(kW)
G20/20 mbar
(Metan)
G30/28-30 mbar
(LPG)
1
1,7
2,7
95 I/h
162 I/h
257 I/h
73 g/h
124 g/h
196 g/h
Otočte voličem do pozice požadované teploty.
Rozsvítí se kontrolka příslušné plotny a plotna se začne zahřívat.
Po skončení vaření otočte voličem zpět do pozice „O. (Obrázek
10). Nenechávejte varnou plotnu zapnutou bez nádobí. Průměr
plotny a použitého nádobí je velmi důležitý. Maximální průměr dna
je 14 cm a dno musí být rovné.
Při prvním použití nechte plotnu zahřát po dobu 5 minut, než na ní
postavíte nádobí. To umožní vytvrdnutí povrchu vypálením.
K čištění horké plotny použijte vlhkou utěrku a čisticí prostředek.
Neodstraňujte zbytky pokrmů z plotny pomocí nože ani jiných
ostrých předmětů.
Po čištění zapněte plotnu na několik sekund k vysušení.
Nenechávejte ji však zapnutou dlouhou dobu.
3.2. POUŽITÍ ELEKTRICKÝCH PLOTEN
Pozice
Výkon (Watty)
Výkon (Watty)
Popis
0
1
2
3
4
5
6
0
100 W
180 W
250 W
500 W
750 W
1000 W
0
135 W
220 W
300 W
850 W
1150 W
1500 W
Vypnutá
Ohřev
Vaření na nízké teplotě
Vaření na nízké teplotě
Vaření, pečení
Vaření, pečení
Vaření, pečení
Vhodnost varného nádobí (Obrázek 11)
Mějte na paměti, že větší pánve mají větší ohřevný povrch.
To umožňuje rychlejší přípravu než u nádobí s menším průměrem
dna. Vždy používejte velikosti nádobí vhodné k množství
připravovaného pokrmu. Pro zabránění stříkání nepoužívejte příliš
malé nádobí, zejména pro pokrmy s velkým množstvím tekutin.
Pokud používáte nadměrně velké nádobí pro rychle připravované
pokrmy, omáčky a šťáva se přilepí a zbytky mohou zůstat na dně
nádobí.
Uzavřené nádoby a pečicí plechy nebo formy se doporučují pro
přípravu cukroví. Vytečený cukr a šťáva z otevřené nádoby se může
přilepit na povrch plotny a je obtížné jej odstranit.
Toto je zejména důležité pro nádobí používané pro pečení nebo
tlakové vaření při vysoké teplotě.
Nenechávejte plotny bez nádobí ani prázdné nádobí na plotně.
Zkontrolujte vhodnost nádobí s ohledem na následující požadavky;
Musí být těžké.
Musí zcela zakrývat povrch plotny; mohou být o něco větší, nikoli
menší. Dno nádoby musí být rovné.
•Pro nejlepší použití elektrických varných ploten a k minimalizaci
spotřeby elektrické energie používejte pouze nádobí s hladkým
rovným dnem. Velikost nádobí musí být shodná s průměrem varné
plotny, nikdy menší. Dno nádoby musí být suché. Na plotně
nenechávejte prázdné nádoby a plotny nepoužívejte bez nádobí.
2.3. ZMĚNA VARNÉ DESKY NA JINÝ DRUH
PLYNU
Pro úpravu varné desky na jiný typ plynu proveďte následující kroky:
• sejměte mřížky a hořáky
• vložte klíč (7 mm) do podložky hořáku (obrázek 7)
• vyšroubujte trysku a nahraďte vhodnou pro daný typ
používaného plynu (viz tabulku typů Plynu)

4. ÚDRŽBA A ČIŠTĚNÍ
Před čištěním varné desky se ujistěte, zda dostatečně vychladla.
Odpojte zástrčku od elektrické zásuvky nebo vypněte jistič.
Čištění a údržbu nesmí provádět děti bez dohledu.
K čištění nepoužívejte drsné, korosivní prostředky, bělidla, nebo
kyseliny. Vyhněte se jakýkoli kyselinám (citrónová šťáva, ocet,
apod.) Na smaltovaném nebo nerezovém povrchu.
Pokud čistíte smaltovaný, lakovaný nebo chrómový povrch,
použijte roztok saponátu a vody. Pro nerezovou ocel používejte
vhodný čisticí prostředek.
Hořáky můžete čistit vodou se saponátem. K obnovení původního
lesku použijte čistič na nerezovou ocel. Po vyčistění nechte
hořáky vysušit a vraťte na své místo.
Je důležité nasadit hořáky správně.
Chromové mřížky a hořáky
Chromové mřížky a hořáky mají při použití tendenci ztmavnout.
Toto je normální a neodvratný fenomén, ale nemá vliv na
funkčnost varné desky. V případě potřeby jsou náhradní díly
dostupné v servisním středisku.
5. SERVIS
Dříve než zavoláte servis, zkontrolujte následující:
• je připojená zástrčka k síťové zásuvce;
• není problém v přípojce plynu.
Pokud nelze závadu odstranit: vypněte spotřebič, nedemontujte
jej a kontaktujte autorizované servisní středisko.
Tento spotřebič je označen v souladu s evropskou
směrnicí 2012/19/EU o odpadu z elektrického a
elektronického zařízení (WEEE). WEEE obsahuje
jak škodlivé látky (které mohou vyvolat nepříznivý
dopad na životní prostředí), tak i suroviny (které lze
použít opakovaně). Je nutno používat speciální
zacházení vzhledem k WEEE, aby se všechny
nečistoty likvidovaly správně a bylo možno
recyklovat všechny materiály.
Jednotlivci mohou hrát významnou úlohu při zajišťování toho, aby
se z WEEE nestal ekologický problém; je nezbytné dodržovat
některá základní pravidla:
• WEEE nelikvidujte jako běžný domovní odpad.
• WEEE předávejte na příslušná sběrná místa řízená městskými
úřady nebo registrovanými společnostmi. V řadě zemí může být
používán systém domácího odběru velkých WEEE.
• Když kupujete nový spotřebič, můžete starý vrátit prodejci, který
jej musí zdarma odebrat na principu kus za kus, pokud jde o
zařízení odpovídajícího typu, které má stejné funkce jako
dodávané zařízení
Prohlášení o shodě: Tento spotřebič přicházející do kontaktu s
potravinami vyhovuje předpisům směrnice EEC 89/109.
Spotřebič vyhovuje Evropské směrnici 2006/95/EC a
2004/108/EC a 2009/142/EC, a následným změnám.
Výrobce nenese žádnou odpovědnost za nepřednosti vyplývající
z tisku nebo překladu v tomto návodu. Vyhrazujeme si právo na
změny výrobku, včetně bodů o spotřebě, bez předchozího
upozornění, které nemají vliv na funkčnost nebo bezpečnost
výrobku.
6. OCHRANA ŽIVOTNÍHO PROSTŘEDÍ
16 CZ
Tabulka 1
Vestavné varné desky
4
R /2SR / AUX
plynové
S60\HBGS S60\HBGN
1
ANO
1
-
2
1
7.1 kW
516 g/h
3
220-240 V / 50-60 Hz
15 W
ANO
585 x 510
676 l/h
3
R / SR / AUX / E
plynové
2
S60\HBGS S60\HBGN
ANO
1
1
1
5.4 kW
393 g/h
3
220-240 V / 50-60 Hz
1500 W
ANO
585 x 510
514 l/h
1
Tento spotřebič je navržený pro nekomerční použití v domácnosti.
Hořák
Typ / reference
Bezpečnostní zařízení
Pomocný hořák (A Ø 50 mm)
Elektrických Ploten
Normální hořák (SR Ø 75 mm)
Silný hořák (R Ø 100 mm)
Typ plynu/výkon:
G 20/20 mbar (metan)
G 30/28-30 mbar (LPG)
Instalační třída
Napětí/frekvence V / Hz
Příkon
Elektrické zapalování
Rozměry spotřebiče
Výkon
NE
NE

17 DE
WARNUNG: Das Gerät und die zugänglichen Teile des Gerätes werden während des Betriebs heiß. Das
Berühren der heißen Geräteteile sollte vermieden werden.
• Kinder unter 8 Jahren sollten ohne Aufsicht nicht in die Nähe des Gerätes gelassen werden.
• Dieses Gerät ist nicht bestimmt zum Gebrauch durch Personen (einschließlich Kindern) mit
beeinträchtigten körperlichen, sensorischen oder geistigen Fähigkeiten oder durch Personen, die keine
entsprechenden Erfahrungen oder Kenntnisse besitzen, es sei denn, sie werden beaufsichtigt oder
angewiesen durch eine Person, die für ihre Sicherheit verantwortlich ist.
• Kinder dürfen nicht mit dem Gerät spielen.
• Die Reinigung und Wartung des Gerätes darf nicht durch Kinder ohne Aufsicht durchgeführt werden.
WARNUNG: unbeaufsichtigtes Kochen auf dem Herd mit Fett oder Öl kann gefährlich sein und
Feuerentstehung verursachen.
• Versuchen Sie NIEMALS das Feuer mit Wasser zu löschen; schalten Sie den Herd aus und bedecken
sie die Flamme mit z.B. einem Deckel oder einer Feuerlöschdecke.
WARNUNG: FEUERGEFAHR - Bewahren Sie keine Gegenstände auf der Herdoberfläche auf.
WARNUNG: ist die Herdoberfläche beschädigt, schalten Sie das Gerät aus, um einen Stromschlag zu
vermeiden.
• Nutzen Sie kein Dampfreinigungsgerät zur Reinigung des Ofens.
• Jegliche verschüttete Lebensmittel sollten vom Deckel entfernt werden, bevor Sie diesen öffnen.
• Die Herdoberfläche sollte erst abkühlen, bevor Sie den Deckel schließen.
• Das Gerät sollte nicht durch einen externen Timer oder eine Fernbedienung gesteuert werden.
• Die Abschaltung muss mit einer festen Verdrahtung im Einklang mit den Verkabelungsregeln
durchgeführt werden.
• Ist das Gerätekabel beschädigt, muss es durch ein spezielles Kabel ersetzt werden, welches beim
Kundendienst/Hersteller erhältlic ist.
ACHTUNG: Um elektrische Schläge durch unbeabsichtigtes Zurückstellen des Wärmerelais zu
vermeiden, sollte das Gerät nicht über eine externe Schalteinrichtung versorgt werden, wie
beispielsweise ein Timer oder einem Stromkreislauf, der regelmäßig ausgeschaltet wird.
• Das Gerät sollte gemäß den Installationsanweisungen installiert werden und genügend Belüftung
gewährleistet werden. Lesen Sie bitte die Anweisungen, bevor Sie das Gerät installieren.
• "Diese Anleitung ist nur gültig, wenn das entsprechende Landessymbol auf dem Gerät zu finden ist.
Wenn das Symbol nicht auf dem Gerät angebracht ist, ist es notwendig, die technischen Anweisungen,
welche die notwendigen Anweisungen zur Änderung des Gerätes an die Einsatzbedingungen des
jeweiligen Landes beinhalten, zu beachten ".
• Vor der Installation vergewissern Sie sich, dass die örtliche Bedingungen (Art des Gases und
Gasdruck) und die Anpassung des Gerätes kompatibel sind»
• Die Einstellung für dieses Gerät sind auf dem Etikett (oder Typenschild) angegeben"
• "Dieses Gerät nicht in die Nähe von leicht entflammbaren Materialien positionieren. Es soll gemäß den
geltenden Installationsvorschriften montiert und angeschlossen werden. Besonderes Augenmerk sollte
auf die Anforderungen hinsichtlich der Belüftung gelegt werden."
• «Der Einsatz eines Gaskochgerätes erzeugt Wärme und Feuchtigkeit in dem Raum, in dem es
installiert ist. Vergewissern Sie sich, dass die Küche gut belüftet ist. Halten Sie die Belüftungsschlitze
geöffnet oder installieren Sie eine mechanische Lüftungseinrichtung (mechanische
Dunstabzugshaube). Längere intensive Nutzung des Gerätes kann eine zusätzliche Belüftung
erfordern, z. B. Öffnen eines Fensters oder die Erhöhung der mechanischen Belüftung, falls vorhanden."
SICHERHEITSVORSCHRIFTEN

18 DE
1. INSTALLATIONSANWEISUNG
Die Arbeitsplatte, in der diese Kochmulde eingebaut werden soll, kann
aus beliebigem Material sein, vorausgesetzt, es ist hitzebeständig
und kann eine Temperatur von 100°C aushalten. Die Arbeitsplatte
kann zwischen 25 und 40 mm dick sein. Die Einbaumaße entnehmen
Sie bitte der Abb. 2.
Falls an einer Seite der Kochmulde die Wand eines Möbels ist, muss
der Abstand der Mulde zur Möbelwand mindestens 15 cm betragen (s.
Abb. 4). Zwischen Küchenwand und Mulde muss ein Abstand von
mindestens 5,5 cm eingehalten werden. Der Abstand zwischen der
Kochmulde und einem eventuell darüber befindlichen Element (z.B.
Dunstabzugshaube) muss mindestens 70 cm betragen (s. Abb. 4).
Wenn unter der Kochmulde ein zugängliches Möbelteil vorhanden ist,
muss zwischen der Kochmulde und der unteren Möbelnische eine
Trennplatte aus isolierendem, hitzebeständigem Material (Holzplatte
o.Ä.) dazwischen gebaut werden (s. Abb. 3).
Wichtig: Entnehmen Sie der Abb. 1, wie die Dichtungsstreifen
angebracht werden müssen.
Die Befestigung an das Möbel erfolgt mit Fixierbügel, die als Zubehör
zur Mulde mitgeliefert werden. Am Geräteboden sind die Bohrungen
zum Verschrauben der Fixierbügel bereits vorhanden.
Falls unter der Kochmulde (60 cm) ein Backofen ohne
Kühlungsventilator installiert sein sollte, müssen in der Einbaunische
Öffnungen angebracht werden, damit die Luftzirkulation
gewährleistet ist. Diese Öffnungen müssen eine freie Oberfläche von
mindestens 300 cm² gewährleisten, verteilt wie in der Abb. 5 gezeigt.
Unter der Kochmulde mit 75 cm Breite kann nur ein Backofen mit
Kühlungsventilator installiert werden.
Das Gerät sollte nicht durch einen externen Timer oder eine
Fernbedienung gesteuert werden.
Die Installation eines Haushaltsgeräts kann unter Umständen eine komplexe Arbeit sein; wenn diese nicht korrekt ausgeführt wird,
könnte es zu schweren Beeinträchtigungen der Sicherheit des Benutzers kommen. Das ist der Grund, warum sie von einem
qualifizierten Fachmann unter Einhaltung der geltenden technischen Regeln durchgeführt werden soll. Falls diese Empfehlung nicht
beachtet und die Installation des Gerätes durch eine nicht qualifizierte Person durchgeführt werden sollte, lehnt der Hersteller jede
Verantwortung für eventuelle technische Fehler des Produktes ab, gleichviel, ob es zu Schäden an Personen oder Sachen führt.
1.1. EINBAU
1.2. GEEIGNETER STANDORT
Das Gerät sollte gemäß den Installationsanweisungen installiert
werden und genügend Belüftung gewährleistet werden. Lesen Sie
bitte die Anweisungen, bevor Sie das Gerät installieren.
Beim Gebrauch eines Gasherdes entstehen Hitze und Feuchtigkeit,
die sich im Raum verbreiten. Daher ist es wichtig, eine ausreichende
Belüftung des Raumes zu gewährleisten, entweder durch
Lüftungsöffnungen oder durch eine Dunstabzugshaube mit
Außenanschluss. Bei einem längeren Gebrauch des Gerätes ist es
ratsam, die Belüftung zu fördern, z.B. durch zusätzliches Öffnen eines
Fensters oder durch Erhöhung der Dunstabzugsleistung.
Sollte der Einbau einer Dunstabzugshaube nicht möglich sein, ist die
Verwendung eines Elektroventilators vonnöten, der entweder an der
Außenwand oder am Fenster angebracht wird, sofern der Raum über
ausreichend Lufteinlassöffnungen verfügt. Der Elektroventilator muss
eine Leistung aufweisen, die ausreicht, um den 3- bis 5- fachen
Luftvolumen der Küche pro Stunde auszutauschen.
Beachten Sie bitte die im jeweiligen Land geltenden Standardregeln
für Gasinstallationen.
2.1. ELEKTRISCHER ANSCHLUSS
Überprüfen Sie die auf dem Matrikelschild angegebenen Daten. Das
Matrikelschild befindet sich auf der unteren Seite des Gerätegehäuses.
Notieren Sie alle Daten wie Matrikel- und Seriennummer am besten direkt
auf dem Deckblatt der Bedienungsanleitung, da diese Angaben in einem
eventuellen Servicefall vom Kundendienst benötigt werden. Überprüfen
Sie, dass die Netzspannung und die Leistung für den Betrieb des Gerätes
geeignet sind.
Vor dem elektrischen Anschluss ist die einwandfreie Erdung der
elektrischen Hausinstallation zu prüfen. Die Erdung des Gerätes ist
gesetzlich vorgeschrieben. Der Hersteller weist jede Verantwortung für
Sach- oder Personenschäden zurück, die auf fehlende bzw. mangelhafte
Erdung zurückzuführen sind. Bei den Modellen, die ohne Stecker geliefert
werden, ist ein genormter Stecker an das Kabel zu montieren, welcher für
die auf das Matrikelschild angegebene Belastung geeignet ist. Der
Erdleiter ist durch das gelb-grüne Kabel gekennzeichnet. Der Stecker
muss in jedem Fall zugänglich sein.
PHASE
ERDE
NULL
L
N
Netzkabel
Broun
Gelb/Grün
Blau
Strom-
versorgungs-
netz
2.2. GASANSCHLUSS
Diese Anweisung richtet sich an das für die Installation autorisierte
Fachpersonal und muss lt. geltenden Richtlinien ausgeführt werden.
Jeder Eingriff am Gerät muss bei ausgeschalteter Stromversorgung
erfolgen.
Auf dem Gerät finden Sie Aufkleber, auf denen der Gastyp angegeben ist,
für den die Kochmulde eingestellt ist. Der Anschluss am
Gasversorgungsnetz bzw. an der Gasflasche muss unter
Berücksichtigung der geltenden Vorschriften durchgeführt werden.
Stellen Sie sicher, dass das Gerät für das von Ihnen verwendete Gas
eingestellt ist.
Sollte das Gerät mit Flüssiggas aus Gasflaschen betrieben werden,
benutzen Sie bitte nur vorschriftsmäßige Druckregler, die den geltenden
Normen entsprechen.
Benutzen Sie ausschließlich genormte Schläuche und Dichtungen, die
den nationalen Standards entsprechen.
Bei einigen Modellen wird ein konischer Anschlussadapter mitgeliefert, da
die Gasinstallation in einigen Ländern diesen Adapter vorschreibt. In der
Abb. 8 werden die zwei unterschiedlichen Adaptertypen dargestellt (CY:
zylindrisch, CO: konisch). In jedem Fall muss die zylindrische Seite des
Anschlussadapters an die Gaskochmulde angeschlossen werden.
Werden bei der Installation biegsame Rohre benutzt, achten Sie bitte
darauf, dass sie nicht länger als 2 Meter sind.
Um den Installationsvorgang zu erleichtern und um Undichtigkeiten am
Gasrohr zu vermeiden, empfiehlt es sich, den Anschluss des
Gasversorgungsrohres in der untenstehenden Reihenfolge
vorzunehmen (s. Abb. 6)
Der Schlauch soll so eingebaut werden, so dass er nicht mit einem
beweglichen Teil des Gehäuses in Berührung kommen kann (z.B. einer
Schublade). Der Schlauch darf nicht durch Räumlichkeiten verlegt werden
indem er Überlastungen standhalten muss.
Um das Gerät direkt an das Stromnetz anzuschließen, beachten Sie
bei der Verkabelung die elektronischen Vorschriften sowie die
Bedingungen eines Überspannungsschutz Klasse 3.
Soll das Gerät an einer festen Anschlussdose angeschlossen werden, ist
zwischen dem Gerät und dem Versorgungsnetz eine der Last
entsprechende, genormte Abschaltvorrichtung einzubauen.
Sollte das Netzkabel beschädigt sein, muss dieser durch einen
qualifizierten Fachmann ausgewechselt werden.
Der gelb-grüne Erdleiter muss mindestens 10 mm länger sein als die
Phasenleiter. Der Querschnitt der Kabel muss der Leistung der
Kochmulde entsprechen (s. Matrikelschild). Benutzen Sie ausschließlich
ein Netzkabel des Typs 3x0.75 mm² H05RR-F.
1. Montieren Sie die Teile in der abgebildeten Reihenfolge:
A: 1/2 Anschlussstutzen zylindrisch
B: 1/2 Dichtung
C: 1/2 Gasadapter konisch-zylindrisch bzw. zylindrisch-zylindrisch
2) Schrauben Sie das Verbindungsstück mit dem
Sechskantschlüssel fest an. Richten Sie dabei die bewegliche
Verbindung in die gewünschte Position.
3) Verbinden Sie den Rohrbogen C mit dem Gasversorgungsnetz
entweder mit einem starren Rohr aus Kupfer oder mit einem
biegsamen aus Stahl.

19 DE
2.3. UMSTELLUNG AUF EINE ANDERE
GASART
Für die Länder, für die das Gerät für den Betrieb mit einer anderen
Gasart zugelassen ist, kann das Gerät von der werkseitigen
Einstellung auf eine andere Gasart umgestellt werden. Gehen Sie
dabei wie folgt vor:
• Topfträger entfernen
• Brennerdeckel und Brennerköpfe entfernen
• Schrauben Sie die Düsen ab und ersetzen Sie diese mit einer für
die gewünschte Gasart geeigneten Düse (s. Tabelle der Gasarten)
Anmerkung: In Deutschland und Österreich ist der Betrieb nur für
Erdgas vorgesehen.
2.4. EINSTELLEN DER GASMINDESTZUFUHR
Zünden Sie jeden Brenner und drehen Sie den entsprechenden
Drehschalter auf die kleinste Stufe, ziehen Sie dann den Drehschalter
durch leichte Kraftanwendung heraus.
Mithilfe eines Schraubendrehers regulieren Sie die Einstellschraube
wie in der Abb. 9 dargestellt. Durch Drehen der Einstellschraube im
Uhrzeigersinn wird die Gaszufuhr reduziert, in die andere Richtung
dagegen erhöht. Stellen Sie die Schraube so ein, dass die Flamme
ca. 3-4 mm lang ist und setzen Sie schließlich den Drehschalter
wieder ein.
Nach der Einstellung der Gasflamme ersetzen Sie das Matrikelschild
mit der alten Gasart durch ein neues (mitgeliefertes) Matrikelschild
entsprechend der neuen Gasart.
3. BEDIENUNGSANLEITUNG
Dieses Gerät ist ausschließlich für den Gebrauch gedacht, Speisen
zuzubereiten. Jede andere Verwendung wäre zweckentfremdend
und gegebenenfalls gefährlich. Der Hersteller kann für eventuelle
Schäden, die auf einen ungeeigneten, fehlerhaften und
unvernünftigen Einsatz zurückzuführen sind, nicht haftbar gemacht
werden.
3.1. INBETRIEBNAHME DER BRENNER
Um die Brenner des Kochfeldes anzuzünden, nähern Sie eine
Flamme an den gewünschten Brenner. Drücken Sie dann und drehen
Sie den entsprechenden Schalterknopf gegen den Uhrzeigersinn.
Für Geräte mit elektronischer Zündvorrichtung gehen Sie wie folgt
vor:
• drücken Sie und drehen Sie den Schalterknopf gegen den
Uhrzeigersinn bis zum Zündungssymbol
• zünden Sie den Brenner durch Betätigen der Zündungstaste
Für Geräte mit automatischer Zündvorrichtung genügt es, den
Schalterknopf zu drücken und bis zum Zündsymbol zu drehen.
Solange Sie den Knopf gedrückt halten, werden kleine Funken durch
die Zündvorrichtung entladen. Wenn die Flamme sich nicht innerhalb
von 5 Sekunden anzündet, drehen Sie den Schalterknopf wider auf
die Position 0 und wiederholen Sie den Vorgang.
Bei den Geräten mit Sicherheitsgashahn wird die Gaszufuhr bei
einem ungewollten Auslöschen der Flamme automatisch
unterbrochen. Das Zünden der Brenner erfolgt bei diesen Geräten
wie oben beschrieben, jedoch muss der Schalterknopf
mindestens 5-6 Sekunden nach Entzünden der Flamme
gedrückt gehalten werden. Nach dieser Zeit ist die
Sicherheitsvorrichtung eingeschaltet und die Flamme bleibt stabil.
ACHTUNG:
Bevor Sie das Gaskochfeld einschalten, überprüfen Sie, dass die
Brenner richtig aufliegen und die Funktion der Zündkerzen nicht
beeinträchtigen.
Bei Pfannen oder Töpfen mit kleinem Durchmesser regulieren Sie die
Leistung des Brenners so, dass die Flamme den Topf- bzw.
Pfannenboden nicht überlappt.
Verwenden Sie bitte nur Pfannen oder Töpfe mit flachem Boden!
HINWEIS: Sollte die Flamme ungewollt ausgehen, schalten Sie
die Gaszufuhr durch Drehen des Schalterknopfes aus und
warten Sie mindestens eine Minute, bevor Sie den Brenner
wieder anzünden.
Sollten die Gashähne mit der Zeit schwergängig werden, müssen sie
mit einem geeigneten Schmierstoff neu geschmiert werden. Dieser
Vorgang darf ausschließlich durch den Werkskundendienst
durchgeführt werden.
ALLGEMEINER HINWEIS
Um die Flamme optimal und energiesparend auszunutzen, benutzen
Sie nur Töpfe und Pfannen, deren Durchmesser für den jeweiligen
Brenner geeignet ist. Vergleichen Sie dazu folgende Tabelle A:
Topfdurch-
messer (cm)
A
SR
R
12 - 18
18 - 24
24 - 26
Leistung
(kW)
G20/20 mbar
(Erdgas)
G30/28-30 mbar
(LPG)
1
1,7
2,7
95 I/h
162 I/h
257 I/h
73 g/h
124 g/h
196 g/h
Tabelle A
Brennertyp
Hilfsbrenner
Normalbrenner
Schnellbrenner
Drehen Sie bitte den Knopf, um die gewünschte Temperatur der
Kochplatte einzustellen. Das Anzeigelicht beginnt zu leuchten und die
Kochplatte wird heiß.
Nachdem der Kochvorgang beendet ist, drehen Sie bitte den Knopf wieder
auf die Position "0" (Abbildung 10). Lassen Sie die Kochplatte auf keinem
Fall in eingeschalteter Position, wenn kein Kochgeschirr darauf steht. Der
Durchmesser und die untere Form des Kochgeschirrs, welches Sie
benutzen, sind wichtig. Der maximale Durchmesser des Kochgeschirrs
sollte 14 cm sein.
Die untere Form sollte eben sein. Bei der ersten Benutzung warten Sie
bitte 5 Minuten nachdem Sie die Kochplatte eingeschaltet haben, bevor
Sie dann ein Kochgeschirr darauf stellen. Durch die erste Erhitzung härten
die Kochplatten vollständig aus.
Zur Säuberung der Kochplatte benutzen Sie bitte ein feuchtes Tuch und
ein Putzmittel. Entfernen Sie auf keinem Fall Lebensmittelrückstände mit
einem Messer oder mit anderen harten, scharfen Gegenständen von der
Kochplatte.
Nach dem Putzen schalten Sie bitte die Kochplatte ein paar Sekunden ein,
damit sie dadurch trocknet. Bitte beachten Sie dabei, dass die Kochplatte
niemals länger als ein paar Sekunden eingeschaltet werden darf, wenn
kein Kochgeschirr darauf steht.
3.2. BENUTZUNG DER ELEKTRISCHEN
KOCHLATTEN
Position
Leistung (Watt)
Leistung (Watt)
Erläuterung
0
1
2
3
4
5
6
0
100 W
180 W
250 W
500 W
750 W
1000 W
0
135 W
220 W
300 W
850 W
1150 W
1500 W
Ausgeschaltet
Erwärmung
Kochen in niedriger Temperatur
Kochen in niedriger Temperatur
Kochen, Braten, Garen
Kochen, Braten, Garen
Kochen, Braten, Garen
Achtung: Nach der Montage überprüfen Sie die Verbindungen
auf ihre Dichtigkeit durch Beschmieren mit einfachem
Seifenwasser. Benutzen Sie hierzu niemals eine offene Flamme!
Versichern Sie sich außerdem, dass das biegsame Rohr nicht
eingeklemmt oder beschädigt werden kann (z.B. durch eine
Schublade des Einbauschrankes).
Achtung: Sollten Sie Gasgeruch in der Nähe des Gerätes
wahrnehmen, schalten Sie die Gasversorgung umgehend ab und
rufen Sie den Kundendienst. Suchen Sie Gasleckagen niemals mit
offener Flamme!
Geeignetes Kochgeschirr (Abbildung 11)
Denken Sie bitte daran, dass größeres Kochgeschirr größere Flächen
hat, die erwärmt werden.
Das führt im Vergleich zu Kochgeschirr mit kleineren Flächen dazu,
dass Lebensmittel schneller zubereitet werden können.
Verwenden Sie bitte immer nur diejenige Kochgeschirrgröße, die
angesichts der zuzubereitenden Lebensmittel als erforderlich
erscheint. Um Spritzer zu vermeiden, sollten Sie kein allzu kleines
Kochgeschirr benutzen. Besonders bei Lebensmittel mit großen
Flüssigkeitsanteilen. Wenn Sie großes Kochgeschirr für schnell
zubereitbare Lebensmittel verwenden, können z.B. Soßen und
Flüssigkeiten anbrennen und deren Rückstände im Kochgeschirr
bleiben.
Zur Zubereitung von Desserts empfehlen wir Kochgeschirr mit Deckel
und Backofenbleche bzw. Kuchenformen. Aus einem Kochgeschirr
ohne Deckel können Zucker und Säfte herausspritzen, wobei diese
dann auf der Kochoberfläche kleben bleiben, einbrennen können und
schwer zu entfernen sind.

20 DE
Das ist vor allem bei Kochgeschirr zu beachten, mit dem bei hohen
Temperaturen z.B. Braten zubereitet werden. Auch während des
Kochens unter hohem Druck sollten Sie unserer Empfehlung folge
leisten.
Lassen Sie Kochplatten bitte nicht unbeaufsichtigt eingeschaltet, wenn
kein Kochgeschirr darauf steht oder wenn nur ein leeres Kochgeschirr
darauf steht.
Kontrollieren Sie bitte die Eignung des Kochgeschirrs unter
Berücksichtigung der
folgenden Kriterien:
Das Kochgeschirr muss schwer sein.
Das Kochgeschirr muss die Wärmefläche vollständig bedecken.
Achten Sie unbedingt darauf, dass der Durchmesser des
Kochgeschirrs nicht kleiner ist als die Kochplatte. Der Topfboden muss
gerade sein und eben auf der Kochplatte stehen. Zur bestmöglichsten
Um den Energieverbrauch zu minimieren, verwenden Sie bitte nur
solches Kochgeschirr, das eine ebene untere Fläche hat.. Die untere
Seite des Kochgeschirrs sollte trocken sein, wobei Spritzer vermieden
werden müssen. Leeres Kochgeschirr darf auf der Platte nicht stehen
gelassen werden. Die Kochplatten dürfen nicht eingeschaltet werden,
wenn kein Kochgeschirr darauf steht.
EINBAUKOCHMULDE
Tabelle 1
4 gas
R /2SR / AUX
S60\HBGS S60\HBGN
1
NEIN
1
-
2
1
7.1 kW
516 g/h
3
220-240 V / 50-60 Hz
15 W
JA
585 x 510
676 l/h
3 gas
R / SR / AUX / E
2
S60\HBGS S60\HBGN
JA
1
1
1
5.4 kW
393 g/h
3
220-240 V / 50-60 Hz
1500 W
JA
585 x 510
514 l/h
1
Elektrischen kochplate
Dieses Gerät ist für die nichtprofessionelle Benutzung, d.h. Für Haushaltsnutzung, vorgesehen
Brenner
Typ / Bezeichnung
Thermosicherung
Hilfsbrenner ( A Ø 50 mm)
Normalbrenner ( SR Ø 75 mm)
Schnellbrenner ( R Ø 100 mm)
Eingestellter Gastyp/Leistung:
G 20/20 mbar (Erdgas)
G 30/28-30 mbar (LPG)
Installationsklasse
Spannung / Frequenz V / Hz
Gesamtanschlusswert
Elektrische Zündung
Gerätemaße
Leistung
4. WARTUNG UND REINIGUNG
Vor jedem Vorgang zur Reinigung des Gerätes schalten Sie den Strom
durch Ziehen des Steckers aus der Steckdose oder durch Ausschalten
der Haussicherung ab. Bevor Sie das Gerät reinigen, warten Sie, bis es
vollständig abgekühlt ist.
Die Reinigung und Wartung des Gerätes darf nicht durch Kinder ohne
Aufsicht durchgeführt werden.
Verwenden Sie bitte niemals scheuernde oder korrosive
Reinigungsmittel, auch kleine Bleichmittel oder Säuren. Achten Sie
darauf, dass keine säurehaltigen bzw. ätzenden Substanzen
(Zitronensäure, Essig. o.Ä.) auf die emaillierten bzw. lackierten Flächen
liegen bleiben.
Reinigen Sie die emaillierten, verchromten oder lackierten Teile mit
lauwarmem Seifenwasser oder mit nicht scheuernden Flüssigmitteln.
Für die Edelstahlteile verwenden Sie bitte die handelsüblichen Mittel
zur Pflege von Edelstahl.
Reinigen Sie die Gasbrenner mit Seifenwasser. Um den ursprünglichen
Glanz zu bewahren, verwenden Sie einen handelsüblichen
Spezialreiniger für Aluminiumlegierungen. Nach der Reinigung sind die
Brenner sorgfältig zu trocken, bevor sie wieder aufgesetzt werden.
Kontrollieren Sie bitte unbedingt, dass die Brenner wieder richtig
aufliegen, da eine fehlerhafte Montage der Brenner zur
mangelhaften Verbrennung des Gases führen kann.
Gitterroste und Chromteile
Die Gitterroste und die verchromten Teile neigen mit der Zeit dazu, sich
zu verfärben.
Dies ist ein natürliches Phänomen, das sich zwar nicht vermeiden lässt,
jedoch in keiner Weise die Funktion des Gerätes beeinträchtigt. Auf
Wunsch sind entsprechende Ersatzteile erhältlich. Fragen Sie bitte bei
beim Werkskundendienst nach.
5.TECHNISCHER KUNDENDIENST
Sollte Ihr Gerät einmal nicht ordnungsgemäß funktionieren, kontrollieren
Sie bitte folgendes, bevor Sie den technischen Kundendienst rufen:
• überprüfen Sie, dass das Gerät stromversorgt ist
• überprüfen Sie, dass die Gaszufuhr in Ordnung ist.
Sollte die Ursache für die Funktionsstörung nicht ermittelt werden können,
trennen Sie das Gerät vom Stromnetz und rufen Sie den Kundendienst.
Unternehmen Sie nichts auf eigene Faust!
Dieses Gerät ist in Übereinstimmung mit der
europäischen Richtlinie 2012/19/EU zu elektrischen und
elektronischen Altgeräten (WEEE) gekennzeichnet.
Elektrische und elektronische Altgeräte enthalten sowohl
Schadstoffe (die negative Auswirkungen auf die Umwelt
haben können) als auch Basiskomponenten (die
wiederverwendet werden können). Es ist wichtig, dass
elektrische und elektronische Altgeräte spezifischer
Handhabung unterliegen, damit alle Schadstoffe
angemessen entfernt und entsorgt und alle Materialien
wiederverwertet und recycelt werden.
Verbraucher spielen eine wichtige Rolle bei der Gewährleistung, dass
elektrische und elektronische Altgeräte nicht zu Umweltproblemen
werden; es ist wichtig, einige grundlegende Regeln zu befolgen:
• Elektrische und elektronische Altgeräte können nicht als Haushaltsabfall
behandelt werden.
• Elektrische und elektronische Altgeräte sollten an relevante
Sammelpunkte übergeben werden, die von der Stadtverwaltung oder
eingetragenen Unternehmen verwaltet werden. In vielen Ländern können
bei großen elektrischen und elektronischen Altgeräten heimische
Sammeldienste verfügbar sein.
• Wenn Sie ein neues Gerät erwerben, kann das alte Gerät
möglicherweise an den Händler übergeben werden, der es kostenlos auf
einer 1:1-Basis sammeln muss, solange das Gerät von dem gleichen Typ
ist und dieselben Funktionen hat wie das gelieferte Gerät
6. UMWELTGERECHTE ENTSORGUNG
Der Hersteller übernimmt keine Haftung für eventuelle Fehler, die durch
den Druck, die Transkription oder Übersetzung dieser Broschüre
entstanden sein könnten, ab. Wir behalten uns das Recht vor, technische
Änderungen im Interesse der Konsumenten an den Produkten
vorzunehmen, ohne die Sicherheitseigenschaften oder die Funktion der
Geräte zu verändern.
Konformitätserklärung: Dieses Gerät entspricht in den Teilen, die mit
Lebensmitteln in Berührung kommen, den Vorgaben der Europäischen
Richtlinie EEC 89/109.
Das Gerät entspricht den Europäischen Richtlinien
2006/95/EC, 2004/108/EC und 2009/142/EC und deren
nachfolgenden Änderungen.
JA
NEIN
Sayfa yükleniyor ...
Sayfa yükleniyor ...
Sayfa yükleniyor ...
Sayfa yükleniyor ...
Sayfa yükleniyor ...
Sayfa yükleniyor ...
Sayfa yükleniyor ...
Sayfa yükleniyor ...
Sayfa yükleniyor ...
Sayfa yükleniyor ...
Sayfa yükleniyor ...
Sayfa yükleniyor ...
Sayfa yükleniyor ...
Sayfa yükleniyor ...
Sayfa yükleniyor ...
Sayfa yükleniyor ...
Sayfa yükleniyor ...
Sayfa yükleniyor ...
Sayfa yükleniyor ...
Sayfa yükleniyor ...
Sayfa yükleniyor ...
Sayfa yükleniyor ...
Sayfa yükleniyor ...
Sayfa yükleniyor ...
Sayfa yükleniyor ...
Sayfa yükleniyor ...
Sayfa yükleniyor ...
Sayfa yükleniyor ...
Sayfa yükleniyor ...
Sayfa yükleniyor ...
Sayfa yükleniyor ...
Sayfa yükleniyor ...
Sayfa yükleniyor ...
Sayfa yükleniyor ...
Sayfa yükleniyor ...
Sayfa yükleniyor ...
Sayfa yükleniyor ...
Sayfa yükleniyor ...
Sayfa yükleniyor ...
Sayfa yükleniyor ...
Sayfa yükleniyor ...
Sayfa yükleniyor ...
Sayfa yükleniyor ...
Sayfa yükleniyor ...
-
 1
1
-
 2
2
-
 3
3
-
 4
4
-
 5
5
-
 6
6
-
 7
7
-
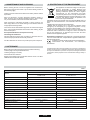 8
8
-
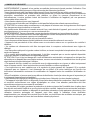 9
9
-
 10
10
-
 11
11
-
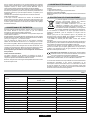 12
12
-
 13
13
-
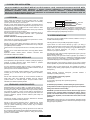 14
14
-
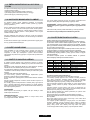 15
15
-
 16
16
-
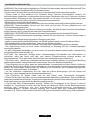 17
17
-
 18
18
-
 19
19
-
 20
20
-
 21
21
-
 22
22
-
 23
23
-
 24
24
-
 25
25
-
 26
26
-
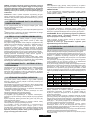 27
27
-
 28
28
-
 29
29
-
 30
30
-
 31
31
-
 32
32
-
 33
33
-
 34
34
-
 35
35
-
 36
36
-
 37
37
-
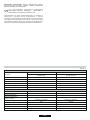 38
38
-
 39
39
-
 40
40
-
 41
41
-
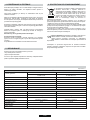 42
42
-
 43
43
-
 44
44
-
 45
45
-
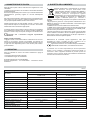 46
46
-
 47
47
-
 48
48
-
 49
49
-
 50
50
-
 51
51
-
 52
52
-
 53
53
-
 54
54
-
 55
55
-
 56
56
-
 57
57
-
 58
58
-
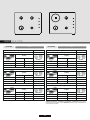 59
59
-
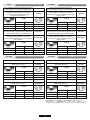 60
60
-
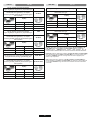 61
61
-
 62
62
-
 63
63
-
 64
64


Diğer dillerde
- slovenčina: Candy CLGC64SPTF/1 Používateľská príručka
- français: Candy CLGC64SPTF/1 Manuel utilisateur
- italiano: Candy CLGC64SPTF/1 Manuale utente
- português: Candy CLGC64SPTF/1 Manual do usuário
- română: Candy CLGC64SPTF/1 Manual de utilizare
İlgili Makaleler
Diğer Belgeler
-
Hoover 33801531 Kullanım kılavuzu
-
-
-
Electrolux EGE6182NOK Kullanım kılavuzu
-
-
AEG HG654320NM Kullanım kılavuzu
-
-
Electrolux EGG6242NOX Kullanım kılavuzu
-
-