
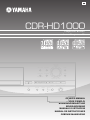
CDR-HD1000
G
OWNER’S MANUAL
MODE D’EMPLOI
BEDIENUNGSANLEITUNG
BRUKSANVISNING
MANUALE DI ISTRUZIONI
MANUAL DE INSTRUCCIONES
GEBRUIKSAANWIJZING
Compact Disc Recorder
Lecteur/Enregistreur CD
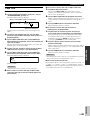
TEXT/TIME MODE/SET
MULTI JOG
DIGITAL REC LEVEL
PUSH ENTER
TRACK NO.
FINALIZE ERASE
BOOKMARK
COMPLETE
MENU
CLEAR
MIN MAX
OPTICAL
ANALOG REC LEVEL
INPUT
REC
COAXIAL
ANALOG

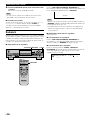
CAUTION
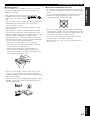
CAUTION: READ THIS BEFORE OPERATING THIS UNIT
• To assure the finest performance, please read this manual
carefully. Keep it in a safe place for future reference.
• Install this unit in a well ventilated, cool, dry, clean place with at
least 30cm on the top, 20cm on the right and left, and 10cm at the
back of this unit for ventilation space – away from direct sunlight,
heat sources, vibration, dust, moisture, and/or cold.
• Locate this unit away from other electrical appliances, motors, or
transformers to avoid humming sounds. To prevent fire or
electrical shock, do not place this unit where it may get exposed
to rain, water, and/or any type of liquid.
• Do not expose this unit to sudden temperature changes from cold
to hot, and do not locate this unit in a environment with high
humidity (i.e. a room with a humidifier) to prevent condensation
inside this unit, which may cause an electrical shock, fire, damage
to this unit, and/or personal injury.
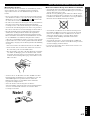
• On the top of this unit, do NOT place:
• Other components, as they may cause damage and/or
discoloration on the surface of this unit.
• Burning objects (i.e. candles), as they may cause fire, damage
to this unit, and/or personal injury.
• Containers with liquid in them, as they may cause electrical
shock to the user and/or damage to this unit.
• Do not cover the rear panel of this unit with a newspaper,
tablecloth, curtain, etc. in order not to obstruct heat radiation. If
the temperature inside this unit rises, it may cause fire, damage to
this unit, and/or personal injury.
• Do not plug in this unit to a wall outlet until all connections are
complete.
• Do not operate this unit upside-down. It may overheat, possibly
causing damage.
• Do not use force on switches, knobs and/or cords.
• When disconnecting the power cord from the wall outlet, grasp
the plug; do not pull the cord.
• Do not clean this unit with chemical solvents; this might damage
the finish. Use a clean, dry cloth.
• Only voltage specified on this unit must be used. Using this unit
with a higher voltage than specified is dangerous and may cause
fire, damage to this unit, and/or personal injury. YAMAHA will
not be held responsible for any damage resulting from use of this
unit with a voltage other than specified.
• To prevent damage by lightning, disconnect the power cord from
the wall outlet during an electrical storm.
• Take care of this unit so that no foreign objects and/or liquid
drops inside this unit.
• Do not attempt to modify or fix this unit. Contact qualified
YAMAHA service personnel when any service is needed. The
cabinet should never be opened for any reasons.
• When not planning to use this unit for long periods of time (i.e.
vacation), disconnect the AC power plug from the wall outlet.
• Be sure to read the “Troubleshooting” section on common
operating errors before concluding that this unit is faulty.
• Before moving this unit, first check that there is no disc in the disc
tray. Finally, press POWER to turn off this unit, and disconnect
the AC power plug from the wall outlet.
SPECIAL INSTRUCTIONS FOR U.K. MODEL
IMPORTANT
The wires in this mains lead are coloures in accordance with the
following code:
GREEN-and-YELLOW:Earth
BLUE:Neutral
BROWN:Live
As the colours of the wires in the mains lead of this apparatus
may not correspond with the coloured markings identifying the
terminals in your plug proceed as follows: The wire which is
coloured GREEN-and-YELLOW must be connected to the
terminal in the plug which is marked by the letter E or by the
safety earth symbol or coloured GREEN or GREEN-and -
YELLOW. The wire which is coloured BLUE must be
connected to the terminal which is marked with the letter N or
coloured BLACK. The wire which is coloured BROWN must be
connected to the terminal which is marked with the letter L or
coloured RED.
For U.K. customers
If the socket outlets in the home are not suitable for the plug
supplied with this appliance, it should be cut off and an appropriate
3 pin plug fitted. For details, refer to the instructions described
above.
Note: The plug severed from the mains lead must be destroyed, as
a plug with bared flexible cord is hazardous if engaged in a live
socket outlet.
Laser component in this product is capable of emitting radiation
exceeding the limit for Class 1.

E-1
PREPARATION
RECORDING AND
COPYING
EDITING
PLAYBACK
ADDITIONAL
INFORMATION
English
Features
• Copying a CD to the HDD at maximum 10x speed
• Copying data on the HDD to a CD-R disc at maximum 8x speed
• Copying data on the HDD to a CD-RW disc at maximum 4x
speed
• CD TEXT compatible
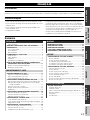
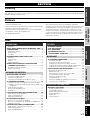
Contents
PREPARATION
Features .................................................................................. 1
DISCS COMPATIBLE WITH THIS UNIT .......................... 2
PREPARATION ............................................................... 4
Supplied Accessories ............................................................. 4
Remote Control ..................................................................... 5
Connections ........................................................................... 6
CONTROLS AND FUNCTIONS ...................................... 7
Front Panel ............................................................................. 7
Remote Control ..................................................................... 8
Display ................................................................................... 9
Display Information ............................................................. 10
RULES OF DIGITAL RECORDING AND NOTES ON
SYSTEM .................................................................... 11
Rules of Digital Recording .................................................. 11
Notes on System .................................................................. 11
RECORDING AND COPYING
RECORDING AND COPYING ....................................... 13
Usable Recording Media ..................................................... 13
Types of Recording and Copying ........................................ 13
Before Starting to Record and Copy ................................... 13
BASIC RECORDING OPERATION ............................... 14
Recording from an External Component onto the HDD ..... 14
Recording from an External Component onto a CD-R or
CD-RW Disc ................................................................... 15
Selecting an Input Source .................................................... 17
Adjusting the Recording Level ............................................ 17
Finalization .......................................................................... 19
ADVANCED RECORDING OPERATION ...................... 20
Selecting a Disc for Recording ............................................ 20
Setting the Recording Mode ................................................ 20
Manual Track Marking ........................................................ 21
BASIC COPYING OPERATION .................................... 22
Copying from a CD onto the HDD ...................................... 22
Copying from the HDD onto a CD-R or CD-RW Disc ....... 24
Duplication of a CD ............................................................. 26
ADVANCED COPYING OPERATION ........................... 28
Selecting a Disc to Be Copied on ........................................ 28
Setting the Copying Mode ................................................... 28
Copying Menu Setting ......................................................... 29
EDITING
ALBUM EDITING .......................................................... 31
TRACK EDITING ........................................................... 37
DISC EDITING ............................................................... 46
UNDO FUNCTION ......................................................... 50
ERASING A CD-RW DISC ............................................ 51
PLAYBACK
BASIC PLAYBACK OPERATION ................................. 52
Playing a CD ........................................................................ 52
Playing Tracks on the HDD ................................................. 52
Finding the Desired Passage (Search) ................................. 53
Finding the Desired Group (Group Skip) ............................ 53
Finding the Desired Track (Track Skip) .............................. 54
ADVANCED PLAYBACK OPERATION ......................... 55
Setting the Play Style ........................................................... 55
Random Play ....................................................................... 56
Single Repeat Play ............................................................... 56
Full Repeat Play .................................................................. 57
Intro Play ............................................................................. 57
Album Play .......................................................................... 58
Bookmark Play .................................................................... 58
Listening with Headphones ................................................. 58
ADDITIONAL INFORMATION
OTHERS ........................................................................ 59
HDD Utility ......................................................................... 59
System Utility ...................................................................... 60
DAC (Digital/Analog Converter) Mode .............................. 62
Display Messages ................................................................ 63
Troubleshooting ................................................................... 64
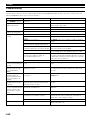
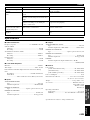
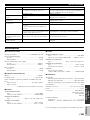
Specifications....................................................................... 65
ENGLISH
Introduction
Thank you for purchasing this YAMAHA product. We hope it will give you many years of trouble-free enjoyment. For the best performance,
read this manual carefully. It will guide you in operating your YAMAHA product.
This unit has a built-in hard disk drive (HDD) with large capacity
that makes a long recording possible. You can copy several CDs
onto the HDD, pick up and play your favorite from the copied data
on the HDD. Moreover, various sound sources recorded to the HDD
can be edited variously. By copying the edited sound source to CD-
R or CD-RW discs, your original CD can be easily created by this
unit itself.

E-2
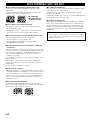
■ Discs that can be used for recording on this unit
Be sure to use only CD-R and CD-RW discs made by reliable
manufacturers.
CD-R and CD-RW digital audio discs that display either of the
following marks can be used with this unit.
■ Discs that can be used for recording
• CD-R discs can only be recorded on once, and the recorded
material cannot be erased.
• CD-RW discs can be recorded on, have the recorded material
erased, and then recorded on again any number of times.
■ Discs that cannot be used for recording on this unit
• Discs bearing marks other than those shown above.
• Discs intended for recording computer data.
• Discs intended for professional use or labeled “FOR
PROFESSIONAL USE ONLY”.
■ Finalization of CD-R discs for playback on standard
CD players
Although a partially recorded CD-R disc can be played on this unit,
it cannot be played on a standard CD player until it has undergone a
process known as “finalization”. In the finalization process, the
Table of Contents (TOC) is written onto the disc and further
recording is not possible.
However, this process makes it possible to play a CD-R disc on a
standard CD player.
Some CD players may not play back the finalized CD-R discs
properly due to differences in the playback system of different
manufacturers.
See page 19 for the finalization procedure.
■ Erasure or loss of data
Yamaha and suppliers accept no liability for the loss of data written
on the HDD and CD-R or CD-RW discs, or any problems caused as
a result of using this unit. As a precaution, it is recommended that
the discs are tested after they have been recorded on. Furthermore,
under no circumstances do Yamaha and suppliers guarantee the
reliability of the discs.
■ Discs that can be played back
In addition to CD-R and CD-RW digital audio discs described
above, commercially available pre-recorded CDs bearing the marks
shown below can also be played on this unit.
DISCS COMPATIBLE WITH THIS UNIT
FOR CONSUMER
FOR CONSUMER USE
FOR MUSIC USE ONLY
■ Playback of CD-RW discs
Please note that even after a CD-RW disc has been finalized, it still
cannot be played on a standard CD player.
CD-RW discs can only be played back on CD-RW-compatible
players such as this unit.
Additionally, CD-RW discs can be erased even after finalization has
been performed, and recorded on again.
■ Playback on DVD players
Before playing back a finalized CD-R or CD-RW discs on a DVD
player, please check whether the DVD player is compatible with
CD-R or CD-RW discs or not. Refer to the owner’s manual of the
DVD player for more information. CD-R or CD-RW discs cannot
be played on a DVD player that is not compatible with CD-R or
CD-RW discs.
IMPORTANT
• Please check the copyright laws in your country to record from
records, CDs, radio, etc. Recording of copyright material may
infringe copyright laws.

E-3
PREPARATION
English
DISCS COMPATIBLE WITH THIS UNIT
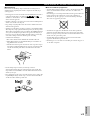
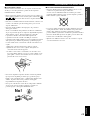
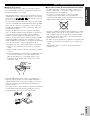
■ Handling of discs
Heed the following notes on handling of discs not to create any
cause for a recording failure, a loss of the recorded data, or a
malfunction of this unit.
• This compact disc recorder is designed for use with CDs
(including 8cm [3”] discs) bearing the , , , or
marks only. Never attempt to load any other type of disc into this
unit.
• CDs are not subjected to wear during play. However if the disc is
handled improperly, damage may be created on the disc to
adversely affect the disc’s play.
• Do not use cleaning discs or warped discs. All of these could
damage this unit.
• Although playback of CDs is generally not affected by small
particles of dust or fingerprints on their playing surface, dust,
fingerprints, small scratches and direct sunlight on the recording
surface of a CD-R or CD-RW disc may make recording
impossible. Therefore, for optimal performance of the recorder
and for long-term enjoyment of your CD collection, handle discs
correctly as outlined in the following guidelines.
1. Hold discs by touching only the edges or center hole.
2. When a disc is not currently being used, remove it from the
recorder and store in an appropriate case.
3. With proper disc maintenance, cleaning should not be
necessary. However, should cleaning be required, wipe by
using a clean, dry cloth. Do not wipe with a circular motion;
wipe straight outward from the center.
• Do not try to clean the disc’s surface by using any type of disc
cleaner, record spray, antistatic spray or liquid, or any other
chemical-based liquid, because such substances might irreparably
damage the disc’s surface.
• Do not expose discs to direct sunlight, high temperature, or high
humidity for a long period of time, because this might warp or
otherwise damage the disc.
No!
■ To prevent a malfunction of this unit
• Do not use any non-standard shaped CDs (heart, flower shaped,
etc.) available on the market, because they are off-balance in their
weight.
If a non-standard shaped CD is loaded into this unit, it may create
problems such as improper playback, opening the disc tray,
creating an usual noise, and this unit’s failure.
• Be sure to use a felt-tip pen or similar writing tool when writing
on the label side of the disc. Do not use a ball-point pen, pencil, or
other hard-tipped writing tool, as these may damage the disc and
may adversely affect further recording on the disc.
• Do not use the discs with glue left on their surface. It may get
stuck in this unit or create damage to this unit.
• When using an 8cm (3”) disc, do not place a normal 12cm (5”)
disc on top of it.

E-4
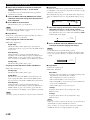
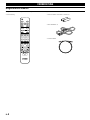
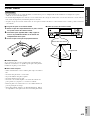
Supplied Accessories
After unpacking, make sure the following items are included in your package.
PREPARATION
• Remote Control • Batteries (size AA, UM-3, or R6) (2)
• RCA Pin Cables (2)
• Optical Fiber Cable
OPEN/CLOSE
COPY REC
TEXT/TIME
INPUT
MODE/SET
MENU
CLEAR
1
ABC
2
DEF
3
GHI
4
JKL
5
MNO
6
PQR
7
STU
8
VWX
9
YZ
SPACE
SYMBOL
0 +10
BOOKMARK
REPEAT RANDOM
GROUP SKIP
INTRO
ENTER
COMPLETE
FINALIZE ERASE
TRACK NO.
WRITE
HDD CDR

E-5
PREPARATION
English
PREPARATION
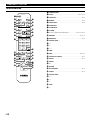
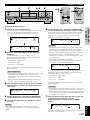
Remote Control
Cautions
• If operation of this unit by the remote control creates any malfunction in any other components, change the placement of the component.
• Do not spill any liquid on or drop the remote control. Do not place it near a heater or in the bathroom where the temperature and humidity
become high.
• Make sure the remote control sensor is not exposed to direct sunlight or strong lights. If it is, it may not function correctly.
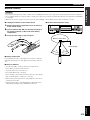
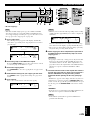
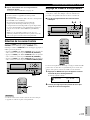
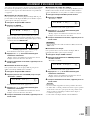
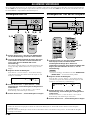
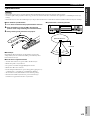
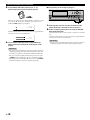
■ Loading the batteries in the remote control
1. Remove the battery compartment cover on the back
of the remote control.
2. Insert 2 batteries (AA, UM-3 or R6 type) according to
the polarity markings on the inside of the battery
compartment.
3. Close the cover until it snaps into place.
■ Battery replacement
If you find that the remote control must be used closer to this unit
than usual, the batteries are weak. Replace both batteries with new
ones.
■ Notes on batteries
• Use only AA, UM-3, or R6 type batteries for replacement.
• Do not mix a new battery with a used one.
• A rechargeable battery cannot be used.
• Do not mix different types of battery.
• Do not attempt to short out the batteries by directly connecting the
plus (+) and the minus (–) with a piece of metal.
• Remove the batteries if the remote control will not be used for an
extended period of time.
• If batteries leak, dispose of them immediately. Clean the battery
compartment thoroughly before installing new batteries.
2
1
3
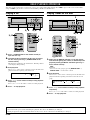
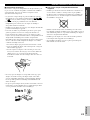
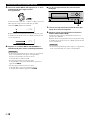
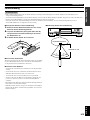
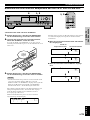
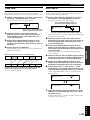
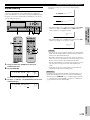
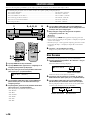
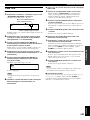
■ Remote control operation range
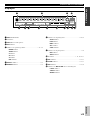
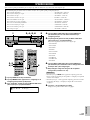
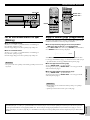
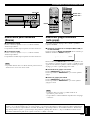
NATURAL SOUND HDD/CD RECORDER CDR–HD1000
TEXT/TIME MODE/SET
MULTI JOG
DIGITAL REC LEVEL
PUSH ENTER
TRACK NO.
FINALIZE ERASE
BOOKMARK
COMPLETE
MENU
CLEAR
MIN MAX
OPTICAL
ANALOG REC LEVEL
INPUT
REC
COAXIAL
ANALOG
COPYCDRHDD
MIN MAX
LEVELPHONES
POWER
30°
30°
Remote control sensor
Within 6m (20’)

E-6
PREPARATION
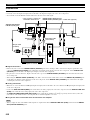
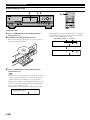
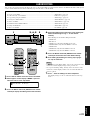
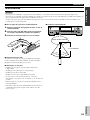
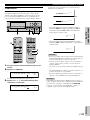
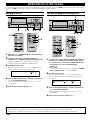
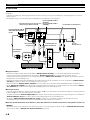
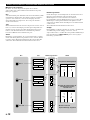
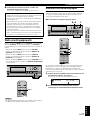
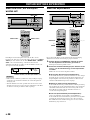
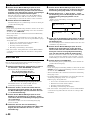
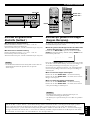
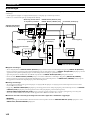
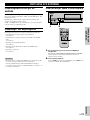
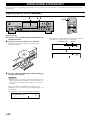
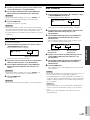
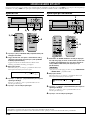
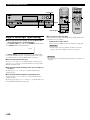
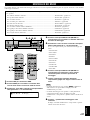
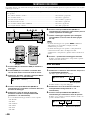
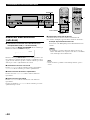
Connections
Turn off the power of this unit and the other components, and unplug them from the wall outlet before making any connections.
• Correctly connect the input and output jacks on this unit to the input and output jacks on the other components.
• Arrow marks (➞) in the illustration below indicate the direction of the audio signal.
■ Digital connections
• Remove the jack covers for the DIGITAL IN/OUT (OPTICAL) jacks before starting to make connections. Using the optical fiber cable,
connect the DIGITAL IN (OPTICAL) jack on this unit to the digital optical output jack on the other component, and the DIGITAL OUT
(OPTICAL) jack on this unit to the digital optical input jack on the other component.
• Keep the jack covers for future use. Replace them in order to protect the DIGITAL IN/OUT (OPTICAL) jacks from dust when the jacks
are not being used.
• When using the DIGITAL IN/OUT (COAXIAL) jacks, make connections with coaxial cables. Connect the DIGITAL IN (COAXIAL) jack
on this unit to the digital coaxial output jack on the other component, and the DIGITAL OUT (COAXIAL) jack on this unit to the digital
coaxial input jack on the other component.
■ Analog connections
• Make sure to connect the L (left) and R (right) input and output jacks on this unit to the correct L (left) and R (right) input and output jacks
on the other component.
• Connect the ANALOG LINE IN (REC) jack on this unit to the analog output jack on the other component, and the ANALOG LINE OUT
(PLAY) jack on this unit to the analog input jack on the other component.
• The ANALOG LINE IN (REC)/LINE OUT (PLAY) jacks on this unit are numbered # and $ respectively. Connect these jacks to the
jacks with the same numbers when connecting this unit to a Yamaha amplifier or receiver.
■ Plug in this unit to a wall outlet when all connections are complete.
Note
• When you play the data on the HDD or CDs, signals are output both from the ANALOG LINE OUT (PLAY) jack and from the DIGITAL
OUT (OPTICAL/COAXIAL) jacks.
RS–232C
DIGITAL
INLINE IN —LINE OUT
COAXIAL OPTICAL
OUT
COAXIAL OPTICAL
R
L
R
L
4 3
ANALOG
REC PLAY
REC
PLAY
OUT
IN
DIGITAL
INPUT
COAXIAL
DIGITAL
OUTPUT
R
L
R
L
OPTICAL
OPTICAL
DIGITAL
OUTPUT
COAXIAL
ANALOG LINE IN (REC)/
LINE OUT (PLAY) jacks
* This connector is used for an
examination in the factory.
DIGITAL IN/OUT (OPTICAL) jacks
DIGITAL IN/OUT (COAXIAL) jacks Coaxial cable (optional)
RCA pin cable
(included)
RCA pin cable
(included)
Optical fiber cable
(one included)
To wall outlet
Amplifier or receiver DVD player or DAT deck

E-7
PREPARATION
English
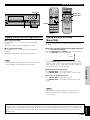
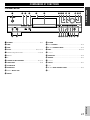
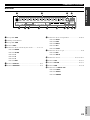
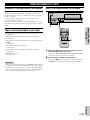
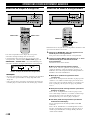
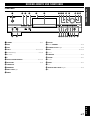
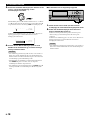
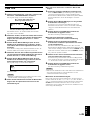
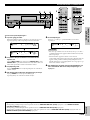
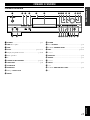
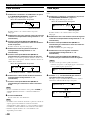
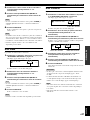
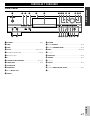
1 POWER ............................................................................. P. 13
2 HDD
3 CDR
4 COPY ..................................................................... P. 23, 25, 27
5 Front panel display ......................................................... P. 9, 10
6 Disc tray
7 v
8 TRACK NO./BOOKMARK ....................................... P. 21, 36
9 TEXT/TIME ....................................................................... P. 10
0 COMPLETE
q MODE/SET
w MULTI JOG knob
e MENU
CONTROLS AND FUNCTIONS
Front Panel
r CLEAR
t PHONES jack ................................................................... P. 58
y PHONES LEVEL control ................................................. P. 58
u REC ............................................................................. P. 14, 16
i t/e
o FINALIZE .......................................................................... P. 19
p ERASE .............................................................................. P. 51
a r/y
s INPUT ................................................................................ P. 17
d w/d
f ANALOG REC LEVEL control ....................................... P. 18
g a
NATURAL SOUND HDD/CD RECORDER CDR–HD1000
TEXT/TIME MODE/SET
MULTI JOG
DIGITAL REC LEVEL
PUSH ENTER
TRACK NO.
FINALIZE ERASE
BOOKMARK
COMPLETE
MENU
CLEAR
MIN MAX
OPTICAL
ANALOG REC LEVEL
INPUT
REC
COAXIAL
ANALOG
COPYCDRHDD
MIN MAX
LEVELPHONES
POWER
1
ty uiopasdfg
23 4 5 6 7890q wer

E-8
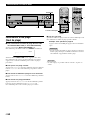
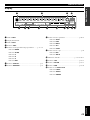
CONTROLS AND FUNCTIONS
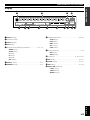
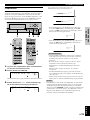
1 OPEN/CLOSE
2 COPY ..................................................................... P. 23, 25, 27
3 FINALIZE .......................................................................... P. 19
4 ERASE .............................................................................. P. 51
5 TEXT/TIME ....................................................................... P. 10
6 MODE/SET
7 COMPLETE
8 CLEAR
9 Alphabetical/numeric buttons ........................... P. 35, 45, 49, 54
0 REPEAT ...................................................................... P. 56, 57
q RANDOM .......................................................................... P. 56
w GROUP SKIP q
e t
r d
t e
y HDD
u REC ............................................................................. P. 14, 16
i TRACK NO. WRITE ......................................................... P. 21
o INPUT ................................................................................ P. 17
p MENU
a +/–
s ENTER
d BOOKMARK .................................................................... P. 36
f INTRO................................................................................ P. 57
g GROUP SKIP w
h y
j r
k w
l CDR
; a
Remote Control
OPEN/CLOSE
COPY REC
TEXT/TIME
INPUT
MODE/SET
MENU
CLEAR
1
ABC
2
DEF
3
GHI
4
JKL
5
MNO
6
PQR
7
STU
8
VWX
9
YZ
SPACE
SYMBOL
0
+
10
BOOKMARK
REPEAT RANDOM
GROUP SKIP
INTRO
ENTER
COMPLETE
FINALIZE ERASE
TRACK NO.
WRITE
HDD CDR
1
2
3
4
5
6
7
8
9
0
q
w
e
r
t
y
u
i
o
p
a
s
d
f
g
h
j
k
l
;

E-9
PREPARATION
English
CONTROLS AND FUNCTIONS
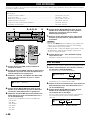
1 HDD mark
2 Information display
3 CDR mark
4 REC indicator
5 Playback mode/play style indicator ............................ P. 55—58
RNDM indicator
ALBM indicator
S indicator
G indicator
A indicator
REP indicator
6 DUPLCT indicator ............................................................ P. 27
7 BKMARK indicator ........................................................... P. 36
Display
RNDM
S
AUTO PRD DIG
REC
LEVEL
TRACK
GROUP
VAR
CD–RW
L
R
dB –30 –10 –6 –20
MULT ALL SYNC ANLG
ALBM
DUPLCT
REP BKMARKGA
8888888888888
TOC
1
567 8 9 0 qwer
234
8 Recording mode indicator ............................................ P. 20, 28
AUTO indicator
PRD indicator
MULT indicator
ALL indicator
SYNC indicator
9 Copying mode indicator ..................................................... P. 30
DIG indicator
ANLG indicator
0 Level meter ....................................................... P. 18, 19, 30, 51
q TOC indicator .............................................................. P. 19, 51
w CD-RW indicator ......................................................... P. 19, 51
e VAR indicator ............................................................... P. 18, 30
r MULTI JOG status indicator
LEVEL indicator
TRACK indicator
GROUP indicator

E-10
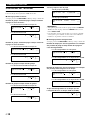
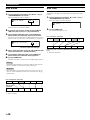
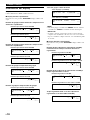
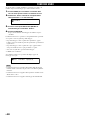
CONTROLS AND FUNCTIONS
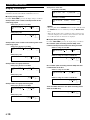
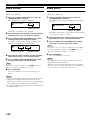
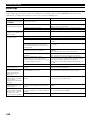
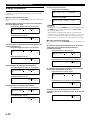
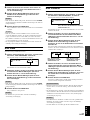
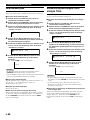
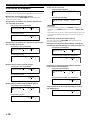
Display Information
The display located in the center of this unit provides the
information about the drive (HDD or CDR drive) selected.
■ Display during playback
Each time TEXT/TIME is pressed, the display changes as follows:
Group number, track number and elapsed time of the
track being played
While playing the data on the HDD
While playing a CD
Group number, track number and remaining time of the
track being played
While playing the data on the HDD
While playing a CD
Group number and group total time
While playing the data on the HDD
While playing a CD
Group number and group remaining time
While playing the data on the HDD
While playing a CD
GROUP
L
R
dB –30 –10 –6 –20
Dsc001 1 004
GROUP
CD
L
R
dB –30 –10 –6 –20
1 004
TOC
GROUP
L
R
dB –30 –10 –6 –20
Dsc001 1- 221
GROUP
CD
L
R
dB –30 –10 –6 –20
1- 221
TOC
GROUP
CD
L
R
dB –30 –10 –6 –20
6545
TOC
GROUP
L
R
dB –30 –10 –6 –20
Dsc001 6545
L
R
dB –30 –10 –6 –20
Dsc001 -6240
GROUP
CD
L
R
dB –30 –10 –6 –20
-6240
TOC
Group title or track title
Group title (or CD TEXT)
Track title (or CD TEXT)
Notes
• The group title with the GROUP indicator and the track title with
the TRACK indicator are switched by rotating the MULTI JOG
knob.
• When the title and the name contain more than 13 characters, the
entire title is displayed as scrolled to the left. After the entire title
has scrolled, the first 13 characters are displayed.
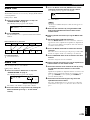
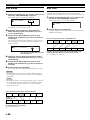
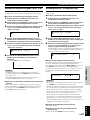
■ Display during recording
Each time TEXT/TIME is pressed, the display changes as follows:
Disc number (while recording onto the HDD), track
number and elapsed time of the track being recorded
While recording onto the HDD
While recording onto a CD-R or CD-RW disc
Disc number (while recording onto the HDD) and total
recorded time on the disc
While recording onto the HDD
While recording onto a CD-R or CD-RW disc
Total recordable time on a disc (while recording onto a
CD-R or CD-RW disc)
GROUP
L
R
dB –30 –10 –6 –20
LIVE AT CARNE
L
R
dB –30 –10 –6 –20
PRIDE AND JOY
TRACK
L
R
dB –30 –10 –6 –20
Dsc001 1 004
REC
GROUP
GROUP
CD-RW
L
R
dB –30 –10 –6 –20
1 004
REC
REC
GROUP
CD–RW
L
R
dB –30 –10 –6 –20
1543
REC
GROUP
L
R
dB –30 –10 –6 –20
Dsc001 1543
REC
GROUP
CD–RW
L
R
dB –30 –10 –6 –20
- 221

E-11
PREPARATION
English
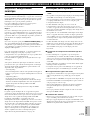
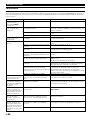
Rules of Digital Recording
■ SCMS—Serial Copy Management System
As a digital audio component, this unit conforms with the Serial
Copy Management System (SCMS) standards. The Serial Copy
Management System restricts copies made by recording digital
signals to first-generation copies only.
The digital program sources that have been recorded cannot be
digitally recorded again.
There are 2 rules as follows:
Rule 1
Digital sources such as commercially available CDs can be copied
digitally onto other recordable digital media with this unit (a first-
generation digital copy). However, the first-generation digital copy
cannot be copied digitally any further.
Rule 2
The source that was recorded via the ANALOG LINE IN (REC)
jacks can be copied digitally onto other recordable digital media (a
first-generation digital copy). However, the first-generation digital
copy cannot be copied digitally any further.
This unit monitors the SCMS status for each track when a digital
recording is made. If the track is protected from digital recording
and copying, it is not possible to make a digital recording and copy
of that track.
The SCMS standard does not apply to analog recording and
copying.
When making a copy from a CD onto the HDD, or from the HDD
onto a CD-R or CD-RW disc, any of the copy methods described
below can be selected. The following selections are contained in
“Copy Method”.
•“Auto Dig/Anlg”:
Automatically switches to analog recording if the track cannot be
digitally recorded for SCMS.
•“Digital Copy/Move”:
Performs recording of only those tracks that can be digitally
copied when recording from a CD onto the HDD. Switches to the
Digital Move method when recording from the HDD onto a CD-R
or CD-RW disc.
•“Analog Copy”:
Performs analog copying regardless of the SCMS standard.
■ Digital Move
This unit has a built-in HDD with large space that makes a long
recording possible. You can create your own CD by editing the
various program sources that have been recorded onto the HDD of
this unit and copying them onto a CD-R or CD-RW disc.
If you want to make a digital copy of the original data that has been
created on the HDD to a CD-R or CD-RW disc, the “Digital Move”
method is convenient. You can make a digital copy from the HDD
onto a CD-R or CD-RW disc even if the track is protected from
making a second-generation copy by the SCMS standard.
However, since the concept of “Digital Move” is that the data is
moved from the HDD onto a CD-R or CD-RW disc, the original
data on the HDD is erased when moving is complete. See page 30
for details.
RULES OF DIGITAL RECORDING AND NOTES ON SYSTEM
Notes on System
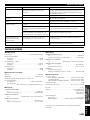
■ Number of recordable discs and tracks and their
length
• One CD-R or CD-RW disc, or one disc on the HDD can be
recorded with up to 99 tracks on them.
• Once 99 tracks have been recorded, no further recording is
possible even if space for recording is available on the disc.
• The minimum length of one track must be 4 seconds. If a
recording is stopped while the track is less than 4 seconds long,
this unit will record for 4 seconds, and then stop recording. The
maximum length of one track is 99 minutes 59 seconds for the
HDD.
• 999 discs can be created at maximum on the HDD of this unit.
However, the number of discs that can be created is limited
according to the space availability (total recordable time) on the
HDD. Total recordable time for the HDD is approximately 30
hours.
• The maximum length of one disc on the HDD is 99 minutes 59
seconds. However, since each track on the HDD is handled in the
unit of frame (75 frames are equal to one second), the maximum
length of one track or disc may vary slightly.
■ Source sampling rate conversion
• Digital input of this unit supports sampling frequencies of 32kHz,
44.1kHz, 48kHz, and 96kHz. This unit converts these inputs to
the 44.1kHz,16-bit digital signals and records them onto the
HDD, or a CD-R or CD-RW disc.
• Analog input is also converted to the same digital signal to be
recorded.
• This unit always produces the signals at the sampling frequency
of 44.1kHz, 16-bit from its digital output.
■ Recording of non-audio signals
• This unit is designed exclusively for recording audio signals.
Recording is only possible for audio signals.
• When a CD with CD TEXT is recorded onto the HDD, CD TEXT
will be automatically copied if it is not copy protected.
• If the digital signals contain graphic data such as CD graphics, the
non-audio signals will not be recorded.
• It is not possible to record from non-audio sources such as CD-
ROM or DVD.
■ Data processing
• A small amount of space may be used for data processing besides
recording the actual program sources.
• Although this unit is capable of recording 999 albums at
maximum onto the HDD, the data processing speed may slow
down if a large number of albums is created.

E-12
RULES OF DIGITAL RECORDING AND NOTES ON SYSTEM
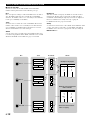
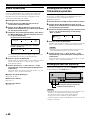
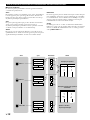
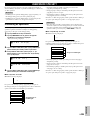
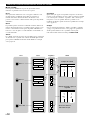
■ Data on the HDD
The data recorded onto the built-in HDD of this unit will be
numbered and organized based on the following concept:
Disc
One consequent recording is counted and numbered as one unit of
disc. The HDD of this unit can record 999 discs at maximum.
(However, the number of discs to be created may be less than 999
for the space availability on the HDD.)
Track
99 tracks can be recorded onto a disc at maximum. (However the
number of discs tracks to be recorded may be less than 99 for the
space availability on the HDD.) One track must be 4 seconds at
shortest and 99 minutes 59 seconds at longest.
Album
A group of the source programs selected from different discs and
recorded as the playlist is called “album”. This unit can record 999
albums at maximum onto the HDD. See page 31 for details.
Bookmark
This unit can make a temporary bookmark on a favorite track as
playing back. The list of the program sources marked is called
“bookmark”. This marking is temporary and cannot be duplicated.
However, an album can be easily created by copying the
bookmarked tracks. See page 36 for details.
Group
A collection of tracks such as a disc, album, and bookmark is called
“group”. Any of the recorded discs, created albums, and marked
bookmarks can be selected as a group in the order by rotating the
MULTI JOG knob.
Disc 1
Track 1
Track 2
Track 3
Track 99
✓
✓
Disc 2
Track 1
Track 2
Track 3
Track 99
✓
✓
Disc 999
Track 1
Track 2
Track 3
Track 99
✓
Disc
1
1
2
2
Track
1
2
2
3
Disc
1
2
1
999
2
Track
1
2
3
3
99
Disc Track Bookmark Album
Example of the playlist
Example of the copied tracks
with bookmarks
* The tracks are listed in the
order of copying.

E-13
RECORDING AND
COPYING
English
Usable Recording Media
The media used for recording and copying with this unit are the
hard disk drive (HDD) or a compact disc for recording (a CD-R or
CD-RW disc). Choose whichever suits your needs.
HDD is convenient to make a long recording, and to edit the
recorded tracks afterwards.
A CD-R and CD-RW disc can be used to make an original CD that
another CD player can play.
Types of Recording and Copying
5 types of recording and copying are possible with this unit as
follows:
• Recording from an external component onto the HDD
➞ See page 14.
• Recording from an external component onto a CD-R or CD-RW
disc
➞ See page 15.
• Copying from a CD onto the HDD
➞ See page 22.
• Copying from the HDD onto a CD-R or CD-RW disc
➞ See page 24.
• Duplication of a CD
➞ See page 26.
Note
• When a CD with CD TEXT is recorded from an external CD
player, CD TEXT cannot be copied even if it is not copy
protected. To copy CD TEXT, copy a CD onto the HDD following
the steps for “Copying from a CD onto the HDD” on pages 22—
23.
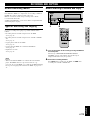
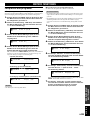
RECORDING AND COPYING
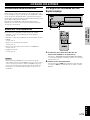
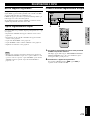
Before Starting to Record and Copy
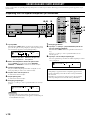
1. Turn on the power of this unit by pressing POWER on
the front panel.
The message “WELCOME TO YAMAHA HDD/CD
SYSTEM” appears on the display. After the message is
displayed, this unit is ready for operation.
2. Select the recording medium.
Press HDD when recording onto the HDD, and CDR when
recording onto a CD-R or CD-RW disc.
NATURAL SOUND HDD/CD RECORDER CDR–HD1000
REC
COPYCDRHDD
MIN MAX
LEVELPHONES
POWER
12
GROUP SKIP
HDD CDR
2

E-14
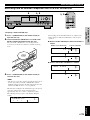
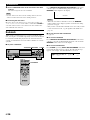
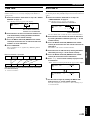
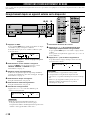
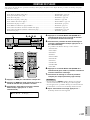
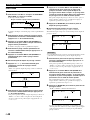
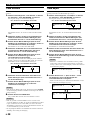
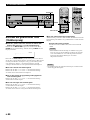
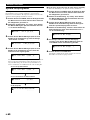
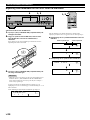
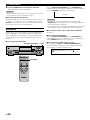
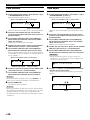
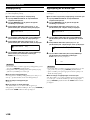
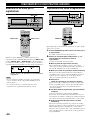
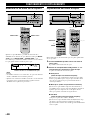
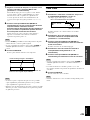
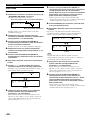
This section describes the basic recording operation. The operation steps are explained by using the buttons on the front panel and the remote
control.
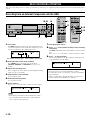
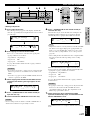
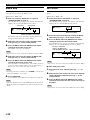
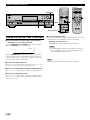
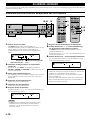
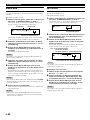
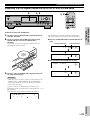
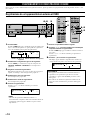
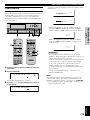
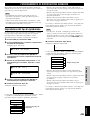
Recording from an External Component onto the HDD
BASIC RECORDING OPERATION
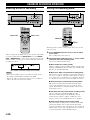
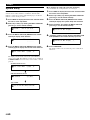
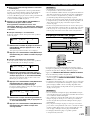
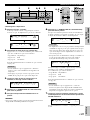
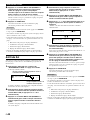
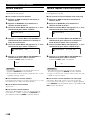
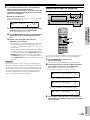
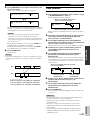
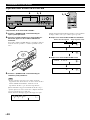
1. Press REC.
The HDD mark flashes, and the disc and track numbers to be
recorded are indicated on the display. Recording has not been
started yet at this stage. (Recording pause mode)
2. Select the input source to be recorded.
Press INPUT to select the input source from among
OPTICAL, COAXIAL, and ANALOG. See page 17 for
details.
3. Adjust the recording level.
The recording level can be adjusted for both digital and analog
input. See page 17 for details.
4. Select the disc to be recorded.
See page 20 for details.
5. Select the recording mode.
See page 20 for details.
6. Start recording.
Press w/d (w or d on the remote control) to start recording.
Note
• In the multi-synchronized or all-synchronized recording
mode, this unit automatically starts recording when the
source component starts playback.
NATURAL SOUND HDD/CD RECORDER CDR–HD1000
TEXT/TIME MODE/SET
MULTI JOG
DIGITAL REC LEVEL
PUSH ENTER
TRACK NO.
FINALIZE ERASE
BOOKMARK
COMPLETE
MENU
CLEAR
MIN MAX
OPTICAL
ANALOG REC LEVEL
INPUT
REC
COAXIAL
ANALOG
COPYCDRHDD
MIN MAX
LEVELPHONES
POWER
6, 8
12
9
OPEN/CLOSE
COPY REC
TEXT/TIME
INPUT
MODE/SET
MENU
CLEAR
1
ABC
2
DEF
3
GHI
4
JKL
5
MNO
6
PQR
7
STU
8
VWX
9
YZ
SPACE
SYMBOL
0 +10
BOOKMARK
REPEAT RANDOM INTRO
ENTER
COMPLETE
FINALIZE ERASE
TRACK NO.
WRITE
7
STU
8
VWX
9
YZ
SPACE
SYMBOL
0 +10
BOOKMARK
REPEAT RANDOM
GROUP SKIP
INTRO
HDD CDR
1
2
6, 8
6, 8
9
Disc number to be recorded Track number to be recorded
REC
L
R
dB –30 –10 –6 –20
Dsc002 1 000
GROUP
REC
L
R
dB –30 –10 –6 –20
Dsc002 1 001
GROUP
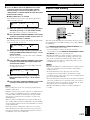
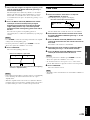
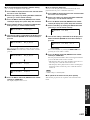
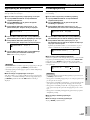
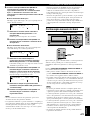
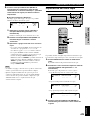
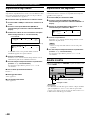
7. Start playing the source.
8. Press w/d (d on the remote control) to stop recording
temporarily.
The HDD mark flashes and the track number is advanced to the
next.
Press w/d (w or d on the remote control) to resume recording.
9. Press a to stop recording.
The first track number of the disc at which recording has been
stopped is indicated on the display.
IMPORTANT
• Never turn off the power of this unit during recording.
Recording may not be correctly made, or the data on the HDD
may be damaged.
• During recording, make sure that this unit is not subjected to
shock or vibration as the HDD may be damaged.
L
R
dB –30 –10 –6 –20
G
Dsc002 1
GROUP

E-15
RECORDING AND
COPYING
English
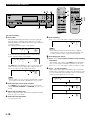
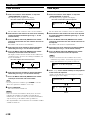
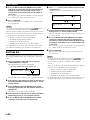
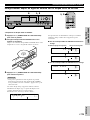
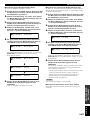
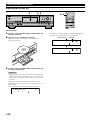
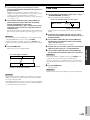
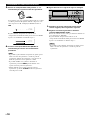
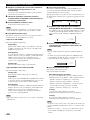
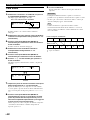
BASIC RECORDING OPERATION
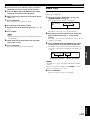
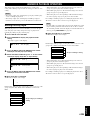
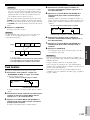
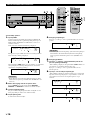
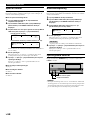
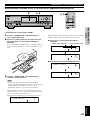
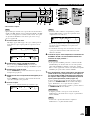
<Preparing a CD-R or CD-RW disc>
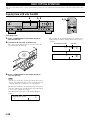
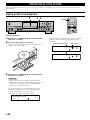
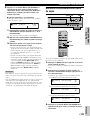
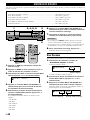
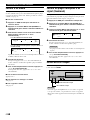
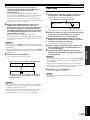
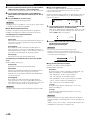
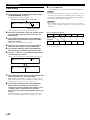
1. Press v (OPEN/CLOSE on the remote control) to
open the disc tray.
2. Load a new CD-R or CD-RW disc, or a CD-R or CD-
RW disc without finalization on the disc tray.
Place the CD-R or CD-RW disc correctly aligned in the
recessed area of the disc tray with its recordable side facing
down.
3. Press v (OPEN/CLOSE on the remote control) to
close the disc tray.
Note
• The disc tray can be also closed by pressing the front edge of
the disc tray gently. If a CD-R or CD-RW disc without
finalization has been loaded, this unit starts playback of that
CD-R or CD-RW disc. Press a to stop playback.
This unit starts reading the disc information (type and capacity
of the disc) when the disc has been loaded. It takes
approximately 10 to 15 seconds to complete the reading.
The following message appears on the display during the
reading.
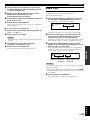
Recording from an External Component onto a CD-R or CD-RW Disc
NATURAL SOUND HDD/CD RECORDER CDR–HD1000
TEXT/TIME MODE/SET
MULTI JOG
DIGITAL REC LEVEL
PUSH ENTER
TRACK NO.
FINALIZE ERASE
BOOKMARK
COMPLETE
MENU
CLEAR
MIN MAX
OPTICAL
ANALOG REC LEVEL
INPUT
REC
COAXIAL
ANALOG
COPYCDRHDD
MIN MAX
LEVELPHONES
POWER
2 1, 3
OPEN/CLOSE
COPY REC
TEXT/TIME
INPUT
MODE/SET
MENU
CLEAR ENTER
COMPLETE
FINALIZE ERASE
TRACK NO.
WRITE
1, 3
GROUP
L
R
dB –30 –10 –6 –20
Reading
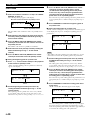
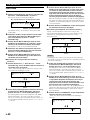
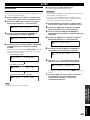
When reading the disc information has been completed, the
display changes as follows and this unit becomes ready for
operation.
■ When a CD-R or CD-RW disc without finalization is
loaded
■ When a new CD-R or CD-RW disc is loaded
GROUP
L
R
dB –30 –10 –6 –20
14 6817
CD–RW
GROUP
L
R
dB –30 –10 –6 –20
1
CD–RW
Number of recorded tracks Total recorded time
GROUP
L
R
dB –30 –10 –6 –20
New Disc
CD–R
GROUP
L
R
dB –30 –10 –6 –20
0
CD–R

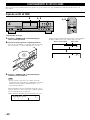
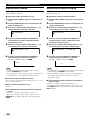
E-16
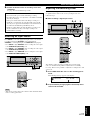
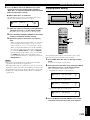
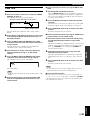
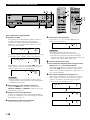
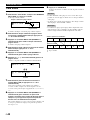
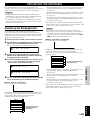
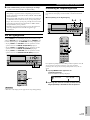
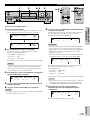
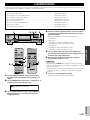
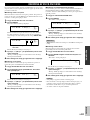
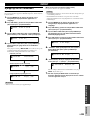
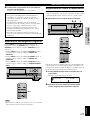
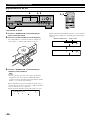
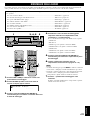
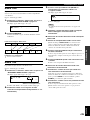
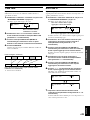
BASIC RECORDING OPERATION
<To start recording>
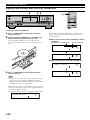
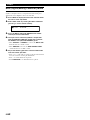
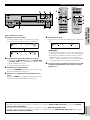
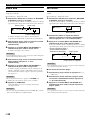
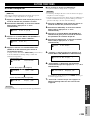
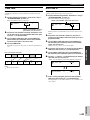
1. Press REC.
This unit automatically adjusts the laser strength against the
disc reflection for optimal recording. This process is called
OPC (Optimum Power Calibration) and takes approximately 15
seconds to complete.
The following message appears on the display.
If this unit determines that OPC is not needed for the disc
loaded, “Standby” flashes on the display.
The CDR mark starts flashing in a few seconds, and the track
number is indicated on the display. Recording has not been
started yet at this stage. (Recording pause mode)
Note
• Before starting to record, check the remaining time available
for recording on the CD-R or CD-RW disc. (See page 10.)
2. Select the input source to be recorded.
Press INPUT to select the input source to be recorded from
among OPTICAL, COAXIAL and ANALOG. See page 17 for
details.
3. Adjust the recording level.
The recording level can be adjusted for both digital and analog
input. See page 17 for details.
4. Select the recording mode.
See page 20 for details.
5. Start recording.
Press w/d (w or d on the remote control) to start recording.
Note
• In the multi-synchronized, all-synchronized, or full auto-
synchronized recording mode, this unit automatically starts
recording when the source component starts playback.
6. Start playing the source.
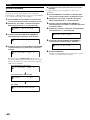
7. Press w/d (d on the remote control) to stop recording
temporarily.
“Wait” flashes on the display. The CDR mark starts flashing in
a few seconds and the track number is advanced to the next.
Press w/d (w or d on the remote control) to resume recording.
8. Press a to stop recording.
“Wait” flashes on the display. The number of recorded tracks
and the total recorded time are indicated on the display in a few
seconds, and then the first track number of the recorded tracks
is indicated on the display in a few seconds.
NATURAL SOUND HDD/CD RECORDER CDR–HD1000
TEXT/TIME MODE/SET
MULTI JOG
DIGITAL REC LEVEL
PUSH ENTER
TRACK NO.
FINALIZE ERASE
BOOKMARK
COMPLETE
MENU
CLEAR
MIN MAX
OPTICAL
ANALOG REC LEVEL
INPUT
REC
COAXIAL
ANALOG
COPYCDRHDD
MIN MAX
LEVELPHONES
POWER
5, 7
12
8
OPEN/CLOSE
COPY REC
TEXT/TIME
INPUT
MODE/SET
MENU
CLEAR
1
ABC
2
DEF
3
GHI
4
JKL
5
MNO
6
PQR
7
STU
8
VWX
9
YZ
SPACE
SYMBOL
0 +10
BOOKMARK
REPEAT RANDOM INTRO
ENTER
COMPLETE
FINALIZE ERASE
TRACK NO.
WRITE
7
STU
8
VWX
9
YZ
SPACE
SYMBOL
0 +10
BOOKMARK
REPEAT RANDOM
GROUP SKIP
INTRO
HDD CDR
1
2
5, 7
5, 7
8
REC
GROUP
L
R
dB –30 –10 –6 –20
OPC Adjust
CD–RW
REC
L
R
dB –30 –10 –6 –20
Standby
CD–RW
REC
L
R
dB –30 –10 –6 –20
1 000
CD–RW
REC
L
R
dB –30 –10 –6 –20
1 001
CD–RW
REC
L
R
dB –30 –10 –6 –20
Wait
CD–RW
GROUP
L
R
dB –30 –10 –6 –20
1
CD–RW
GROUP
L
R
dB –30 –10 –6 –20
14 6817
CD–RW

E-17
RECORDING AND
COPYING
English
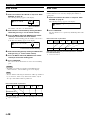
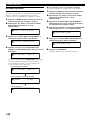
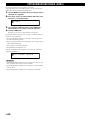
BASIC RECORDING OPERATION
9. Perform finalization when all recordings have been
completed.
See page 19 for the finalization procedure.
IMPORTANT
• Never turn off the power of this unit during recording.
Recording may not be correctly made, or the CD-R or CD-RW
disc may be damaged.
• If the power of this unit is turned off during recording on a
CD-R disc, recording may become impossible or the CD-R
disc may not be played back normally because information is
not written in the PMA (Program Memory Area).
• During recording, make sure that this unit is not subjected to
shock or vibration as it may cause skips or jumps to be
included in the recording.
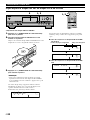
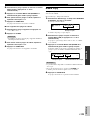
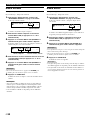
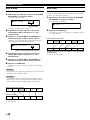
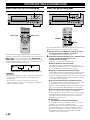
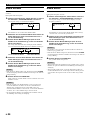
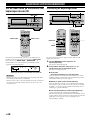
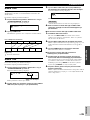
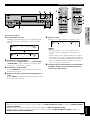
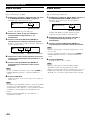
Selecting an Input Source
Press INPUT to select the appropriate input source to be used for
recording from among OPTICAL (optical digital input),
COAXIAL (coaxial digital input), and ANALOG (analog input).
• Press INPUT to light OPTICAL when recording the source input
to the DIGITAL IN (OPTICAL) jack.
• Press INPUT to light COAXIAL when recording the source input
to the DIGITAL IN (COAXIAL) jack.
• Press INPUT to light ANALOG when recording the source input
to the ANALOG LINE IN (REC) jacks.
Note
• This selection of the input source must be made while this unit is
in the recording pause mode.
E
R CDR–HD1000
TEXT/TIME MODE/SET
MULTI JOG
DIGITAL REC LEVEL
PUSH ENTER
TRACK NO.
FINALIZE ERASE
BOOKMARK
COMPLETE
MENU
CLEAR
MIN MAX
OPTICAL
ANALOG REC LEVEL
INPUT
REC
COAXIAL
ANALOG
COPY
INPUT
OPEN/CLOSE
COPY REC
TEXT/TIME
INPUT
MODE/SET
MENU
CLEAR ENTER
COMPLETE
FINALIZE ERASE
TRACK NO.
WRITE
INPUT
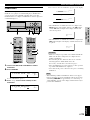
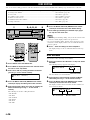
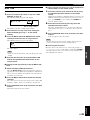
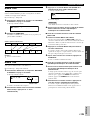
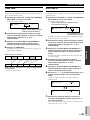
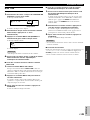
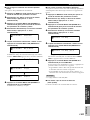
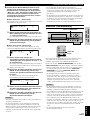
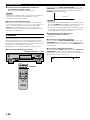
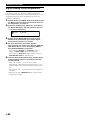
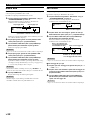
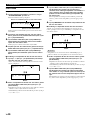
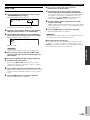
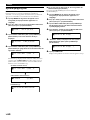
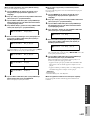
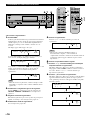
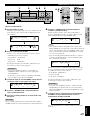
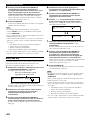
Adjusting the Recording Level
There is an adjusting procedure for each input source to be recorded
as explained below. Choose the one for your input source and
follow the steps.
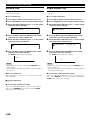
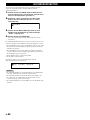
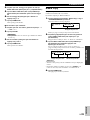
■ When recording a digital input source
The digital recording level is set to 0dB, the level of the input
source, as an initial setting. Further adjustment is not normally
necessary. However it is possible to adjust the recording level to suit
your needs.
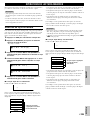
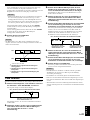
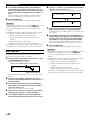
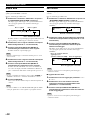
1. Press MENU while this unit is in the recording pause
mode.
The following message appears on the display.
2. Play the loudest passage (highest sound level) of the
source to be recorded.
E
R CDR–HD1000
TEXT/TIME MODE/SET
MULTI JOG
DIGITAL REC LEVEL
PUSH ENTER
TRACK NO.
FINALIZE ERASE
BOOKMARK
COMPLETE
MENU
CLEAR
MIN MAX
OPTICAL
ANALOG REC LEVEL
INPUT
REC
COAXIAL
ANALOG
COPY
3, 4 1
OPEN/CLOSE
COPY REC
TEXT/TIME
INPUT
MODE/SET
MENU
CLEAR
1
ABC
2
DEF
3
GHI
4
JKL
5
MNO
6
PQR
7
STU
8
VWX
9
YZ
SPACE
SYMBOL
0 +10
BOOKMARK
REPEAT RANDOM INTRO
ENTER
COMPLETE
FINALIZE ERASE
TRACK NO.
WRITE
1
3
4
REC
LEVEL
L
R
dB –30 –10 –6 –20
Level 0.0dB

E-18
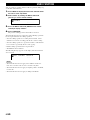
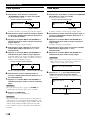
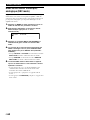
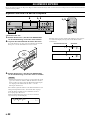
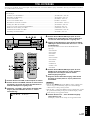
BASIC RECORDING OPERATION
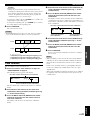
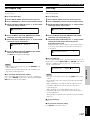
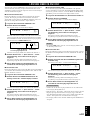
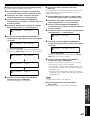
3. Rotate the MULTI JOG knob (press +/– on the remote
control) to adjust the recording level.
Adjustment is possible in the –12dB to +12dB range by 0.4dB
steps. When the level is set to a value other than 0dB, the VAR
indicator lights on the display.
Adjust the recording level so that the red part on the peak level
meter does not light at the loudest sound levels.
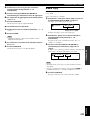
4. Press the MULTI JOG knob (ENTER on the remote
control) to return to the previous display.
Notes
• The recording level can be adjusted while this unit is in either
the recording or recording pause mode. Once recording has
been stopped, the recording level is reset to 0dB.
• Adjustment of the recording level can be canceled by
pressing MENU when the level is adjusted in the recording
pause mode.
• The recording level is set to 0dB by pressing CLEAR when
the level is adjusted in the recording pause mode.
GROUP
VAR
CD–RW
L
R
dB –30 –10 –6 –20
GROUP
VAR
CD–RW
L
R
dB –30 –10 –6 –20
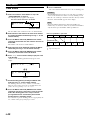
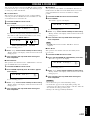
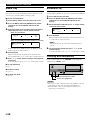
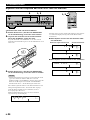
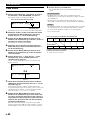
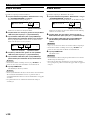
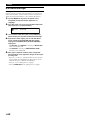
■ When recording an analog input source
1. Play the loudest passage (highest sound level) of the
source to be recorded.
2. Adjust the recording level by rotating the ANALOG
REC LEVEL control.
Rotate the control clockwise to increase the level and
counterclockwise to decrease the level.
Adjust the recording level so that the red part on the peak level
meter does not light at the loudest sound levels.
Note
• The recording level can be adjusted while this unit is in either
the recording or recording pause mode.
E
R CDR–HD1000
TEXT/TIME MODE/SET
MULTI JOG
DIGITAL REC LEVEL
PUSH ENTER
TRACK NO.
FINALIZE ERASE
BOOKMARK
COMPLETE
MENU
CLEAR
MIN MAX
OPTICAL
ANALOG REC LEVEL
INPUT
REC
COAXIAL
ANALOG
COPY
2
Sayfa yükleniyor...
Sayfa yükleniyor...
Sayfa yükleniyor...
Sayfa yükleniyor...
Sayfa yükleniyor...
Sayfa yükleniyor...
Sayfa yükleniyor...
Sayfa yükleniyor...
Sayfa yükleniyor...
Sayfa yükleniyor...
Sayfa yükleniyor...
Sayfa yükleniyor...
Sayfa yükleniyor...
Sayfa yükleniyor...
Sayfa yükleniyor...
Sayfa yükleniyor...
Sayfa yükleniyor...
Sayfa yükleniyor...
Sayfa yükleniyor...
Sayfa yükleniyor...
Sayfa yükleniyor...
Sayfa yükleniyor...
Sayfa yükleniyor...
Sayfa yükleniyor...
Sayfa yükleniyor...
Sayfa yükleniyor...
Sayfa yükleniyor...
Sayfa yükleniyor...
Sayfa yükleniyor...
Sayfa yükleniyor...
Sayfa yükleniyor...
Sayfa yükleniyor...
Sayfa yükleniyor...
Sayfa yükleniyor...
Sayfa yükleniyor...
Sayfa yükleniyor...
Sayfa yükleniyor...
Sayfa yükleniyor...
Sayfa yükleniyor...
Sayfa yükleniyor...
Sayfa yükleniyor...
Sayfa yükleniyor...
Sayfa yükleniyor...
Sayfa yükleniyor...
Sayfa yükleniyor...
Sayfa yükleniyor...
Sayfa yükleniyor...
Sayfa yükleniyor...
Sayfa yükleniyor...
Sayfa yükleniyor...
Sayfa yükleniyor...
Sayfa yükleniyor...
Sayfa yükleniyor...
Sayfa yükleniyor...
Sayfa yükleniyor...
Sayfa yükleniyor...
Sayfa yükleniyor...
Sayfa yükleniyor...
Sayfa yükleniyor...
Sayfa yükleniyor...
Sayfa yükleniyor...
Sayfa yükleniyor...
Sayfa yükleniyor...
Sayfa yükleniyor...
Sayfa yükleniyor...
Sayfa yükleniyor...
Sayfa yükleniyor...
Sayfa yükleniyor...
Sayfa yükleniyor...
Sayfa yükleniyor...
Sayfa yükleniyor...
Sayfa yükleniyor...
Sayfa yükleniyor...
Sayfa yükleniyor...
Sayfa yükleniyor...
Sayfa yükleniyor...
Sayfa yükleniyor...
Sayfa yükleniyor...
Sayfa yükleniyor...
Sayfa yükleniyor...
Sayfa yükleniyor...
Sayfa yükleniyor...
Sayfa yükleniyor...
Sayfa yükleniyor...
Sayfa yükleniyor...
Sayfa yükleniyor...
Sayfa yükleniyor...
Sayfa yükleniyor...
Sayfa yükleniyor...
Sayfa yükleniyor...
Sayfa yükleniyor...
Sayfa yükleniyor...
Sayfa yükleniyor...
Sayfa yükleniyor...
Sayfa yükleniyor...
Sayfa yükleniyor...
Sayfa yükleniyor...
Sayfa yükleniyor...
Sayfa yükleniyor...
Sayfa yükleniyor...
Sayfa yükleniyor...
Sayfa yükleniyor...
Sayfa yükleniyor...
Sayfa yükleniyor...
Sayfa yükleniyor...
Sayfa yükleniyor...
Sayfa yükleniyor...
Sayfa yükleniyor...
Sayfa yükleniyor...
Sayfa yükleniyor...
Sayfa yükleniyor...
Sayfa yükleniyor...
Sayfa yükleniyor...
Sayfa yükleniyor...
Sayfa yükleniyor...
Sayfa yükleniyor...
Sayfa yükleniyor...
Sayfa yükleniyor...
Sayfa yükleniyor...
Sayfa yükleniyor...
Sayfa yükleniyor...
Sayfa yükleniyor...
Sayfa yükleniyor...
Sayfa yükleniyor...
Sayfa yükleniyor...
Sayfa yükleniyor...
Sayfa yükleniyor...
Sayfa yükleniyor...
Sayfa yükleniyor...
Sayfa yükleniyor...
Sayfa yükleniyor...
Sayfa yükleniyor...
Sayfa yükleniyor...
Sayfa yükleniyor...
Sayfa yükleniyor...
Sayfa yükleniyor...
Sayfa yükleniyor...
Sayfa yükleniyor...
Sayfa yükleniyor...
Sayfa yükleniyor...
Sayfa yükleniyor...
Sayfa yükleniyor...
Sayfa yükleniyor...
Sayfa yükleniyor...
Sayfa yükleniyor...
Sayfa yükleniyor...
Sayfa yükleniyor...
Sayfa yükleniyor...
Sayfa yükleniyor...
Sayfa yükleniyor...
Sayfa yükleniyor...
Sayfa yükleniyor...
Sayfa yükleniyor...
Sayfa yükleniyor...
Sayfa yükleniyor...
Sayfa yükleniyor...
Sayfa yükleniyor...
Sayfa yükleniyor...
Sayfa yükleniyor...
Sayfa yükleniyor...
Sayfa yükleniyor...
Sayfa yükleniyor...
Sayfa yükleniyor...
Sayfa yükleniyor...
Sayfa yükleniyor...
Sayfa yükleniyor...
Sayfa yükleniyor...
Sayfa yükleniyor...
Sayfa yükleniyor...
Sayfa yükleniyor...
Sayfa yükleniyor...
Sayfa yükleniyor...
Sayfa yükleniyor...
Sayfa yükleniyor...
Sayfa yükleniyor...
Sayfa yükleniyor...
Sayfa yükleniyor...
Sayfa yükleniyor...
Sayfa yükleniyor...
Sayfa yükleniyor...
Sayfa yükleniyor...
Sayfa yükleniyor...
Sayfa yükleniyor...
Sayfa yükleniyor...
Sayfa yükleniyor...
Sayfa yükleniyor...
Sayfa yükleniyor...
Sayfa yükleniyor...
Sayfa yükleniyor...
Sayfa yükleniyor...
Sayfa yükleniyor...
Sayfa yükleniyor...
Sayfa yükleniyor...
Sayfa yükleniyor...
Sayfa yükleniyor...
Sayfa yükleniyor...
Sayfa yükleniyor...
Sayfa yükleniyor...
Sayfa yükleniyor...
Sayfa yükleniyor...
Sayfa yükleniyor...
Sayfa yükleniyor...
Sayfa yükleniyor...
Sayfa yükleniyor...
Sayfa yükleniyor...
Sayfa yükleniyor...
Sayfa yükleniyor...
Sayfa yükleniyor...
Sayfa yükleniyor...
Sayfa yükleniyor...
Sayfa yükleniyor...
Sayfa yükleniyor...
Sayfa yükleniyor...
Sayfa yükleniyor...
Sayfa yükleniyor...
Sayfa yükleniyor...
Sayfa yükleniyor...
Sayfa yükleniyor...
Sayfa yükleniyor...
Sayfa yükleniyor...
Sayfa yükleniyor...
Sayfa yükleniyor...
Sayfa yükleniyor...
Sayfa yükleniyor...
Sayfa yükleniyor...
Sayfa yükleniyor...
Sayfa yükleniyor...
Sayfa yükleniyor...
Sayfa yükleniyor...
Sayfa yükleniyor...
Sayfa yükleniyor...
Sayfa yükleniyor...
Sayfa yükleniyor...
Sayfa yükleniyor...
Sayfa yükleniyor...
Sayfa yükleniyor...
Sayfa yükleniyor...
Sayfa yükleniyor...
Sayfa yükleniyor...
Sayfa yükleniyor...
Sayfa yükleniyor...
Sayfa yükleniyor...
Sayfa yükleniyor...
Sayfa yükleniyor...
Sayfa yükleniyor...
Sayfa yükleniyor...
Sayfa yükleniyor...
Sayfa yükleniyor...
Sayfa yükleniyor...
Sayfa yükleniyor...
Sayfa yükleniyor...
Sayfa yükleniyor...
Sayfa yükleniyor...
Sayfa yükleniyor...
Sayfa yükleniyor...
Sayfa yükleniyor...
Sayfa yükleniyor...
Sayfa yükleniyor...
Sayfa yükleniyor...
Sayfa yükleniyor...
Sayfa yükleniyor...
Sayfa yükleniyor...
Sayfa yükleniyor...
Sayfa yükleniyor...
Sayfa yükleniyor...
Sayfa yükleniyor...
Sayfa yükleniyor...
Sayfa yükleniyor...
Sayfa yükleniyor...
Sayfa yükleniyor...
Sayfa yükleniyor...
Sayfa yükleniyor...
Sayfa yükleniyor...
Sayfa yükleniyor...
Sayfa yükleniyor...
Sayfa yükleniyor...
Sayfa yükleniyor...
Sayfa yükleniyor...
Sayfa yükleniyor...
Sayfa yükleniyor...
Sayfa yükleniyor...
Sayfa yükleniyor...
Sayfa yükleniyor...
Sayfa yükleniyor...
Sayfa yükleniyor...
Sayfa yükleniyor...
Sayfa yükleniyor...
Sayfa yükleniyor...
Sayfa yükleniyor...
Sayfa yükleniyor...
Sayfa yükleniyor...
Sayfa yükleniyor...
Sayfa yükleniyor...
Sayfa yükleniyor...
Sayfa yükleniyor...
Sayfa yükleniyor...
Sayfa yükleniyor...
Sayfa yükleniyor...
Sayfa yükleniyor...
Sayfa yükleniyor...
Sayfa yükleniyor...
Sayfa yükleniyor...
Sayfa yükleniyor...
Sayfa yükleniyor...
Sayfa yükleniyor...
Sayfa yükleniyor...
Sayfa yükleniyor...
Sayfa yükleniyor...
Sayfa yükleniyor...
Sayfa yükleniyor...
Sayfa yükleniyor...
Sayfa yükleniyor...
Sayfa yükleniyor...
Sayfa yükleniyor...
Sayfa yükleniyor...
Sayfa yükleniyor...
Sayfa yükleniyor...
Sayfa yükleniyor...
Sayfa yükleniyor...
Sayfa yükleniyor...
Sayfa yükleniyor...
Sayfa yükleniyor...
Sayfa yükleniyor...
Sayfa yükleniyor...
Sayfa yükleniyor...
Sayfa yükleniyor...
Sayfa yükleniyor...
Sayfa yükleniyor...
Sayfa yükleniyor...
Sayfa yükleniyor...
Sayfa yükleniyor...
Sayfa yükleniyor...
Sayfa yükleniyor...
Sayfa yükleniyor...
Sayfa yükleniyor...
Sayfa yükleniyor...
Sayfa yükleniyor...
Sayfa yükleniyor...
Sayfa yükleniyor...
Sayfa yükleniyor...
Sayfa yükleniyor...
Sayfa yükleniyor...
Sayfa yükleniyor...
Sayfa yükleniyor...
Sayfa yükleniyor...
Sayfa yükleniyor...
Sayfa yükleniyor...
Sayfa yükleniyor...
Sayfa yükleniyor...
Sayfa yükleniyor...
Sayfa yükleniyor...
Sayfa yükleniyor...
Sayfa yükleniyor...
Sayfa yükleniyor...
Sayfa yükleniyor...
Sayfa yükleniyor...
Sayfa yükleniyor...
Sayfa yükleniyor...
Sayfa yükleniyor...
Sayfa yükleniyor...
Sayfa yükleniyor...
Sayfa yükleniyor...
Sayfa yükleniyor...
Sayfa yükleniyor...
Sayfa yükleniyor...
Sayfa yükleniyor...
Sayfa yükleniyor...
Sayfa yükleniyor...
Sayfa yükleniyor...
Sayfa yükleniyor...
Sayfa yükleniyor...
Sayfa yükleniyor...
Sayfa yükleniyor...
Sayfa yükleniyor...
Sayfa yükleniyor...
Sayfa yükleniyor...
Sayfa yükleniyor...
Sayfa yükleniyor...
Sayfa yükleniyor...
Sayfa yükleniyor...
Sayfa yükleniyor...
Sayfa yükleniyor...
Sayfa yükleniyor...
Sayfa yükleniyor...
Sayfa yükleniyor...
Sayfa yükleniyor...
Sayfa yükleniyor...
Sayfa yükleniyor...
Sayfa yükleniyor...
Sayfa yükleniyor...
Sayfa yükleniyor...
Sayfa yükleniyor...
Sayfa yükleniyor...
Sayfa yükleniyor...
Sayfa yükleniyor...
Sayfa yükleniyor...
Sayfa yükleniyor...
Sayfa yükleniyor...
Sayfa yükleniyor...
Sayfa yükleniyor...
Sayfa yükleniyor...
Sayfa yükleniyor...
Sayfa yükleniyor...
Sayfa yükleniyor...
Sayfa yükleniyor...
Sayfa yükleniyor...
Sayfa yükleniyor...
Sayfa yükleniyor...
Sayfa yükleniyor...
Sayfa yükleniyor...
Sayfa yükleniyor...
Sayfa yükleniyor...
Sayfa yükleniyor...
Sayfa yükleniyor...
Sayfa yükleniyor...
Sayfa yükleniyor...
Sayfa yükleniyor...
Sayfa yükleniyor...
Sayfa yükleniyor...
Sayfa yükleniyor...
Sayfa yükleniyor...
Sayfa yükleniyor...
Sayfa yükleniyor...
Sayfa yükleniyor...
Sayfa yükleniyor...
Sayfa yükleniyor...
Sayfa yükleniyor...
Sayfa yükleniyor...
Sayfa yükleniyor...
Sayfa yükleniyor...
Sayfa yükleniyor...
Sayfa yükleniyor...
Sayfa yükleniyor...
Sayfa yükleniyor...
Sayfa yükleniyor...
Sayfa yükleniyor...
Sayfa yükleniyor...
Sayfa yükleniyor...
Sayfa yükleniyor...
Sayfa yükleniyor...
Sayfa yükleniyor...
Sayfa yükleniyor...
Sayfa yükleniyor...
Sayfa yükleniyor...
-
 1
1
-
 2
2
-
 3
3
-
 4
4
-
 5
5
-
 6
6
-
 7
7
-
 8
8
-
 9
9
-
 10
10
-
 11
11
-
 12
12
-
 13
13
-
 14
14
-
 15
15
-
 16
16
-
 17
17
-
 18
18
-
 19
19
-
 20
20
-
 21
21
-
 22
22
-
 23
23
-
 24
24
-
 25
25
-
 26
26
-
 27
27
-
 28
28
-
 29
29
-
 30
30
-
 31
31
-
 32
32
-
 33
33
-
 34
34
-
 35
35
-
 36
36
-
 37
37
-
 38
38
-
 39
39
-
 40
40
-
 41
41
-
 42
42
-
 43
43
-
 44
44
-
 45
45
-
 46
46
-
 47
47
-
 48
48
-
 49
49
-
 50
50
-
 51
51
-
 52
52
-
 53
53
-
 54
54
-
 55
55
-
 56
56
-
 57
57
-
 58
58
-
 59
59
-
 60
60
-
 61
61
-
 62
62
-
 63
63
-
 64
64
-
 65
65
-
 66
66
-
 67
67
-
 68
68
-
 69
69
-
 70
70
-
 71
71
-
 72
72
-
 73
73
-
 74
74
-
 75
75
-
 76
76
-
 77
77
-
 78
78
-
 79
79
-
 80
80
-
 81
81
-
 82
82
-
 83
83
-
 84
84
-
 85
85
-
 86
86
-
 87
87
-
 88
88
-
 89
89
-
 90
90
-
 91
91
-
 92
92
-
 93
93
-
 94
94
-
 95
95
-
 96
96
-
 97
97
-
 98
98
-
 99
99
-
 100
100
-
 101
101
-
 102
102
-
 103
103
-
 104
104
-
 105
105
-
 106
106
-
 107
107
-
 108
108
-
 109
109
-
 110
110
-
 111
111
-
 112
112
-
 113
113
-
 114
114
-
 115
115
-
 116
116
-
 117
117
-
 118
118
-
 119
119
-
 120
120
-
 121
121
-
 122
122
-
 123
123
-
 124
124
-
 125
125
-
 126
126
-
 127
127
-
 128
128
-
 129
129
-
 130
130
-
 131
131
-
 132
132
-
 133
133
-
 134
134
-
 135
135
-
 136
136
-
 137
137
-
 138
138
-
 139
139
-
 140
140
-
 141
141
-
 142
142
-
 143
143
-
 144
144
-
 145
145
-
 146
146
-
 147
147
-
 148
148
-
 149
149
-
 150
150
-
 151
151
-
 152
152
-
 153
153
-
 154
154
-
 155
155
-
 156
156
-
 157
157
-
 158
158
-
 159
159
-
 160
160
-
 161
161
-
 162
162
-
 163
163
-
 164
164
-
 165
165
-
 166
166
-
 167
167
-
 168
168
-
 169
169
-
 170
170
-
 171
171
-
 172
172
-
 173
173
-
 174
174
-
 175
175
-
 176
176
-
 177
177
-
 178
178
-
 179
179
-
 180
180
-
 181
181
-
 182
182
-
 183
183
-
 184
184
-
 185
185
-
 186
186
-
 187
187
-
 188
188
-
 189
189
-
 190
190
-
 191
191
-
 192
192
-
 193
193
-
 194
194
-
 195
195
-
 196
196
-
 197
197
-
 198
198
-
 199
199
-
 200
200
-
 201
201
-
 202
202
-
 203
203
-
 204
204
-
 205
205
-
 206
206
-
 207
207
-
 208
208
-
 209
209
-
 210
210
-
 211
211
-
 212
212
-
 213
213
-
 214
214
-
 215
215
-
 216
216
-
 217
217
-
 218
218
-
 219
219
-
 220
220
-
 221
221
-
 222
222
-
 223
223
-
 224
224
-
 225
225
-
 226
226
-
 227
227
-
 228
228
-
 229
229
-
 230
230
-
 231
231
-
 232
232
-
 233
233
-
 234
234
-
 235
235
-
 236
236
-
 237
237
-
 238
238
-
 239
239
-
 240
240
-
 241
241
-
 242
242
-
 243
243
-
 244
244
-
 245
245
-
 246
246
-
 247
247
-
 248
248
-
 249
249
-
 250
250
-
 251
251
-
 252
252
-
 253
253
-
 254
254
-
 255
255
-
 256
256
-
 257
257
-
 258
258
-
 259
259
-
 260
260
-
 261
261
-
 262
262
-
 263
263
-
 264
264
-
 265
265
-
 266
266
-
 267
267
-
 268
268
-
 269
269
-
 270
270
-
 271
271
-
 272
272
-
 273
273
-
 274
274
-
 275
275
-
 276
276
-
 277
277
-
 278
278
-
 279
279
-
 280
280
-
 281
281
-
 282
282
-
 283
283
-
 284
284
-
 285
285
-
 286
286
-
 287
287
-
 288
288
-
 289
289
-
 290
290
-
 291
291
-
 292
292
-
 293
293
-
 294
294
-
 295
295
-
 296
296
-
 297
297
-
 298
298
-
 299
299
-
 300
300
-
 301
301
-
 302
302
-
 303
303
-
 304
304
-
 305
305
-
 306
306
-
 307
307
-
 308
308
-
 309
309
-
 310
310
-
 311
311
-
 312
312
-
 313
313
-
 314
314
-
 315
315
-
 316
316
-
 317
317
-
 318
318
-
 319
319
-
 320
320
-
 321
321
-
 322
322
-
 323
323
-
 324
324
-
 325
325
-
 326
326
-
 327
327
-
 328
328
-
 329
329
-
 330
330
-
 331
331
-
 332
332
-
 333
333
-
 334
334
-
 335
335
-
 336
336
-
 337
337
-
 338
338
-
 339
339
-
 340
340
-
 341
341
-
 342
342
-
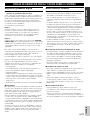 343
343
-
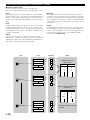 344
344
-
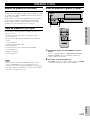 345
345
-
 346
346
-
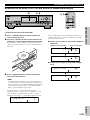 347
347
-
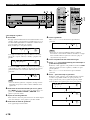 348
348
-
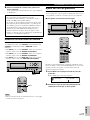 349
349
-
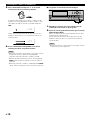 350
350
-
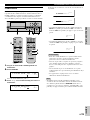 351
351
-
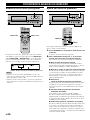 352
352
-
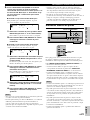 353
353
-
 354
354
-
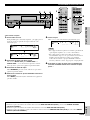 355
355
-
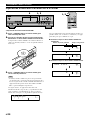 356
356
-
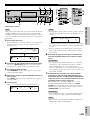 357
357
-
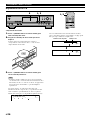 358
358
-
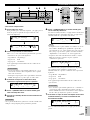 359
359
-
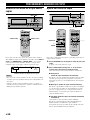 360
360
-
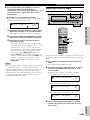 361
361
-
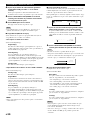 362
362
-
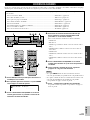 363
363
-
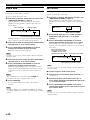 364
364
-
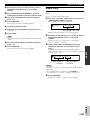 365
365
-
 366
366
-
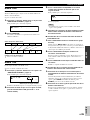 367
367
-
 368
368
-
 369
369
-
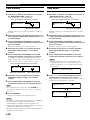 370
370
-
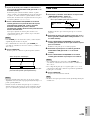 371
371
-
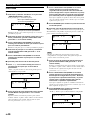 372
372
-
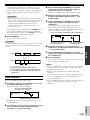 373
373
-
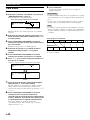 374
374
-
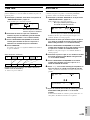 375
375
-
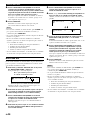 376
376
-
 377
377
-
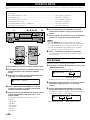 378
378
-
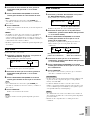 379
379
-
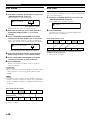 380
380
-
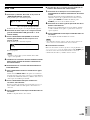 381
381
-
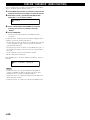 382
382
-
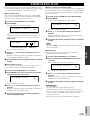 383
383
-
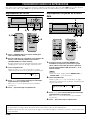 384
384
-
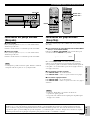 385
385
-
 386
386
-
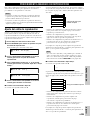 387
387
-
 388
388
-
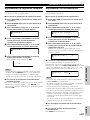 389
389
-
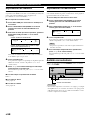 390
390
-
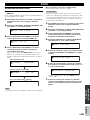 391
391
-
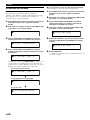 392
392
-
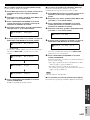 393
393
-
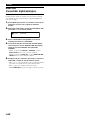 394
394
-
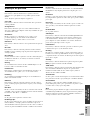 395
395
-
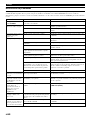 396
396
-
 397
397
-
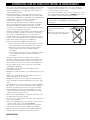 398
398
-
 399
399
-
 400
400
-
 401
401
-
 402
402
-
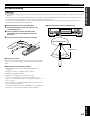 403
403
-
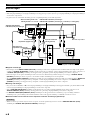 404
404
-
 405
405
-
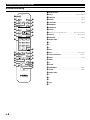 406
406
-
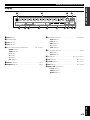 407
407
-
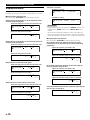 408
408
-
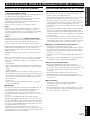 409
409
-
 410
410
-
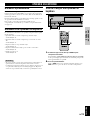 411
411
-
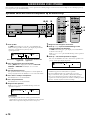 412
412
-
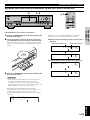 413
413
-
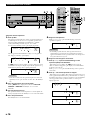 414
414
-
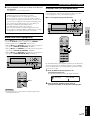 415
415
-
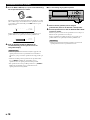 416
416
-
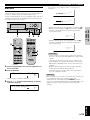 417
417
-
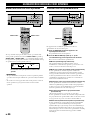 418
418
-
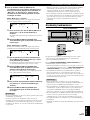 419
419
-
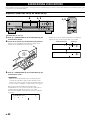 420
420
-
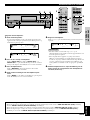 421
421
-
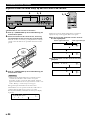 422
422
-
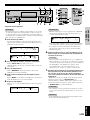 423
423
-
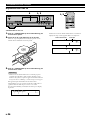 424
424
-
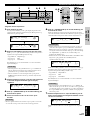 425
425
-
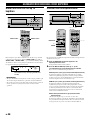 426
426
-
 427
427
-
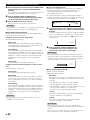 428
428
-
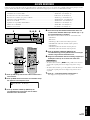 429
429
-
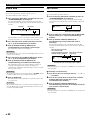 430
430
-
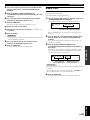 431
431
-
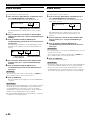 432
432
-
 433
433
-
 434
434
-
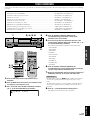 435
435
-
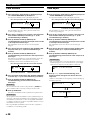 436
436
-
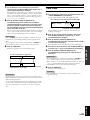 437
437
-
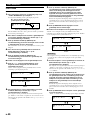 438
438
-
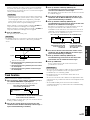 439
439
-
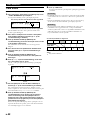 440
440
-
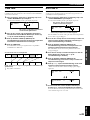 441
441
-
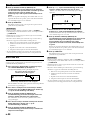 442
442
-
 443
443
-
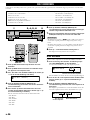 444
444
-
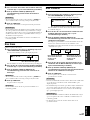 445
445
-
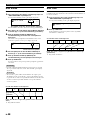 446
446
-
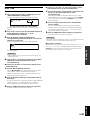 447
447
-
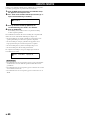 448
448
-
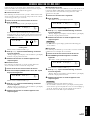 449
449
-
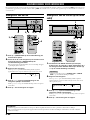 450
450
-
 451
451
-
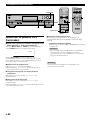 452
452
-
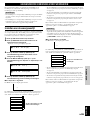 453
453
-
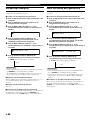 454
454
-
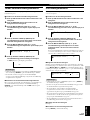 455
455
-
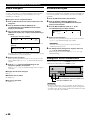 456
456
-
 457
457
-
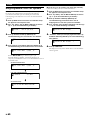 458
458
-
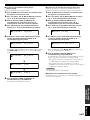 459
459
-
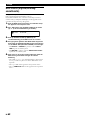 460
460
-
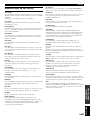 461
461
-
 462
462
-
 463
463
-
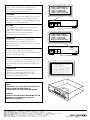 464
464


diğer dillerde
- español: Yamaha CDR-HD1000 El manual del propietario
- français: Yamaha CDR-HD1000 Le manuel du propriétaire
- italiano: Yamaha CDR-HD1000 Manuale del proprietario
- svenska: Yamaha CDR-HD1000 Bruksanvisning
- Deutsch: Yamaha CDR-HD1000 Bedienungsanleitung
- English: Yamaha CDR-HD1000 Owner's manual
- dansk: Yamaha CDR-HD1000 Brugervejledning
- Nederlands: Yamaha CDR-HD1000 de handleiding
- română: Yamaha CDR-HD1000 Manualul proprietarului