
Sandwichera
Sandwich maker
Appareil à croque-monsieur
Sandwicheira
Sandwichmaker
Tostiera
Tostiapparaat
Sandviç makinesi
Montana
Cod. 30397
GB
E
F
P
D
I
NL
GR
RU
AR
HU
TR
MODO DE EMPLEO
OPERATING INSTRUCTIONS
MODE D’EMPLOI
MODO DE EMPRÊGO
GEBRAUCHSANLEITUNG
ISTRUZIONI
GEBRUIKSAANWIJZING
TROPOS CRHSHS
HASZNÁLATI UTASÍTÁS
kullanma wekli
BG
ΰΒΨϟ κϤΤϣ

2

3
ESPAÑOL. . . . . . . . . . . . . . . 6
ENGLISH . . . . . . . . . . . . . . . 8
FRANÇAIS . . . . . . . . . . . . . . 10
PORTUGUÊS. . . . . . . . . . . . 12
DEUTSCH . . . . . . . . . . . . . . 14
ITALIANO . . . . . . . . . . . . . . . 16
NEDERLANDS. . . . . . . . . . . 18
ELLHNIKA . . . . . . . . . . . . . . 20
. . . . . . . . . . . . . 22
. . . . . . . . . . . 25
MAGYAR . . . . . . . . . . . . . . . 26
TÜRkÇe
. . . . . . . . . . . . . . . . 28
. . . . . . . . . . . . . . 30
GB
E
F
P
D
I
NL
GR
RU
AR
HU
TR
BG

4
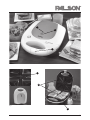
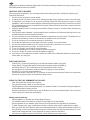
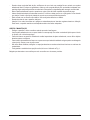
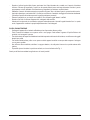
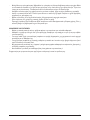
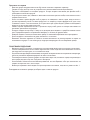
1 Indicador de potencia
2 Indicador de tostado
3 Mecanismo de auto-cierre
4 Apoyo anti-deslizante
5 Bandeja de tostado
6 Conexión mediante eje de seguridad
1 Power light
2 Toaster light
3 Self-closing device
4 Non-slip support
5 Hot plate
6 Connection by means of safety axis
1 Indicateur de puissance
2 Indicateur de brunissement
3 Mécanisme d’auto-fermeture
4 Appui antidérapant
5 Plaque de cuisson
6 Connexion au moyen de l’axe de sécurité
1 Indicador de funcionamento
2 Indicador de temperatura
3 Mecanismo de fecho automático
4 Apoio anti-derrapante
5 Placas antiaderentes
6 Ligação através de eixo de segurança
1 Betriebsanzeige
2 Anzeige Heizvorgang
3 Automatischer Schließmechanismus
4 Rutschfester Gerätefuß
5 Heizplatten
6 Scharnier mit Sicherheitsachse
1 Spia di potenza
2 Spia di tostatura
3 Meccanismo di chiusura automatica
4 Appoggio antiscivolo
5 Vassoio di tostatura
6 Collegamento tramite asse di sicurezza
1 Vermogensindicatielampje
2 Roosterindicatielampje
3 Zelfsluitingsmechanisme
4 Antislipsteun
5 Toastplaat
6 Verbinding via veiligheidsas
3 Automatikus záró mechanizmus
5 Pirító tálca
6 Biztonsági tengely-kapcsolat
1 Güç göstergesi
1.ΓϮϘϟ ήηΆϣ
2.κϴϤΤΘϟ ήηΆϣ
3.ϲϟϵ ϖϠϐϟ Δϴϟ
4.ϕϻΰϧϼϟ ΓΩΎπϣ ΔϣΎϋΩ
5.κϴϤΤΘϟ ΔϴϨϴλ
6.ϥΎϣϷ έϮΤϣ ϖϳήσ Ϧϋ ϞϴλϮΗ

5
4
3
1
5
6
2
Fig. 1

6
E
Nuestros productos están desarrollados para alcanzar los más altos estándares de calidad, funcionalidad y diseño.
Esperamos que disfrute de su nueva sandwichera MONTANA de PALSON.
MEDIDAS DE SEGURIDAD IMPORTANTES
Al usar aparatos eléctricos, debe respetar siempre las precauciones de seguridad básicas, incluyendo las siguientes:
Lea todas las instrucciones.
2. Para protegerse de una descarga eléctrica no sumerja el cable, ni el enchufe, ni el aparato en agua u otro
líquido.
3.
Este producto no está permitido para uso infantil u otras personas sin asistencia o supervisión si su estado físico,
sensorial o mental le limita de usarlo con seguridad. Los niños deberían ser supervisados para asegurar que no
juegan con dicho producto.
4. Desenchufe el aparato de la toma eléctrica cuando no lo esté usando y antes de limpiarlo. Déjelo enfriar antes de
proceder a su limpieza y antes de guardarlo.
5.
Si el cable de corriente está dañado, deberá ser sustituido por el fabricante o su servicio técnico autorizado o por un
técnico cualificado, con tal de evitar un peligro.
6. El uso de accesorios no recomendados por el fabricante del aparato puede provocar lesiones. No utilice cables de
corriente con temporizadores externos ni controles remotos con este aparato.
9. No coloque la sandwichera encima o cerca de un quemador eléctrico o de gas, ni en un horno caliente.
10. Extreme las precauciones cuando la desplace, si está en funcionamiento estará caliente.
11. Para desconectarlo, desenchúfelo de la toma eléctrica de la pared. No tire del cable.
13. No intente desprender restos de comida con el aparato enchufado.
incluyendo cortinas, ropas, paredes, etc., durante su uso.
PIEZAS Y FUNCIONES:
- Indicador de potencia (1): El indicador de potencia se iluminará en rojo cuando el enchufe de la sandwichera esté
conectado a una toma eléctrica.
- Bandeja de tostado (5): Posee propiedades antiadherentes a altas temperaturas.
necesidad de dar la vuelta al producto y facilita la limpieza.
DURANTE EL PRIMER USO RECUERDE QUE HA DE:
- Limpiar la bandeja de tostado con un paño húmedo o una esponja.
- Aplicar una cantidad generosa de mantequilla o aceite a la bandeja de tostado.
- Enchufar el aparato a la toma eléctrica de la pared y encender la sandwichera para calentar la bandeja de tostado.
Debe esperar a que se apague automáticamente la luz verde antes de tostar los alimentos.
¡Atención! Es posible que perciba una pequeña cantidad de humo durante el primer uso de la sandwichera; esto
es normal, ya que es la primera vez que se calientan las piezas internas.
Preparación de sándwiches
- Enchufe el aparato a la toma eléctrica. A continuación, se encenderán los pilotos verde y rojo.
- La sandwichera estará lista para su uso cuando se apague automáticamente la luz verde.
- Prepare los ingredientes de su sándwich. Para un sándwich use dos rebanadas de pan y cierta cantidad de
ingredientes.
- Para conseguir un color dorado, aplique una pequeña cantidad de mantequilla en la parte del pan que entrará en
contacto con la bandeja de tostado.

7
- Cuando coloque la primera rebanada de pan, asegúrese de que el lado de la mantequilla queda en contacto con la
bandeja de tostado inferior. Coloque los ingredientes y cúbralos con la segunda rebanada de pan, a la que también
habrá aplicado mantequilla. Ahora está listo para hacer un buen sándwich. Coloque bien los ingredientes para
conseguir un efecto ideal.
- Baje la bandeja de tostado superior y presiónela sobre el pan, hasta cerrar el broche de presión del asa.
- Abra la sandwichera después de un tostado de 2-3 minutos para ver si el sándwich ha adquirido el tono dorado
que usted desea. Controle el periodo de tostado según sus preferencias personales.
- Cuando termine de usar el aparato, desenchúfelo.
¡Atención! La luz verde se encenderá y apagará automáticamente a intervalos regulares durante el uso. De este
modo, el aparato mantiene su temperatura dentro de los límites adecuados.
LIMPIEZA Y MANTENIMIENTO
- Desenchufe el aparato y déjelo enfriar antes de proceder a su limpieza.
producto, no lo introduzca en agua.
objetos abrasivos para su limpieza.
- Para el exterior de la sandwichera, limpiar con un paño suave que haya sido enjuagado casi seco en agua jabonosa
caliente. Secarla con un trapo suave.
sandwichera.
- Puede guardar la sandwichera en posición vertical, tal como se indica en la Fig. 1.
Gracias por demostrarnos su confianza al elegir uno de nuestros productos.

8
GB
Our products are designed to attain the highest quality, functionality and design standards. We hope you enjoy your new
MONTANA sandwich maker from PALSON.
IMPORTANT SAFETY MEASURES
When using electrical appliances, you must always observe basic safety precautions, including the following ones:
Read all the instructions.
1. Do not touch the hot surfaces, use the handles.
2. To protect yourself from electric shocks, do not submerge the cable, plug or appliance in water or any other liquid.
3. This appliance is not intended for use by persons (including children) with reduced physical, sensory or mental
capabilities, or lack of experience and knowledge, unless they have been given supervision or instruction concerning
use of the appliance by a person responsible for their safety. Children should be supervised to ensure that they do
not play with the appliance
4. Unplug the appliance when it is not being used and before cleaning it. Leave it to cool down before cleaning it and
putting it away.
5. If the electricity cable is damaged, it must be replaced by the manufacturer or its authorised technical service or by
6. The use of accessories not recommended by the appliance manufacturer can cause injuries. The appliance is not
intended to be operated by means of an external timer or separate remote-control system.
7. Do not use it outdoors or for commercial purposes or industrial use.
8. Do not allow the cable to hang over the edge of the table or worktop, or touch hot surfaces.
9. Do not put the sandwich toaster on top of or near to an electric hob or gas burner or in a hot oven.
10. Maximise precautions when you move it, as it will be hot if it is on.
11. To turn it off, unplug it from the wall. Do not pull the cable.
12. Do not use the appliance for any other use than it has been designed for.
13. Do not try to scrape off remains of food with the appliance plugged in.
clothes, walls, etc. during use.
PARTS AND FUNCTIONS:
- Power light (1): The power light will light up in red when the sandwich toaster is plugged in.
- Toaster light (2): The green pilot light will indicate that the sandwich toaster has heated up.
- Self-closing device (3): This is a mechanism to block the sandwich toaster’s closing.
- Non-slip support (4): It prevents the sandwich toaster from slipping on uneven surfaces.
- Hot plate (5): It is non-stick at high temperatures.
- Connection by means of safety axis (6): The connection of the two thermal surfaces by means of an axis prevents
the need for turning the product over and makes it easier to clean.
DURING THE FIRST USE, REMEMBER THAT YOU MUST:
- Clean the hot plate with a damp cloth or sponge.
- Put a generous amount of butter or oil on the hot plate.
- Plug the appliance in and turn the sandwich toaster on to head the hot plate. You must wait until the green light turns
off automatically before toasting any food.
Making toasted sandwiches
- Plug the appliance in. The green and red pilot lights will light up.
- The sandwich toaster will be ready for use when the green light turns off automatically.
- Get the ingredients for your sandwich ready. Use two slices of bread and some ingredients for a sandwich.
- To obtain a golden colour, apply a small amount of butter on the part of the bread in contact with the hot plate.
the ingredients on and cover them with the second slice of bread, which must also have been buttered. It is now
ready to make a tasty sandwich. Put the ingredients on evenly to obtain the ideal effect.
- Lower the top hot plate and push it onto the bread, until the handle’s pressure clasp closes.

9
toasting time according to your personal needs.
- Take the sandwich out with a non-metallic utensil. Do not use abrasive or sharp objects.
Attention! The green light will turn on and off automatically regularly during usage. This way, the appliance maintains
its temperature within the suitable limits.
CLEANING AND MAINTENANCE
- Unplug the appliance and leave it to cool before cleaning it.
- Clean the hot plate with a damp cloth or sponge. To prevent liquid from entering the appliance, do not submerge it
in water.
- To prevent the hot plate’s non-stick from getting damaged at high temperatures, never use abrasive products to
clean it.
- Clean the outer part of the sandwich toaster with an almost dry, soft cloth that has been rinsed in hot soapy water.
Dry it with a soft cloth.
- The sandwich toaster can be put away upright, as indicated in Fig. 1.
Thank you for choosing one of our products.

10
F
Nos produits sont développés pour répondre aux standards les plus stricts en matière de qualité, de fonctionnalité et
de PALSON.
INSTRUCTIONS IMPORTANTES CONCERNANT LA SÉCURITÉ.
Pour l’utilisation de tous les appareils électriques, certaines précautions élémentaires doivent être prises, y compris
les suivantes :
Lisez attentivement toutes les instructions.
1. Ne touchez pas les surfaces chaudes. Utilisez les poignées.
2. Pour éviter tout risque d’électrocution, ne plongez pas le câble, la prise ou l’appareil lui-même dans l’eau, ou dans
tout autre liquide quel qu’il soit.
3. Ce produit ne doit pas être utilisé, sans surveillance ou supervision, par un enfant ou toute autre personne dont
l’état physique, sensoriel ou mental pourrait mettre en péril la sécurité. Ne laissez pas les enfants jouer avec ce
produit.
4. Débranchez l’appareil du secteur lorsque vous ne l’utilisez pas ou lorsque vous le nettoyez. Laissez-le refroidir
avant de le nettoyer et de le ranger.
5. Si le câble d’alimentation est endommagé, il devra être remplacé par le fabricant, son service après-vente autorisé
6. L’utilisation de tout accessoire non recommandé par le fabricant de l’appareil peut provoquer des blessures. Ne pas
utiliser de câbles électriques connectés à des minuteries externes ou des télécommandes avec cet appareil.
8. Ne laissez pas le cordon pendre au bord de la table ou du plan de travail ni toucher des surfaces chaudes.
9. Ne placez pas l’appareil à croque-monsieur sur ou près d’un brûleur électrique ou à gaz ou dans un four chaud.
10. Redoublez de prudence lorsque vous déplacez l’appareil, s’il est en marche il sera chaud.
11. Pour le déconnecter, débranchez-le de la prise au mur. Ne tirez pas sur le câble.
13. N’essayez pas de décoller les restes d’aliments lorsque l’appareil est allumé.
cela s’applique également aux rideaux, vêtements, murs, etc., pensant son utilisation.
PIÈCES ET FONCTIONS:
- Indicateur de puissance (1): Le voyant indicateur de puissance s’allume en rouge lorsque la prise de l’appareil à
croque-monsieur est raccordée au secteur.
- Indicateur de brunissement (2): Le voyant vert indique que l’appareil à croque-monsieur a terminé son
préchauffage.
- Appui antidérapant (4): Il évite que l’appareil à croque-monsieur glisse sur les surfaces dénivelées.
- Plaque de cuisson (5): Elle possède des propriétés antiadhésives à des températures élevées.
- Connexion au moyen de l’axe de sécurité (6) : La connexion des deux surfaces thermiques au moyen d’un axe évite
d’avoir à retourner le produit et facilite son nettoyage.
LORS DE LA PREMIÈRE UTILISATION, N’OUBLIEZ PAS QUE VOUS DEVEZ:
- Nettoyer la plaque de cuisson avec un chiffon humide ou une éponge.
- Appliquer une quantité généreuse de beurre ou d’huile sur la plaque de cuisson.
- Brancher l’appareil à la prise électrique du mur et l’allumer pour chauffer la plaque de cuisson. Vous devez attendre
que le voyant vert s’éteigne automatiquement avant de toaster les aliments.
Attention ! Il est possible qu’un peu de fumée s’échappe de l’appareil lors de la première utilisation ; cela est normal
car les pièces internes chauffent pour la première fois.
Préparation de sandwichs
- Branchez l’appareil au secteur. Les voyants verts et rouges s’allumeront.
- L’appareil à sandwich est prêt à être utilisé lorsque le voyant vert s’éteint automatiquement.
- Préparez les ingrédients de votre sandwich. Pour un sandwich, utilisez deux tranches de pain et une certaine
quantité d’ingrédients.

11
- Pour obtenir une jolie couleur dorée, beurrez légèrement la tranche de pain sur le côté qui sera en contact avec la
plaque de cuisson.
- Lorsque vous placez la première tranche de pain, assurez-vous que le côté beurré est en contact avec la plaque
de cuisson inférieure. Disposez les ingrédients et recouvrez-les de la seconde tranche de pain, que vous aurez
également beurré légèrement. Et voilà, tout est prêt pour préparer un délicieux sandwich. Placez les ingrédients de
la meilleure façon.
- Abaissez la plaque de cuisson supérieure et faites pression sur le pain jusqu’à fermer le clip de pression de la
poignée.
- Ouvrez l’appareil à croque-monsieur après une cuisson de 2-3 minutes, pour voir si votre sandwich est toasté à
votre goût. Contrôlez le temps de cuisson en fonction de votre goût personnel.
- Retirez le sandwich à l’aide d’un ustensile non métallique. N’utilisez pas d’objets abrasifs ou coupants.
- Lorsque vous avez terminé d’utiliser l’appareil, débranchez-le.
Attention ! Le voyant vert s’allumera et s’éteindra automatiquement à intervalles réguliers pendant l’utilisation. De
cette façon, l’appareil maintient sa température dans les limites adéquates.
NETTOYAGE ET ENTRETIEN
- Débranchez l’appareil et laissez-le refroidir avant de le nettoyer.
d’éviter l’entrée de liquide à l’intérieur.
- Pour éviter d’endommager la surface antiadhésive de la plaque de cuisson à des températures élevées, ne le
nettoyez jamais avec des objets abrasifs.
- Nettoyez l’extérieur de l’appareil avec un chiffon doux trempé dans de l’eau savonneuse chaude et très bien essoré.
Séchez-le avec un chiffon doux.
à croque-monsieur.
- Vous pouvez ranger l’appareil en position verticale, comme indiqué sur la Fig. 1.

12
P
Os nossos produtos foram desenvolvidos para alcançar os mais elevados padrões de qualidade, funcionalidade e
concepção. Esperamos que desfrute da sua nova sandwicheira MONTANA da PALSON.
MEDIDAS DE SEGURANÇA IMPORTANTES
Ao utilizar aparelhos eléctricos, deve respeitar sempre as precauções de segurança básicas, incluindo as seguintes:
Leia todas as instruções.
1. Não toque nas superfícies quentes, use as pegas.
2. Para se proteger de uma descarga eléctrica não submirja nem o cabo, nem a tomada, nem o aparelho em água
ou outro líquido.
3. Este aparelho não está permitido para utilização infantil ou por outras pessoas sem assistência ou supervisão
caso o seu estado físico, sensorial ou mental lhe limite a utilização com segurança. As crianças devem ser
supervisionadas para assegurar que não brincam com o aparelho.
4. Desligue o aparelho da tomada eléctrica quando não estiver a utilizá-lo e antes de o limpar. Deixe-o arrefecer antes
de proceder à sua limpeza e antes de o guardar.
6. O uso de acessórios não recomendados pelo fabricante do aparelho pode provocar lesões. Não utilize cabos de
corrente com temporizadores externos nem com controlos remotos com este aparelho.
quentes.
9. Não coloque a sandwicheira em cima ou perto de um bico eléctrico ou a gás, nem num forno quente.
10. Tenha muito cuidado quando a move, se estiver em funcionamento estará quente.
11. Para parar o seu funcionamento, desligue-o da tomada eléctrica da parede. Não puxe pelo cabo.
13. Não tente remover restos de comida com o aparelho ligado.
cortinas, roupas, paredes, etc. durante a sua utilização.
PEÇAS E FUNÇÕES:
- Indicador de funcionamento (1): O indicador de funcionamento irá acender-se de cor vermelha quando a tomada
da sandwicheira estiver ligada a uma tomada eléctrica.
- Indicador de temperatura (2): O piloto verde indicará que a sandwicheira terminou o seu pré-aquecimento.
- Apoio anti-derrapante (4): Evita que a sandwicheira derrape em superfícies desniveladas.
- Placa antiaderente (5): Possui propriedades antiaderentes a altas temperaturas.
- Ligação através de eixo de segurança (6): A ligação das duas superfícies térmicas através de um eixo evita a
necessidade de dar a volta ao produto e facilita a limpeza.
DURANTE A PRIMEIRA UTILIZAÇÃO LEMBRE-SE QUE TEM DE:
- Limpar a placa antiaderente com um pano húmido ou com uma esponja.
- Aplicar uma quantidade generosa de manteiga ou óleo de cozinha na placa antiaderente.
- Ligar o aparelho à tomada eléctrica da parede e ligar a sandwicheira para aquecer a placa antiaderente. Deve
esperar até que a luz verde se apague automaticamente antes de tostar os alimentos.
Atenção! É possível que note uma pequena quantidade de fumo durante a primeira utilização da sandwicheira. Isso
é normal, pois é a primeira vez que as peças internas são aquecidas.
Preparação de tostas
- Ligue o aparelho à tomada eléctrica. Depois irão acender-se os pilotos verde e vermelho.
- A sandwicheira estará pronta a ser utilizada quando a luz verde se apagar automaticamente.
- Prepare os ingredientes da sua tosta. Para uma tosta, utilize duas fatias de pão e mais alguns ingredientes a gosto.
- Para conseguir uma cor dourada, aplique uma pequena quantidade de manteiga na face do pão que irá estar em
contacto com a placa antiaderente.

13
antiaderente inferior. Coloque os ingredientes e cubra-os com a segunda fatia de pão, que também terá barrado com
manteiga. Agora está pronta para fazer uma boa tosta. Coloque bem os ingredientes para conseguir um efeito ideal.
- Baixe a placa antiaderente superior e pressione-a contra o pão até fechar a patilha de pressão da pega.
- Abra a sandwicheira depois de esta estar cerca de 2-3 minutos a tostar para ver se o pão ganhou o tom dourado
que deseja. Controle o período de tostado de acordo com as suas preferências pessoais.
- Quando terminar de usar o aparelho, desligue-o.
Atenção! A luz verde irá acender-se e apagar-se automaticamente em intervalos regulares durante a utilização.
Deste modo, o aparelho mantém a sua temperatura dentro dos limites adequados.
LIMPEZA E MANUTENÇÃO
- Desligue o aparelho e deixe-o arrefecer antes de proceder à sua limpeza.
- Limpe a placa antiaderente com um pano húmido ou uma esponja. Para evitar a entrada de líquido para o interior
do produto, não o introduza em água.
- Para evitar danos na superfície antiaderente a altas temperaturas da placa antiaderente, nunca utilize objectos
abrasivos para a sua limpeza.
- Para o exterior da sandwicheira, limpe com um pano suave que tenha sido molhado em água quente com detergente
e bem torcido. Seque-o com um pano suave.
sandwicheira.
- Pode guardar a sandwicheira na posição vertical, tal como é indicado na Fig. 1.

14
D
Unsere Produkte entsprechen aufgrund Ihrer Entwicklung den höchsten Qualitäts-, Funktionalitäts- und Designstandards.
Wir wünschen Ihnen viel Freude mit Ihrem neuen Sandwichmaker MONTANA von PALSON.
WICHTIGE SICHERHEITSMASSNAHMEN
Bei der Benutzung von Elektrogeräten sollten Sie stets einige grundlegende Sicherheitsmaßnahmen einhalten. Dazu
zählen unter anderem:
Lesen Sie alle Bedienungsanweisungen.
1. Berühren Sie keine heißen Geräteteile, benutzen Sie die Griffe.
2. Tauchen Sie weder das Kabel, den Stecker noch das Gerät selbst in Wasser oder andere Flüssigkeiten. Sie könnten
sonst einen elektrischen Schlag erleiden.
3. Dieses Gerät darf von Kindern und anderen Personen, deren körperlicher, sensorischer oder geistiger Zustand eine
sichere Handhabung nicht zulässt, nicht ohne Aufsicht oder Assistenz benutzt werden. Kinder müssen beaufsichtigt
werden, um sicherzustellen, dass sie nicht mit dem Gerät spielen.
4. Ziehen Sie den Netzstecker aus der Steckdose, wenn Sie das Gerät nicht benutzen und bevor Sie es reinigen.
Lassen Sie das Gerät abkühlen, bevor Sie es reinigen und zur Aufbewahrung wegstellen.
5. Falls das Stromkabel beschädigt ist, sollte es durch den Hersteller, den autorisierten Kundendienst oder von einem
6. Die Verwendung von nicht durch den Hersteller empfohlenem Gerätezubehör kann zu Beschädigungen führen.
Verwenden Sie mit diesem Gerät weder Stromkabel mit externer Zeituhr noch Fernbedienungen.
7. Benutzen Sie das Gerät nicht im Freien. Das Gerät eignet sich nicht für die kommerzielle oder industrielle
Nutzung.
8. Achten Sie darauf, dass das Kabel nicht über die Tischkante oder die Anrichte hängt und dass es nicht mit heißen
9. Stellen Sie den Sandwichmaker nicht auf oder in der Nähe von heißen elektrischen Heizern, Gasheizern oder
einem heißen Backofen auf.
10. Lassen Sie beim Umsetzen an einen anderen Standort besondere Vorsicht walten. Das Gerät ist heiß, wenn es in
Betrieb ist.
11. Zum Ausschalten ziehen Sie den Netzstecker aus der Wandsteckdose. Ziehen Sie nicht am Kabel.
12. Benutzen Sie das Gerät ausschließlich gemäß seiner bestimmungsgemäßen Verwendung.
13. Versuchen Sie nicht, Lebensmittelreste zu entfernen, während das Gerät ans Stromnetz angeschlossen ist.
14. Decken Sie das Gerät nicht ab und lassen Sie es während des Betriebs nicht mit brennbaren Materialien, wie
Gardinen, Kleidung, Wänden, usw. in Kontakt kommen. Es könnte sonst ein Feuer entstehen.
BESTANDTEILE UND FUNKTIONEN:
- Betriebsanzeige (1): Die Betriebsanzeige leuchtet rot auf, wenn der Sandwichmaker an ein Stromnetz angeschlossen
wird.
- Anzeige Heizvorgang (2): Die grüne Leuchtanzeige zeigt an, dass der Sandwichmaker die Aufwärmphase
abgeschlossen hat.
- Automatischer Schließmechanismus (3): Hierbei handelt es sich um einen Mechanismus zum festen Verschließen
des Sandwichmakers.
- Rutschfester Gerätefuß (4): Verhindert das Wegrutschen des Sandwichmakers auf unebenen Flächen.
- Heizplatten (5): Mit Antihaftbeschichtung für hohe Temperaturen.
- Scharnier mit Sicherheitsachse (6): Durch die Scharnierverbindung der beiden Heizplatten wird vermieden, dass
die Sandwiches gewendet werden müssen. Außerdem erleichtert sie die Reinigung.
VOR DER ERSTEN BENUTZUNG:
- Reinigen Sie die Heizplatten mit einem feuchten Tuch oder einem Schwamm.
- Geben Sie großzügig Butter oder Öl auf die Heizplatte.
- Schließen Sie den Sandwichmaker an die Wandsteckdose an und schalten Sie das Gerät ein, um die Heizplatten
aufzuheizen. Bitte warten Sie, bis die grüne Leuchtanzeige automatisch erlischt, bevor Sie Speisen toasten.
Achtung! Es ist möglich, dass bei der Erstbenutzung des Sandwichmakers etwas Rauch entsteht. Dies ist normal,
denn die internen Bestandteile werden zum ersten Mal aufgeheizt.

15
Zubereitung von Sandwiches
- Stecken Sie den Netzstecker in eine Steckdose. Die rote und grüne Leuchtanzeige schalten sich nun ein.
- Der Sandwichmaker ist zur Benutzung bereit, wenn sich die grüne Leuchtanzeige automatisch ausgeschaltet hat.
- Bereiten Sie die Zutaten für ein Sandwich vor. Benutzen Sie pro Sandwich zwei Brotscheiben und eine beliebe
Menge Zutaten.
- Um ein goldbraun getoastetes Sandwich zu erhalten, können Sie die Seite des Brots, die mit der Heizplatte in
Berührung kommt, mit etwas Butter bestreichen.
Heizplatte in Berührung kommt. Belegen Sie die Brotscheibe mit den Zutaten und bedecken Sie alles mit einer
zweiten Brotscheibe, die Sie ebenfalls mit Butter bestrichen haben. Jetzt können Sie sich ein leckeres Sandwich
zubereiten. Belegen Sie die Brotscheiben sorgfältig, um ein ideales Sandwich zu erzielen.
- Klappen Sie die obere Heizplatte herunter und drücken Sie sie auf das Brot, bis der Druckverschluss am Griff
schließt.
- Öffnen Sie den Sandwichmaker nach 2-3 Betriebsminuten, um nachzusehen, ob das Sandwich die von Ihnen
gewünschte Bräunung erreicht hat. Toasten Sie das Sandwich entsprechend Ihres Geschmacks.
- Entnehmen Sie das Sandwich mit einem nicht-metallischen Gegenstand. Verwenden Sie keine scheuernden oder
spitzen Gegenstände.
- Ziehen Sie den Netzstecker aus der Steckdose, wenn Sie das Gerät nicht mehr verwenden.
Achtung! Während der Benutzung schaltet sich die grüne Leuchtanzeige in regelmäßigen Abständen ein und aus.
Auf diese Weise hält das Gerät die erforderliche Betriebstemperatur.
REINIGUNG UND WARTUNG
- Ziehen Sie vor der Reinigung den Netzstecker aus der Steckdose und warten Sie, bis das Gerät abgekühlt ist.
- Reinigen Sie die Heizplatte mit einem feuchten Tuch oder einem Schwamm. Tauchen Sie das Gerät nicht ins
Wasser, um zu verhindern, dass Flüssigkeit ins Geräteinnere eindringt.
- Eine Beschädigung der Antihaftbeschichtung der Heizplatten vermeiden Sie, indem Sie keine scheuernden Objekte
für deren Reinigung benutzen.
- Reinigen Sie das Äußere des Sandwichmakers mit einem weichen Tuch, dass Sie zuvor in warmes Seifenwasser
getaucht und gut ausgewrungen haben. Wischen Sie das Gerät mit einem weichen Tuch trocken.
- Benutzen Sie zur Reinigung der inneren und äußeren Flächen des Sandwichmakers keine metallischen Gewebe,
Scheuerlappen oder Kratzschwämme.
- Sie können den Sandwichmaker in vertikaler Position aufbewahren, siehe Abb. 1.
Vielen Dank für Ihr Vertrauen in unsere Produkte.

16
I
I nostri prodotti sono studiati per raggiungere i massimi standard qualitativi, funzionali e di design. Ci auguriamo che la
vostra nuova tostiera MONTANA di PALSON sia di vostro gradimento.
IMPORTANTI MISURE DI SICUREZZA
Quando si utilizzano apparecchi elettrici, è opportuno seguire sempre le precauzioni di sicurezza basilari, comprese
le seguenti:
Leggere tutte le istruzioni.
2. Per proteggersi da un’eventuale scarica elettrica, non immergere il cavo, né la spina, né l’apparecchio in acqua o
altri liquidi.
non consenta loro di utilizzarlo in modo sicuro. È opportuno che i bambini facciano uso del prodotto sotto la
supervisione di un adulto per evitare che lo utilizzino come un giocattolo.
4. Scollegare l’apparecchio dalla presa elettrica quando non lo si utilizza e prima di pulirlo. Lasciarlo raffreddare prima
di procedere alle operazioni di pulizia e prima di riporlo.
5. Se il cavo elettrico è danneggiato, dovrà essere sostituito dal produttore o dal servizio di assistenza autorizzato o
6. L’uso di accessori non raccomandati dal produttore dell’apparecchio potrebbe provocare lesioni. Non utilizzare cavi
di alimentazione con temporizzatori esterni o controlli remoti con questo dispositivo.
9. Non collocare la tostiera sopra o vicino ad un bruciatore elettrico o a gas, né all’interno di un forno caldo.
10. Prestare ulteriore attenzione quando si sposta l’elettrodomestico: quando è in funzione è caldo.
11. Per scollegare l’apparecchio, estrarre la spina dalla presa elettrica a parete. Non tirare il cavo.
13. Non cercare di rimuovere eventuali resti di cibo mentre l’apparecchio è collegato alla rete elettrica.
PARTI E FUNZIONI:
- Spia di potenza (1): La spia di potenza si illumina di rosso quando la spina della tostiera è collegata ad una presa
elettrica.
- Spia di tostatura (2): L’indicatore luminoso verde indica che la tostiera ha terminato il preriscaldamento.
- Vassoio di tostatura (5): Ha proprietà antiaderenti ad alte temperature.
DURANTE IL PRIMO UTILIZZO, RICORDARE DI:
- Pulire il vassoio di tostatura con un panno umido o una spugna.
- Applicare un’abbondante quantità di burro o olio sul vassoio di tostatura.
- Collegare l’apparecchio alla presa elettrica a parete ed accendere la tostiera per scaldare il vassoio di tostatura. È
necessario attendere che la spia verde si spenga automaticamente prima di tostare gli alimenti.
un fenomeno normale, dato che è la prima volta che si scaldano le parti interne.
Preparazione dei sandwich
- Collegare l’apparecchio alla presa elettrica. In seguito si accenderanno le spie verde e rossa.
- La tostiera è pronta all’uso quando la luce verde si spegne automaticamente.
- Preparare gli ingredienti del sandwich. Per un sandwich, utilizzare due fette di pane ed una certa quantità di
ingredienti.
- Per ottenere un colore dorato, applicare una piccola quantità di burro sulla parte di pane che entrerà in contatto con
il vassoio di tostatura.

17
- Quando si colloca la prima fetta di pane, assicurarsi che il lato imburrato sia a contatto con il vassoio di tostatura
inferiore. Collocare gli ingredienti e coprirli con la seconda fetta di pane, anch’essa imburrata. Ora tutto è pronto
per preparare un buon sandwich. Sistemare bene gli ingredienti per ottenere un effetto ideale.
Controllare il periodo di tostatura secondo le proprie preferenze personali.
Attenzione! La spia verde si accenderà e spegnerà automaticamente a intervalli regolari durante l’uso. In questo
modo, l’apparecchio mantiene la propria temperatura entro i limiti adeguati.
PULIZIA E MANUTENZIONE
- Scollegare l’apparecchio e lasciarlo raffreddare prima di procedere alla sua pulizia.
- Pulire il vassoio di tostatura con un panno umido o una spugna. Onde evitare l’ingresso di liquidi all’interno del
prodotto, non immergerlo in acqua.
abrasivi per pulirla.
- Per l’esterno della tostiera, pulire con un panno morbido appena inumidito con acqua calda e sapone. Asciugare
con un panno morbido.
tostiera.
- È possibile riporre la tostiera in posizione verticale, così come indicato nella Fig. 1.

18
NL
Bij de ontwikkeling van onze producten wordt gestreefd naar de hoogste kwaliteitsnormen, de grootste functionaliteit en
het beste ontwerp Wij hopen dat u veel plezier beleeft aan uw nieuw MONTANA tostiapparaat van PALSON.
BELANGRIJKE VEILIGHEIDSMAATREGELEN
Bij het gebruik van elektrische apparaten moet altijd een reeks basisveiligheidsmaatregelen in acht genomen worden,
zoals de volgende:
Lees alle instructies.
1. Raak nooit de hete oppervlakken aan, gebruik de handgrepen.
2. Ter bescherming tegen elektrische schokken mag u nooit het snoer, de stekker en het apparaat onderdompelen in
water of in een andere vloeistof.
3. Dit apparaat is niet bestemd voor gebruik door kinderen of andere mensen met beperkte fysieke, zintuiglijke of
mentale mogelijkheden, tenzij dit gebeurt met hulp of onder toezicht. Kinderen moeten onder toezicht gehouden
worden, opdat ze niet met het apparaat kunnen spelen.
4. Trek de stekker van het apparaat uit het stopcontact wanneer u het niet gebruikt en voor u het reinigt. Laat het
afkoelen voor u het reinigt en voor u het bewaart.
5. Als het stroomsnoer beschadigd is, moet het vervangen worden door de fabrikant, een door deze erkende
6. Het gebruik van accessoires die niet aanbevolen worden door de fabrikant, kan verwondingen veroorzaken. Bij
dit apparaat mogen geen stroomkabels voorzien van externe tijdschakelaars of afstandsbedieningen gebruikt te
worden.
7. Gebruik het apparaat niet buiten, en ook niet voor commerciële of industriële doeleinden.
8. Laat het snoer niet over de rand van de tafel of de toonbank hangen, en zorg ervoor dat het niet in aanraking komt
met hete oppervlakken.
9. Plaats het tostiapparaat niet op of in de buurt van een elektrische brander of een gasbrander, en ook niet in een
hete oven.
10. Ga uiterst voorzichtig te werk als u het apparaat verplaatst. Het is heet als het in werking is.
11. Trek om de stroom af te sluiten de stekker uit het stopcontact in de muur. Trek niet aan het snoer.
12. Gebruik het apparaat niet voor andere doeleinden dan het voorziene gebruik.
13. Probeer geen voedselresten te verwijderen terwijl de stekker van het apparaat in het stopcontact steekt.
14. Er kan brand ontstaan als het apparaat afgedekt wordt of als het tijdens het gebruik in aanraking komt met een
brandbaar materiaal, zoals gordijnen, kleren, muren enz.
ONDERDELEN EN FUNCTIES:
- Vermogensindicatielampje (1): het vermogensindicatielampje gaat rood branden wanneer de stekker van het
tostiapparaat in het stopcontact wordt gestoken.
- Roosterindicatielampje (2): het groene controlelampje geeft aan dat de voorverwarming van het tostiapparaat is
afgelopen.
- Zelfsluitingsmechanisme (3): dit is een mechanisme om de sluiting van het tostiapparaat vast te zetten.
- Antislipsteun (4): hiermee wordt vermeden dat het tostiapparaat wegglipt als het op ongelijke oppervlakken staat.
- Toastplaat (5): plaat met antiaanbakeigenschappen op hoge temperaturen.
- Verbinding via veiligheidsas (6): de verbinding tussen de twee warmteoppervlakken met een as zorgt ervoor dat het
product niet moet omgedraaid worden, en vergemakkelijkt de reiniging van het apparaat.
TIJDENS HET EERSTE GEBRUIK MOET U:
- De toastplaat reinigen met een vochtige doek of een spons.
- Een overvloedige hoeveelheid boter of olie aanbrengen op de toastplaat.
- De stekker van het apparaat in het stopcontact steken en het tostiapparaat inschakelen om de toastplaat op te
warmen. U moet wachten tot het groene lampje automatisch uitgaat alvorens de voedingsmiddelen te toasten.
Opgelet! Het is mogelijk dat er een kleine hoeveelheid rook vrijkomt bij het eerste gebruik van het tostiapparaat. Dit
is normaal, omdat de interne onderdelen voor de eerste keer opgewarmd worden.
Bereiding van tosti’s
- Steek de stekker van het apparaat in het stopcontact. Het groene en het rode lampje gaan branden.
- Het tostiapparaat is klaar voor gebruik wanneer het groene lampje automatisch uitgaat.

19
- Maak de ingrediënten van uw tosti klaar. Gebruik voor een tosti twee boterhammen en een zekere hoeveelheid
ingrediënten.
- Breng om een goudgele kleur te verkrijgen een kleine hoeveelheid boter aan op de zijde van het brood die in
aanraking komt met de toastplaat.
- Zorg er wanneer u de eerste boterham in het apparaat legt voor dat de met boter besmeerde zijde in aanraking
komt de onderste toastplaat. Leg de ingrediënten erop en dek ze af met de tweede boterham, die u ook insmeert
met boter. U bent nu klaar om een lekkere tosti te maken. Zorg voor een goede plaatsing van de ingrediënten om
een ideaal effect te verkrijgen.
- Laat de bovenste toastplaat zakken en druk ze op het brood, tot de druksluiting van de handgreep vastklikt.
- Open na een roostertijd van 2-3 minuten het tostiapparaat om te kijken of de tosti de gewenste goudgele toon heeft
verkregen. Controleer de roosterperiode in overeenstemming met uw persoonlijke voorkeur.
- Haal de tosti eruit met een niet-metalen instrument. Gebruik geen schurend of scherp gerei.
- Trek als u klaar bent met het gebruik van het apparaat de stekker uit het stopcontact.
Opgelet! Het groene lampje gaat regelmatig automatisch aan en uit tijdens het gebruik. Het apparaat behoudt zo
de juiste temperatuur binnen de gepaste limieten.
REINIGING EN ONDERHOUD
- Trek de stekker van het apparaat uit het stopcontact en laat het afkoelen voor u overgaat tot de reiniging ervan.
- Reinig de toastplaat met een vochtige doek of een spons. Leg het product niet in water, om te vermijden dat er
vloeistoffen binnendringen in het interne gedeelte.
- Gebruik nooit schurende voorwerpen voor de reiniging van de toastplaat, om bij hoge temperaturen een beschadiging
van het antiaanbakoppervlak te vermijden.
- Reinig de buitenkant van het tostiapparaat met een zachte doek, die bijna droog gespoeld werd in warm zeepwater.
Afdrogen met een zachte doek.
- Gebruik op geen enkele binnen- of buitenzijde van het tostiapparaat metaalvezels, schuursponzen o
schuurkussentjes.
- Het tostiapparaat kan bewaard worden in verticale stand, zoals is aangegeven op Fig. 1.
Bedankt voor uw vertrouwen bij de keuze van één van onze producten.

20
GR
ΣΗΜΑΝΤΙΚΑ ΜΕΤΡΑ ΑΣΦΑΛΕΙΑΣ
ΕΞΑΡΤΗΜΑΤΑ ΚΑΙ ΛΕΙΤΟΥΡΓΙΕΣ:
ΠΡΙΝ ΑΠΟ ΤΗΝ ΠΡΩΤΗ ΧΡΗΣΗ ΝΑ ΘΥΜΑΣΤΕ ΟΤΙ ΠΡΕΠΕΙ ΝΑ:
Προετοιμασία των σάντουιτς
Sayfa yükleniyor ...
Sayfa yükleniyor ...
Sayfa yükleniyor ...
Sayfa yükleniyor ...
Sayfa yükleniyor ...
Sayfa yükleniyor ...
Sayfa yükleniyor ...
Sayfa yükleniyor ...
Sayfa yükleniyor ...
Sayfa yükleniyor ...
Sayfa yükleniyor ...
Sayfa yükleniyor ...
-
 1
1
-
 2
2
-
 3
3
-
 4
4
-
 5
5
-
 6
6
-
 7
7
-
 8
8
-
 9
9
-
 10
10
-
 11
11
-
 12
12
-
 13
13
-
 14
14
-
 15
15
-
 16
16
-
 17
17
-
 18
18
-
 19
19
-
 20
20
-
 21
21
-
 22
22
-
 23
23
-
 24
24
-
 25
25
-
 26
26
-
 27
27
-
 28
28
-
 29
29
-
 30
30
-
 31
31
-
 32
32


Diğer dillerde
- español: Palson 30397 El manual del propietario
- français: Palson 30397 Le manuel du propriétaire
- italiano: Palson 30397 Manuale del proprietario
- Deutsch: Palson 30397 Bedienungsanleitung
- português: Palson 30397 Manual do proprietário
- English: Palson 30397 Owner's manual
- русский: Palson 30397 Инструкция по применению
- Nederlands: Palson 30397 de handleiding