Whirlpool AKR 454 IX Program Chart
- Kategori
- Ocak davlumbazları
- Tip
- Program Chart
Bu kılavuz aynı zamanda aşağıdakiler için de uygundur:

5019 318 33073
AKR 433-444-446-453-454-464-466-467
INSTALLATIONSANGABEN UND ALLGEMEINE HINWEISE
Mindestabstand zur Kochfläche: 60 cm (Elektroplatten), 70 cm (Gas-, Öl- oder Kohlekochmulde).
VORSICHT!
Bei allen Modellen mit direkt außen angebrachtem Fettfilter kann das Absauggitter nicht
entfernt werden: alle Wartungs- und Montagearbeiten, bei denen ein Zugang zum Inneren
der Dunstabzugshaube erforderlich ist, können unmittelbar nach Entfernung des
Fettfilters vorgenommen werden; es folgt eine Liste der betreffenden Modelle (die Zahl
in Klammern entspricht den letzten 5 Ziffern des auf dem Wartungsaufkleber
angegebenen 12-Ziffern-Codes): AKR444 IX (22030), AKR446 IX (01000),
AKR453 IX (10030), AKR453 IX (15040), AKR454 IX (01000), AKR464 IX (01030),
AKR466 IX (01030), AKR467 IX (29030).
Schließen Sie das Gerät erst nach erfolgter Installation an die Stromversorgung an.
Das Auslassrohr (13 A) wird nicht mitgeliefert und muss gesondert gekauft werden.
INSTALLATION SHEET AND GENERAL PRECAUTIONS
Minimum height above cooker: 60 cm (electric cookers), 70 cm (gas, oil-fired or coal cookers).
Warning!
Models with externally mounted grease filter feature a permanently fixed extraction
grille: all cleaning and maintenance operations requiring access to the hood interior
should be carried out by removing the grease filters only; this applies to the following
models (the number in brackets indicates the last 5 digits of the 12-digit code on the
maintenance label): AKR444 IX (22030), AKR446 IX (01000), AKR453 IX (10030),
AKR453 IX (15040), AKR454 IX (01000), AKR464 IX (01030), AKR466 IX (01030),
AKR467 IX (29030).
Do not connect the appliance to the electrical power supply until installation is
completed.
The exhaust pipe is not supplied, and should be bought separately.
FICHE D'INSTALLATION ET RECOMMANDATIONS GÉNÉRALES
Distance minimale par rapport à la cuisinière : 60 cm (cuisinière électrique), 70 cm
(cuisinière à gaz, mazout ou charbon).
Attention !
Il est impossible de retirer la grille d'aspiration des modèles INOX avec filtre à graisses
monté directement à l'extérieur : procéder aux opérations de montage et d'entretien pour
lesquelles il est nécessaire d'accéder à lintérieur de la hotte en retirant uniquement les
filtres à graisses ; vous trouverez ci-dessous la liste des modèles concernés (le nombre
entre parenthèses indique les 5 derniers chiffres du code à 12 chiffres présent sur
l'autocollant Service) : AKR444 IX (22030), AKR446 IX (01000), AKR453 IX (10030),
AKR453 IX (15040), AKR454 IX (01000), AKR464 IX (01030), AKR466 IX (01030),
AKR467 IX (29030).
Ne branchez pas l'appareil tant que l'installation n'est pas terminée.
Le tuyau d'évacuation n'est pas fourni avec l'appareil et doit être acheté à part.
INSTALLATIEKAART EN ALGEMENE AANWIJZINGEN
Minimumafstand tot het kooktoestel: 60 cm (elektrische kooktoestellen), 70 cm
(kooktoestellen op gas, olie of kolen).
Let op!
Bij de modellen waarbij het vetfilter direct aan de buitenkant is gemonteerd, is het niet
mogelijk om het afzuigrooster te verwijderen: wanneer er montage- of
onderhoudswerkzaamheden binnenin de afzuigkap uitgevoerd moeten worden, dient het
vetfilter te worden verwijderd. zie de lijst met de betreffende modellen (het nummer
tussen haakjes geeft de laatste 5 cijfers aan van de 12-cijferige code op de
onderhoudssticker): AKR444 IX (22030), AKR446 IX (01000), AKR453 IX (10030),
AKR453 IX (15040), AKR454 IX (01000), AKR464 IX (01030), AKR466 IX (01030),
AKR467 IX (29030).
Sluit het apparaat niet aan op de netvoeding voordat de installatie geheel voltooid is.
De afvoerleiding wordt niet bijgeleverd en dient aangeschaft te worden.
D
GB
F
NL
31833073.fm Page 1 Wednesday, January 22, 2003 12:12 PM

AKR 433-444-446-453-454-464-466-467
5019 318 33073
FICHA DE INSTALACIÓN Y ADVERTENCIAS GENERALES
Distancia mínima desde los quemadores: 60 cm (quemadores eléctricos), 70 cm
(quemadores a gas, gasóleo o carbón).
¡Atención!
En los modelos con el filtro para grasas montado directamente en el exterior, la rejilla de
aspiración no se extrae: Para efectuar operaciones de montaje y mantenimiento en el
interior de la campana, sólo deben quitarse los filtros para grasas. Dichos modelos son los
siguientes (el número entre paréntesis indica las últimas 5 cifras del código de 12 cifras
incluido en el adhesivo de mantenimiento): AKR444 IX (22030), AKR446 IX (01000),
AKR453 IX (10030), AKR453 IX (15040), AKR454 IX (01000), AKR464 IX (01030),
AKR466 IX (01030), AKR467 IX (29030).
No conecte el aparato a la corriente eléctrica hasta que la instalación esté completamente
finalizada.
El tubo de salida no se suministra con la campana y debe comprarse aparte.
FICHA DE INSTALAÇÃO E ADVERTÊNCIAS GERAIS
Distância mínima dos fogões: 60 cm (fogões eléctricos), 70 cm (fogões a gás, óleo ou carbono).
Atenção!
Em todos os modelos com filtro de gordura montado directamente no exterior não é
possível retirar a grelha de aspiração: todas as operações de montagem e manutenção que
impliquem o acesso ao interior do exaustor devem ser executadas retirando apenas os
filtros de gordura; apresenta-se, de seguida, a lista dos modelos abrangidos (o número
entre parêntesis indica os últimos 5 algarismos do código de 12 algarismos indicado no
autocolante de manutenção): AKR444 IX (22030), AKR446 IX (01000),
AKR453 IX (10030), AKR453 IX (15040), AKR454 IX (01000), AKR464 IX (01030),
AKR466 IX (01030), AKR467 IX (29030).
Não ligue o aparelho à corrente eléctrica até a instalação estar concluída.
O tubo de descarga não é fornecido com o aparelho, pelo que deve ser adquirido.
SCHEDA INSTALLAZIONE E AVVERTENZE GENERALI
Distanza minima dai fuochi: 60 cm (fuochi elettrici), 70 cm (fuochi a gas, gasolio o carbone).
Attenzione!
In tutti i modelli con filtro antigrasso montato direttamente all'esterno, non è possibile
rimuovere la griglia di aspirazione: tutte le operazioni di montaggio e manutenzione che
richiedono l'accesso all'interno della cappa vanno eseguite togliendo solamente i filtri
antigrasso; segue la lista dei modelli interessati (il numero tra parentesi indica le ultime
5 cifre del codice a 12 cifre riportato sull'adesivo di manutenzione): AKR444 IX (22030),
AKR446 IX (01000), AKR453 IX (10030), AKR453 IX (15040), AKR454 IX (01000),
AKR464 IX (01030), AKR466 IX (01030), AKR467 IX (29030).
Non dare corrente allapparecchio finché linstallazione non è totalmente completata.
Il tubo di scarico non è fornito e va acquistato.
ùüùü+ùùùþùÿ+üÿüüÿûÿþüÿ
ü$12.)12.1.)2"0120"FP02!"0120"FP0120"
.0! #02!0. #0! #
! 1 $
0).2. 2.02 32! .2 02 12 0&20!)/0
02!02..3.!012"!."..!!)31")0" 0010"
2 21".1#2!1" #..2 *2!)1.112 01&20!)2 #
. !! 32!.020 *2..3.!+2.") 2.32!..ù #0
.2 "2&1$02+ 2& .!)"10.!01# /+02.
200#2..%3.2 #/&/0.%3 #&/ * #..!302.12 .#2 )2
1#2!1"$.5,;$.5,;$.5,;$.5
,;$.5,;$.5,;
$.5,;$.5,;
2! 3 / 2020002!)!0*.21#10#!2 !&12"
0.212.1"
1&."..&"/0 /.202.02 . !! 32!..!0.
. 20$&!12
E
P
I
GR
31833073.fm Page 2 Wednesday, January 22, 2003 12:12 PM

5019 318 33073
AKR 433-444-446-453-454-464-466-467
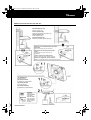
Entfernen Sie das Schaumstoffstück vom hinteren
Luftauslass!
Remove the sponge from the rear outlet!
Retirez la mousse du dispositif d'évacuation
arrière !
Verwijder de spons uit de afvoer aan de
achterkant!
¡Quite la esponja de la salida posterior!
Retire a esponja do tubo de descarga posterior!
Rimuovere la spugna dallo scarico posteriore!
ú202 13 #!.)2 1& ...&"
(F) Umluftversion
(F) Filter Version
(F) Version Filtrante
(F) Model met luchtcirculatie
(F) Versión filtrante
(F) Versão Filtrante
(F) Versione Filtrante
) 2 0..*&1
Kohlefilter
Carbon filter
Filtre au charbon
Koolstoffilte
Filtro de carbón
Filtro de carbono
Filtro al carbone
-2! 00! *
!..
Dunstabzugsversion (A)
Extractor version (A)
Version aspirante (A)
Model met luchtafvoer naar buiten (A)
Versión aspirante (A)
Versão aspirante (A)
Versione Aspirante (A)
2 0..&2 #.!.$
31833073.fm Page 3 Wednesday, January 22, 2003 12:12 PM

AKR 433-444-446-453-454-464-466-467
5019 318 33073
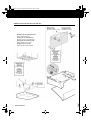
Wandmontage
Wall mounting
Fixation au mur
Bevestiging aan een wand
Fijación en la pared
Fixação na parede
Fissaggio al muro
20!&1102 $
ABZUGSHAUBE
EXTRACTOR
ASPIRANTE
LUCHTAFVOER NAAR
BUITEN
ASPIRADOR
ASPIRANTE
ASPIRANTE
üùù++þ
ùüù
ABZUGSHAUBE
EXTRACTOR
ASPIRANTE
LUCHTAFVOER NAAR
BUITEN
ASPIRADOR
ASPIRANTE
ASPIRANTE
üùù++þ
ùüù
Montage unter einem Hängeschrank
Under cupboard mounting
Fixation sous un élément mural
Bevestiging onder een keukenkastje
Fijación bajo un mueble de pared
Fixação debaixo de um móvel
Fissaggio sotto un pensile
20!&12&.)2 #
31833073.fm Page 4 Wednesday, January 22, 2003 12:12 PM

5019 318 33073
AKR 433-444-446-453-454-464-466-467
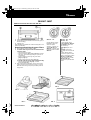
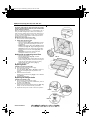
1.
Control panel.
2.
Grease filter (positioned behind the extraction grille, or
fitted externally).
3.
Lighting unit.
Note! The AKR 454 and AKR 467 models are designed for use
with two 20 W bulbs.
Removing and washing the grease filters:
1.
Disconnect the electrical power supply.
2. For models with the grease filter located behind the
extraction grille:
-
Open the extractor grille.
-
Press the buttons
(Fig. 1a-b-c, Fig. 2d)
to release
the grille, all the time supporting it to prevent it
from falling).
-
Remove the device securing the grease filter
(Fig. 3e, Fig. 4f)
.
-
Remove the dirty grease filter
(Fig. 4g)
.
For models with the grease filter located externally:
-
Pull the handles back
(Fig. 5h)
, and then
downwards
(Fig. 5i)
.
3.
After cleaning the grease filter refit in reverse order,
making sure the entire extraction surface is covered.
Wash the extraction grille (where provided) with hot
soapy water.
CONTROL PANEL
AKR 433 - 444
A.
Light ON/OFF switch.
B.
Rotating switch for
extraction speed
selection, 3 settings for
models
AKR 433
and
AKR 446
, 3 settings plus
intensive speed for model
AKR 444
.
AKR 453 - 454 - 464
AKR 466 - 467
C.
Light ON/OFF switch
(models
AKR 453, AKR 454
and
AKR 464
feature two
light functions):
Bright light:
press once
only.
Soft light:
press twice.
Press again to switch off the
light.
D.
Motor ON/OFF switch.
E.
Extraction speed increase
button, 3 settings for models
AKR 453
and
AKR 454
,
3 plus intensive for models
AKR 464-466-467
.
F.
Extraction speed decrease
button.
FIG. 1
FIG. 2
FIG. 5
FIG. 3
FIG. 4
F NL E PGBD GRI
PRODUCT SHEET
31833073.fm Page 7 Wednesday, January 22, 2003 12:12 PM

AKR 433-444-446-453-454-464-466-467
5019 318 33073
Active carbon filter maintenance:
The active carbon filter for this unit is made of a spongy
material, and should be washed every two months under
normal working conditions.
Wash the carbon filter by hand or in a dishwasher at 65° C
using a suitable detergent (be careful not to damage its
cloth covering). Gently remove excess water, then dry in an
oven at a constant temperature of 100° C for 10 minutes.
The filter can be washed together with the plastic frame
which secures it in place.
Replace the carbon filter every 2 years.
1.
Disconnect the electrical power supply.
2. Models with extraction grille
-
Open the extractor grille.
-
Press the buttons
(Fig. 1a-b-c, Fig. 2d)
to release
the grille, all the time supporting it to prevent it
from falling).
-Fitting:
Fit the active carbon filter
(Fig. 6j)
over the
extraction grill (
Fig. 6k
- bayonet fitting), the arrow
(Fig. 6l)
printed on the carbon filter should align
with the arrow on the fan shroud
(Fig. 6m)
. Turn
clockwise.
- Removing:
Turn the active carbon filter anti-
clockwise to release it from its seat.
Models with an external grease filter
-
Open the grease filters.
-
Pull the handles back
(Fig. 5h)
, and then
downwards
(Fig. 5i)
.
-
Fit the rectangular active carbon filters over the rear
section of the grease filters and secure them in place
using the four small metal rods (two per filter)
supplied with the carbon filters
(Fig. 7)
.
3.
Refit the extractor grille.
Replacing bulbs
(AKR 433-444-446-453-464-466)
1.
Disconnect the electrical power supply.
2.
Open the extractor grille.
Press the buttons
(Fig. 1a-b-c, Fig. 2d)
to release it,
all the time holding the grille to prevent it from
falling).
3.
Remove the burnt-out bulb.
Replace using 40 W max E14
(Fig. 8)
or PL 11 W bulbs
only
(Fig. 9)
.
4.
Refit the extractor grille.
Replacing the halogen bulbs
(AKR 454 and AKR 467 only)
1.
Disconnect the electrical power supply.
Using a screwdriver or any other suitable tool, prize off
the lamp cover
(Fig. 10)
.
2.
Remove the burnt-out bulb.
Replace using 20 W max halogen bulbs only
(Fig. 10)
taking care not to touch them with your hands.
3.
Replace the lamp cover so that it clicks into position.
FIG. 6
FIG. 7
FIG. 8
FIG. 9
FIG. 10
F NL E PGBD GRI
31833073.fm Page 8 Wednesday, January 22, 2003 12:12 PM
-
 1
1
-
 2
2
-
 3
3
-
 4
4
-
 5
5
-
 6
6


Whirlpool AKR 454 IX Program Chart
- Kategori
- Ocak davlumbazları
- Tip
- Program Chart
- Bu kılavuz aynı zamanda aşağıdakiler için de uygundur:
diğer dillerde
- español: Whirlpool AKR 454 IX
- français: Whirlpool AKR 454 IX
- Deutsch: Whirlpool AKR 454 IX
- English: Whirlpool AKR 454 IX
- Nederlands: Whirlpool AKR 454 IX
İlgili makaleler
-
Whirlpool AKR 446 WH Program Chart
-
-
-
-
-
-
Whirlpool AKR 466 IX WP Program Chart
-
-
-
Whirlpool AKR 466 IX WP Program Chart