HOTPOINT/ARISTON AQ94F 29D EU Kullanici rehberi
- Kategori
- Çamaşır makineleri
- Tip
- Kullanici rehberi

GB
1
Contents
Installation, 2-3
Unpacking and levelling
Connecting the electricity and water supplies
Technical data
Care and maintenance, 4
Cutting off the water and electricity supplies
Cleaning the machine
Cleaning the detergent dispenser drawer
Caring for your appliance drum
Cleaning the pump
Checking the water inlet hose
Precautions and tips, 5
General safety
Load balancing system
Disposal
Opening the porthole door manually
Description of the machine, 6-7
Control panel
Running a wash cycle, 8
Wash cycles and options, 9
Table of wash cycles
Wash options
Detergents and laundry, 10
Detergent
Preparing the laundry
Washing recommendations
Trouble shooting, 11
Assistance, 12
WASHING MACHINE
Instructions for
installation and use
English,1
GB
AQUALTIS
AQ94F 29D
Česky,13
CZ
Polski,25
PL
GR
ΕΛΛΗΝΙΚΑ,49
Türkçe,37
TR
BG
Áúëãàðñêè,73
Magyar,61
HU

GB
2
Installation
! This instruction manual should be kept in a
safe place for future reference. If the washing
machine is sold, given away or moved, please
ensure the manual is kept with the machine,
so that the new owner may benefit from the
advice contained within it.
! Read these instructions carefully: they
contain vital information relating to the safe
installation and operation of the appliance.
! Inside the pack containing this manual, you
will also find the guarantee and all the details
necessary for installation.
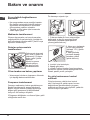
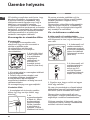
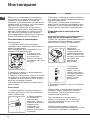
Unpacking and levelling
Unpacking
1. Once you have removed all the packaging
from the washing machine, make sure it has not
been damaged during transportation. If it has
been damaged, contact the retailer and do not
proceed any further with the installation process.
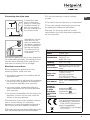
2. Remove the 4
protective screws
(used during
transportation) and
the corresponding
spacer, located on
the rear part of the
appliance (see figure).
3. Close off the holes using the plastic plugs
supplied in the pack.
4. Keep all the parts in a safe place; they will
be needed again if the washing machine is
moved to another location, to prevent the
inside of the appliance being damaged.
! Packaging materials should not be used as
toys for children.
Levelling
1. Place the washing machine on a flat sturdy
floor, without resting it up against walls or
cabinets.
2. If the floor is
uneven, the front feet
of the machine may
be adjusted until it
reaches a horizontal
position (the angle of
inclination must not
exceed 2 degrees).
! If the appliance is levelled correctly, it will
be more stable and much less likely to cause
vibrations and noise while it is operating,
particularly during the spin cycle.
! If it is placed on carpet or a rug, adjust the
feet in such a way as to allow a sufficient
ventilation space underneath the washing
machine.
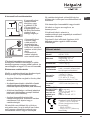
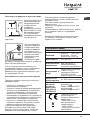
Connecting the electricity and
water supplies
Connecting the water inlet hose
! Before connecting the inlet hose to the water
supply, run the water until it is perfectly clear.
1. Connect the inlet
hose to the machine
by screwing it onto
the cold water inlet of
the appliance, which
is situated on the top
right-hand side of
the rear part of the
appliance (see figure).
2. Connect the inlet
hose by screwing it to
a cold water tap using
a 3/4 gas threaded
connection (see
figure).
3. Make sure that the hose is not folded over
or bent.
! The water pressure at the tap must fall within
the values indicated in the Technical data table
(see next page).
! If the inlet hose is not long enough, contact a
specialised shop or an authorised technician.
! Never use second-hand or old inlet hoses;
use the products supplied with the machine.

GB
3
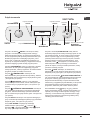
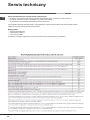
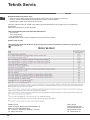
Technical data
Model
AQ94F 29D
Dimensions
width 59.5 cm
height 85 cm
depth 64,5 cm
Capacity
from 1 to 9 kg
Electrical
connections
please refer to the technical
data plate fixed to the ma-
chine
Water con-
nections
maximum pressure
1 MPa (10 bar)
minimum pressure
0.05 MPa (0.5 bar)
drum capacity 71 litres
Spin speed
up to 1200 rotations per
minute
Test wash
cycles in
accordan-
ce with
directives
1061/2010
and
1015/2010
programme
;
Cotton standard 60°C.
programme ;
Cotton standard 40°C.
This appliance conforms to
the following EC Directives:
- 2004/108/EC (Electroma-
gnetic Compatibility)
- 2006/95/EC (Low Voltage)
- 2012/19/EU
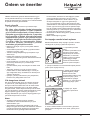
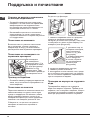
Connecting the drain hose
Connect the drain
hose to drain duct
piping or a wall drain
located between 65
and 100 cm above
the floor, making sure
it is not bent at all.
Alternatively, rest the
drain hose on the
side of a washbasin
or bathtub, fastening
the duct supplied to
the tap (see figure).
The free end of the
hose should not be
underwater.
! We advise against the use of hose extensions;
if it is absolutely necessary, the extension must
have the same diameter as the original hose
and must not exceed 150 cm in length.
Electrical connections
Before plugging the appliance into the
electricity socket, make sure that:
• thesocketisearthedandcomplieswithall
applicable laws;
• thesocketisabletowithstandthemaximum
power load of the appliance as indicated in
the Technical data table (see opposite);
• thepowersupplyvoltagefallswithinthe
values indicated in the Technical data table
(see opposite);
• thesocketiscompatiblewiththeplugofthe
appliance. If this is not the case, have the
socket or the plug replaced.
! The machine must not be installed outdoors,
even in covered areas. It is extremely
dangerous to leave the appliance exposed to
rain, storms and other weather conditions.
! The mains socket must remain within easy reach
after the washing machine has been installed.
! Do not use extension cords or multiple
sockets.
! The cable should not be bent or compressed.
! The power supply cable and plug must only
be replaced by authorised technicians.
Warning! The company shall not be held
responsible in the event that these regulations
are not respected.
65 - 100 cm

GB
4
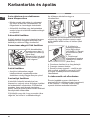
Care and maintenance
Cutting off the water and
electricity supplies
• Turnoffthewatertapaftereverywashcycle.
This will limit wear on the hydraulic system in
the machine and help to prevent leaks.
• Unplugtheappliancewhencleaningitand
during all maintenance work.
Cleaning the machine
The outer parts and rubber components of the
appliance can be cleaned using a soft cloth
soaked in lukewarm soapy water. Do not use
solvents or abrasives.
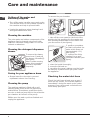
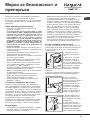
Cleaning the detergent dispenser
drawer
To remove the drawer,
press lever (1) and pull
the drawer outwards (2)
(see figure).
Wash it under running
water; this procedure
should be repeated
frequently.
Caring for your appliance drum
• Alwaysleavethedoorajartoprevent
unpleasant odours from forming.
Cleaning the pump
The washing machine is fitted with a self-
cleaning pump which does not require any
maintenance. Sometimes, small items (such
as coins or buttons) may fall into the protective
pre-chamber at the base of the pump.
! Make sure the wash cycle has finished and
unplug the appliance.
To access the pre-chamber:
1. take off the cover panel on the front of the
machine by first pressing it in the centre and
then pushing downwards on both sides until
you can remove it (see figures);
2. position a container
so that it will collect the
water which flows out
(approximately 1.5 l)
(see figure);
3. unscrew the lid by
rotating it in an anti-
clockwise direction (see
figure);
4. clean the inside thoroughly;
5. screw the lid back on;
6. reposition the panel, making sure the hooks
are securely in place before you push it onto
the appliance.
Checking the water inlet hose
Check the inlet hose at least once a year. If
there are any cracks, it should be replaced
immediately: during the wash cycles, water
pressure is very strong and a cracked hose
could easily split open.
1
2
1
2
1
2

GB
5
Precautions and tips
! The machine was designed and constructed in
accordance with international safety regulations. The
following information is provided for safety reasons and
must therefore be read carefully.
General safety
• Thisappliancewasdesignedfordomesticuseonly.
• This appliance can be used by children
aged from 8 years and above and
persons with reduced physical, sensory or
mental capabilities or lack of experience
and knowledge if they have been given
supervision or instruction concerning use of
the appliance in a safe way and understand
the hazards involved. Children shall not
play with the appliance. Cleaning and user
maintenance shall not be made by children
without supervision.
• Donottouchthemachinewhenbarefootorwithwetor
damp hands or feet.
• Donotpullonthepowersupplycablewhenunplugging
the appliance from the electricity socket. Hold the plug
and pull.
• Donottouchthedrainedwaterasitmayreach
extremely high temperatures.
• Neverforcetheportholedoor.Thiscoulddamagethe
safety lock mechanism designed to prevent accidental
opening.
• Iftheappliancebreaksdown,donotunderany
circumstances access the internal mechanisms in an
attempt to repair it yourself.
• Alwayskeepchildrenwellawayfromtheappliancewhile
it is operating.
• Ifitmustbemoved,proceedwiththehelpoftwoor
three people and handle it with the utmost care. Never
try to do this alone, because the appliance is very heavy.
• Beforeloadinglaundryintothewashingmachine,make
sure the drum is empty.
Load balancing system
Before every spin cycle, to avoid excessive vibrations
before every spin and to distribute the load in a uniform
manner, the drum rotates continuously at a speed which
is slightly greater than the washing rotation speed. If,
after several attempts, the load is not balanced correctly,
the machine spins at a reduced spin speed. If the load is
excessively unbalanced, the washing machine performs
the distribution process instead of spinning. To encourage
improved load distribution and balance, we recommend
small and large garments are mixed in the load.
Disposal
• Disposingofthepackagingmaterials:observelocal
regulations so that the packaging may be re-used.
• TheEuropeanDirective2012/19/EUrelatingtoWaste
Electrical and Electronic Equipment (WEEE) states
that household appliances should not be disposed of
using the normal solid urban waste cycle. Exhausted
appliances should be collected separately in order to
optimise the cost of re-using and recycling the materials
inside the machine, while preventing potential damage
to the atmosphere and to public health.
The crossed-out dustbin is marked on all products
to remind the owner of their obligations regarding
separated waste collection.
For more information relating to the correct disposal of
household appliances, owners should contact their local
authorities or appliance dealer.
Opening the porthole door manually
In the event that it is not possible to open the porthole door
due to a powercut, and if you wish to remove the laundry,
proceed as follows:
1. remove the plug from the
electrical socket.
2. make sure the water level
inside the machine is lower
than the door opening; if
it is not, remove excess
water using the drain hose,
collecting it in a bucket as
indicated in the figure.
3. remove the cover panel on the lower front part of the
washing machine (see overleaf).
4. pull outwards using the
tab as indicated in the figure,
until the plastic tie-rod is freed
from its stop position; pull
downwards until you hear a
“click”, which indicates that
the door is now unlocked.
5. open the door; if this is
still not possible repeat the
procedure.
6. reposition the panel, making sure the hooks are securely
in place before you push it onto the appliance.

GB
6
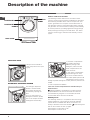
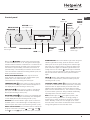
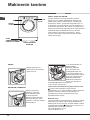
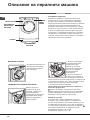
Description of the machine
CONTROL
PANEL
PORTHOLE DOOR
PORTHOLE DOOR
HANDLE
KICK STRIP
DIRECT INJECTION SYSTEM
The washing machine features the innovative “Direct
Injection” technology that quickly solubilises the detergent
and efficiently activates all the various components. The
system guarantees the complete use and dissolution of
the detergent, which is mixed with water before reaching
the garments. This ensures better cleaning results already
at low temperatures, providing significant energy savings
while perfectly protecting colours and fibres. The “Direct
Injection” technology is activated automatically in all the
cycles.
ADJUSTABLE FEET
1. pre-wash compartment:
use powder detergent.
! Before pouring in the
detergent, make sure that
extra compartment 3 has
been removed.
2. main wash compartment:
If liquid detergent is used,
it is recommended that the
removable plastic partition A
(supplied) be used for proper
dosage.If powder detergent is used, place the partition into
slot B.
3. extra compartment: Bleach
! The use of extra compartment 3 excludes the pre-
wash function.
washing additives compartment: for fabric softener
or liquid additives. We recommend that the maximum
level indicated by the grille is not exceeded, and that
concentrated fabric softeners are diluted.
Standby mode
This washing machine, in compliance with new energy
saving regulations, is fitted with an automatic standby
system which is enabled after about 30 minutes if no
activity is detected. Press the ON-OFF button briefly and
wait for the machine to start up again.
Consumption in off-mode: 0,5 W
Consumption in Left-on: 8 W
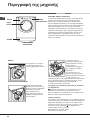
PORTHOLE DOOR
Always use the handle to
open the porthole door (see
figure).
DETERGENT DISPENSER DRAWER
The detergent dispenser
drawer is located inside
the machine and can be
accessed by opening the
door.
For more information on
detergent measures, please
refer to the chapter entitled
“Detergents and laundry”.
3
1
2
1
8
0
2
1
0
1
5
0
1
2
0
9
0
6
0
B
A

GB
77
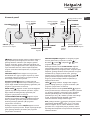
TEMPERATURE button
WASH CYCLE
SELECTOR knob
OPTION buttons
with indicator lights
LOCK
indicator light
START/
PAUSE
button with
indicator light
WASH
CYCLE
PHASE
icons
SPIN button
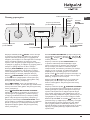
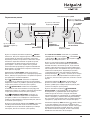
CONTROL PANEL
LOCK button with
indicator light
Button with ON/OFF
indicator light
ECO
indicator light
OPTION buttons
with indicator lights
Control panel
Button with ON/OFF indicator light: press this briefly
to switch the machine on or off. The green indicator light
indicates that the machine is switched on. To switch off the
washing machine during the wash cycle, press and hold
the button for approximately 3 seconds; if the button is
pressed briefly or accidentally the machine will not switch
off. If the machine is switched off during a wash cycle, this
wash cycle will be cancelled.
WASH CYCLE SELECTOR knob: may be turned in
either direction. To select the most suitable wash cycle,
please refer to the “Table of wash cycles”.
The knob will not move during the wash cycle.
TEMPERATURE button: press to modify or exclude
the temperature setting; the value selected will appear on
the display above (see “Running a wash cycle”).
SPIN CYCLE button: press to modify or exclude the
spin cycle; the value selected will appear on the display
above (see “Running a wash cycle”).
DELAYED START button: press to set a delayed start
for the selected wash cycle; the set delay time will appear
on the display above (see “Running a wash cycle”).
OPTION buttons with indicator lights: press to select the
available options. The indicator light corresponding to the
selected option will remain lit (see “Running a wash cycle”).
WASH CYCLE PHASE icons: these illuminate to indicate the
progress of the wash cycle (Wash – Rinse – Spin –
Drain ). The text lights up when the cycle is complete.
START/PAUSE button with indicator light: when the green
indicator light flashes slowly, press the button to start a
wash cycle. Once the cycle has begun the indicator light
will remain lit in a fixed manner. To pause the wash cycle,
press the button again; the indicator light will flash in an
orange colour. If the “LOCK” indicator light is switched
off, the door may be opened. To start the wash cycle from
the point at which it was interrupted, press the button
again.
LOCK indicator light: indicates that the porthole door
is locked. To open the door, pause the wash cycle (see
“Running a wash cycle”).
CONTROL PANEL LOCK button with indicator light:
to activate or deactivate the control panel lock, press and
hold the button for approximately 2 seconds. when the
indicator light is illuminated, the control panel is locked
(apart from the ON/OFF button). This means it is possible
to prevent wash cycles from being modified accidentally,
especially where there are children in the home.
ECO indicator light: the icon lights up when, after
altering the washing parameters, an energy saving of
at least 10% is made. Furthermore, before the machine
enters “Standby” mode, the icon will light up for a few
seconds; when the machine is switched off the estimated
energy saving will be around the 80% mark.
DELAYED
START
button
DISPLAY

GB
8
Running a wash cycle
WARNING: before you use the washing machine for the
first time, run a wash cycle with detergent and no laundry,
using the 90° cottons cycle without pre-wash.
1. SWITCH THE MACHINE ON. Press the button.
All the indicator lights will illuminate for 1 second; the
indicator light corresponding to the button will then
remain lit in a fixed manner and the START/PAUSE
indicator light will flash slowly.
2. LOAD THE LAUNDRY. Open the porthole door.
Load the laundry, making sure you do not exceed the
maximum load value indicated in the table of wash
cycles on the following page.
3. MEASURE OUT THE DETERGENT. Pull out the
detergent dispenser drawer and pour the detergent into
the relevant compartments as described in “Description
of the machine”.
4. CLOSE THE PORTHOLE DOOR.
5. SELECT THE PROGRAMME. Turn the WASH CYCLE
SELECTOR KNOB right or left, until you have selected
the desired wash cycle. A temperature and spin speed
is set for each wash cycle; these may be adjusted.
6. CUSTOMISE THE WASH CYCLE. Use the relevant
buttons on the control panel:
Modify the temperature and/or spin speed.
The machine automatically displays the maximum
temperature and spin speed values set for the selected
cycle, or the most recently-used settings if they are
compatible with the selected cycle. The temperature
can be decreased by pressing the button, until the
cold wash ( ) setting is reached. The spin speed may
be progressively reduced by pressing the button,
until it is completely excluded ( ). If these buttons are
pressed again, the maximum values are restored.
! Exception: if the
programme is selected, the
temperature can be increased up to a value of 90°C.
Set a delayed start.
Press the button until you have reached the desired
delay time. During the setting process, the delay time is
shown on the display and the symbol flashes.
After selecting a delayed start time, the fixed symbol
and the cycle duration will appear on the display. Press
the button once to display the selected delay time.
To remove the delayed start option, press the button
until the display shows the text OFF; the symbol will
disappear.
! Once the START/PAUSE button has been pressed, the
time delay may only be decreased.
Modify the cycle settings.
Press the OPTION buttons to customise the wash cycle
in accordance with your own requirements.
•Pressthebuttontoactivatetheoption;the
corresponding indicator light will switch on.
•Pressthebuttonagaintodisabletheoption;the
indicator light will switch off.
! If the selected option is not compatible with the
selected wash cycle, this incompatibility will be signalled
by the flashing of the indicator light and a sound alert
(3 beeps); the option will not be activated.
! If the selected option is not compatible with another
option that has been selected previously, the indicator
light corresponding to the first option selected will
flash and only the second option will be activated; the
indicator light corresponding to the button will remain lit
in a constant manner.
7. START THE PROGRAMME. Press the START/PAUSE
button. The corresponding indicator light remains lit in a
fixed manner and the porthole door locks (the LOCK
indicator light illuminates). The icons corresponding to
the wash cycle phases will light up during the cycle to
indicate which phase is currently in progress.
To change a wash cycle once it has already started,
pause the washing machine by pressing the START/
PAUSE button; then select the desired cycle and press
the START/PAUSE button again.
To open the door during a wash cycle, press the START/
PAUSE button; if the LOCK indicator light is switched
off you may open the door. Press the START/PAUSE
button again to restart the wash cycle from the point at
which it was interrupted.
8. THE END OF THE WASH CYCLE. This is indicated
by the illuminated text END. The porthole door may be
opened immediately. If the START/PAUSE indicator light
is flashing, press the button to end the cycle. Open the
door, unload the laundry and switch off the machine.
! If you wish to cancel a cycle which has already begun,
press and hold the button until the cycle stops and the
machine switches off.
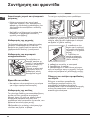
Bag for quilts, curtains and delicate garments
The Aqualtis washing machine makes it easier for you
to wash even the most valuable and delicate garments
in complete confidence thanks to the special bag which
protects the laundry (this is supplied with the machine).
We recommend that the bag is used every time you wash
quilts and padded items with an outer layer made
using synthetic material.

GB
99
Wash cycles and options
Wash options
Extra rinse
By selecting this option, the efficiency of the rinse is increased
and optimal residual detergent removal is guaranteed. It is
particularly useful for skin which is sensitive to detergents. We
recommend this option is used with a full load of washing, or
when a large amount of detergent is required.
! It cannot be used in conjunction with , , , , , .
Easy Iron
By selecting this option, the wash and spin cycles will be
modified in order to reduce the formation of creases.
At the end of the cycle the washing machine drum will
rotate slowly; the “Easy Iron” and START/PAUSE indicator
lights will flash. To end the cycle press the START/PAUSE
button or the “Easy Iron” button.
! It cannot be used in conjunction with , , , , , .
Super Wash
This option offers a high-performance wash due to the greater
quantity of water used in the initial phase of the cycle, and
due to the increased wash cycle duration, is particularly useful
for the removal of stubborn stains. It can be used with or
without bleach. If you desire
bleaching, insert the extra
tray compartment (3) into
compartment 1. When pouring
in the bleach, be careful not to
exceed the “max” level marked
on the central pivot (see figure).
To bleach laundry without
carrying out a full wash cycle,
pour the bleach into the extra
compartment 3, select the
“Rinse” cycle and activate the “Super Wash” option .
! It cannot be used in conjunction with , , , , , ,
, , , .
Prewash
If this function is selected, the pre-wash cycle will run; this is
useful for removing stubborn stains.
N.B.: put the detergent in the relevant compartment.
! It cannot be used in conjunction with , , , , ,
, , , , , , (60°), .
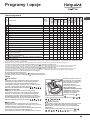
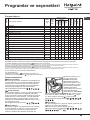
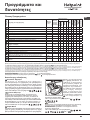
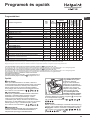
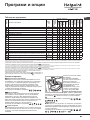
Table of wash cycles
Note: 10 minutes after the START, the machine will recalculate the time remaining until the end of the wash cycle on the basis of the load inside it; this value will then be shown on the display.
The length of cycle shown on the display or in this booklet is an estimation only and is calculated assuming standard working conditions. The actual duration can vary according to factors such as
water temperature and pressure, the amount of detergent used, the amount and type of load inserted, load balancing and any wash options selected.
1) Test wash cycle in compliance with directive 1061/2010: set wash cycle with a temperature of 60°C.
This cycle is designed for cotton loads with a normal soil level and is the most efficient in terms of both electricity and water consumption; it should be used for
garments which can be washed at 60°C. The actual washing temperature may differ from the indicated value.
2) Test wash cycle in compliance with directive 1061/2010: set wash cycle with a temperature of 40°C.
This cycle is designed for cotton loads with a normal soil level and is the most efficient in terms of both electricity and water consumption; it should be used for
garments which can be washed at 40°C. The actual washing temperature may differ from the indicated value.
3) At 60 °C the “Prewash” function cannot be selected.
For all Test Institutes:
2) Long wash cycle for cottons: set wash cycle with a temperature of 40°C.
4) Long wash cycle for synthetics: set wash cycle with a temperature of 40°C.
Icon
Description of the wash cycle
Max.
temp.
(°C)
Max.
speed
(rpm)
Detergent and addi-
tives
Max. load (kg)
Residual dam-
pness %
Energy con-
sumption kWh
Total water lt
Cycle duration
Prewash
Wash
Bleach
Fabric
softener
Multi Colour
20° 1200 -
-
9 - - - 185’
Coloureds Intensive
40° 1200
-
9 - - - 175’
Darks
30° 800 -
-
9 - - - 80’
Synthetics
60° 800
5,5 48 1,21 74 125’
Synthetics (4) 40° 800
5,5 48 0,71 72 105’
Shirts
40° 600 -
2,5 - - - 85’
Duvets: for down-stuffed garments. 30° 1000 -
-
3,5 - - - 120’
Bed&Bath for bedlinen and towels. 60° 1200
9 - - - 160’
Rinse
- 1200 - -
9 - - - 49’
Spin and Pump out - 1200 - - - - 9 - - - 16’
Anti Allergy Plus
60° 1200 -
-
6 - - - 210’
Anti Allergy Delicate
40° 1200 -
-
6 - - - 230’
Ultradelicates
30° 0 -
-
1 - - - 80’
Wool: for wool, cashmere, etc. 40° 800 -
-
2,5 - - - 105’
Mix 30': to refresh lightly soiled garments quickly (not suitable for
wool, silk and clothes which require washing by hand).
30° 800 -
-
4 71 0,20 44 30’
Cotton Standard 60°C (1): heavily soiled whites and resistant colours.
60°
(Max. 90°)
1200
(3)
9 53 0,89 57,5 190’
Cotton Standard 40°C (2): lightly soiled whites and delicate colours. 40° 1200 -
9 53 0,87 88 170’
3
1
2

GB
10
Detergents and laundry
Shirts: use the special wash cycle to wash shirts in
different fabrics and colours to guarantee they receive the
best possible care.
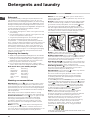
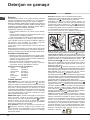
Duvets: to wash double or single duvets (the weight of which
should not exceed 3,5 kg), cushions or clothes padded with
goose down such as puffa jackets, use the special wash
cycle. We recommend that duvets are placed in the drum
with their edges folded inwards (see figure) and that no more
than ¾ of the total volume of the drum is used. To achieve the
best results, we recommend that a liquid detergent is used
and placed inside the detergent dispenser drawer.
Quilts: to wash quilts with a synthetic outer layer, use the
bag provided and set the wash cycle to .
Bedlinen and towels: Use programme to wash bed
linen and towels in one single cycle: it optimises softener
performance and helps you save time and energy. We
recommend the use of powder detergent
Anti Allergy Plus : cycle studied for cotton laundry and
other resistant fabrics to guarantee the removal of the main
allergens such as pollen, mites, cat and dog hair.
Anti Allergy Delicate : cycle studied for cotton laundry
and other resistant fabrics to guarantee the removal of
pollen and cat and dog hair already at 40°.
Ultradelicates: use programme to wash very delicate
garments having strasses or sequins.
We recommend turning the garments inside out before
washing and placing small items into the special bag
for washing delicates. Use liquid detergent on delicate
garments for best results.
To wash Silk garments and Curtains (these should be folded
and placed inside the bag provided), select cycle and then
option (in this case it will also be possible to enable the
“Extra Rinse” option); the machine will end the cycle while
the laundry is soaking and the indicator light will flash.
To drain the water so that the laundry may be removed,
press the START/PAUSE button or the button.
Wool: the wool wash cycle on this Hotpoint-Ariston
machine has been tested and approved by The
Woolmark Company for washing wool garments labelled
as hand washable provided that the garments are
washed according to the instructions on the garment
label and those issued by the manufacturer of this
washing machine. Hotpoint-Ariston is the first washing
machine brand to be approved by The Woolmark
Company for Apparel Care- Platinum for its washing
performance and consumption of energy and water.
(M1135)
In UK, Eire, Hong Kong and India the Woolmark trade mark
is a Certification trade mark.
Detergent
The type and quantity of detergent required depend on the
type of fabric you are washing (cotton, wool, silk, etc.), as
well as its colour, the washing temperature, the level of soiling
and the hardness of the water in the area. Measuring out the
detergent carefully will avoid wastage and help to protect the
environment: although they are biodegradable, detergents still
contain ingredients which alter the balance of nature.
We recommend the following:
• usepowderdetergentsforwhitecottongarmentsand
pre-washing.
• useliquiddetergentsfordelicatecottongarmentsand
for all low-temperature wash cycles.
• usegentleliquiddetergentsforwoolandsilkgarments.
The detergent should be poured into the relevant
compartment - or the dispenser placed directly inside the
drum - before the wash cycle begins. In the latter case, it will
not be possible to select the Cottons with pre-wash cycle.
! Use powder detergent for white cotton garments, for
pre-washing, and for washing at temperatures over 60°C
! Follow the instructions given on the detergent packaging.
! Do not use hand washing detergents because these
create too much foam.
Preparing the laundry
• Shakeoutthegarmentsbeforeloadingthemintothemachine.
• Dividethelaundryaccordingfabrictype(symbolonthe
washing instruction label) and colour, making sure you
separate the coloured garments from the white ones;
• Emptyallpocketsandcheckthebuttons;
• Donotexceedthevalueslistedinthe“Table of wash
cycles”, which refer to the weight of the laundry when dry.
How much does your laundry weigh?
1 sheet 400-500 g
1 pillowcase 150-200 g
1 tablecloth 400-500 g
1 bathrobe 900-1200 g
1 towel 150-250 g
1 pair of jeans 400-500 g
1 shirt 150-200 g
Washing recommendations
Multi Colour: use the cycle to wash medium-soiled
multi-coloured garments or garments of different colours.
Cycle designed to ensure colour care while achieving a 40°
performance at just 20°. We recommend using detergents
that are suitable for coloured washes and active already at
low temperatures.
! We always recommend a separate wash for running
garments and the first time you wash a new coloured item.
Coloureds Intensive: use the cycle on light coloured
garments to remove tough stains without damaging
the integrity and brightness of the colours. The cycle
is studied to guarantee a 60° performance at only 40°.
We recommend the use of detergents suitable to wash
coloured clothes.
Darks: use cycle to wash dark-coloured garments.
This programme is designed to maintain dark colours
over time. We recommend using a liquid detergent for the
best results when washing dark-coloured garments.

GB
11
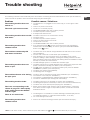
Trouble shooting
Your washing machine could occasionally fail to work. Before contacting the Technical Assistance Centre (see “Assistance”),
make sure that the problem cannot be solved easily using the following list.
Problem:
The washing machine does not
switch on.
The wash cycle does not start.
The washing machine does not fill
with water.
The washing machine door
remains locked.
The machine continuously fills
with water and drains.
The washing machine does not
drain or spin.
The machine vibrates a lot during
the spin cycle.
The washing machine leaks.
The icons corresponding to the
“Phase in progress” flash rapidly
at the same time as the ON/OFF
indicator light.
There is too much foam.
The washing machine door
remains locked.
Possible causes / Solutions:
• Theapplianceisnotpluggedintothesocketfully,ornotenoughtomake
contact.
• Thereisnopowerinthehouse.
• Thedoorisnotclosedproperly.
• TheSTART/PAUSEbuttonhasnotbeenpressed.
• Thewatertaphasnotbeenopened.
• Adelayedstarthasbeenset.
• Thewaterinlethoseisnotconnectedtothetap.
• Thehoseisbent.
• Thewatertaphasnotbeenopened.
• Thereisnowatersupplyinthehouse.
• Thepressureistoolow.
• TheSTART/PAUSEbuttonhasnotbeenpressed.
• Ifyouhaveselectedthe function, at the end of the cycle the washing
machine drum will rotate slowly; to end the cycle press the START/PAUSE
button or the button.
• Thedrainhoseisnotfittedataheightbetween65and100cmfromthefloor
(see “Installation”).
• Thefreeendofthehoseisunderwater(see “Installation”).
• Ifthedwellingisononeoftheupperfloorsofabuilding,theremaybe
problems relating to water drainage, causing the washing machine to fill with
water and drain continuously. Special anti-draining valves are available in shops
and help to prevent this inconvenience.
• Thewalldrainagesystemisnotfittedwithabreatherpipe.
• Thewashcycledoesnotincludedraining:Somewashcyclesrequirethedrain
phase to be started manually (see “Wash cycles and options”).
• The option is enabled: to complete the wash cycle, press the START/
PAUSE button (“Wash cycles and options”).
• Thedrainhoseisbent(see Installation).
• Thedrainageductisclogged.
• Thedrumwasnotunlockedcorrectlyduringinstallation(see “Installation”).
• Themachineisnotlevel(see “Installation” ).
• Themachineistrappedbetweencabinetsandwalls(see “Installation”).
• Theloadisunbalanced(see “Detergents and laundry”).
• Thewaterinlethoseisnotscrewedonproperly(see“Installation”).
• Thedetergentdispenserisblocked(tocleanit,see “Care and maintenance”).
• Thedrainhoseisnotfixedinplaceproperly(see“Installation”).
• Switchoffthemachineandunplugit,waitforapproximately1minuteand
then switch it back on again. If the problem persists, contact the Technical
Assistance Service.
• Thedetergentisnotsuitableformachinewashing(itshoulddisplaythetext
“for washing machines” or “hand and machine wash”, or the like).
• Toomuchdetergentwasused.
• Performthemanualunlockingprocedure(see “Precautions and tips”).
! Note: to exit “Demo mode”, switch machine off, press and hold the two and buttons simultaneously for 3 seconds.

GB
12
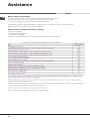
Before calling for Assistance:
• Checkwhetheryoucansolvetheproblembyyourself(see“Trouble shooting”);
• Restartthewashcycletocheckwhethertheproblemhasbeensolved;
• Ifithasnot,contacttheAuthorisedTechnicalAssistanceService.
! If the washing machine has been installed or used incorrectly, you will have to pay for the call-out service.
! Always request the assistance of authorised technicians.
Please have the following information to hand:
• thetypeofproblem;
• theappliancemodel(Mod.);
• theserialnumber(S/N).
The above information can be found on the data plate located on the appliance itself.
Assistance

13
CZ
Česky
Obsah
Instalace, 14-15
Rozbalení a vyrovnání do vodorovné polohy
Připojení k elektrické a k vodovodní síti
Technické údaje
Údržba a péče, 16
Uzavření přívodu vody a vypnutí elektrického napájení
Čištění zařízení
Čištění dávkovače pracích prostředků
Péče o buben
Čištění čerpadla
Kontrola přítokové hadice na vodu
Opatření a rady, 17
Základní bezpečnostní pokyny
Systém automatického vyvážení náplně
Likvidace
Manuální otevření dvířek s průzorem
Popis zařízení, 18-19
Ovládací panel
Spuštení pracího cyklu, 20
Programy a volitelné funkce, 21
Tabulka programů
Možnosti
Prací prostředky a prádlo, 22
Prací prostředek
Příprava prádla
Rady pro praní
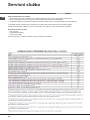
Poruchy a způsob jejich odstranění, 23
Servisní služba, 24
CZ
PRAČKA
AQUALTIS
AQ94F 29D
Návod k instalaci a použití

CZ
14
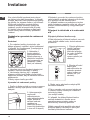
Instalace
! Je velmi důležité uschovat tento návod
za účelem jeho další konzultace. V případě
prodeje, darování nebo přestěhování pračky
se ujistěte, že zůstane uložen v její blízkosti.
! Pozorně si přečtěte uvedené pokyny:
Obsahují důležité informace týkající se
instalace, použití a bezpečnosti při práci.
! V obálce s tímto návodem mužete najít
kromě záruky také součástky potřebné k
instalaci.
Rozbalení a vyrovnání do vodorovné
polohy
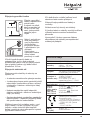
Rozbalení
1. Po rozbalení pračky zkontrolujte, zda
během přepravy nedošlo k jejímu poškození.
V případě, že je poškozena, ji nezapojujte a
obraťte se na prodejce.
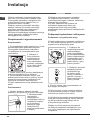
2. Odstraňte 4
šrouby chránící
před poškozením
během přepravy a
příslušnou rozpěrku;
tyto komponenty se
nacházejí v zadní
části (viz obrázek).
3. Uzavřete otvory po šroubech plastovými
krytkami, které se nacházejí v obálce.
4. Uschovejte všechny díly; v prípadě
přepravy pračky bude třeba provést jejich
opětovnou montáž, aby se zamezilo vnitřním
poškozením.
! Obaly nejsou hračky pro děti!
Vyrovnání do vodorovné polohy
1. Pračku je třeba umístit na rovnou a pevnou
podlahu, aniž by byla opřena o stěnu nebo
nábytek.
2. Vykompenzujte
nerovnosti
odšroubováním
nebo zašroubováním
nožek, dokud se
zařízení nebude
nacházet ve
vodorovné poloze
(nesmí být nakloněno
o více než 2 stupně).
! Důsledné vyrovnání do vodorovné polohy
zajistí stabilitu a zabrání vibracím a hlučnosti,
a to zejména ve fázi odstřed’ování.
! V případě instalace na podlahovou krytinu
nebo na koberec nastavte nožky tak, aby pod
pračkou zůstal dostatečný volný prostor pro
ventilaci.
Připojení k elektrické a k vodovodní
síti
Připojení přítokové hadice vody
! Před připojením přítokové hadice k rozvodu
vody nechte odtékat vodu, dokud nebude
průzračná.
1. Připojte přítokovou
hadici k zařízení
prostřednictvím
příslušné přípojky
na vodu, umístěné
v zadní části
vpravo nahoře (viz
obrázek).
2. Připojte přívodní
hadici jejím
zašroubováním ke
kohoutku studené
vody s hrdlem se
závitem 3/4 (viz
obrázek).
3. Dbejte na to, aby hadice nebyla příliš
ohnutá ani stlačená.
! Tlak v rozvodu vody se musí pohybovat
v rozmezí hodnot uvedených v tabulce s
technickými údaji
(viz vedlejší strana).
! V případě, že délka přítokové hadice
nebude dostatečná, obraťte se na
specializovanou prodejnu nebo na
autorizovaný technický personál.
! Nikdy nepoužívejte použité nebo staré
přítokové hadice, ale hadice, které jsou
součástí příslušenství zařízení.

15
CZ
65 - 100 cm
Připojení vypouštěcí hadice
Připojte vypouštěcí
hadici k odpadovému
potrubí nebo
k odpadu ve stěně,
který se nachází od
65 do 100 cm nad
zemí; jednoznačně
zamezte jejímu
ohybu.
Nebo ji zachyťte na
okraj umyvadla či
vany a připevněte
ji ke kohoutku
přivázáním držáku
z příslušenství (viz
obrázek).
Volný konec
vypouštěcí hadice
nesmí zůstat
ponořený ve vodě.
! Použití prodlužovacích hadic se
nedoporučuje; je-li to však nezbytné,
prodlužovací hadice musí mít stejný průměr
jako originální hadice a její délka nesmí
přesáhnout 150 cm.
Připojení k elektrické síti
Před zasunutím zástrčky do zásuvky se
ujistěte, že:
• Je zásuvka uzemněna a že vyhovuje normám;
• Je zásuvka schopna snést maximální zátěž
odpovídající jmenovitému příkonu zařízení,
uvedenému v tabulce s technickými údaji
(viz vedle);
• Hodnota napájecího napětí odpovídá
údajům uvedených v tabulce s technickými
údaji (viz vedle);
• Se zásuvka shoduje se zástrčkou napájecího
kabelu zařízení. V opačném případě je třeba
dát vyměnit zásuvku nebo zástrčku.
! Zařízení nesmí být umístěno venku – pod
širým nebem, a to ani v případě, že by se
jednalo o místo chráněné před nepřízní
počasí, protože je velmi nebezpečné vystavit
jej působení deště a bouří.
! Po denitivním umístění zařízení musí
zásuvka zůstat snadno přístupná.
! Nepoužívejte prodlužovací kabely a
rozvodky.
! Kabel nesmí být ohnutý ani stlačený.
! Výměna kabelu a zástrčky musí být svěřena
výhradně autorizovanému technickému
personálu.
Upozornění! Výrobce neponese žádnou
odpovědnost za následky nerespektování
uvedených předpisů.
Technické údaje
Model AQ94F 29D
Rozmìry
šíøka 59,5 cm
výška 85 cm
hloubka 64,5 cm
Kapacita od 1 do 9 kg
Napájení
Viz štítek s technickými úda-
ji, aplikovaný na zarízení.
Pøipojení k
rozvodu vody
maximální tlak
1 MPa (10 bar)
minimální tlak
0.05 MPa (0.5 bar)
kapacita bubnu 71 litrù
Rychlost
odstøeïování
a¡z do 1200 otáèek za
minutu
Kontro-
lní pro-
gramy podle
směrnic
1061/2010
1015/2010
Program
; BAVLNA
STANDARD 60°.
program
; BAVLNA
STANDARD 40°.
Toto zaøízení odpovídá
následujícím normám
Evropské unie:
- 2004/108/CE (Elektro-
magnetická kompatibilita)
- 2006/95/CE (Nízké
napìtí)
- 2012/19/EU
Hluènost
(dB(A)
re 1 pW)
Praní: 52
Odstøeïování: 74

CZ
16
Uzavření přívodu vody a vypnutí
elektrického napájení
• Po každém praní uzavřete přívod vody.
Tímto způsobem dochází k omezení
opotřebení rozvodu vody zařízení a ke
snížení nebezpečí úniku vody.
• Před zahájením čištění zařízení a během
operací údržby je třeba vytáhnout zástrčku
přívodního kabelu ze zásuvky.
Čištění zařízení
Vnější části a části z gumy mohou být
čištěny hadrem navlhčeným ve vlažné vodě
a saponátu. Nepoužívejte rozpouštědla ani
abrazivní látky.
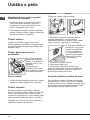
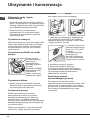
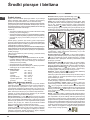
Čištění dávkovače pracích
prostředků
Za účelem vytažení
dávkovače stiskněte
páčku (1) a táhněte ji
směrem ven (2) (viz
obrázek).
Umyjte jej pod
proudem vody; tento
druh vyčištění je třeba
provádět pravidelně.
Péče o buben
• Dvířka nechte pokaždé pootevřená, aby se
zabránilo tvorbě nepříjemných zápachů.
Čištění čerpadla
Součástí pračky je samočisticí čerpadlo,
které nevyžaduje údržbu. Může se však stát,
že se v jeho vstupní části, určené k jeho
ochraně a nacházející se v jeho spodní části,
zachytí drobné předměty (mince, knoíky).
! Ujistěte se, že byl prací cyklus ukončen, a
vytáhněte zástrčku ze zásuvky.
Přístup ke vstupní části čerpadla:
1. Sejměte krycí panel na přední straně
zařízení zatlačením na jeho střed a
následným zatlačením směrem dolů z obou
stran a poté jej vytázněte (viz obrázky).
2. Připravte nádobu na
zachycení vody, která
vyteče ven (približne
1,5 l) (viz obrázek);
3. Odšroubujte víko
otáčením proti směru
hodinových ručiček
(viz obrázek);
4. Dokonale vyčistěte vnitřek;
5. Zašroubujte zpět víko;
6. Namontujte zpět panel, přičemž se
před jeho přisunutím k zařízení ujistěte, že
došlo ke správnému zachycení háčků do
příslušných podélných otvorů.
Kontrola přítokové hadice na vodu
Stav přítokové hadice je třeba zkontrolovat
alespoň jednou ročně. Jsou-li na ní viditelné
praskliny nebo trhliny, je třeba ji vyměnit: silný
tlak působící na hadici během pracího cyklu
by mohl způsobit její náhlé roztržení.
1
2
1
2
1
2
Údržba a péče

17
CZ
množství recyklovaných a znovupoužitých materiálů,
ze kterých jsou tato zařízení složena, a aby se
zabránilo možným ublížením na zdraví a škodám na
životním prostředí. Symbolem je přeškrtnutý koš,
uvedený na všech výrobcích s cílem připomenout
povinnosti spojené se separovaným sběrem.
Podrobnější informace týkající se správného způsobu
vyřazení elektrospotřebičů z provozu mohou jejich
držitelé získat tak, že se obrátí na navrženou veřejnou
instituci nebo na prodejce.
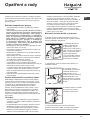
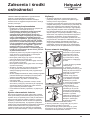
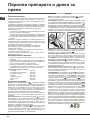
Manuální otevření dvířek s průzorem
V případě, že není možné otevřít dvířka s průzorem
z důvodu výpadku elektrické energie a přejete si prádlo
pověsit, postupujte následovně:
1. Vytáhněte zástrčku ze
zásuvky elektrické sítě.
2. Zkontrolujte, zda je
hladina vody uvnitř zařízení
nižší, než je úroveň otevření
dvíře; v opačném případě
vypusťte přebytečnou
vodu a vypouštěcí hadicí a
zachyťte ji do vědra, jak je
znázorněno na obrázku.
3. Sejměte kdycí panel na přední straně pračky (viz
následující strana).
4. S použitím jazýčku
znázorněného na obrázku
potáhněte směrem ven
plastové táhlo, aby se
uvolnilo z dorazu; současně
jej táhněte směrem ven,
dokud neuslyšíte „cvaknutí“
poukazující na odblokování
dvířek.
5. Otevřete dvířka; v případě,
že to ješte není možné,
zopakuje operaci znovu.
6. namontujte zpět panel, přičemž se před jeho
přisunutím k zařízení ujistěte, že došlo ke správnému
zachycení háčků do příslušných podélných otvorů.
Opatření a rady
! Pračka byla navržena a vyrobena v souladu s platnými
mezinárodními bezpečnostními předpisy. Tato upozornění
jsou uváděna z bezpečnostních důvodů a je třeba si je
pozorně přečíst.
Základní bezpečnostní pokyny
• Toto zařízení bylo navrženo výhradně pro použití v
domácnosti.
• Toto zařízení mohou používat děti od 8 let a
osoby se sníženými fyzickými, senzorickými
nebo duševními schopnostmi nebo osoby s
nedostatečnými zkušenostmi a znalostmi,
když se nacházejí pod náležitým dohledem
nebo když byly náležitě vyškoleny ohledně
bezpečného použití zařízení a uvědomují
si související nebezpečí. Děti si nesmí hrát
se zařízením. Děti nesmí provádět operace
údržby a čištění bez dohledu.
• Nedotýkejte se zařízení bosí nebo v případě, že máte
mokré nebo vlhké ruce či nohy.
• Nevytahujte zástrčku ze zásuvky tahem za kabel, ale
uchopením za zástrčku.
• Nedotýkejte se odčerpávané vody, protože může mít
velmi vysokou teplotu.
• Nepokoušejte se o násilné otevření dvířek s průzorem:
mohlo by dojít k poškození bezpečnostního uzávěru,
který zabraňuje náhodnému otevření.
• Při výskytu poruchy se v žádném případě
nepokoušejte o opravu vnitřních částí zařízení.
• Vždy mějte pod kontrolou děti a zabraňte tomu, aby se
přibližovaly k zařízení během pracího cyklu.
• V případě potřeby přemísťujte zařízení ve dvou nebo
ve třech a věnujte celé operaci zvláštní pozornost.
Nikdy se nepokoušejte zařízení přemísťovat sami, je
totiž velmi těžké.
• Před zahájením vkládání prádla zkontrolujte, zda je
buben prázdný.
Systém automatického vyvážení náplně
Před každým odstřeďováním buben provede otáčení
rychlostí, která mírně převyšuje rychlost praní, aby se
odstranily vibrace a aby se náplň rovnoměrně rozložila.
V případě, že po několikanásobných pokusech o
vyvážení prádlo ještě nebude správně vyváženo,
zařízení provede odstřeďování nižší rychlostí, než je
přednastavená rychlost. Při nadměrném nevyvážení
pračka provede namísto odstřeďování vyvážení. Pro
dosažení rovnoměrnějšího rozložení náplně a jejího
správného vyvážení se doporučuje míchat velké a malé
kusy prádla.
Likvidace
• Likvidace obalových materiálů: při jejich odstranění
postupujte v souladu s místními předpisy a dbejte na
možnou recyklaci.
• Evropská směrnice 2012/19/EU o odpadu tvořeném
elektrickými a elektronickými zařízeními nařizuje,
že elektrospotřebiče nesmí být likvidovány v rámci
běžného pevného městského odpadu. Vyřazená
zařízení musí být sesbírána zvlášť, aby se zvýšilo

CZ
18
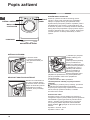
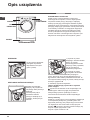
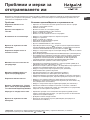
DVÍŘKA S PRŮZOREM
K otevření dvířek
s průzorem používejte
vždy příslušné madlo (viz
obrázek).
DÁVKOVAČ PRACÍCH PROSTŘEDKŮ
Nachází se uvnitř zařízení a
je k němu umožněn přístup
po otevření dvířek. Informace
týkající se dávkování pracích
prostředků jsou uvedeny
v kapitole „Prací prostředky
a prádlo“.
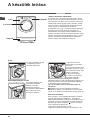
1. přihrádka pro předpírku:
použijte práškový prací
prostředek.
! Před naplněním přihrádky
pracím prostředkem se
ujistěte, že v dávkovači není
vložena přídavná přihrádka 3.
2. přihrádka pro praní: V
případě použití tekutého
pracího prostředku se
doporučuje použít pro
správné dávkování malou
přepážku A z příslušenství. Pro použití práškového
pracího prostředku vložte malou přepážku do
prohloubeniny B.
3. přídavná nádobka: Bělicí prostředek
! Použití přídavné nádobky 3 vylučuje možnost
předpírky.
přihrádka pro přídavné prací prostředky: pro tekutou
aviváž nebo jiné tekuté přídavné prostředky.
Doporučujeme, abyste nikdy nepřekračovali maximální
úroveň, která je vyznačena mřížkou, a rozředili
koncentrovanou aviváž.
Pohotovostní režim
Za účelem shody s novými předpisy souvisejícími s
energetickou úsporou je tato pračka vybavena systémem
automatického vypnutí (přechodu do pohotovostního
režimu – standby), který je aktivován po uplynutí 30
minut, když se pračka nepoužívá. Krátce stiskněte
tlačítko ON/OFF a vyčkejte na obnovení činnosti
zařízení.
Spotřeba v off-mode: 0,5 W
Spotřeba v Left-on: 8 W
OVLÁDACÍ
PANEL
DVÍŘKA S PRŮZOREM
MADLO DVÍŘEK
S PRŮZOREM
PODSTAVEC
NASTAVITELNÉ NOŽKY
Popis zařízení
3
1
2
1
8
0
2
1
0
1
5
0
1
2
0
9
0
6
0
B
A
SYSTÉM DIRECT INJECTION
Pračka je vybavena inovativní technologií „Direct
Injection“, která rychle rozpouští prací prostředek a
aktivuje co nejlépe všechny jeho jednotlivé složky.
Systém zaručuje kompletní použití a rozpuštění pracího
prostředku díky jeho smíšení s vodou ještě dříve, než
se dostane na prádlo. To umožňuje dosáhnout dokonalé
čistoty již při nízkých teplotách a spojit výraznou úsporu
energie s dokonalou péčí o barvy a vlákna. Technologie
„Direcet Injection“ se aktivuje automaticky ve všech
cyklech.

19
CZ
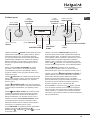
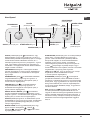
Ovládací panel
Tlačítko skontrolkou ON/OFF: Krátké stisknutí tohoto
tlačítka slouží k zapnutí nebo vypnutí zařízení. Zelená
kontrolka poukazuje na to, že je zařízení zapnuté.
Pro vypnutí pračky během praní je třeba držet tlačítko
stisknuté déle, přibližně 3 sek.; krátké nebo náhodné
stisknutí neumožní vypnutí pračky. Vypnutí zařízení
během praní způsobí zrušení probíhajícího pracího
programu.
Otočný ovladač VOLBY PROGRAMŮ: je možné
jím otáčet v obou směrech. Za účelem nastavení
nejvhodnějšího programu si prohlédněte “Tabulka
programů”. Během pracího programu zůstane otočný
knoík bez pohybu.
Tlačítko TEPLOTA: Jeho stisknutí slouží ke změně
teploty nebo vyloučení ohřevu; zvolená hodnota bude
zobrazena na displeji nad tlačítkem (viz “Spuštení
pracího cyklu”).
Tlačítko ODSTŘEĎOVÁNÍ: Jeho stisknutí slouží ke
změně rychlosti nebo k úplnému vyloučení odstřeďování;
zvolená hodnota nad tlačítkem (viz Spuštění pracího
cyklu).
Tlačítko ODLOŽENÝ START: Jeho stisknutí slouží
k nastavení odloženého startu zvoleného programu;
hodnota nastaveného odložení bude zobrazena na
displeji nad tlačítkem (viz “Spuštení pracího cyklu”).
Tlačítka s kontrolkami VOLITELNÉ FUNKCE: Slouží
k volbě jednotlivých nabízených volitelných funkcí.
Příslušná kontrolka zvolené volitelné funkce zůstane
rozsvícena (viz “Spuštení pracího cyklu”).
Ikony FÁZE PRANÍ: se rozsvítí za účelem zobrazování
průběhu cyklu (Praní - Extra Máchání -
Odstřeďování - Vypouštění ). Nápis se rozsvítí
po ukončení cyklu.
Tlačítko s kontrolkou START/PAUSE: když zelená
kontrolka začne pomalu blikat, stiskněte toto tlačítko za
účelem zahájení praní. Po zahájení cyklu se kontrolka
rozsvítí stálým světlem. Přejete-li si přerušit praní, znovu
stiskněte tlačítko; kontrolka bude blikat oranžovým
světlem. Když je kontrolka „LOCK“ zhasnutá, je možné
otevřít dvířka s průzorem. Pro opětovné zahájení cyklu
z místa, ve kterém byl přerušen, znovu stiskněte tlačítko.
Kontrolka LOCK: poukazuje na to, že dvířka
s průzorem jsou zablokována. Pro otevření dvířek je
třeba přerušit prací cyklus (viz “Spuštení pracího cyklu”).
Tlačítko s kontrolkou ZABLOKOVÁNÍ TLAČÍTEK: za
úcelem aktivace nebo zrušení zablokování ovládacího
panelu držte stisknuté tlačítko přibližně 2 sekundy.
Rozsvícená kontrolka poukazuje na to, že ovládací
panel je zablokován (s výjimkou tlačítko ON/OFF). Tímto
způsobem se zamezí náhodným změnám programu,
zejména v případě, že jsou v domácnosti děti.
Kontrolka EKO: K rozsvícení ikony dojde v případě,
že se při změně parametru praní dosáhne energetické
úspory nejméne 10%. Kromě toho se ještě před aktivací
režimu „Stand by“ na zařízení ikona rozsvítí na několik
málo sekund; při vypnutém zařízení je odhad energetické
úspory přibližně 80%.
Otočný ovladač
PROGRAMŮ
Tlačítko
ODLOŽENÝ
START
DISPLEJ
Tlačítko s kontrolkou
ON/OFF
Tlačítko TEPLOTA
Kontrolka
LOCK
Kontrolka
EKO
Tlačítko s kontrolkou
ZABLOKOVÁNÍ TLAČÍTEK
Tlačítko s kontrolkou
START/PAUSE
Ikony
FÁZE PRANÍ
Tlačítko
ODSTŘEĎOVÁNÍ
Tlačítka
s kontrolkami
VOLITELNÉ
FUNKCE
Tlačítka
s kontrolkami
VOLITELNÉ
FUNKCE

CZ
20
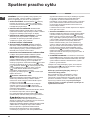
POZNÁMKA: při prvním použití pračky spusťte prací
cyklus bez prádla, s pracím práškem a nastaveným
pracím programem pro vlnu 90°C, bez předpírky.
1. ZAPNUTÍ ZAŘÍZENÍ. Stiskněte tlačítko . Všechny
kontrolky se rozsvítí na 1 sekundu a poté zůstane
rozsvícená kontrolka tlačítka a kontrolka START/
PAUSEbude pomalu blikat.
2. NAPLŇTE PRAČKU PRÁDLEM. Otevřete dvířka.
Naplňte práčku prádlem a dbejte přitom, aby nedošlo
k překročení množství náplně, které je uvedeno v tabulce
programů na následující straně nebo na displeji.
3. NADÁVKUJTE PRACÍ PROSTŘEDEK. Vytáhněte
dávkovač pracích prostředků a naplňte prací
prostředek do příslušných přihrádek způsobem
vysvětleným v části „Popis zařízení“.
4. ZAVŘETE DVÍŘKA S PRŮZOREM.
5. ZVOLTE PRACÍ PROGRAM. Otáčejte OTOČNÝ
OVLADAČ VOLBY PROGRAMU směrem doprava
nebo doleva, dokud nezvolíte požadovaný program;
budou přiřazeny teploty, rychlost odstřeďování a
intenzita praní, které se mohou měnit.
6. NASTAVTE PRACÍ PROGRAM DLE VAŠICH POTŘEB.
Použijte k tomu příslušná tlačítka ovládacího panelu:
Změňte teplotu a/nebo odstřeďování.
Zařízení automaticky zobrazuje maximální teplotu a
rychlost odstřeďování pro nastavený program nebo
poslední zvolené hodnoty, jsou-li kompatibilní se
zvoleným programem. Stisknutím tlačítka je možné
postupně snížit teplotu až po praní ve studené vodě
( ). Stisknutím tlačítka je možné postupně snížit
rychlost odstřeďování až po jeho úplné vyloučení
( ). Další stisknutí tlačítek obnoví nastavení
maximálních přednastavených hodnot.
! Výjimka: při volbě programu
bude možné zvýšit
teplotu až na 90°C.
Nastavení odloženého startu.
Postupným stisknutím příslušného tlačítka je možné
dosáhnout požadované doby odložení. Během
nastavování bude zobrazena doba odložení spolu
s blikajícím symbolem .
Po nastavení odloženého startu bude na displeji
zobrazen rozsvícený symbol a doba trvání
cyklu. Při jednom stisknutí tlačítka bude zobrazena
nastavená doba odložení.
Pro zrušení odloženého startu tisknete tlačítko, dokud
se nezobrazí nápis OFF; zhasne symbol .
! Po stisknutí tlačítka START/PAUSE bude možné
změnit hodnotu odložení startu pouze jejím snížením.
Změňte vlastnosti cyklu.
• Stisknutím tlačítka aktivujte volitelnou funkci; na
displeji se zobrazí název volitelné funkce a rozsvítí se
kontrolka odpovídající danému tlačítku.
• Opětovným stisknutím tlačítka můžete zrušit volbu použití
volitelné funkce; na displeji se objeví název volitelné
funkce a nápis OFF a příslušná kontrolka zhasne.
! Když zvolená volitelná funkce není kompatibilní
s nastaveným programem, tato nekompatibilita bude
signalizována blikáním kontrolky a akustickým signálem
(3 pípnutí) a volitelná funkce nebude aktivována.
! V případě, že zvolená volitelná funkce není
kompatibilní s jinou předem zvolenou funkcí, kontrolka
první volitelné funkce bude blikat a bude aktivována
pouze druhá, přičemž kontrolka zvolené funkce se
rozsvítí stálým světlem.
! Volitelné funkce mohou změnit doporučenou náplň a/
nebo dobu trvání cyklu.
7. SPUSŤTE PROGRAM. Stiskněte tlačítko START/
PAUSE. Příslušná kontrolka se rozsvítí stálým světlem
a dvířka se zablokují (kontrolka LOCK se rozsvítí).
Během pracího cyklu se postupně rozsvítí příslušné
ikony, odpovídající jednotlivým fázím praní, informující
o jeho průběhu. Za účelem změny programu během
pracího cyklu přerušte činnost pračky stisknutím
tlačítka START/PAUSE; poté zvolte požadovaný
cyklus a opětovně stiskněte tlačítko START/PAUSE.
Aby bylo možné otevrít dvírka behem pracího cyklu,
je treba stisknout tlacítko START/PAUSE; když je
kontrolka LOCK zhasnutá, je možné otevřít dvířka.
Opětovným stisknutím tlačítka START/PAUSE
opětovně uveďte do činnosti prací program z bodu, ve
kterém byl přerušen.
8. UKONČENÍ PROGRAMU. Je oznámeno rozsvícením
nápisu END. Dvířka s průzorem bude možné okamžitě
otevřít. Když kontrolka START/PAUSE bliká, ukončete
cyklus stisknutím tlačítka. Otevřete dvířka, vyložte
prádlo a vypněte zařízení.
! Přejete-li si zrušit již zahájený cyklus, znovu dlouze
stiskněte tlačítko . Cyklus bude přerušen a dojde k
automatickému vypnutí zařízení.
Sáček pro prošívané přikrývky, záclony a
choulostivé kusy prádla
Díky speciálnímu sácku, dodávanému v rámci
príslušenství, vám Aqualtis umožní prát i vaše
nejcennejší a nejchoulostivejší kusy prádla, pricemž
jim zarucí maximální ochranu. V každém prípade se
doporucuje používat sácek pro praní prošívaných
prikrývek a perin s vnejším povlakem vyrobeným ze
syntetického materiálu.
Spuštení pracího cyklu
Sayfa yükleniyor...
Sayfa yükleniyor...
Sayfa yükleniyor...
Sayfa yükleniyor...
Sayfa yükleniyor...
Sayfa yükleniyor...
Sayfa yükleniyor...
Sayfa yükleniyor...
Sayfa yükleniyor...
Sayfa yükleniyor...
Sayfa yükleniyor...
Sayfa yükleniyor...
Sayfa yükleniyor...
Sayfa yükleniyor...
Sayfa yükleniyor...
Sayfa yükleniyor...
Sayfa yükleniyor...
Sayfa yükleniyor...
Sayfa yükleniyor...
Sayfa yükleniyor...
Sayfa yükleniyor...
Sayfa yükleniyor...
Sayfa yükleniyor...
Sayfa yükleniyor...
Sayfa yükleniyor...
Sayfa yükleniyor...
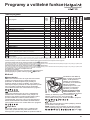
Sayfa yükleniyor...
Sayfa yükleniyor...
Sayfa yükleniyor...
Sayfa yükleniyor...
Sayfa yükleniyor...
Sayfa yükleniyor...
Sayfa yükleniyor...
Sayfa yükleniyor...
Sayfa yükleniyor...
Sayfa yükleniyor...
Sayfa yükleniyor...
Sayfa yükleniyor...
Sayfa yükleniyor...
Sayfa yükleniyor...
Sayfa yükleniyor...
Sayfa yükleniyor...
Sayfa yükleniyor...
Sayfa yükleniyor...
Sayfa yükleniyor...
Sayfa yükleniyor...
Sayfa yükleniyor...
Sayfa yükleniyor...
Sayfa yükleniyor...
Sayfa yükleniyor...
Sayfa yükleniyor...
Sayfa yükleniyor...
Sayfa yükleniyor...
Sayfa yükleniyor...
Sayfa yükleniyor...
Sayfa yükleniyor...
Sayfa yükleniyor...
Sayfa yükleniyor...
Sayfa yükleniyor...
Sayfa yükleniyor...
Sayfa yükleniyor...
Sayfa yükleniyor...
Sayfa yükleniyor...
Sayfa yükleniyor...
-
 1
1
-
 2
2
-
 3
3
-
 4
4
-
 5
5
-
 6
6
-
 7
7
-
 8
8
-
 9
9
-
 10
10
-
 11
11
-
 12
12
-
 13
13
-
 14
14
-
 15
15
-
 16
16
-
 17
17
-
 18
18
-
 19
19
-
 20
20
-
 21
21
-
 22
22
-
 23
23
-
 24
24
-
 25
25
-
 26
26
-
 27
27
-
 28
28
-
 29
29
-
 30
30
-
 31
31
-
 32
32
-
 33
33
-
 34
34
-
 35
35
-
 36
36
-
 37
37
-
 38
38
-
 39
39
-
 40
40
-
 41
41
-
 42
42
-
 43
43
-
 44
44
-
 45
45
-
 46
46
-
 47
47
-
 48
48
-
 49
49
-
 50
50
-
 51
51
-
 52
52
-
 53
53
-
 54
54
-
 55
55
-
 56
56
-
 57
57
-
 58
58
-
 59
59
-
 60
60
-
 61
61
-
 62
62
-
 63
63
-
 64
64
-
 65
65
-
 66
66
-
 67
67
-
 68
68
-
 69
69
-
 70
70
-
 71
71
-
 72
72
-
 73
73
-
 74
74
-
 75
75
-
 76
76
-
 77
77
-
 78
78
-
 79
79
-
 80
80
-
 81
81
-
 82
82
-
 83
83
-
 84
84


HOTPOINT/ARISTON AQ94F 29D EU Kullanici rehberi
- Kategori
- Çamaşır makineleri
- Tip
- Kullanici rehberi