Indesit IWE 7108 S (EU) Kullanici rehberi
- Kategori
- Çamaşır makineleri
- Tip
- Kullanici rehberi

1
GB
English,1
Contents
Installation, 2-3
Unpacking and levelling
Connecting the electricity and water supplies
The first wash cycle
Technical data
Description of the washing machine, 4-5
Control panel
Display
Running a wash cycle, 6
Wash cycles and options, 7
Table of wash cycles
Wash options
Detergents and laundry, 8
Detergent dispenser drawer
Preparing the laundry
Special wash cycles
Load balancing system
Precautions and tips, 9
General safety
Disposal
Opening the porthole door manually
Care and maintenance, 10
Cutting off the water or electricity supply
Cleaning the washing machine
Cleaning the detergent dispenser drawer
Caring for the door and drum of your appliance
Cleaning the pump
Checking the water inlet hose
Troubleshooting, 11
Service, 12
GB
IWE 7108 S
Instructions for use
WASHING MACHINE
TR
Türkçe,13

2
GB
Installation
! This instruction manual should be kept in a safe place for
future reference. If the washing machine is sold, transferred
or moved, make sure that the instruction manual remains
with the machine so that the new owner is able to familiari-
se himself/herself with its operation and features.
! Read these instructions carefully: they contain vital infor-
mation relating to the safe installation and operation of the
appliance.
Unpacking and levelling
Unpacking
1. Remove the washing machine from its packaging.
2. Make sure that the washing machine has not been
damaged during the transportation process. If it has been
damaged, contact the retailer and do not proceed any
further with the installation process.
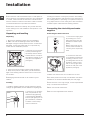
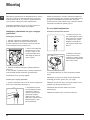
3. Remove the 4 protective
screws (used during tran-
sportation) and the rubber
washer with the correspon-
ding spacer, located on the
rear part of the appliance
(see figure).
4. Close off the holes using the plastic plugs provided.
5. Keep all the parts in a safe place: you will need them
again if the washing machine needs to be moved to ano-
ther location.
! Packaging materials should not be used as toys for
children.
Levelling
1. Install the washing machine on a flat sturdy floor, without
resting it up against walls, furniture cabinets or anything else.
2. If the floor is not perfectly
level, compensate for any
unevenness by tightening
or loosening the adjustable
front feet (see figure); the an-
gle of inclination, measured
in relation to the worktop,
must not exceed 2°.
Levelling the machine correctly will provide it with stability,
help to avoid vibrations and excessive noise and prevent it
from shifting while it is operating. If it is placed on carpet or
a rug, adjust the feet in such a way as to allow a sufficient
ventilation space underneath the washing machine.
Connecting the electricity and water
supplies
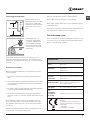
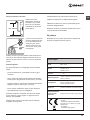
Connecting the water inlet hose
1. Connect the supply pipe
by screwing it to a cold
water tab using a 3/4 gas
threaded connection (see
figure).
Before performing the con-
nection, allow the water to
run freely until it is perfectly
clear.
2. Connect the inlet hose
to the washing machine by
screwing it onto the corre-
sponding water inlet of the
appliance, which is situa-
ted on the top right-hand
side of the rear part of the
appliance (see figure).
3. Make sure that the hose is not folded over or bent.
! The water pressure at the tap must fall within the values
indicated in the Technical details table (see next page).
! If the inlet hose is not long enough, contact a specialised
shop or an authorised technician.
! Never use second-hand hoses.
! Use the ones supplied with the machine.

3
GB
65 - 100 cm
Connecting the drain hose
Connect the drain hose,
without bending it, to a drai-
nage duct or a wall drain
located at a height between
65 and 100 cm from the
floor;
alternatively, rest it on
the side of a washbasin
or bathtub, fastening the
duct supplied to the tap
(see figure). The free end
of the hose should not be
underwater.
! We advise against the use of hose extensions; if it is
absolutely necessary, the extension must have the same
diameter as the original hose and must not exceed 150 cm
in length.
Electrical connections
Before plugging the appliance into the electricity socket,
make sure that:
• thesocketisearthedandcomplieswithallapplicable
laws;
• thesocketisabletowithstandthemaximumpowerload
of the appliance as indicated in the Technical data table
(see opposite);
• thepowersupplyvoltagefallswithinthevaluesindicated
in the Technical data table (see opposite);
• thesocketiscompatiblewiththeplugofthewashing
machine. If this is not the case, replace the socket or the
plug.
! The washing machine must not be installed outdoors,
even in covered areas. It is extremely dangerous to leave
the appliance exposed to rain, storms and other weather
conditions.
! When the washing machine has been installed, the elec-
tricity socket must be within easy reach.
! Do not use extension cords or multiple sockets.
! The cable should not be bent or compressed.
! The power supply cable must only be replaced by autho-
rised technicians.
Warning! The company shall not be held responsible in the
event that these regulations are not respected.
The first wash cycle
Once the appliance has been installed, and before you use
it for the first time, run a wash cycle with detergent and no
laundry, using the wash cycle 2.
Technical dat
Model
IWE 7108 S
Dimensions
width 59.5 cm
height 85 cm
depth 53,5 cm
Capacity
from 1 to 7 kg
Electrical
connections
please refer to the technical data plate fixed
to the machine
Water connection
maximum pressure 1 MPa (10 bar)
minimum pressure 0.05 MPa (0.5 bar)
drum capacity 52 litres
Spin speed
up to 1000 rotations per minute
Test
Programmes
according to
2010/1061
Programme 2: temperature 60°C and 40°C;
This appliance conforms to the following EC
Directives:
- 89/336/EEC dated 03/05/89 (Electro-
magnetic Compatibility) and subsequent
modifications
- 2002/96/EC
- 2006/95/EC Low Voltage)

4
GB
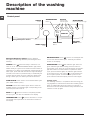
Detergent dispenser drawer: used to dispense
detergents and washing additives (see “Detergents and
laundry”).
ON/OFF button : press this briefly to switch the ma-
chine on or off. The START/PAUSE indicator light, which
flashes slowly in a green colour shows that the machine is
switched on. To switch off the washing machine during the
wash cycle, press and hold the button for approximately 3
seconds; if the button is pressed briefly or accidentally the
machine will not switch off. If the machine is switched off
during a wash cycle, this wash cycle will be cancelled.
WASH CYCLE knob: used to set the desired wash cycle
(see “Table of wash cycles”).
OPTION buttons with indicator light: used to select the
available options. The indicator light corresponding to the
selected option will remain lit.
SPIN button : press to reduce or completely exclude
the spin cycle - the value is indicated on the display.
TEMPERATURE button : press to decrease or comple-
tely exclude the temperature: the value will be shown on
the display.
DELAYED START button : press to set a delayed start
time for the selected wash cycle. The delay time will be
shown on the display.
START/PAUSE button with indicator light: when the
green indicator light flashes slowly, press the button to
start a wash cycle. Once the cycle has begun the indicator
light will remain lit in a fixed manner. To pause the wash
cycle, press the button again; the indicator light will flash
in an orange colour. If the symbol is not illuminated, the
door may be opened. To start the wash cycle from the
point at which it was interrupted, press the button again.
Standby mode
This washing machine, in compliance with new energy sa-
ving regulations, is fitted with an automatic standby system
which is enabled after about 30 minutes if no activity is
detected. Press the ON-OFF button briefly and wait for the
machine to start up again.
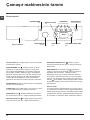
Description of the washing
machine
Control panel
TEMPERATURE
Button
Detergent dispenser drawer
OPTION
buttons with
indicator lights
ON/OFF
button
SPIN SPEED
Button
START/PAUSE
button with indicator light
DISPLAY
DELAYED
START Button
WASH CYCLE
knob

5
GB
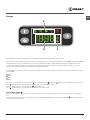
Display
The display is useful when programming the machine and provides a great deal of information.
The duration of the available programmes and the remaining time of a running cycle appear in section A; if the DELAY START
option has been set, the countdown to the start of the selected programme will appear. Pressing the relative button, the
machine automatically displays the maximum temperature and spin speed values set for the selected cycle, or the most
recently-used settings if they are compatible with the selected cycle.
The “programme phases” relative to the selected programme and the “programme phase” of the running programme appear
in section B:
Wash
Rinse
Spin
Drain
The icons corresponding to “temperature” , “Programmed start” and “spin” appear in section C from top to bottom:
If the symbol lights up, the display will visualise the set “temperature” value.
When a “delayed start” has been set, the symbol lights up.
If the symbol lights up, the display will visualise the set “spin” value.
Door locked symbol
The lit symbol indicates that the door is locked. To prevent any damage, wait until the symbol turns off before opening the
door.
To open the door while a cycle is in progress, press the START/PAUSE button; if the DOOR LOCKED symbol is switched
off the door may be opened.
B
CA

6
GB
Running a wash cycle
1. SWITCH THE MACHINE ON. Press the button;
the START/PAUSE indicator light will flash slowly in a
green colour.
2. LOAD THE LAUNDRY. Open the porthole door.
Load the laundry, making sure you do not exceed
the maximum load value indicated in the table of
programmes on the following page.
3. MEASURE OUT THE DETERGENT. Pull out the
detergent dispenser drawer and pour the detergent into
the relevant compartments as described in “Detergents
and laundry”.
4. CLOSE THE DOOR.
5. SELECT THE WASH CYCLE. Set the WASH CYCLE
knob to the desired programme; a temperature and
spin speed is set for each wash cycle; these may be
adjusted. The duration of the cycle will appear on the
display.
6. CUSTOMISE THE WASH CYCLE. Use the relevant
buttons:
Modifying the temperature and/or spin
speed. The machine automatically displays the
maximum temperature and spin speed values set for
the selected cycle, or the most recently-used settings
if they are compatible with the selected cycle. The
temperature can be decreased by pressing the
button, until the cold wash “OFF” setting is reached.
The spin speed may be progressively reduced by
pressing the button, until it is completely excluded
(the “OFF” setting). If these buttons are pressed again,
the maximum values are restored.
Setting a delayed start.
To set a delayed start for the selected programme,
press the corresponding button repeatedly until the
required delay period has been reached. When this
option is enabled, the symbol lights up on the
display. To remove the delayed start option press the
button until the text “OFF” appears on the display.
Modifying the cycle settings.
• Press the button to enable the option; the indicator
light corresponding to the button will switch on.
• Press the button again to disable the option; the
indicator light will switch off.
! If the selected option is not compatible with the
programmed wash cycle, the indicator light will flash
and the option will not be activated.
! If the selected option is not compatible with another
option which has been selected previously, the indicator
light corresponding to the first option selected will
flash and only the second option will be activated; the
indicator light corresponding to the enabled option will
remain lit.
! The options may affect the recommended load value
and/or the duration of the cycle.
7. START THE PROGRAMME. Press the START/
PAUSE button. The corresponding indicator light will
become green, remaining lit in a fixed manner, and the
door will be locked (the DOOR LOCKED symbol will
be on). To change a wash cycle while it is in progress,
pause the washing machine using the START/PAUSE
button (the START/PAUSE indicator light will flash slowly
in an orange colour); then select the desired cycle and
press the START/PAUSE button again.
To open the door while a cycle is in progress, press the
START/PAUSE button; if the DOOR LOCKED symbol
is switched off the door may be opened. Press the
START/PAUSE button again to restart the wash cycle
from the point at which it was interrupted.
8. THE END OF THE WASH CYCLE. This will be
indicated by the text “END” on the display; when the
DOOR LOCKED symbol switches off the door may be
opened. Open the door, unload the laundry and switch
off the machine.
! If you wish to cancel a cycle which has already begun,
press and hold the button. The cycle will be stopped
and the machine will switch off.

7
GB
Wash cycles and options
Wash options
Selecting this option enables you to suitably adjust drum rotation,
temperature and water to a reduced load of lightly soiled cotton and
synthetic fabrics (refer to the “Table of wash cycles”). “ ” enables
you to wash in less time thereby saving water and electricity. We suggest
using a liquid detergent suitably measured out to the load quantity.
! It cannot be used with the 1, 2, 6, 7, 8, 9, 10, 11, 12, 13, , ,
programmes.
Stain removal
This option is particularly useful for
the removal of stubborn stains. Place
extra compartment 4 (supplied) into
compartment 1.
When pouring in the bleach, be
careful not to exceed the “max” level
marked on the central pivot (see
figure).
To run the bleach cycle on its
own, pour the bleach into extra
compartment 4, set the “Rinse”
programme and activate the “Stain removal” option. To bleach during a
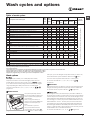
Table of wash cycles
wash cycle, pour in the detergent and any fabric softener you wish to use,
set the desired wash cycle and enable the “Stain removal” option.
The use of extra compartment 4 excludes the “Pre-wash” option.
! It cannot be used with the 1, 6, 7, 8, 9, 10, 11, 12, 13, ,
programmes.
Extra rinse
By selecting this option, the efficiency of the rinse is increased and optimal
detergent removal is guaranteed. It is particularly useful for sensitive skin.
! It cannot be used in conjunction with the 9, , programmes.
Easy iron
By selecting this function, the wash and spin cycles will be modified in or-
der to reduce the formation of creases. At the end of the cycle the washing
machine will perform slow rotations of the drum; the indicator lights for the
EASY IRON and START/PAUSE options will flash (the first one green, the
second orange). To end the cycle, press the START/PAUSE button or the
EASY IRON button. For the 7-10 wash cycles, the machine will end the
cycle while the laundry is soaking and the EASY IRON and START/PAU-
SE indicator lights will flash and the RINSE phase will remain lit in a fixed
manner. To drain the water so that the laundry may be removed, press the
START/PAUSE button or the EASY IRON button.
! It cannot be used with the 6, 9, 11, 12, 13, , programmes.
1
2
3
4
The cycle duration indicated on the display or instruction manual is an estimate based on standard conditions. The actual duration may vary in relation
to several factors, such as the temperature and pressure of the incoming water, ambient temperature, amount of detergent, load quantity and type, load
balancing and any additional options selected.
For all Test Institutes:
1) Test wash cycle in compliance with regulation 2010/1061: set wash cycle 2 with a temperature of 60°C and 40°C.
2) Long wash cycle for cottons: set wash cycle 2 with a temperature of 40°C.
3) Short wash cycle for cottons: set wash cycle 4 with a temperature of 40°C.
4) Synthetic program along: set wash cycle 5 with a temperature of 40°C.
Wash cycles
Description of the wash cycle
Max.
temp.
(°C)
Max.
speed
(rpm)
Detergents Max. load (kg)
Cycle
duration
Prewa-
sh
Wash
Ble-
ach
Fabric
softe-
ner
Normal
Eco
Time
Daily
The duration of the wash cycles can be checked on the display.
1
Cotton with prewash: extremely soiled whites. 90° 1000
-
7 -
2
Cotton: extremely soiled whites. 90° 1000 -
7 -
2
Cotton (1-2): heavily soiled whites and resistant colours. 60° 1000 -
7 -
2
Cotton (2): heavily soiled whites and delicate colours. 40° 1000 -
7 -
3
Cotton: heavily soiled whites and resistant colours. 60° 1000 -
7 3,5
4
Coloured Cottons (3): lightly soiled whites and delicate colours. 40° 1000 -
7 3,5
5
Synthetics: lightly soiled resistant colours. 60° 800 -
3 2
5
Synthetics (4): lightly soiled resistant colours. 40° 800 -
3 2
Special
6
Wool: for wool, cashmere, etc. 40° 800 -
-
1,5 -
7
Silk/Curtains: for garments in silk and viscose, lingerie. 30° 0 -
-
1 -
8 Jeans
40° 800 -
-
3 -
9
Express: to refresh lightly soiled garments quickly (not suitable
for wool, silk and clothes which require washing by hand).
30° 800 -
-
1,5 -
10 Outwear
30° 400 -
- - 2 -
Sport
11 Sport Intensive
30° 600 -
-
3 -
12 Sport Light
30° 600 -
-
3 -
13 Sport Shoes
30° 600 -
-
Max. 2
pairs
-
Partial wash cycles
Rinse - 1000 - -
7 -
Spin - 1000 - - - - 7 -
Drain - 0 - - - - 7 -

8
GB
Detergents and laundry
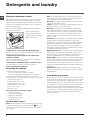
Detergent dispenser drawer
Good washing results also depend on the correct dose of
detergent: adding too much detergent will not necessa-
rily result in a more efficient wash, and may in fact cause
build up on the inside of your appliance and contribute to
environmental pollution.
! Do not use hand washing detergents because these
create too much foam.
Open the detergent di-
spenser drawer and pour
in the detergent or washing
additive, as follows.
compartment 1: Pre-wash detergent (powder)
Before pouring in the detergent, make sure that extra com-
partment 4 has been removed.
compartment 2: Detergent for the wash cycle
(powder or liquid)
Liquid detergent should only be poured in immediately
prior to the start of the wash cycle.
compartment 3: Additives (fabric softeners, etc.)
The fabric softener should not overflow the grid.
extra compartment 4: Bleach
Preparing the laundry
•Dividethelaundryaccordingto:
- the type of fabric/the symbol on the label
- the colours: separate coloured garments from whites.
•Emptyallgarmentpocketsandcheckthebuttons.
•Donotexceedthelistedvalues,whichrefertotheweight
of the laundry when dry:
Durable fabrics: max. 7 kg
Synthetic fabrics: max. 3 kg
Delicate fabrics: max. 2 kg
Wool: max. 1,5 kg
Silk: max. 1 kg
How much does your laundry weigh?
1 sheet 400-500 g
1 pillow case 150-200 g
1 tablecloth 400-500 g
1 bathrobe 900-1200 g
1 towel 150-250 g
Special wash cycles
Wool: All wool garments can be washed using programme
6, even those carrying the “hand-wash only” label. For
best results, use special detergents and do not exceed 1,5
kg of laundry.
Silk: use special wash cycle 7 to wash all silk garments.
We recommend the use of special detergent which has
been designed to wash delicate clothes.
Curtains: fold curtains and place them in a pillow case or
mesh bag. Use wash cycle 7.
Jeans: Turn garments inside-out before washing and use
a liquid detergent. Use programme 8.
Express: this wash cycle was designed to wash lightly
soiled garments quickly: it lasts just 15 minutes and the-
refore saves both energy and time. By selecting this wash
cycle (
9
at 30°C), it is possible to wash different fabrics
together (except for wool and silk items), with a maximum
load of 1.5 kg.
Outwear (
wash cycle
10): is studied for washing water-
repellent fabrics and winter jackets (e.g. Gore-Tex,
polyester, nylon); for best results, use a liquid detergent
and dosage suitable for a half-load; pre-treat necks,
cuffs and stains if necessary; do not use softeners or
detergents containing softeners. Stuffed duvets cannot
be washed with this programme.
Sport Intensive (
wash cycle
11): is for washing heavily
soiled sports clothing fabrics (tracksuits, shorts, etc.);
for best results, we recommend not exceeding the ma-
ximum load indicated in the “Table of wash cycles”.
Sport Light (
wash cycle
12): is for washing lightly soiled
sports clothing fabrics (tracksuits, shorts, etc.); for best
results, we recommend not exceeding the maximum
load indicated in the “Table of wash cycles”. We recom-
mend using a liquid detergent and dosage suitable for a
half-load.
Sport Shoes (
wash cycle
13): is for washing sports
shoes; for best results, do not wash more than 2 pairs
simultaneously.
Load balancing system
Before every spin cycle, to avoid excessive vibrations and
to distribute the load in a uniform manner, the drum rotates
continuously at a speed which is slightly greater than the
washing rotation speed. If, after several attempts, the load
is not balanced correctly, the machine spins at a reduced
spin speed. If the load is excessively unbalanced, the
washing machine performs the distribution process instead
of spinning. To encourage improved load distribution and
balance, we recommend small and large garments are
mixed in the load.
1
2
3
4

9
GB
Precautions and tips
! This washing machine was designed and constructed in
accordance with international safety regulations. The fol-
lowing information is provided for safety reasons and must
therefore be read carefully.
General safety
• Thisappliancewasdesignedfordomesticuseonly.
• Thisapplianceisnotintendedforusebypersons(inclu-
ding children) with reduced physical, sensory or mental
capabilities, or lack of experience and knowledge, unless
they have been given supervision or instruction concer-
ning use of the appliance by a person responsible for
their safety. Children should be supervised to ensure that
they do not play with the appliance.
• Thewashingmachinemustonlybeusedbyadults,inaccor-
dance with the instructions provided in this manual.
• Donottouchthemachinewhenbarefootorwithwetor
damp hands or feet.
• Donotpullonthepowersupplycablewhenunplugging
the appliance from the electricity socket. Hold the plug
and pull.
• Donotopenthedetergentdispenserdrawerwhilethe
machine is in operation.
• Donottouchthedrainedwaterasitmayreachextreme-
ly high temperatures.
• Neverforcetheportholedoor.Thiscoulddamagethe
safety lock mechanism designed to prevent accidental
opening.
• Iftheappliancebreaksdown,donotunderanycircum-
stances access the internal mechanisms in an attempt
to repair it yourself.
• Alwayskeepchildrenwellawayfromtheappliancewhile
it is operating.
• Thedoorcanbecomequitehotduringthewashcycle.
• Iftheappliancehastobemoved,workinagroupoftwo
or three people and handle it with the utmost care. Never
try to do this alone, because the appliance is very heavy.
• Beforeloadinglaundryintothewashingmachine,make
sure the drum is empty.
Disposal
• Disposingofthepackagingmaterials:observelocal
regulations so that the packaging may be re-used.
• TheEuropeanDirective2002/96/EConWasteElectrical
and Electronic Equipment, requires that old household
electrical appliances must not be disposed of in the normal
unsorted municipal waste stream. Old appliances must
be collected separately in order to optimise the recovery
and recycling of the materials they contain and reduce
the impact on human health and the environment.
The crossed out “wheeled bin” symbol on the product
reminds you of your obligation, that when you dispose
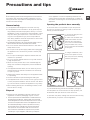
Opening the porthole door manually
In the event that it is not possible to open the porthole
door due to a powercut, and if you wish to remove the
laundry, proceed as follows:
1. remove the plug from the
electrical socket.
2. make sure the water level
inside the machine is lower
than the door opening; if it
is not, remove excess water
using the drain hose, collec-
ting it in a bucket as indicated
in the figure.
3. using a screwdriver, remo-
ve the cover panel on the lo-
wer front part of the washing
machine (see figure).
4. pull outwards using the tab as indicated in the figure,
until the plastic tie-rod is freed from its stop position; pull
downwards and open the door at the same time.
5. reposition the panel, making sure the hooks are securely
in place before you push it onto the appliance.
of the appliance it must be separately collected. Con
sumers should contact their local authority or retailer for
information concerning the correct disposal of their old
appliance.

10
GB
Care and maintenance
Cutting off the water and electricity
supplies
• Turnoffthewatertapaftereverywashcycle.Thiswill
limit wear on the hydraulic system inside the washing
machine and help to prevent leaks.
• Unplugthewashingmachinewhencleaningitanddu-
ring all maintenance work.
Cleaning the washing machine
The outer parts and rubber components of the appliance
can be cleaned using a soft cloth soaked in lukewarm
soapy water. Do not use solvents or abrasives.
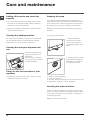
Cleaning the detergent dispenser dra-
wer
Remove the dispenser by
raising it and pulling it out
(see figure).
Wash it under running wa-
ter; this operation should be
repeated frequently.
Caring for the door and drum of your
appliance
• Alwaysleavetheportholedoorajarinordertoprevent
unpleasant odours from forming.
Cleaning the pump
The washing machine is fitted with a self-cleaning pump
which does not require any maintenance. Sometimes, small
items (such as coins or buttons) may fall into the pre-cham-
ber which protects the pump, situated in its bottom part.
! Make sure the wash cycle has finished and unplug the
appliance.
To access the pre-chamber:
1. using a screwdriver,
remove the cover panel
on the lower front part of
the washing machine (see
figure);
2. unscrew the lid by rotating
it anti-clockwise (see figure):
a little water may trickle out.
This is perfectly normal;
3. clean the inside thoroughly;
4. screw the lid back on;
5. reposition the panel, making sure the hooks are securely
in place before you push it onto the appliance.
Checking the water inlet hose
Check the inlet hose at least once a year. If there are any
cracks, it should be replaced immediately: during the wash
cycles, water pressure is very strong and a cracked hose
could easily split open.
! Never use second-hand hoses.

11
GB
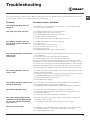
Troubleshooting
Your washing machine could fail to work. Before contacting the Technical Assistance Centre (see “Assistance”), make sure
that the problem cannot be not solved easily using the following list.
Problem:
The washing machine does not
switch on.
The wash cycle does not start.
The washing machine does not
take in water (“H2O” will flash on
the display).
The washing machine continuously
takes in and
drains water.
The washing machine does not
drain or spin.
The washing machine vibrates a lot
during the spin cycle.
The washing machine leaks.
The “option” indicator lights and the
“start/pause” indicator light flash and
an error code appears on the display
(e.g.: F-01, F-..).
There is too much foam.
Possible causes / Solutions:
• Theapplianceisnotpluggedintothesocketfully,orisnotmakingcontact.
• Thereisnopowerinthehouse.
• Thewashingmachinedoorisnotclosedproperly.
• TheON/OFFbuttonhasnotbeenpressed.
• TheSTART/PAUSEbuttonhasnotbeenpressed.
• Thewatertaphasnotbeenopened.
• Adelayedstarthasbeenset(see “Running a wash cycle”).
• Thewaterinlethoseisnotconnectedtothetap.
• Thehoseisbent.
• Thewatertaphasnotbeenopened.
• Thereisnowatersupplyinthehouse.
• Thepressureistoolow.
• TheSTART/PAUSEbuttonhasnotbeenpressed.
• Thedrainhoseisnotfittedataheightbetween65and100cmfromthefloor
(see “Installation”).
• Thefreeendofthehoseisunderwater(see “Installation”).
• Thewalldrainagesystemisnotfittedwithabreatherpipe.
If the problem persists even after these checks, turn off the water tap, switch
the appliance off and contact the Assistance Service. If the dwelling is on one of
the upper floors of a building, there may be problems relating to water drainage,
causing the washing machine to fill with water and drain continuously. Special
anti-draining valves are available in shops and help to avoid this inconvenience.
• Thewashcycledoesnotincludedraining:somewashcyclesrequirethedrain
phase to be started manually.
• The“Easyiron”optionhasbeenactivated:Tocompletethewashcycle,press
the START/PAUSE button (see “Wash cycles and options”).
• Thedrainhoseisbent(see “Installation”).
• Thedrainageductisclogged.
• Thedrumwasnotunlockedcorrectlyduringinstallation(see “Installation”).
• Thewashingmachineisnotlevel(see “Installation”).
• Thewashingmachineistrappedbetweencabinetsandwalls(see “Installation”).
• Thewaterinlethoseisnotscrewedonproperly(see “Installation”).
• Thedetergentdispenserdrawerisblocked(forcleaninginstructions,see
“Care and maintenance”).
• Thedrainhoseisnotfixedproperly(see “Installation”).
• Switchoffthemachineandunplugit,waitforapproximately1minuteand
then switch it back on again.
If the problem persists, contact the Technical Assistance Service.
• Thedetergentisnotsuitableformachinewashing(itshoulddisplaythetext
“for washing machines” or “hand and machine wash”, or the like).
• Toomuchdetergentwasused.

12
GB
Service
Before calling for Assistance:
• Check whether you can solve the problem alone (see “Troubleshooting”);
• Restarttheprogrammetocheckwhethertheproblemhasbeensolved;
• Ifthisisnotthecase,contactanauthorisedTechnicalAssistanceCentreusingthetelephonenumberprovidedonthe
guarantee certificate.
! Always request the assistance of authorised technicians.
Have the following information to hand:
• thetypeofproblem;
• theappliancemodel(Mod.);
• theserialnumber(S/N).
This information can be found on the data plate applied to the rear of the washing machine, and can also be found on the
front of the appliance by opening the door.

13
TR
Türkçe
İçindekiler
Montaj, 14-15
Ambalajın çıkartılması ve seviye ayarı getirilmesi
Su ve elektrik bağlantıları
İlk yıkama
Teknik veriler
Çamaşır makinesinin tanımı, 16-17
Kontrol paneli
Ekran
Bir yıkama devri nasıl yapılır, 18
Programlar ve işlevler, 19
Program tablosu
Yıkama işlevleri
Deterjan ve çamaşır, 20
Deterjan haznesi
Çamaşırın hazırlanması
Özel programlar
Yük dengeleme sistemi
Önlemler ve öneriler, 21
Genel güvenlik uyarıları
Atıkların tasye edilmesi
Cam kapağın açılması
Bakım ve özen, 22
Su ve elektrik kesilmesi
Çamaşır makinesin temizlenmesi
Deterjan haznesinin temizlenmesi
Kapak ve hazne bakımı
Pompanın temizlenmesi
Su besleme hortumunun kontrol edilmesi
Arızalar ve onarımlar, 23
Teknik Servis, 24
TR
IWE 7108 S
Kullanma Kılavuzu
ÇAMAŞIR MAKİNESİ

14
TR
Montaj
! Bu kitapçığı gerektiği her an danışabilmeniz için özenle
saklayınız. Çamaşır makinesinin satılması, devri veya
nakli durumlarında da, yeni sahibinin faydalanabilmesi
için bu kılavuz makineyle beraber saklanmalıdır.
! Talimatları dikkatlice okuyunuz; montaj, kullanım ve
güvenliğe ilişkin önemli bilgiler içermektedir.
Ambalajın çıkartılması ve aynı seviyeye
getirilmesi
Ambalajdan çıkartılması
1. Çamaşır makinesinin ambalajdan çıkartılması.
2. Çamaşır makinesinin taşıma esnasında hasar
görmemiş olduğunu kontrol ediniz. Hasar görmüş ise
monte etmeyiniz. Satıcıya başvurunuz.
3. Taşıma sırasında arka
tarafta bulunan 4 adet
koruyucu vidayı ve ara
parçasıyla birlikte bura-
daki lastiği de çıkartınız
(bakınız şekil).
4. Delikleri ambalajda bulacağınız plastik kapaklarla
kapayınız.
5. Tüm parçaları muhafaza ediniz: çamaşır makinesinin
nakli gerektiği takdirde takılmaları gerekmektedir.
! Ambalajlar çocuk oyuncağı değildir.
Cihazın aynı seviyeye getirilmesi
1. çamaşır makinesini düz ve sert bir zemine yerleştiriniz,
duvar veya mobilyalara dayamayınız.
2. Yerleştirilecek zemin
tam düz değilse çamaşır
makinesinin vidalı ön
ayaklarını sıkarak veya
gevşeterek dengeyi
sağlayınız (bkz. şekil);
eğim açısı, makinenin üst
tezgahına göre 2° den
fazla olmamalıdır.
Sağlıklı bir dengeleme, çamaşır makinesine sağlam bir
duruş kazandıracağı gibi, çalışması esnasındaki sarsıntı,
gürültü ve hareketlilikleri de önleyecektir. Zeminde
moket veya halı olması halinde, ayarı makinenin altında
havalandırma olabilecek şekilde yapınız .
Su ve elektrik bağlantıları
Su besleme hortumunun takılması
1. Tedarik borusunu 3/4
gaz vidali baglanti kullana-
rak bir soguk su muslugu-
na baglayin (bkz. şekil).
Bağlantı öncesinde ber-
rak su gelene kadar suyu
akıtınız.
2. Besleme hortumunu
arka kısımda üst sağ
köşedeki su girişine vidala-
yarak çamaşır makinesine
takınız (bkz. şekil).
3. Hortumda katlanma ve ezilme olmamasına dikkat
ediniz.
! Musluğun su basıncının Teknik Veriler tabelasında
belirtildiği gibi olması gerekir (bkz. yan sayfa).
! Besleme hortumunun boyu yetersizse yetkili bir satıcı
mağaza veya teknisyene başvurunuz.
! Kesinlikle daha önceden kullanılmış hortum
kullanmayınız.
! Makine ile birlikte verilen hortumları kullanınız.

15
TR
65 - 100 cm
Tahliye hortumunun takılması
Tahliye hortumunu,
katlanmasını önleyerek,
zemindeki veya yerden
65 ile 100 cm yükseklik
arasındaki bir duvar tahli-
yesine takınız
veya mevcut olan kılavuzu
çeşmeye bağlayarak lava-
bo ya da küvet kenarına
yaslayınız (bkz. şekil).
Tahliye hortumunun ser-
best ucunun suya girme-
mesi gerekir.
! Tahliye hortumu için ilave uzatma kullanılmaması tav-
siye olunur; aksi mümkün değilse, uzatma hortumunun
çapının da aynı olması ve 150 cm. den uzun olmaması
gerekir.
Elektrik bağlantısı
Fişi prize takmadan evvel aşağıdaki hususlara dikkat
ediniz:
• prizin topraklamasının yürürlükteki normlara uygun
olmasına;
• prizin, makinenin Teknik Veriler tabelasında belirtilen,
azami gücünü taşıyabilecek olmasına (bkz. yan taraf);
• şebeke geriliminin, Teknik Veriler tabelasında belirtilen
değerlere uygun olmasına (bkz. yan taraf);
• prizin çamaşır makinesinin şiyle uyumlu olmasına.
Aksi takdirde şi veya prizi değiştiriniz.
! Çamaşır makinesi, muhafazalı olsa bile açık alanda
monte edilemez, çünkü rüzgara ve yağmura maruz
kalması çok tehlikelidir.
! Monte edilen çamaşır makinesinin şinin kolaylıkla
erişilebilir olması gerekir.
! Uzatma kablosu ile çoklu prizler kullanmayınız.
! Kablonun ezilmemesi ve katlanmaması gerekir.
! Beslenme kablosunun yalnızca yetkili teknisyenler
tarafından değiştirilmelidir.
Dikkat! Bu kurallara uyulmaması halinde rma hiç bir
sorumluluk kabul etmemektedir.
İlk yıkama
Montajdan sonra, çamaşır koymaksızın deterjanla 2.
programı ayarlayarak yıkama yapınız.
Teknik bilgiler
Model IWE 7108 S
Ölçüler
geniþlik 59,5 cm
yükseklik 85 cm
derinlik 53,5 cm
Kapasite 1 - 7 kg
Elektrik baðlantýlarý
makine üstünde takýlý olan teknik veriler
plakasýna bakýnýz.
Su baðlantýlarý
max. su basýncý 1 MPa (10 bar) min. su
basýncý 0,05 MPa (0,5 bar)
tambur kapasitesi 52 litre
Sýkma hýzý maksimum dakikada 1000 devire kadar
EN 60456 standartlarý
uyarýnca kontrol
programlarý
program 2; 60°C sýcaklýkta; 7 kg çamaþýrla.
Bu makina aþaðýda belirtilen AB normlarýna
uygundur:
- 03/05/89 tarihli 89/336/CEE (Elektro-
manyetik Uyum) ve daha sonra yapýlan
düzenlemeler
- 2002/96/CE
- 2006/95/CE (Alçak gerilim)

16
TR
Çamaşır makinesinin tanımı
Deterjan Bölmesi: ve diğer katkıları koyunuz (“Deterjan-
lar bölümüne” bakınız).
AÇMA/KAPAMA tuşu : makineyi açmak ya da ka-
patmak için bu tuşa kısa süreli basınız. Yeşil renkte
yanıp sönen BAŞLA/BEKLE uyarı lambası makinenin
açık olduğunu gösterir. Makineyi çalışır vaziyetteyken
kapatmak için tuşu daha uzun, yaklaşık 3 saniye, basılı
tutmanız gerekir;hafçe ya da yanlışlıkla basıldığında
makine kapanmaz. Makinenin çalışır vaziyetteyken
kapatılması devrede olan yıkama programını iptal eder.
PROGRAMLAR
düğmesi
: istenilen programı ayarlamak
için (bkz. Program tablosu).
FONKSİYON uyarı lambalı tuşları: şlev seçimi için. Seçi-
len işlev düğmesinde ışıklı gösterge yanık kalır.
SANTRÜFÜJ tuşu : santrifüjü azaltmak ya da devre
dışı bırakmak için basınız – değeri ekranda görüntülenir.
SİCAKLİK AYARİ tuşu : sıcaklığı azaltmak veya tama-
men çıkarmak için basınız – değer ekranda görünür.
GECIKMELI BAŞLAMA tuşu : seçilen programı
geciktirmeli çalıştırmak için basınız. Gecikme ekranda
belirtilecektir.
BAŞLA/BEKLE uyarı lambalı tuşu : yeşil lamba
yavaşça yanıp sönünce istediğiniz yıkama programını
başlatmak için tuşa basınız. Yıkama programı
başladıktan sonra uyarı lambası yanık kalır. Seçilen
bir programın beklemeye alınması için aynı tuşa tekrar
basınız; uyarı lambası turuncu renkte yanıp sönecektir.
Sembol yanık değilse makine kapağı açılabilir. Yıkama
programının kaldığı yerden devam etmesi için aynı tuşa
tekrar basınız.
Bekleme modu
Yeni enerji tasarrufu düzenlemeleri ile uyumlu bu çama-
sir makinesine herhangi bir faaliyet algilanmadiginda 30
dakika içinde devreye sokulan otomatik bekleme sistemi
yerlestirilmistir. ON-OFF (AÇMA-KAPAMA) dügmesine
bir süre basin ve makinenin tekrar çalismasini bekleyin.
BAŞLA/BEKLE
uyarı lambalı tuşu
Kontrol paneli
SİCAKLİK AYARİ
tuşu
SANTRÜFÜJ
tuşu
AÇMA/KAPAMA
tuşu
Deterjan Bölmesi
PROGRAMLAR
düğmesi
GECIKMELI BAŞLAMA
tuşu
Ekran
FONKSÝYON
uyarý lambalý tuþlarý

17
TR
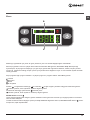
Ekran
Makineyi programlamak için yararlı bir gereç olmasının yanı sıra ekranda değişik bilgiler verilmektedir.
Mevcut programların süresi ve çalışan devrin kalan süresi bölüm A’da görünür; GECIKMELI BAŞLAMA seçeneği
ayarlanmışsa, seçili programın başlangıcı için geri sayım görünecektir. İlgili butona basarak, makine, seçilen çevrimle
uyumlu ise maksimum sicakligi, seçilen çevrim için ayarli dönüs hizi degerlerini veya en son kullanilan ayarlari otomatik
olarak görüntüler.
Seçili programla ilgili “program safhaları” ve çalışan programın “program safhası” bölüm B’de görünür.
Yıkama
Durulama
Sıkma
Su boşaltma
Sicaklik” , “Programlanan baslangiç” ve “santrüfüj” ile ilgili simgeler yukaridan asagiya C bölümünde görünür:
sembolü yanarsa, ekran ayarlanan “sicaklik” degerini gösterir.
Gecikmeli bir baslangiç ayarlanmissa, sembolü yanar.
sembolü yanarsa, ekran ayarlanan “santrüfüj” degerini gösterir.
KAPAK KILITLI sembolü
Yanan sembol kapağın kilitli olduğunu gösterir. Makinenin hasar görmesini önlemek için, kapağı açmadan önce sembol
sönene kadar bekleyiniz.
Yıkama esnasında makine kapağını açmak için BAŞLAT/BEKLE düğmesine basınız; MAKINE KAPAĞI KILITLI sembo-
lü kapalı ise, kapak açılabilecektir.
B
CA

18
TR
Bir yıkama devri nasıl yapılır
1. MAKINENIN ÇALIŞTIRILMASI. tuşuna bastıktan
ve BAŞLA/BEKLE uyarı lambası yeşil renkte yanıp
sönmeye başlayacaktır.
2. MAKİNANIN DOLDURULMASI. Kapağı açınız.
Sonraki sayfada bulunan program tabelasında
belirtilen yük miktarını geçmeyecek şekilde tamburu
çamaşırlarınızla doldurunuz.
3. DETERJAN KONULMASI. Deterjan haznesini
açınız ve deterjanı “Deterjan ve çamaşır” bölümünde
açıklandığı gibi koyunuz.
4. MAKINE KAPAĞININ KAPATILMASI.
5. PROGRAMIN SEÇILMESI. PROGRAM düğmesiyle
istenen programı seçiniz, seçilen programa bağlı
değiştirilemeyecek sıcaklık derecesi ve sıkma devir
hızı vardır. Ekranda program süresi görüntülenecektir.
6. YIKAMA DEVRININ KIŞISEL AYARLARINI mevcut
olan tuşları kullanarak yapınız:
Sıcaklık derecesi ve/ya santrifüjün değiştirilmesi.
Makine, seçilen çevrimle uyumlu ise maksimum
sicakligi, seçilen çevrim için ayarli dönüs hizi
degerlerini veya en son kullanilan ayarlari otomatik
olarak görüntüler. tuşuna basıldığında OFF soğuk
yıkama programındaki sıcaklık derecesine ulaşıncaya
kadar sıcaklık derecesi düşer. düğmesine
basıldığında OFF devreden çıkıncaya kadar sıkma
devri gittikçe azalır. Tuşlara bir daha basıldığında
fabrika değerlerine dönülecektir.
Gecikmeli başlatma ayarı.
Seçilmiş olan programın gecikmeli başlamasını
ayarlamak için istenilen gecikme süresi ayarlanıncaya
kadar tuşa basınız. Bu opsiyon açık olduğunda
ekranda sembolü görüntülenecektir. Gecikmeli
başlatmayı iptal etmek için ekranda OFF yazısı
görüntüleninceye kadar tuşa basınız.
Yıkama özelliklerinin
değiştirilmesi.
• Fonksiyonu çalıştırmak için tuşa basınız; ilgili uyarı
lambası yanacaktır.
• İşlevi kapatmak için aynı tuşa tekrar basınız; ilgili
uyarı lambası sönecektir.
! Seçilen işlem yürütülen programla uyumlu olmadığı
takdirde, uyarı lambası yanıp sönecek ve işlem
başlamayacaktır.
! Seçilen fonksiyon ayarlanmış olan programla uyumlu
olmadığı takdirde, ilk işlevle ilgili uyarı lambası yanıp
sönecek ve etkinleştirilmiş işlev yanıp sönmesi sona
erecektir.
! Fonksiyonlar önerilen yük seviyesi ve yıkama
süresini değiştirebilirler.
7. PROGRAMIN ÇALIŞTIRILMASI. BAŞLAT/BEKLE
tuşuna basınız. İlgili uyarı lambası yeşil renkte sabit
yanacak ve makinenin kapağı kilitlenecektir (MAKINE
KAPAĞI KILITLI uyarı lambası açıktır). Devrede
olan bir programı değiştirmek için BAŞLA/BEKLE
tuşuna basarak çamaşır makinesini beklemeye alınız
(BAŞLA/BEKLE uyarı lambası turuncu renkte yavaşça
yanmaya başlayacaktır), istenilen programı seçiniz ve
BAŞLA/BEKLE tuşuna tekrar basınız.
Yıkama esnasında makine kapağını açmak için
BAŞLAT/BEKLE düğmesine basınız; MAKINE
KAPAĞI KILITLI sembolü kapalı ise, kapak
açılabilecektir. Yıkama programının kaldığı yerden
devam etmesi için BAŞLA/BEKLE tuşuna tekrar
basınız.
8. PROGRAMIN BITMESI. “END” yazısıyla belirtilir.
MAKINE KAPAĞI KILITLI uyarı lambası kapağın
açılabilir hale geldiğini belirtmek için söner. Makine
kapağını açtıktan sonra çamaşırları boşaltıp makineyi
kapatınız.
! Devrede olan bir programı iptal etmek için tuşunu
uzun süre basılı tutunuz. Program bitirilecek ve makine
kapanacaktır.

19
TR
Programlar ve işlevler
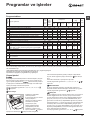
Program tablosu
Ekran veya kitapçık üzerinde gösterilen devre süresi, standart şartlara göre hesaplanmış tahmini bir süredir. Geçerli olan süre, girişteki sıcaklık derecesi ve suyun
basıncı, ortam sıcaklığı, deterjan miktarı, yük miktarı ve tipi, yükün dengesi, seçilen ilave seçenekler gibi sayısız faktörlere göre değişiklik gösterebilmektedir.
Tüm Test Enstitüleri için:
1) EN 60456 standartları uyarınca kontrol programları 60°C ve 2. programa ayarlayınız.
2) Pamuklu uzun programı; 2 programda 40°C’ye ayarlayınız.
3) Pamuklu kısa programı; 4 programda 40°C’ye ayarlayınız.
Yıkama işlevleri
Bu seçeneği seçerek haf lekeli pamuklu ve sentetik kumaşların (“Program
tablosu”na bakınız) yükünü azaltmak için tambur yönünü, sıcaklık ve suyu
uygun bir şekilde ayarlayabilirsiniz. “ ” daha kısa sürede yıkamanızı
ve dolayısıyla su ve elektrikten tasarruf etmenizi sağlar. Yük miktarına göre
ölçülmüş sıvı deterjan kullanmanız tavsiye edilir.
! Sonraki programlarda uygulanamaz: 1, 2, 6, 7, 8, 9, 10, 11, 12, 13, ,
, programları.
Leke önleyici
Bu fonksiyon en inatçı lekeleri
çıkarmak için kullanılır.
4 numaralı ilave hazneyi 1 numaralı
hazneye yerleştiriniz.
Çamaşır suyu dozajını ayarlarken
orta mildeki “max” işaretini
geçmeyiniz (bkz. şekil).
Sadece beyazlatma işlemini
gerçekleştirmek için 4. kaba
beyazlatıcıyı (çamaşır suyunu)
koyunuz, “Durulama” programını
ayarlayınız ve “Leke Önleyici” fonksiyonunu etkin hale getiriniz.
Yıkama esnasında beyazlatma yapmak için deterjan ve diğer katkıları
koyunuz, istenilen programı ayarlayıp “Leke Önleyici” işlevini devreye
alınız.
4 no’lu kabın kullanılması ön yıkamayı devre dışı bırakır.
! Sonraki programlarda uygulanamaz: 1, 6, 7, 8, 9, 10, 11, 12, 13, ,
programları.
Ekstra Durulama
Bu opsiyon seçildiğinde durulamanın verimliliği daha yüksek olur ve
deterjandan tamamen temizlenmesi sağlanır. Hassas ciltler için uygundur.
! Sonraki programlarda uygulanamaz: 9, , programları.
Kolay ütü
Bu iþlev seçildiðinde kýrýþýklarý önleyecek þekilde yýkama ve sýkma devrinin
özellikleri deðiþtirilecektir. Devrin sonunda, çamaþýr makinesi tamburu
yavaþ bir þekilde dönecek; KOLAY ÜTÜ ve BAÞLAT/DURAKLAT göster-
gesi ýþýklarý yanacak (turuncu) ve ekranda "PROGRAM SONU" yazýsý
görünecektir. Devri bitirmek için, BAÞLA/BEKLE düðmesine veya KOLAY
ÜTÜ düðmesine basýn. 7-10 yýkama devri çamaþýrýn makinede beklemeye
býrakýlmasýyla biter; KOLAY ÜTÜ ve BAÞLA/BEKLE göstergesi ýþýklarý
yanacak (turuncu) ve ekranda "SUDA BEKLET" yazýsý görünecektir. Suyu
boþaltmak için BAÞLA/BEKLE ya da KOLAY ÜTÜ düðmesine basmanýz
gerekir. Simdi çamaþýrlarýnýzý alabilirsiniz.
! Sonraki programlarda uygulanamaz: 6, 9, 11, 12, 13, , programlarý.
1
2
3
4
Programlar
Program açýklamas
Maks.
Isý de-
recesi
(°C)
Maks
Hýz
(Daki-
kada
devir)
Deterjanlar
Maks yük
(Kg)
Devir
süresi
Önyýka-
ma
Yýka-
ma
Çamaþýr
suyu
Yumuþa-
týcý
Normal
Eco
Time
Günlük programlar
Yýkama programalarýnýn süresi ekrandan kontrol edilebilir.
1 Ön yýkama pamuklular aþýrý kirli beyazlar. 90° 1000
-
7 -
2 Beyaz pamuklular: aþýrý kirli beyazlar. 90° 1000
-
7 -
2 Beyaz pamuklular (1): çok kirli dayanýklý beyaz ve renkliler. 60° 1000
-
7 -
2 Beyaz pamuklular (2): çok kirli hassas renkli ve beyazlar. 40° 1000
-
7 -
3 Renklý pamuklular/hýzlý/prg: çok kirli dayanýklý beyaz ve renkliler. 60° 1000
-
7 3,5
4 Renklý pamuklular (3): az kirli beyazlar ve nazik renkliler. 40° 1000
-
7 3,5
5 Beyaz sentetikler: çok kirli dayanýklý renkli çamaþýrlar. 60° 800
-
3 2
Özel programlar
6 Yünlüler: yün ve kaþmir için kullanýlýr. 40° 600
-
-
1,5 -
7 Ýpekliler/Perdeler: ýpekli, viskoz ve iç çamaþýrlar için kullanýlýr. 30° 0
-
-
1 -
8 Blucin 40° 800
-
-
3 -
9
Hýzlý: az kirli çamaþýrlarý kýsa sürede yýkamak üzere kullanýlýr
(yünlü, ipekli, ve elde yýkanacak çamaþýrlara uygun deðildir).
30° 800
-
-
1,5 -
10 Mont - Yaðmurluk 30° 400
-
- -
2 -
Sport
11 Yoðun Spor Kýyafetler 30° 600
-
-
3 -
12 Narin Spor Kýyafetler 30° 600
-
-
3 -
13 Spor Ayakkabýlar 30° 600
-
-
En fazla
2 çift
-
Ek Programlar
Durulama - 1000
- -
7 -
Sýkma - 1000
- - - -
7 -
Su boþaltma - 0
- - - -
7 -

20
TR
Deterjanlar ve çamaşır
Deterjan haznesi
Yıkamanın iyi sonuç vermesi doğru dozda deterjan
kullanılmasına da bağlıdır: aşırı deterjan kullanmak
suretiyle daha temiz çamaşırlar elde edilemeyeceği gibi
makinenin aksamına zarar verilerek, çevre kirliliğine
sebebiyet verilir.
! Elde yıkama deterjanları kullanmayınız, çünkü aşırı
köpük yaparlar.
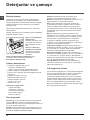
Deterjan haznesini açınız ve deterjan ile katkı maddelerini
aşağıdaki şekilde koyunuz.
hazne 1: Ön yıkama için
deterjan (toz)
Deterjanı koymadan önce
4 numaralı ilave haznenin
takılı olmadığını kontrol
edin.
hazne 2: Yıkama için
deterjan (toz veya likit)
Sıvı deterjan, yalnızca,
makine çalıştırılmadan
konulabilir.
hazne 3: Katkı maddeleri (yumuşatıcı, vs.)
Yumuşatıcı ızgara seviyesini aşmamalıdır.
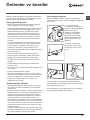
ilave hazne 4: Çamaşır suyu
Çamaşır hazırlanması
• Çamaşırları aşağıdaki gibi ayırınız:
- kumaş tipi / etiketteki işaret.
- renkler: renkli çamaşırları beyazlardan ayırınız.
• Ceplerini boşaltınız ve düğmeleri kontrol ediniz.
• Çamaşırın kuru ağırlığını esas alan değerlerin dışına
çıkmayınız:
Dayanıklı kumaşlar: max 7 kg
Sentetik kumaşlar: max 3 kg
Hassas kumaşlar: max 2 kg
Yünlüler: max 1,5 kg
İpekliler: max 1 kg
Çamaşırların ağırlığı nedir?
1 çarşaf 400-500 gr.
1 yastık kılıfı 150-200 gr.
1 masa örtüsü 400-500 gr.
1 bornoz 900-1.200 gr.
1 havlu 150-250 gr.
Özel programlar
Yünlüler: Tüm yünlü kıyafetler üzerinde “yalnızca elde
yıkayın” etiketi olsa bile program 6 kullanılarak
yıkanabilir. En iyi sonuçlar için, özel deterjanlar kullanınız
ve 1,5 kg çamaşırı geçmeyiniz.
İpekliler: ipekli tüm dokumalar için tasarlanmış olan 7.
programın kullanılması tavsiye edilir. Hassas dokumalar
için özel bir deterjan kullanılması önerilir.
1
2
3
4
Perdeler: katlayarak mevcut olan poşetin içine
yerleştiriniz. 7. programın kullanılması önerilir.
Blucin: Yıkamadan önce kıyafetleri ters çeviriniz ve sıvı
deterjan kullanınız. program 8’i kullanınız.
Hızlı: az kirli çamaşırları kısa sürede yıkamak üze-
re hazırlanmıştır: sadece 15 dakika sürer ve böylece
zaman ve enerji tasarrufu sağlar 9. programın 30°C
ye ayarlanmasıyla, azami 1,5 kg. olmak üzere muhtelif
kumaşlardaki (yün ve ipek hariç) çamaşırları yıkamak
mümkündür.
Mont (program 10): su geçirmez kumaşlar ve kış
ceketleri için (örn. Gore-Tex, polyester, naylon) yıkama
için kullanılır; en iyi sonuçlar için, sıvı deterjan ve yarım
yük doz kullanınız; gömlek yakalarını, manşetlerini
ve lekeleri ön işlemden geçiriniz; yumuşatıcı veya
yumuşatıcı içeren deterjan kullanmayınız. Doldurulmuş
yorganlar bu programla yıkanamaz.
Yoğun Spor Kıyafetler (program 11) ağır lekeli spor
kıyafetlerinin kumaşları (eşofman, şort, vb.) için kullanılır;
en iyi sonuçlar için, “Program tablosu”nda gösterilen
maksimum yükü geçmemeniz tavsiye edilir.
Narin Spor Kıyafetler (program 12): haf lekeli spor
kıyafetlerinin kumaşları (eşofman, şort, vb.) için kullanılır;
en iyi sonuçlar için, “Program tablosu” nda gösterilen
maksimum yükü geçmemeniz tavsiye edilir. Sıvı deterjan
ve yarım yük doz kullanmanız tavsiye edilir.
Spor Ayakkabılar (program 13) spor ayakkabılarını
yıkamak için kullanılır; en iyi sonuçlar için, aynı anda 2
çiftten fazla yıkamayınız.
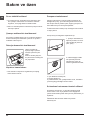
Yük dengeleme sistemi
Aşırı titremenin engellenmesi ve yükün düzenli dağılması
için her sıkma devrinden önce iç sepet normal yıkama
hızından biraz daha hızlı döner. Farklı şekillerde
çamaşırları makineye doldurduktan sonra yük dengeli
hale gelmediyse makine daha yavaş bir sıkma devrini
uygular. Yük çok dengesiz ise çamaşır makinesi sıkma
devrini gerçekleştirmeden çamaşırları dağıtır. Yükün
daha iyi yerleştirilmesi ve dengeli olması için küçük giysi-
lerle büyük giysileri karıştırınız.
Sayfa yükleniyor...
Sayfa yükleniyor...
Sayfa yükleniyor...
Sayfa yükleniyor...
-
 1
1
-
 2
2
-
 3
3
-
 4
4
-
 5
5
-
 6
6
-
 7
7
-
 8
8
-
 9
9
-
 10
10
-
 11
11
-
 12
12
-
 13
13
-
 14
14
-
 15
15
-
 16
16
-
 17
17
-
 18
18
-
 19
19
-
 20
20
-
 21
21
-
 22
22
-
 23
23
-
 24
24


Indesit IWE 7108 S (EU) Kullanici rehberi
- Kategori
- Çamaşır makineleri
- Tip
- Kullanici rehberi
diğer dillerde
- English: Indesit IWE 7108 S (EU) User guide