
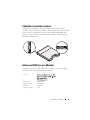
Dell PowerVault MD3600i and
MD3620i Storage Arrays
Getting Started With
Your System
Začínáme se systémem
Mise en route
Handbuch zum Einstieg
Τα πρώτα βήματα με το σύστημά σας
Rozpoczęcie pracy z systemem
Начало работы с системой
Introducción al sistema
Sisteminizi Kullanmaya Başlarken


Dell PowerVault MD3600i and
MD3620i Storage Arrays
Getting Started With
Your System
Regulatory Model Series E03J and E04J

Notes, Cautions, and Warnings
NOTE:
A NOTE indicates important information that helps you make better use of
your computer.
CAUTION:
A CAUTION indicates potential damage to hardware or loss of data
if instructions are not followed.
WARNING:
A WARNING indicates a potential for property damage, personal
injury, or death.
____________________
Information in this publication is subject to change without notice.
© 2011 Dell Inc. All rights reserved.
Reproduction of these materials in any manner whatsoever without the written permission of Dell Inc.
is strictly forbidden.
Trademarks used in this text: Dell™, the DELL logo, and PowerVault™ are trademarks of Dell Inc.
Microsoft
®
and Windows Server
®
are either trademarks or registered trademarks of Microsoft
Corporation in the United States and/or other countries Red Hat
®
and Red Hat Enterprise Linux
®
are
registered trademarks of Red Hat, Inc. in the United States and other countries. SUSE
®
is a registered
trademark of Novell, Inc. in the United States and other countries. VMware
®
is a registered trademark
of VMware, Inc. in the United States and/or other jurisdictions.
Other trademarks and trade names may be used in this publication to refer to either the entities claiming
the marks and names or their products. Dell Inc. disclaims any proprietary interest in trademarks and
trade names other than its own.
Regulatory Model Series E03J and E04J
2011 - 08 P/N T1VCV Rev. A02

Getting Started With Your System
3
Before You Begin
NOTE:
Throughout the document, Dell PowerVault MD3600i series storage
array refers to both Dell PowerVault MD3600i and Dell PowerVault MD3620i.
Dell PowerVault MD1200 series expansion enclosure refers to both
Dell PowerVault MD1200 and Dell PowerVault MD1220.
Before setting up your Dell PowerVault MD3600i series storage array,
you must consider certain best practices to ensure that your storage array
operates at maximum efficiency and offers full redundancy (if required).
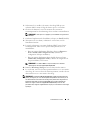
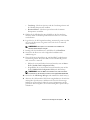
• The PowerVault MD3600i series storage array is a 10GBase-T product that
requires a 10GBase-T capable infrastructure that consists of Category 6 or
higher cables, 10GBase-T capable patch panels, and switches.
• Existing 1GBase-T infrastructures can be used either through a 10GBase-T
switch, that interconnects the 10GBase-T network, or by manually
configuring the iSCSI ports to run at 1GBase-T speeds. You can also
use the Modular Disk Configuration Utility (MDCU) to configure
the port speeds. For more information about MDCU, see "Installing the
MD Storage Software" on page 14.
NOTE:
Auto-negotiation is not supported and the operation speed must be
configured manually.
• Throughout the network, always use a Category 6 (or higher) Ethernet cable.
• It is recommended that you use a dedicated IP SAN for iSCSI data
transmission. Management traffic can be isolated on a separate
management network.
• Complete the iSCSI configuration worksheet before configuring iSCSI.
See "Completing the iSCSI Worksheet" on page 5. This worksheet gathers
physical network information in a single source.
• After completing the iSCSI worksheet, draw the configuration before
setting up the solution.
• Always configure redundant iSCSI data paths to provide alternate paths
to and from the host server should one of the data paths become disabled.

4
Getting Started With Your System
• If multiple NICs are installed on a host, it is recommeded that you use
different subnets for management and iSCSI data links.
• Before connecting any cables between the host server and storage array,
physically label each port and connector.
• Always follow proper power-up and power-down procedures when cycling
power across the network. You must also ensure that critical network
components are on separate power circuits.
NOTE:
The illustrations in this document show cabling for only one PowerVault
MD3600i series storage array in a SAN environment. The illustrations also show only
the default IP addresses for the PowerVault MD3600i series storage array. To cable more
than one PowerVault MD3600i series storage array in a SAN environment,
see the Deployment Guide.

Getting Started With Your System
5
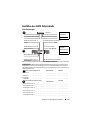
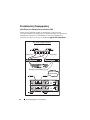
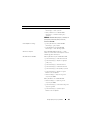
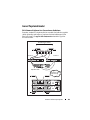
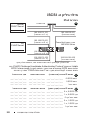
Completing the iSCSI Worksheet
IPv4 Settings
Mutual
CHAP Secret
Target
CHAP Secret
A
B
host server
PowerVault MD3600i
series storage array
192.168.130.101 (In 0 default)
192.168.131.101 (In 1 default)
192.168.128.101 (management network port)
192.168.130.102 (In 0 default)
192.168.131.102 (In 1 default)
192.168.128.102 (management network port)
If you need additional space for more than one host server, use an additional sheet.
iSCSI port 0
iSCSI port 1
Management port
Subnet mask
Default gateway
A
___ . ___ . ___ . ___
___ . ___ . ___ . ___
___ . ___ . ___ . ___
___ . ___ . ___ . ___
___ . ___ . ___ . ___
___ . ___ . ___ . ___
___ . ___ . ___ . ___
___ . ___ . ___ . ___
___ . ___ . ___ . ___
Static IP address (storage array)
Subnet mask
Default gateway
B
___ . ___ . ___ . ___
___ . ___ . ___ . ___
___ . ___ . ___ . ___
___ . ___ . ___ . ___
___ . ___ . ___ . ___
___ . ___ . ___ . ___
iSCSI controller 0, In 0
iSCSI controller 0, In 1
Management port cntrl 0
iSCSI controller 1, In 0
iSCSI controller 1, In 1
Management port cntrl 1
___ . ___ . ___ . ___
___ . ___ . ___ . ___
___ . ___ . ___ . ___
___ . ___ . ___ . ___
___ . ___ . ___ . ___
___ . ___ . ___ . ___
___ . ___ . ___ . ___
___ . ___ . ___ . ___
___ . ___ . ___ . ___
___ . ___ . ___ . ___
___ . ___ . ___ . ___
___ . ___ . ___ . ___
Static IP address (host server)
NOTE: Challenge Handshake Authentication Protocol (CHAP) is an optional iSCSI authentication
method where the storage array (target) authenticates iSCSI initiators on the host server. For more
information, see “Understanding CHAP Authentication” in the Deployment Guide.

6
Getting Started With Your System
NOTE:
For information about the IPv6 worksheet, see the Deployment Guide.
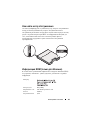
Other Documentation and Media You May Need
WARNING:
See the safety and regulatory information that shipped with
your system. Warranty information may be included within this document or
as a separate document.
NOTE:
All PowerVault MD3600i series storage array documents are available at
support.dell.com/manuals.
• The rack documentation included with your rack solution describes how
to install your system into a rack.
•The
Owner’s Manual
provides information about system features and
describes how to troubleshoot the system and install or replace system
components.
•The
Deployment Guide
provides information about installing and
configuring the software and hardware.
•The
CLI Guide
provides information about using the command line
interface (CLI) to configure and manage your storage array.
•The
SMI-S Provider Installation Guide
provides information about
installing the SMI-S provider.
• Any media that ships with your system that provides documentation
and tools for configuring and managing your system, including those
pertaining to the operating system, system management software,
system updates, and system components that you purchased
with your system.
NOTE:
Always check for updates on support.dell.com/manuals and read the
updates first because they often supersede information in other documents.

Getting Started With Your System
7
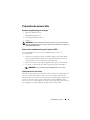
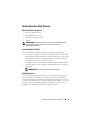
Preparing the Host Server
Supported Operating Systems
• Microsoft Windows Server
• Red Hat Enterprise Linux
• SUSE Linux Enterprise Server
•VMware
NOTE:
For the latest information on all supported operating system versions,
see the Support Matrix at support.dell.com/manuals.
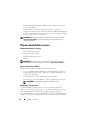
Additional NICs for iSCSI
When installing additional NICs, it is recommended that:
• You use dedicated redundant storage networks for iSCSI traffic.
If a dedicated network is not feasible, isolate the iSCSI traffic from
general network traffic using virtual local area networks (VLAN).
• You use additional NICs dedicated for iSCSI traffic.
• The NICs must be added in pairs for redundancy.
NOTE:
A single NIC is also supported.
NIC Configuration
In a SAN environment, depending on the number of switches, it is
recommended that you use two unique subnets for iSCSI traffic.
For direct-attached storage environments, each NIC directly connected to
the PowerVault MD36xxi must be on a separate subnet. All host IP addresses
must be configured before installing the MD storage software.

8
Getting Started With Your System
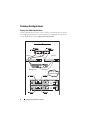
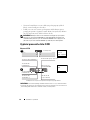
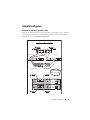
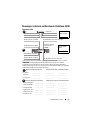
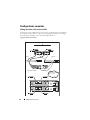
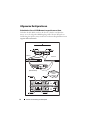
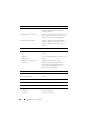
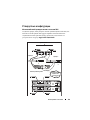
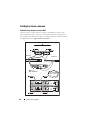
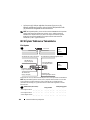
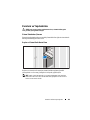
Common Configurations
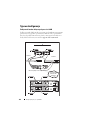
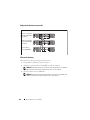
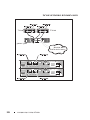
Cabling Your SAN-Attached Hosts
Connect all cables between the servers, switches, and storage arrays as shown
in the following illustration. For more examples of cabling the storage arrays,
see the Deployment Guide at support.dell.com/manuals.
Up to 64 hosts
Server 1
Server 2
Storage array
Corporate, public,
or private network
Switch 1
Switch 2

Getting Started With Your System
9
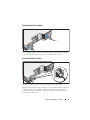
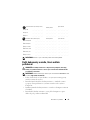
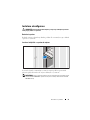
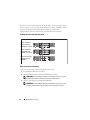
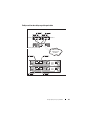
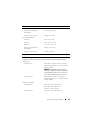
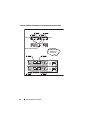
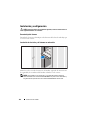
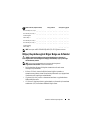
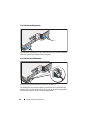
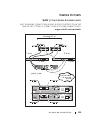
Cabling Your Direct-Attached Hosts
Server 1
Server 2
Storage array
Corporate, public,
or private network

10
Getting Started With Your System
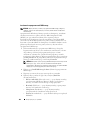
Installation and Configuration
WARNING:
Before performing the following procedure, review the safety
instructions that came with the system.
Unpacking the System
Unpack your system and identify each item with the packing list that shipped
with your system.
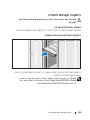
Installing the Rails and System in a Rack
Assemble the rails and install the system in the rack following the safety
instructions and the rack installation instructions provided with your system.
NOTE:
To balance the weight load, it is recommended that you install the
PowerVault MD3600i series storage arrays at the bottom of the rack and the
PowerVault MD1200 series expansion enclosures above it.

Getting Started With Your System
11
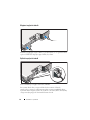
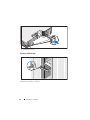
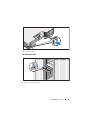
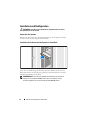
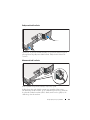
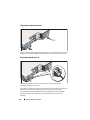
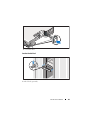
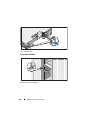
Connecting the Power Cable(s)
Ensure that the power switch is in the OFF position before connecting the
power cables. Connect the system’s power cable(s) to the system.
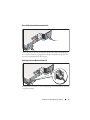
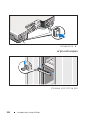
Securing the Power Cable(s)
Secure the cable(s) firmly to the bracket using the provided strap.
Plug the other end of the power cable(s) into a grounded electrical outlet or
a separate power source such as an uninterrupted power supply (UPS) or
a power distribution unit (PDU). Each power supply must be connected
to a separate power circuit.

12
Getting Started With Your System
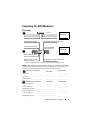
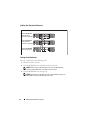
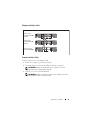
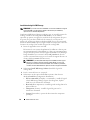
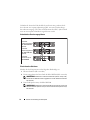
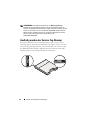
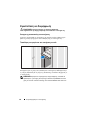
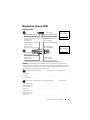
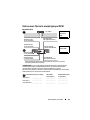
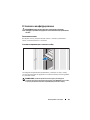
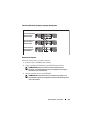
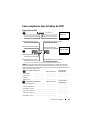
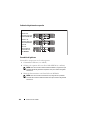
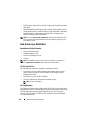
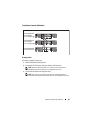
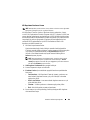
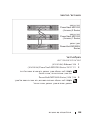
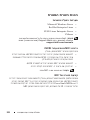
Cabling Your Expansion Enclosure
Turning On the Enclosure
Turn on components in the following order
1
Ethernet switches (if used)
2
PowerVault MD1200 series expansion enclosures (if used)
NOTE:
Before turning on the storage array, ensure that the expansion
enclosure status LED on the front of the enclosure is blue.
3
PowerVault MD3600i series storage array
NOTE:
Before turning on the host server(s), ensure that the storage array
status LED on the front of the storage array is blue.
PowerVault MD3600i
series storage array
PowerVault MD1200
series expansion
enclosure 1 (optional)
PowerVault MD1200
series expansion
enclosure 2 (optional)

Getting Started With Your System
13
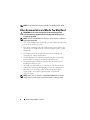
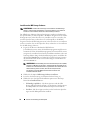
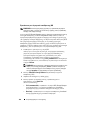
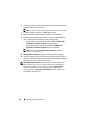
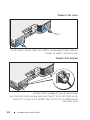
4
Host server(s)
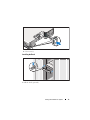
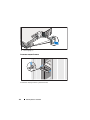
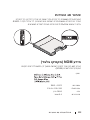
Installing the Bezel
Install the bezel (optional).

14
Getting Started With Your System
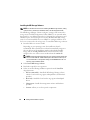
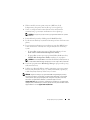
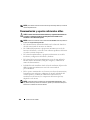
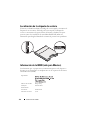
Installing the MD Storage Software
NOTE:
For detailed instructions about installing the MD storage software, setting
up the enclosure, and the post-installation tasks, see the Deployment Guide.
The MD Storage Manager software configures, manages and monitors the
storage array. The MD Configuration Utility (MDCU) is an optional utility
that provides a consolidated approach for configuring the management and
iSCSI host ports, and creating sessions for the iSCSI modular disk storage
arrays. It is recommended that you use MDCU to configure iSCSI on each
host server connected to the storage array. To install the MD storage software:
1
Insert the MD series resource media.
Depending on your operating system, the installer may launch
automatically. If the installer does not launch automatically, navigate to
the root directory of the installation media (or downloaded installer
image) and run the
md_launcher.exe
file. For Linux-based systems,
navigate to the root of the resource media and run the
autorun
file.
NOTE:
By default, the Red Hat Enterprise Linux operating system mounts the
resource media with the -noexec mount option which does not allow you to
run executable files. To change this setting, see the Readme file in the root
directory of the installation media.
2
Select
Install MD Storage Software
.
3
Read and accept the license agreement.
4
Select one of the following installation options from the
Install Set
drop-down menu:
•
Full (recommended)
—Installs the MD Storage Manager (client)
software, host-based storage agent, multipath driver, and hardware
providers.
•
Host Only
—Installs the host-based storage agent and multipath
drivers.
•
Management
—Installs the management software and hardware
providers.
•
Custom
—Allows you to select specific components.

Getting Started With Your System
15
5
Select the MD storage array model(s) you are setting up to serve as data
storage for this host server.
6
Choose whether to start the event monitor service automatically when the
host server reboots or manually
NOTE:
This option is applicable only to Windows client software installation.
7
Confirm the installation location and click
Install
.
8
If prompted, reboot the host server after the installation completes.
9
When the reboot is complete, the MDCU may launch automatically.
If the MDCU does not launch automatically, launch it manually.
• In a Windows-based operating system, click
Start
→
Dell
→
Modular
Disk Configuration Utility
.
• In a Linux-based operating system, double-click the
Modular Disk
Configuration Utility
icon on the desktop.
NOTE:
If MDCU is not installed, see the Deployment Guide at
support.dell.com/manuals.
10
Start the
MD Storage Manager
and discover the array(s).
11
If applicable, activate any premium features purchased with your storage
array. If you purchased premium features, see the printed activation card
shipped with your storage array.
NOTE:
The MD Storage Manager installer automatically installs the required
drivers, firmware, and operating system patches/hotfixes to operate your storage
array. These drivers and firmware are also available at support.dell.com. In
addition, see the Support Matrix at support.dell.com/manuals for any additional
settings and/or software required for your specific storage array.

16
Getting Started With Your System
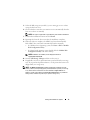
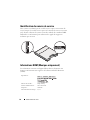
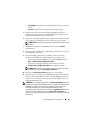
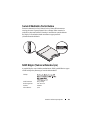
Locating Your Service Tag
Your system is identified by a unique Express Service Code and Service Tag
number. The Express Service Code and Service Tag are found on the front of
the system and at the back of the system next to the RAID controller
modules. This information is used by Dell to route support calls to the
appropriate personnel.
NOM Information (Mexico Only)
The following information is provided on the device described
in this document in compliance with the requirements of the
official Mexican standards (NOM):
Importer:
Model number: E03J and E04J
Supply voltage: 100–240 V CA
Frequency: 50/60 Hz
Current consumption: 8.6 A

Getting Started With Your System
17
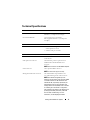
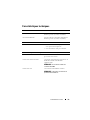
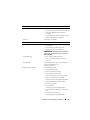
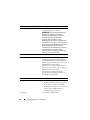
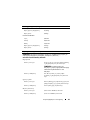
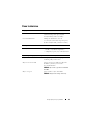
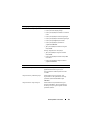
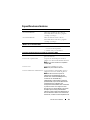
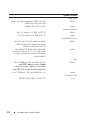
Technical Specifications
Drives
PowerVault MD3600i Up to twelve 3.5-inch SAS hot-swappable
hard drives (3.0 Gbps and 6.0 Gbps)
PowerVault MD3620i Up to twenty four 2.5-inch SAS
hot-swappable hard drives (3.0 Gbps and
6.0 Gbps)
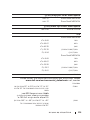
RAID Controller Modules
RAID controller modules
• One or two hot-swappable modules
with temperature sensors
• 2 GB of cache per controller
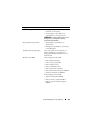
Back-Panel Connectors (Per RAID Controller Module)
iSCSI connectors Two 10 GB iSCSI IN connectors to
connect hosts
SAS expansion connector One SAS OUT port for expansion to an
additional PowerVault MD1200 series
enclosure.
NOTE:
SAS connectors are SFF-8088 compliant.
Serial connector One 6-pin mini-DIN connector
NOTE:
For technical support use only.
Management Ethernet connector One 100/1000 Base-T port Ethernet for
out-of-band management of the enclosure
NOTE:
The default management port IP
addresses for the primary and secondary RAID
controller modules are 192.168.128.101 and
192.168.128.102, respectively. By default, the
management ports are set to Dynamic Host
Configuration Protocol (DHCP). If the controller
is unable to get an IP address configuration
from a DHCP server within a specified time out
period (approximately 3 minutes), it defaults
back to static IP addressing. For more
information, see the Deployment Guide.

18
Getting Started With Your System
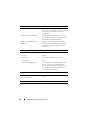
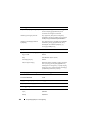
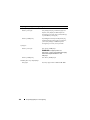
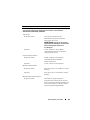
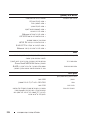
Expansion
PowerVault MD1200 series Supports a maximum of 192 hard drives with
any combination of PowerVault MD1200 or
PowerVault MD1220 expansion enclosures.
Support for 192 hard drives is a Premium
Feature and requires activation. The
maximum number of hard drives supported
without using the Premium Feature is 120.
Redundant path connectivity provides
redundant data paths to each hard drive.
Backplane Board
Connectors
• 12 or 24 SAS hard-drive connectors
• Two power supply/cooling fan
module connectors
• Two sets of RAID controller module
connectors
• One control panel connector for front LEDs
and enclosure mode switch
Sensors Two temperature sensors
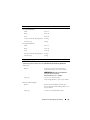
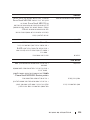
LED Indicators
Front panel
• One two-color LED indicator for
system status
• Two single-color LED indicators for power
and enclosure mode
NOTE:
The enclosure mode LED is not
applicable to the PowerVault MD3600i series
storage array.
Hard-drive carrier
• One single-color activity LED
• One two-color LED status indicator
per drive
Power supply/cooling fan Three LED status indicators for power supply
status, power supply/fan fault, and AC status
Sayfa yükleniyor...
Sayfa yükleniyor...
Sayfa yükleniyor...
Sayfa yükleniyor...
Sayfa yükleniyor...
Sayfa yükleniyor...
Sayfa yükleniyor...
Sayfa yükleniyor...
Sayfa yükleniyor...
Sayfa yükleniyor...
Sayfa yükleniyor...
Sayfa yükleniyor...
Sayfa yükleniyor...
Sayfa yükleniyor...
Sayfa yükleniyor...
Sayfa yükleniyor...
Sayfa yükleniyor...
Sayfa yükleniyor...
Sayfa yükleniyor...
Sayfa yükleniyor...
Sayfa yükleniyor...
Sayfa yükleniyor...
Sayfa yükleniyor...
Sayfa yükleniyor...
Sayfa yükleniyor...
Sayfa yükleniyor...
Sayfa yükleniyor...
Sayfa yükleniyor...
Sayfa yükleniyor...
Sayfa yükleniyor...
Sayfa yükleniyor...
Sayfa yükleniyor...
Sayfa yükleniyor...
Sayfa yükleniyor...
Sayfa yükleniyor...
Sayfa yükleniyor...
Sayfa yükleniyor...
Sayfa yükleniyor...
Sayfa yükleniyor...
Sayfa yükleniyor...
Sayfa yükleniyor...
Sayfa yükleniyor...
Sayfa yükleniyor...
Sayfa yükleniyor...
Sayfa yükleniyor...
Sayfa yükleniyor...
Sayfa yükleniyor...
Sayfa yükleniyor...
Sayfa yükleniyor...
Sayfa yükleniyor...
Sayfa yükleniyor...
Sayfa yükleniyor...
Sayfa yükleniyor...
Sayfa yükleniyor...
Sayfa yükleniyor...
Sayfa yükleniyor...
Sayfa yükleniyor...
Sayfa yükleniyor...
Sayfa yükleniyor...
Sayfa yükleniyor...
Sayfa yükleniyor...
Sayfa yükleniyor...
Sayfa yükleniyor...
Sayfa yükleniyor...
Sayfa yükleniyor...
Sayfa yükleniyor...
Sayfa yükleniyor...
Sayfa yükleniyor...
Sayfa yükleniyor...
Sayfa yükleniyor...
Sayfa yükleniyor...
Sayfa yükleniyor...
Sayfa yükleniyor...
Sayfa yükleniyor...
Sayfa yükleniyor...
Sayfa yükleniyor...
Sayfa yükleniyor...
Sayfa yükleniyor...
Sayfa yükleniyor...
Sayfa yükleniyor...
Sayfa yükleniyor...
Sayfa yükleniyor...
Sayfa yükleniyor...
Sayfa yükleniyor...
Sayfa yükleniyor...
Sayfa yükleniyor...
Sayfa yükleniyor...
Sayfa yükleniyor...
Sayfa yükleniyor...
Sayfa yükleniyor...
Sayfa yükleniyor...
Sayfa yükleniyor...
Sayfa yükleniyor...
Sayfa yükleniyor...
Sayfa yükleniyor...
Sayfa yükleniyor...
Sayfa yükleniyor...
Sayfa yükleniyor...
Sayfa yükleniyor...
Sayfa yükleniyor...
Sayfa yükleniyor...
Sayfa yükleniyor...
Sayfa yükleniyor...
Sayfa yükleniyor...
Sayfa yükleniyor...
Sayfa yükleniyor...
Sayfa yükleniyor...
Sayfa yükleniyor...
Sayfa yükleniyor...
Sayfa yükleniyor...
Sayfa yükleniyor...
Sayfa yükleniyor...
Sayfa yükleniyor...
Sayfa yükleniyor...
Sayfa yükleniyor...
Sayfa yükleniyor...
Sayfa yükleniyor...
Sayfa yükleniyor...
Sayfa yükleniyor...
Sayfa yükleniyor...
Sayfa yükleniyor...
Sayfa yükleniyor...
Sayfa yükleniyor...
Sayfa yükleniyor...
Sayfa yükleniyor...
Sayfa yükleniyor...
Sayfa yükleniyor...
Sayfa yükleniyor...
Sayfa yükleniyor...
Sayfa yükleniyor...
Sayfa yükleniyor...
Sayfa yükleniyor...
Sayfa yükleniyor...
Sayfa yükleniyor...
Sayfa yükleniyor...
Sayfa yükleniyor...
Sayfa yükleniyor...
Sayfa yükleniyor...
Sayfa yükleniyor...
Sayfa yükleniyor...
Sayfa yükleniyor...
Sayfa yükleniyor...
Sayfa yükleniyor...
Sayfa yükleniyor...
Sayfa yükleniyor...
Sayfa yükleniyor...
Sayfa yükleniyor...
Sayfa yükleniyor...
Sayfa yükleniyor...
Sayfa yükleniyor...
Sayfa yükleniyor...
Sayfa yükleniyor...
Sayfa yükleniyor...
Sayfa yükleniyor...
Sayfa yükleniyor...
Sayfa yükleniyor...
Sayfa yükleniyor...
Sayfa yükleniyor...
Sayfa yükleniyor...
Sayfa yükleniyor...
Sayfa yükleniyor...
Sayfa yükleniyor...
Sayfa yükleniyor...
Sayfa yükleniyor...
Sayfa yükleniyor...
Sayfa yükleniyor...
Sayfa yükleniyor...
Sayfa yükleniyor...
Sayfa yükleniyor...
Sayfa yükleniyor...
Sayfa yükleniyor...
Sayfa yükleniyor...
Sayfa yükleniyor...
Sayfa yükleniyor...
Sayfa yükleniyor...
Sayfa yükleniyor...
Sayfa yükleniyor...
Sayfa yükleniyor...
Sayfa yükleniyor...
Sayfa yükleniyor...
Sayfa yükleniyor...
Sayfa yükleniyor...
Sayfa yükleniyor...
Sayfa yükleniyor...
Sayfa yükleniyor...
Sayfa yükleniyor...
Sayfa yükleniyor...
Sayfa yükleniyor...
Sayfa yükleniyor...
Sayfa yükleniyor...
Sayfa yükleniyor...
Sayfa yükleniyor...
Sayfa yükleniyor...
Sayfa yükleniyor...
Sayfa yükleniyor...
Sayfa yükleniyor...
Sayfa yükleniyor...
Sayfa yükleniyor...
Sayfa yükleniyor...
Sayfa yükleniyor...
Sayfa yükleniyor...
Sayfa yükleniyor...
-
 1
1
-
 2
2
-
 3
3
-
 4
4
-
 5
5
-
 6
6
-
 7
7
-
 8
8
-
 9
9
-
 10
10
-
 11
11
-
 12
12
-
 13
13
-
 14
14
-
 15
15
-
 16
16
-
 17
17
-
 18
18
-
 19
19
-
 20
20
-
 21
21
-
 22
22
-
 23
23
-
 24
24
-
 25
25
-
 26
26
-
 27
27
-
 28
28
-
 29
29
-
 30
30
-
 31
31
-
 32
32
-
 33
33
-
 34
34
-
 35
35
-
 36
36
-
 37
37
-
 38
38
-
 39
39
-
 40
40
-
 41
41
-
 42
42
-
 43
43
-
 44
44
-
 45
45
-
 46
46
-
 47
47
-
 48
48
-
 49
49
-
 50
50
-
 51
51
-
 52
52
-
 53
53
-
 54
54
-
 55
55
-
 56
56
-
 57
57
-
 58
58
-
 59
59
-
 60
60
-
 61
61
-
 62
62
-
 63
63
-
 64
64
-
 65
65
-
 66
66
-
 67
67
-
 68
68
-
 69
69
-
 70
70
-
 71
71
-
 72
72
-
 73
73
-
 74
74
-
 75
75
-
 76
76
-
 77
77
-
 78
78
-
 79
79
-
 80
80
-
 81
81
-
 82
82
-
 83
83
-
 84
84
-
 85
85
-
 86
86
-
 87
87
-
 88
88
-
 89
89
-
 90
90
-
 91
91
-
 92
92
-
 93
93
-
 94
94
-
 95
95
-
 96
96
-
 97
97
-
 98
98
-
 99
99
-
 100
100
-
 101
101
-
 102
102
-
 103
103
-
 104
104
-
 105
105
-
 106
106
-
 107
107
-
 108
108
-
 109
109
-
 110
110
-
 111
111
-
 112
112
-
 113
113
-
 114
114
-
 115
115
-
 116
116
-
 117
117
-
 118
118
-
 119
119
-
 120
120
-
 121
121
-
 122
122
-
 123
123
-
 124
124
-
 125
125
-
 126
126
-
 127
127
-
 128
128
-
 129
129
-
 130
130
-
 131
131
-
 132
132
-
 133
133
-
 134
134
-
 135
135
-
 136
136
-
 137
137
-
 138
138
-
 139
139
-
 140
140
-
 141
141
-
 142
142
-
 143
143
-
 144
144
-
 145
145
-
 146
146
-
 147
147
-
 148
148
-
 149
149
-
 150
150
-
 151
151
-
 152
152
-
 153
153
-
 154
154
-
 155
155
-
 156
156
-
 157
157
-
 158
158
-
 159
159
-
 160
160
-
 161
161
-
 162
162
-
 163
163
-
 164
164
-
 165
165
-
 166
166
-
 167
167
-
 168
168
-
 169
169
-
 170
170
-
 171
171
-
 172
172
-
 173
173
-
 174
174
-
 175
175
-
 176
176
-
 177
177
-
 178
178
-
 179
179
-
 180
180
-
 181
181
-
 182
182
-
 183
183
-
 184
184
-
 185
185
-
 186
186
-
 187
187
-
 188
188
-
 189
189
-
 190
190
-
 191
191
-
 192
192
-
 193
193
-
 194
194
-
 195
195
-
 196
196
-
 197
197
-
 198
198
-
 199
199
-
 200
200
-
 201
201
-
 202
202
-
 203
203
-
 204
204
-
 205
205
-
 206
206
-
 207
207
-
 208
208
-
 209
209
-
 210
210
-
 211
211
-
 212
212
-
 213
213
-
 214
214
-
 215
215
-
 216
216
-
 217
217
-
 218
218
-
 219
219
-
 220
220
-
 221
221
-
 222
222


