Dell OptiPlex 5250 All In One Hızlı başlangıç Kılavuzu
- Kategori
- Arabirim göbekleri
- Tip
- Hızlı başlangıç Kılavuzu
Bu kılavuz aynı zamanda aşağıdakiler için de uygundur:

3
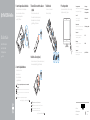
4 Install the cable cover (optional)
Installer le cache-câbles (en option) | Instale a cobertura do cabo (opcional)
Kablo kapağını kurun (İsteğe Bağlı) |
Remove the Torx screw from the cable cover
(optional)
Retirer la vistorx du cache-câbles (en option)
Retire o parafuso Torx da cobertura do cabo (opcional)
Kablo kapağından torx vidasını çıkarın (İsteğe bağlı)
torx
NOTE: Securing the cable cover by using the Torx screw is optional.
REMARQUE : la fixation du cache des câbles au moyen de la vis Torx est facultative.
NOTA: Fixar a cobertura do cabo com o parafuso torx é opcional.
NOT: Torx vida kullanarak kablo kapağını sabitlemek isteğe bağlıdır.
Torx:ةظحم
OptiPlex 5250 All-in-One
Quick Start Guide
Guide d'information rapide
Guia de iniciação rápida
Hızlı Başlangıç Kılavuzu
1 Connect the power cable and other devices
Brancher le câble d'alimentation et les autres périphériques
Ligue o cabo de alimentação e outros dispositivos
Güç kablosunu ve diğer aygıtları takın
2
Connect the keyboard and mouse
Connecter le clavier et la souris
Ligue o teclado e o rato
Klavye ve farenin bağlanması
NOTE: If you are connecting a wireless keyboard or mouse, see the documentation that
shipped with it.
REMARQUE : si vous connectez un clavier ou une souris sans fil, consultez la documentation fournie.
NOTA: Se está a ligar-se a um teclado sem fios ou a um rato, consulte a documentação enviada
com os mesmos.
NOT: Kablosuz klavye veya fare bağlıyorsanız birlikte gönderilen belgelere bakın.
:ةظحم
5 Install the stand
Installer le socle | Instale o suporte
Kaideyi kurun |
6 Press the power button
Appuyer sur le bouton d'alimentation | Prima o botão de ligação
Güç düğmesine basın |
Product support and manuals
Support produits et manuels | Suporte e manuais do produto
Ürün desteği ve kılavuzlar |
Dell.com/support
Dell.com/support/manuals
Dell.com/support/windows
Contact Dell
Contacter Dell | Contacte a Dell
Dell'e başvurun | Dell
Dell.com/contactdell
Regulatory and safety
Réglementations et sécurité | Regulamentos e segurança
Mevzuat ve güvenlik |
Dell.com/regulatory_compliance
Regulatory model
Modèle réglementaire | Modelo regulamentar
Yasal model numarası |
W14B
Regulatory type
Type réglementaire | Tipo regulamentar
Yasal tür |
W14B002
Computer model
Modèle de l'ordinateur | Modelo do computador
Bilgisayar modeli |
OptiPlex 5250 All-in-One
Printed in China.
2016-11
© 2016 Dell Inc.
© 2016 Microsoft Corporation.
© 2016 Canonical Ltd.

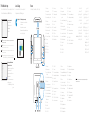
Features
Caractéristiques | Funcionalidades | Özellikler |
1. Microphone
2. Camera (optional)
3. Camera privacy latch (optional)
4. Camera status light (optional)
5. Microphone
6. Optical drive (optional)
7. On Screen Display (OSD) buttons
8. Hard drive status light
9. Power status light
10. Power button/Power light
11. Audio port
12. DisplayPort
13. HDMI out port
14. USB 3.0 ports
15. USB 2.0 ports
16. Network port
17. Power connector port
18. Power diagnostic light
19. Cable cover
20. Security cable slot
21. Stand
22. Service tag label
23. Headset connector
24. USB 3.0 port
25. USB 3.0 port with PowerShare
26. Media card reader
1. Microphone
2. Webcam (en option)
3. Loquet du cache de la webcam
(en option)
4. Voyant d'état de la webcam (en option)
5. Microphone
6. Lecteur optique (en option)
7. Boutons de menu à l'écran (OSD)
8. Voyant d'état du disque dur
9. Voyant d'état de l'alimentation
10. Bouton d'alimentation/voyant
d'alimentation
11. Port audio
12. DisplayPort
13. Port de sortie HDMI
14. Ports USB3.0
15. Ports USB2.0
16. Port réseau
17. Port du connecteur d'alimentation
18. Voyant de diagnostic d'alimentation
19. Cache-câbles
20. Passage du câble de sécurité
21. Socle
22. Étiquette du numéro de service
23. Port pour casque
24. Port USB3.0
25. Port USB3.0 avec PowerShare
26. Lecteur de carte mémoire
1. Microfone
2. Câmara (opcional)
3. Trinco de privacidade da câmara
(opcional)
4. Luz de estado da câmara (opcional)
5. Microfone
6. Unidade ótica (opcional)
7. Botões On Screen Display (OSD)
8. Luz de estado do disco rígido
9. Luz de estado da alimentação
10. Botão/luz de alimentação
11. Porta de áudio
12. DisplayPort
13. Porta HDMI-out
14. Portas USB 3.0
15. Portas USB 2.0
16. Porta de rede
17. Porta do conetor de alimentação
18. Luz de diagnóstico da alimentação
19. Cobertura do cabo
20. Ranhura do cabo de segurança
21. Suporte
22. Rótulo da etiqueta de serviço
23. Conetor para auscultadores
24. Porta USB 3.0
25. Porta USB 3.0 com PowerShare
26. Leitor de cartões multimédia
1. Mikrofon
2. Kamera (isteğe bağlı)
3. Kamera gizlilik mandalı (isteğe bağlı)
4. Kamera durum ışığı (isteğe bağlı)
5. Mikrofon
6. Optik sürücü (isteğe bağlı)
7. Ekran Gösterge (OSD) düğmeleri
8. Sabit sürücü durum ışığı
9. Güç durum ışığı
10. Güç düğmesi/Güç ışığı
11. Ses bağlantı noktası
12. DisplayPort
13. HDMI çıkışı bağlantı noktası
14. USB 3.0 bağlantı noktaları
15. USB 2.0 bağlantı noktaları
16. Ağ bağlantı noktası
17. Güç kablosu konektör bağlantı noktası
18. Güç tanılama ışığı
19. Kablo kapağı
20. Güvenlik kablosu yuvası
21. Ayak
22. Servis etiketi çıkartması
23. Kulaklıklı mikrofon konnektörü
24. USB 3.0 bağlantı noktası
25. PowerShare ile birlikte USB 3.0
bağlantınoktası
26. Ortam kartı okuyucu
1 .
2 .
3 .
4 .
5 .
6 .
7 .)OSD
8 .
9 .
10 .
11 .
12 .DisplayPort
13 .HDMI
14 .
15 .
16 .
17 .
18 .
19 .
20 .
21 .
22 .
23 .
24 .
25 .PowerShare
26 .
NOTE: Connection and use of this communications equipment is permitted by the Nigerian
Communications Commission.
7
Finish Windows 10 setup
Terminer l'installation de Windows 10 | Conclua a configuração do Windows 10
Windows 10 kurulumunu tamamlama |
Connect to your network
Se connecter au réseau
Estabeleça ligação à rede
Ağınıza bağlanın
NOTE: If you are connecting to a secured wireless network, enter the password for the wireless
network access when prompted.
REMARQUE : si vous vous connectez à un réseau sans fil sécurisé, saisissez le mot de passe
d'accès au réseau sans fil lorsque vous y êtes invité.
NOTA: Se estiver a ligar-se a uma rede sem fios protegida, introduza a palavra passe de acesso
à rede sem fios quando solicitado.
NOT: Güvenli bir kablosuz ağa bağlanıyorsanız, sorulduğunda kablosuz ağ erişimi parolasını girin.
:ةظحم
Sign in to your Microsoft account
orcreate alocal account
Connectez-vous à votre compte Microsoft
ou créez un compte local
Inicie sessão na sua conta Microsoft ou
crie uma conta local
Microsoft hesabınıza oturum açın veya
yerel bir hesap oluşturun
Microsoft
Locate Dell apps
Localiser les applications Dell | Localize as aplicações Dell
Dell uygulamalarını bulma | Dell
SupportAssist Check and update your computer
Rechercher des mises à jour et les installer sur
votreordinateur
Verifique e atualize o seu computador
Bilgisayarınızı kontrol edin ve güncellemeleri yapın
-
 1
1
-
 2
2


Dell OptiPlex 5250 All In One Hızlı başlangıç Kılavuzu
- Kategori
- Arabirim göbekleri
- Tip
- Hızlı başlangıç Kılavuzu
- Bu kılavuz aynı zamanda aşağıdakiler için de uygundur:
diğer dillerde
İlgili makaleler
-
Dell OptiPlex 7450 All-In-One Hızlı başlangıç Kılavuzu
-
-
-
Dell OptiPlex 3050 All In One Hızlı başlangıç Kılavuzu
-
-
Dell OptiPlex 3240 All-in-One Hızlı başlangıç Kılavuzu
-
-
-