HOTPOINT/ARISTON AQ93F 29 EU Kullanici rehberi
- Kategori
- Çamaşır makineleri
- Tip
- Kullanici rehberi

EN
1
English,1
Contents
Installation, 2-3
Unpacking and levelling
Connecting the electricity and water supplies
Technical data
Description of the machine, 4-5
Control panel
Running a wash cycle, 6
Wash cycles and options, 7
Table of wash cycles
Wash options
Detergents and laundry, 8
Detergent
Preparing the laundry
Washing recommendations
Precautions and advice, 9
General safety
Load balancing system
Disposal
Opening the porthole door manually
Care and maintenance, 10
Cutting off the water and electricity supplies
Cleaning the machine
Cleaning the detergent dispenser drawer
Caring for your appliance drum
Cleaning the pump
Checking the water inlet hose
Trouble shooting, 11
Assistance, 12
EN
WASHING MACHINE
AQUALTIS
AQ93F 29
Instructions for
installation and use
PT
Português,13
Türkçe,25
TR

EN
22
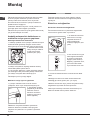
! If the appliance is levelled correctly, it will be more stable
and much less likely to cause vibrations and noise while it
is operating, particularly during the spin cycle.
! If it is placed on carpet or a rug, adjust the feet in such a
way as to allow a sufficient ventilation space underneath
the washing machine.
Connecting the electricity and water
supplies
Connecting the water inlet hose
! Before connecting the inlet hose to the water supply, run
the water until it is perfectly clear.
1. Connect the inlet hose
to the machine by screwing
it onto the cold water inlet
of the appliance, which is
situated on the top right-
hand side of the rear part of
the appliance (see figure).
2. Connect the inlet hose
by screwing it to a cold
water tap using a 3/4 gas
threaded connection (see
figure).
3. Make sure that the hose is not folded over or bent.
! The water pressure at the tap must fall within the values
indicated in the Technical data table (see next page).
! If the inlet hose is not long enough, contact a specialised
shop or an authorised technician.
! Never use second-hand or old inlet hoses; use the
products supplied with the machine.
! This instruction manual should be kept in a safe place
for future reference. If the washing machine is sold, given
away or moved, please ensure the manual is kept with
the machine, so that the new owner may benefit from the
advice contained within it.
! Read these instructions carefully: they contain vital
information relating to the safe installation and operation of
the appliance.
! Inside the pack containing this manual, you will also find
the guarantee and all the details necessary for installation.
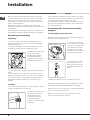
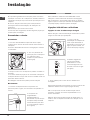
Unpacking and levelling
Unpacking
1. Once you have removed all the packaging from the
washing machine, make sure it has not been damaged
during transportation.
If it has been damaged, contact the retailer and do not
proceed any further with the installation process.
2. Remove the 4 protective
screws (used during
transportation) and the
corresponding spacer,
located on the rear part of
the appliance (see figure).
3. Close off the holes using the plastic plugs supplied in the
pack.
4. Keep all the parts in a safe place; they will be needed
again if the washing machine is moved to another location,
to prevent the inside of the appliance being damaged.
! Packaging materials should not be used as toys for
children.
Levelling
1. Place the washing machine on a flat sturdy floor, without
resting it up against walls or cabinets.
2. If the floor is uneven, the
front feet of the machine
may be adjusted until
it reaches a horizontal
position (the angle of
inclination must not exceed
2 degrees).
Installation

EN
3
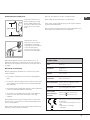
65 - 100 cm
Connecting the drain hose
Connect the drain hose to
drain duct piping or a wall
drain located between 65
and 100 cm above the floor,
making sure it is not bent
at all.
Alternatively, rest the
drain hose on the side of
a washbasin or bathtub,
fastening the duct supplied
to the tap (see figure).
The free end of the hose
should not be underwater.
! We advise against the use of hose extensions; if it is
absolutely necessary, the extension must have the same
diameter as the original hose and must not exceed 150 cm
in length.
Electrical connections
Before plugging the appliance into the electricity socket,
make sure that:
• thesocketisearthedandcomplieswithallapplicable
laws;
• thesocketisabletowithstandthemaximumpowerload
of the appliance as indicated in the Technical data table
(see opposite);
• thepowersupplyvoltagefallswithinthevaluesindicated
in the Technical data table (see opposite);
• thesocketiscompatiblewiththeplugoftheappliance.
If this is not the case, have the socket or the plug
replaced.
! The appliace must only be installed indoor in a frost free
and dry room, to prevent it from electronic damage due to
frost or condensation.
! The mains socket must remain within easy reach after the
washing machine has been installed.
! Do not use extension cords or multiple sockets.
! The cable should not be bent or compressed.
! The power supply cable and plug must only be replaced
by authorised technicians.
Warning! The company shall not be held responsible in the
event that these regulations are not respected.
Technical data
Model
AQ93F 29
Dimensions
width 59.5 cm
height 85 cm
depth 64,5 cm
Capacity
from 1 to 9 kg
Electrical
connections
please refer to the technical data plate
fixed to the machine
Water connections
maximum pressure 1 MPa (10 bar)
minimum pressure 0.05 MPa (0.5 bar)
drum capacity 71 litres
Spin speed
up to 1200 rotations per minute
Test Program-
mes according to
2010/1061
programme
; temperature 60°C;
programme
; temperature 40°C.
This appliance conforms to the following
EC Directives:
- 2004/108/EC (Electromagnetic Compa-
tibility)
- 2006/95/EC (Low Voltage)
- 2002/96/EC

EN
4
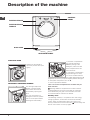
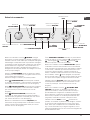
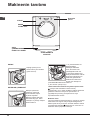
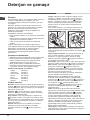
1. pre-wash compartment:
use powder detergent.
! Before pouring in the
detergent, make sure that
extra compartment 3 has
been removed.
2. main wash compartment:
If liquid detergent is used,
it is recommended that the
removable plastic partition A
(supplied) be used for proper dosage.If powder detergent
is used, place the partition into slot B.
3. extra compartment: Bleach
! The use of extra compartment 3 excludes the pre-
wash function.
washing additives compartment: for fabric softener
or liquid additives. We recommend that the maximum
level indicated by the grille is not exceeded, and that
concentrated fabric softeners are diluted.
Standby mode
This washing machine, in compliance with new energy
saving regulations, is fitted with an automatic standby
system which is enabled after about 30 minutes if no
activity is detected. Press the ON-OFF button briefly and
wait for the machine to start up again.
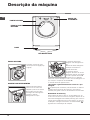
PORTHOLE DOOR
Always use the handle to
open the porthole door (see
figure).
DETERGENT DISPENSER DRAWER
The detergent dispenser
drawer is located inside
the machine and can be
accessed by opening the
door.
For more information on
detergent measures, please
refer to the chapter entitled
“Detergents and laundry”.
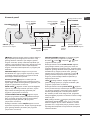
CONTROL
PANEL
PORTHOLE DOOR
PORTHOLE DOOR
HANDLE
KICK STRIP
ADJUSTABLE FEET
3
1
2
1
8
0
2
1
0
1
5
0
1
2
0
9
0
6
0
B
A
Description of the machine

EN
5
TEMPERATURE button
WASH CYCLE
SELECTOR knob
OPTION buttons
with indicator lights
LOCK
indicator light
START/
PAUSE
button with
indicator light
WASH
CYCLE
PHASE
icons
SPIN button
CONTROL PANEL
LOCK button with
indicator light
Button with ON/OFF
indicator light
ECO
indicator light
OPTION buttons
with indicator lights
Control panel
Button with ON/OFF indicator light: press this briefly
to switch the machine on or off. The green indicator light
indicates that the machine is switched on. To switch off the
washing machine during the wash cycle, press and hold
the button for approximately 3 seconds; if the button is
pressed briefly or accidentally the machine will not switch
off. If the machine is switched off during a wash cycle, this
wash cycle will be cancelled.
WASH CYCLE SELECTOR knob: may be turned in
either direction. To select the most suitable wash cycle,
please refer to the “Table of wash cycles”.
The knob will not move during the wash cycle.
TEMPERATURE button: press to modify or exclude
the temperature setting; the value selected will appear on
the display above (see “Running a wash cycle”).
SPIN CYCLE button: press to modify or exclude the
spin cycle; the value selected will appear on the display
above (see “Running a wash cycle”).
DELAYED START button: press to set a delayed start
for the selected wash cycle; the set delay time will appear
on the display above (see “Running a wash cycle”).
OPTION buttons with indicator lights: press to select the
available options. The indicator light corresponding to the
selected option will remain lit (see “Running a wash cycle”).
WASH CYCLE PHASE icons: these illuminate to indicate the
progress of the wash cycle (Wash – Rinse – Spin –
Drain ). The text lights up when the cycle is complete.
START/PAUSE button with indicator light: when the green
indicator light flashes slowly, press the button to start a
wash cycle. Once the cycle has begun the indicator light
will remain lit in a fixed manner. To pause the wash cycle,
press the button again; the indicator light will flash in an
orange colour. If the “LOCK” indicator light is switched
off, the door may be opened. To start the wash cycle from
the point at which it was interrupted, press the button
again.
LOCK indicator light: indicates that the porthole door
is locked. To open the door, pause the wash cycle (see
“Running a wash cycle”).
CONTROL PANEL LOCK button with indicator light:
to activate or deactivate the control panel lock, press and
hold the button for approximately 2 seconds. when the
indicator light is illuminated, the control panel is locked.
This means it is possible to prevent wash cycles from being
modified accidentally, especially where there are children in
the home.
ECO indicator light: the icon lights up when, after
altering the washing parameters, an energy saving of
at least 10% is made. Furthermore, before the machine
enters “Standby” mode, the icon will light up for a few
seconds; when the machine is switched off the estimated
energy saving will be around the 80% mark.
DELAYED
START
button
DISPLAY

EN
6
WARNING: before you use the washing machine for the
first time, run a wash cycle with detergent and no laundry,
using the 90° cottons cycle without pre-wash.
1. SWITCH THE MACHINE ON. Press the button.
All the indicator lights will illuminate for 1 second; the
indicator light corresponding to the button will then
remain lit in a fixed manner and the START/PAUSE
indicator light will flash slowly.
2. LOAD THE LAUNDRY. Open the porthole door.
Load the laundry, making sure you do not exceed the
maximum load value indicated in the table of wash
cycles on the following page.
3. MEASURE OUT THE DETERGENT. Pull out the
detergent dispenser drawer and pour the detergent into
the relevant compartments as described in “Description
of the machine”.
4. CLOSE THE PORTHOLE DOOR.
5. SELECT THE PROGRAMME. Turn the WASH CYCLE
SELECTOR KNOB right or left, until you have selected
the desired wash cycle. A temperature and spin speed
is set for each wash cycle; these may be adjusted.
6. CUSTOMISE THE WASH CYCLE. Use the relevant
buttons on the control panel:
Modify the temperature and/or spin speed.
The machine automatically displays the maximum
temperature and spin speed values set for the selected
cycle, or the most recently-used settings if they are
compatible with the selected cycle. The temperature
can be decreased by pressing the button, until the
cold wash ( ) setting is reached. The spin speed may
be progressively reduced by pressing the button,
until it is completely excluded ( ). If these buttons are
pressed again, the maximum values are restored.
! Exception: if the programme is selected, the
temperature can be increased up to a value of 90°C.
Set a delayed start.
Press the button until you have reached the desired
delay time. During the setting process, the delay time is
shown on the display and the symbol flashes.
After selecting a delayed start time, the fixed symbol
and the cycle duration will appear on the display. Press
the button once to display the selected delay time.
To remove the delayed start option, press the button
until the display shows the text OFF; the symbol will
disappear.
! Once the START/PAUSE button has been pressed, the
time delay may only be decreased.
Modify the cycle settings.
Press the OPTION buttons to customise the wash cycle
in accordance with your own requirements.
•Pressthebuttontoactivatetheoption;the
corresponding indicator light will switch on.
•Pressthebuttonagaintodisabletheoption;the
indicator light will switch off.
! If the selected option is not compatible with the
selected wash cycle, this incompatibility will be signalled
by the flashing of the indicator light and a sound alert
(3 beeps); the option will not be activated.
! If the selected option is not compatible with another
option that has been selected previously, the indicator
light corresponding to the first option selected will
flash and only the second option will be activated; the
indicator light corresponding to the button will remain lit
in a constant manner.
7. START THE PROGRAMME. Press the START/PAUSE
button. The corresponding indicator light remains lit in a
fixed manner and the porthole door locks (the LOCK
indicator light illuminates). The icons corresponding to
the wash cycle phases will light up during the cycle to
indicate which phase is currently in progress.
To change a wash cycle once it has already started,
pause the washing machine by pressing the START/
PAUSE button; then select the desired cycle and press
the START/PAUSE button again.
To open the door during a wash cycle, press the START/
PAUSE button; if the LOCK indicator light is switched
off you may open the door. Press the START/PAUSE
button again to restart the wash cycle from the point at
which it was interrupted.
8. THE END OF THE WASH CYCLE. This is indicated
by the illuminated text END. The porthole door may be
opened immediately. If the START/PAUSE indicator light
is flashing, press the button to end the cycle. Open the
door, unload the laundry and switch off the machine.
! If you wish to cancel a cycle which has already begun,
press and hold the button until the cycle stops and the
machine switches off.
Bag for quilts, curtains and delicate garments
The Aqualtis washing machine makes it easier for you
to wash even the most valuable and delicate garments
in complete confidence thanks to the special bag which
protects the laundry (this is supplied with the machine).
We recommend that the bag is used every time you wash
quilts and padded items with an outer layer made
using synthetic material.
Running a wash cycle

EN
7
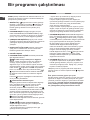
Wash options
Extra rinse
By selecting this option, the efficiency of the rinse is
increased and optimal residual detergent removal is
guaranteed. It is particularly useful for skin which is
sensitive to detergents. We recommend this option is used
with a full load of washing, or when a large amount of
detergent is required.
! It cannot be used in conjunction with , , , , .
Easy Iron
By selecting this option, the wash and spin cycles will be
modified in order to reduce the formation of creases.
At the end of the cycle the washing machine drum will
rotate slowly; the “Easy Iron” and START/PAUSE indicator
lights will flash. To end the cycle press the START/PAUSE
button or the “Easy Iron” button.
! It cannot be used in conjunction with , , , , .
Super Wash
This option offers a high-performance wash due to the
greater quantity of water used in the initial phase of the
cycle, and due to the increased wash cycle duration, is
particularly useful for the removal of stubborn stains. It can
be used with or without bleach.
If you desire bleaching, insert
the extra tray compartment
(3) into compartment 1.
When pouring in the bleach,
be careful not to exceed the
“max” level marked on the
central pivot (see figure). To
bleach laundry without
carrying out a full wash
cycle, pour the bleach into
the extra compartment 3,
select the “Rinse” cycle” and activate the “Super Wash”
option .
! It cannot be used in conjunction with , , , , ,
, , , .
Time Saver
If you select this option, the wash cycle duration will be
reduced by up to 50%, depending on the selected cycle,
thereby guaranteeing simultaneous water and energy
saving. Use this cycle for lightly soiled garments.
! It cannot be used in conjunction with , , , , ,
, , , .
3
1
2
Wash cycles and options
(*) Note: 10 minutes after the START, the machine will recalculate the time remaining until the end of the wash cycle on the basis of the load inside it; this value will then be shown on the display.
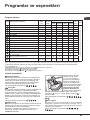
Table of wash cycles
For all Test Institutes:
1) Test wash cycle in compliance with regulation 2010/1061: set wash cycle with a temperature of 60°C.
2) Test wash cycle in compliance with regulation 2010/1061: set wash cycle with a temperature of 40°C.
3) Long wash cycle for cottons: set wash cycle with a temperature of 40°C.
4) Short wash cycle for cottons: set wash cycle with a temperature of 40°C.
5) Long wash cycle for synthetics: set wash cycle with a temperature of 40°C.
Icon Description of the wash cycle
Max. temp.
(°C)
Max.
speed
(rpm)
Detergent and additives
Max.
load
(kg)
Cycle
duration
Prewash Wash Bleach
Fabric
softener
Cotton (2-3): lightly soiled whites and delicate colours. 40° 1200 -
9
Synthetics Resistent 60° 800 -
5
Synthetics Resistent (5) 40° 800 -
5
Whites
60° 1200 -
-
6
Coloureds (4)
40° 1200 -
6
Darks
30° 800 -
-
6
Shirts
40° 600 -
2,5
Duvets: for down-stuffed garments. 30° 1000 -
-
3,5
Bed&Bath for bedlinen and towels. 60° 1200 -
9
Rinse
- 1200 - -
9
Spin and Pump out - 1200 - - - - 9
Anti allergy
60° 1200 -
-
6
Ultradelicates
30° 0 -
-
1
Wool: for wool, cashmere, etc. 40° 800 -
-
2,5
Mix 30': to refresh lightly soiled garments quickly (not suitable
for wool, silk and clothes which require washing by hand).
30° 800 -
-
4
Cotton Prewash
(Add detergent to the relevant compartment).
90° 1200
-
9
Cotton (1): heavily soiled whites and resistant colours.
60°
(Max. 90°C)
1200 -
9
(*) The duration of the wash cycles can be checked on the display.
The length of cycle shown on the display or in this booklet is an estimation only and is calculated assuming standard working conditions. The actual duration can vary according to factors such as
water temperature and pressure, the amount of detergent used, the amount and type of load inserted, load balancing and any wash options selected.

EN
8
Detergents and laundry
Duvets: to wash double or single duvets (the weight of
which should not exceed 3,5 kg), cushions or clothes
padded with goose down such as puffa jackets, use the
special wash cycle. We recommend that duvets are
placed in the drum with their edges folded inwards (see
figure) and that no more than ¾ of the total volume of the
drum is used. To achieve the best results, we recommend
that a liquid detergent is used and placed inside the
detergent dispenser drawer.
Quilts: to wash quilts with a synthetic outer layer, use the
bag provided and set the wash cycle to .
Bedlinen and towels: use programme to wash bed
linen and towels in one single cycle: it optimises softener
performance and helps you save time and energy. We
recommend the use of powder detergent.
Anti allergy: use programme to remove major
allergens such as pollen, mites, cat’s and dog’s hair.
Ultradelicates: use programme to wash very delicate
garments having strasses or sequins.
We recommend turning the garments inside out before
washing and placing small items into the special bag
for washing delicates. Use liquid detergent on delicate
garments for best results.
To wash Silk garments and Curtains (these should be
folded and placed inside the bag provided), select cycle
and then option ; the machine will end the cycle while
the laundry is soaking and the indicator light will flash.
To drain the water so that the laundry may be removed,
press the START/PAUSE button or the button.
Wool: this is the only washing machine brand to have
been awarded the prestigious Woolmark Apparel Care
- Platinum endorsement (M1135) by The Woolmark
Company. The “Wool” wash cycle can be used
to wash up to 2,5 kg of all washable wool garments
in the washing machine while guaranteeing optimum
performance. This means that all washable wool
garments may be washed in the washing machine, even
those which state “hand wash only” on the label when
washed in accordance with the instructions for the wool
cycle.
Stubborn stains: it is wise to treat stubborn stains with
solid soap before washing, and to use the Cottons with
pre-wash cycle.
Detergent
The type and quantity of detergent required depend on
the type of fabric you are washing (cotton, wool, silk,
etc.), as well as its colour, the washing temperature, the
level of soiling and the hardness of the water in the area.
Measuring out the detergent carefully will avoid wastage
and help to protect the environment: although they are
biodegradable, detergents still contain ingredients which
alter the balance of nature.
We recommend the following:
• usepowderdetergentsforwhitecottongarmentsand
pre-washing.
• useliquiddetergentsfordelicatecottongarmentsand
for all low-temperature wash cycles.
• usegentleliquiddetergentsforwoolandsilk
garments.
The detergent should be poured into the relevant
compartment - or the dispenser placed directly inside the
drum - before the wash cycle begins. In the latter case, it
will not be possible to select the Cottons with pre-wash
cycle.
! Do not use hand washing detergents because these
create too much foam.
Preparing the laundry
• Shakeoutthegarmentsbeforeloadingthemintothe
machine.
• Dividethelaundryaccordingfabrictype(symbolonthe
washing instruction label) and colour, making sure you
separate the coloured garments from the white ones;
• Emptyallpocketsandcheckthebuttons;
• Donotexceedthevalueslistedinthe“Table of wash
cycles”, which refer to the weight of the laundry when
dry.
How much does your laundry weigh?
1 sheet 400-500 g
1 pillowcase 150-200 g
1 tablecloth 400-500 g
1 bathrobe 900-1200 g
1 towel 150-250 g
1 pair of jeans 400-500 g
1 shirt 150-200 g
Washing recommendations
Whites: use this cycle to wash white clothes. The
programme is designed to maintain the brightness of
white clothes over time.
Coloureds: use this cycle to wash bright coloured
clothes. The programme is designed to maintain bright
colours over time.
Darks: Use programme to wash dark-coloured
garments. This programme is designed to maintain
dark colours over time. We recommend using a liquid
detergent for the best results when washing dark-
coloured garments.
Shirts: use the special wash cycle to wash shirts in
different fabrics and colours to guarantee they receive the
best possible care.

EN
9
Precautions and tips
that household appliances should not be disposed of
using the normal solid urban waste cycle. Exhausted
appliances should be collected separately in order to
optimise the cost of re-using and recycling the materials
inside the machine, while preventing potential damage
to the atmosphere and to public health. The crossed-out
dustbin is marked on all products to remind the owner
of their obligations regarding separated waste collection.
For more information relating to the correct disposal of
household appliances, owners should contact their local
authorities or appliance dealer.
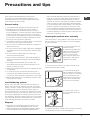
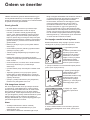
Opening the porthole door manually
In the event that it is not possible to open the porthole door
due to a powercut, and if you wish to remove the laundry,
proceed as follows:
1. remove the plug from the
electrical socket.
2. make sure the water level
inside the machine is lower
than the door opening; if
it is not, remove excess
water using the drain hose,
collecting it in a bucket as
indicated in the figure.
3. remove the cover panel on the lower front part of the
washing machine (see overleaf).
4. pull outwards using the
tab as indicated in the figure,
until the plastic tie-rod is freed
from its stop position; pull
downwards until you hear a
“click”, which indicates that
the door is now unlocked.
5. open the door; if this is
still not possible repeat the
procedure.
6. reposition the panel, making sure the hooks are securely
in place before you push it onto the appliance.
! The machine was designed and constructed in
accordance with international safety regulations. The
following information is provided for safety reasons and
must therefore be read carefully.
General safety
• Thisappliancewasdesignedfordomesticuseonly.
• Thisapplianceisnotintendedforusebypersons
(including children) with reduced physical, sensory or
mental capabilities, or lack of experience and knowledge,
unless they have been given supervision or instruction
concerning use of the appliance by a person responsible
for their safety. Children should be supervised to ensure
that they do not play with the appliance.
• themachinemustonlybeusedbyadults,inaccordance
with the instructions given in this manual.
• Donottouchthemachinewhenbarefootorwithwetor
damp hands or feet.
• Donotpullonthepowersupplycablewhenunplugging
the appliance from the electricity socket. Hold the plug
and pull.
• Donottouchthedrainedwaterasitmayreach
extremely high temperatures.
• Neverforcetheportholedoor.Thiscoulddamagethe
safety lock mechanism designed to prevent accidental
opening.
• Iftheappliancebreaksdown,donotunderany
circumstances access the internal mechanisms in an
attempt to repair it yourself.
• Alwayskeepchildrenwellawayfromtheappliancewhile
it is operating.
• Ifitmustbemoved,proceedwiththehelpoftwoor
three people and handle it with the utmost care. Never
try to do this alone, because the appliance is very heavy.
• Beforeloadinglaundryintothewashingmachine,make
sure the drum is empty.
Load balancing system
Before every spin cycle, to avoid excessive vibrations
before every spin and to distribute the load in a uniform
manner, the drum rotates continuously at a speed which
is slightly greater than the washing rotation speed. If,
after several attempts, the load is not balanced correctly,
the machine spins at a reduced spin speed. If the load is
excessively unbalanced, the washing machine performs
the distribution process instead of spinning. To encourage
improved load distribution and balance, we recommend
small and large garments are mixed in the load.
Disposal
• Disposingofthepackagingmaterials:observelocal
regulations so that the packaging may be re-used.
• TheEuropeanDirective2002/96/ECrelatingtoWaste
Electrical and Electronic Equipment (WEEE) states

EN
10
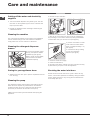
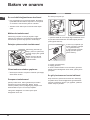
To access the pre-chamber:
1. take off the cover panel on the front of the machine by
first pressing it in the centre and then pushing downwards
on both sides until you can remove it (see figures);
2. position a container so that
it will collect the water which
flows out (approximately 1.5 l)
(see figure);
3. unscrew the lid by rotating
it in an anti-clockwise
direction (see figure);
4. clean the inside thoroughly;
5. screw the lid back on;
6. reposition the panel, making sure the hooks are securely
in place before you push it onto the appliance.
Checking the water inlet hose
Check the inlet hose at least once a year. If there are any
cracks, it should be replaced immediately: during the wash
cycles, water pressure is very strong and a cracked hose
could easily split open.
Cutting off the water and electricity
supplies
• Turnoffthewatertapaftereverywashcycle.Thiswill
limit wear on the hydraulic system in the machine and
help to prevent leaks.
• Unplugtheappliancewhencleaningitandduringall
maintenance work.
Cleaning the machine
The outer parts and rubber components of the appliance
can be cleaned using a soft cloth soaked in lukewarm
soapy water. Do not use solvents or abrasives.
Cleaning the detergent dispenser
drawer
To remove the drawer, press
lever (1) and pull the drawer
outwards (2) (see figure).
Wash it under running water;
this procedure should be
repeated frequently.
Caring for your appliance drum
• Alwaysleavethedoorajartopreventunpleasantodours
from forming.
Cleaning the pump
The washing machine is fitted with a self-cleaning pump
which does not require any maintenance. Sometimes,
small items (such as coins or buttons) may fall into the
protective pre-chamber at the base of the pump.
Make sure the wash cycle has finished and unplug the
appliance.
1
2
1
2
1
2
Care and maintenance

EN
11
Trouble shooting
Your washing machine could occasionally fail to work. Before contacting the Technical Assistance Centre (see “Assistance”),
make sure that the problem cannot be not solved easily using the following list.
Problem:
The washing machine does not
switch on.
The wash cycle does not start.
The washing machine does not fill
with water.
The washing machine door
remains locked.
The machine continuously fills
with water and drains.
The washing machine does not
drain or spin.
The machine vibrates a lot during
the spin cycle.
The washing machine leaks.
The icons corresponding to the
“Phase in progress” flash rapidly
at the same time as the ON/OFF
indicator light.
There is too much foam.
The washing machine door
remains locked.
Possible causes / Solutions:
• Theapplianceisnotpluggedintothesocketfully,ornotenoughtomake
contact.
• Thereisnopowerinthehouse.
• Thedoorisnotclosedproperly.
• TheSTART/PAUSEbuttonhasnotbeenpressed.
• Thewatertaphasnotbeenopened.
• Adelayedstarthasbeenset.
• Thewaterinlethoseisnotconnectedtothetap.
• Thehoseisbent.
• Thewatertaphasnotbeenopened.
• Thereisnowatersupplyinthehouse.
• Thepressureistoolow.
• TheSTART/PAUSEbuttonhasnotbeenpressed.
• Ifyouhaveselectedthe option, at the end of the cycle the washing machine
drum will rotate slowly; to end the cycle press the START/PAUSE button or the
option.
• Thedrainhoseisnotfittedataheightbetween65and100cmfromthefloor
(see “Installation”).
• Thefreeendofthehoseisunderwater(see “Installation”).
• Ifthedwellingisononeoftheupperfloorsofabuilding,theremaybe
problems relating to water drainage, causing the washing machine to fill with
water and drain continuously. Special anti-draining valves are available in shops
and help to prevent this inconvenience.
• Thewalldrainagesystemisnotfittedwithabreatherpipe.
• Thewashcycledoesnotincludedraining:Somewashcyclesrequirethedrain
phase to be started manually (see “Wash cycles and options”).
• The“Easyiron”optionisenabled:tocompletethewashcycle,pressthe
START/PAUSE button (“Wash cycles and options”).
• Thedrainhoseisbent(see Installation).
• Thedrainageductisclogged.
• Thedrumwasnotunlockedcorrectlyduringinstallation(see “Installation”).
• Themachineisnotlevel(see “Installation” ).
• Themachineistrappedbetweencabinetsandwalls(see “Installation”).
• Theloadisunbalanced(see “Detergents and laundry”).
• Thewaterinlethoseisnotscrewedonproperly(see“Installation”).
• Thedetergentdispenserisblocked(tocleanit,see “Care and maintenance”).
• Thedrainhoseisnotfixedinplaceproperly(see“Installation”).
• Switchoffthemachineandunplugit,waitforapproximately1minuteand
then switch it back on again. If the problem persists, contact the Technical
Assistance Service.
• Thedetergentisnotsuitableformachinewashing(itshoulddisplaythetext
“for washing machines” or “hand and machine wash”, or the like).
• Toomuchdetergentwasused.
• Performthemanualunlockingprocedure(see “Precautions and tips”).
! Note: to exit “Demo mode”, switch machine off, then press and hold the two “START/PAUSE” and “ON/OFF” buttons
simultaneously for 3 seconds.

EN
12
Before calling for Assistance:
• Checkwhetheryoucansolvetheproblembyyourself(see“Trouble shooting”);
• Restartthewashcycletocheckwhethertheproblemhasbeensolved;
• Ifithasnot,contacttheAuthorisedTechnicalAssistanceService.
! If the washing machine has been installed or used incorrectly, you will have to pay for the call-out service.
! Always request the assistance of authorised technicians.
Please have the following information to hand:
• thetypeofproblem;
• theappliancemodel(Mod.);
• theserialnumber(S/N).
The above information can be found on the data plate located on the appliance itself.
Assistance

13
PT
Português
Sumário
Instalação, 14-15
Desembalar e nivelar
Ligações hidráulicas e eléctricas
Dados técnicos
Descrição da máquina, 16-17
Painel de comandos
Como efectuar um ciclo de lavagem, 18
Programas e opções, 19
Tabela dos Programas
Opções de Lavagem
Detergentes e roupa, 20
Detergente
Preparar a roupa
Conselhos de lavagem
Precauções e conselhos, 21
Segurança geral
Sistema de balanceamento da carga
Eliminação
Abertura manual da porta de vidro
Manutenção e cuidados, 22
Interromper a alimentação de água e de corrente eléctrica
Limpar a máquina
Limpar a gaveta dos detergentes
Cuidados com o tambor
Limpar a bomba
Verificar o tubo de alimentação de água
Anomalias e soluções, 23
Assistência, 24
PT
MÁQUINA DE LAVAR ROUPA
AQUALTIS
AQ93F 29
Instruções para a instalação e a
utilização

PT
14
Instalação
! É importante guardar este livrete para poder consultá-lo
a qualquer momento. Se a máquina for vendida, cedida ou
transferida, certifique-se que este livrete permaneça com a
máquina.
! Leia com atenção estas instruções: há importantes
informações acerca da instalação, da utilização e da
segurança.
! No envelope que contém este manual
encontrará, além da garantia, também algumas peças que
servirão para a instalação.
Desembalar e nivelar
Desembalar
1. Uma vez desembalada a máquina de lavar roupas,
verifique que a mesma não tenha sofrido danos durante o
transporte.
Se estiver danificada não efectue a sua ligação e contacte
o revendedor.
2. Tire os 4 parafusos de
protecção para o transporte
e o respectivo calço,
situados na parte traseira
(veja a figura).
3. Tampe os furos com as tampas em plástico contidas no
envelope.
4. Conserve todas as peças; se for necessário transportar
a máquina de lavar roupa, terão de ser montadas outra vez
para evitar danos internos.
! Embalagens não são brinquedos para as crianças!
Nivelamento
1. Posicione a máquina de lavar roupa sobre um
pavimento plano e rígido, sem encostá-la em paredes ou
móveis.
2. Compense as
irregularidades
desatarraxando ou
atarraxando os pés até que
a máquina esteja nivelada
horizontalmente (não deve
ter uma inclinação superior
aos 2 graus).
! Um cuidadoso nivelamento dá estabilidade e evita
vibrações e ruídos sobretudo na fase de centrifugação.
! Se a máquina for posicionada sobre tapete ou alcatifa,
regule os pés em modo que embaixo da máquina de lavar
roupa haja espaço suficiente para a ventilação.
Ligações hidráulicas e eléctricas
Ligação do tubo de alimentação da água
! Antes de ligar o tubo de alimentação à rede hídrica, deixe
a água escorrer até que seja límpida.
1. Ligue o tubo de
alimentação na máquina de
lavar roupa atarraxado no
apropriado fornecimento da
água, na parte traseira, em
cima à direita (veja a figura).
2. Realize a ligação do
tubo de alimentação
parafusando-o a uma
torneira de água fria com
bocal de rosca de 3/4 gás
(ver figura).
3. Tome cuidado para o tubo não ser dobrado nem
esmagado.
! A pressão hídrica da torneira deve ser entre os valores da
tabela dos Dados técnicos (veja a página ao lado).
! Se o comprimento do tubo de alimentação não for
suficiente, contacte uma oficina especializada ou um
técnico autorizado.
! Nunca utilize tubos de alimentação de água velhos ou
usados, mas sim aqueles fornecidos em dotação com a
máquina.

15
PT
Ligação do tubo de descarga
Ligue o tubo de descarga,
sem dobrá-lo, a uma
conduta de descarga ou a
uma descarga na parede
situada entre 65 e 100 cm.
de altura do chão.
Em alternativa, coloque na
beira de um lavabo ou de
uma banheira, prendendo
na torneira a guia fornecida
com o produto (veja a
figura).
A ponta solta do tubo
de descarga não deve
permanecer emergida na
água.
! É desaconselhado empregar tubos de extensão; mas
se for indispensável, a extensão deve ter o mesmo
diâmetro do tubo original e não medir mais de 150 cm de
comprimento.
Ligação eléctrica
Antes de ligar a ficha na tomada eléctrica, certifique-se
que:
• atomadatenhaumaligaçãoàterraesejanostermos
da legislação;
• atomadatenhaacapacidadeparasuportaracarga
máxima de potência da máquina, indicada na tabela
dos Dados técnicos (veja ao lado);
• atensãodealimentaçãosejaentreosvaloresindicados
na tabela dos Dados técnicos (veja ao lado);
• atomadasejacompatívelcomafichadamáquina.Se
não for, substitua a tomada ou a ficha.
! Esta máquina de lavar roupa não deve ser instalada ao
aberto, nem mesmo abrigada, porque é muito perigoso
deixá-la exposta à chuva e às tempestades.
! Depois de ter instalado a máquina de lavar roupa, o
acesso à tomada eléctrica deve ser fácil.
! Não empregue extensões nem fichas múltiplas.
! O cabo não deve ser dobrado nem apertado.
! O cabo de alimentação e a ficha devem ser substituídos
somente por técnicos autorizados.
Atenção! O fabricante declina toda a responsabilidade se
estas regras não forem respeitadas.
Dados técnicos
Modelo
AQ93F 29
Medidas
largura 59.5 cm
altura 85 cm
profundidade 64,5 cm
Capacidade
de 1 a 9 kg
Ligações eléctri-
cas
veja a placa das características técnicas
colocada na máquina
Ligações hídricas
pressão máxima 1 MPa (10 bar)
pressão mínima 0.05 MPa (0.5 bar)
capacidade do tambor 71 litros
Velocidade da
centrifugação
até 1.200 rotações por minuto
Programas de
ensaio confor-
me a directiva
2010/1061
programa
; temperatura 60°C;
programa
; temperatura 40°C.
Esta aparelhagem é em conformidade
com as seguintes Directivas Comunitárias:
- 2004/108/CE (Compatibilidade Electro-
magnética)
- 2002/96/CE
- 2006/95/CE (Baixa Tensão)
65 - 100 cm

PT
16
PORTA DE VIDRO
Para abrir a porta de vidro
use sempre a sua pega (veja
a figura).
GAVETA DOS DETERGENTES
A gaveta dos detergentes
encontra-se no interior da
máquina e para se ter acesso
deve-se abrir a porta. Para
a dosagem dos detergentes
consulte o capítulo
“Detergentes e roupa”.
PAINEL DE
COMANDOS
PORTA DE VIDRO
PEGA DA PORTA
DE VIDRO
BASE
PÉS REGULÁVEIS
Descrição da máquina
1. recipiente para a pré-
lavagem: use detergente em
pó.
! Antes de deitar detergente
verifique se há dentro a
gaveta adicional 3.
2. recipiente para a
lavagem: No caso do uso de
detergente líquido, aconselha-
se usar a parede divisória A
fornecido com o aparelho
para uma correcta dosagem. Para o uso do detergente em
pó, coloque o recipiente na cavidade B.
3. Gaveta adicional: água de Javel
! Se utilizar a gaveta adicional 3 exclui-se a pré-
lavagem.
recipiente para os aditivos: para amaciador ou aditivos
líquidos. Recomenda-se não superar o nível máximo
indicado pela grade e diluir os amaciadores concentrados.
Modalidade de Stand by
Esta máquina de lavar roupa, em conformidade com as
novas normas sobre a economia energética, dispõe de um
sistema de desligação automática (stand by) que entra em
função aproximadamente 30 minutos depois, no caso de
inutilização. Carregue brevemente no botão ON/OFF e
aguarde até a reactivação da máquina.
3
1
2
1
8
0
2
1
0
1
5
0
1
2
0
9
0
6
0
B
A

17
PT
Painel de comandos
Botão com indicador luminoso ON/OFF: carregue
brevemente no botão para ligar ou desligar a máquina. O
indicador luminoso verde indica que a máquina está ligada.
Para desligar a máquina de lavar roupa durante a lavagem,
é necessário manter pressionado o botão por mais tempo,
aproximadamente 3 segundos; uma pressão breve ou
acidental não permitirá o desligamento da máquina. O
desligamento da máquina durante uma lavagem em curso
anula a própria lavagem.
Selector de PROGRAMAS: pode ser girado em ambas
as direcções. Para estabelecer o programa mais correcto,
veja a “Tabela dos Programas”.
Durante a lavagem o selector permanece parado.
Botão TEMPERATURA: pressionar para modificar
ou excluir a temperatura; o valor escolhido é indicado pelo
visor acima (ver “Como efectuar um ciclo de lavagem”).
Botão CENTRIFUGAÇÃO: pressionar para modificar
ou excluir a centrifugação; o valor escolhido é indicado
pelo visor acima (ver “Como efectuar um ciclo de
lavagem”).
Botão INÍCIO POSTERIOR: pressionar para
configurar um início posterior do programa escolhido; o
valor do atraso programado é indicado pelo visor acima
(ver “Como efectuar um ciclo de lavagem”).
Botões com Indicadores luminosos OPÇÕES: para
seleccionar as opções disponíveis. O indicador luminoso
relativo à opção seleccionada ficará aceso (ver “Como
efectuar um ciclo de lavagem”).
Ícone FASES DE LAVAGEM: acendem-se para indicar o
estado de avanço do ciclo (Lavagem - Enxaguamento
- Centrifugação – Descarga ). A escrita
acende-se quanto o ciclo tiver terminado.
Botão com indicador luminoso START/PAUSE: quando
o indicador luminoso verde acende-se com intermitência
lenta, carregar no botão para iniciar uma lavagem. Quando
o ciclo iniciar, o indicador permanecerá aceso fixo. Para
colocar em pausa a lavagem, carregar novamente no
botão; o indicador ficará intermitente com uma luz laranja.
Se o indicador “LOCK” estiver apagado, será possível
abrir a porta de vidro. Para fazer iniciar a lavagem do ponto
em que foi interrompida, carregar novamente no botão.
Indicador luminoso LOCK: indica que a porta de vidro
está bloqueada. Para abrir a porta é necessário colocar
o ciclo em pausa (ver “Como efectuar um ciclo de
lavagem”).
Botão com indicador luminoso BLOQUEIO DAS
TECLAS: para activar ou desactivar o bloqueio do
painel de comandos, manter pressionado o botão por
aproximadamente 2 segundos. O indicador luminoso
aceso indica que o painel de comandos está bloqueado.
Deste modo, impedem-se modificações acidentais dos
programas, sobretudo se houver crianças em casa.
Indicador luminoso ECO: o ícone irá acender-se
quando, ao modificar os parâmetros de lavagem, irá obter-
se uma economia energética de ao menos 10%. Além
disto, antes que a máquina entre na modalidade “Stand
by” o ícone irá acender-se por alguns segundos; com a
máquina desligada estima-se uma economia energética de
aproximadamente 80%.
Botão TEMPERATURA
Selector de
PROGRAMAS
Botões com Indicadores
luminosos OPÇÕES
Indicador luminoso de
LOCK
Botão com indicador
luminoso START/
PAUSE
Ícone FASES DE
LAVAGEM
Botão CENTRIFUGAÇÃO
Botão INÍCIO
POSTERIOR
Botão com indicador
luminoso BLOQUEIO
DAS TECLAS
Botão com indicador luminoso
ON/OFF
Indicador luminoso
ECO
VISOR
Botões com Indicadores
luminosos OPÇÕES

PT
18
Observação: a primeira vez que utilizar a máquina de
lavar roupa, efectue um ciclo de lavagem sem roupas mas
com detergente, usando o programa algodão 90º sem
pré-lavagem.
1. LIGAR A MÁQUINA. Carregar no botão . Todos
os indicadores se acenderão por 1 segundo e logo em
seguida permanecerá aceso o indicador do botão , o
indicador luminoso START/PAUSE começará a piscar
lentamente.
2. COLOCAR A ROUPA. Abrir a porta de vidro. Coloque
a roupa dentro da máquina prestando atenção para
não superar a carga máxima indicada na tabela dos
programas na página seguinte .
3. DOSAGEM DO DETERGENTE. Extrair a gaveta e
deitar o detergente nos específicos recipientes como
explicado no parágrafo “Descrição da máquina”.
4. FECHAR A PORTA DE VIDRO.
5. ESCOLHA DO PROGRAMA.Girar o SELECTOR DE
PROGRAMAS para a direita ou para a esquerda até
seleccionar o programa desejado; será associada uma
temperatura e uma velocidade de centrifugação que
podem ser modificados.
6. PERSONALIZAR O CICLO DE LAVAGEM. Utilizar
os específicos botões no painel de comandos:
Modificar a temperatura e/ou a
centrifugação.
A máquina visualiza automaticamente a temperatura e a
centrifugação máximas para o programa seleccionado
ou as últimas seleccionadas se compatíveis com o
programa escolhido. Carregando no botão pode-se
reduzir a temperatura progressivamente até a lavagem
a frio ( ). Carregando no botão pode-se reduzir a
centrifugação progressivamente até a sua exclusão
( ). Uma ulterior pressão dos botões colocará os
valore novamente aos máximos previstos.
! Excepção: seleccionando o programa a
temperatura pode ser aumentada até a 90º.
Programar um início posterior.
Carregue no relativo botão até alcançar o tempo
de atraso desejado. Durante a programação, será
visualizado o tempo de atraso junto ao símbolo que
pisca.
Após ter programado o início posterior, o visor mostrará
o símbolo aceso fixo e a duração do ciclo. Ao
carregar no botão uma vez, será visualizado o tempo de
atraso programado.
Para cancelar o início posterior, carregue no botão até
que no visor apareça a escrita OFF; o símbolo irá
apagar-se.
! Uma vez pressionado o botão START/PAUSE o valor
do atraso poderá ser modificado somente diminuindo.
Modificar as características do
ciclo.
Carregar nos botões OPÇÕES para personalizar a
lavagem conforme as próprias exigências.
•Carregarnobotãoparaactivaraopção;orespectivo
indicador luminoso irá acender-se.
•Carregarnovamentenobotãoparadesactivara
opção; o respectivo indicador luminoso irá apagar-se.
! Se a opção seleccionada não for compatível com o
programa escolhido, a incompatibilidade será indicada
com a intermitência do indicador luminoso e um sinal
acústico (3 beep) e a opção não será activada.
! Se a opção seleccionada não for compatível com uma
outra programada anteriormente, o respectivo indicador
luminoso irá piscar e será activada somente a segunda,
o indicador luminoso do botão ficará aceso fixo.
7. INICIAR O PROGRAMA. Carregar no botão START/
PAUSE. O indicador luminoso ficará aceso fixo e a porta
irá bloquear-se (indicador luminoso LOCK aceso).
Os ícones relativos às fases de lavagem acendem-se
durante o ciclo para indicar a fase em curso.
Para modificar um programa durante a realização do
ciclo, colocar a máquina de lavar roupa em pausa
carregando no botão START/PAUSE; seleccionar o
ciclo desejado e carregar novamente no botão START/
PAUSE.
Para abrir a porta durante a realização de um ciclo,
carregar no botão START/PAUSE; se o indicador
luminoso LOCK estiver apagado, será possível abrir
a porta. Carregar novamente no botão START/PAUSE
para fazer iniciar o programa do ponto em que foi
interrompido.
8. FIM DO PROGRAMA. É indicado pela escrita
END acesa. A porta de vidro poderá ser aberta
imediatamente. Se o indicador luminoso START/PAUSE
piscar, carregar no botão para terminar o ciclo. Abrir a
porta, retirar a roupa e desligar a máquina.
! Se desejar anular um ciclo já iniciado, mantenha
pressionada a tecla até que o ciclo será interrompido e
a máquina irá desligar-se.
Saquinho para acolchoados, cortinas e peças
delicadas
Graças ao especial saquinho fornecido com o produto, a
Aqualtis consente lavar também as peças mais preciosas
e delicadas garantido a máxima protecção. Recomenda-
se o uso do saquinho para a lavagem de acolchoados
e edredões com forro externo realizado em material
sintético.
Como efectuar um ciclo de
lavagem

19
PT
Se desejar efectuar também
o alvejo, coloque a gaveta
adicional 3, fornecida, na
gaveta 1. Quando deitar a
água de javel, não ultrapasse
o nível “máx” indicado no
pino central (veja a figura).
Para efectuar somente
o branqueamento sem
efectuar a lavagem
completa, deitar a lixívia na
gaveta adicional 3, estabelecer o programa “Enxaguamento”
e activar a opção “Super Lavagem” .
! Não pode ser activada com os programas , , ,
, , , , , .
Economizar Tempo
Seleccionando esta opção, diminui de até 50% a duração
do programa, conforme o ciclo escolhido, garantindo ao
mesmo tempo uma economia de água e energia eléctrica.
Use este ciclo apenas para roupas não excessivamente
sujas.
! Não pode ser activada com os programas , , ,
, , , , , .
Opções de Lavagem
Extra Enxaguamento
Seleccionando esta opção aumenta-se a eficácia da
enxaguadura, e garante-se a máxima remoção dos
resíduos de detergente. É útil para quem tem a pele
particularmente sensível aos detergentes. Aconselha-se
o uso desta opção com a máquina de lavar roupa com a
carga cheira ou com grandes doses de detergente.
! Não pode ser activada com os programas , , , , .
Engomar Fácil
Seleccionando esta opção, a lavagem e a centrifugação
serão oportunamente modificados para reduzir a formação
de rugas. No fim do ciclo a máquina de lavar roupa
efectuará lentas rotações do tambor; os indicadores
luminosos “Engomar Fácil” e START/PAUSE irão piscar.
Para terminar o ciclo, carregar no botão START/PAUSE ou
no botão “Engomar Fácil”.
! Não pode ser activada com os programas , , , , .
Super Lavagem
Esta opção garante uma lavagem com altas performances
graças ao uso de uma maior quantidade de água na fase
inicial do ciclo e a uma maior duração do programa, é útil
para eliminar as manchas mais resistentes.
Pode ser utilizada com ou sem lixívia.
3
1
2
(*) Nota: após aproximadamente 10 minutos do START, a máquina, conforme a carga efectuada, irá calcular novamente e indicar o tempo faltante para o fim
do programa.
Programas e opções
Tabela dos Programas
Para todos Test Institutes:
1) Programa de controlo segundo a norma 2010/1061: configurar o programa
com uma temperatura 60°C.
2) Programa de controlo segundo a norma 2010/1061: configurar o programa
com uma temperatura 40°C.
3) Programa longo para algodão: configurar o programa
com uma temperatura 40°C.
4) Programa curto para algodão: configurar o programa
com uma temperatura de 40ºC.
5) Programa longo para sintetico: configurar o programa
com uma temperatura 40°C.
Icone Descrição do Programa
Temp.
max.
(°C)
Velocità max.
(rotações por
minuto)
Detergentes e aditivos
Carga
max.
(Kg)
Duração
ciclo
Pré-
lavagem
Lava-
gem
Água de
Javel
Amacia-
dor
Algodão (2-3): brancos e coloridos delicados muito sujos. 40° 1200 -
9
Sintéticos resistentes 60° 800 -
5
Sintéticos resistentes (5) 40° 800 -
5
Brancos
60° 1200 -
-
6
Coloridos (4)
40° 1200 -
6
Escuros
30° 800 -
-
6
Camisas
40° 600 -
2,5
Edredões: para peças com enchimento em plumas de ganso. 30° 1000 -
-
3,5
Roupas ”7 dias”: roupa de banho e de cama. 60° 1200 -
9
Enxaguamento
- 1200 - -
9
Centrifugação e Descarga - 1200 - - - - 9
Anti-alérgico
60° 1200 -
-
6
Ultradelicado
30° 0 -
-
1
Lã: para lã, cashmere, etc. 40° 800 -
-
2,5
Mix 30’: para refrescar rapidamente roupas levemente sujas (não
é indicado para lã, seda e roupas que deve ser lavadas à mão).
30° 800 -
-
4
Algodão com pré-lavagem
(Acrescentar o detergente no específico compartimento).
90° 1200
-
9
Algodão (1): brancos e coloridos resistentes muito sujos.
60°
(Max. 90°C)
1200 -
9
(*) É possível controlar a duração dos programas
de lavagem no visor.
A duração do ciclo indicada no visor ou no manual é uma estima calculada com base nas condições padrão. O tempo efectivo poderá variar a depender de vários factores, tais como a temper-
atura e a pressão da água em entrada, a temperatura ambiental, a quantidade de detergente, a quantidade e o tipo de carga, o balanceamento da carga e as opções adicionais seleccionadas.

PT
20
Detergentes e roupa
Detergente
A escolha e a quantidade de detergente dependem do tipo
de tecido (algodão, lã, seda...), da cor, da temperatura de
lavagem, do grau de sujidade e da dureza da água.
Uma correcta dosagem de detergente evita desperdícios
e protege o meio ambiente: mesmos os detergentes
biodegradáveis contêm componentes que alteram o
equilíbrio da natureza.
Aconselha-se:
• usardetergenteempóparaaspeçasdealgodão
brancas e para a pré-lavagem.
• usardetergentelíquidoparapeçasdelicadasde
algodão e para todos os programas com baixas
temperaturas.
• usardetergentelíquidodelicadoparalãeseda.
O detergente deve ser deitado antes do início da lavagem
no específico recipiente ou no doseador que deve ser
colocado directamente no tambor. Neste caso, não é
possível seleccionar o ciclo Algodão com pré-lavagem.
! Não use detergentes para lavagem à mão, porque
formam espuma demais.
Preparar a roupa
• Desdobrebemasroupasantesdecarregá-las.
• Dividaaroupaemfunçãodotipodetecido(símbolona
etiqueta da roupa) e a da cor, prestando atenção para
separar as peças coloridas das peças brancas;
• Esvazieasalgibeiraseverifiquesehábotõessoltos;
• NãoultrapasseosvaloresindicadosnaTabela dos
Programas que se referem ao peso da roupa enxuta.
Quanto pesa a roupa?
1 lençol 400-500 gr.
1 fronha 150-200 gr.
1 toalha 400-500 gr.
1 roupão 900-1200 gr.
1 toalha de rosto 150-250 gr.
1 calça de ganga 400-500 gr.
1 camisa 150-200 gr.
Conselhos de lavagem
Brancos: utilize o ciclo para a lavagem de peças
brancas. O programa foi estudado para preservar no tempo
a luminosidade das peças brancas. Para obter melhores
resultados, recomenda-se o uso de detergente em pó.
Coloridos: utilizar o ciclo para a lavagem de peças
de cor clara. O programa foi estudado para preservar no
tempo a luminosidade das cores.
Escuros: utilizar o ciclo para a lavagem de peças
escuras. O programa foi estudado para preservar no
tempo a duração das cores escuras. Para obter melhores
resultados, recomenda-se o uso de detergente líquido,
preferivelmente para peças escuras.
Camisas: utilize o específico ciclo para lavar camisas
de vários tipos de tecido e cores para garantir o máximo
cuidado.
Edredões: para lavar peças com enchimento de plumas
de ganso de casal ou de solteiro (com peso inferior a 3,5
kg), travesseiros, jaquetas, utilizar o programa específico
. Recomenda-se colocar as peças no tambor dobrando
as suas pontas para dentro (veja as figuras) e de não
superar os ¾ do volume do próprio tambor.
Para obter óptimos resultados de lavagem recomenda-
se utilizar o detergente líquido dosado na gaveta dos
detergentes.
Acolchoados: para lavar os acolchoados com forro
sintético, use o específico saquinho fornecido com o
produto e o programa .
Roupa de banho e de cama: para lavar toda a
roupa de banho e de cama com um único ciclo, utilize
o programa que optimiza o uso do amaciador
e consente uma economia de tempo e energia.
Aconselhamos a utilização de detergente em pó.
Anti-alérgico: utilizar o programa para remover as
principais causas de alergia, como pólen, ácaros, pelos de
gato e cão.
Ultradelicado: utilize o programa para a lavagem de
peças muito delicadas, que possuem aplicações como
aplicações ou brilhantes.
Recomenda-se virar do avesso as roupas antes de lavá-las
e colocar as peças pequenas no saquinho específico para
a lavagem das peças delicadas.
Para obter melhores resultados, recomenda-se o uso de
detergente líquido para peças delicadas.
Para a lavagem de peças de Seda e Cortinas (dobre-as e
coloque-as dentro do saquinho fornecido com o produto),
seleccionar o ciclo e activar a opção ; a máquina
terminará o ciclo com a roupa de molho e o indicador
luminoso irá piscar. Para descarregar a água e poder
retirar a roupa é necessário carregar no botão START/
PAUSE ou no botão .
Lã: é a única marca de máquinas de lavar roupa que
obteve da Woolmark Company a prestigiosa certificação
Woolmark Apparel Care - Platinum (M1135). O ciclo de
lavagem “Lã” , garantindo desempenhos óptimos,
permite lavar até 2,5 kg de peças de lã laváveis na
máquina de lavar roupa. Significa que qualquer peça
de roupa de lã lavável, mesmo que na etiqueta indique
“apenas lavagem à mão”, pode ser lavada na máquina se
a lavagem for efectuada respeitando as instruções do ciclo
da lã.
Manchas resistentes: tratar as manchar mais
resistentes com um sabão sólido antes da lavagem e
utilizar o programa Algodão com pré-lavagem.
Sayfa yükleniyor...
Sayfa yükleniyor...
Sayfa yükleniyor...
Sayfa yükleniyor...
Sayfa yükleniyor...
Sayfa yükleniyor...
Sayfa yükleniyor...
Sayfa yükleniyor...
Sayfa yükleniyor...
Sayfa yükleniyor...
Sayfa yükleniyor...
Sayfa yükleniyor...
Sayfa yükleniyor...
Sayfa yükleniyor...
Sayfa yükleniyor...
Sayfa yükleniyor...
-
 1
1
-
 2
2
-
 3
3
-
 4
4
-
 5
5
-
 6
6
-
 7
7
-
 8
8
-
 9
9
-
 10
10
-
 11
11
-
 12
12
-
 13
13
-
 14
14
-
 15
15
-
 16
16
-
 17
17
-
 18
18
-
 19
19
-
 20
20
-
 21
21
-
 22
22
-
 23
23
-
 24
24
-
 25
25
-
 26
26
-
 27
27
-
 28
28
-
 29
29
-
 30
30
-
 31
31
-
 32
32
-
 33
33
-
 34
34
-
 35
35
-
 36
36


HOTPOINT/ARISTON AQ93F 29 EU Kullanici rehberi
- Kategori
- Çamaşır makineleri
- Tip
- Kullanici rehberi
diğer dillerde
- português: HOTPOINT/ARISTON AQ93F 29 EU Guia de usuario
- English: HOTPOINT/ARISTON AQ93F 29 EU User guide