
Fresh
H4001
USER MANUAL
MODE D’EMPLOI
MANUAL DEL USUARIO
MANUAL DO UTILIZADOR
ΕΓΧΕΙΡΙΙΟ ΧΡΗΣΤΗ
BRUKSANVISNING
ANVÄNDARHANDBOK
BRUGERMANUAL
BEDIENUNGSANLEITUNG
KULLANIM KILAVUZU
MANUALE PER L’UTENTE
NL
ES
PT
GR
NO
FI
SV
DA
RU
DE
EN
EN
EN
DE
FR
NL
ES
PT
GR
TR
NO
IT
SV
DA
GEBRUIKSAANWIJZING

11
66
33
22
44
55
88
77
99

EN
1
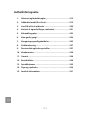
Table of contents
1. Warnings & contraindications............................................2
2. Safety with Silk'n Fresh ......................................................6
3. Get to know Silk'n Fresh ..................................................... 7
4. Device controls & settings ..................................................8
5. Treatment plan .................................................................. 10
6. Get started! ........................................................................11
7. Cleaning & maintenance ..................................................12
8. Troubleshooting ...............................................................14
9. Parts & consumables ........................................................15
10. Customer service .............................................................. 15
11. Warranty ............................................................................15
12. Disposal .............................................................................16
13. Specications ....................................................................16
14. Signs & symbols ...............................................................17
15. Legal notice .......................................................................18

EN
2
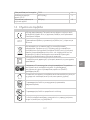
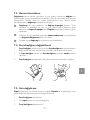
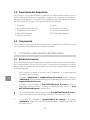
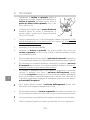
1. Warnings & contraindications
The user manual is based on the standards
and rules in force in the European Union.
When abroad, you must also observe
country-specic guidelines and laws. Please
read all warnings and contraindications
before use.
CDo not use if the parts or accessories
are not supplied by the manufacturer as
dened in this manual, or if the device
is damaged or does not appear to be
working properly. In such cases contact
Customer Service.
COnly authorized personnel are permitted
to perform repairs. Do not attempt to
repair or open sealed parts of your device.
You may expose yourself to dangerous
components and cause serious harm to
yourself. It will also void your warranty.
CKeep the adapter away from water. The
adapter is not waterproof.
CDo not place or store the stand/charging
cradle or adapter where it can fall or be
pulled into a tub, sink, water or any other
liquid.

EN
3
CDo not reach for the stand/charging
cradle or adapter if they have fallen
into water. Unplug immediately before
retrieving either of them. Failure to
unplug the stand/charging cradle may
result in an electric shock!
CNever use the adapter if it has a damaged
cable or plug, it isn’t working properly,
or has been submerged in water. If
that happens, unplug the adapter
immediately.
CDo not leave the device submerged in
bath or shower water for more than 20
minutes.
CDo not attach wet brush heads when
charging the device.
CDo not use face washes that contain
exfoliating beads or other particles.
CDo not allow face wash to accumulate
on the brush heads.
CThe device is only to be used with the
power supply unit provided.
CIf a battery has leaked, avoid contact with
the skin, eyes and mucous membranes. If
necessary, rinse the aected areas with
water and seek medical assistance.

EN
4
CDo not clean the device or any of its parts
in the dishwasher.
CDo not dispose with household waste!
The law requires that you dispose of this
electrical device (including all accessories
and parts) at a designated recycling
collection point for electrical devices. For
details, see section 12. Disposal.
CThe battery must be removed from the
appliance before it is scrapped.
CThe appliance must be disconnected
from the supply mains when removing
the battery.
CThe battery is to be disposed of safely.
CAttention should be drawn to the environ-
mental aspects of battery disposal. Don’t
throw used batteries in a dustbin. Please
contact your retailer in order to protect
the environment.
Battery Removal
To remove the battery, the device must
be broken apart. The device will no longer
function after this procedure, nor can it be
repaired. Any warranty will be void when the
appliance housing is broken and the battery
is removed. It is strongly recommended to
wear safety protective goggles and gloves.

EN
5
Silk'n is not liable for any physical or material
damages as a result of performing this
procedure.
To remove the battery place the device on
a hard, strong surface. Use a hammer to hit
the appliance on the seam and continue to
do so along the whole seam on both sides
of the device.
Once the seam is suciently broken, use
pliers or a screwdriver to take the housing
apart. Unscrew the PCB (printed circuit board)
and remove the battery by disconnecting
the plug from the PCB.
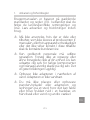
Contraindications
CThis device can be used by children aged
from 8 years and above, and persons
with reduced physical, sensory or mental
capabilities or lack of experience and
knowledge if they have been given
supervision or instruction concerning
use of the device in a safe way and
understand the hazards involved.
CChildren must not play with the device.
CCleaning and maintenance must not be
done by children without supervision.
CFor hygienic reasons, do not share the
device with others.

EN
6
CAvoid contact with the eyes.
Do not use this device if you have:
Csore or injured skin on the face or neck.
Ca pacemaker.
Consult your physician if you have:
Cany medical condition or any kind of
sensitivity.
Cacne or any other skin disorder.
Ca rash, redness or itching during or after
use.
2. Safety with Silk'n Fresh
Silk'n Fresh has been tested for water ingress to the extent covered by IPX7. This
means your device is waterproof and suitable for use in the shower or while taking
a bath, but do not leave it submerged in water for more than 20 minutes.
The device also has an overcharge protection. This means that you can safely leave
the device in the stand/charging cradle even if it is connected to the electricity
supply, without the risk of damage.

EN
7
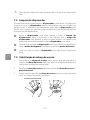
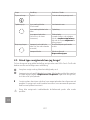
3. Get to know Silk'n Fresh
Silk'n Fresh eectively cleanses the skin and removes the outer layer of dry and
aky skin cells. It lifts out impurities from within the pores as well as any build-up
of debris from within the folds of ne lines and wrinkles. The device uses
vibrations to help smooth the skin's surface, and massages your skin to improve
blood circulation. Silk'n Fresh removes up to 6 times more makeup than manual
cleansing, leaving your skin clean, smooth and soft.
Silk'n Fresh is an electrical device and should be used with special attention to safety.
Before use, it is important that you read and understand the instructions
on how to use the device including after-use procedures, and follow them
strictly. We recommend you refamiliarise yourself with the instructions in this
manual before each treatment.
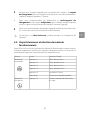
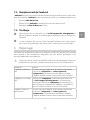
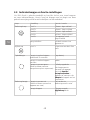
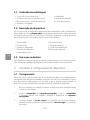
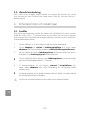
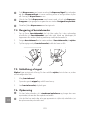
3.1 Package contents
yYour Silk'n Fresh device yAdapter
y2 brush heads (regular, soft) yUser manual
yNipple + spares yWarranty card
yStand /charging cradle
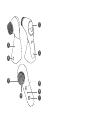
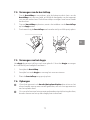
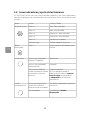
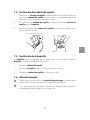
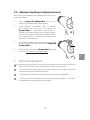
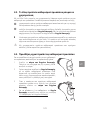
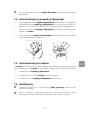
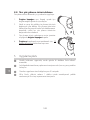
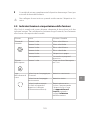
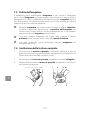
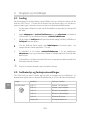
3.2 Device description
Silk'n Fresh is a small, hand-held, electrically powered skin cleanser. It includes an
integrated dispenser that allows you to use a liquid face wash of your choice. Refer
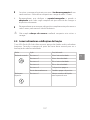
to the diagram at the front of this manual to see the location of each feature.
1. Dispenser 6. Nipple
2. Charging light 7. Control button
3. Stand / charging cradle 8. Operating light
4. Adapter socket 9. Dispensing button
5. Brush head
3.3 Intended use
Silk'n Fresh is an over the counter device intended for cleansing your face and neck.
Do not use for any purpose other than as described in this manual.

EN
8
4. Device controls & settings
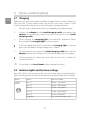
4.1 Charging
Before rst use, your device needs to be fully charged. For best results, charge your
Silk'n Fresh for 12 hours before using it for the rst time, even if there is some
residual charge left in the device as a result of quality control procedures.
1. For your safety, make sure the device is completely dry before charging.
2. Connect the adapter to the stand/charging cradle and connect the
adapter to the electricity supply. Then place the device in the stand/
charging cradle.
3. When charging, the charging light is red and blinks continously. When
fully charged, the charging light is constant green.
ZIf you are charging for the rst time but the charging light is constant
green, you still need to charge the device for 12 hours.
4. We recommend you unplug the stand/charging cradle and store the
adapter after each full charge until you need to charge the device again.
ZWe recommend you charge the device fully at least every 3 months to
sustain battery life.
CDo not attach wet brush heads when charging the device.
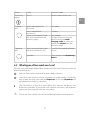
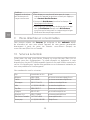
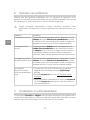
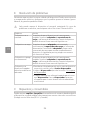
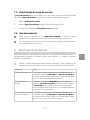
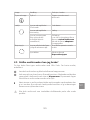
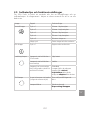
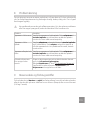
4.2 Indicator lights and function settings
Your Silk'n Fresh is easy to use and has just two buttons and two indicator lights.
Refer to the diagram at the front of the manual to see the location of each feature.
Button Action Function / Mode
Control
button
Press x 1 Vibrates - low speed
Press x 2 Vibrates - high speed
Press x 3 Pulsates - low speed
Press x 4 Pulsates - high speed
Press x 5 Device switches o
Long press Also switches the device o

EN
9
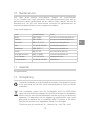
Button Action Function / Mode
Dispensing
button
Press x 1 Releases a dose of face wash
Charging
light
Light is red and blinks for
10 seconds
Low battery
Light is red and blinks
continuously
Charging
Light is constant green (visible
only when connected to the
electricity supply)
Fully charged.
The light will go out when the
device is not in the stand/
charging cradle, or when you
remove the adapter from the
electricity supply.
Operating
light
Light is constant white (visible
only when the device is on)
One of the four operating modes
is active
Light blinks When you press the dispensing
button
4.3 What types of face wash can I use?
You can use a wide range of liquid face washes with Silk'n Fresh. For best results we
recommend that you:
Uonly use face washes and not all-purpose body cleansers.
Uuse a face wash that has a runny consistency. In other words, it should be
easy to pour the face wash into the dispenser. In fact, the dispenser will
not release face wash if it is too thick.
ZThe consistency of the face wash aects the amount the device can
dispense in one dose. A face wash with a thinner consistency will dispense
more easily than one with a thicker consistency.
CDo not use face washes that contain exfoliating beads or other particles.

EN
10
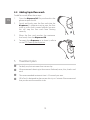
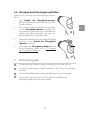
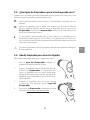
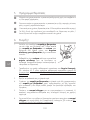
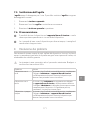
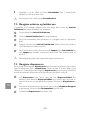
4.4 Adding liquid face wash
To add face wash, follow these steps:
1. Open the dispenser lid. Put your thumb in the
groove to open the lid.
2. Gently and slowly, pour the face wash into the
dispenser. It's important not to pour the face
wash in so fast that it creates bubbles, because
this will stop the face wash from owing
correctly.
3. When the face wash reaches the maximum
level mark, close the dispenser lid.
4. To empty the dispenser or to clean it, refer to
section 7.3 Cleaning the dispenser.
5. Treatment plan
UFor daily use, but not more than twice a day.
UWe recommend cleansing in these areas: forehead, nose, chin, cheeks and
neck.
UThe recommended treatment time is 10 seconds per area.
USilk'n Fresh is designed to cleanse your skin in just 1 minute. We recommend
that you do not to exceed this time.

EN
11
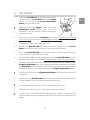
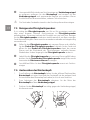
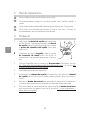
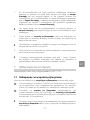
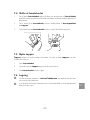
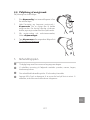
6. Get started!
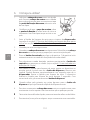
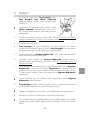
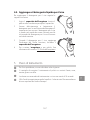
1. Select the brush head suitable for your skin type.
Gently push the brush head onto the nipple
which sits on top of the brush attachment
point, until you hear a click.
ZMake sure that the nipple covers the metal
attachment point before you start your
treatment. This will prevent it from touching or
irritating your skin.
2. Pour the face wash into the dispenser (see section 4.3 What types of face
wash can I use?, and section 4.4 Adding liquid face wash).
3. Dampen your face with lukewarm water.
4. Moisten the brush head with lukewarm water. Do not use a dry brush
head on the face or neck, because it may cause skin irritation.
5. Press the control button to turn on the device. The device automatically
starts in the low speed vibration mode.
6. To select the mode you want, keep pressing the control button to cycle
through the modes (see section 4.2 Indicator lights and function settings).
7. To release face wash, hold the device in an upright position and press the
dispensing button once, then release. It may take a second or so before
the dispenser releases the face wash. The device will release face wash for
about 3 seconds. If you need more, press the dispensing button again.
ZFor rst time use, press the dispensing button a few times until face wash
is released.
8. Gently press the brush head against your skin and move it in an upward
circular motion. There's no need to apply any pressure.
ZTry to avoid delicate skin areas such as around the eyes or lips.
9. To nish, rinse your skin with water, and pat dry with a towel.
ZThe device is set to switch o automatically after 1 minute. However, if you
change modes during a treatment, the timer will reset to zero and will start
again.

EN
12
7. Cleaning & maintenance
Use warm water up to a maximum of 45ºC / 113ºF.
7.1 Cleaning the brush heads
Clean the brush head after each use.
USwitch the device o. Rinse with warm water and mild soap to remove any
build-up that may have accumulated. Then shake o any excess water.
UDry the brush and the brush head with a towel. You can also dry the
brush head by switching the device back on, and rubbing it against a
towel for 5-10 seconds.
ZWe recommend you replace used brush heads every 3 months, or earlier if
you see that they are worn.
CDo not allow face wash to accumulate on the brush heads.
7.2 Cleaning the device and charging cradle
We recommend that you clean the device after each use, and the stand/charging
cradle once a month. Before cleaning:
URemove the device from the stand/charging cradle.
UDisconnect the stand/charging cradle from the electricity supply.
UDo not use abrasive cleaners or chemicals to clean any parts.
UClean the device or stand/charging cradle with a damp cloth using a
mild detergent, then wipe it dry with a clean cloth.
UTo remove any residue of face wash around the nipple, remove the brush
head, and wash the nipple and the surrounding area with warm water.
Then wipe it dry with a clean cloth.
CDo not clean the device or any of its parts in the dishwasher.

EN
13
7.3 Cleaning the dispenser
It's important to clean the dispenser from time to time and not to leave face wash
in the dispenser for a long time without use. This is because it will dry up and
solidify. We recommend you clean the dispenser at least once a month, especially
if the device hasn't been used for some time, or won't be used regularly.
UFill the dispenser with warm water and close the dispenser lid. Shake
the device and then open the dispenser lid to let the warm water and
face wash residue run out. Repeat this until the dispenser is clean.
UWhen you have lled the dispenser with warm water, press the
dispensing button a few times to clean the inside of the attachment
point.
UAfter that, rell the dispenser with face wash.
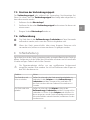
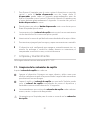
7.4 Replacing the brush head
1. To remove the brush head, simply grip the outer plastic base of the brush
head with one hand, and the device handle with the other, and pull
upwards until it snaps loose.
2. To attach a brush head, place the center of the brush head on the nipple.
3. Gently press the brush head and push down until it clicks into place.
7.5 Replacing the nipple
The nipple releases the face wash for use. You can replace the nipple if you see it
is damaged or worn.
1. Remove the brush head.
2. Remove the old nipple and replace with a new one.
3. Put the brush head back in place.

EN
14
7.6 Storage
UYou can leave the device in the stand/charging cradle and use it as a
counter top stand even when you are not charging the device.
UIf you don't plan to use the device for some time, we recommend you store
it in a dry place.
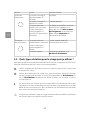
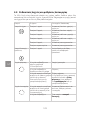
8. Troubleshooting
Do not attempt to repair or open sealed parts of your device. You may expose
yourself to dangerous components and cause serious harm to yourself. It will also
void your warranty.
COnly authorized personnel are permitted to perform repairs. For problems
or queries, please contact Silk'n Customer Service.
Problem Action
The device does not
start.
Make sure the device is properly charged. Attach the
adapter to the stand/charging cradle and the electricity
supply, and charge the device for at least 6 hours before
the next use.
The device does not
charge.
Make sure the adapter is connected correctly to the
stand/charging cradle and the electricity supply. Unplug
the adapter and then reconnect it again to completely
reset the device. If the problem persists, contact Customer
Service.
The device shuts o all
the time.
Make sure the device is properly charged. Attach the
adapter to the stand/charging cradle and the electricity
supply, and charge the device for at least 6 hours before
the next use.
The device does not
dispense the face wash
properly.
yTo release a dose of face wash, hold the device in an
upright position and press the dispensing button.
yClean the dispenser (refer to section 7.3 Cleaning the
dispenser).
yMake sure there is sucient face wash in the dispenser.
Fill the dispenser until the face wash reaches the max
indication line.

EN
15
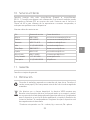
9. Parts & consumables
You can purchase replacement brushes and device nipples through the
retailer where you bought the device, or you can order directly from our website:
www.silkn.eu (Europe) or www.silkn.com (US and Canada).
10. Customer service
See our website www.silkn.eu (Europe) or www.silkn.com (US and Canada) for
more information. This manual is also available as a PDF download from the
website. Contact Silk'n Customer Service to report unexpected operations or
events, or any other problem with your device.
Our contact details are:
Country Service number Email
Belgium 0900-25006 serviceconsommateurbe@silkn.eu
France 0891-655557 serviceconsommateur[email protected]
Italy +31 (0)180-330 550 servizioclientiit@silkn.eu
Netherlands 0900-2502217 klantenservicenl@silkn.eu
Spain 900 823 302 servicioalcliente@silkn.eu
UK 0906-2130009 [email protected]
11. Warranty
Refer to your warranty card.w

EN
16
12. Disposal
IDispose of the packaging separated into single type materials. Dispose of
cardboard and carton as waste paper and lm via the recyclable material
collection service.
N
Do not dispose with household waste! The WEEE directive requires that
you dispose of this electrical device (including all accessories and parts) at a
designated recycling collection point for electrical devices. This ensures that
the device is recycled professionally, and prevents the release of harmful
substances* into the environment. Make sure that the device is in an
uncharged state before disposal.
*Products labelled with Cd = cadmium, Hg = mercury, Pb = lead.
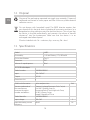
13. Specications
Model: H4001
Powered by: 1 x Li-ion Battery; 3.7V; 650mAh
Device classication: Class II
Protection: IPX7
Volume of soap dispenser: 30ml
10.2 USB wall adapter
Model number: XH0500-0500WG
Input: 100~240VAC
Output: 5V 0.5A
Protection class: II
Published information Value and precision Unit
Name or trademark of
the manufacturer,
commercial register
number and address:
Xiamen Xunheng Electronics Tech Co.,Ltd.
Unit 3047, Building Xuan Ye,
Pioneering Park of Torch High-tech Zone,
361001, Xiamen, Fujian,
People's Republic of China
Model identier: XH0500-0500WG
Input voltage: 100~240 V
Input alternating current
frequency:
50/60 Hz

EN
17
Output voltage: 5 V
Output current: 0.5 A
Output power: 2.5 W
Average eciency during
operation:
73.16 %
Eciency at low load
(10 %):
69.23 (min.) %
Power consumption at
zero load:
0.03 (max.) W
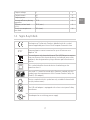
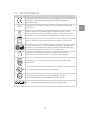
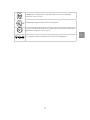
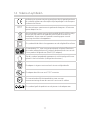
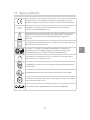
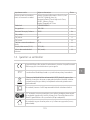
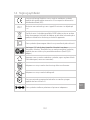
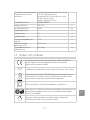
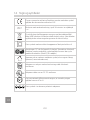
14. Signs & symbols
Declaration of Conformity: Products labelled with this symbol
meet all applicable provisions of the European Economic Area.
Protected against water immersion for up to 30 minutes at a
depth of 1m.
Do not dispose with household waste! The WEEE directive requires
that you dispose of this electrical device (including all accessories
and parts) at a designated recycling collection point for electrical
devices.
This symbol identies electrical devices that belong to the
protection class II.
The word “GS” stands for tested safety. Products marked with this
symbol meet the requirements of the German Product Safety Act
(ProdSG) (EU adapter).
Devices marked with this symbol are only suitable for household
use (dry indoor rooms).
The USB wall adapter is equipped with a short-circuit proof safety
transformer.
The adapter has a switching power supply.
IPX7

EN
18
The international eciency mark indicates that the power supply
meets the level VI requirements.
This symbol indicates the polarity of the pins in the USB wall
adapter.
15. Legal notice
Copyright
2021
© Home Skinovations Ltd. All rights reserved.
Home Skinovations Ltd reserves the right to make changes to its products or
specications to improve performance, reliability, or manufacturability. Information
furnished by Home Skinovations Ltd is believed to be accurate and reliable at the
time of publication. However, Home Skinovations Ltd assumes no responsibility for
its use. No license is granted by its implication or otherwise under any patent or
patent rights of Home Skinovations Ltd.
No part of this document may be reproduced or transmitted in any form or by
any means, electronic or mechanical, for any purpose, without the express
written permission of Home Skinovations Ltd. Data is subject to change without
notication.
Home Skinovations Ltd has patents and pending patent applications, trademarks,
copyrights, or other intellectual property rights covering subject matter in this
document. The furnishing of this document does not give you any license to
these patents, trademarks, copyrights, or other intellectual property rights except
as expressly provided in any written agreement from Home Skinovations Ltd.
Specications are subject to change without notice.
Silk'n and the Silk'n logo are registered trademarks of Home Skinovations Ltd, Tavor
Building, Shaar Yokneam P.O.Box 533, Yokneam 2069206, ISRAEL.
Sayfa yükleniyor...
Sayfa yükleniyor...
Sayfa yükleniyor...
Sayfa yükleniyor...
Sayfa yükleniyor...
Sayfa yükleniyor...
Sayfa yükleniyor...
Sayfa yükleniyor...
Sayfa yükleniyor...
Sayfa yükleniyor...
Sayfa yükleniyor...
Sayfa yükleniyor...
Sayfa yükleniyor...
Sayfa yükleniyor...
Sayfa yükleniyor...
Sayfa yükleniyor...
Sayfa yükleniyor...
Sayfa yükleniyor...
Sayfa yükleniyor...
Sayfa yükleniyor...
Sayfa yükleniyor...
Sayfa yükleniyor...
Sayfa yükleniyor...
Sayfa yükleniyor...
Sayfa yükleniyor...
Sayfa yükleniyor...
Sayfa yükleniyor...
Sayfa yükleniyor...
Sayfa yükleniyor...
Sayfa yükleniyor...
Sayfa yükleniyor...
Sayfa yükleniyor...
Sayfa yükleniyor...
Sayfa yükleniyor...
Sayfa yükleniyor...
Sayfa yükleniyor...
Sayfa yükleniyor...
Sayfa yükleniyor...
Sayfa yükleniyor...
Sayfa yükleniyor...
Sayfa yükleniyor...
Sayfa yükleniyor...
Sayfa yükleniyor...
Sayfa yükleniyor...
Sayfa yükleniyor...
Sayfa yükleniyor...
Sayfa yükleniyor...
Sayfa yükleniyor...
Sayfa yükleniyor...
Sayfa yükleniyor...
Sayfa yükleniyor...
Sayfa yükleniyor...
Sayfa yükleniyor...
Sayfa yükleniyor...
Sayfa yükleniyor...
Sayfa yükleniyor...
Sayfa yükleniyor...
Sayfa yükleniyor...
Sayfa yükleniyor...
Sayfa yükleniyor...
Sayfa yükleniyor...
Sayfa yükleniyor...
Sayfa yükleniyor...
Sayfa yükleniyor...
Sayfa yükleniyor...
Sayfa yükleniyor...
Sayfa yükleniyor...
Sayfa yükleniyor...
Sayfa yükleniyor...
Sayfa yükleniyor...
Sayfa yükleniyor...
Sayfa yükleniyor...
Sayfa yükleniyor...
Sayfa yükleniyor...
Sayfa yükleniyor...
Sayfa yükleniyor...
Sayfa yükleniyor...
Sayfa yükleniyor...
Sayfa yükleniyor...
Sayfa yükleniyor...
Sayfa yükleniyor...
Sayfa yükleniyor...
Sayfa yükleniyor...
Sayfa yükleniyor...
Sayfa yükleniyor...
Sayfa yükleniyor...
Sayfa yükleniyor...
Sayfa yükleniyor...
Sayfa yükleniyor...
Sayfa yükleniyor...
Sayfa yükleniyor...
Sayfa yükleniyor...
Sayfa yükleniyor...
Sayfa yükleniyor...
Sayfa yükleniyor...
Sayfa yükleniyor...
Sayfa yükleniyor...
Sayfa yükleniyor...
Sayfa yükleniyor...
Sayfa yükleniyor...
Sayfa yükleniyor...
Sayfa yükleniyor...
Sayfa yükleniyor...
Sayfa yükleniyor...
Sayfa yükleniyor...
Sayfa yükleniyor...
Sayfa yükleniyor...
Sayfa yükleniyor...
Sayfa yükleniyor...
Sayfa yükleniyor...
Sayfa yükleniyor...
Sayfa yükleniyor...
Sayfa yükleniyor...
Sayfa yükleniyor...
Sayfa yükleniyor...
Sayfa yükleniyor...
Sayfa yükleniyor...
Sayfa yükleniyor...
Sayfa yükleniyor...
Sayfa yükleniyor...
Sayfa yükleniyor...
Sayfa yükleniyor...
Sayfa yükleniyor...
Sayfa yükleniyor...
Sayfa yükleniyor...
Sayfa yükleniyor...
Sayfa yükleniyor...
Sayfa yükleniyor...
Sayfa yükleniyor...
Sayfa yükleniyor...
Sayfa yükleniyor...
Sayfa yükleniyor...
Sayfa yükleniyor...
Sayfa yükleniyor...
Sayfa yükleniyor...
Sayfa yükleniyor...
Sayfa yükleniyor...
Sayfa yükleniyor...
Sayfa yükleniyor...
Sayfa yükleniyor...
Sayfa yükleniyor...
Sayfa yükleniyor...
Sayfa yükleniyor...
Sayfa yükleniyor...
Sayfa yükleniyor...
Sayfa yükleniyor...
Sayfa yükleniyor...
Sayfa yükleniyor...
Sayfa yükleniyor...
Sayfa yükleniyor...
Sayfa yükleniyor...
Sayfa yükleniyor...
Sayfa yükleniyor...
Sayfa yükleniyor...
Sayfa yükleniyor...
Sayfa yükleniyor...
Sayfa yükleniyor...
Sayfa yükleniyor...
Sayfa yükleniyor...
Sayfa yükleniyor...
Sayfa yükleniyor...
Sayfa yükleniyor...
Sayfa yükleniyor...
Sayfa yükleniyor...
Sayfa yükleniyor...
Sayfa yükleniyor...
Sayfa yükleniyor...
Sayfa yükleniyor...
Sayfa yükleniyor...
Sayfa yükleniyor...
Sayfa yükleniyor...
Sayfa yükleniyor...
Sayfa yükleniyor...
Sayfa yükleniyor...
Sayfa yükleniyor...
Sayfa yükleniyor...
Sayfa yükleniyor...
Sayfa yükleniyor...
Sayfa yükleniyor...
Sayfa yükleniyor...
Sayfa yükleniyor...
Sayfa yükleniyor...
Sayfa yükleniyor...
Sayfa yükleniyor...
Sayfa yükleniyor...
Sayfa yükleniyor...
Sayfa yükleniyor...
Sayfa yükleniyor...
Sayfa yükleniyor...
Sayfa yükleniyor...
Sayfa yükleniyor...
Sayfa yükleniyor...
Sayfa yükleniyor...
Sayfa yükleniyor...
Sayfa yükleniyor...
Sayfa yükleniyor...
Sayfa yükleniyor...
Sayfa yükleniyor...
Sayfa yükleniyor...
Sayfa yükleniyor...
Sayfa yükleniyor...
Sayfa yükleniyor...
Sayfa yükleniyor...
Sayfa yükleniyor...
Sayfa yükleniyor...
Sayfa yükleniyor...
Sayfa yükleniyor...
Sayfa yükleniyor...
Sayfa yükleniyor...
Sayfa yükleniyor...
Sayfa yükleniyor...
Sayfa yükleniyor...
Sayfa yükleniyor...
Sayfa yükleniyor...
Sayfa yükleniyor...
Sayfa yükleniyor...
-
 1
1
-
 2
2
-
 3
3
-
 4
4
-
 5
5
-
 6
6
-
 7
7
-
 8
8
-
 9
9
-
 10
10
-
 11
11
-
 12
12
-
 13
13
-
 14
14
-
 15
15
-
 16
16
-
 17
17
-
 18
18
-
 19
19
-
 20
20
-
 21
21
-
 22
22
-
 23
23
-
 24
24
-
 25
25
-
 26
26
-
 27
27
-
 28
28
-
 29
29
-
 30
30
-
 31
31
-
 32
32
-
 33
33
-
 34
34
-
 35
35
-
 36
36
-
 37
37
-
 38
38
-
 39
39
-
 40
40
-
 41
41
-
 42
42
-
 43
43
-
 44
44
-
 45
45
-
 46
46
-
 47
47
-
 48
48
-
 49
49
-
 50
50
-
 51
51
-
 52
52
-
 53
53
-
 54
54
-
 55
55
-
 56
56
-
 57
57
-
 58
58
-
 59
59
-
 60
60
-
 61
61
-
 62
62
-
 63
63
-
 64
64
-
 65
65
-
 66
66
-
 67
67
-
 68
68
-
 69
69
-
 70
70
-
 71
71
-
 72
72
-
 73
73
-
 74
74
-
 75
75
-
 76
76
-
 77
77
-
 78
78
-
 79
79
-
 80
80
-
 81
81
-
 82
82
-
 83
83
-
 84
84
-
 85
85
-
 86
86
-
 87
87
-
 88
88
-
 89
89
-
 90
90
-
 91
91
-
 92
92
-
 93
93
-
 94
94
-
 95
95
-
 96
96
-
 97
97
-
 98
98
-
 99
99
-
 100
100
-
 101
101
-
 102
102
-
 103
103
-
 104
104
-
 105
105
-
 106
106
-
 107
107
-
 108
108
-
 109
109
-
 110
110
-
 111
111
-
 112
112
-
 113
113
-
 114
114
-
 115
115
-
 116
116
-
 117
117
-
 118
118
-
 119
119
-
 120
120
-
 121
121
-
 122
122
-
 123
123
-
 124
124
-
 125
125
-
 126
126
-
 127
127
-
 128
128
-
 129
129
-
 130
130
-
 131
131
-
 132
132
-
 133
133
-
 134
134
-
 135
135
-
 136
136
-
 137
137
-
 138
138
-
 139
139
-
 140
140
-
 141
141
-
 142
142
-
 143
143
-
 144
144
-
 145
145
-
 146
146
-
 147
147
-
 148
148
-
 149
149
-
 150
150
-
 151
151
-
 152
152
-
 153
153
-
 154
154
-
 155
155
-
 156
156
-
 157
157
-
 158
158
-
 159
159
-
 160
160
-
 161
161
-
 162
162
-
 163
163
-
 164
164
-
 165
165
-
 166
166
-
 167
167
-
 168
168
-
 169
169
-
 170
170
-
 171
171
-
 172
172
-
 173
173
-
 174
174
-
 175
175
-
 176
176
-
 177
177
-
 178
178
-
 179
179
-
 180
180
-
 181
181
-
 182
182
-
 183
183
-
 184
184
-
 185
185
-
 186
186
-
 187
187
-
 188
188
-
 189
189
-
 190
190
-
 191
191
-
 192
192
-
 193
193
-
 194
194
-
 195
195
-
 196
196
-
 197
197
-
 198
198
-
 199
199
-
 200
200
-
 201
201
-
 202
202
-
 203
203
-
 204
204
-
 205
205
-
 206
206
-
 207
207
-
 208
208
-
 209
209
-
 210
210
-
 211
211
-
 212
212
-
 213
213
-
 214
214
-
 215
215
-
 216
216
-
 217
217
-
 218
218
-
 219
219
-
 220
220
-
 221
221
-
 222
222
-
 223
223
-
 224
224
-
 225
225
-
 226
226
-
 227
227
-
 228
228
-
 229
229
-
 230
230
-
 231
231
-
 232
232
-
 233
233
-
 234
234
-
 235
235
-
 236
236


diğer dillerde
- español: Silk n H4001 Manual de usuario
- français: Silk n H4001 Manuel utilisateur
- italiano: Silk n H4001 Manuale utente
- português: Silk n H4001 Manual do usuário
- dansk: Silk n H4001 Brugermanual
- Nederlands: Silk n H4001 Handleiding
İlgili makaleler
Diğer belgeler
-
Silk'n FaceTite Kullanım kılavuzu
-
-
-
-
-
-
 Silkn AP-3WD Instructions For Use Manual
-
Otsein-Hoover DYN 9124DG/L-80 Kullanım kılavuzu
-
-
Whirlpool LFB 5M010 TK Kullanici rehberi
