

2
Introduction
Blood pressure measurements determined with J401 are equivalent to
those obtained by a trained observer using cuff/stethoscope auscultation
method, within the limits prescribed by the American National Standard,
Electronic or Automated Sphygmomanometers.
J401 is protected against manufacturing defects by an established
International Warranty Program. For warranty information, you can contact
the manufacturer, Rossmax International Ltd. or your local distributors
Attention: Consult the accompanying documents.
Please read this manual carefully before use. For specific information on
your own blood pressure, contact your physician. Please be sure to keep
this manual.
Preliminary Remarks
This Blood Pressure Monitor complies with the European regulations underlying
the German Law governing medical products (MPG) and bears the CE mark "CE
0366". The quality of the device has been verified and conforms to the provisions
of the EC council directive 93/42/EEC dated 14 June 1993 concerning medical
devices, as well as the EMC directive 89/336/EEC:EN 1060-1 (Dec. 1995)
Non-invasive blood pressure measuring equipment General requirements and EN
1060-3 (Feb. 1997) Noninvasive blood pressure measuring equipment
Supplementary requirements for electromechanical blood pressure measuring
systems. To ensure accurate measurements, it is recommended that calibration
be completed every two years.
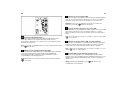
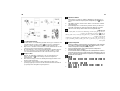
How “J401” Works
J401 uses oscillometric method to detect your blood pressure. Before the cuff
starts inflating, the device will establish a baseline cuff pressure, which is
equivalent to the air pressure. The measurement of your blood pressure is
based on this baseline pressure. After the cuff inflates to block your blood in the
artery, the deflation process starts. During the deflation of the wrist cuff, J401 is
detecting the pressure oscillations generated by the beat-to-beat pulsatile. Any
muscle movement during this period of time will cause measurement error. After
detecting the amplitude and the slope of the pressure oscillations during the
deflation process, J401 will determine the systolic and diastolic pressures for you,
and your pulse rate is detected at the same time.
3
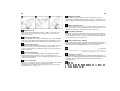
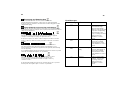
Systolic
(SYS.)
Diastolic
(DIA.)
< 120
and
< 80
120 – 139
or
80 – 89
140 – 159
or
90 – 99
160
or
100
Normal Prehypertension Stage 1
Hypertension
Stage 2
Hypertension
Normal Prähypertonie Hypertenesion
Bluthochdruck,
Stufe 1
Hypertenesion
Bluthochdruck,
Stufe 2
Normale Préhypertension Hypertension
stade 1
Hypertension
stade 2
Normal Prehipertensión Fase 1
Hipertensión
Fase 2
Hipertensión
Normal Pré-hipertensão Hipertensão de
estágio 1
Hipertensão de
estágio 2
Cinienie
normalne
Cinienie podwyszone Nadcinienie
pierwszego stopnia
Nadcinienie
drugiego stopnia
Normal Pre-ipertensione Stadio 1
Ipertensione
Stadio 2
Ipertensione
Normaal Prehypertensie Fase 1
Hypertensie
Fase 2
Hypertensie
Normal Prehipertansiyon 1. Evre
Hipertansiyon
2. Evre
Hipertansiyon
1
2
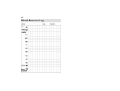
For reliable monitoring and reference of blood pressure, keeping long- term
records is recommended. Please download the blood pressure log(chart for
recording and tracking crucial info : date, time, blood pressure, pulse rate
and body condition) at
www.rossmaxhealth.com

4
About Blood Pressure
The National High Blood Pressure Education Program Coordinating
Committee has developed a blood pressure standard, according to which
areas of low- and high-risk blood pressure are identified. This standard,
however, is a general guideline as individual's blood pressure varies among
different people and different age groups...etc.
It is important that you consult with your physician regularly. Your physician
will tell you your normal blood pressure range as well as the point at which
you will be considered at risk.
Informationen über den Blutdruck
Das National High Blood Pressure Education Program Coordinating
Committee (Koordinationskomitee für nationale Programme zur Aufklärung
über Bluthochdruck) haben Blutdruck-Standardwerte zur Erkennung von
Blutdruckwerten mit hohem und geringem Risiko entwickelt. Diese
Standardwerte dienen jedoch lediglich als allgemeine Richtlinie, da der
individuelle Blutdruck bei verschiedenen Personen und unterschiedlichen
Altersgruppen usw. abweicht.
Es ist wichtig, dass Sie Ihren Arzt in regelmäßigen Abständen zu Rate
ziehen. Ihr Arzt teilt Ihnen Ihre individuellen Werte für einen normalen
Blutdruck sowie den Wert mit, ab dem die Höhe des Blutdrucks als
gefährlich einzustufen ist.
A propos de la pression sanguine
Le Comité national de coordination du programme d'éducation sur
l'hypertension artérielle ont mis au point une norme sur la pression
sanguine, qui identifie les zones de pression sanguine à hauts et faibles
risques. Cette norme, cependant, n'est qu'un guide général, car la pression
sanguine individuelle varie selon les personnes, les différents groupes
d'âge, etc.
Il est important que vous consultiez votre médecin régulièrement. Votre
médecin pourra vous dire quelle est votre plage de pression sanguine
normale, ainsi que le point à partir duquel vous serez considéré comme
étant exposé à un risque.
5
Acerca de la Presión Sanguínea
La Comisión Coordinadora Nacional del Programa de Educación sobre Alta
Presión Sanguínea ha desarrollado un estándar de presión sanguínea, en
la cual se identifican las áreas de presión sanguínea de alto y bajo riesgo.
Este estándar, sin embargo, es una guía general, ya que la presión
sanguínea de cada individuo varia según las personas y los distintos
grupos de edad...etc.
Es importante que consulte a su médico regularmente. Su médico le
informará sobre su rango de presión sanguínea normal así como el punto
en el que se le considera paciente de riesgo.
Sobre a pressão arterial
O Comitê Nacional de Programa de Educação de Pressão Arterial Elevada
desenvolveram um padrão de pressão arterial, de acordo com a
identificação das áreas de pressão arterial de baixo e alto risco. Este
padrão, entretanto, é uma diretriz geral, uma vez que a pressão arterial
individual varia entre diferente pessoas e grupos de faixa etária, etc.
É importante que consulte seu médico regularmente. Seu médico definirá
a sua faixa de pressão arterial normal bem como o índice considerado
como risco.
Einführung
Blutdruckmessungen mit Hilfe des J 401 sind gleichwertig mit
Blutdruckmessungen, die von einem geschulten Benutzer unter
Verwendung der Manschetten-/Stethoskop-Abhörmethode durchgeführt
werden, die den Vorschriften der American National Standards für
elektronische oder automatisierte Blutdruckmessapparate entspricht.
Das J 401 ist durch ein etabliertes Internationales Garantieprogramm
gegen Herstellungsfehler geschützt. Für Garantieinformationen lesen Sie
bitte unter Service und Garantie in dieser Gebrauchsanleitung.
Hinweis: Bitte beachten Sie die Begleitpapiere.
Lesen Sie diese Bedienungsanleitung vor Gebrauch aufmerksam durch. Bei
speziellen Fragen zu Ihrem Blutdruck wenden Sie sich bitte an Ihren Arzt.
Bewahren Sie diese Gebrauchsanleitung sorgfältig auf.

6
Informazioni sulla Pressione sanguigna
La Commissione di coordinazione per il programma nazionale educativo
sull’alta pressione, hanno sviluppato uno standard sulla pressione
sanguigna in base alle aree identificate come ad alto e a basso rischio
d’alta pressione. Questo standard, tuttavia, è una direttiva generica poiché
la pressione sanguigna individuale varia in base all’età e ad altri fattori.
È importante consultare regolarmente il proprio medico. Sarà il medico a
dire quali sono valori normali della pressione sanguigna personale e quali
quelli considerati rischiosi.
Over bloeddruk
De Nationale Coördinatiecommissie voor Vormingsprogramma’s over Hoge
Bloeddruk hebben een bloeddrukstandaard ontwikkeld, die wordt gebruikt
om de risicogebieden voor lage of hoge bloeddruk te identificeren. Deze
standaard is echter een algemene richtlijn, aangezien de bloeddruk van
een individu kan variëren volgens verschillende mensen en
leeftijdsgroepen, enz. Het is belangrijk dat u regelmatig uw arts raadpleegt.
Uw dokter zal u het bereik van uw normale bloeddruk laten weten, en zal u
vertellen op welk punt u een risico loopt.
Tansiyon ile ilgili Bilgiler
Ulusal Yüksek Tansiyon Eitim Programı Koordinasyon Kurulu düük ve
yüksek riskli tansiyon aralıklarını belirlemede kullanılmak üzere bir tansiyon
standardı gelitirilmitir. Bununla beraber bu standart, tansiyonun kiiden
kiiye ve ya grupları vb. arasında farklılıklar göstermesi nedeniyle genel bir
kılavuz mahiyetindedir.
Doktorunuza düzenli olarak danımanız önem arz etmektedir. Doktorunuz
size normal tansiyon aralıınızı ve risk altında olduunuz noktaları
bildirecektir.
7
Vorbemerkungen
Dieser Blutdruckmesser entspricht den europäischen Vorschriften, die dem
deutschen Medizinproduktegesetz (MPG) zugrunde liegen und trägt das
CE-Zeichen CE 0366. Die Qualität des Gerätes wurde geprüft und
entspricht den Bestimmungen der EG-Richtlinie 93/42/EWG des Rates vom
14. Juni 1993 über Medizinprodukte und den Bestimmungen der
EMV-Richtlinie 89/336/EWG -EN 1060-1 (Dez. 1995) Nichtinvasive
Blutdruckmessgeräte, allgemeine Anforderungen und EN 1060-3 (Feb.
1997) Nichtinvasive Blutdruckmessgeräte, ergänzende Anforderungen für
elektromechanische Blutdruckmesssysteme.
Es wird empfohlen, das Gerät alle zwei Jahre zu kalibrieren, um genaue
Messungen sicherzustellen.
Funktionsweise des J 401
Das J 401 verwendet die oszillometrische Methode zur Bestimmung Ihres
Blutdrucks. Bevor sich die Manschette aufpumpt, erzeugt das Gerät einen
Manschettenausgangsdruck, der dem Luftdruck entspricht. Die Messung
Ihres Blutdrucks beruht auf diesem Ausgangsdruck. Nachdem sich die
Manschette aufgepumpt hat, um den Blutfluss in der Arterie zu stoppen,
beginnt der Ablassvorgang. Während die Luft aus der
Handgelenksmanschette abgelassen wird, ermittelt das J 401 die durch den
Pulsschlag erzeugten Druckschwankungen. Jede Muskelbewegung
während dieser Zeit verursacht Messfehler. Nach der Ermittlung der
Amplitude und der Steigung der Druckschwankungen während des
Ablassvorgangs bestimmt das J 401 den systolischen und diastolischen
Druck, wobei gleichzeitig Ihre Pulsfrequenz ermittelt wird.
Für die zuverlässige Überwachung und Bestimmung des Blutdrucks wird die
langfristige Aufzeichnung der Messwerte empfohlen.

8
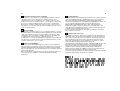
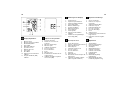
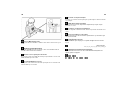
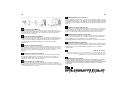
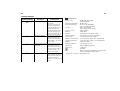
Name/Function of Each Part
1. LCD Display
2. Battery Cover
3. User-Switching Key
4. Memory Recall Key
5. ON/OFF/START Key
6. Wrist Cuff
7. Date/Time Set Key
Nombre/Función de cada
parte
1. Pantalla LCD
2. Cubierta de la batería
3. Tecla cambio de usuario
4. Tecla Restaurar memoria
5. Tecla ON/OFF/INICIO
6. Brazalete para muñeca
7. Tecla ajuste fecha/hora
Name/Funktion der Einzelteile
1. LCD-Display
2. Batterieabdeckung
3. Taste Benutzerschaltung
4. Taste Speicheraufruf
5. Taste EIN/AUS/START
6. Handgelenksmanschette
7. Taste Datums-/Zeiteinstellung
Nom/fonction de chaque
pièce
1. Affichage LCD
2. Couvercle de la batterie
3. Touche du commutateur de
l’utilisateur
4. Touche de remise en mémoire
5. Touche ON/OFF/START
6. Brassard
7. Touche de configuration
Date/Heure
9
Nome / função de cada componente
1. Visor de LCD
2. Tampa do compartimento de pilha
3. Tecla de troca de usuário
4. Tecla de chamada de memória
5. Tecla liga / desliga / início (ON/OFF/START)
6. Punho
7. Tecla de ajuste de data/hora
Nazwa/funkcja kadego z elementów
1. Wywietlacz LCD
2. Pokrywa baterii
3. Przełcznik uytkownika
4. Przycisk przywoływania pamici
5. Przycisk WŁ/WYŁ/START (ON/OFF/START)
6. Mankiet na nadgarstek
7. Przycisk ustawiania daty/czasu
Sayfa yükleniyor...

12
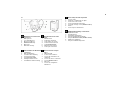
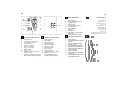
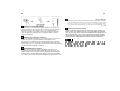
Display Explanations
1. Memory Zones
2. Memory Sequence Number
3. Weak Battery Mark
4. Pulse Mark
5. Date/Time Indicator
6. Systolic Pressure
7. Diastolic Pressure
8. Pulse Rate
9. Error Mark
10. Hypertension Classification
Indicator
11. Irregular Heartbeat (IHB)
Indicator
Explicación de la pantalla
1. Zonas de memoria
2. Número de secuencia de
memoria
3. Marca de batería baja
4. Marca de pulso
5. Indicador Fecha/Hora
6. Presión sistólica
7. Presión diastólica
8. Pulso
9. Marca de error
10. El indicador de clasificación de
la hypertension
11. Indicador de latidos irregulares
del corazón (IHB)
13
Erklärungen des Displays
1. Speicherzonen
2. Speichersequenznummer
3. Symbol Schwache Batterie
4. Herzschlagsymbol
5. Datums-/Zeitanzeige
6. Systolischer Druck
7. Diastolischer Druck
8. Herzschlagrate
9. Fehlersymbol
10. Hypertonie Klassifikation
Indikator
11. Indikator für unregelmäßigen
Herzschlag (IHB)
Explications d’affichage
1. Zones de mémoire
2. Numéro de séquence
mémorielle
3. Signal de batterie faible
4. Indicateur de pouls
5. Indicateur Date/Heure
6. Pression systolique
7. Pression diastolique
8. Pouls
9. Signal d’erreur
10. L’Indicateur du classification de
l’hypertension
11. Indicateur de Pouls irrégulier
(IHB)
Descrição do visor
1. Zonas da memória
2. Número seqüencial da memória
3. Marca de pilha fraca
4. Marca de pulso
5. Indicador de data / hora
6. Pressão sistólica
7. Pressão diastólica
8. Pulsação
9. Marca de erro
10. O indicador de Classificação da
Hipertensão
11. Indicador de arritmia cardíaca
(IHB - Irregular Heartbeat)
Wy%wietlacz
1. Strefy pamici
2. Numer kolejnej pamici
3. Znak słabej baterii
4. Znak ttna
5. Wska^nik daty/czasu
6. Cinienie skurczowe
7. Cinienie rozkurczowe
8. Czsto_ ttna
9. Znak błdu
10. Wska^nik klasyfikacji
nadcinienia
11. Wska^nik IHB (Irregular
Heartbeat [Arytmia serca])
Sayfa yükleniyor...

16
Hypertension Classification Indicator
The National High Blood Pressure Education Program Coordinating
Committee has developed a blood pressure standard according to which
areas of low- and high-risk blood pressure are identified,
classifying blood
pressure ranges into 4 stages. This unit is equipped with innovative
blood
pressure classification indicator, which visually indicates the assumed
risk
level (prehypertension / stage 1 hypertension / stage 2 hypertension) of
the result after each measurement. (Please note above.)
Hypertonie Klassifikation Indikator
Das National High Blood Pressure Education Program Coordinating
Committee (Koordinationskomitee für nationale Programme zur
Aufklärung über Bluthochdruck) haben Blutdruck-Standardwerte zur
Erkennung von Blutdruckwerten mit hohem und geringem Risiko
entwickelt
, der den Blutdruckbereich in 4 Stufen unterteilt. Dieser Gerät ist
mit einer innovativen Blutdruck-Klassifizierungsanzeige ausgestattet, die
sichtbar den angenommenen Riskofaktor (Vor-Bluthochdruck /
Bluthochdruck Stufe 1 / Bluthochdruck Stufe 2) des Ergebnisses nach
jeder Messung anzeigt. (Beachten Sie obiges.)
L’Indicateur du classification de l’hypertension
Le Comité national de coordination du programme d'éducation sur
l'hypertension artérielle ont mis au point une norme sur la pression
sanguine, qui identifie les zones de pression sanguine à hauts et faibles
risques, permettant de classer les pressions sanguines sous quatre
catégories. Cette unité est équipée d'un indicateur de pression
sanguine exclusif qui indique visuellement le niveau de risque
supposé (préhypertension / hypertension de niveau 1 / hypertension de
niveau 2) pour les résultats après chaque mesure. (Veuillez vous
reporter à la remarque ci-dessous.)
17
El indicador de clasificación de la hypertension
La Comisión Coordinadora Nacional del Programa de Educación sobre
Alta Presión Sanguínea ha desarrollado un estándar de presión
sanguínea, en la cual se identifican las áreas de presión sanguínea de
alto y bajo riesgo, clasificando los intervalos de ésta en 4 grados. Esta
unidad cuenta con un innovador indicador de clasificación de la presión
arterial que muestra visualmente el nivel de riesgo asumido
(prehipertensión/ hipertensión de grado 1/ hipertensión de grado 2) del
resultado después de cada medición. (Anote los valores por debajo.)
O indicador de Classificação da Hipertensão
O Comitê de Coordenação do Programa Nacional de Educação para
Hipertensão desenvolveram um padrão que classifica as faixas de
pressão sangüínea em 4 estágios. Esta unidade está equipada com um
inovador indicador de classificação de pressão sangüínea que mostra o
nível de risco adotado (pré-hipertensão / hipertensão estágio 1 /
hipertensão estágio 2) do resultado depois de cada medição. (Veja
abaixo.)
Wska^nik klasyfikacji nadcinienia
Komitet Koordynacyjny Narodowego Programu Edukacyjnego Wysokiego
Cinienia Krwi opracowały standard cinienia krwi, zgodnie z którym
okrelane s obszary ryzyka wystpienia niskiego i wysokiego cinienia
krwi, klasyfikujc zakresy cinienia krwi w 4 fazach. Urzdzenie jest
wyposaone w innowacyjny wska^nik klasyfikacji cinienia krwi,
wizualnie okrelajcy po kadym pomiarze przypuszczalny poziom
ryzyka (przednadcinienie / faza 1 nadcinienia / faza 2
nadcinienia). (Patrz uwaga powyej.)

18
Indicatore della classificazione dell'ipertensione La Commissione di
coordinazione per il programma nazionale educativo sull’alta pressione,
hanno sviluppato uno standard sulla pressione sanguigna in base alle
aree identificate come ad alto e a basso rischio d’alta pressione,
classificando le misurazioni della pressione sanguigna in 4 livelli. Questa
unità è dotata di un innovativo indicatore per la classificazione della
pressione sanguigna che indica visivamente il livello di rischio presunto
(preipertensione / ipertensione di 1° livello / ipertensione di 2° livello) del
risultato dopo ogni misurazione. (Nota in sopra.)
Hypertensieklasse-indicator
De Nationale Coördinatiecommissie voor Vormingsprogramma’s over
Hoge Bloeddruk hebben een bloeddrukstandaard ontwikkeld, die wordt
gebruikt om de risicogebieden voor lage of hoge bloeddruk te
identificeren, waarbij vier niveaus worden onderscheiden. Dit apparaat
unit is uitgerust met een innovatieve indicator voor classificatie van de
bloeddruk, die het veronderstelde risiconiveau van het resultaat na ieder
meting zichtbaar maakt (prehypertensie / niveau 1 hypertensie / niveau 2
hypertensie). (Zie opmerking hierboven.)
Hipertansiyon Sınıflandırma Göstergesi
Ulusal Yüksek Tansiyon Eitim Programı Koordinasyon Komitesi bir
tansiyon basınç standardı gelitirerek kan basıncı aralıını 4 aamada
sınıflandırdı. Bu ünitede yeni tansiyon sınıflandırması göstergesi
bulunmakta olup her ölçüm sonrası elde edilen sonucun varsayılan risk
düzeyini görsel olarak göstermektedir (hipertansiyon öncesi / 1. aama
hipertansiyon / 2. aama hipertansiyon). (Lütfen aaıdakileri not alınız.)
19
()#$HmIt31 $euc?17h4
t31 $euc?+B(/ji;uG u@47/!+B()#$HmIt31 li4/j#$~4k7"d#-xc-#$c•d#$EF4G
€#•()#$HmI5.‚$74 .ƒ„B…(/j…()#$HmIeuc?1†u"#7ƒ+"47h-Bf‡•4ˆ‡•#$$9‰E
/+,4ŠuI/+B…i‹74Œ 7+3-#$6 /!*#$•Ž()#$HmIt31 $."G•d‚7-#$()#$HmIt31 $•
d‚7-#$()#$HmIt31 $•‘uGud-:.8)@B‡ud:p/?0#$>1i+#$•u+cd#Ž4x‚’4%“7#$
”k•–• $E/‰•
z M|}
}MTO }O R U]
QOM MO O U R
RM, R RR O ROMO ]O M
ROP \ RM, ON M|}] 4
R RM. LON Q Q]R
RO M|} R RM,
ON RU]MT UOR MON ]RT
U]MT (U/ 1- T U / 2- T
U) M \ U. ( T ROP.)

20
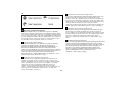
Irregular Heartbeat (IHB) Indicator
This unit is equipped with an Irregular Heartbeat (IHB) Indicator which
allows those who have an irregular heartbeat to obtain accurate
measurements alerting the user of the presence of an irregular heart beat
during the measurement.
Note: It is strongly recommended that you consult your physician if the IHB
icon (
) appears often.
Indikator für unregelmäßigen Herzschlag (IHB)
Dieses Gerät ist mit einem Indikator für unregelmäßigen Herzschlag (IHB)
ausgestattet. Damit können auch Anwender mit unregelmäßigem
Herzschlag genaue Messergebnisse erhalten und werden auf einen
unregelmäßigen Herzschlag hingewiesen.
Hinweis: Wenden Sie sich an Ihren Arzt, wenn des Herzstolpern-Symbol
(
) oft erscheint.
21
Indicateur de Pouls irrégulier (IHB)
Cette unité est équipée d'un indicateur de Pouls irrégulier (IHB) qui permet à
ceux qui ont un pouls irrégulier d'obtenir des mesures précises alertant
l'utilisateur sur la présence d'un pouls irrégulier en cours de mesure.
Remarque : Nous vous recommandons vivement de consulter votre
médecin si l'icône IHB (
) s'affiche fréquemment.
Indicador de latidos irregulares del corazón (IHB)
Esta unidad dispone de un indicador de latidos irregulares del corazón (IHB)
que permite a aquellas personas cuyo ritmo de latidos no es regular
obtener mediciones precisas que les adviertan de la presencia de dichos
latidos.
Nota: Se recomienda que consulte con su médico si aparece el icono IHB
(
) con frecuencia.
Indicador de arritmia cardíaca (IHB - Irregular Heartbeat)
Este aparelho está equipado com um indicador de arritmia cardíaca (IHB -
Irregular Heartbeat) que permite obter medições precisas que alertam o
usuário sobre a presença de arritmia cardíaca durante a medição.
Nota: é altamente recomendado que você consulte seu médico se o ícone
de IHB (
) aparecer com freqüência.
Wska2nik IHB (Irregular Heartbeat [Arytmia serca])
Urzdzenie to jest wyposaone we wska^nik IHB (Irregular Heartbeat
[Arytmia serca]), który umoliwia uzyskanie dokładnych pomiarów u osób z
arytmi serca, informujc uytkownika podczas pomiaru o wystpieniu
arytmii serca.
Uwaga: Przy czstym wywietlaniu ikony (
) IHB, zalecane jest
skontaktowanie z si z lekarzem.

22
Indicatore IHB (Irregular Heart Beat: battito cardiaco irregolare)
Questa unità è attrezzata con un indicatore IHB (Irregular Heart Beat:
battito cardiaco irregolare) che consente alle persone con aritmia cardiaca
di ottenere misurazioni accurate avvisando della presenza dell’aritmia
durante la misurazione.
Nota: si raccomanda vivamente di consultare il proprio medico se l’icona
IHB (
) appare con frequenza.
Indicator voor een onregelmatige hartslag (IHB=Irregular
Heartbeat)
Dit toestel is voorzien van een indicator voor een onregelmatige hartslag
(IHB=Irregular Heartbeat) waarmee mensen die een onregelmatige
hartslag hebben nauwkeurige metingen kunnen uitvoeren zodat ze tijdens
het meten worden gewaarschuwd van de aanwezigheid van een
onregelmatige hartslag.
Opmerking: wij raden u sterk aan uw arts te raadplegen als het
IHB-pictogram (
) vaak verschijnt.
23
Düzensiz Kalp Atı3ı (IHB)
Bu cihazda Düzensiz Kalp Atıı (IHB) Göstergesi bulunmakta olup ölçüm
sırasında düzensiz kalp atıı olduu hakkında kullanıcıyı uyararak düzensiz
kalp atıı bulunanlarda doru sonuç elde edilmesine olanak salamaktadır.
Not: Sık bir ekilde IHB simgesi (
) beliriyorsa doktorunuza bavurmanız
önemle tavsiye edilir.
456)7,8'9:,;<:=>'+?@8
(x+k$():—4†/k@—9#$%lh‡#Š-,-4…vdj#$wB7I(x+k$():7h-B6f‡•46)‚/#$”9‰
—4EjuG•w;uG€d:p/?0#Bvdj#$wB7I‘uj#$ud-:p’˜>‰7901>™
*;ABCDvdj#$wB7I(x+k$():f4 /‡š)c:vu"!#$6 „+;B6)„B€›/Ž• 7ƒ+4.ƒ„B
E$ F G FH0F H #FI (IHB)
LON Q œ ]M }Q
(IHB), URMSœ M}, Sœ ]MO
}Q, UT ] O• œN
M]T ]RM ]M }Q R R
U.
.FG". žM IHB (
) RM ,
MT ] QT Mœ] R].
IHB
IHB

24
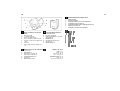
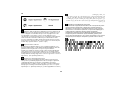
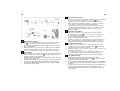
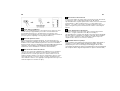
Applying the cuff
Apply cuff to left wrist with palm facing up (1). Make sure the edge of the
cuff is about 1 cm from the palm (2). Fasten the velcro strap securely
around your wrist (3).
Anbringen der Manschette
Bringen Sie die Manschette am linken Handgelenk an, mit dem Handteller
nach oben (1). Der Abstand zwischen Manschette und Handteller muss ca.
1 cm betragen (2). Binden Sie das Klettband fest um Ihr Handgelenk (3).
Application du brassard
Attachez la bande de poignet au poignet gauche, avec la paume de la main
orientée vers le haut (1). Assurez-vous que le bord de la bande est à
environ 1 cm de la paume (2). Attachez la bande velcro fermement autour
de votre poignet (3).
Aplicación del brazalete
Colóquese la pulsera en la muñeca izquierda con la palma de la mano
mirando hacia arriba (1) Asegúrese de que el borde de la pulsera se
encuentra aproximadamente a 1 cm. de la palma (2). Ajuste la tira de velcro
alrededor de la muñeca (3).
Colocar a bracadeira
Aplicar a correia de punho no pulso esquerdo com a palma da mão voltada
para cima (1). Certifique-se de que a borda do punho fique
aproximadamente 1 cm distante da palma (2). Aperte a correia de velcro
firmemente ao redor do pulso (3).
25
Zakładanie mankietu
Załoy_ mankiet na lewy nadgarstek, dłoŸ skierowana do góry (rys.1).
Upewni_ si, e krawd^ mankietu znajduje si około 1 cm od dłoni (rys.2).
Dobrze zapi_ rzepy połczenia mankietu otaczajcego nadgarstek (rys.3).
Utilizoo della manichetta
Indossare la polsiera al polso sinistro con il palmo della mano rivolto verso
l'alto (1). Assicurarsi che l’estremità della polsiera sia posta ad almeno 1 cm
dal palmo (2). Stringere la cinghia di velcro attorno al polso (3).
De armband aanbrengen
Breng de polsband aan rond uw linkerpols terwijl u de palm van uw hand
naar boven gericht houdt (1). Zorg ervoor dat de rand van de polsband zich
op een afstand van ongeveer 1 cm van de handpalm bevindt (2). Maak de
velcroband stevig vast rond uw pols. (3).
Tansiyon Man3onunun Takılması
Avuç içi yukarı doru bakacak ekilde bileklii sol bileinize takınız ( ek. 3).
Bilekliin kenarı avucunuzdan yaklaık 1 cm mesafede olmalıdır ( ek. 2).
Velcro yapıkan bandını bileinizin etrafına sıkıca sarın ( ek. 3)
!"#$%&'()*+,-. /0*123456%70/089:!;<)4 =
%1-%23>56-.?(2@02A331235B6
T \] MR UT, R]R MT RR• (¡. 1).
YQT, N \O •T 1
M (¡. 2). ¢] U M]] R] RP
UT (¡. 3).

26
Correct Measuring Posture
Place your elbow on the table so that the cuff is at the same level as your
heart
.
Ordnungsgemäße Messhaltung
Legen Sie den Ellbogen auf den Tisch, so dass sich die Manschette in
derselben Höhe wie Ihr Herz befindet.
Posture correcte par la prise de mesure
Posez votre coude sur la table de telle façon que l'attache se trouve à la
même hauteur que votre cœur.
Postura de Medición Correcta
Coloque el codo en una mesa de modo que la pulsera se encuentre a la
misma altura que su corazón.
27
Postura correta para medição
Coloque seu cotovelo na mesa para que o punho fique no mesmo nível de
seu coração.
Wła%ciwa postawa do pomiaru
Oprze_ łokie_ na stole tak, aby mankiet znajdował si na tym samym
poziomie, co serce.
Posizione corretta per la misurazione
Collocare il gomito sul tavolo in modo tale che la polsiera sia a livello con il
cuore.
Correcte houding voor de meting
Plaats uw elleboog op de tafel zodat de polsband zich op dezelfde hoogte
van uw hart bevindt.
DoJru Ölçüm Pozisyonu
Bileklik kalbinizle aynı hizaya gelecek ekilde bileinizi masanın üzerine
koyun
.
C7+($,DEFA/0:(2$GHI(AJ7A*
.F0K / 0 0 GF
M\ RP MT M , QO \ •MT
]R }
.

28
Measurement Procedures
1. Press the “User-Switching” key to select a memory zone, and press
the “
” key to start measurement in the chosen memory zone.
2. After checking the display with all digits lighting up, the monitor will
automatically inflate.
3. When completed, the systolic pressure, diastolic pressure and pulse
rate will be shown simultaneously on the same LCD screen. The
values are automatically stored in the pre-designated memory zone.
Messvorgänge
1. Drücken Sie die Taste “Benutzerschaltung”, um eine Speicherzone zu
wählen, und drücken Sie die Taste “
”, um mit der Messung in der
gewählten Speicherzone zu beginnen.
2. Nach dem Prüfen des Displays, wobei alle Ziffern leuchten, bläht sich
der Monitor automatisch auf.
3. Zum Abschluss werden der systolische Druck, der diastolische Druck
und der Herzschlag gleichzeitig auf dem gleichen LCD-Bildschirm
angezeigt. Die Werte werden automatisch in der vorherbestimmten
Speicherzone abgespeichert.
29
Procédures de mesurage
1. Appuyez sur la touche “Commutateur de l’utilisateur” pour sélectionner
une zone de mémoire et appuyez sur la touche “
” pour
2. commencer les mesures dans la zone de mémoire sélectionnée.
Après vérification de l’affichage de façon à ce que tous les chiffres
soient allumés, le moniteur se gonfle automatiquement.
3. Cela fait, la pression systolique, la pression diastolique et le pouls
s’afficheront automatiquement sur le même écral LCD. Les valeurs
sont automatiquement enregistrées dans la zone de mémoire
désignée d’avance.
Procedimiento de medición
1. Pulse la tecla "Cambio usuario" para seleccionar una zona de
memoria y pulse la tecla "
" para comenzar con la medición en la
zona de memoria elegida.
2. Tras comprobar la pantalla con todos los dígitos encendidos, el
monitor se inflará automáticamente.
3. Cuando se complete, se mostrará la presión sistólica, diastólica y el
pulso simultáneamente en la misma pantalla LCD. Los valores se
almacenan automáticamente en la zona de memoria prediseñada.
Procedimentos de medição
1. Pressione a tecla “Troca de usuário” para selecionar a zona da
memória e pressione a tecla “liga / desliga / início"
" para iniciar a
medição na zona de memória escolhida.
2. Depois de verificar o visor com todos os dígitos acesos, o monitor será
inflado automaticamente.
3. Ao concluir, as pressões sistólica e diastólica e a pulsação serão
mostradas simultaneamente no visor de LCD. Os valores são
armazenados automaticamente na zona de memória designada.
Procedura pomiarowa
1. W celu wybrania strefy pamici nacisn_ przycisk "Wybór
uytkownika" i nacisn_ przycisk włcznika "
", w celu rozpoczcia
pomiaru dla wybranej strefy pamici.
2. Po sprawdzeniu poprawnoci działania wywietlacza, kiedy zapal si
wszystkie jego elementy, miernik zacznie automatycznie pompowa_
powietrze.
3.
Po zakoŸczeniu pomiaru na ekranie LCD równoczenie wywietlona
zostanie warto_ cinienia skurczowego, rozkurczowego oraz
czsto_ ttna. Wartoci zapisywane s automatycznie w wybranej
strefie pamici.

30
Procedura di misurazione
1. Premere il tasto “User-Switching” (Cambio utente) per selezionare una
zona di memoria e premere il tasto "
" (accensione/ spegnimento /
avvio) per avviare la misurazione nella zona di memoria scelta.
2. Dopo avere controllato le funzioni dello schermo attivando tutte le cifre,
il monitor gonfierà automaticamente la manichetta.
3. Al completamento, sullo schermo LCD appariranno simultaneamente:
pressione sistolica, pressione diastolica e battito cardiaco. I valori
sono archiviati automaticamente nella zona di memoria prescelta.
Meetprocedure
1. Druk op de “Gebruikers schakeltoets” om een geheugenzone te
kiezen en druk op "
" om de meting te starten in de gekozen
geheugenzone.
2. Het scherm wordt gecontroleerd, waarbij alle lampjes branden en de
monitor wordt opgepompt.
3. Tenslotte ziet u de systolische druk, de diastolische druk en de
polsslag tegelijk op het lcd-scherm. De waarden worden automatisch
op geslagen in de aangewezen geheugenzone.
31
Ölçüm Prosedürleri
1. Hafıza alanını seçmek için “Kullanıcı Deitirme” tuuna basın ve
seçilen hafıza alanında ölçüm ilemine balamak için N"
" tuuna
basın.
2. Tüm dijitler yanarken ekranı kontrol ettikten sonra monitör otomatik
olarak iecektir.
3. Tamamlandıında ise sistolik basınç, diastolic basınç ve nabız hızı
aynı LCD ekranında aynı anda gösterilecektir. Deerler otomatik
olarak önceden dizayn edilen hafıza alanına kaydedilecektir.
L ,6)7'M
4()*+,££-#$.£/012££+34€££d:Hm£I$User-SwitchingHm££I$E…678$9££#$ab££c4•)£‚•)££)0+#
2+34€d:"
"‰ u+˜$>1i+#$678$9#$j!c4i¤‘uj#$%)"#
>¥uƒu14/1E–ˆ‡•#$–)"¦/;…„#$€d:(G §$¨u-“6%I•EŒ 7@#$e‹šE© 0¤g @B
()#$HmI‘uj#%$/‡#$D3cB
Bwn£"c#$p)£@4Eib,"kl$Hmn#$E…iI"jkl$Hmn#$p)@4Œ 7:>+…‘uj#$—4%‡+kl$)@BE
Œ 7£@#$£ª£3k€£d:)£‚$EF£GEi£¤ >£1i£+#$678$9£#$£j!c4i£¤¥£uƒu14/1E–>u£j#$—f£*1>+££-8
¥j",4‰ u+˜$
. F GF
1. \ MRP] MS MTURMN, QO ROQT
U] . \ MRP] "
" (VKW./VX KW./YZK), QO
T U R ROQ]S U] .
2. M R QO R• UR M UMT
R ].
3.
J KL-M R R
U M M RM O
]MT. y R •S R RMT
ROQN U .
1.
" "
2.
3.

32
Recall Values from Memory
Press the “User-Switching key” to select a memory zone, and press the “M” key to
switch from memory to memory with sequence numbers. (The average of the previous
measurements will be displayed first. The calculated average will be applied to a
maximum of the last 3 memories.)
Werte aus dem Speicher abrufen
Drücken Sie die Taste “Benutzerschaltung”, um eine Speicherzone zu wählen, und
drücken Sie die Taste “M”, um vom Speicher zum Speicher mit Sequenznummern zu
schalten. (Der Durchschnitt der vorherigen Messungen wird zuerst angezeigt. Der
berechnete Durchschnitt wird maximal für die letzten 3 Speichervorgänge
übernommen.)
Valeurs de remise en mémoire
Veuillez appuyer sur la “touche du commutateur de l’utilisateur” pour sélectionner une
zone de mémoire et appuyez sur la touche “M” pour passer d’une mémoire à l’autre
grâce à des numéros séquentiels. (La moyenne des mesures précédentes s’affichera
d’abord. La moyenne calculée sera appliquée aux 3 dernières mémoires au
maximum.)
Restablecer valores de la memoria
Pulse la "tecla cambio de usuario" para seleccionar una zona de memoria y pulse la
tecla "M" para cambiar de memoria a memoria con números de secuencia. (El
promedio de medidas anteriores se mostrará primero. El promedio calculado se
aplicará a un máximo de las 3 últimas memorias.)
Como chamar valores da memória
Pressione a tecla de “Troca de usuário” para selecionar uma zona da memória e
pressione a tecla “M” para alternar entre as memórias com números seqüenciais. (As
média das medições anteriores será exibida primeiro. A média calculada será aplicada
às três últimas memórias no máximo.)
33
Odczytywanie warto%ci z pamiNc
i
W celu wybrania strefy pamici, z której bd odczytywane wartoci nacisn_
przycisk"Wybór uytkownika", a nastpnie w celu przełczenia pomidzy kolejnymi
pamiciami naciska_ przycisk "M". (Najpierw zostanie wywietlona warto_ rednia
poprzednich pomiarów. Obliczona rednia dotyczy_ bdzie maksymalnie ostatnich 3
pamici.
Richiamo dei valori dalla memoria
Premere il tasto “User-Switching” (Cambio utente) per selezionare la zona di memoria
da cui richiamare i valori e premere il tasto “M” per passare in modo consecutivo da
memoria a memoria. (La media delle misurazioni precedenti sarà visualizzata per
prima. La media calcolata sarà applicata ad un massimo di 3 memorie recenti. )
Waarden uit het geheugen terugroepen
Druk op de “Gebruiker schakeltoets” om een geheugenzone te kiezen en druk op de
knop “M” om van het geheugen om te schakelen naar geheugen met volgnummers.
(Het gemiddelde van de vorige metingen wordt eerst getoond. Het
berekendegemiddelde wordt toegepast tot een maximum over de laatste 3 metingen.)
Hafızadaki DeJerlerin ÇaJrılması
Bir hafıza alanı seçmek için “Kullanıcı Deitirme Tuu”na basın ve sıralma sayıları ile
birlikte bir hafızadan dier hafızaya geçmek için “M” tuuna basın. (Önceki ölçümlerin
ortalaması ilk once gösterilecektir. Hesaplanan ortalama en az son 3 hafızaya
uygulanacaktır.)
O'P)QC6),>=
()*+,-#$./012+34€d:HmI$
"User Switching"
˜l€d:HmI$E…678$9#$abc4•)‚• u+
2+34
"M"
d,d,+4(G rB•7˜–€#•678$«—4pj+k’#
Ž¥lE–jB,#$w;uj#$H;/+4Œ 7:>+
7˜–€d:¬/,0-#$H;/+-#$au"!1>+¦/;EB€?G–)08w$78$«•
RS ST /G$
\ MRP] MS MTURMN, QO ROQT U] ,
œTS MRP “M” MSN UO MRMTO
. (ZM Q] Q\ U U]MTR UN.
VOM U Q] ] 3 M
U]MT.)

34
Clear Values from Memory
Press the “User-Switching key” to select a memory zone, then press and
hold the “M” key for approximately 5 seconds to clear the data in the
pre-designated memory zone. The data may be erased if any of the
batteries is removed.(Suggest the users to first record the data on the blood
pressure log before replacing or moving away the batteries.)
Werte im Speicher löschen
Drücken Sie die Taste “Benutzerschaltung”, um eine Speicherzone zu
wählen, und drücken und halten Sie die Taste “M” ca. 5 Sekunden lang, um
die Daten in der vorherbestimmten Speicherzone zu löschen.
Die Daten
werden gelöscht, wenn eine der Batterien entfernt wird.(Dem Benutzer wird
empfohlen, zuerst die Daten in der Blutdruck-Aufzeichnungstabelle
aufzuzeichen, bevor die Batterien ersetzt oder entfernt werden.)
Effacement des valeurs de mémoire
Appuyez sur la “touche du commutateur de l’utilisateur” pour sélectionner
une zone de mémoire puis appuyez sur la touche “M” et maintenez-la
pendant environ 5 secondes pour effacer les données dans la zone de
mémoire désignée d’avance. Les données risquent d'être effacées si l'une
quelconque des piles est enlevée. (Nous conseillons aux utilisateurs de
noter d'abord les données sur le graphique d'enregistrement de la pression
avant de remplacer ou d'enlever les piles.)
35
Borrar valores de la memoria
Pulse la "tecla cambio de usuario" para seleccionar una zona de memoria,
a continuación, pulse y mantenga pulsada la tecla "M" durante
aproximadamente 5 segundos para borrar los datos de la zona de memoria
predesignada.
Los datos
pueden borrarse si se retira alguna de las
baterías. (Se sugiere a los usuarios que graben primero los datos en el
gráfico de registro de presión arterial antes de sustituir o extraer alguna
batería).
Como apagar valores da memória
Pressione a tecla de "Troca de usuário" para selecionar uma zona da
memória e, a seguir, mantenha a tecla "M" pressionada por
aproximadamente 5 segundos para apagar a zona de memória designada.
Os dados podem ser apagados se a pilha for removida. (Recomendamos
que os usuários registrem os dados na tabela de registro de pressão
sangüínea antes de trocar ou remover as baterias.)
Usuwanie warto%ci z pamiNci
W celu wybrania strefy pamici nacisn_ przycisk "Wybór uytkownika", a
nastpnie, w celu usunicia zawartoci wybranej pamici, nacisn_ i
przytrzyma_ przez około 5 sekund przycisk "M". Wyjcie baterii, moe
spowodowa_ utrat danych. (Zaleca si uytkownikom, aby przed wymian
lub usuniciem baterii, najpierw zapisa_ dane na wykresie cinienia krwi.)

36
Azzeramento valori dalla memoria
Premere il tasto “User-Switching” (Cambio utente) per selezionare una
zona di memoria e premere il tasto “M” per circa 5 secondi per azzerare i
dati nella memoria scelta.
I dati possono essere eliminati quando si
rimuovono le batterie. (Si suggerisce all’utente di registrare i dati nella
tavola di registrazione della pressione sanguigna prima di sostituire o
rimuovere le batterie.)
Waarden uit het geheugen verwijderen
Druk op de “Gebruiker schakeltoets” om een geheugenzone te kiezen en
houd de knop “M” 5 seconden ingedrukt om de gegevens uit de
geheugenzone te verwijderen Het is mogelijk dat de gegevens worden
gewist wanneer een van de batterijen wordt verwijderd. (Wij raden u aan
eerst de gegevens op te slaan in de gegevenstabel van de bloeddrukmeting
voordat u batterijen verwijdert of vervangt.)
Hafızadaki DeJerlerin Silinmesi
Bir hafıza alanı seçmek için “Kullanıcı Deitirme tuu”na basın ve
ardından önceden tasarlanan hafıza alanındaki verileri silmek için “M”
tuuna yaklaık olarak 5 saniye basılı tutun. Bataryalardan herhangi biri
çıkarılırsa veriler silinebilir. (Bataryaları deitirmeden veya çıkarmadan
önce kullanıcıların verileri tansiyon kayıt çizelgesine kaydetmelerini önerin.)
37
O'P)QC6)UVC
()*+,-#$./012+34€d:HmI$"User Switching"HmI$>™…678$9#$abc4•)‚• u+˜l
2+34€d:Hmn#$i¤7-+;$E"M" 6)-#K1i+#$678$9#$i¤6•/“/-#$wku"#$Š,-#¥"7j1†$/™>
¥j",4‰))01
w !"#$p$)"+;$."G()#$HmI.•;i¤wku"#$.u•,1—4)8r1
—4 !B-–#$ˆ•>1$«•wku"#$¦9‚>+)G
!"#$w5
Ž#$ˆ•E–p$)"+;$."G()#$HmI.u•,1pE)“€d:wku"#$.u•,+B$)B(uj#$.n3…$9#
w !"#$•
W0 "! /G$
\ MRP] MS MTURMN, QO ROQT U]
, M \ MRP] “M” ]\RN
T ], QO ]MT O R RMT ROQN U
. LO ] QOT O ]M MSQN U Q.
(\ MTURM UN M ]M Q
UT O ] } R RM.)
(M) 5
(
)

38
Time Adjustment
Press the “
“ key and “ ” to adjust the month. Then press the “
“ and “ ” in turn to adjust the date, hour, minute and confirm the entry.
Zeiteinstellung
Drücken Sie die Tasten “
“ und “ ”, um den Monat einzustellen.
Drücken Sie dann hintereinander die Tasten “
“ und “ ”, um jeweils
das Datum, die Stunde, die Minute einzustellen und die Einträge zu
bestätigen.
Réglage de l’heure
Appuyez sur la touché “
“ et sur “ ” pour régler le mois. Appuyez
ensuite tout à tour sur “
“ et “ ” pour régler la date, l’heure, les
minutes et confirmez la saisie.
Ajuste de la hora
Pulse la tecla “
“ y “ ” para ajustar el mes. A continuación, pulse
“
“ y “ ” por turnos para ajustar la fecha, hora, minutos y confirmar la
entrada.
39
Ajuste da hora
Pressione a tecla “
“ e “ ” para ajustar o mês. A seguir, pressione
“
“ e “ ” para ajustar a data, a hora, os minutos e confirmar a
entrada.
Ustawienie czasu
W celu ustawienia miesica nacisn_ przycisk “
“ i “ ”. Nastpnie
w celu ustawienia i potwierdzenia daty, godziny i minuty nacisn_ kolejno
przyciski “
" i "
”.
Regolazione dell’ora
Premere il tasto “ “ e “ ” per regolare il mese. Poi premere il tasto
“
“ e “ ” per regolare la data, l’ora ed i minuti e confermare
l'inserimento.
Tijdinstelling
Druk op de knop “
“ en “ ” om de maand in te stellen. Druk daarna
in volgorde op “
” en “ “ om de datum, het uur en de minuut in te
stellen en de invoer te bevestigen.
Saat Ayarlaması
Ay’ı deitirmek için “
“ key and “ ” tuuna basın. Ardından tarihi,
saati, dakikayı deitirmek için “
“ ve “ ” tuuna basın ve girdiiniz
deerleri onaylayın.
XYZ)[\9
d:HmI$i‚+34€® ®E® ¯7‡„#$H"n# —4.8€d:°#«)@BHmI$>™®®E®®
°#«)u8r1EjuG)#$E…:,#$E…D +#$H"n#vu17+#B
#$F ! FG
\R MRP “
“ “ ” ]R }. M ±,
\ “
“ “ ”, ]R ], , ]]
R RR.

40
Sicherheitshinweise
1. Das Gerät enthält Hochpräzisionsbauteile. Vermeiden Sie deshalb
extreme Temperaturen, Luftfeuchtigkeit und direktes Sonnenlicht.
Vermeiden Sie das Herunterfallen der Haupteinheit sowie starke
Stöße und schützen Sie diese vor Staub.
2. Undichte Batterien können das Gerät beschädigen. Entfernen Sie die
Batterien, wenn das Gerät für längere Zeit nicht benutzt wird.
3. Das Gerät darf nicht von Kindern bedient werden, um
Gefahrensituationen zu vermeiden.
4. Die Reparatur des J 401 darf nur durch Fachpersonal erfolgen.
Verwenden Sie kein Werkzeug, um das Gerät zu öffnen, und
versuchen Sie nicht, im Inneren des Gerätes Einstellungen
vorzunehmen. Falls Probleme auftreten, wenden Sie sich bitte an das
Geschäft oder den Arzt, bei dem Sie das J 401 gekauft haben, oder an
IBP GmbH.
5. Bei Benutzern mit Herzrhythmusstörungen (Vorhof- oder
Kammerextrasystole oder Vorhofflimmern), Diabetes,
Blutkreislaufschwäche, Nierenproblemen oder bei Benutzern, die
einen Schlaganfall erlitten haben oder bewusstlos sind, können
Probleme bei der genauen Bestimmung des Blutdrucks auftreten.
6. Reinigen Sie das Gehäuse des Blutdruckmessgeräts und die
Manschette sorgfältig mit einem leicht feuchten, weichen Tuch. Nicht
aufdrücken. Die Manschette darf nicht gewaschen oder mit
chemischen Reinigungsmitteln behandelt werden. Verwenden Sie
niemals Verdünner, Alkohol oder Benzin als Reinigungsmittel.
7. Sie können den Aufpumpvorgang jederzeit abbrechen, indem Sie die
Taste
drücken, und die Luft in der Manschette wird zügig
abgelassen.
8. Sobald beim
Aufpumpen 300 mm Hg erreicht werden, startet das
Gerät aus Sicherheitsgründen zügig den Ablassvorgang.
Hinweise:
Batterien sind Sondermüll.
Entsorgen Sie Batterien nicht mit dem Haushaltsmüll.
Schließen Sie die Batterie nicht kurz.
Werfen Sie die Batterie nicht ins Feuer.
ö ä
41
Cautionary Notes
1. The unit contains high-precision assemblies. Therefore, avoid
extreme temperatures, humidity, and direct sunlight. Avoid dropping
or strongly shocking the main unit, and protect it from dust.
2. Leaky batteries can damage the unit. Remove the batteries when the
unit is not used for a long time.
3. The unit should not be operated by children so to avoid hazardous
situations.
4. J401 is not field serviceable. You should not use any tool to open the
device nor should you attempt to adjust anything inside the device. If
you have any problems, please contact the store or the doctor from
whom you purchased J401 or please contact Rossmax International
Ltd.
5. For users diagnosed with common arrhythmia (atrial or ventricular
premature beats or atrial fibrillation), diabetes, poor circulation of
blood, kidney problems, or for users suffered from stroke, or for
unconscious users, the device may have difficulty in determining the
proper blood pressure.
6. Clean the blood pressure monitor body and the cuff carefully with a
slightly damp, soft cloth. Do not press. Do not wash the cuff or use
chemical cleaner on it. Never use thinner, alcohol or petrol (gasoline)
as cleaner.
7. To stop inflation at any time, press the
key, and the air in the cuff
will be rapidly exhausted.
8. Once the inflation reaches 300 mmHg, the unit will start deflating
rapidly for safety reason.
Notes:
Batteries are hazardous waste.
Do not dispose them together with the household garbage.
Sayfa yükleniyor...
Sayfa yükleniyor...
Sayfa yükleniyor...
Sayfa yükleniyor...

GARANTIE
___________________________________________________________________________
! "# # $
% & '
( ) * &+ ! &+ * , -. ) & , -. " -. + $
& & + &/- + - & ) & * & + & )
& ) + &
0 & &, / ' & + &+ &' &) & & , + * -.1 & )
& - )
( * /1 ' /1 . + & &
2 + - ) & &/ &' & * , -. )' & & , -. , ' .
' & ) &/ ( + , & + & & / + * - &&
* & ,
Afdanking en milieubescherming
& + & ' & 1 . + + & &' &
' + + - ) / & 1 + & 3
* & ' * & ' & - , ' &
! ) - * + & "
% , + * & , && . &, .' & ' + + / 1 )
), . , && . 1 + & 1 *
, ' /4 )) / &1 & / 5 5 # 6 /% 3
---, )
Sayfa yükleniyor...
-
 1
1
-
 2
2
-
 3
3
-
 4
4
-
 5
5
-
 6
6
-
 7
7
-
 8
8
-
 9
9
-
 10
10
-
 11
11
-
 12
12
-
 13
13
-
 14
14
-
 15
15
-
 16
16
-
 17
17
-
 18
18
-
 19
19
-
 20
20
-
 21
21
-
 22
22
-
 23
23
-
 24
24
-
 25
25
-
 26
26
-
 27
27


diğer dillerde
- español: IBP J401 El manual del propietario
- français: IBP J401 Le manuel du propriétaire
- italiano: IBP J401 Manuale del proprietario
- polski: IBP J401 Instrukcja obsługi
- Deutsch: IBP J401 Bedienungsanleitung
- português: IBP J401 Manual do proprietário
- English: IBP J401 Owner's manual
- Nederlands: IBP J401 de handleiding