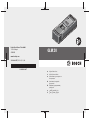
Bosch GLM 20 (601072) Kullanım kılavuzu
- Kategori
- Ölçme
- Tip
- Kullanım kılavuzu

GLM 20
Robert Bosch Power Tools GmbH
70538 Stuttgart
GERMANY
www.bosch-pt.com
1 609 92A 4JT (2018.09) O / 88
en Original instructions
tr Orijinal işletme talimatı
ru Оригинальное руководство по
эксплуатации
uk Оригінальна інструкція з
експлуатації
kk Пайдалану нұсқаулығының
түпнұсқасы
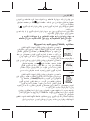
ar
fa
1 609 92A 4JT
GLM 20

English ..................................................... page 6
Türkçe..................................................... Sayfa 17
Русский............................................... Страница 29
Українська .............................................Сторінка 42
Қазақ ....................................................... Бет 53
................................................... 65
................................................... 78
2 |
1 609 92A 4JT | (05.09.2018) Bosch Power Tools

3 |
1 609 92A 4JT | (05.09.2018) Bosch Power Tools

4 |
1 609 92A 4JT | (05.09.2018) Bosch Power Tools
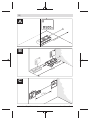
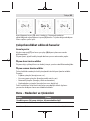
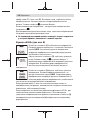
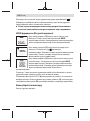
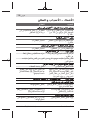
GLM 20
(2)
(1)
(e)
(c) (b)(d) (a)
(f)
(g)
(3)
(4)
(5)
(6)
(7)
(8)

5 |
1 609 92A 4JT | (05.09.2018) Bosch Power Tools
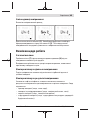
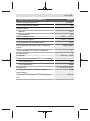
0,5 m
0,5
m
1,0
m
0
,5
m
A
B
C

6 | English
1 609 92A 4JT | (05.09.2018) Bosch Power Tools
English
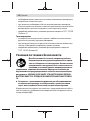
Safety instructions
All instructions must be read and observed in order for
the measuring tool to function safely. The safeguards in-
tegrated into the measuring tool may be compromised if
the measuring tool is not used in accordance with these
instructions. Never make warning signs on the measur-
ing tool unrecognisable. SAVE THESE INSTRUCTIONS FOR FUTURE REF-
ERENCE AND INCLUDE THEM WITH THE MEASURING TOOL WHEN
TRANSFERRING IT TO A THIRD PARTY.
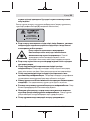
u Warning! If operating or adjustment devices other than those spe-
cified here are used or other procedures are carried out, this can lead
to dangerous exposure to radiation.
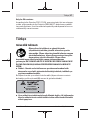
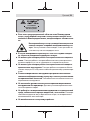
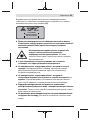
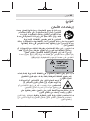
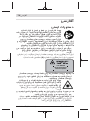
The measuring tool is delivered with a warning sign (marked in the illustra-
tion of the measuring tool on the graphics page with number (6)).
14
@
Laser Radiation
Do
not stare into beam
Class 2 laser product
u If the text on the warning label is not in your native language, cover it
with the label supplied, which is in your language, before initial com-
missioning.
Do not direct the laser beam at persons or animals and
do not look directly into the laser beam or at its reflec-
tion. Doing so could lead to blindless, or could cause acci-
dents or damage to the eyes.
u If laser radiation hits your eye, you must close your eyes and immedi-
ately turn your head away from the beam.
u Do not use the laser goggles as protective goggles. The laser goggles
make the laser beam easier to see; they do not protect you against laser
radiation.

u Do not use the laser goggles as sunglasses or while driving. The laser
goggles do not provide full UV protection and impair your ability to see
colours.
u Have the measuring tool serviced only by a qualified specialist using
only original replacement parts. This will ensure that the safety of the
measuring tool is maintained.
u Do not let children use the laser measuring tool unsupervised. They
could accidentally dazzle someone.
u Do not use the measuring tool in explosive atmospheres which con-
tain flammable liquids, gases or dust. Sparks may be produced inside
the measuring tool, which can ignite dust or fumes.
u Do not make any modifications to the laser equipment.
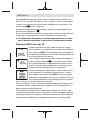
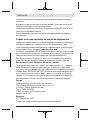
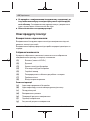
Product Description and Specifications
Intended Use
The measuring tool is intended for measuring distances, lengths, heights
and clearances.
The measuring tool is suitable for indoor and outdoor use.
Product features
The numbering of the product features shown refers to the illustration of the
measuring tool on the graphic page.
(1)
On/off button ("Hold" button)
(2)
Display
(3)
Battery compartment cover
(4)
Locking mechanism of the battery compartment cover
(5)
Serial number
(6)
Laser warning label
(7)
Reception lens
(8)
Laser beam output
Display elements
(a)
Battery warning
English | 7
Bosch Power Tools 1 609 92A 4JT | (05.09.2018)

8 | English
1 609 92A 4JT | (05.09.2018) Bosch Power Tools
(b)
Temperature warning
(c)
Laser switched on
(d)
Measurement stopped
(e)
Previous measured value
(f)
Unit of measurement
(g)
Current measured value
Technical Data
Digital laser measure GLM 20
Article number 3 601 K72 E..
Measuring range (typical) 0.15–20 m
A)
Measuring accuracy (typical) ± 3.0 mm
B)
Smallest display unit 1 mm
Measuring time
– typical 0.5 s
– maximum 4 s
Operating temperature -10 °C to +40 °C
Storage temperature -20 °C to +70 °C
Max. relative humidity 90%
Max. working height above reference height 2000 m
Degree of soiling in accordance with IEC 61010-1 2
C)
Laser class 2
Laser type 635 nm, < 1 mW
Laser beam diameter (at 25 °C) approx.
– 10 m distance 9 mm
– 20 m distance 18 mm
Batteries 2 x 1.5 V LR03 (AAA)
Battery life during measuring operation approx. 5 h
Weight according to EPTA-Procedure 01:2014 0.13 kg

Digital laser measure GLM 20
Dimensions 100 x 36 x 23 mm
A) The working range increases depending on how well the laser light is reflected
from the surface of the target (scattered, not reflective) and how bright the laser
point is relative to the ambient light intensity (interior spaces, twilight). In unfa-
vourable conditions, e.g. with extremely bright interior lighting or a poorly reflect-
ing surface, the measuring range may be reduced.
B) In unfavourable conditions, e.g. with extremely bright interior lighting, a poorly re-
flecting surface, or a room temperature that deviates significantly from 25 °C, the
maximum deviation can be up to ± 7 mm at 15 m. In favourable conditions, a devi-
ation influence of ± 0.05 mm/m needs to be taken into account.
C) non-conductive soiling only, whereby occasional temporary conductivity caused
by condensation is expected
The serial number (5) on the type plate is used to clearly identify your measuring tool.
Fitting
Inserting/Changing the Batteries
It is recommended that you use alkaline manganese batteries to operate the
measuring tool.
Push the locking mechanism (4) in the direction of the arrow to open the
battery compartment cover (3) and remove the battery compartment cover.
Insert the batteries. When inserting, pay attention to the correct polarity ac-
cording to the representation on the inside of the battery compartment.
When the battery symbol first appears on the display, measurements can
be made for approx. another 15 minutes. When the battery symbol flashes,
you have to replace the batteries because measurements are no longer pos-
sible.
Always replace all the batteries at the same time. Only use batteries from the
same manufacturer and which have the same capacity.
u Take the batteries out of the measuring tool when you are not using it
for a prolonged period of time. The batteries can corrode and self-dis-
charge during prolonged storage.
English | 9
Bosch Power Tools 1 609 92A 4JT | (05.09.2018)

10 | English
1 609 92A 4JT | (05.09.2018) Bosch Power Tools
Operation
Start-Up
u Never leave the measuring tool unattended when switched on, and
ensure the measuring tool is switched off after use. Others may be
dazzled by the laser beam.
u Protect the measuring tool from moisture and direct sunlight.
u Do not expose the measuring tool to any extreme temperatures or
variations in temperature. For example, do not leave it in a car for ex-
tended periods of time. In case of large variations in temperature, allow
the measuring tool to adjust to the ambient temperature before putting it
into operation. The precision of the measuring tool may be compromised
if exposed to extreme temperatures or variations in temperature.
u Avoid subjecting the measuring tool to violent jolts and falls. Always
check the measuring tool before continuing work if it has been subjected
to severe external influences (see "Checking the Measuring Tool",
page14).
Switching On/Off
To switch on the measuring tool, press the on/off button (1). When the
measuring tool is switched on, the laser beam is switched on. The laser sym-
bol flashes on the display.
To switch off the measuring tool, press and hold the on/off button (1) for at
least three seconds.
If no button on the measuring tool is pressed for approx. 5 mins, the measur-
ing tool will automatically switch itself off to preserve battery life.
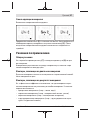
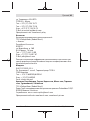
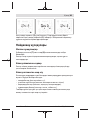
Measuring Process
A continuous measurement is performed after the measuring tool has been
switched on. Aim the laser beam at the target surface. The current measured
value (g) is shown on the bottom line of the display (see figure A). During
continuous measurement, the measuring tool can be moved relative to the
target and the current measured value (g) will be updated approx. every 0.5
seconds on the bottom line of the display (see figure B). You can, for ex-
ample, move a desired distance away from a wall while reading off the cur-
rent distance at all times. The laser symbol flashes on the display.

The rear edge of the measuring tool ( ) is the reference level for the meas-
urement.
In order to carry out a measurement of the distance between two walls, for
example, place the measuring tool with the rear edge touching the first wall.
u Do not direct the laser beam at persons or animals and do not stare
into the laser beam yourself (even from a distance).
"Hold" Function (see figure B)
Press the on/off button (1) to stop the measuring process.
The laser beam is switched off and the Hold indicator ap-
pears on the display. The current measured value will con-
tinue to be shown in the bottom line of the display, but it
will no longer be continuously updated.
Press the on/off button (1) again to switch the laser back
on. The laser symbol flashes on the display. The pre-
vious measured value is displayed in the top line. The con-
tinuously updated/current measured value will be shown in
the bottom line.
Press the on/off button (1) again to stop the measuring pro-
cess again. The laser beam is switched off and the Hold in-
dicator appears on the display. The previous measured
value is displayed in the top line. The current measured
value will be shown in the bottom line, but it will no longer
be continuously updated.
If no button on the measuring tool is pressed for approx. 5 mins, the measur-
ing tool will automatically switch itself off to preserve battery life.
If a measured value has been held using the "Hold" function, it will be re-
tained if the tool switches off automatically. Once the measuring tool has
been switched on again by pressing the on/off button (1), the previous
measured value (e) is shown in the top line of the display.
Changing the Unit of Measurement
Switch the measuring tool off.
English | 11
Bosch Power Tools 1 609 92A 4JT | (05.09.2018)

12 | English
1 609 92A 4JT | (05.09.2018) Bosch Power Tools
Hold down the on/off button (1). When the required unit of measure is dis-
played, release the on/off button (1). After releasing, the measuring tool
switches itself on with the selected setting.
Practical Advice
General Advice
The reception lens (7) and the laser beam output (8) must not be covered
during the measuring process.
The measurements are taken at the centre of the laser beam, even when the
laser is pointed at surfaces diagonally.
Influences on the Measuring Range
The measuring range depends on the lighting conditions and the reflective
properties of the target surface.
Influences on the Measurement Result
Due to physical effects, the possibility of inaccurate measurements when
measuring various surfaces cannot be excluded. These include:
– Transparent surfaces (e.g. glass, water)
– Reflective surfaces (e.g. polished metal, glass)
– Porous surfaces (e.g. insulating materials)
– Structured surfaces (e.g. roughcast, natural stone).
Layers of air at different temperatures and indirectly received reflections
can also influence the measured value.

Errors – Causes and Corrective Measures
Cause Corrective measures
Temperature warning(b) flashes, measurement not possible.
Measuring tool is outside of the oper-
ating temperature range of -10°C to
+40°C.
Wait until the measuring tool has
reached operating temperature.
The battery warning (a) appears
The battery voltage is weakening
(measuring is still possible).
Change the batteries
The battery warning (a) is flashing, measuring is not possible
Battery voltage too low Change the batteries
"−−−−" indicator appears on the display
The measuring tool was moved too
quickly.
Move the measuring tool more
slowly.
The measuring object is outside of
the range of the laser beam.
Go closer to the measuring object.
All indicators on the display are flashing
The measuring tool is faulty. Contact customer service
The laser beam output (8) and/or re-
ception lens (7) are fogged up (e.g.
due to a rapid temperature change).
Wipe the laser beam output (8) and/
or reception lens (7) dry with a soft
cloth.
"Err" indicator appears after the on/off button is pressed
Measuring result is unreliable
Target surface reflection not distinct
(e.g. water, glass).
Cover the target surface.
Laser beam output (8) and/or recep-
tion lens (7) are covered.
Keep the laser beam output (8) and/
or reception lens (7) clear.
Measurement result implausible
Obstruction in the path of the laser
beam.
Laser point must be fully on the tar-
get surface.
English | 13
Bosch Power Tools 1 609 92A 4JT | (05.09.2018)

14 | English
1 609 92A 4JT | (05.09.2018) Bosch Power Tools
The measuring tool monitors for correct operation in every measurement. If
a defect is detected, all indicators on the display will flash. In this case, or if
you are unable to rectify an error using the corrective measures above, send
the measuring tool to Bosch customer service via your dealer.
Checking the Measuring Tool
You can check the accuracy of the measuring tool as follows:
– Choose a measuring section of approx. 1–10 m in length that is perman-
ently unchanged, the exact length of which is known to you (e.g. room
width, door opening). The measuring section must be indoors, and the
target surface of the measurement must be smooth and reflect well.
– Measure the section ten times in succession.
The deviation of the individual measurements from the mean value must not
exceed ± 1.6 mm over the entire measuring section in favourable condi-
tions. Record the measurements in order to be able to compare the accuracy
at a later date.
Maintenance and Servicing
Maintenance and Cleaning
Keep the measuring tool clean at all times.
Never immerse the measuring tool in water or other liquids.
Wipe off any dirt using a damp, soft cloth. Do not use any detergents or
solvents.
Take particular care of the reception lens (7), which must be handled with
the same level of care you would give to a pair of glasses or a camera lens.
Send in the measuring tool if it requires repair.
After-sales service and advice on using products
Our after-sales service responds to your questions concerning maintenance
and repair of your product as well as spare parts. You can find explosion
drawings and information on spare parts at: www.bosch-pt.com
The Bosch product use advice team will be happy to help you with any ques-
tions about our products and their accessories.
In all correspondence and spare parts orders, please always include the
10‑digit article number given on the nameplate of the product.

Great Britain
Robert Bosch Ltd. (B.S.C.)
P.O. Box 98
Broadwater Park
North Orbital Road
Denham Uxbridge
UB 9 5HJ
At www.bosch-pt.co.uk you can order spare parts or arrange the collection
of a product in need of servicing or repair.
Tel. Service: (0344) 7360109
E-Mail: [email protected]
Ireland
Origo Ltd.
Unit 23 Magna Drive
Magna Business Park
City West
Dublin 24
Tel. Service: (01) 4666700
Fax: (01) 4666888
Australia, New Zealand and Pacific Islands
Robert Bosch Australia Pty. Ltd.
Power Tools
Locked Bag 66
Clayton South VIC 3169
Customer Contact Center
Inside Australia:
Phone: (01300) 307044
Fax: (01300) 307045
Inside New Zealand:
Phone: (0800) 543353
Fax: (0800) 428570
Outside AU and NZ:
Phone: +61 3 95415555
www.bosch-pt.com.au
www.bosch-pt.co.nz
English | 15
Bosch Power Tools 1 609 92A 4JT | (05.09.2018)

16 | English
1 609 92A 4JT | (05.09.2018) Bosch Power Tools
Republic of South Africa
Customer service
Hotline: (011) 6519600
Gauteng – BSC Service Centre
35 Roper Street, New Centre
Johannesburg
Tel.: (011) 4939375
Fax: (011) 4930126
E-mail: [email protected]
KZN – BSC Service Centre
Unit E, Almar Centre
143 Crompton Street
Pinetown
Tel.: (031) 7012120
Fax: (031) 7012446
E-mail: [email protected]
Western Cape – BSC Service Centre
Democracy Way, Prosperity Park
Milnerton
Tel.: (021) 5512577
Fax: (021) 5513223
E-mail: [email protected]
Bosch Headquarters
Midrand, Gauteng
Tel.: (011) 6519600
Fax: (011) 6519880
E-mail: [email protected]
Disposal
Measuring tools, accessories and packaging should be recycled in an envir-
onmentally friendly manner.
Do not dispose of measuring tools or batteries with household
waste.

Only for EU countries:
According to the Directive 2012/19/EU, measuring tools that are no longer
usable, and according to the Directive 2006/66/EC, defective or used bat-
tery packs/batteries, must be collected separately and disposed of in an en-
vironmentally correct manner.
Türkçe
Güvenlik talimatı
Ölçme cihazı ile tehlikesiz ve güvenli biçimde
çalışabilmek için bütün güvenlik talimatı ve uyarılar
okunmalıdır. Ölçme cihazı bu güvenlik talimatına uygun
olarak kullanılmazsa, ölçme cihazına entegre koruyucu
donanımların işlevi kısıtlanabilir. Ölçme cihazı
üzerindeki uyarı etiketlerini hiçbir zaman görünmez duruma
getirmeyin. BU TALİMATLARI İYİ VE GÜVENLİ BİR YERDE SAKLAYIN VE
ÖLÇME CİHAZINI BAŞKASINA VERDİĞİNİZDE BUNLARI DA BİRLİKTE
VERİN.
u Dikkat – Burada anılan kullanım ve ayar donanımlarından farklı
donanımlar veya farklı yöntemler kullanıldığı takdirde, tehlikeli ışın
yayılımına neden olunabilir.
Bu ölçme cihazı bir uyarı etiketi ile teslim edilir (ölçme cihazının resminin
bulunduğu grafik sayfasında (6) numara ile gösterilmektedir).
14
@
Laser Radiation
Do
not stare into beam
Class 2 laser product
u Uyarı etiketi üzerindeki metin kendi dilinizde değilse, ilk kullanımdan
önce bu etiketin üzerine aletle birlikte teslim edilen kendi dilinizdeki
etiketi yapıştırın.
Türkçe | 17
Bosch Power Tools 1 609 92A 4JT | (05.09.2018)

18 | Türkçe
1 609 92A 4JT | (05.09.2018) Bosch Power Tools
Lazer ışınını başkalarına veya hayvanlara doğrultmayın
ve doğrudan gelen veya yansıyan lazer ışınına
bakmayın. Aksi takdirde başkalarının gözünü
kamaştırabilir, kazalara neden olabilir veya gözlerde hasara
neden olabilirsiniz.
u Lazer ışını gözünüze gelecek olursa gözlerinizi bilinçli olarak kapatın
ve hemen başınızı başka tarafa çevirin.
u Lazer gözlüğünü koruyucu gözlük olarak kullanmayın. Lazer gözlüğü
lazer ışınının daha iyi görülmesini sağlar, ancak lazer ışınına karşı koruma
sağlamaz.
u Lazer gözlüğünü güneş gözlüğü olarak veya trafikte kullanmayın.
Lazer gözlü kızılötesi ışınlara karşı tam bir koruma sağlamaz ve renk
algılama performansını düşürür.
u Ölçme cihazının sadece kalifiye uzman personel tarafından ve orijinal
yedek parçalarla onarılmasını sağlayın. Bu sayede ölçme cihazının
güvenliğini sağlarsınız.
u Çocukların kontrolünüz dışında lazerli ölçme cihazını kullanmasına
izin vermeyin. Çocuklar istemeden de olsa başkalarının gözlerini
kamaştırabilir.
u Ölçme cihazı ile içinde yanıcı sıvılar, gazlar veya tozlar bulunan
patlama riski bulunan ortamlarda çalışmayın. Ölçme cihazı içinde tozu
veya buharları tutuşturabilecek kıvılcımlar oluşabilir.
u Lazer donanımında hiçbir değişiklik yapmayın.
Ürün ve performans açıklaması
Usulüne uygun kullanım
Bu ölçme cihazı uzaklıkların, uzunlukların, yüksekliklerin ve mesafelerin
ölçülmesi için tasarlanmıştır.
Bu ölçme cihazı kapalı mekanlarda ve açık havada kullanılmaya uygundur.
Şekli gösterilen elemanlar
Şekli gösterilen elemanların numaraları ile grafik sayfasındaki ölçme cihazı
resmindeki numaralar aynıdır.
(1)
Açma/kapama tuşu („Hold“ tuşu)

(2)
Ekran
(3)
Batarya gözü kapağı
(4)
Batarya gözü kapağı kilidi
(5)
Seri numarası
(6)
Lazer uyarı etiketi
(7)
Algılama merceği
(8)
Lazer ışını çıkış deliği
Gösterge elemanları
(a)
Batarya uyarısı
(b)
Sıcaklık uyarısı
(c)
Lazer açık
(d)
Ölçme işlemi durduruldu
(e)
Bir önceki ölçme değeri
(f)
Ölçme birimi
(g)
Güncel ölçme değeri
Teknik veriler
Dijital lazerli uzaklık ölçer GLM 20
Ürün kodu 3601K72E..
Ölçme aralığı (tipik) 0,15-20 m
A)
Ölçme hassaslığı (tipik) ±3,0 mm
B)
En küçük gösterge birimi 1 mm
Ölçme süresi
– Tipik 0,5 s
– Maksimum 4 s
İşletme sıcaklığı –10 °C ... +40 °C
Saklama sıcaklığı –20 °C ... +70 °C
Nispi hava nemi, maks. 90 %
Referans yükseklik üzerinde maks. uygulama
yüksekliği
2000 m
Türkçe | 19
Bosch Power Tools 1 609 92A 4JT | (05.09.2018)

20 | Türkçe
1 609 92A 4JT | (05.09.2018) Bosch Power Tools
Dijital lazerli uzaklık ölçer GLM 20
IEC 61010-1 uyarınca kirlenme derecesi 2
C)
Lazer sınıfı 2
Lazer tipi 635nm, <1 mW
Lazer ışını çapı (25°C'de) yak.
– 10m uzaklıkta 9mm
– 20m uzaklıkta 18mm
Bataryalar 2 x 1,5 V LR03 (AAA)
Ölçme işletmesinde bataryaların yaklaşık kullanım
ömrü
5 h
Ağırlığı EPTA-Procedure 01:2014 uyarınca 0,13 kg
Ölçüleri 100 x 36 x 23 mm
A) Lazer ışını hedef yüzeyden ne kadar iyi geri döndürülürse (dağılımlı olarak,
yansıtmalı değil) ve ortam aydınlığına göre lazer noktası ne kadar parlaksa (iç
mekanlar, alaca karanlık) , erişim uzaklığı da o kadar büyük olur. Elverişsiz
koşullarda, örneğin çok güçlü mekan aydınlatmasında veya yüzeydeki kötü
yansıtma özelliğinde ölçme aralığı sınırlı olabilir.
B) Elverişsiz koşullarda, örneğin çok güçlü mekan aydınlatmasında veya yüzeydeki
kötü yansıtmada veya 25°C'den çok fazla sapma gösteren mekan sıcaklığında
maksimum sapma 15 m'de ±7mm olabilir. Elverişsiz koşullarda ±0,05mm/m'lik
bir etki beklenebilir.
C) Sadece iletken olmayan kirler için, ancak geçici yoğunlaşma sonucu iletkenlik
beklenebilir
Tip etiketi üzerindeki seri numarası (5) ölçme cihazınızın kimliğinin belirlenmesine
yarar.
Montaj
Bataryaların takılması/değiştirilmesi
Bu ölçme cihazının alkali mangan bataryalarla çalıştırılması tavsiye olunur.
Batarya gözü kapağını (3) açmak için kilidi (4) ok yönünde bastırın ve
batarya gözü kapağını çıkarın. Bataryaları yerlerine yerleştirin. Batarya
gözünün iç tarafındaki şekle bakarak doğru kutuplama yapın.
Ekranda batarya sembolü ilk kez göründükten sonra yaklaşık 15 dakika
daha ölçme yapılabilir. Batarya sembolü yanıp sönmeye başladığında
bataryaları değiştirmeniz gerekir, artık ölçme yapamazsınız.
Sayfa yükleniyor...
Sayfa yükleniyor...
Sayfa yükleniyor...
Sayfa yükleniyor...
Sayfa yükleniyor...
Sayfa yükleniyor...
Sayfa yükleniyor...
Sayfa yükleniyor...
Sayfa yükleniyor...
Sayfa yükleniyor...
Sayfa yükleniyor...
Sayfa yükleniyor...
Sayfa yükleniyor...
Sayfa yükleniyor...
Sayfa yükleniyor...
Sayfa yükleniyor...
Sayfa yükleniyor...
Sayfa yükleniyor...
Sayfa yükleniyor...
Sayfa yükleniyor...
Sayfa yükleniyor...
Sayfa yükleniyor...
Sayfa yükleniyor...
Sayfa yükleniyor...
Sayfa yükleniyor...
Sayfa yükleniyor...
Sayfa yükleniyor...
Sayfa yükleniyor...
Sayfa yükleniyor...
Sayfa yükleniyor...
Sayfa yükleniyor...
Sayfa yükleniyor...
Sayfa yükleniyor...
Sayfa yükleniyor...
Sayfa yükleniyor...
Sayfa yükleniyor...
Sayfa yükleniyor...
Sayfa yükleniyor...
Sayfa yükleniyor...
Sayfa yükleniyor...
Sayfa yükleniyor...
Sayfa yükleniyor...
Sayfa yükleniyor...
Sayfa yükleniyor...
Sayfa yükleniyor...
Sayfa yükleniyor...
Sayfa yükleniyor...
Sayfa yükleniyor...
Sayfa yükleniyor...
Sayfa yükleniyor...
Sayfa yükleniyor...
Sayfa yükleniyor...
Sayfa yükleniyor...
Sayfa yükleniyor...
Sayfa yükleniyor...
Sayfa yükleniyor...
Sayfa yükleniyor...
Sayfa yükleniyor...
Sayfa yükleniyor...
Sayfa yükleniyor...
Sayfa yükleniyor...
Sayfa yükleniyor...
Sayfa yükleniyor...
Sayfa yükleniyor...
Sayfa yükleniyor...
Sayfa yükleniyor...
Sayfa yükleniyor...
-
 1
1
-
 2
2
-
 3
3
-
 4
4
-
 5
5
-
 6
6
-
 7
7
-
 8
8
-
 9
9
-
 10
10
-
 11
11
-
 12
12
-
 13
13
-
 14
14
-
 15
15
-
 16
16
-
 17
17
-
 18
18
-
 19
19
-
 20
20
-
 21
21
-
 22
22
-
 23
23
-
 24
24
-
 25
25
-
 26
26
-
 27
27
-
 28
28
-
 29
29
-
 30
30
-
 31
31
-
 32
32
-
 33
33
-
 34
34
-
 35
35
-
 36
36
-
 37
37
-
 38
38
-
 39
39
-
 40
40
-
 41
41
-
 42
42
-
 43
43
-
 44
44
-
 45
45
-
 46
46
-
 47
47
-
 48
48
-
 49
49
-
 50
50
-
 51
51
-
 52
52
-
 53
53
-
 54
54
-
 55
55
-
 56
56
-
 57
57
-
 58
58
-
 59
59
-
 60
60
-
 61
61
-
 62
62
-
 63
63
-
 64
64
-
 65
65
-
 66
66
-
 67
67
-
 68
68
-
 69
69
-
 70
70
-
 71
71
-
 72
72
-
 73
73
-
 74
74
-
 75
75
-
 76
76
-
 77
77
-
 78
78
-
 79
79
-
 80
80
-
 81
81
-
 82
82
-
 83
83
-
 84
84
-
 85
85
-
 86
86
-
 87
87


