PROFILO VS6PT Series Instructions For Use Manual
- Kategori
- Elektrikli süpürgeler
- Tip
- Instructions For Use Manual

VS6PT...
Kullanma kılavuzu
Instructions for use
Инструкция по эксплуатации
Gebrauchsanweisung
tr
en
ru
de
ar

tr Kullanım kılavuzu . . . . . . . . . . . . . . . . . . . . . . . . . . . . . . . . . . . . . . . . . . . . .1
en Instruction manual . . . . . . . . . . . . . . . . . . . . . . . . . . . . . . . . . . . . . . . . . . .5
ru Инструкция по эксплуатации . . . . . . . . . . . . . . . . . . . . . . . . . . . . . . . . . . .9
de Gebrauchsanweisung . . . . . . . . . . . . . . . . . . . . . . . . . . . . . . . . . . . . . . . .13
21 . . . . . . . . . . . . . . . . . . . . . . . . . . . . . . . . . . . . . . . . . . . . ar

10*
16
14
a
12*
bc
11
13*
15

10*
16
14
a
12*
bc
11
13*
15

a
18*
b
18*
20 ba
17
21
19

22*
23*
24*

EF
B C D
G
Typ G
5* 6
19* 1718 16 1415
1*
1*
2*
12
13
11
9
10
7* 8*
4*
3*

Bu ürünün tasarımı çevre dostudur.
Tüm plastik parçalar yeniden değerlendirme için işaretlenmiştir.
The design of this product is environmentally friendly.
All plastic parts are marked for recycling.
Конструкция прибора не наносит вреда окружающей среде. Все пластиковые
детали подлежат повторной переработке.
Das Design dieses Produkts ist umweltfreundlich.
Alle Kunststoffteile sind zur Wiederverwertung gekennzeichnet.

A
GA 9000 647 161 A
03/11

1
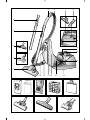
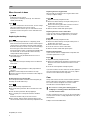
Cihaz açıklaması
1 Aç∂l∂r-kapan∂r süpürme baµl∂π∂*
2 Sert zemin aπz∂*
3 Sürgü düπmeli teleskopik boru*
4 Sürgü manµetli teleskopik boru*
5 Hortum tutamaπ∂*
6 Emiµ hortumu
7 Koltuk-Döµeme ünitesi*
8 Dar aral∂k temizleme ünitesi*
9 Park yard∂m∂
10 Ωebeke baπlant∂ kablosu
11 Üfleme (egzoz) filtresi
12 Elektronik emme gücü düzenleyicisine
sahip açma/kapama düπmesi
13 Motor koruma filtresi, y∂kanabilir
14 Yerleµtirme yard∂m∂ (cihaz∂n alt taraf∂nda)
15 Filtre torbas∂
16 Toz haznesi kapaπ∂
17 Taµ∂ma kollar∂ (ön ve arka tarafta)
18 Üfleme kafesi
19 Filtre deπiµtirme göstergesi*
*cihaz donan∂m∂na baπl∂d∂r
EEE Yönetmeliπine Uygundur
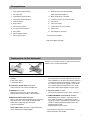
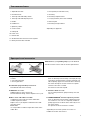
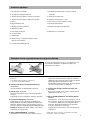
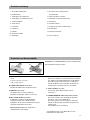
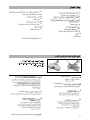
Yedek parçalar ve Özel Aksesuarlar
Ip kaldırıcı (1) ve parlatma șeritleri (2) yetkili servislerden temin
edilebilir ve bu servislerde de ˘giștirilebilir.
2
1
1
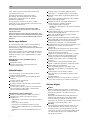
A Yedek filtre paketi VZ51PT1AFG
çindekiler:
5 filtre torbas∂, kilit ile
1 mikro-hijyen filtresi
B Tekstil filtresi (Sürekli filtre) VZ10PT0TFG*
Dokuma kilitli (cırt cırtlı) tekrar kullanılabilir filtre.
C HEPA Filtre VZ153HFB*
Üflenen havan∂n daha temiz olmas∂ için ek filtre.
Alerjik insanlar için tavsiye edilir. Y∂lda bir deπiµtirin.
D Mikro-Aktif Karbon Filtresi VZ192MAF *
Mikro ve aktif karbon filtresinin kombinasyonu. Uzun süre,
kötü kokular∂ önler. Yar∂m senede bir deπiµtirilmelidir.
Karbon filtresi çerçevesini mikro filtre tutucu
çerçevesi ile deπiµtiriniz.
Lütfen dikkat ediniz! "Hepa-filtre" + "Mikro-Aktif karbon
filtresi" kombinasyonu mümkün deπildir.
E TURBO-UNIVERSAL®F∂rça VZ102TBB*
K∂sa tüylü hal∂lar∂n, zemin hal∂ kaplamalar∂n∂n veya tüm
zemin kaplamalar∂n∂n, bir iµlem kapsam∂nda f∂rçalanmas∂
ve emilerek temizlenmesi için kullan∂l∂r. Özellikle hayvan
tüy ve k∂llar∂n∂ temizlemek için uygundur. F∂rçal∂ merda
nesi, elektrikli süpürgenin emdiπi havan∂n ak∂µ∂ üzerin
den hareket ettirilir. Elektrik baπlant∂s∂na gerek yoktur.
F Sert zemin ünitesi VZ123HD*
Düz zeminlerin süpürülmesi (parke, fayans, terracotta,...)
G TURBO-UNIVERSAL
®
f∂rça Yast∂k için VZ46001*
Minderli mobilyalar∂n, yataklar∂n, araç koltuklar∂n∂n v.s.
tek aµamada f∂rçalanmas∂ ve süpürülmesi. Özellikle
hayvan tüy ve k∂llar∂n∂ temizlemek için uygundur. F∂rçal∂
merdanesi, elektrikli süpürgenin emdiπi havan∂n ak∂µ∂
üzerinden hareket ettirilir.
Elektrik baπlant∂s∂na gerek yoktur.
*Cihaz donan∂m∂na baπl∂ olarak, özel aksesuarlar
yetkili servisimizden sat∂n al∂nabilir.

2
tr
Profilo VS6PT serisi bir elektrikli süpürge almaya karar
vermeniz bizi memnun etti.
Bu kullanım kılavuzunda çeşitli VS6PT modelleri
gösterilmiştir. Bu nedenle açıklanan tüm donanım
özelliklerinin ve fonksiyonların sizin modelinizde
bulunmaması mümkündür.
En iyi performansı elde etmek için sadece elektrikli
süpürgeniz için özel olarak geliştirilmiş olan orijinal Profilo
aksesuarlarını kullanmalısınız.
Kullanma k∂lavuzunu lütfen itinayla muhafaza ediniz.
Cihaz∂ baµka birisine verecek olursan∂z, lütfen kullanma
k∂lavuzunu da veriniz.
Kullan∂m k∂lavuzlar∂ bir çok model için yap∂lmaktad∂r. Sizin
cihaz∂n∂z ile kullan∂m k∂lavuzu özellik detaylar∂nda farkl∂l∂klar
olabilir. Lütfen cihaz∂n∂z∂n teknik özelliklerine dikkat ederek
okuyunuz.
Amaca uygun kullanım
Bu elektrikli süpürge sadece evdeki normal kullanım için
tasarlanmıştır ve ticari kullanım için uygun değildir.
Elektrikli süpürgeyi daima bu kullanma kılavuzundaki bilgiler
doğrultusunda kullanınız.
Amaca uygun olmayan veya hatalı kullanımdan kaynaklanan
muhtemel hasarlardan üretici sorumlu değildir ve sorumlu
tutulamaz. Bu nedenle, lütfen aşağıdaki bilgilere kesinlikle
dikkat ediniz!
Elektrikli süpürge sadece aşağıdaki parçalar ile
kullanılmalıdır:
Orijinal filtre torbası
Orijinal yedek parçalar, orijinal aksesuarlar veya
orijinal özel aksesuarlar
Güvenlik bilgileri
Bu elektrikli süpürge, geçerli teknik kurallara ve bilinen
güvenlik mevzuatına uygundur.
Elektrikli süpürgeyi sadece tip levhasındaki gibi takıp
kullanınız.
Asla filtre torbasız süpürmeyiniz.
=> Cihaz zarar görebilir!
Çocukların elektrikli süpürgeyi sadece gözetim altında
kullanmalarına izin veriniz.
Bu cihaz, fiziksel, algısal veya zihinsel yetersizlikleri olan
kişiler tarafından (çocuklar dahil), sorumlu kişilerin
gözetimi olmaksızın kullanılamaz.
Elektrikli süpürge şunlar için kullanılamaz:
İnsanların veya hayvanların bu cihaz ile temizlenmesi
Aşağıdaki cisim, madde veya pisliklerin emilerek
temizlenmesi:
– Sağlığa zararlı, keskin kenarlı, sıcak veya kor halindeki
maddeler
– Nemli, ıslak veya sıvı maddeler
– Kolay alevlenen veya patlayıcı maddeler ve gazlar.
– Merkezi ısıtma tesisatlarındaki ve çini sobalardaki kül
ve kurumlar
– Yazıcılardan veya fotokopi makinalarından çıkan toner
tozu.
Tutamağı, üniteyi ve boruyu baş yakınında tutarak
süpürmeyiniz. => Yaralanma tehlikesi söz konusudur!
Süpürürken cihazı sağlam ve güvenli bir altlığın üzerine
koyunuz.
Merdivenlerde süpürürken cihaz daima, cihazı kullanan
kişinin alt tarafında durmalıdır.
Aşağıdaki durumlarda cihaz derhal durdurulmalı ve
müşteri hizmetleri ile irtibata geçilmelidir:
– Elektrik bağlantı kablosu hasarlıysa.
– Yanlışlıkla sıvı süpürdüyseniz veya cihazın iç kısımlarına
sıvı girdiyse
– Cihaz yere düştüyse.
Elektrik bağlantı kablosunu, elektrikli süpürgeyi taşıma/
nakletme amacıyla kullanmayınız.
Birkaç saat sürekli çalıştırdıysanız şebeke bağlantı
kablosunu tamamen çekiniz.
Elektrik fişi prizden çıkarılacağı zaman, elektrik bağlantı
kablosundan değil, fişin kendisinden tutulup çekilmelidir.
Elektrik bağlantı kablosu keskin kenarlar üzerinden
çekilmemeli ve herhangi bir yere sıkıştırılmamalıdır.
Elektrikli süpürgede ve aksesuarlarında herhangi bir işlem
yapılmadan önce, elektrik fişi prizden çekilip
çıkarılmalıdır.
Elektrikli süpürgede herhangi bir hasar varsa kesinlikle
çalıştırmayınız. Bir arıza söz konusu olduğu zaman,
elektrik fişini prizden çekip çıkarınız.
Tehlikelerden korunmak için tamir işlemleri ve elektrikli
süpürge üzerindeki yedek parça değişiklikleri sadece
yetkili müşteri hizmetleri tarafından uygulanmalıdır.
Elektrikli süpürgeyi yağış, nem ve ısı kaynaklarından
koruyunuz.
Elektrikli süpürge inşaat alanında kullanıma uygun
değildir. => Hafriyatın süpürülmesi cihaza zarar verebilir.
Süpürmediğinizde cihazı kapatınız.
Eski ve artık kullanılmayacak olan cihazlar derhal
kullanılamaz hale getirilmeli ve gerektiği şekilde imha
edilmelidir.
Plastik torbalar ve folyolar küçük çocukların
ulaşamayacakları yerlerde muhafaza edilmeli ve imha
edilmelidir
(Boğulma tehlikesi).
Filtre (filtre torbası, motor koruma filtresi, toz filtresi vs.)
üzerine yanıcı veya alkol içeren maddeler dökmeyiniz.
Giderme bilgileri
Ambalaj
Ambalaj, elektrikli süpürgenin nakliye esnasında zarar
görmesini önlemektedir. Ambalaj çevreye zarar vermeyen
malzemelerden ibarettir ve bu nedenle tekrar geri
kazanılabilir.
Almanya'da artık kullanılmayan ambalaj malzemelerini,
»Grüner Punkt« adını taşıyan yeniden değerlendirme
sisteminin toplama merkezlerine gönderiniz. Kendi
ülkenizde bu cins merkezler varsa, ambalaj malzemelerinizi
bu merkezlere göndermenizi tavsiye ederiz.
Eski cihaz
Eski cihazlar birçok değerli malzemeler ihtiva eder. Bu
sebeple kullanılmış cihazınızı satıcınıza veya bir geri
dönüşüm merkezine geri dönüştürülmesi için teslim
ediniz. Güncel giderme yöntemleri hakkında bilgi almak
için, lütfen yetkili satıcınıza veya oturduğunuz bölge
belediyesine başvurunuz.

3
tr
Filtrelerin ve filtre torbalarının imha edilmesi
Filtreler ve filtre torbaları çevreye zarar vermeyen
malzemelerden üretilmiştir. Ev atıklarına katılmaları yasak
olan maddeler içermedikleri sürece, normal ev atıkları ile
birlikte imha edilebilirler.
!
Lütfen dikkat
Şebeke prizi en az 16 A sigorta ile emniyete alınmış
olmalıdır.
Cihazın açılması esnasında sigorta devreye girmişse, bu
durum yüksek bağlantı değerine sahip başka elektrikli
cihazların aynı devreye bağlanmış olmasından kaynaklanıyor
olabilir.
Cihazı açarken en düşük güç kademesini ayarlayarak ve güç
kademesini sonradan artırarak sigortanın devreye girmesini
engelleyebilirsiniz.
Elektrik süpürgenizi daha verimli kullanabilmeniz için:
Elektrikli süpürgeniz için her zaman orijinal yedek parça,
aksesuar veya özel aksesuarlar kullannz.
Optimum verimlilik için; motor koruma filtresi ve hava
çkş filtresini kullanma klavuzunda belirtildiği gibi düzenli
olarak temizleyiniz ve değiştiriniz.
Süpürülecek yerin tipine göre motor gücünü ayarlaynz.
Bu cihazlar ev tipi kullanma uygundur, endüstriyel (sanayi
tipi) kullanma uygun değildir.
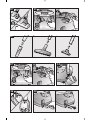
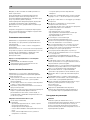
Lütfen resimli sayfalar∂ aç∂n∂z!
∑lk kullan∂mdan önce
Resim
Tutamaπ∂ emme hortumuna tak∂n∂z ve oturtunuz.
Resim
Aral∂k ünitesini ve minder ünitesini resimde gösterilen
µekilde aksesuar boµluπuna itiniz.
Çal∂µt∂r∂lmas∂
Resim
a) Emme hortumu boπaz∂n∂ kapaktaki emme boµluπuna
yerleµtiriniz.
b) Emiµ hortumu ç∂kar∂l∂rken, iki kilit dili bast∂r∂lmal∂ ve
hortum çekilerek d∂µar∂ ç∂kar∂lmal∂d∂r.
Resim
Tutamaπ∂ emme borusuna / teleskopik boruya itiniz.
Baπlant∂y∂ çözmek için tutamaπ∂ hafifçe çevirerek borudan
çekiniz.
4*
3
2*
1*
Resim
Emme borusunu / teleskopik boruyu zemin ünitesinin
boπaz∂na tak∂n∂z.
Baπlant∂y∂ çözmek için boruyu hafifçe çevirerek zemin
ünitesinden çekiniz.
Resim
Sürgü düπmesi / Sürgü manµeti ok iµareti yönünde
deπiµtirerek, teleskopik borunun kilidi çözülmeli ve
istenilen uzunluk ayarlanmal∂d∂r.
Resim
Ωebeke baπlant∂ kablosunu fiµten tutun, istediπiniz
uzunluπa kadar çekin µebeke fiµini tak∂n.
Resim
Elektrikli süpürgeyi açma / kapama düπmesini ok
yönünde hareket ettirerek açabilir / kapatabilirsiniz..
Resim
Emme gücünü açma/ kapama tuµunu ok yönünde
çevirerek ayarlayabilirsiniz.
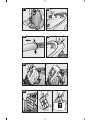
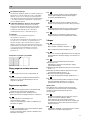
Emerek temizleme
Resim
Zemin süpürme ünitesinin ayarlanmas∂:
䡲
Hal∂lar ve Hal∂ kaplamalar∂ =>
䡲
Düz zeminler =>
Resim
Minder ünitesini ve aral∂k ünitesini resimde gösterilen
µekilde aksesuar boµluπundan al∂n∂z.
Resim
Ek aksesuar ile süpürme
Üniteyi ihtiyac∂n∂za göre emme borusuna veya tutamaπa
tak∂n:
a) Aral∂klar∂n ve köµelerin v.s. süpürülmesi için aral∂k ünitesi.
b)Minderli mobilyalar∂n, perdelerin v.s. temizlenmesi için
minder ünitesi.
c) Mobilya f∂rças∂
Pencere çerçevelerinin, dolaplar∂n, çerçevelerin vs.
temizlenmesi için
Resim
Aral∂k ünitesini ve minder ünitesini kullan∂mdan sonra
resimde gösterilen µekilde aksesuar boµluπuna itiniz.
Turbo-f∂rça
Cihaz∂n∂z bir turbo-f∂rça ile donat∂lm∂µsa lütfen ilgili kullanma
k∂lavuzundaki uyar∂lardan ve bak∂m ile ilgili bilgilerden
faydalan∂n∂z.
Resim
K∂sa süpürme molalar∂nda cihaz∂n∂z∂n kenar∂ndaki park
yard∂m∂n∂ kullanabilirsiniz.
Cihaz∂ kapatt∂ktan sonra zemin ünitesindeki kancay∂
cihaz∂n kenar∂ndaki girintiye itiniz.
14
13
12*
11
10
9
8
7
6*
5*

4
tr
Resim
Örn. merdivenlerin süpürülmesi esnas∂nda cihaz iki
tutamaktan biri ile de taµ∂nabilir.
Çal∂µma sona erdikten sonra
Resim
Fiµi çekin.
Ωebeke baπlant∂ kablosundan hafifçe çekin ve serbest
b∂rak∂n (kablo otomatik olarak sar∂lacakt∂r).
Resim
Cihaz∂ saklamak / nakletmek için cihaz∂n alt taraf∂ndaki
saklama yard∂m∂n∂ kullanabilirsiniz.
Cihaz∂ dik konuma al∂n∂z. Zemin aπz∂ndaki kancay∂
cihaz∂n alt taraf∂ndaki boµluπa itiniz.
Filtre torbas∂n∂n deπiµtirilmesi
Resim
a) Zeminden kald∂r∂lm∂µ zemin ünitesinde ve en yüksek
emme performans∂ ayar∂nda kapaktaki filtre deπiµim
göstergesi tamam∂yla sar∂ysa, filtre torbas∂ dolmam∂µsa
da deπiµtirilmelidir. Böyle bir durumda filtredeki kirin türü
deπiµimi gerekli k∂lmaktad∂r.
Aksi takdirde filtre deπiµtirme göstergesinin devreye
girmesine yol açacaπ∂ndan, emme ünitesi, emme borusu
ve emme hortumu t∂kal∂ olmamal∂d∂r.
b)T∂kanmalar∂n giderilmesi için tutamak hortumdan hafifçe
çözülebilir.
Resim
Kapaπ∂ kilit kolunu ok yönüne iterek aç∂n∂z.
Resim
a) Filtre torbas∂n∂, kapama kulaπ∂n∂ çekerek kapat∂n∂z ve
ç∂kart∂n∂z.
b)Yeni filtre torbas∂n∂ dayamaya kadar brakete itiniz.
!
Dikkat: Kapak ancak filtre torbas∂ yerleµtirildiπinde
kapanacakt∂r.
Motor koruma filtresinin temizlenmesi
Motor koruma filtresi düzenli aral∂klarla vurularak ve/veya
y∂kanarak temizlenmelidir!
Resim
䡲
Toz haznesi kapaπ∂n∂ aç∂n∂z.
䡲
Motor koruma filtresini ok yönünde çekiniz.
䡲
Motor koruma filtresini vurarak temizleyiniz.
䡲
Kirlenme yoπunsa motor koruma filtresi y∂kanmal∂d∂r.
Ard∂ndan filtreyi en az
24 saat kurumaya b∂rak∂n∂z.
䡲
Temizleme iµleminden sonra motor koruma filtresini
cihaza yerleµtiriniz ve toz haznesi kapaπ∂n∂ kapat∂n∂z.
21
20
19
18*
17
16
15
Mikro hijyen filtresinin deπiµtirilmesi
Ne zaman deπiµtirileceπi: Her yeni filtre deπiµtirme paketi
aç∂lmas∂nda
Resim
䡲
Toz haznesi kapaπ∂n∂ aç∂n∂z.
䡲
Kapama koluna ok yönünde basarak filtre tutamaπ∂n∂
çözünüz.
䡲
Mikro hijyen filtresini al∂n∂z. Yeni mikro hijyen filtresini
cihaza yerleµtiriniz.
䡲
Filtre braketini cihaza yerleµtiriniz ve yerine oturtunuz.
Mikro-aktif karbon filtresinin deπiµtirilmesi
Cihaz∂n∂ mikro-aktif karbon filtresi ile donat∂lm∂µsa filtre alt∂
ayda bir deπiµtirilmelidir.
Resim
䡲
Toz haznesi kapaπ∂n∂ aç∂n∂z.
䡲
Kapama koluna ok yönünde basarak filtre tutamaπ∂n∂
çözünüz.
䡲
Mikro-aktif karbon filtresini al∂n∂z.
䡲
Yeni mikro-aktif karbon filtresini yerleµtiriniz.
䡲
Filtre braketini cihaza yerleµtiriniz ve yerine oturtunuz.
Hepa filtrenin* deπiµtirilmesi
Cihaz∂n∂z bir Hepa filtre ile donat∂lm∂µsa, bu filtre senede bir
kez deπiµtirilmelidir.
Resim
䡲
Toz haznesi kapaπ∂n∂ aç∂n∂z.
䡲
Kapama koluna ok yönünde basarak Hepa-filtresini
çözünüz ve cihazdan ç∂kart∂n∂z.
䡲
Yeni Hepa-filtresini yerleµtiriniz ve yerine oturtunuz.
Ufak toz partiküllerinin süpürülmesinden sonra motor
koruma filtresini temizleyiniz, gerekirse mikro hijyen filtresini,
mikro-aktif karbon filtresini veya HEPA-filtresini deπiµtiriniz.
Bak∂m
Elektrikli süpürgeyi temizlemeden önce kapat∂n∂z ve µebeke
fiµini çekiniz. Elektrikli süpürgenin ve plastik aksesuar
parçalar∂n∂n bak∂m∂, s∂radan plastik temizleyicisi ile
yap∂labilir.
!
Y∂prat∂c∂ madde, cam temizleyicisi veya çok amaçl∂
temizleyici kullanmay∂n∂z. Elektrikli süpürge
kesinlikle suya sokulmamal∂d∂r.
Toz bölmesi gerektiπinde ikinci bir elektrikli süpürge ile
süpürülebilir, veya kuru bir toz bezi / toz f∂rças∂ ile
temizlenebilir.
Teknik deπiµiklikler olabilir.
24*
23*
22*
*donanıma göre

Your vacuum cleaner
1 Adjustable floor tool*
2 Hard-floor brush*
3 Telescopic tube with sliding switch*
4 Telescopic tube with adjusting sleeve
5 Handle*
6 Flexible hose
7 Upholstery nozzle*
8 Crevice nozzle*
9 Parking aid
10 Power cord
11 Exhaust filter
12 On/off button with electronic suction regulator
13 Motor protection filter, washable
14 Storage aid (on underside of unit)
15 Dust bag
16 Dust bag compartment lid
17 Carrying handles (on the front and back)
18 Exhaust grille
19 Dust bag change indicator*
*Depending on equipment
5
Spare parts and accessories
Filament lever (1) and polishing strips (2) can be obtained
from the customer services and can also be replaced there
2
1
1
A Replacement filter pack VZ51PT1AFG
Contains:
5 self-sealing dust bags
1 micro-hygiene filter
B Textile filter (long-term filter) VZ10PT0TFG*
Reusable filter with Velcro fastening.
C HEPA filter VZ153HFB*
Additional filter for cleaner exhaust air.
Recommended for allergy sufferers. Replace once a year.
D Micro active carbon filter VZ192MAF*
Combination of micro filter and active carbon filter.
Combats unpleasant odours.
Replace twice a year. Replace carbon filter frame with
micro filter frame.
Please note
It is not possible to combine a Hepa filter and an active
carbon filter.
E TURBO UNIVERSAL
®
brush VZ102TBB*
All in one brushing and vacuuming of short-pile pile rugs
and carpets and all hard floor coverings. Especially suit
able for picking up pet hair. The brush roller is driven by
the air flow through the vacuum cleaner. No separate
electrical connection is needed.
No electrical connection required.
F Hard-floor brush VZ123HD*
For vacuuming hard floors (parquet flooring, tiles, lami
nate, etc.)
G TURBO-UNIVERSAL
®
brush for upholstery VZ46001*
All in one brushing and vacuuming of upholstered furni-
ture, mattresses, car seats, etc. Especially suitable for
picking up pet hair. The brush roller is driven by the suc-
tion of the air flow.
No separate electrical connection is needed.
*Depending on the model, special accessories are
available in our After Sales Service.

en
Congratulations on your purchase of a Profilo VS6PT
vacuum cleaner.
This instruction manual describes various VS6PT models,
which means that some of the equipment features and
functions described may not be available on your model.
You should only use original Profilo accessories, which
have been specially developed for your vacuum cleaner to
achieve the best possible vacuuming results.
Please keep this instruction manual in a safe place. If you
pass the vacuum cleaner on to someone else, please also
pass on this instruction manual.
Intended use
This vacuum cleaner is intended for domestic use only, not
for commercial use.
Only use this vacuum cleaner in accordance with the
instructions in this instruction manual.
The manufacturer will not accept any responsibility for
damage caused by improper use or incorrect operation.
Therefore, you must note the following points.
The vacuum cleaner must only be operated with:
Manufacturer's original dust bags
Manufacturer's original replacement parts, accessories
or special accessories
Safety information
This vacuum cleaner complies with the generally accepted
standards of technology and relevant safety regulations.
Always observe the information on the rating plate
when using the vacuum cleaner and connecting to the
power supply.
Never use the vacuum cleaner without a dust bag fitted.
=> This can damage the appliance.
Only allow children to use the vacuum cleaner under
supervision.
This appliance must not be used by children or persons
with limited physical, sensory or mental abilities or with
a lack of experience and knowledge (including children)
unless they have been instructed in the use of the
appliance by a responsible person.
The vacuum cleaner may not be used for:
cleaning persons or animals
vacuuming up:
– hazardous, sharp-edged, hot or red hot substances.
– damp or liquid substances
– highly flammable or explosive substances and gases
– ash, soot from tiled stoves and central heating
systems
– toner dust from printers and copiers.
Keep suction away from your head when using the
handle, nozzles or pipe.
=> Risk of injury.
Stand the appliance on a firm, secure surface when
vacuuming.
When vacuuming stairs, the appliance must always be
lower down than you.
In the following cases, stop using the appliance
immediately and contact the after-sales
service:
– if the mains connection cable is damaged.
– if you have accidentally vacuumed up some liquid or
liquid has entered the inside of the appliance
– if the appliance has been dropped.
Do not use the power cord to carry the vacuum cleaner.
Fully extend the power cord when using the vacuum
cleaner continuously for several hours.
When disconnecting the appliance from the mains, pull
on the plug, not the power cord.
Do not pull the power cord around sharp corners or
allow it to become trapped.
Unplug the power cord from the mains before carrying
out any work on the vacuum cleaner or its accessories.
Do not use the vacuum cleaner if it
is damaged. Unplug the power cord from the mains if a
fault is detected.
For safety reasons, only authorised after-sales service
personnel are permitted to carry out repairs and fit
replacement parts to the vacuum cleaner.
Protect the vacuum cleaner from outside weather
conditions, moisture and sources of heat.
The vacuum cleaner is not suitable for use on
building sites.
=> Vacuuming up building rubble could damage the
appliance.
Switch off the appliance when it is not in use.
At the end of its life, the appliance should be rendered
unusable, then disposed of in an appropriate manner.
Plastic bags and films must be kept out of the reach of
children before disposal (risk of suffocation).
do not pour any flammable substances or substances
containing alcohol onto the filters (filter bag, motor
protective filter, exhaust filter, etc.).
Disposal information
Packaging
The packaging is designed to protect the vacuum
cleaner from being damaged during transportation. It is
made of environmentally friendly materials and can be
recycled.
Dispose of packaging that is no longer required at an
appropriate recycling point.
Used vacuum cleaners
Used vacuum cleaners still contain many valuable
materials. Therefore, please take your used vacuum
cleaner to your retailer or recycling centre to be
recycled. For current disposal methods, please enquire
at your retailer or your local council.
6

Figure
Holding the power cord by the plug, pull out the required
length and plug it into the mains socket.
Figure
Press the on/off button in the direction of the arrow to
switch your vacuum cleaner on/off.
Figure
Adjust the suction by turning the on/off button in the
direction of the arrow.
Vacuuming
Figure
Adjusting the floor tool:
䡲
Rugs and carpets =>
䡲
hard floors =>
Figure
Remove the upholstery nozzle and crevice nozzle from
the accessories holder as illustrated.
Figure Vacuuming with accessories
Attach the nozzles to the suction pipe or handle as
required:
a) Crevice nozzle for vacuuming crevices and corners, etc.
b) Upholstery nozzle for vacuuming upholstered furniture,
curtains, etc.
c) Furniture brush
For cleaning window frames, cabinets, mouldings, etc.
Figure
After use, push the crevice nozzle and upholstery nozzle
back into the accessories holder as indicated.
Turbo brush
If your vacuum cleaner is equipped with a turbo brush,
please consult the accompanying instruction manual for
notes on use and maintenance.
Figure
You can use the parking aid on the side of the vacuum
cleaner if you wish to stop vacuuming for a short time.
Once you have switched off the vacuum cleaner, slide
the catch on the floor tool into the groove on the side of
the appliance.
Figure
The appliance can also be carried using one of the two
handles when vacuuming steps, for example.
15
14
13
12*
11
10
9
8
7
Disposal of filters and dust bags
Filters and dust bags are made from environmentally
friendly materials.
As long as they do not contain substances that are not
permitted to be disposed of in the household rubbish,
you can dispose of them with your normal household
rubbish.
!
Please note
The mains socket must be protected by at least a 16
amp fuse.
If a fuse should blow when you switch on the appliance,
this may be because other electrical appliances which
have a high current draw are connected to the same
power circuit.
To prevent the fuse from blowing, select the lowest
power setting before switching the appliance on, and
increase the power only once it
is running.
Fold out picture pages.
Before using for the first time
Figure
Push the handle onto the flexible tube and until it
engages.
Figure
Push the crevice nozzle and upholstery nozzle back into
the accessories holder as illustrated.
Setting up
Figure
a) Push the flexible hose adapter into the air intake opening
on the vacuum cleaner lid until it engages.
b) To remove the flexible hose, press the two lugs together
and pull the tube out.
Figure
Push the handle into the suction pipe/telescopic tube.
To remove it, turn the handle slightly and pull it off the
tube.
Figure
Insert the suction pipe/telescopic tube into the adapter of
the floor tool.
To remove it, turn the tube slightly and pull it out of the
floor tool.
Figure
To adjust the length of the telescopic tube, adjust the
adjusting sleeve/sliding switch in the direction of the
arrow and adjust the tube to the required length.
6*
5*
4*
3
2*
1*
en
7

Replacing the micro-hygiene filter
When should you change the micro-hygiene filter? when
starting a newpack of bags
Figure
䡲
Open the dust bag compartment lid.
䡲
Release the filter holder by moving the locking lever in
the direction of the arrow.
䡲
Remove the micro-hygiene filter. Insert the new micro-
hygiene filter into the vacuum cleaner.
䡲
Reinsert the filter holder and clip into place.
Replacing the micro active carbon filter
If your vacuum cleaner is equipped with a micro active
carbon filter, this should be replaced every six months.
Figure
䡲
Open the dust bag compartment lid.
䡲
Release the filter holder by moving the locking lever in
the direction of the arrow.
䡲
Remove the micro active carbon filter.
䡲
Insert the new micro active carbon filter.
䡲
Reinsert the filter holder and clip into place.
Replacing the Hepa filter
If your vacuum cleaner is equipped with a Hepa filter, this
should be replaced once a year.
Figure
䡲
Open the dust bag compartment lid.
䡲
Release the Hepa filter by moving the locking lever in the
direction of the arrow and remove it from the vacuum
cleaner.
䡲
Insert the new Hepa filter and clip into place.
If you have used the vacuum cleaner for fine dust particles,
clean the motor protection filter and, if necessary, replace
the micro active carbon filter or Hepa filter.
Care
Always switch off the vacuum cleaner and disconnect the
power cord from the mains before cleaning the appliance.
The vacuum cleaner and plastic accessories can be
cleaned with a commercial plastic cleaner.
!
Do not use a scourer, glass-cleaning agent or
multipurpose cleaning product. Never immerse the
vacuum cleaner in water.
The dust compartment can, if necessary, be cleaned with a
second vacuum cleaner or simply wiped with a dry cloth or
dusting brush.
Subject to technical modifications.
24*
23*
22*
When the work is done
Figure
Unplug the vacuum cleaner.
Tug the power cord briefly and let go. The cable then
rewinds automatically.
Figure
To store or transport the vacuum cleaner, use the storage
aid on the underside of the vacuum cleaner.
Stand the vacuum cleaner up on its end. Slide the catch
on the floor tool into the groove on the underside of the
appliance.
Replacing the dust bag
Figure
a) If the dust bag change indicator is completely yellow
when the floor tool is lifted from the floor and the highest
suction power is selected, the dust bag needs changing.
Even if the dust bag is not full, it may still need changing,
due to the type of dust which has been vacuumed.
First check that the nozzle, suction pipe and flexible tube
are not blocked, as this would also lead to dust bag
change indicator being triggered.
b) The handle can easily be detached from the hose to
remove blockages.
Figure
Open the lid by moving the locking lever in the direction
of the arrow.
Figure
a) Seal the dust bag by pulling the sealing strip and then
remove it.
b) Slide the new dust bag into the holder to the stop.
!
Caution: The lid can only be closed when a dust bag has
been inserted.
Cleaning the motor protection filter
The motor protection filter should be cleaned regularly by
knocking out the dirt and rinsing.
Figure
䡲
Open the dust bag compartment lid.
䡲
Pull out the motor protection filter in the direction of the
arrow.
䡲
Clean the motor protection filter by tapping it.
䡲
If it is very dirty, the motor protection filter should be
rinsed.
Now leave the filter to dry for at least 24 hours.
䡲
After cleaning, slide the motor protection filter into the
vacuum cleaner and close the dust bag compartment lid.
21
20
19
18*
17
16
en
*Depending on version
8

9
Opisanie pribora
1 ç‡Ò‡‰Í‡ ‰Îfl ÔÓ·/ÍÓ‚‡*
2 ç‡Ò‡‰Í‡ ‰Îfl ڂ‰˚ı ÔÓÍ˚ÚËÈ*
3 íÂÎÂÒÍÓÔ˘ÂÒ͇fl Ú۷͇ Ò ÍÌÓÔÍÓÈ-ÔÓÎÁÛÌÍÓÏ*
4 íÂÎÂÒÍÓÔ˘ÂÒ͇fl Ú۷͇ Ò ÏÛÙÚÓÈ-ÔÓÎÁÛÌÍÓÏ*
5 ê͇ۘ*
6 ÇÒ‡Ò˚‚‡˛˘ËÈ ¯Î‡Ì„
7 ç‡Ò‡‰Í‡ ‰Îfl Ïfl„ÍÓÈ Ï·ÂÎË*
8 ôÂ΂‡fl ̇҇‰Í‡*
9 èÓ‰ÒÚ‡‚͇ ‰Îfl ˘ÂÚÍË
10 ëÂÚ‚ÓÈ Í‡·Âθ
11 Exhaust filter
12 Ç˚Íβ˜‡ÚÂθ Ò ˝ÎÂÍÚÓÌÌ˚Ï Â„ÛÎflÚÓÓÏ
ÏÓ˘ÌÓÒÚË ‚Ò‡Ò˚‚‡ÌËfl*
13 ÉË„ËÂÌ˘ÂÒÍËÈ ÏËÍÓÙËθÚ
14 è‡ÍÓ‚Ó˜Ì˚ ÙËÍÒ‡ÚÓ˚ (Ò ÌËÊÌÂÈ ÒÚÓÓÌ˚
ÔË·Ó‡)
15 å¯ÓÍ ‰Îfl Ò·Ó‡ Ô˚ÎË
16 ä˚¯Í‡ Ô˚ÎÂÒ·ÓÌÓ„Ó ÓÚÒÂ͇
17 êÛÍÓflÚÍË (ÔÓ Ó‰ÌÓÈ ÒÔÂÂ‰Ë Ë ÒÁ‡‰Ë)
18 ê¯ÂÚ͇ ‚ÂÌÚËÎflÚÓ‡
19 à̉Ë͇ÚÓ Á‡„flÁÌÂÌËfl ÙËθڇ*
*‚ Á‡‚ËÒËÏÓÒÚË ÓÚ ÓÒ̇˘ÂÌËfl
Zapasnye çasti i dopolnitel´nye prisposobleniä
Poloski dlä ulavlivaniä nitok (1) i poliruüwie polo-
ski (2) moΩno priobresti v servisnoj sluΩbe, gde
proizvoditsä ix zamena.
2
1
1
A Упаковка сменных пылесборников VZ51PT1AFG
В наборе:
5 сменных пылесборника с застёжкой
1 гигиенический микрофильтр
B Tekstil´nyj fil´tr (nemenäemyj fil´tr)
VZ10PT0TFG*
Postoännyj fil´tr, zakryvaemyj “lipuçkoj”.
C îËÎ¸Ú Hepa VZ153HFB*
ÑÓÔÓÎÌËÚÂθÌ˚È ÙËÎ¸Ú ‰Îfl Ó˜ËÒÚÍË ‚˚‰Û‚‡ÂÏÓ„Ó
‚ÓÁ‰Ûı‡.
êÂÍÓÏẨÛÂÚÒfl ‰Îfl ‡Î΄ËÍÓ‚. á‡ÏÂÌflÚ¸ ÂÊ„ӉÌÓ.
D ì„ÓθÌ˚È ÏËÍÓÙËÎ¸Ú VZ192MAF*
äÓÏ·Ë̇ˆËfl Û„ÓθÌÓ„Ó ÙËθڇ Ë ÏËÍÓÙËθڇ.
è‰ÓÚ‚‡˘‡ÂÚ ÔÓfl‚ÎÂÌË ÌÂÔËflÚÌ˚ı Á‡Ô‡ıÓ‚ ÔË
ı‡ÌÂÌËË. á‡ÏÂÌflÚ¸ ‡Á ‚ ÔÓ΄Ӊ‡. ê‡Ï͇ Û„ÓθÌÓ„Ó
ÙËθڇ Á‡ÏÂÌflÂÚÒfl ‰Âʇ˘ÂÈ ‡ÏÍÓÈ ÏËÍÓÙËθڇ.
ÇÌËχÌËÂ! äÓÏ·Ë̇ˆËfl "ÙËÎ¸Ú Hepa" + "ì„ÓθÌ˚È
ÏËÍÓÙËθÚ" ̉ÓÔÛÒÚËχ
E ôÂÚ͇ TURBO-UNIVERSAL
®
VZ102TBB*
é‰ÌÓ‚ÂÏÂÌÌÓ ˜ËÒÚËÚ ˘ÂÚÍÓÈ Ë ‚Ò‡Ò˚‚‡ÂÚ Ô˚θ ËÁ
ÍÓ‚Ó‚ Ë Ì‡ÔÓθÌ˚ı ÍÓ‚Ó‚˚ı ÔÓÍ˚ÚËÈ Ò ÍÓÓÚÍËÏ
‚ÓÒÓÏ ËÎË Î˛·˚ı ̇ÔÓθÌ˚ı ÔÓÍ˚ÚËÈ. éÒÓ·ÂÌÌÓ
˝ÙÙÂÍÚ˂̇ ‰Îfl Û‰‡ÎÂÌËfl ¯ÂÒÚË ÊË‚ÓÚÌ˚ı. LJÎËÍ
˘ÂÚÍË ÔË‚Ó‰ËÚÒfl ‚ ‰‚ËÊÂÌË ÔÓÚÓÍÓÏ
‚Ò‡Ò˚‚‡ÂÏÓ„Ó Ô˚ÎÂÒÓÒÓÏ ‚ÓÁ‰Ûı‡. ÑÓÔÓÎÌËÚÂθÌ˚È
ËÒÚÓ˜ÌËÍ ˝ÎÂÍÚÓ˝Ì„ËË Ì Ú·ÛÂÚÒfl.
F ç‡Ò‡‰Í‡ ‰Îfl ڂ‰˚ı ̇ÔÓθÌ˚ı ÔÓÍ˚ÚËÈ
VZ123HD*
ÑÎfl ˜ËÒÚÍË „·‰ÍËı ÔÓÎÓ‚ (Ô‡ÍÂÚ, ͇ÙÂθ̇fl ËÎË
Í‡Ï˘ÂÒ͇fl ÔÎËÚ͇ Ë Ú. ‰.)
G ôÂÚ͇ TURBO-UNIVERSAL
®
‰Îfl Ïfl„ÍÓÈ Ï·ÂÎË
VZ46001*
é‰ÌÓ‚ÂÏÂÌÌÓ ˜ËÒÚËÚ ˘ÂÚËÌÓÈ Ë ‚Ò‡Ò˚‚‡ÂÚ Ô˚θ ËÁ
Ïfl„ÍÓÈ Ï·ÂÎË, χڇÒÓ‚, ‡‚ÚÓÏÓ·ËθÌ˚ı ÒˉÂÌËÈ Ë
Ú. ‰. éÒÓ·ÂÌÌÓ ˝ÙÙÂÍÚ˂̇ ‰Îfl Û‰‡ÎÂÌËfl ¯ÂÒÚË
ÊË‚ÓÚÌ˚ı. LJÎËÍ ˘ÂÚÍË ÔË‚Ó‰ËÚÒfl ‚ ‰‚ËÊÂÌËÂ
ÔÓÚÓÍÓÏ ‚Ò‡Ò˚‚‡ÂÏÓ„Ó Ô˚ÎÂÒÓÒÓÏ
‚ÓÁ‰Ûı‡.ÑÓÔÓÎÌËÚÂθÌ˚È ËÒÚÓ˜ÌËÍ ˝ÎÂÍÚÓ˝Ì„ËË
ÌÂÚ·ÛÂÚÒfl.
*Запасные части в случае необходимости можно
заказать в сервисной службе.

10
ru
Мы рады, что Вы остановили свой выбор на пылесосе
Profilo серии VS6PT.
В этой инструкции по эксплуатации представлены
различные модели VS6PT. Поэтому возможно, что
некоторые функции и принадлежности, описанные здесь,
могут отсутствовать у Вашего прибора.
Чтобы гарантировать наилучший результат уборки, Вам
необходимо использовать только оригинальные
принадлежности Profilo, разработанные специально для
Вашего пылесоса.
Сохраните инструкцию по эксплуатации. При передаче
пылесоса новому владельцу не забудьте передать также
инструкцию по эксплуатации.
Указания по использованию
Данный пылесос предназначен для уборки бытовых
помещений, он не предназначен для промышленного
использования.
Используйте пылесос только согласно инструкции по
эксплуатации.
Изготовитель не несёт ответственности за повреждения,
полученные в результате использования пылесоса не по
назначению или неправильного обращения с ним.
Поэтому обязательно соблюдайте указания,
приведённые ниже!
В процессе эксплуатации пылесоса необходимо
использовать:
оригинальный сменный пылесборник
оригинальные запчасти, принадлежности или
специальные принадлежности
Правила техники безопасности
Данный пылесос соответствует общепризнанным
техническим требованиям и специальным правилам
техники безопасности.
Подсоединение к электросети и включение пылесоса
должно производиться только с учётом данных
типовой таблички.
Не используйте пылесос без сменного пылесборника.
=> Пылесос может быть повреждён!
Разрешайте детям пользоваться пылесосом только в
присутствии взрослых.
Запрещается самостоятельно пользоваться прибором
людям с ограниченными физическими или
умственными способностями, а также лицам, не
ознакомленным с правилами эксплуатации пылесоса
(в том числе детям).
Запрещается использовать пылесос для:
чистки людей и животных;
всасывания:
– вредных для здоровья веществ, острых, горячих
или раскалённых предметов;
– мокрых предметов или жидкостей;
– легковоспламеняющихся или взрывчатых веществ и
газов;
– пепла, сажи из кафельных печей и установок
центрального отопления;
– тонера из принтеров или копировальных
аппаратов.
Не подносите всасывающий шланг с ручкой, насадки
и трубку к голове. => Это может привести к травме!
При уборке ставьте пылесос на твёрдую и устойчивую
поверхность.
При уборке лестницы пылесос всегда должен
находиться ниже пользователя.
В следующих случаях следует немедленно прекратить
использование пылесоса и связаться
с сервисной службой:
– при повреждении сетевого кабеля;
– при случайном всасывании жидкости или при
попадании жидкости внутрь пылесоса;
– при падении пылесоса.
Не используйте сетевой кабель для
переноски/транспортировки пылесоса.
Для многочасовой работы в непрерывном режиме
полностью вытягивайте сетевой кабель.
При отсоединении пылесоса от электросети всегда
беритесь рукой за вилку, а не за сетевой кабель.
Следите за тем, чтобы сетевой кабель не был зажат и
не попадал на острые края предметов.
Перед проведением любых работ по ремонту и
техническому обслуживанию пылесоса отсоединяйте
его от электросети.
Не пользуйтесь неисправным пылесосом. При
возникновении неисправности вынимайте вилку из
розетки.
Во избежание опасности все работы по ремонту и
замене деталей пылесоса следует выполнять только в
авторизованной сервисной службе.
Защищайте пылесос от воздействия неблагоприятных
климатических условий, влажности и источников тепла.
Пылесос не предназначен для эксплуатации на
строительных объектах. => При засасывании
строительного мусора пылесос может выйти из строя.
Выключайте пылесос даже при небольших паузах в
уборке.
Отслуживший пылесос сделайте непригодным для
дальнейшего использования, а затем утилизируйте в
соответствии с действующими правилами.
Пакеты и плёнки из полимерных материалов следует
хранить и утилизировать вне зоны доступа
малолетних детей
(опасность удушения).
запрещается обрабатывать пылесборник и
фильтры (моторный фильтр, выпускной фильтр и
т.д.) горючими спиртосодержащими веществами.
Инструкции по утилизации
Упаковка
Упаковка служит для защиты пылесоса от
повреждений при транспортировке. Она изготовлена
из экологически чистых материалов, поэтому её
можно использовать для вторичной переработки.
Использованные упаковочные материалы относите в
пункты приёма вторсырья.

11
ru
Отслужившие приборы
Отслужившие приборы являются ценным сырьем для
дальнейшего использования. Поэтому отслуживший
прибор следует отнести дилеру или в пункт приёма
вторсырья для дальнейшей утилизации. Информацию
о способах утилизации спрашивайте у дилера или в
местной администрации.
Утилизация фильтра и сменного пылесборника
Фильтр и сменный пылесборник изготовлены из
экологически безвредных материалов. Если они не
содержат в себе никаких веществ, запрещённых к
утилизации с бытовым мусором, то вы можете
утилизировать их вместе с бытовым мусором.
!
Внимание:
Сетевая розетка должна быть защищена
предохранителем на 16 А.
Если при включении прибора предохранитель сразу
же перегорел, это означает, что одновременно в
данную электрическую цепь был включён другой
прибор с большой общей потребляемой мощностью.
Срабатывание предохранителя можно предотвратить,
если перед включением прибора установить
минимальную мощность, а затем постепенно
увеличить её.
ê‡Á‚ÂÌËÚ ÒÚ‡Ìˈ˚ Ò ËÒÛÌ͇ÏË!
è‰ Ô‚˚Ï ËÒÔÓθÁÓ‚‡ÌËÂÏ
êËÒ.
燉Â̸Ú ÛÍÓflÚÍÛ Ì‡ ¯Î‡Ì„ Ë Á‡˘ÂÎÍÌËÚ ÂÂ.
êËÒ.
ôÂ΂‡fl ̇҇‰Í‡ Ë Ì‡Ò‡‰Í‡ ‰Îfl Ïfl„ÍÓÈ Ï·ÂÎË
۷ˇ˛ÚÒfl ‚ ÓÚÒÂÍ ‰Îfl ÔË̇‰ÎÂÊÌÓÒÚÂÈ, ͇Í
ÔÓ͇Á‡ÌÓ Ì‡ ËÒÛÌÍÂ.
èÓ‰„ÓÚӂ͇ Í ‡·ÓÚÂ
êËÒ.
‡) èÓ‰ÒÓ‰ËÌËÚ ԇÚÛ·ÓÍ ¯Î‡Ì„‡ Í ‚Ò‡Ò˚‚‡˛˘ÂÏÛ
ÓÚ‚ÂÒÚ˲, ‡ÒÔÓÎÓÊÂÌÌÓÏÛ Ì‡ Í˚¯ÍÂ.
·) óÚÓ·˚ ÓÚÒÓ‰ËÌËÚ¸ ¯Î‡Ì„, ̇ÊÏËÚ ̇ Ó·‡
ÙËÍÒ‡ÚÓ‡ Ë ‚˚̸Ú ԇÚÛ·ÓÍ ¯Î‡Ì„‡ ËÁ ÓÚ‚ÂÒÚËfl.
êËÒ.
ÇÒÚ‡‚¸Ú ۘÍÛ ‚Ó ‚Ò‡Ò˚‚‡˛˘Û˛ ËÎË
ÚÂÎÂÒÍÓÔ˘ÂÒÍÛ˛ ÚÛ·ÍÛ.
óÚÓ·˚ ÓÚÒÓ‰ËÌËÚ¸ Û˜ÍÛ, ÌÂÏÌÓ„Ó ÔÓ‚ÂÌËڠ Ë
‚˚Ú‡˘ËÚ ËÁ ÚÛ·ÍË.
êËÒ.
ÇÒÚ‡‚¸Ú ‚Ò‡Ò˚‚‡˛˘Û˛ ËÎË ÚÂÎÂÒÍÓÔ˘ÂÒÍÛ˛ ÚÛ·ÍÛ
‚ Ô‡ÚÛ·ÓÍ Ì‡Ò‡‰ÍË ‰Îfl ÔÓ·.
óÚÓ·˚ ÓÚÒÓ‰ËÌËÚ¸ ÚÛ·ÍÛ, ÌÂÏÌÓ„Ó ÔÓ‚ÂÌËڠ Ë
‚˚Ú‡˘ËÚ ËÁ ̇҇‰ÍË.
5*
4*
3
2*
1*
êËÒ.
ç‡ÊËχfl ̇ ÍÌÓÔÍÛ-/ÏÛÙÚÛ-ÔÓÎÁÛÌÓÍ ‚ ̇ԇ‚ÎÂÌËË
ÒÚÂÎÍË, ‡Á·ÎÓÍËÛÈÚ ÚÂÎÂÒÍÓÔ˘ÂÒÍÛ˛ ÚÛ·ÍÛ Ë
ÛÒÚ‡ÌÓ‚ËÚ ÌÂÓ·ıÓ‰ËÏÛ˛ ‰ÎËÌÛ.
êËÒ.
ÇÓÁ¸ÏËÚÂÒ¸ Á‡ ‚ËÎÍÛ ÒÂÚÂ‚Ó„Ó Í‡·ÂÎfl, ‚˚ÚflÌËÚÂ
͇·Âθ ̇ ÌÛÊÌÛ˛ ‰ÎËÌÛ Ë ‚ÒÚ‡‚¸Ú ‚ËÎÍÛ ‚ ÓÁÂÚÍÛ.
êËÒ.
ÇÍβ˜ÂÌËÂ/‚˚Íβ˜ÂÌË Ô˚ÎÂÒÓÒ‡ ÓÒÛ˘ÂÒÚ‚ÎflÂÚÒfl
̇ʇÚËÂÏ ‚˚Íβ˜‡ÚÂÎfl ‚ ̇ԇ‚ÎÂÌËË ÒÚÂÎÍË.
êËÒ.
Ç˚·Ó ÏÓ˘ÌÓÒÚË ‚Ò‡Ò˚‚‡ÌËfl ÓÒÛ˘ÂÒÚ‚ÎflÂÚÒfl
ÔÓ‚ÓÓÚÓÏ ‚˚Íβ˜‡ÚÂÎfl ‚ ̇ԇ‚ÎÂÌËË ÒÚÂÎÍË.
ì·Ó͇
êËÒ.
àÒÔÓθÁÛÈÚ ̇҇‰ÍÛ ‰Îfl ÔÓ·:
䡲
‰Îfl ÍÓ‚Ó‚ Ë ÍÓ‚Ó‚˚ı ÔÓÍ˚ÚËÈ =>
䡲
‰Îfl „·‰ÍËı ̇ÔÓθÌ˚ı ÔÓÍ˚ÚËÈ =>
êËÒ.
Ç˚̸Ú ËÁ ÓÚÒÂ͇ ‰Îfl ÔË̇‰ÎÂÊÌÓÒÚÂÈ Ì‡Ò‡‰ÍÛ ‰Îfl
Ïfl„ÍÓÈ Ï·ÂÎË Ë ˘ÂÎÂ‚Û˛ ̇҇‰ÍÛ, Í‡Í ÔÓ͇Á‡ÌÓ Ì‡
ËÒÛÌÍÂ.
êËÒ.
ì·Ó͇ Ò ËÒÔÓθÁÓ‚‡ÌËÂÏ ‰ÓÔÓÎÌËÚÂθÌ˚ı
ÔË̇‰ÎÂÊÌÓÒÚÂÈ
燉‚‡ÈÚ ̇ Û˜ÍÛ ËÎË ‚Ò‡Ò˚‚‡˛˘Û˛ ÚÛ·ÍÛ
ÌÛÊÌ˚Â Ç‡Ï Ì‡Ò‡‰ÍË:
a) ôÂ΂‡fl ̇҇‰Í‡ Ô‰̇Á̇˜Â̇ ‰Îfl ˜ËÒÚÍË ˘ÂÎÂÈ,
Û„ÎÓ‚ Ë Ú. Ô.
b) ç‡Ò‡‰Í‡ ‰Îfl Ïfl„ÍÓÈ Ï·ÂÎË Ô‰̇Á̇˜Â̇ ‰Îfl
˜ËÒÚÍË Ïfl„ÍÓÈ Ï·ÂÎË, ¯ÚÓ Ë Ú. ‰.
c) åfl„͇fl ˘ÂÚ͇ ‰Îfl ÍÓÔÛÒÌÓÈ Ï·ÂÎË -
‰Îfl ˜ËÒÚÍË ÓÍÓÌÌ˚ı ‡Ï, ¯Í‡ÙÓ‚, ÔÓÙËÎÂÈ Ë Ú. Ô.
êËÒ.
èÓÒΠËÒÔÓθÁÓ‚‡ÌËfl ˘Â΂‡fl ̇҇‰Í‡ Ë Ì‡Ò‡‰Í‡
‰Îfl Ïfl„ÍÓÈ Ï·ÂÎË Û·Ë‡˛ÚÒfl ‚ ÓÚÒÂÍ ‰Îfl
ÔË̇‰ÎÂÊÌÓÒÚÂÈ, Í‡Í ÔÓ͇Á‡ÌÓ Ì‡ ËÒÛÌÍÂ.
ôÂÚ͇ Turbo
ÖÒÎË Ç‡¯ Ô˚ÎÂÒÓÒ ÛÍÓÏÔÎÂÍÚÓ‚‡Ì ˘ÂÚÍÓÈ Turbo,
ËÌÒÚÛ͈ËË ÔÓ Â ËÒÔÓθÁÓ‚‡Ì˲ Ë Ó·ÒÎÛÊË‚‡Ì˲
̇ıÓ‰flÚÒfl ‚ ÔËÎÓÊÂÌÌÓÏ êÛÍÓ‚Ó‰ÒÚ‚Â ÔÓ
˝ÍÒÔÎÛ‡Ú‡ˆËË.
êËÒ.
ÖÒÎË Ç‡Ï ÌÂÓ·ıÓ‰ËÏÓ Ò‰Â·ڸ ÍÓÓÚÍÛ˛ Ô‡ÛÁÛ ‚
Û·ÓÍÂ, ËÒÔÓθÁÛÈÚ ԇÍÓ‚ÍÛ ÚÛ·ÍË,
‡ÒÔÓÎÓÊÂÌÌÛ˛ Ò·ÓÍÛ Ì‡ ÍÓÔÛÒ Ô˚ÎÂÒÓÒ‡.
èÓÒΠ‚˚Íβ˜ÂÌËfl Ô˚ÎÂÒÓÒ‡ ‚ÒÚ‡‚¸Ú ̇҇‰ÍÛ ‰Îfl
ÔÓ· Ͳ˜ÍÓÏ ‚ „ÌÂÁ‰Ó, ‡ÒÔÓÎÓÊÂÌÌÓ ҷÓÍÛ Ì‡
ÍÓÔÛÒÂ Ô˚ÎÂÒÓÒ‡.
êËÒ.
èË Û·ÓÍÂ, ̇ÔËÏÂ, ̇ ÎÂÒÚÌˈ Ô˚ÎÂÒÓÒ ÏÓÊÌÓ
ÔÂÂÌÓÒËÚ¸ Á‡ β·Û˛ ËÁ ‰‚Ûı ÛÍÓflÚÓÍ.
15
14
13
12*
11
10
9
8
7
6*
Sayfa yükleniyor...
Sayfa yükleniyor...
Sayfa yükleniyor...
Sayfa yükleniyor...
Sayfa yükleniyor...
Sayfa yükleniyor...
Sayfa yükleniyor...
Sayfa yükleniyor...
Sayfa yükleniyor...
Sayfa yükleniyor...
Sayfa yükleniyor...
Sayfa yükleniyor...
Sayfa yükleniyor...
Sayfa yükleniyor...
Sayfa yükleniyor...
Sayfa yükleniyor...
Sayfa yükleniyor...
Sayfa yükleniyor...
Sayfa yükleniyor...
Sayfa yükleniyor...
Sayfa yükleniyor...
-
 1
1
-
 2
2
-
 3
3
-
 4
4
-
 5
5
-
 6
6
-
 7
7
-
 8
8
-
 9
9
-
 10
10
-
 11
11
-
 12
12
-
 13
13
-
 14
14
-
 15
15
-
 16
16
-
 17
17
-
 18
18
-
 19
19
-
 20
20
-
 21
21
-
 22
22
-
 23
23
-
 24
24
-
 25
25
-
 26
26
-
 27
27
-
 28
28
-
 29
29
-
 30
30
-
 31
31
-
 32
32
-
 33
33
-
 34
34
-
 35
35
-
 36
36
-
 37
37
-
 38
38
-
 39
39
-
 40
40
-
 41
41


PROFILO VS6PT Series Instructions For Use Manual
- Kategori
- Elektrikli süpürgeler
- Tip
- Instructions For Use Manual
diğer dillerde
- Deutsch: PROFILO VS6PT Series
- English: PROFILO VS6PT Series
- русский: PROFILO VS6PT Series
İlgili makaleler
Diğer belgeler
-
Siemens vs63a21 El kitabı
-
Bosch BSG71636/11 Kullanım kılavuzu
-
Bosch BSGL42232/01 Kullanım kılavuzu
-
Siemens VSZ62522/02 Kullanım kılavuzu
-
Siemens VSZ62512/01 Kullanım kılavuzu
-
-
Siemens VSZ61245GB Kullanım kılavuzu
-
Siemens VS06G2535/03 Kullanım kılavuzu
-
Siemens VS05G2510/03 Kullanım kılavuzu
-