Motorola CLP series Başvuru Kılavuzu
- Kategori
- Mobil kulaklıklar
- Tip
- Başvuru Kılavuzu
Bu kılavuz için de uygundur

CLP SERIES
TWO-WAY RADIO™
BLUETOOTH
QUICK REFERENCE
CLP446 BLUETOOTH MODEL
en
da-DK
de-DE
es-ES
fr-FR
it-IT
nl-NL
nb-NO
pl-PL
pt-PT
ru-RU
fi-FI
sv-SE
tr-TR
uk-UA
68012004024_booklet.book Page 1 Thursday, December 8, 2016 3:51 PM

68012004024_booklet.book Page 2 Thursday, December 8, 2016 3:51 PM

M
CLP SERIES™ BLUETOOTH TWO-WAY RADIO
QUICK REFERENCE GUIDE
English
1
ENGLISH
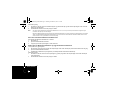
Add Bluetooth Headset (Initial Pairing)
Prior to pairing, make sure to:
1. Turn the radio OFF by pressing and holding the power button until the red LED on the Smart Status Glow blinks once.
2. Unscrew the wired accessory from the radio.
3. Put the Bluetooth Headset in pairing mode (refer to the Bluetooth Headset instructions leaflet).
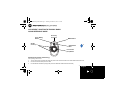
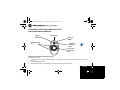
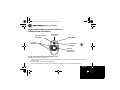
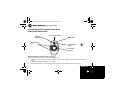
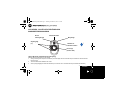
Accessory
Connector
Smart Status
Glow
Volume
Control (+/-)
Power Battery
Button
MENU Button
Push-to-Talk
(PTT) Button
68012004024_booklet.book Page 1 Thursday, December 8, 2016 3:51 PM

English
2
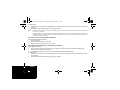
To initiate pairing:
1. With the radio turned OFF, hold down the PTT button, then press and hold the power button until the illuminating red LED turns
solid blue.
2. The purple/blue LED sequence displays when pairing is complete.
Note: The CLP radio uses proximity pairing. Make sure the headset is within 3 – 6 inches of the CLP radio. Pairing process takes up to 60 seconds.
Do not press any other button.
Bluetooth Pairing PIN code is only applicable for Legacy headsets (Bluetooth 2.0 and before). The CLP Bluetooth PIN code is defaulted to
‘0000’. Please refer to your Bluetooth Headset manual to confirm if a different pin code is required, in which case you should use the CLP CPS
to input new PIN code to allow pairing.
Reconnect to Last Connected Bluetooth Headset
With the Bluetooth Headset powered ON:
1. Turn the radio OFF.
2. Unscrew the wired accessory from the radio.
3. Press and hold the power button to turn the radio ON.
Erase Bluetooth Headset history and add Bluetooth Headset
Prior to pairing, make sure to:
1. Turn the radio OFF by pressing and holding the power button until the red LED on the Smart Status Glow blinks once.
2. Unscrew the wired accessory from the radio.
3. Put the Bluetooth Headset in pairing mode (refer to the Bluetooth Headset instructions leaflet).
To initiate pairing:
1. With the radio turned OFF, hold down the MENU button, then press and hold the power button until the illuminating red LED
turns solid blue.
2. The purple/blue LED sequence displays when pairing is complete.
68012004024_booklet.book Page 2 Thursday, December 8, 2016 3:51 PM

English
3
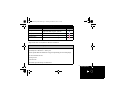
Accessories
Refer to the following table for Bluetooth Headset compatibility:
LED Configuration
User Mode LED Status Color
Bluetooth Pairing Mode
Last connection – Fast blinking blue
Add or erase/add – Illuminated blue
Pairing Successfully Blue/purple blinks for 5 seconds
Bluetooth Disconnected Red/purple blinks until radio reconnects
Pairing Fail/Timeout Red/purple blinks until radio reconnects
Bluetooth Headset Guideline
Supports Headset Profile (HSP) 1.2
Bluetooth 2.1 + EDR specs and above
Supports up to 8 Bluetooth Headsets for last connection history (refer to CPS for configuration)
7 hours of talk time or above
Echo cancellation
Volume controls
Prefers no voice prompts in headset
68012004024_booklet.book Page 3 Thursday, December 8, 2016 3:51 PM

English
MOTOROLA, MOTO, MOTOROLA SOLUTIONS and the Stylised M logo are trademarks or registered
trademarks of Motorola Trademark Holdings, LLC and are used under licence.
All other trademarks are the property of their respective owners.
© 2012, 2016 Motorola Solutions, Inc.
All rights reserved.
4
Note: Compatibility tested with Motorola Solutions HK200 Bluetooth Headset.
Motorola Solutions cannot be responsible in any way for any ancillary equipment not furnished by Motorola Solutions which is attached to or
used in connection with the Product, or for operation of the Product with any ancillary equipment, and all such equipment is expressly excluded
from warranty.
EU Contact:
Motorola Solutions Germany GmbH,
Am Borsigturm 130,
13507 Berlin, Germany.
Micro USB charging
Light weight - 0.39oz or less
On/off switch
Fast connection to headset audio
Noise reduction microphone or software for loud environment
Loud audio for noisy environment
On-ear wearing style for lasting comfort
LED for status
Bluetooth Headset Guideline
68012004024_booklet.book Page 4 Thursday, December 8, 2016 3:51 PM

M
CLP SERIES TOVEJS-RADIO MED BLUETOOTH
HURTIG REFERENCEHÅNDBOG
Dansk
1
DANISH
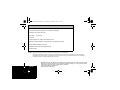
Tilføj Bluetooth-headset (indledende parring)
Udfør følgende før parring:
1. SLUK for radioen ved at trykke på tænd/sluk-knappen og hold den nede, indtil den røde lysdiode på Smart Status Glow blinker
én gang.
2. Skru kabeltilbehøret af radioen.
3. Sæt Bluetooth-headsettet i parringstilstand (se instruktionsfolderen til Bluetooth-headsettet).
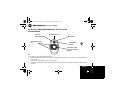
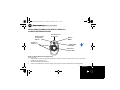
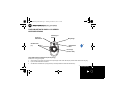
Tilbehørsstik
Intelligent
indikator for
status
Lydstyrkekontrol
(+/-)
Knap til
batteridrift
Knappen
MENU
Push to Talk-
funktionstast
(PTT)
68012004024_booklet.book Page 1 Thursday, December 8, 2016 3:51 PM

Dansk
2
Sådan indledes parring:
1. SLUK radioen, og tryk på knappen PTT, og hold den nede. Tryk derefter på tænd/sluk-knappen, indtil den tændte røde
lysdiode begynder at lyse blåt.
2. Den violette/blå LED-sekvens vises, når parringen er fuldført.
Bemærk: CLP-radioen anvender nærhedsparring. Sørg for, at headsettet befinder sig inden for 8-15 cm afstand af CLP-radioen. Parringsprocessen
tager op til 60 sekunder. Tryk ikke på nogen anden knap.
PIN-koden til Bluetooth-parring er kun gældende for Legacy-headset (Bluetooth 2.0 og tidligere). PIN-koden til Bluetooth-parring med CLP er
som standard indstillet til "0000". Se brugermanualen til dit Bluetooth-headset for at kontrollere, om der kræves en anden PIN-kode. I så
tilfælde skal du benytte CLP CPS til at indtaste den nye PIN-kode for at muliggøre parring.
Genopret forbindelse til det Bluetooth-headset, der sidst har været oprettet forbindelse til
Når Bluetooth-headsettet TÆNDES:
1. SLUK for radioen.
2. Skru kabeltilbehøret af radioen.
3. Tryk på tænd/sluk-knappen, og hold den nede, for at TÆNDE for radioen.
Slet Bluetooth-headsettets historik, og tilføj et Bluetooth-headset
Udfør følgende før parring:
1. SLUK for radioen ved at trykke på tænd/sluk-knappen og hold den nede, indtil den røde lysdiode på Smart Status Glow blinker
én gang.
2. Skru kabeltilbehøret af radioen.
3. Sæt Bluetooth-headsettet i parringstilstand (se instruktionsfolderen til Bluetooth-headsettet).
Sådan indledes parring:
1. SLUK radioen, og tryk på knappen MENU, og hold den nede. Tryk derefter på tænd/sluk-knappen, indtil den tændte røde
lysdiode begynder at lyse blåt.
2. Den violette/blå LED-sekvens vises, når parringen er fuldført.
68012004024_booklet.book Page 2 Thursday, December 8, 2016 3:51 PM

Dansk
3
Tilbehør
Se følgende tabel for at få oplysninger om kompatibilitet med Bluetooth-headset:
Konfiguration af LED
Brugertilstand LED-status Farve
Parringstilstand for Bluetooth
Sidste forbindelse – hurtigt blåt blink
Tilføj eller slet/tilføj – konstant blåt
Parring oprettet Blåt/violet blinker i 5 sekunder
Bluetooth afbrudt
Rødt/violet blinker, indtil radioforbindelse
genoprettes
Parring mislykkedes/timeout
Rødt/violet blinker, indtil radioforbindelse
genoprettes
Retningslinjer for Bluetooth-headset
Understøtter Headset Profile (HSP) 1.2
Bluetooth 2.1 + EDR-specifikationer og derover
Understøtter op til otte Bluetooth-headset i forhold til historik og sidste genoprettede
forbindelse (se CPS for at få oplysninger om konfiguration)
7 timers taletid eller derover
Eliminering af ekko
Lydstyrkeknapper
68012004024_booklet.book Page 3 Thursday, December 8, 2016 3:51 PM

Dansk
MOTOROLA, MOTO, MOTOROLA SOLUTIONS og det stiliserede M-logo er varemærker eller registrerede
varemærker tilhørende Motorola Trademark Holdings, LLC og anvendes under licens.
Alle andre varemærker tilhører deres respektive ejere.
© 2012, 2016 Motorola Solutions, Inc.
Alle rettigheder forbeholdes.
4
Bemærk: Kompatibilitet med Motorola Solutions HK200 Bluetooth-headset.
MOTOROLA SOLUTIONS kan ikke på nogen måde holdes ansvarlig for noget tilbehør, der ikke er leveret af MOTOROLA SOLUTIONS, og
som fastgøres til eller benyttes i forbindelse med produktet, eller for betjening af produktet med noget ekstraudstyr, og garantier for alt sådant
udstyr fralægges udtrykkeligt.
Foretrækker ikke stemmemeddelelser i headset
Opladning via Micro USB
Lav vægt – 11 gram eller mindre
Tænd/sluk-knap
Hurtig forbindelse til headset-lyd
Mikrofon eller software med støjreduktion til brug i miljøer med støj
Høj lyd til brug i miljøer med støj
Bæres på øret af hensyn til langvarig komfort
LED indikerer status
Retningslinjer for Bluetooth-headset
68012004024_booklet.book Page 4 Thursday, December 8, 2016 3:51 PM

M
BLUETOOTH-ZWEIWEGEFUNKGERÄT DER CLP-SERIE
KURZREFERENZ
Deutsch
1
GERMAN
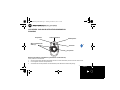
Bluetooth-Headset hinzufügen (erste Kopplung (Pairing))
Vor der Kopplung sollten Sie Folgendes sicherstellen:
1. Schalten Sie das Funkgerät AUS, indem Sie die Ein-/Austaste gedrückt halten, bis die rote LED an der Smart-Status-Leuchte
einmal aufblinkt.
2. Lösen Sie das kabelgebundene Zubehör vom Funkgerät.
3. Wählen Sie beim Bluetooth-Headset den Pairing-Modus aus (Anweisungen dazu finden Sie in der Bedienungsanleitung des
Headsets).
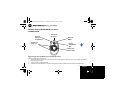
Zubehöranschluss
Smart-Status-
Leuchte
Lautstärkeregelung
(+/-)
Taste für
Batterieladung
Menü-Taste
Taste Push-to-Talk
(PTT - zum Sprechen
drücken)
68012004024_booklet.book Page 1 Thursday, December 8, 2016 3:51 PM

Deutsch
2
So starten Sie die Kopplung:
1. Halten Sie bei AUSgeschaltetem Funkgerät die PTT-Taste gedrückt, und drücken Sie anschließend auf die Ein-/Austaste, bis
die rote LED durchgängig blau leuchtet.
2. Die LED leuchtet violett/blau, wenn die Kopplung abgeschlossen ist.
Hinweis: Das CLP-Funkgerät verwendet die Näherungskopplung. Stellen Sie sicher, dass das Headset zwischen 8 und 15 cm vom CLP-Funkgerät
entfernt ist. Der Kopplungsvorgang dauert bis zu 60 Sekunden. Drücken Sie keine andere Taste.
Der PIN-Code für die Bluetooth-Kopplung gilt nur für ältere Headsets (Bluetooth 2.0 und älter). Der CLP Bluetooth-PIN-Code ist standardmäßig
auf '0000' voreingestellt. Informationen darüber, ob ein anderer PIN-Code erforderlich ist und in welchem Fall Sie das CLP-CPS verwenden
sollten, um einen neuen PIN-Code einzugeben, finden Sie in der Bedienungsanleitung des Bluetooth-Headsets.
Schließen Sie das zuletzt angeschlossene Bluetooth-Headset wieder an.
Mit EINgeschaltetem Bluetooth-Headset:
1. Schalten Sie das Funkgerät AUS.
2. Lösen Sie das kabelgebundene Zubehör vom Funkgerät.
3. Drücken Sie die Ein-/Austaste und halten Sie sie gedrückt, um das Funkgerät EINzuschalten.
Löschen Sie das Bluetooth-Headset aus der Liste und fügen Sie ein neues Bluetooth-Headset hinzu.
Vor der Kopplung sollten Sie Folgendes sicherstellen:
1. Schalten Sie das Funkgerät AUS, indem Sie die Ein-/Austaste gedrückt halten, bis die rote LED an der Smart-Status-Leuchte
einmal aufblinkt.
2. Lösen Sie das kabelgebundene Zubehör vom Funkgerät.
3. Wählen Sie beim Bluetooth-Headset den Pairing-Modus aus (Anweisungen dazu finden Sie in der Bedienungsanleitung des
Headsets).
So starten Sie die Kopplung:
1. Halten Sie bei AUSgeschaltetem Funkgerät die Menü-Taste gedrückt, und drücken Sie dann auf die Ein-/Austaste, bis die rote
LED durchgängig blau leuchtet.
2. Die LED leuchtet violett/blau, wenn die Kopplung abgeschlossen ist.
68012004024_booklet.book Page 2 Thursday, December 8, 2016 3:51 PM

Deutsch
3
Zubehör
In der folgenden Tabelle finden Sie nähere Informationen zur Kompatibilität der Bluetooth-Headsets:
LED-Konfiguration
Benutzermodus LED-Status Farbe
Bluetooth-Pairing-Modus
Letzte Verbindung - Blinkt schnell blau
Hinzufügen oder löschen/hinzufügen - Leuchtet
blau
Kopplung erfolgreich Blinkt blau/violett für fünf Sekunden
Bluetooth getrennt
Blinkt rot/violett, bis sich das Funkgerät wieder
verbindet
Kopplung fehlgeschlagen/
Timeout
Blinkt rot/violett, bis sich das Funkgerät wieder
verbindet
Richtlinie Bluetooth-Headset
Unterstützt Headset-Profil (HSP) 1.2
Bluetooth 2.1 + EDR-Daten und darüber
Unterstützt bis zu 8 Bluetooth-Headsets für den letzten Verbindungsverlauf (siehe CPS für die
Konfiguration)
7 Stunden Gesprächszeit oder höher
Echounterdrückung
68012004024_booklet.book Page 3 Thursday, December 8, 2016 3:51 PM

Deutsch
MOTOROLA, MOTO, MOTOROLA SOLUTIONS und das stilisierte M-Logo sind Marken oder
eingetragene Marken von Motorola Trademark Holdings, LLC und werden unter Lizenz verwendet.
Alle anderen Marken sind Eigentum ihrer jeweiligen Inhaber.
© 2012, 2016 Motorola Solutions, Inc.
Alle Rechte vorbehalten.
4
Hinweis: Kompatibilität getestet mit Motorola Solutions HK200 Bluetooth-Headset.
MOTOROLA SOLUTIONS übernimmt keinerlei Verantwortung für Zusatzgeräte, die nicht von MOTOROLA SOLUTIONS geliefert wurden, die
mit dem Produkt verbunden oder in Verbindung mit dem Produkt verwendet werden, oder für den Betrieb des Produkts mit beliebigen
Zusatzgeräten. Solche Geräte sind ausdrücklich von dieser Garantie ausgeschlossen.
Lautstärkeregler
Bevorzugt keine Sprachanweisungen im Headset
Micro-USB Ladevorgang
Ultraleicht – 11,1 g oder leichter
Ein-/Ausschalter
Schnelle Verbindung zum Headset-Audio
Mikrofon mit Rauschunterdrückung oder Software für laute Umgebung
Laute Audio für laute Umgebungen
Kann am Ohr getragen werden für anhaltenden Komfort
LED für Status
Richtlinie Bluetooth-Headset
68012004024_booklet.book Page 4 Thursday, December 8, 2016 3:51 PM

M
RADIO BIDIRECCIONAL BLUETOOTH SERIE CLP
GUÍA RÁPIDA DE REFERENCIA
Español
1
SPANISH
Agregar auricular Bluetooth (emparejamiento inicial)
Antes del emparejamiento, asegúrese de:
1. Apagar la radio manteniendo pulsado el botón de encendido hasta que parpadee una vez el indicador LED rojo de la luz de
estado inteligente.
2. Desenroscar de la radio el accesorio con cableado.
3. Cambiar el auricular Bluetooth al modo de emparejamiento (consulte las instrucciones del auricular Bluetooth).
Conector para
accesorios
Luz de estado
inteligente
Control de
volumen (+/-)
Botón de encendido
de la batería
Botón MENU
Botón de
presionar para
hablar (PTT)
68012004024_booklet.book Page 1 Thursday, December 8, 2016 3:51 PM

Español
2
Para iniciar el emparejamiento:
1. Con la radio apagada, mantenga pulsado el botón PTT y, a continuación, mantenga pulsado el botón de encendido hasta que
el indicador LED rojo se vuelva azul fijo.
2. El indicador LED muestra una secuencia violeta/azul cuando ha finalizado el emparejamiento.
Nota: La radio CLP utiliza un emparejamiento por proximidad. Asegúrese de que el auricular está a 7 - 15 cm de la radio CLP. El proceso de
emparejamiento puede durar hasta 60 segundos. No pulse ningún otro botón.
El código PIN de emparejamiento Bluetooth solo se aplica a auriculares antiguos (Bluetooth 2.0 y anteriores). El código PIN para CLP
Bluetooth predeterminado es "0000". Consulte el manual del auricular Bluetooth para confirmar si es necesario un código PIN diferente,
en cuyo caso debería utilizar el CPS de CLP para introducir un nuevo código PIN que permita el emparejamiento.
Volver a conectarse al auricular Bluetooth conectado anteriormente
Con los auriculares Bluetooth encendidos:
1. Apague la radio.
2. Desenrosque de la radio el accesorio con cableado.
3. Mantenga pulsado el botón de encendido para encender la radio.
Borrar el historial de auriculares Bluetooth y agregar el auricular Bluetooth
Antes del emparejamiento, asegúrese de:
1. Apagar la radio manteniendo pulsado el botón de encendido hasta parpadee una vez el indicador LED rojo de la luz de estado
inteligente.
2. Desenroscar de la radio el accesorio con cableado.
3. Cambiar el auricular Bluetooth al modo de emparejamiento (consulte las instrucciones del auricular Bluetooth).
Para iniciar el emparejamiento:
1. Con la radio apagada, mantenga pulsado el botón MENU y, a continuación, mantenga pulsado el botón de encendido hasta
que el indicador LED rojo se vuelva azul fijo.
2. El indicador LED muestra una secuencia violeta/azul cuando ha finalizado el emparejamiento.
68012004024_booklet.book Page 2 Thursday, December 8, 2016 3:51 PM

Español
3
Accesorios
Consulte la siguiente tabla para conocer los auriculares Bluetooth compatibles:
Configuración del indicador LED
Modo de usuario Estado del indicador LED Color
Modo de emparejamiento
Bluetooth
Última conexión: parpadeo rápido azul
Agregar o borrar/agregar: azul
Emparejamiento correcto Parpadeo azul/violeta durante 5 segundos
Bluetooth desconectado
Parpadeo rojo/violeta hasta que la radio vuelve a
conectarse
Tiempo de espera agotado/
error de emparejamiento
Parpadeo rojo/violeta hasta que la radio vuelve a
conectarse
Directrices de uso del auricular Bluetooth
Compatibilidad con el perfil de auriculares (HSP) 1.2
Especificación EDR de Bluetooth 2.1 + y superior
Capacidad para un máximo de 8 auriculares Bluetooth en el historial de últimas conexiones
(consulte el CPS para la configuración)
7 horas de tiempo de conversación o más
Mitigación de eco
Controles de volumen
68012004024_booklet.book Page 3 Thursday, December 8, 2016 3:51 PM

Español
MOTOROLA, MOTO, MOTOROLA SOLUTIONS y el logotipo de la M estilizada son marcas
comerciales o marcas comerciales registradas de Motorola Trademark Holdings, LLC y se utilizan bajo
licencia.
Todas las demás marcas comerciales son propiedad de sus respectivos propietarios.
© 2012, 2016 Motorola Solutions, Inc.
Reservados todos los derechos.
4
Nota: Compatibilidad probada con los auriculares Bluetooth HK200 de Motorola Solutions.
MOTOROLA SOLUTIONS no puede hacerse responsable en forma alguna de ningún equipo auxiliar no suministrado por MOTOROLA
SOLUTIONS que se conecte o utilice junto con el Producto, ni del funcionamiento del Producto con cualquier tipo de equipo auxiliar. Además,
dichos equipos quedan expresamente excluidos de esta garantía.
Preferiblemente, sin mensajes de voz en el auricular
Carga a través de micro-USB
Peso ligero: 11,1 g o menos
Interruptor de encendido/apagado
Conexión rápida con el audio del auricular
Micrófono con reducción de ruido o software para entornos ruidosos
Audio más fuerte para entornos ruidosos
Uso sobre la oreja para una mayor comodidad
Indicador LED de estado
Directrices de uso del auricular Bluetooth
68012004024_booklet.book Page 4 Thursday, December 8, 2016 3:51 PM

M
RADIO BIDIRECTIONNELLE BLUETOOTH SÉRIE CLP
GUIDE DE RÉFÉRENCE RAPIDE
Français
1
FRENCH
Ajout du casque Bluetooth (couplage initial)
Avant le couplage :
1. Mettez la radio hors tension en appuyant longuement sur le bouton de mise sous tension jusqu'à ce que le voyant d'état
intelligent rouge clignote une fois.
2. Dévissez l'accessoire câblé de la radio.
3. Placez le casque Bluetooth en mode de couplage (reportez-vous à la brochure d'instructions du casque Bluetooth).
Connecteur pour
accessoires
Voyant d'état
intelligent
Contrôle du
volume (+ / -)
Bouton de mise
sous tension /
batterie
Bouton
MENU
Bouton PTT
(Push-to-Talk)
68012004024_booklet.book Page 1 Thursday, December 8, 2016 3:51 PM

Français
2
Pour effectuer le couplage :
1. Une fois la radio éteinte, maintenez le bouton PTT, puis appuyez longuement sur le bouton de mise sous tension jusqu'à ce
que le voyant rouge devienne bleu fixe.
2. Lorsque le couplage est effectué, le voyant clignote selon une séquence violet / bleu.
Remarque : la radio CLP utilise le couplage par proximité. Assurez-vous que le casque se trouve à une distance de 7 à 15 cm de la radio CLP. L e
processus de couplage dure jusqu'à 60 secondes. N'appuyez sur aucun autre bouton.
Le code PIN de couplage Bluetooth n'est disponible que pour les anciens casques (Bluetooth 2.0 et versions antérieures). Le code PIN
Bluetooth par défaut de la radio CLP est défini sur 0000. Reportez-vous au manuel de votre casque Bluetooth pour vérifier si un code PIN
différent est nécessaire. Le cas échéant, vous devrez utiliser le CPS de la radio CLP pour saisir un nouveau code PIN permettant le
couplage.
Reconnexion au dernier casque Bluetooth connecté
Lorsque le casque Bluetooth est allumé :
1. Mettez la radio hors tension.
2. Dévissez l'accessoire câblé de la radio.
3. Appuyez longuement sur le bouton de mise sous tension pour allumer la radio.
Suppression de l'historique et ajout d'un casque Bluetooth
Avant le couplage :
1. Mettez la radio hors tension en appuyant longuement sur le bouton de mise sous tension jusqu'à ce que le voyant d'état
intelligent rouge clignote une fois.
2. Dévissez l'accessoire câblé de la radio.
3. Placez le casque Bluetooth en mode de couplage (reportez-vous à la brochure d'instructions du casque Bluetooth).
Pour effectuer le couplage :
1. Une fois la radio éteinte, maintenez le bouton MENU, puis appuyez longuement sur le bouton de mise sous tension jusqu'à ce
que le voyant rouge devienne bleu fixe.
2. Lorsque le couplage est effectué, le voyant clignote selon une séquence violet / bleu.
68012004024_booklet.book Page 2 Thursday, December 8, 2016 3:51 PM
Sayfa yükleniyor ...
Sayfa yükleniyor ...
Sayfa yükleniyor ...
Sayfa yükleniyor ...
Sayfa yükleniyor ...
Sayfa yükleniyor ...
Sayfa yükleniyor ...
Sayfa yükleniyor ...
Sayfa yükleniyor ...
Sayfa yükleniyor ...
Sayfa yükleniyor ...
Sayfa yükleniyor ...
Sayfa yükleniyor ...
Sayfa yükleniyor ...
Sayfa yükleniyor ...
Sayfa yükleniyor ...
Sayfa yükleniyor ...
Sayfa yükleniyor ...
Sayfa yükleniyor ...
Sayfa yükleniyor ...
Sayfa yükleniyor ...
Sayfa yükleniyor ...
Sayfa yükleniyor ...
Sayfa yükleniyor ...
Sayfa yükleniyor ...
Sayfa yükleniyor ...
Sayfa yükleniyor ...
Sayfa yükleniyor ...
Sayfa yükleniyor ...
Sayfa yükleniyor ...
Sayfa yükleniyor ...
Sayfa yükleniyor ...
Sayfa yükleniyor ...
Sayfa yükleniyor ...
Sayfa yükleniyor ...
Sayfa yükleniyor ...
Sayfa yükleniyor ...
Sayfa yükleniyor ...
Sayfa yükleniyor ...
Sayfa yükleniyor ...
Sayfa yükleniyor ...
Sayfa yükleniyor ...
Sayfa yükleniyor ...
Sayfa yükleniyor ...
-
 1
1
-
 2
2
-
 3
3
-
 4
4
-
 5
5
-
 6
6
-
 7
7
-
 8
8
-
 9
9
-
 10
10
-
 11
11
-
 12
12
-
 13
13
-
 14
14
-
 15
15
-
 16
16
-
 17
17
-
 18
18
-
 19
19
-
 20
20
-
 21
21
-
 22
22
-
 23
23
-
 24
24
-
 25
25
-
 26
26
-
 27
27
-
 28
28
-
 29
29
-
 30
30
-
 31
31
-
 32
32
-
 33
33
-
 34
34
-
 35
35
-
 36
36
-
 37
37
-
 38
38
-
 39
39
-
 40
40
-
 41
41
-
 42
42
-
 43
43
-
 44
44
-
 45
45
-
 46
46
-
 47
47
-
 48
48
-
 49
49
-
 50
50
-
 51
51
-
 52
52
-
 53
53
-
 54
54
-
 55
55
-
 56
56
-
 57
57
-
 58
58
-
 59
59
-
 60
60
-
 61
61
-
 62
62
-
 63
63
-
 64
64


Motorola CLP series Başvuru Kılavuzu
- Kategori
- Mobil kulaklıklar
- Tip
- Başvuru Kılavuzu
- Bu kılavuz için de uygundur
Diğer dillerde
- español: Motorola CLP series Guia de referencia
- français: Motorola CLP series Guide de référence
- italiano: Motorola CLP series Guida di riferimento
- svenska: Motorola CLP series Referens guide
- polski: Motorola CLP series instrukcja obsługi
- Deutsch: Motorola CLP series Referenzhandbuch
- português: Motorola CLP series Guia de referência
- English: Motorola CLP series Reference guide
- dansk: Motorola CLP series henvisning guide
- русский: Motorola CLP series Справочное руководство
- suomi: Motorola CLP series pikaopas
- Nederlands: Motorola CLP series Referentie gids
İlgili Makaleler
-
Motorola CLP446 Kullanım kılavuzu
-
-
Motorola CLPe Series Kullanım kılavuzu
-
Motorola PMLN6396 Kullanım kılavuzu
-
-
Motorola H790 - Headset - Monaural Hızlı başlangıç Kılavuzu
-
-
Motorola HK200 Hızlı başlangıç Kılavuzu
-
-