
CLK446
USER GUIDE
en
de-DE
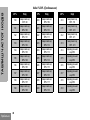
ru-RU es-ES sv-SE tr-TR
it-IT nn-N O pl- PL pt-PT
da-DK nl -NL fi-FI fr-FR
uk-UA
Front_Multilingual.fm Page 1 Tuesday, August 25, 2015 12:32 PM

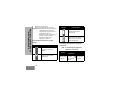
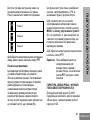
Open Source Software Legal Notices:
This Motorola product contains Open Source Software. For information regarding
licenses, acknowledgements, required copyright notices and other usage terms,
refer to the documentation for this Motorola product at:
https://emeaonline.motorolasolutions.com
Go to: Resource Center > Product Information > Manual > Accessories.
MN002168A01.book Page 2 Monday, September 28, 2015 8:01 PM

English
1
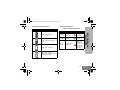
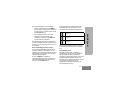
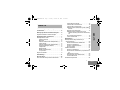
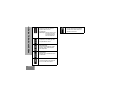
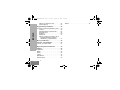
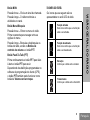
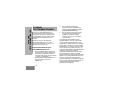
CONTENTS
Contents. . . . . . . . . . . . . . . . . . . . . . . . . . . . .1
Computer Software Copyrights . . . . . . . . . .3
Safety . . . . . . . . . . . . . . . . . . . . . . . . . . . . . . .4
Batteries and Chargers Safety Information 5
Operational Safety Guidelines. . . . . . . . . . . . .6
Radio Overview . . . . . . . . . . . . . . . . . . . . . . .7
Parts Of The Radio . . . . . . . . . . . . . . . . . . . . .7
Built-in Antenna. . . . . . . . . . . . . . . . . . . . .8
Microphone . . . . . . . . . . . . . . . . . . . . . . . .8
Volume Control Button (+) . . . . . . . . . . . .8
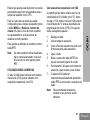
INFO Button . . . . . . . . . . . . . . . . . . . . . . .8
Volume Control Button (–) . . . . . . . . . . . .8
Programming Cable Jack . . . . . . . . . . . . .8
Power Button . . . . . . . . . . . . . . . . . . . . . .8
MON Button . . . . . . . . . . . . . . . . . . . . . . .8
Menu/Lock Button. . . . . . . . . . . . . . . . . . .8
Push-To-Talk (PTT) Button. . . . . . . . . . . .9
Display icons . . . . . . . . . . . . . . . . . . . . . . . . . .9
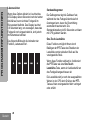
Troubleshooting . . . . . . . . . . . . . . . . . . . . .11
Batteries and Chargers. . . . . . . . . . . . . . . .15
Battery Features And Charging Options . . . .15
About the Li-Ion Battery . . . . . . . . . . . . . 15
Installing the Lithium-Ion (Li-Ion) Battery 16
Removing the Lithium-Ion (Li-Ion) Battery .
16
Charging the Radio with the Single-Unit
Charger . . . . . . . . . . . . . . . . . . . . . . . 17
Charging A Standalone Battery . . . . . . . 17
Charging the Radio with the Multi-Unit
Charger (Optional Accessory) . . . . . . 18
LED Display Battery Indicators . . . . . . . 19
Charger LED Indicators . . . . . . . . . . . . . 19
Getting Started . . . . . . . . . . . . . . . . . . . . . . 20
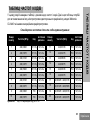
Turning radio ON/OFF . . . . . . . . . . . . . . . . . 20
Adjusting Volume. . . . . . . . . . . . . . . . . . 20
Selecting a Channel. . . . . . . . . . . . . . . . 20
Receiving a Call. . . . . . . . . . . . . . . . . . . 20
Talk Range . . . . . . . . . . . . . . . . . . . . . . 21
Menu Options. . . . . . . . . . . . . . . . . . . . . . . . 22
Selecting a Channel. . . . . . . . . . . . . . . . 22
Starting and Stopping Scan . . . . . . . . . . 22
Nuisance Channel Delete . . . . . . . . . . . 23
Setting Squelch Levels . . . . . . . . . . . . . 23
Repeater/Talkaround . . . . . . . . . . . . . . . 24
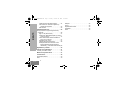
CONTENTS
MN002168A01TOC.fm Page 1 Friday, October 30, 2015 10:38 AM

English
2
CONTENTS
Hands-Free Use/VOX . . . . . . . . . . . . . . . . . .24
With Compatible VOX Accessories. . . . .24
Enabling and Disabling VOX. . . . . . . . . .25
Voice Announcement . . . . . . . . . . . . . . .25
Programming Features. . . . . . . . . . . . . . . .26
Customer Programming Software (CPS) . . .26
Sign of Life . . . . . . . . . . . . . . . . . . . . . . .27
Transmit Time-Out Timer . . . . . . . . . . . .27
One Touch Volume. . . . . . . . . . . . . . . . .27
Call Tone. . . . . . . . . . . . . . . . . . . . . . . . .27
Reverse Burst . . . . . . . . . . . . . . . . . . . . .28
Cloning Radios Using the CPS Cloning Ca-
ble Kit P/N HKKN4028_ (optional acces-
sory) . . . . . . . . . . . . . . . . . . . . . . . . . .28
Use and Care . . . . . . . . . . . . . . . . . . . . . . . .30
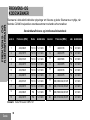
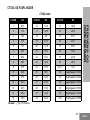
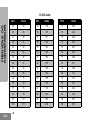
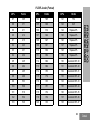
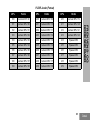
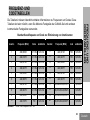
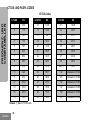
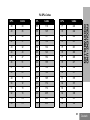
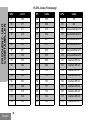
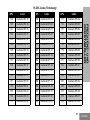
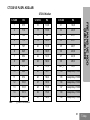
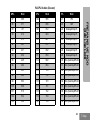
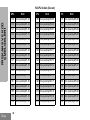
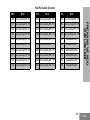
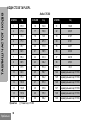
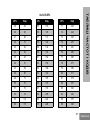
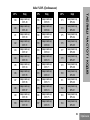
Frequency and Code Charts . . . . . . . . . . .31
CTCSS and PL/DPL Codes . . . . . . . . . . . . .32
Motorola Limited Warranty. . . . . . . . . . . . .37
Accessories . . . . . . . . . . . . . . . . . . . . . . . . .39
Audio Accessories. . . . . . . . . . . . . . . . . . . . .39
Battery. . . . . . . . . . . . . . . . . . . . . . . . . . . . . .39
Cables . . . . . . . . . . . . . . . . . . . . . . . . . . . . . .39
Chargers . . . . . . . . . . . . . . . . . . . . . . . . . . . .39
Carry Accessories . . . . . . . . . . . . . . . . . . . . 40
Power Supply . . . . . . . . . . . . . . . . . . . . . . . . 40
Cover . . . . . . . . . . . . . . . . . . . . . . . . . . . . . . 40
MN002168A01TOC.fm Page 2 Friday, October 30, 2015 10:38 AM

English
3
COMPUTER SOFTWARE
COPYRIGHTS
COMPUTER SOFTWARE
COPYRIGHTS
The Motorola products described in this
manual may include copyrighted Motorola
computer programs stored in semiconductor
memories or other media. Laws in the United
States and other countries preserve for
Motorola certain exclusive rights for
copyrighted computer programs, including, but
not limited to, the exclusive right to copy or
reproduce in any form the copyrighted
computer program. Accordingly, any
copyrighted Motorola computer programs
contained in the Motorola products described in
this manual may not be copied, reproduced,
modified, reverse-engineered, or distributed in
any manner without the express written
permission of Motorola.
Furthermore, the purchase of Motorola
products shall not be deemed to grant either
directly or by implication, estoppel, or
otherwise, any license under the copyrights,
patents or patent applications of Motorola,
except for the normal non-exclusive license to
use that arises by operation of law in the sale of
a product.
MN002168A01.book Page 3 Monday, September 28, 2015 8:01 PM

English
4
SAFETY
SAFETY
RF ENERGY EXPOSURE AND
PRODUCT SAFETY GUIDE FOR
PORTABLE TWO-WAY RADIOS
ATTENTION!
Before using this product, read the RF Energy
Exposure and Product Safety Guide that ships
with the radio which contains instructions for
safe usage and RF energy awareness and
control for compliance with applicable
standards and regulation.
MN002168A01.book Page 4 Monday, September 28, 2015 8:01 PM

English
5
BATTERIES AND
CHARGERS SAFETY
BATTERIES AND
CHARGERS SAFETY
INFORMATION
This document contains important safety and
operating instructions. Read these instructions
carefully and save them for future reference.
Before using the battery charger, read all the
instructions and cautionary markings on
• the charger,
• the battery, and
• the radio using the battery
1. To reduce risk of injury, charge only the
rechargeable Motorola-authorized
batteries. Other batteries may explode,
causing personal injury and damage.
2. Use of accessories not recommended by
Motorola may result in risk of fire, electric
shock, or injury.
3. To reduce risk of damage to the electric
plug and cord, pull by the plug rather than
the cord when disconnecting the charger.
4. An extension cord should not be used
unless absolutely necessary. Use of an
improper extension cord could result in
risk of fire and electric shock. If an
extension cord must be used, make sure
that the cord size is 18AWG for lengths
up to 100 feet (30.48 m), and 16AWG for
lengths up to 150 feet (45.72 m).
5. To reduce risk of fire, electric shock, or
injury, do not operate the charger if it has
been broken or damaged in any way.
Take it to a qualified Motorola service
representative.
6. Do not disassemble the charger; it is not
repairable and replacement parts are not
available. Disassembly of the charger
may result in risk of electrical shock or
fire.
7. To reduce risk of electric shock, unplug
the charger from the AC outlet before
attempting any maintenance or cleaning.
MN002168A01.book Page 5 Monday, September 28, 2015 8:01 PM

English
6
BATTERIES AND CHARGERS
SAFETY INFORMATION
OPERATIONAL SAFETY
GUIDELINES
• Turn the radio OFF when charging battery.
• The charger is not suitable for outdoor use.
Use only in dry locations/conditions.
• Connect charger only to an appropriately
fused and wired supply of the correct
voltage (as specified on the product).
• Disconnect charger from line voltage by
removing main plug.
• The outlet to which this equipment is
connected should be nearby and easily
accessible.
• In equipment using fuses, replacements
must comply with the type and rating
specified in the equipment instructions.
• Maximum ambient temperature around the
power supply equipment must not exceed
104°F (40°C).
• Power output from the power supply unit
must not exceed the ratings stated on the
product label located at the bottom of the
charger.
• Make sure that the cord is located where it
will not be stepped on, tripped over, or
subjected to water, damage, or stress.
MN002168A01.book Page 6 Monday, September 28, 2015 8:01 PM

English
7
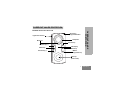
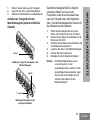
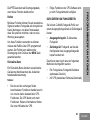
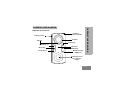
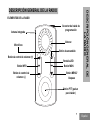
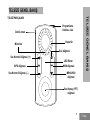
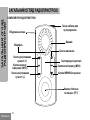
RADIO OVERVIEW
RADIO OVERVIEW
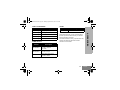
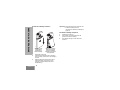
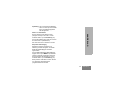
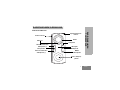
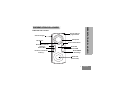
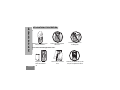
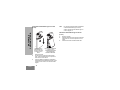
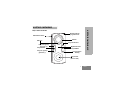
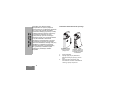
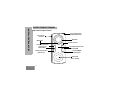
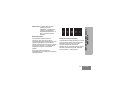
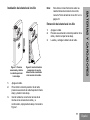
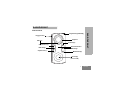
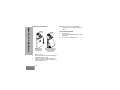
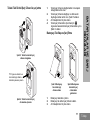
PARTS OF THE RADIO
MON button
Volume Control Button (+)
Programming Cable Jack
Built-in antenna
Microphone
Speaker
Power button
MENU/Lock button
Push-to-Talk (PTT)
button
LED Display
Volume Control Button (–)
INFO button
MN002168A01.book Page 7 Monday, September 28, 2015 8:01 PM

English
8
RADIO OVERVIEW
Built-in Antenna
The antenna for the CLK446 radio is non-
removable.
Microphone
Speak clearly into the microphone when
sending a message.
Volume Control Button (+)
Short press – Increases the volume gradually.
Note: Use this button to scroll through menu
items when in Menu mode.
Long press – Increases the volume
continuously.
INFO Button
Short press – Displays and announces current
channel and battery level.
To stop status display and Voice
Announcement, press this button again. The
radio returns to idle mode.
Volume Control Button (–)
Short press – Decreases the volume gradually.
Note: Use this button to scroll through menu
items when in Menu mode.
Long press – Decreases the volume
continuously.
Programming Cable Jack
This jack is used to connect accessories like
microphone, programming cable, cloning cable
and other authorized accessories.
Power Button
Long press/short press – Powers the radio on/
off.
The Power button plays a different function
when pressed simultaneously with other
buttons.
• When pressed with the Volume Control
Button (+), the radio powers up in factory
reset mode.
• When pressed with the INFO button, the
radio powers up in cloning mode.
• When pressed with the Volume Control
Button (–), the radio establishes a
connection with the connected PC.
MON Button
Short press – Sends a Call Tone.
Long press – The radio monitors for activity in
the channel.
MN002168A01.book Page 8 Monday, September 28, 2015 8:01 PM

English
9
RADIO OVERVIEW
Menu/Lock Button
Short press – Radio enters the Menu. Press
again to navigate from one menu setting to
another.
Long press – Locks and unlocks the radio
buttons, except the Volume Control Buttons
and PTT button.
Push-To-Talk (PTT) Button
Press and hold down the PTT button to talk.
Release the PTT button to listen.
Depending on the settings programmed in the
Customer Programming Software (CPS), the
PTT button can also function as a One Touch
Volume button.
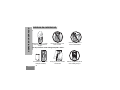
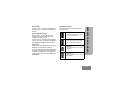
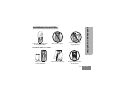
DISPLAY ICONS
The following icons are icons that appear on
the LED display of the radio.
Feature Enabled
This icon indicates that a feature is
being enabled.
Feature Disabled
This icon indicates that a feature is
being disabled.
Receiving
Indicates that the radio is receiving.
Transmitting
Indicates the radio is transmitting.
MN002168A01.book Page 9 Monday, September 28, 2015 8:01 PM

English
10
RADIO OVERVIEW
Channel
Indicates the Channel number the
radio is currently in.
Note: Display icon differs
according to the current
channel the radio is in.
Scan
Indicates Scan feature in the Menu
setting.
Squelch Level
Indicates squelch level settings.
There are three squelch levels.
Repeater Access
Toggle to turn the Repeater mode
on/off.
VOX
Initiates a hands-free voice
activated call.
Voice Announcement
If enabled, the radio audibly
indicates the radio operations.
MN002168A01.book Page 10 Monday, September 28, 2015 8:01 PM

English
11
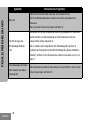
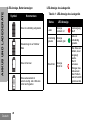
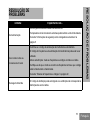
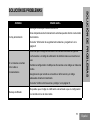
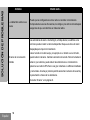
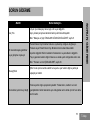
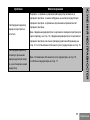
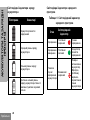
TROUBLESHOOTING
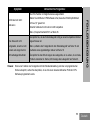
TROUBLESHOOTING
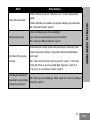
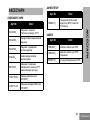
Symptom Try This...
No Power
Recharge or replace the Li-Ion battery.
Extreme operating temperatures may affect battery life.
Refer to “Batteries and Chargers Safety Information” on page 5.
Hearing other noises or
conversation on a channel
Confirm Interference Eliminator Code is set.
Frequency or Interference Eliminator Code may be in use.
Change settings: either change frequencies or codes on all radios.
Make sure radio is at the right frequency and code when transmitting.
Refer to “Frequency and Code Charts” on page 30.
Message Scrambled
Scramble Code might be ON, and/or setting does not match the other radios'
settings.
Audio quality not good enough
Radio settings might not be matching up correctly. Double check frequencies,
codes and bandwidths to make sure they are identical in all radios.
MN002168A01.book Page 11 Monday, September 28, 2015 8:01 PM

English
12
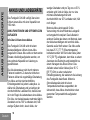
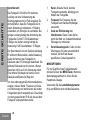
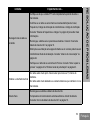
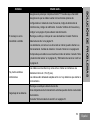
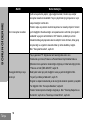
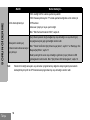
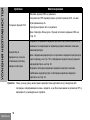
TROUBLESHOOTING
Limited talk range
Steel and/or concrete structures, heavy foliage, buildings or vehicles decrease
range. Check for clear line of sight to improve transmission.
Wearing radio close to body such as in a pocket or on a belt decreases range.
Change location of radio. To increase range and coverage, you can reduce
obstructions or increase power. UHF radios provides greater coverage in
industrial and commercial buildings. Increasing power provides greater signal
range and increased penetration through obstructions.
Refer to “Talk Range” on page 20.
Message not transmitted or
received
Make sure the PTT button is completely pressed when transmitting.
Confirm that the radios have the same Channel, Frequency, Interference
Eliminator Code and Scramble Code settings. Refer to “Frequency and Code
Charts” on page 30 for further information.
Recharge, replace and/or reposition batteries. Refer to “About the Li-Ion
Battery” on page 15.
Obstructions and operating indoors, or in vehicles, may interfere. Change
location. Refer to “Talk Range” on page 20.
Verify that the radio is not in Scan. Refer to “Starting and Stopping Scan” on
page 22 and “Nuisance Channel Delete” on page 22.
Symptom Try This...
MN002168A01.book Page 12 Monday, September 28, 2015 8:01 PM

English
13
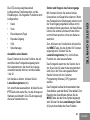
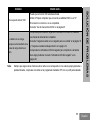
TROUBLESHOOTING
Heavy static or interference
Radios are too close; they must be at 1.5 meters apart.
Radios are too far apart or obstacles are interfering with transmission.
Refer to “Talk Range” on page 20.
Low batteries
Recharge or replace Li-Ion battery.
Extreme operating temperatures affect battery life.
Refer to “About the Li-Ion Battery” on page 15.
Drop-in Charger LED light
does not blink
Check that the radio/battery is properly inserted and check the battery/charger
contacts to ensure that they are clean and charging pin is inserted correctly.
Refer to “Charging the Radio with the Single-Unit Charger” on page 17,
“Charging the Radio with the Multi-Unit Charger (Optional Accessory)” on
page 18 and “Installing the Lithium-Ion (Li-Ion) Battery” on page 16.
Low battery indicator is
blinking although new
batteries are inserted
Refer to “Installing the Lithium-Ion (Li-Ion) Battery” on page 16, and “About the
Li-Ion Battery” on page 15.
Symptom Try This...
MN002168A01.book Page 13 Monday, September 28, 2015 8:01 PM

English
14
TROUBLESHOOTING
Cannot activate VOX
VOX feature might be set to OFF.
Use the CPS to ensure that the VOX Sensitivity level is not set to ‘0’.
Accessory not working or not compatible.
Refer to “Hands-Free Use/VOX” on page 24.
Battery does not charge
although it has been placed in
the drop-in charger for a while
Check drop-in tray charger is properly connected and correspond to a
compatible power supply.
Refer to “Charging the Radio with the Single-Unit Charger” on page 17 and
“Charging A Standalone Battery” on page 17.
Check the charger’s LEDs indicators to see if the battery has a problem. Refer
to “Charger LED Indicators” on page 19.
Note: Whenever a feature in the radio seems to not correspond to the default or preprogrammed values, check
to see if the radio has been programmed using the CPS with a customized profile.
Symptom Try This...
MN002168A01.book Page 14 Monday, September 28, 2015 8:01 PM

English
15
BATTERIES AND
CHARGERS
BATTERIES AND
CHARGERS
The CLK446 radio provides a Lithium-Ion
battery that comes in 1130 mAh capacity.
BATTERY FEATURES AND CHARGING
OPTIONS
About the Li-Ion Battery
The CLK446 radio comes equipped with a
rechargeable Li-Ion battery. This battery should
be fully charged before initial use to ensure
optimum capacity and performance.
Battery life is determined by several factors.
Among the more critical are the regular
overcharge of batteries and the average depth
of discharge with each cycle. Typically, the
greater the overcharge and the deeper the
average discharge, the fewer cycles a battery
will last. For example, a battery which is
overcharged and discharged 100% several
times a day, lasts fewer cycles than a battery
that receives less of an overcharge and is
discharged to 50% per day. Further, a battery
which receives minimal overcharging and
averages only 25% discharge, lasts even
longer.
Motorola batteries are designed specifically to
be used with a Motorola charger and vice
versa. Charging in non-Motorola equipment
may lead to battery damage and void the
battery warranty. The battery should be at
about 77°F (25°C) (room temperature),
whenever possible. Charging a cold battery
(below 50° F [10°C]) may result in leakage of
electrolyte and ultimately in failure of the
battery. Charging a hot battery (above 95°F
[35°C]) results in reduced discharge capacity,
affecting the performance of the radio.
Motorola rapid-rate battery chargers contain a
temperature-sensing circuit to ensure that
batteries are charged within the temperature
limits stated above.
MN002168A01.book Page 15 Monday, September 28, 2015 8:01 PM

English
16
BATTERIES AND CHARGERS
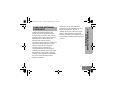
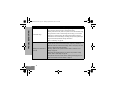
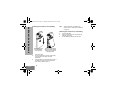
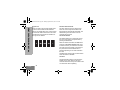
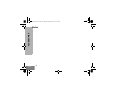
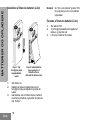
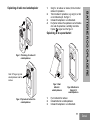
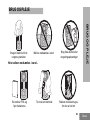
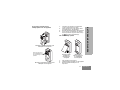
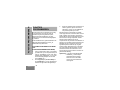
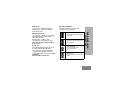
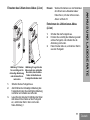
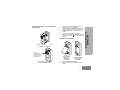
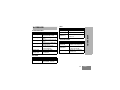
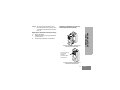
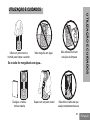
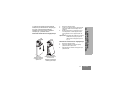
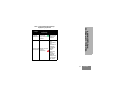
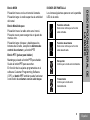
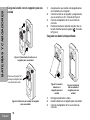
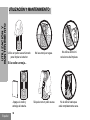
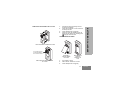
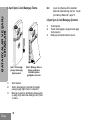
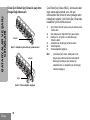
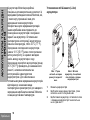
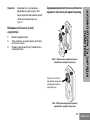
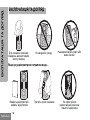
Installing the Lithium-Ion (Li-Ion) Battery
1. Turn off the radio.
2. To remove the back cover of the radio, gently
press the back cover down and slide
downwards.
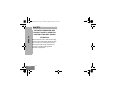
3. Insert the battery by connecting the grooves of
the battery to the grooves on the radio then,
push it down. Refer to Figure 1.
Note: To learn about the Li-Ion Battery Life
features, refer to “About the Li-Ion Battery”
on page 15.
Removing the Lithium-Ion (Li-Ion) Battery
1. Turn OFF the radio.
2. Gently push the back cover of the radio and
slide the cover down.
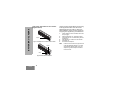
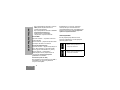
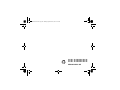
3. Lift and detach the battery from the radio.
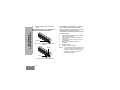
Figure 1: Gently push
and slide the back
cover downward.
Figure 2: Insert the battery
and ensure that the battery
grooves are connected to
the radio grooves.
MN002168A01.book Page 16 Monday, September 28, 2015 8:01 PM

English
17
BATTERIES AND
CHARGERS
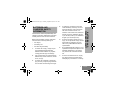
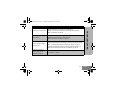
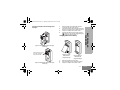
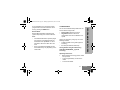
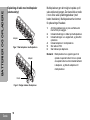
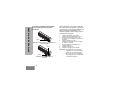
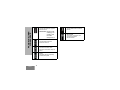
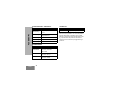
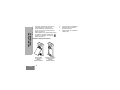
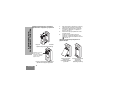
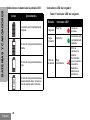
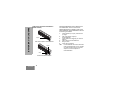
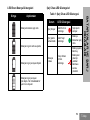
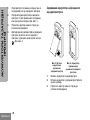
Charging the Radio with the Single-Unit
Charger
1. Ensure that the radio is switched off before
connecting the radio to the charger.
2. Connect the radio to the charger and make sure
that there is a clicking sound. Refer to Figure 3.
3. Plug the AC Adaptor into a power outlet.
4. To detach the radio from the charger, pull the
radio away from the charger while pressing the
logo down. Refer to Figure 4.
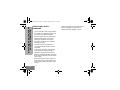
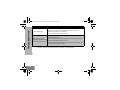
Charging A Standalone Battery
1. Remove the battery from the radio.
2. Insert the battery into the single-unit charger.
3. Plug the AC Adaptor into a power outlet.
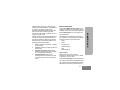
Figure 3: Connecting the radio to the single-
unit charger
Figure 4: Detaching the radio from the single-
unit charger
Push the ‘M’ logo and pull
the single-unit charger
away from the radio.
Figure 5: Insert the
battery into the
single-unit charger
Figure 6: Battery is
attached to the
single-unit charger
MN002168A01.book Page 17 Monday, September 28, 2015 8:01 PM

English
18
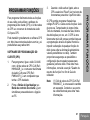
BATTERIES AND CHARGERS
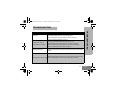
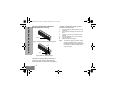
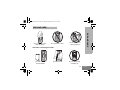
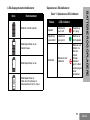
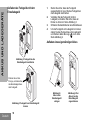
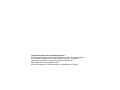
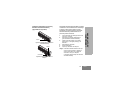
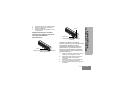
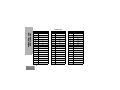
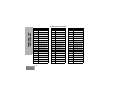
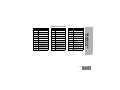
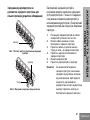
Charging the Radio with the Multi-Unit
Charger (Optional Accessory)
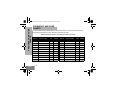
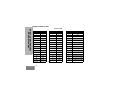
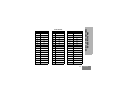
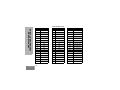
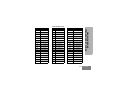
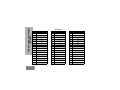
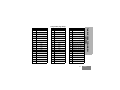
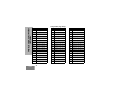
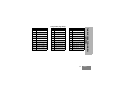
The Multi-Unit Charger (MUC) allows drop-in
charging of up to six radios. Each of the six
charging pockets can hold a radio (with battery
installed). The Multi-Unit Charger provides
pockets for headset storage.
1. Place the charger on a flat surface or mount it
on the wall.
2. Insert the power cord plug into the jack on the
MUC.
3. Plug the cord into an AC outlet and then into
charger.
4. Insert the adapter into the multi-unit charger.
5. Turn the radio OFF.
6. Attach the radio to the adapter.
Note: The multi-unit charger can also be used to
charge the standalone battery. To charge
the standalone battery, insert the battery into
the adapter and attach the adapter to the
multi-unit charger.
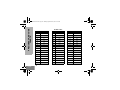
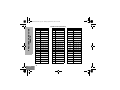
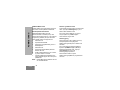
Figure 7: Insert the adapter into the multi-unit charger
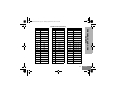
Figure 8: Attach the radio to the adapter
Adapter
Adapter
Radio
MN002168A01.book Page 18 Monday, September 28, 2015 8:01 PM
Sayfa yükleniyor...
Sayfa yükleniyor...
Sayfa yükleniyor...
Sayfa yükleniyor...
Sayfa yükleniyor...
Sayfa yükleniyor...
Sayfa yükleniyor...
Sayfa yükleniyor...
Sayfa yükleniyor...
Sayfa yükleniyor...
Sayfa yükleniyor...
Sayfa yükleniyor...
Sayfa yükleniyor...
Sayfa yükleniyor...
Sayfa yükleniyor...
Sayfa yükleniyor...
Sayfa yükleniyor...
Sayfa yükleniyor...
Sayfa yükleniyor...
Sayfa yükleniyor...
Sayfa yükleniyor...
Sayfa yükleniyor...
Sayfa yükleniyor...
Sayfa yükleniyor...
Sayfa yükleniyor...
Sayfa yükleniyor...
Sayfa yükleniyor...
Sayfa yükleniyor...
Sayfa yükleniyor...
Sayfa yükleniyor...
Sayfa yükleniyor...
Sayfa yükleniyor...
Sayfa yükleniyor...
Sayfa yükleniyor...
Sayfa yükleniyor...
Sayfa yükleniyor...
Sayfa yükleniyor...
Sayfa yükleniyor...
Sayfa yükleniyor...
Sayfa yükleniyor...
Sayfa yükleniyor...
Sayfa yükleniyor...
Sayfa yükleniyor...
Sayfa yükleniyor...
Sayfa yükleniyor...
Sayfa yükleniyor...
Sayfa yükleniyor...
Sayfa yükleniyor...
Sayfa yükleniyor...
Sayfa yükleniyor...
Sayfa yükleniyor...
Sayfa yükleniyor...
Sayfa yükleniyor...
Sayfa yükleniyor...
Sayfa yükleniyor...
Sayfa yükleniyor...
Sayfa yükleniyor...
Sayfa yükleniyor...
Sayfa yükleniyor...
Sayfa yükleniyor...
Sayfa yükleniyor...
Sayfa yükleniyor...
Sayfa yükleniyor...
Sayfa yükleniyor...
Sayfa yükleniyor...
Sayfa yükleniyor...
Sayfa yükleniyor...
Sayfa yükleniyor...
Sayfa yükleniyor...
Sayfa yükleniyor...
Sayfa yükleniyor...
Sayfa yükleniyor...
Sayfa yükleniyor...
Sayfa yükleniyor...
Sayfa yükleniyor...
Sayfa yükleniyor...
Sayfa yükleniyor...
Sayfa yükleniyor...
Sayfa yükleniyor...
Sayfa yükleniyor...
Sayfa yükleniyor...
Sayfa yükleniyor...
Sayfa yükleniyor...
Sayfa yükleniyor...
Sayfa yükleniyor...
Sayfa yükleniyor...
Sayfa yükleniyor...
Sayfa yükleniyor...
Sayfa yükleniyor...
Sayfa yükleniyor...
Sayfa yükleniyor...
Sayfa yükleniyor...
Sayfa yükleniyor...
Sayfa yükleniyor...
Sayfa yükleniyor...
Sayfa yükleniyor...
Sayfa yükleniyor...
Sayfa yükleniyor...
Sayfa yükleniyor...
Sayfa yükleniyor...
Sayfa yükleniyor...
Sayfa yükleniyor...
Sayfa yükleniyor...
Sayfa yükleniyor...
Sayfa yükleniyor...
Sayfa yükleniyor...
Sayfa yükleniyor...
Sayfa yükleniyor...
Sayfa yükleniyor...
Sayfa yükleniyor...
Sayfa yükleniyor...
Sayfa yükleniyor...
Sayfa yükleniyor...
Sayfa yükleniyor...
Sayfa yükleniyor...
Sayfa yükleniyor...
Sayfa yükleniyor...
Sayfa yükleniyor...
Sayfa yükleniyor...
Sayfa yükleniyor...
Sayfa yükleniyor...
Sayfa yükleniyor...
Sayfa yükleniyor...
Sayfa yükleniyor...
Sayfa yükleniyor...
Sayfa yükleniyor...
Sayfa yükleniyor...
Sayfa yükleniyor...
Sayfa yükleniyor...
Sayfa yükleniyor...
Sayfa yükleniyor...
Sayfa yükleniyor...
Sayfa yükleniyor...
Sayfa yükleniyor...
Sayfa yükleniyor...
Sayfa yükleniyor...
Sayfa yükleniyor...
Sayfa yükleniyor...
Sayfa yükleniyor...
Sayfa yükleniyor...
Sayfa yükleniyor...
Sayfa yükleniyor...
Sayfa yükleniyor...
Sayfa yükleniyor...
Sayfa yükleniyor...
Sayfa yükleniyor...
Sayfa yükleniyor...
Sayfa yükleniyor...
Sayfa yükleniyor...
Sayfa yükleniyor...
Sayfa yükleniyor...
Sayfa yükleniyor...
Sayfa yükleniyor...
Sayfa yükleniyor...
Sayfa yükleniyor...
Sayfa yükleniyor...
Sayfa yükleniyor...
Sayfa yükleniyor...
Sayfa yükleniyor...
Sayfa yükleniyor...
Sayfa yükleniyor...
Sayfa yükleniyor...
Sayfa yükleniyor...
Sayfa yükleniyor...
Sayfa yükleniyor...
Sayfa yükleniyor...
Sayfa yükleniyor...
Sayfa yükleniyor...
Sayfa yükleniyor...
Sayfa yükleniyor...
Sayfa yükleniyor...
Sayfa yükleniyor...
Sayfa yükleniyor...
Sayfa yükleniyor...
Sayfa yükleniyor...
Sayfa yükleniyor...
Sayfa yükleniyor...
Sayfa yükleniyor...
Sayfa yükleniyor...
Sayfa yükleniyor...
Sayfa yükleniyor...
Sayfa yükleniyor...
Sayfa yükleniyor...
Sayfa yükleniyor...
Sayfa yükleniyor...
Sayfa yükleniyor...
Sayfa yükleniyor...
Sayfa yükleniyor...
Sayfa yükleniyor...
Sayfa yükleniyor...
Sayfa yükleniyor...
Sayfa yükleniyor...
Sayfa yükleniyor...
Sayfa yükleniyor...
Sayfa yükleniyor...
Sayfa yükleniyor...
Sayfa yükleniyor...
Sayfa yükleniyor...
Sayfa yükleniyor...
Sayfa yükleniyor...
Sayfa yükleniyor...
Sayfa yükleniyor...
Sayfa yükleniyor...
Sayfa yükleniyor...
Sayfa yükleniyor...
Sayfa yükleniyor...
Sayfa yükleniyor...
Sayfa yükleniyor...
Sayfa yükleniyor...
Sayfa yükleniyor...
Sayfa yükleniyor...
Sayfa yükleniyor...
Sayfa yükleniyor...
Sayfa yükleniyor...
Sayfa yükleniyor...
Sayfa yükleniyor...
Sayfa yükleniyor...
Sayfa yükleniyor...
Sayfa yükleniyor...
Sayfa yükleniyor...
Sayfa yükleniyor...
Sayfa yükleniyor...
Sayfa yükleniyor...
Sayfa yükleniyor...
Sayfa yükleniyor...
Sayfa yükleniyor...
Sayfa yükleniyor...
Sayfa yükleniyor...
Sayfa yükleniyor...
Sayfa yükleniyor...
Sayfa yükleniyor...
Sayfa yükleniyor...
Sayfa yükleniyor...
Sayfa yükleniyor...
Sayfa yükleniyor...
Sayfa yükleniyor...
Sayfa yükleniyor...
Sayfa yükleniyor...
Sayfa yükleniyor...
Sayfa yükleniyor...
Sayfa yükleniyor...
Sayfa yükleniyor...
Sayfa yükleniyor...
Sayfa yükleniyor...
Sayfa yükleniyor...
Sayfa yükleniyor...
Sayfa yükleniyor...
Sayfa yükleniyor...
Sayfa yükleniyor...
Sayfa yükleniyor...
Sayfa yükleniyor...
Sayfa yükleniyor...
Sayfa yükleniyor...
Sayfa yükleniyor...
Sayfa yükleniyor...
Sayfa yükleniyor...
Sayfa yükleniyor...
Sayfa yükleniyor...
Sayfa yükleniyor...
Sayfa yükleniyor...
Sayfa yükleniyor...
Sayfa yükleniyor...
Sayfa yükleniyor...
Sayfa yükleniyor...
Sayfa yükleniyor...
Sayfa yükleniyor...
Sayfa yükleniyor...
Sayfa yükleniyor...
Sayfa yükleniyor...
Sayfa yükleniyor...
Sayfa yükleniyor...
Sayfa yükleniyor...
Sayfa yükleniyor...
Sayfa yükleniyor...
Sayfa yükleniyor...
Sayfa yükleniyor...
Sayfa yükleniyor...
Sayfa yükleniyor...
Sayfa yükleniyor...
Sayfa yükleniyor...
Sayfa yükleniyor...
Sayfa yükleniyor...
Sayfa yükleniyor...
Sayfa yükleniyor...
Sayfa yükleniyor...
Sayfa yükleniyor...
Sayfa yükleniyor...
Sayfa yükleniyor...
Sayfa yükleniyor...
Sayfa yükleniyor...
Sayfa yükleniyor...
Sayfa yükleniyor...
Sayfa yükleniyor...
Sayfa yükleniyor...
Sayfa yükleniyor...
Sayfa yükleniyor...
Sayfa yükleniyor...
Sayfa yükleniyor...
Sayfa yükleniyor...
Sayfa yükleniyor...
Sayfa yükleniyor...
Sayfa yükleniyor...
Sayfa yükleniyor...
Sayfa yükleniyor...
Sayfa yükleniyor...
Sayfa yükleniyor...
Sayfa yükleniyor...
Sayfa yükleniyor...
Sayfa yükleniyor...
Sayfa yükleniyor...
Sayfa yükleniyor...
Sayfa yükleniyor...
Sayfa yükleniyor...
Sayfa yükleniyor...
Sayfa yükleniyor...
Sayfa yükleniyor...
Sayfa yükleniyor...
Sayfa yükleniyor...
Sayfa yükleniyor...
Sayfa yükleniyor...
Sayfa yükleniyor...
Sayfa yükleniyor...
Sayfa yükleniyor...
Sayfa yükleniyor...
Sayfa yükleniyor...
Sayfa yükleniyor...
Sayfa yükleniyor...
Sayfa yükleniyor...
Sayfa yükleniyor...
Sayfa yükleniyor...
Sayfa yükleniyor...
Sayfa yükleniyor...
Sayfa yükleniyor...
Sayfa yükleniyor...
Sayfa yükleniyor...
Sayfa yükleniyor...
Sayfa yükleniyor...
Sayfa yükleniyor...
Sayfa yükleniyor...
Sayfa yükleniyor...
Sayfa yükleniyor...
Sayfa yükleniyor...
Sayfa yükleniyor...
Sayfa yükleniyor...
Sayfa yükleniyor...
Sayfa yükleniyor...
Sayfa yükleniyor...
Sayfa yükleniyor...
Sayfa yükleniyor...
Sayfa yükleniyor...
Sayfa yükleniyor...
Sayfa yükleniyor...
Sayfa yükleniyor...
Sayfa yükleniyor...
Sayfa yükleniyor...
Sayfa yükleniyor...
Sayfa yükleniyor...
Sayfa yükleniyor...
Sayfa yükleniyor...
Sayfa yükleniyor...
Sayfa yükleniyor...
Sayfa yükleniyor...
Sayfa yükleniyor...
Sayfa yükleniyor...
Sayfa yükleniyor...
Sayfa yükleniyor...
Sayfa yükleniyor...
Sayfa yükleniyor...
Sayfa yükleniyor...
Sayfa yükleniyor...
Sayfa yükleniyor...
Sayfa yükleniyor...
Sayfa yükleniyor...
Sayfa yükleniyor...
Sayfa yükleniyor...
Sayfa yükleniyor...
Sayfa yükleniyor...
Sayfa yükleniyor...
Sayfa yükleniyor...
Sayfa yükleniyor...
Sayfa yükleniyor...
Sayfa yükleniyor...
Sayfa yükleniyor...
Sayfa yükleniyor...
Sayfa yükleniyor...
Sayfa yükleniyor...
Sayfa yükleniyor...
Sayfa yükleniyor...
Sayfa yükleniyor...
Sayfa yükleniyor...
Sayfa yükleniyor...
Sayfa yükleniyor...
Sayfa yükleniyor...
Sayfa yükleniyor...
Sayfa yükleniyor...
Sayfa yükleniyor...
Sayfa yükleniyor...
Sayfa yükleniyor...
Sayfa yükleniyor...
Sayfa yükleniyor...
Sayfa yükleniyor...
Sayfa yükleniyor...
Sayfa yükleniyor...
Sayfa yükleniyor...
Sayfa yükleniyor...
Sayfa yükleniyor...
Sayfa yükleniyor...
Sayfa yükleniyor...
Sayfa yükleniyor...
Sayfa yükleniyor...
Sayfa yükleniyor...
Sayfa yükleniyor...
Sayfa yükleniyor...
Sayfa yükleniyor...
Sayfa yükleniyor...
Sayfa yükleniyor...
Sayfa yükleniyor...
Sayfa yükleniyor...
Sayfa yükleniyor...
Sayfa yükleniyor...
Sayfa yükleniyor...
Sayfa yükleniyor...
Sayfa yükleniyor...
Sayfa yükleniyor...
Sayfa yükleniyor...
Sayfa yükleniyor...
Sayfa yükleniyor...
Sayfa yükleniyor...
Sayfa yükleniyor...
Sayfa yükleniyor...
Sayfa yükleniyor...
Sayfa yükleniyor...
Sayfa yükleniyor...
Sayfa yükleniyor...
Sayfa yükleniyor...
Sayfa yükleniyor...
Sayfa yükleniyor...
Sayfa yükleniyor...
Sayfa yükleniyor...
Sayfa yükleniyor...
Sayfa yükleniyor...
Sayfa yükleniyor...
Sayfa yükleniyor...
Sayfa yükleniyor...
Sayfa yükleniyor...
Sayfa yükleniyor...
Sayfa yükleniyor...
Sayfa yükleniyor...
Sayfa yükleniyor...
Sayfa yükleniyor...
Sayfa yükleniyor...
Sayfa yükleniyor...
Sayfa yükleniyor...
Sayfa yükleniyor...
Sayfa yükleniyor...
Sayfa yükleniyor...
Sayfa yükleniyor...
Sayfa yükleniyor...
Sayfa yükleniyor...
Sayfa yükleniyor...
Sayfa yükleniyor...
Sayfa yükleniyor...
Sayfa yükleniyor...
Sayfa yükleniyor...
Sayfa yükleniyor...
Sayfa yükleniyor...
Sayfa yükleniyor...
Sayfa yükleniyor...
Sayfa yükleniyor...
Sayfa yükleniyor...
Sayfa yükleniyor...
Sayfa yükleniyor...
Sayfa yükleniyor...
Sayfa yükleniyor...
Sayfa yükleniyor...
Sayfa yükleniyor...
Sayfa yükleniyor...
Sayfa yükleniyor...
Sayfa yükleniyor...
Sayfa yükleniyor...
Sayfa yükleniyor...
Sayfa yükleniyor...
Sayfa yükleniyor...
Sayfa yükleniyor...
Sayfa yükleniyor...
Sayfa yükleniyor...
Sayfa yükleniyor...
Sayfa yükleniyor...
Sayfa yükleniyor...
Sayfa yükleniyor...
Sayfa yükleniyor...
Sayfa yükleniyor...
Sayfa yükleniyor...
Sayfa yükleniyor...
Sayfa yükleniyor...
Sayfa yükleniyor...
Sayfa yükleniyor...
Sayfa yükleniyor...
Sayfa yükleniyor...
Sayfa yükleniyor...
Sayfa yükleniyor...
Sayfa yükleniyor...
Sayfa yükleniyor...
Sayfa yükleniyor...
Sayfa yükleniyor...
Sayfa yükleniyor...
Sayfa yükleniyor...
Sayfa yükleniyor...
Sayfa yükleniyor...
Sayfa yükleniyor...
Sayfa yükleniyor...
Sayfa yükleniyor...
Sayfa yükleniyor...
Sayfa yükleniyor...
Sayfa yükleniyor...
Sayfa yükleniyor...
Sayfa yükleniyor...
Sayfa yükleniyor...
Sayfa yükleniyor...
Sayfa yükleniyor...
Sayfa yükleniyor...
Sayfa yükleniyor...
Sayfa yükleniyor...
Sayfa yükleniyor...
Sayfa yükleniyor...
Sayfa yükleniyor...
Sayfa yükleniyor...
Sayfa yükleniyor...
Sayfa yükleniyor...
Sayfa yükleniyor...
Sayfa yükleniyor...
Sayfa yükleniyor...
Sayfa yükleniyor...
Sayfa yükleniyor...
Sayfa yükleniyor...
Sayfa yükleniyor...
Sayfa yükleniyor...
Sayfa yükleniyor...
Sayfa yükleniyor...
Sayfa yükleniyor...
Sayfa yükleniyor...
Sayfa yükleniyor...
Sayfa yükleniyor...
Sayfa yükleniyor...
Sayfa yükleniyor...
Sayfa yükleniyor...
Sayfa yükleniyor...
Sayfa yükleniyor...
Sayfa yükleniyor...
Sayfa yükleniyor...
Sayfa yükleniyor...
Sayfa yükleniyor...
Sayfa yükleniyor...
Sayfa yükleniyor...
Sayfa yükleniyor...
Sayfa yükleniyor...
Sayfa yükleniyor...
Sayfa yükleniyor...
Sayfa yükleniyor...
Sayfa yükleniyor...
Sayfa yükleniyor...
Sayfa yükleniyor...
Sayfa yükleniyor...
Sayfa yükleniyor...
Sayfa yükleniyor...
Sayfa yükleniyor...
Sayfa yükleniyor...
Sayfa yükleniyor...
Sayfa yükleniyor...
Sayfa yükleniyor...
Sayfa yükleniyor...
Sayfa yükleniyor...
Sayfa yükleniyor...
Sayfa yükleniyor...
Sayfa yükleniyor...
Sayfa yükleniyor...
Sayfa yükleniyor...
Sayfa yükleniyor...
Sayfa yükleniyor...
Sayfa yükleniyor...
Sayfa yükleniyor...
Sayfa yükleniyor...
Sayfa yükleniyor...
Sayfa yükleniyor...
Sayfa yükleniyor...
Sayfa yükleniyor...
Sayfa yükleniyor...
Sayfa yükleniyor...
Sayfa yükleniyor...
Sayfa yükleniyor...
Sayfa yükleniyor...
Sayfa yükleniyor...
Sayfa yükleniyor...
Sayfa yükleniyor...
Sayfa yükleniyor...
Sayfa yükleniyor...
Sayfa yükleniyor...
Sayfa yükleniyor...
Sayfa yükleniyor...
Sayfa yükleniyor...
Sayfa yükleniyor...
Sayfa yükleniyor...
Sayfa yükleniyor...
Sayfa yükleniyor...
Sayfa yükleniyor...
Sayfa yükleniyor...
Sayfa yükleniyor...
Sayfa yükleniyor...
Sayfa yükleniyor...
Sayfa yükleniyor...
Sayfa yükleniyor...
Sayfa yükleniyor...
Sayfa yükleniyor...
Sayfa yükleniyor...
Sayfa yükleniyor...
Sayfa yükleniyor...
Sayfa yükleniyor...
Sayfa yükleniyor...
Sayfa yükleniyor...
Sayfa yükleniyor...
Sayfa yükleniyor...
Sayfa yükleniyor...
Sayfa yükleniyor...
Sayfa yükleniyor...
Sayfa yükleniyor...
Sayfa yükleniyor...
Sayfa yükleniyor...
Sayfa yükleniyor...
Sayfa yükleniyor...
Sayfa yükleniyor...
Sayfa yükleniyor...
Sayfa yükleniyor...
-
 1
1
-
 2
2
-
 3
3
-
 4
4
-
 5
5
-
 6
6
-
 7
7
-
 8
8
-
 9
9
-
 10
10
-
 11
11
-
 12
12
-
 13
13
-
 14
14
-
 15
15
-
 16
16
-
 17
17
-
 18
18
-
 19
19
-
 20
20
-
 21
21
-
 22
22
-
 23
23
-
 24
24
-
 25
25
-
 26
26
-
 27
27
-
 28
28
-
 29
29
-
 30
30
-
 31
31
-
 32
32
-
 33
33
-
 34
34
-
 35
35
-
 36
36
-
 37
37
-
 38
38
-
 39
39
-
 40
40
-
 41
41
-
 42
42
-
 43
43
-
 44
44
-
 45
45
-
 46
46
-
 47
47
-
 48
48
-
 49
49
-
 50
50
-
 51
51
-
 52
52
-
 53
53
-
 54
54
-
 55
55
-
 56
56
-
 57
57
-
 58
58
-
 59
59
-
 60
60
-
 61
61
-
 62
62
-
 63
63
-
 64
64
-
 65
65
-
 66
66
-
 67
67
-
 68
68
-
 69
69
-
 70
70
-
 71
71
-
 72
72
-
 73
73
-
 74
74
-
 75
75
-
 76
76
-
 77
77
-
 78
78
-
 79
79
-
 80
80
-
 81
81
-
 82
82
-
 83
83
-
 84
84
-
 85
85
-
 86
86
-
 87
87
-
 88
88
-
 89
89
-
 90
90
-
 91
91
-
 92
92
-
 93
93
-
 94
94
-
 95
95
-
 96
96
-
 97
97
-
 98
98
-
 99
99
-
 100
100
-
 101
101
-
 102
102
-
 103
103
-
 104
104
-
 105
105
-
 106
106
-
 107
107
-
 108
108
-
 109
109
-
 110
110
-
 111
111
-
 112
112
-
 113
113
-
 114
114
-
 115
115
-
 116
116
-
 117
117
-
 118
118
-
 119
119
-
 120
120
-
 121
121
-
 122
122
-
 123
123
-
 124
124
-
 125
125
-
 126
126
-
 127
127
-
 128
128
-
 129
129
-
 130
130
-
 131
131
-
 132
132
-
 133
133
-
 134
134
-
 135
135
-
 136
136
-
 137
137
-
 138
138
-
 139
139
-
 140
140
-
 141
141
-
 142
142
-
 143
143
-
 144
144
-
 145
145
-
 146
146
-
 147
147
-
 148
148
-
 149
149
-
 150
150
-
 151
151
-
 152
152
-
 153
153
-
 154
154
-
 155
155
-
 156
156
-
 157
157
-
 158
158
-
 159
159
-
 160
160
-
 161
161
-
 162
162
-
 163
163
-
 164
164
-
 165
165
-
 166
166
-
 167
167
-
 168
168
-
 169
169
-
 170
170
-
 171
171
-
 172
172
-
 173
173
-
 174
174
-
 175
175
-
 176
176
-
 177
177
-
 178
178
-
 179
179
-
 180
180
-
 181
181
-
 182
182
-
 183
183
-
 184
184
-
 185
185
-
 186
186
-
 187
187
-
 188
188
-
 189
189
-
 190
190
-
 191
191
-
 192
192
-
 193
193
-
 194
194
-
 195
195
-
 196
196
-
 197
197
-
 198
198
-
 199
199
-
 200
200
-
 201
201
-
 202
202
-
 203
203
-
 204
204
-
 205
205
-
 206
206
-
 207
207
-
 208
208
-
 209
209
-
 210
210
-
 211
211
-
 212
212
-
 213
213
-
 214
214
-
 215
215
-
 216
216
-
 217
217
-
 218
218
-
 219
219
-
 220
220
-
 221
221
-
 222
222
-
 223
223
-
 224
224
-
 225
225
-
 226
226
-
 227
227
-
 228
228
-
 229
229
-
 230
230
-
 231
231
-
 232
232
-
 233
233
-
 234
234
-
 235
235
-
 236
236
-
 237
237
-
 238
238
-
 239
239
-
 240
240
-
 241
241
-
 242
242
-
 243
243
-
 244
244
-
 245
245
-
 246
246
-
 247
247
-
 248
248
-
 249
249
-
 250
250
-
 251
251
-
 252
252
-
 253
253
-
 254
254
-
 255
255
-
 256
256
-
 257
257
-
 258
258
-
 259
259
-
 260
260
-
 261
261
-
 262
262
-
 263
263
-
 264
264
-
 265
265
-
 266
266
-
 267
267
-
 268
268
-
 269
269
-
 270
270
-
 271
271
-
 272
272
-
 273
273
-
 274
274
-
 275
275
-
 276
276
-
 277
277
-
 278
278
-
 279
279
-
 280
280
-
 281
281
-
 282
282
-
 283
283
-
 284
284
-
 285
285
-
 286
286
-
 287
287
-
 288
288
-
 289
289
-
 290
290
-
 291
291
-
 292
292
-
 293
293
-
 294
294
-
 295
295
-
 296
296
-
 297
297
-
 298
298
-
 299
299
-
 300
300
-
 301
301
-
 302
302
-
 303
303
-
 304
304
-
 305
305
-
 306
306
-
 307
307
-
 308
308
-
 309
309
-
 310
310
-
 311
311
-
 312
312
-
 313
313
-
 314
314
-
 315
315
-
 316
316
-
 317
317
-
 318
318
-
 319
319
-
 320
320
-
 321
321
-
 322
322
-
 323
323
-
 324
324
-
 325
325
-
 326
326
-
 327
327
-
 328
328
-
 329
329
-
 330
330
-
 331
331
-
 332
332
-
 333
333
-
 334
334
-
 335
335
-
 336
336
-
 337
337
-
 338
338
-
 339
339
-
 340
340
-
 341
341
-
 342
342
-
 343
343
-
 344
344
-
 345
345
-
 346
346
-
 347
347
-
 348
348
-
 349
349
-
 350
350
-
 351
351
-
 352
352
-
 353
353
-
 354
354
-
 355
355
-
 356
356
-
 357
357
-
 358
358
-
 359
359
-
 360
360
-
 361
361
-
 362
362
-
 363
363
-
 364
364
-
 365
365
-
 366
366
-
 367
367
-
 368
368
-
 369
369
-
 370
370
-
 371
371
-
 372
372
-
 373
373
-
 374
374
-
 375
375
-
 376
376
-
 377
377
-
 378
378
-
 379
379
-
 380
380
-
 381
381
-
 382
382
-
 383
383
-
 384
384
-
 385
385
-
 386
386
-
 387
387
-
 388
388
-
 389
389
-
 390
390
-
 391
391
-
 392
392
-
 393
393
-
 394
394
-
 395
395
-
 396
396
-
 397
397
-
 398
398
-
 399
399
-
 400
400
-
 401
401
-
 402
402
-
 403
403
-
 404
404
-
 405
405
-
 406
406
-
 407
407
-
 408
408
-
 409
409
-
 410
410
-
 411
411
-
 412
412
-
 413
413
-
 414
414
-
 415
415
-
 416
416
-
 417
417
-
 418
418
-
 419
419
-
 420
420
-
 421
421
-
 422
422
-
 423
423
-
 424
424
-
 425
425
-
 426
426
-
 427
427
-
 428
428
-
 429
429
-
 430
430
-
 431
431
-
 432
432
-
 433
433
-
 434
434
-
 435
435
-
 436
436
-
 437
437
-
 438
438
-
 439
439
-
 440
440
-
 441
441
-
 442
442
-
 443
443
-
 444
444
-
 445
445
-
 446
446
-
 447
447
-
 448
448
-
 449
449
-
 450
450
-
 451
451
-
 452
452
-
 453
453
-
 454
454
-
 455
455
-
 456
456
-
 457
457
-
 458
458
-
 459
459
-
 460
460
-
 461
461
-
 462
462
-
 463
463
-
 464
464
-
 465
465
-
 466
466
-
 467
467
-
 468
468
-
 469
469
-
 470
470
-
 471
471
-
 472
472
-
 473
473
-
 474
474
-
 475
475
-
 476
476
-
 477
477
-
 478
478
-
 479
479
-
 480
480
-
 481
481
-
 482
482
-
 483
483
-
 484
484
-
 485
485
-
 486
486
-
 487
487
-
 488
488
-
 489
489
-
 490
490
-
 491
491
-
 492
492
-
 493
493
-
 494
494
-
 495
495
-
 496
496
-
 497
497
-
 498
498
-
 499
499
-
 500
500
-
 501
501
-
 502
502
-
 503
503
-
 504
504
-
 505
505
-
 506
506
-
 507
507
-
 508
508
-
 509
509
-
 510
510
-
 511
511
-
 512
512
-
 513
513
-
 514
514
-
 515
515
-
 516
516
-
 517
517
-
 518
518
-
 519
519
-
 520
520
-
 521
521
-
 522
522
-
 523
523
-
 524
524
-
 525
525
-
 526
526
-
 527
527
-
 528
528
-
 529
529
-
 530
530
-
 531
531
-
 532
532
-
 533
533
-
 534
534
-
 535
535
-
 536
536
-
 537
537
-
 538
538
-
 539
539
-
 540
540
-
 541
541
-
 542
542
-
 543
543
-
 544
544
-
 545
545
-
 546
546
-
 547
547
-
 548
548
-
 549
549
-
 550
550
-
 551
551
-
 552
552
-
 553
553
-
 554
554
-
 555
555
-
 556
556
-
 557
557
-
 558
558
-
 559
559
-
 560
560
-
 561
561
-
 562
562
-
 563
563
-
 564
564
-
 565
565
-
 566
566
-
 567
567
-
 568
568
-
 569
569
-
 570
570
-
 571
571
-
 572
572
-
 573
573
-
 574
574
-
 575
575
-
 576
576
-
 577
577
-
 578
578
-
 579
579
-
 580
580
-
 581
581
-
 582
582
-
 583
583
-
 584
584
-
 585
585
-
 586
586
-
 587
587
-
 588
588
-
 589
589
-
 590
590
-
 591
591
-
 592
592
-
 593
593
-
 594
594
-
 595
595
-
 596
596
-
 597
597
-
 598
598
-
 599
599
-
 600
600
-
 601
601
-
 602
602
-
 603
603
-
 604
604
-
 605
605
-
 606
606
-
 607
607
-
 608
608
-
 609
609
-
 610
610
-
 611
611
-
 612
612
-
 613
613
-
 614
614
-
 615
615
-
 616
616
-
 617
617
-
 618
618
-
 619
619
-
 620
620
-
 621
621
-
 622
622
-
 623
623
-
 624
624
-
 625
625
-
 626
626
-
 627
627
-
 628
628
-
 629
629
-
 630
630
-
 631
631
-
 632
632
-
 633
633
-
 634
634
-
 635
635
-
 636
636
-
 637
637
-
 638
638
-
 639
639
-
 640
640
-
 641
641
-
 642
642
-
 643
643
-
 644
644
-
 645
645
-
 646
646
-
 647
647
-
 648
648
-
 649
649
-
 650
650
-
 651
651
-
 652
652


diğer dillerde
- español: Motorola CLK446 Manual de usuario
- français: Motorola CLK446 Manuel utilisateur
- italiano: Motorola CLK446 Manuale utente
- svenska: Motorola CLK446 Användarmanual
- polski: Motorola CLK446 Instrukcja obsługi
- Deutsch: Motorola CLK446 Benutzerhandbuch
- português: Motorola CLK446 Manual do usuário
- English: Motorola CLK446 User manual
- dansk: Motorola CLK446 Brugermanual
- русский: Motorola CLK446 Руководство пользователя
- suomi: Motorola CLK446 Ohjekirja
- Nederlands: Motorola CLK446 Handleiding
İlgili makaleler
-
Motorola CLK446 Hızlı başlangıç Kılavuzu
-
-
-
-
-
Motorola XT460 Kullanma talimatları
-
-
-
Motorola CLPe Series Kullanım kılavuzu
-
Motorola GP366R Kullanım kılavuzu