Electrolux EUF2042AOX Kullanım kılavuzu
- Kategori
- Dondurucular
- Tip
- Kullanım kılavuzu


CONTENTS
1. SAFETY INFORMATION....................................................................................3
2. SAFETY INSTRUCTIONS..................................................................................4
3. PRODUCT DESCRIPTION................................................................................ 6
4. OPERATION.......................................................................................................6
5. DAILY USE......................................................................................................... 9
6. HINTS AND TIPS............................................................................................. 10
7. CARE AND CLEANING....................................................................................11
8. TROUBLESHOOTING......................................................................................12
9. INSTALLATION................................................................................................ 14
10. TECHNICAL INFORMATION......................................................................... 17
WE’RE THINKING OF YOU
Thank you for purchasing an Electrolux appliance. You’ve chosen a product that
brings with it decades of professional experience and innovation. Ingenious and
stylish, it has been designed with you in mind. So whenever you use it, you can
be safe in the knowledge that you’ll get great results every time.
Welcome to Electrolux.
Visit our website for:
Get usage advice, brochures, trouble shooter, service information:
www.electrolux.com/webselfservice
Register your product for better service:
www.registerelectrolux.com
Buy Accessories, Consumables and Original spare parts for your appliance:
www.electrolux.com/shop
CUSTOMER CARE AND SERVICE
Always use original spare parts.
When contacting our Authorised Service Centre, ensure that you have the
following data available: Model, PNC, Serial Number.
The information can be found on the rating plate.
Warning / Caution-Safety information
General information and tips
Environmental information
Subject to change without notice.
www.electrolux.com2

1. SAFETY INFORMATION
Before the installation and use of the appliance, carefully
read the supplied instructions. The manufacturer is not
responsible if an incorrect installation and use causes
injuries and damages. Always keep the instructions with
the appliance for future reference.
1.1 Children and vulnerable people safety
• This appliance can be used by children aged from 8
years and above and persons with reduced physical,
sensory or mental capabilities or lack of experience
and knowledge if they have been given supervision or
instruction concerning use of the appliance in a safe
way and understand the hazards involved.
• Do not let children play with the appliance.
• Cleaning and user maintenance shall not be made by
children without supervision.
• Keep all packaging away from children.
1.2 General Safety
• This appliance is intended to be used in household
and similar applications such as:
– Farm houses; staff kitchen areas in shops, offices
and other working environments
– By clients in hotels, motels, bed and breakfast and
other residential type environments
• Keep ventilation openings, in the appliance enclosure
or in the built-in structure, clear of obstruction.
• Do not use mechanical devices or other means to
accelerate the defrosting process, other than those
recommended by the manufacturer.
• Do not damage the refrigerant circuit.
• Do not use electrical appliances inside the food
storage compartments of the appliance, unless they
are of the type recommended by the manufacturer.
ENGLISH 3

• Do not use water spray and steam to clean the
appliance.
• Clean the appliance with a moist soft cloth. Only use
neutral detergents. Do not use abrasive products,
abrasive cleaning pads, solvents or metal objects.
• Do not store explosive substances such as aerosol
cans with a flammable propellant in this appliance.
• If the supply cord is damaged, it must be replaced by
the manufacturer, its Authorised Service Centre or
similarly qualified persons in order to avoid a hazard.
2. SAFETY INSTRUCTIONS
2.1 Installation
WARNING!
Only a qualified person must
install this appliance.
• Remove all the packaging.
• Do not install or use a damaged
appliance.
• Obey the installation instruction
supplied with the appliance.
• Always be careful when you move the
appliance because it is heavy. Always
wear safety gloves.
• Make sure the air can circulate
around the appliance.
• Wait at least 4 hours before
connecting the appliance to the power
supply. This is to allow the oil to flow
back in the compressor.
• Do not install the appliance close to
radiators or cookers, oven or hobs.
• The rear of the appliance must stand
against the wall.
• Do not install the appliance where
there is direct sunlight.
• Do not install this appliance in areas
that are too humid or too colds, such
as the construction appendices,
garages or wine cellars.
• When you move the appliance, lift it
by the front edge to avoid scratching
the floor.
2.2 Electrical connection
WARNING!
Risk of fire and electrical
shock.
• The appliance must be earthed.
• Make sure that the electrical
information on the rating plate agrees
with the power supply. If not, contact
an electrician.
• Always use a correctly installed
shockproof socket.
• Do not use multi-plug adapters and
extension cables.
• Make sure not to cause damage to
the electrical components (e.g. mains
plug, mains cable, compressor).
Contact the Authorised Service
Centre or an electrician to change the
electrical components.
• The mains cable must stay below the
level of the mains plug.
• Connect the mains plug to the mains
socket only at the end of the
installation. Make sure that there is
access to the mains plug after the
installation.
• Do not pull the mains cable to
disconnect the appliance. Always pull
the mains plug.
2.3 Use
WARNING!
Risk of injury, burns,
electrical shock or fire.
www.electrolux.com4

• Do not change the specification of this
appliance.
• Do not put electrical appliances (e.g.
ice cream makers) in the appliance
unless they are stated applicable by
the manufacturer.
• Be careful not to cause damage to the
refrigerant circuit. It contains
isobutane (R600a), a natural gas with
a high level of environmental
compatibility. This gas is flammable.
• If damage occurs to the refrigerant
circuit, make sure that there are no
flames and sources of ignition in the
room. Ventilate the room.
• Do not let hot items to touch the
plastic parts of the appliance.
• Do not put soft drinks in the freezer
compartment. This will create
pressure on the drink container.
• Do not store flammable gas and liquid
in the appliance.
• Do not put flammable products or
items that are wet with flammable
products in, near or on the appliance.
• Do not touch the compressor or the
condenser. They are hot.
• Do not remove or touch items from
the freezer compartment if your hands
are wet or damp.
• Do not freeze again food that has
been thawed.
• Obey the storage instructions on the
packaging of frozen food.
2.4 Care and cleaning
WARNING!
Risk of injury or damage to
the appliance.
• Before maintenance, deactivate the
appliance and disconnect the mains
plug from the mains socket.
• This appliance contains hydrocarbons
in the cooling unit. Only a qualified
person must do the maintenance and
the recharging of the unit.
• Regularly examine the drain of the
appliance and if necessary, clean it. If
the drain is blocked, defrosted water
collects in the bottom of the
appliance.
2.5 Disposal
WARNING!
Risk of injury or suffocation.
• Disconnect the appliance from the
mains supply.
• Cut off the mains cable and discard it.
• Remove the door to prevent children
and pets to be closed inside of the
appliance.
• The refrigerant circuit and the
insulation materials of this appliance
are ozone-friendly.
• The insulation foam contains
flammable gas. Contact your
municipal authority for information on
how to discard the appliance
correctly.
• Do not cause damage to the part of
the cooling unit that is near the heat
exchanger.
ENGLISH 5

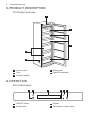
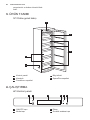
3. PRODUCT DESCRIPTION
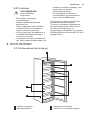
3.1 Product overview
4
2
5
3
1
1
Control panel
2
Flap
3
Freezer baskets
4
Rating plate
5
SpacePlus baskets
4. OPERATION
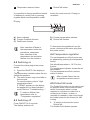
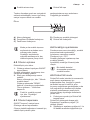
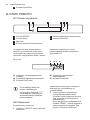
4.1 Control panel
1 2 3 4 5 6
1
ON/OFF button
2
Mode button
3
Display
4
Temperature colder button
www.electrolux.com6

5
Temperature warmer button
6
DrinksChill button
It is possible to change predefined sound
of buttons to a loudly one by pressing
together Mode and temperature colder
button for some seconds. Change is
reversible.
Display
A B C D
E
A) Alarm indicator
B) Freezer EcoMode function
C) FastFreeze function
D) Freezer temperature indicator
E) DrinksChill function
After selection of Mode or
the temperature button the
animations starts.
After selection of the
temperature the animation
flashes for a few minutes.
4.2 Switching on
Connect the mains plug to the power
socket
1. Press the ON/OFF if the display is
off.
The temperature indicators show the set
default temperature.
2. The alarm buzzer may sound after a
few seconds.
To reset the alarm refer to "High
temperature alarm".
If "DEMO" appears on the display,
the appliance is in demonstration
mode. Refer to "Troubleshooting...".
To select a different set
temperature refer to
"Temperature regulation".
4.3 Switching off
Press ON/OFF for 3 seconds.
The display switches off.
To disconnect the appliance from the
power, disconnect the mains plug from
the power socket.
4.4 Temperature regulation
The set temperature of the freezer may
be adjusted by pressing the temperature
button.
Set default temperature: -18°C for the
freezer.
The temperature indicator shows the set
temperature.
The set temperature will be reached
within 24 hours.
After a power failure the set
temperature remains stored.
4.5 DrinksChill mode
The DrinksChill mode is to be used to set
an acoustic alarm at the preferred time,
useful for example when a recipe
requires to cool down a mixture for a
certain period of time, or when a
reminder is needed in order not to forget
the bottles placed in the freezer for fast
cooling.
1. To switch on the function press
DrinksChill .
The DrinksChill indicator appears.
ENGLISH 7

The timer shows the set value (30
minutes).
2. Press the temperature colder button
and temperature warmer button to
change the timer set value from 1 to
90 minutes.
The timer indicator is shown (min).
At the end of the countdown the
DrinksChill indicator flashes and an
audible alarm sounds
3. Remove any drinks contained in the
freezer compartment.
4. Press DrinksChill to switch off the
sound and terminate the function.
It is possible to
deactivate the function at
any time during the
countdown by pressing
DrinksChill. The
DrinksChill indicator
goes off
It is possible to change
the time during the
countdown and at the
end by pressing the
temperature colder
button and the
temperature warmer
button.
4.6 FastFreeze mode
This function stops automatically after 52
hours.
1. To switch on the function press Mode
until the corresponding icon appears.
The FastFreeze indicator goes on.
2. To switch off the function press Mode
in order to select an other function or
press Mode until you can see none of
the special icons.
The FastFreeze indicator goes off.
The function switches off by
selecting a different freezer
set temperature.
4.7 EcoMode
For optimal food storage select the
EcoMode.
1. To switch on the function press Mode
until the corresponding icon appears.
The temperature indicator shows the set
temperature for the freezer: -18°C.
2. To switch off the function press Mode
in order to select an other function or
press Mode until you can see none of
the special icons.
The function switches off
by selecting a different
set temperature.
4.8 High temperature alarm
An increase in the temperature in the
freezer compartment (for example due to
an earlier power failure or door is open)
is indicated by:
• flashing the alarm and freezer
temperature indicators;
• sounding of buzzer.
To reset the alarm press any button.
The buzzer switches off.
The freezer temperature indicator shows
the highest temperature reached for a
few seconds. Then show again the set
temperature.
The alarm indicator continues to flash
until the normal conditions are restored.
When the alarm has
returned the alarm indicator
goes off.
4.9 Door open alarm
An acoustic alarm will sound if the door is
left open for a few minutes. The door
open alarm conditions are indicated by:
• flashing alarm indicator;
• acoustic buzzer.
When normal conditions are restored
(door closed), the alarm will stop. During
the alarm, the buzzer can be switched off
by pressing any button.
www.electrolux.com8

5. DAILY USE
WARNING!
Refer to Safety chapters.
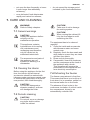
5.1 Initial power on
CAUTION!
Before inserting the power
plug in to the outlet and
switching on the cabinet for
the first time, leave the
appliance standing upright
for at least 4 hours. This will
assure a sufficient amount of
time for the oil to return to
the compressor. Otherwise
the compressor or electronic
components may sustain
damage.
5.2 Storage of frozen food
When first starting-up or after a period
out of use, before putting the products in
the compartment let the appliance run at
least 2 hours with the FastFreeze
function turned on. The freezer drawers
ensure that it is quick and easy to find
the food package you want. If large
quantities of food are to be stored,
remove all drawers except for the bottom
drawer which needs to be in place to
provide good air circulation. On all
shelves it is possible to place food that
protrude until 15 mm from the door.
WARNING!
In the event of accidental
defrosting, for example due
to a power failure, if the
power has been off for
longer that the value shown
in the technical
characteristics chart under
"rising time", the defrosted
food must be consumed
quickly or cooked
immediately and then re-
frozen (after cooling).
5.3 Freezing fresh food
The freezer compartment is suitable for
freezing fresh food and storing frozen
and deep-frozen food for a long time.
To freeze small amount of fresh foods it
is not necessary to change the present
setting.
To freeze fresh food activate the
FastFreeze function at least 24 hours
before placing the food to be frozen in
the freezer compartment.
Place the food to be frozen in the
FastFreeze compartment.
The maximum amount of food that can
be frozen in 24 hours is specified on the
rating plate, a label located on the inside
of the appliance.
The freezing process lasts 24 hours:
during this period do not add other food
to be frozen.
When the freezing process is completed,
return to the required temperature (see
"FastFreeze Function").
5.4 Thawing
Deep-frozen or frozen food, prior to
being used, can be thawed at room
temperature.
Small pieces may even be cooked still
frozen, directly from the freezer: in this
case, cooking will take longer.
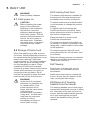
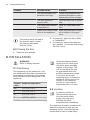
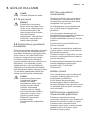
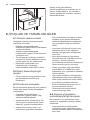
5.5 Removal of freezing
baskets from the freezer
The freezing baskets have a limit stop to
prevent their accidental removal or falling
out. At the time of its removal from the
freezer, pull the basket towards yourself
and, upon reaching the end point,
remove the basket by tilting its front
upwards.
ENGLISH 9

2
1
At the time of putting it back, slightly lift
the front of the basket to insert it into the
freezer. Once you are over the end
points, push the baskets back in their
position.
6. HINTS AND TIPS
6.1 Normal operating sounds
The following sounds are normal during
operation:
• A faint gurgling and bubbling sound
from coils sound when refrigerant is
pumped.
• A whirring and pulsating sound from
the compressor when refrigerant is
pumped.
• A sudden cracking noise from inside
appliance caused by thermic dilatation
(a natural and not dangerous physical
phenomenon).
• A faint click noise from the
temperature regulator when the
compressor switches on or off.
6.2 Hints for energy saving
• Do not open the door frequently or
leave it open longer than absolutely
necessary.
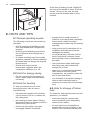
6.3 Hints for freezing
To help you make the most of the
freezing process, here are some
important hints:
• the maximum quantity of food which
can be frozen in 24 hrs. is shown on
the rating plate;
• the freezing process takes 24 hours.
No further food to be frozen should be
added during this period;
• freeze only top quality, fresh and
thoroughly cleaned, foodstuffs;
• prepare food in small portions to
enable it to be rapidly and completely
frozen and to make it possible
subsequently to thaw only the quantity
required;
• wrap up the food in aluminium foil or
polythene and make sure that the
packages are airtight;
• do not allow fresh, unfrozen food to
touch food which is already frozen,
thus avoiding a rise in temperature of
the latter;
• lean foods store better and longer
than fatty ones; salt reduces the
storage life of food;
• water ices, if consumed immediately
after removal from the freezer
compartment, can possibly cause the
skin to be freeze burnt;
• it is advisable to show the freezing in
date on each individual pack to
enable you to keep tab of the storage
time.
6.4 Hints for storage of frozen
food
To obtain the best performance from this
appliance, you should:
• make sure that the commercially
frozen foodstuffs were adequately
stored by the retailer;
• be sure that frozen foodstuffs are
transferred from the foodstore to the
freezer in the shortest possible time;
www.electrolux.com10

• not open the door frequently or leave
it open longer than absolutely
necessary;
• once defrosted, food deteriorates
rapidly and cannot be refrozen;
• do not exceed the storage period
indicated by the food manufacturer.
7. CARE AND CLEANING
WARNING!
Refer to Safety chapters.
7.1 General warnings
CAUTION!
Unplug the appliance before
carrying out any
maintenance operation.
This appliance contains
hydrocarbons in its cooling
unit; maintenance and
recharging must therefore
only be carried out by
authorized technicians.
The accessories and parts of
the appliance are not
suitable for washing in a
dishwasher.
7.2 Cleaning the interior
Before using the appliance for the first
time, the interior and all internal
accessories should be washed with
lukewarm water and some neutral soap
to remove the typical smell of a brand-
new product, then dried thoroughly.
CAUTION!
Do not use detergents or
abrasive powders, as these
will damage the finish.
7.3 Periodic cleaning
CAUTION!
Do not pull, move or damage
any pipes and/or cables
inside the cabinet.
CAUTION!
Take care of not to damage
the cooling system.
CAUTION!
When moving the cabinet, lift
it by the front edge to avoid
scratching the floor.
The equipment has to be cleaned
regularly:
1. Clean the inside and accessories
with lukewarm water and some
neutral soap.
2. Regularly check the door seals and
wipe clean to ensure they are clean
and free from debris.
3. Rinse and dry thoroughly.
4. If accessible, clean the condenser
and the compressor at the back of
the appliance with a brush.
This operation will improve the
performance of the appliance and
save electricity consumption.
7.4 Defrosting the freezer
The freezer compartment is frost free.
This means that there is no build up of
frost when it is in operation, neither on
the internal walls nor on the foods.
The absence of frost is due to the
continuous circulation of cold air inside
the compartment, driven by an
automatically controlled fan.
ENGLISH 11

7.5 Periods of non-operation
When the appliance is not in use for long
periods, take the following precautions:
1. Disconnect the appliance from
electricity supply.
2. Remove all food.
3. Clean the appliance and all
accessories.
4. Leave the door/doors open to
prevent unpleasant smells.
WARNING!
If the cabinet will be kept on,
ask somebody to check it
once in a while to prevent
the food inside from spoiling
in case of a power failure.
8. TROUBLESHOOTING
WARNING!
Refer to Safety chapters.
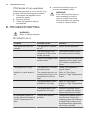
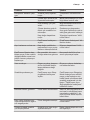
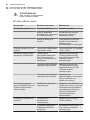
8.1 What to do if...
Problem Possible cause Solution
The appliance does not
operate.
The appliance is switch‐
ed off.
Switch on the appliance.
The mains plug is not
connected to the mains
socket correctly.
Connect the mains plug to
the mains socket correctly.
There is no voltage in the
mains socket.
Connect a different electrical
appliance to the mains sock‐
et. Contact a qualified elec‐
trician.
The appliance is noisy. The appliance is not sup‐
ported properly.
Check if the appliance
stands stable.
Audible or visual alarm is
on.
The cabinet has been re‐
cently switched on or the
temperature is still too
high.
Refer to "Door Open
Alarm"or "High Temperature
Alarm".
The temperature in the
appliance is too high.
Refer to "Door Open
Alarm"or "High Temperature
Alarm".
The temperature in the
appliance is too high.
Contact a qualified electri‐
cian or contact the nearest
Authorised Service Centre.
A rectangular symbol is
shown instead of numbers
on the Temperature Dis‐
play.
Temperature sensor
problem.
Contact the nearest Author‐
ised Service Centre (the
cooling system will continue
to keep food products cold,
but temperature adjustment
will not be possible).
www.electrolux.com12

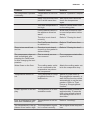
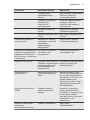
Problem Possible cause Solution
The compressor operates
continually.
Temperature is set incor‐
rectly.
Refer to "Operation" chapter.
Many food products were
put in at the same time.
Wait some hours and then
check the temperature
again.
The room temperature is
too high.
Refer to climate class chart
on the rating plate.
Food products placed in
the appliance were too
warm.
Allow food products to cool
to room temperature before
storing.
The door is not closed
correctly.
Refer to "Closing the door".
The FastFreeze function
is switched on.
Refer to "FastFreeze func‐
tion".
There is too much frost
and ice.
The door is not closed
correctly or the gasket is
deformed/dirty.
Refer to "Closing the door".
The compressor does not
start immediately after
pressing the FastFreeze,
or after changing the tem‐
perature.
This is normal, no error
has occurred.
The compressor starts after
a period of time.
Water flows on the floor. The melting water outlet
is not connected to the
evaporative tray above
the compressor.
Attach the melting water out‐
let to the evaporative tray.
Temperature cannot be
set.
The FastFreeze or Shop‐
pingMode function is
switched on.
Switch off FastFreeze or
ShoppingMode manually, or
wait until the function resets
automatically to set the tem‐
perature. Refer to "Fast‐
Freeze or ShoppingMode
function".
DEMO appears on the dis‐
play.
The appliance is in dem‐
onstration mode.
Keep the Mode pressed for
approximately 10 seconds
until a long sound is heard
and display shuts off for a
short time.
Door is misaligned or inter‐
feres with ventilation grill.
The appliance is not lev‐
elled.
Refer to "Levelling".
The temperature in the ap‐
pliance is too low/too high.
The temperature regula‐
tor is not set correctly.
Set a higher/lower tempera‐
ture.
ENGLISH 13

Problem Possible cause Solution
The food products' tem‐
perature is too high.
Let the food products tem‐
perature decrease to room
temperature before storage.
The door has been
opened often.
Open the door only if neces‐
sary.
The FastFreeze function
is switched on.
Refer to "FastFreeze func‐
tion".
There is no cold air circu‐
lation in the appliance.
Make sure that there is cold
air circulation in the appli‐
ance.
If the advice does not lead to
the desired result, contact
the nearest Authorised
Service Centre.
8.2 Closing the door
1. Clean the door gaskets.
2. If necessary, adjust the door. Refer
to "Installation".
3. If necessary, replace the defective
door gaskets. Contact the Authorised
Service Centre.
9. INSTALLATION
WARNING!
Refer to Safety chapters.
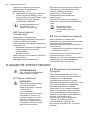
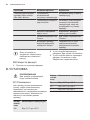
9.1 Positioning
This appliance can be installed in a dry,
well ventilated indoor where the ambient
temperature corresponds to the climate
class indicated on the rating plate of the
appliance:
Climate
class
Ambient temperature
SN +10°C to + 32°C
N +16°C to + 32°C
ST +16°C to + 38°C
T +16°C to + 43°C
Some functional problems
might occur for some types
of models when operating
outside of that range. The
correct operation can only
be guaranteed within the
specified temperature range.
If you have any doubts
regarding where to install the
appliance, please turn to the
vendor, to our customer
service or to the nearest
Authorised Service Centre.
9.2 Location
It must be possible to
disconnect the appliance
from the mains power
supply; the plug must
therefore be easily
accessible after installation.
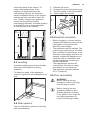
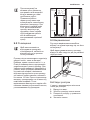
The appliance should be installed well
away from sources of heat such as
radiators, boilers, direct sunlight etc.
Ensure that air can circulate freely
www.electrolux.com14

around the back of the cabinet. To
ensure best performance, if the
appliance is positioned below an
overhanging wall unit, the minimum
distance between the top of the cabinet
and the wall unit must be at least 100
mm . Ideally, however, the appliance
should not be positioned below
overhanging wall units. Accurate levelling
is ensured by one or more adjustable
feet at the base of the cabinet.
A
B
min.
100 mm
20 mm
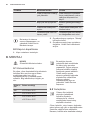
9.3 Levelling
Accurate levelling prevents the vibration
and noise of the appliance during
operation.
To adjust the heigh of the appliance
loosen or tighten the two adjustable front
feet.
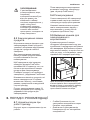
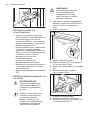
9.4 Rear spacers
You can find the two spacers in the bag
with documentation.
1. Release the screw.
2. Engage the spacer below the screw.
3. Turn the spacer to the right position.
4. Tighten again the screws.
2
4
3
1
9.5 Electrical connection
• Before plugging in, ensure that the
voltage and frequency shown on the
rating plate correspond to your
domestic power supply.
• The appliance must be earthed. The
power supply cable plug is provided
with a contact for this purpose. If the
domestic power supply socket is not
earthed, connect the appliance to a
separate earth in compliance with
current regulations, consulting a
qualified electrician.
• The manufacturer declines all
responsibility if the above safety
precautions are not observed.
• This appliance complies with the
E.E.C. Directives.
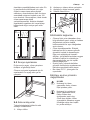
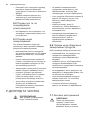
9.6 Door reversibility
WARNING!
Before carrying out any
operations, remove the plug
from the power socket.
Before carrying out any
operation, please be sure
that the appliance is empty.
If not, please move all goods
into right temperature for
proper food storage reason.
ENGLISH 15

CAUTION!
To carry out the following
operations, we suggest that
this be made with another
person that will keep a firm
hold on the doors of the
appliance during the
operations.
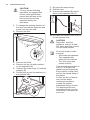
1. To change the opening direction of
the door unscrew the upper pin and
screw it on opposite side.
2. Remove the door.
2
1
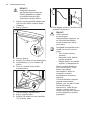
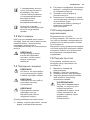
3. Remove the plinth.
4. Remove the cap (A) and position it
on the opposite side .
5. Unscrew the lower hinge (C) and the
washers (B).
6. Position the pin and the washers on
the opposite side.
A
C
B
7. Re-screw the upper hinge.
8. Refit the door.
9. Unscrew the handles (B) and fix
them on the opposite side (C).
A
C
B
10. Re-insert the handle cover pins (A)
on the opposite side.
CAUTION!
Reposition, level the
appliance, wait for at least
four hours and then connect
it to the power socket.
Do a final check to make
sure that:
• All screws are tightened.
• The magnetic seal
adheres to the cabinet.
• The door opens and
closes correctly.
If the ambient temperature is
cold (i.e. in Winter), the
gasket may not fit perfectly
to the cabinet. In that case,
wait for the natural fitting of
the gasket.
In case you do not want to
carry out the above
mentioned operations,
contact the nearest
Authorised Service Centre.
The Authorised Service
specialist will carry out the
reversibility of the doors at
your cost.
www.electrolux.com16

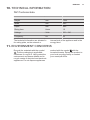
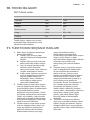
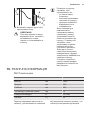
10. TECHNICAL INFORMATION
10.1 Technical data
Height mm 1544
Width mm 595
Depth mm 668
Rising time Hours 15
Voltage Volts 230 - 240
Frequency Hz 50
The technical information are situated in
the rating plate, on the external or
internal side of the appliance and in the
energy label.
11. ENVIRONMENT CONCERNS
Recycle the materials with the symbol
. Put the packaging in applicable
containers to recycle it. Help protect the
environment and human health and to
recycle waste of electrical and electronic
appliances. Do not dispose appliances
marked with the symbol with the
household waste. Return the product to
your local recycling facility or contact
your municipal office.
ENGLISH 17

İÇİNDEKİLER
1. GÜVENLIK BILGILERI..................................................................................... 19
2. GÜVENLIK TALIMATLARI............................................................................... 20
3. ÜRÜN TANIMI.................................................................................................. 22
4. ÇALIŞTIRMA.................................................................................................... 22
5. GÜNLÜK KULLANIM........................................................................................25
6. İPUÇLARI VE YARARLI BILGILER..................................................................26
7. BAKIM VE TEMIZLIK........................................................................................27
8. SORUN GIDERME........................................................................................... 28
9. MONTAJ........................................................................................................... 30
10. TEKNIK BILGILER..........................................................................................33
11. TÜKETICININ SEÇIMLIK HAKLARI............................................................... 33
SİZİ DÜŞÜNÜR
Bir Electrolux cihazı aldığınız için teşekkürler. Size onlarca yıllık profesyonel
deneyim ve yenilik sunan bir ürün tercih ettiniz. Sizi düşünerek tasarlanan yaratıcı
ve şık bir ürün. Bu ürünü her kullandığınızda, daima en iyi sonuçları
alacağınızdan emin olabilirsiniz.
Electrolux'e hoş geldiniz.
Aşağıdakiler için web sitemizi ziyaret edin:
Kullanım önerileri, broşürler, sorun giderme bilgileri, servis bilgileri alın:
www.electrolux.com/webselfservice
Ürününüzü daha iyi servis için kaydedin:
www.registerelectrolux.com
Cihazınız için Aksesuarlar, Sarf Malzemeleri ve Orijinal yedek parçalar satın
alın:
www.electrolux.com/shop
MÜŞTERİ HİZMETLERİ VE SERVİS
Orijinal yedek parça kullanılmasını tavsiye ederiz.
Yetkili Servis Merkezimizle iletişim sırasında, aşağıdaki verilerin bulunduğunu
kontrol edin: Model, PNC, Seri Numarası.
Bilgiler, bilgi etiketinde yazılıdır.
Uyarı / Dikkat-Güvenlik bilgileri
Genel bilgiler ve tavsiyeler
Çevre ile ilgili bilgiler
Önceden haber verilmeksizin değişiklik yapma hakkı saklıdır.
www.electrolux.com18

1. GÜVENLIK BILGILERI
Cihazın montaj ve kullanımından önce, verilen talimatları
dikkatlice okuyun. Üretici, yanlış bir montajın ve
kullanımın yaralanma ve hasara neden olması
durumunda sorumluluk kabul etmez. Talimatları daha
sonra da kullanmak için saklayın.
1.1 Çocukların ve savunmasız kişilerin güvenliği
• Bu cihaz, güvenli şekilde kullanımı ve oluşabilecek
tehlikeler hakkında talimat, gözetim veya bilgi
verilmesi halinde 8 yaş ve üzeri çocuklar ve fiziksel,
duyumsal veya zihinsel kapasitesi düşük veya bilgi ve
deneyimi olmayan kişiler tarafından kullanılabilir.
• Çocukların cihazla oynamasına izin vermeyin.
• Temizlik ve bakımı, gözetim altında bulunmadıkları
müddetçe çocuklar tarafından yapılmamalıdır.
• Tüm ambalaj malzemelerini çocuklardan uzak tutun.
1.2 Genel Güvenlik
• Bu cihaz aşağıdaki gibi, ev ve benzeri alanlarda
kullanılmak üzere tasarlanmıştır:
– Çiftlik evleri; mağaza, ofis ve diğer çalışma
ortamlarındaki çalışanlar için yapılmış mutfak
bölümleri
– Otel, motel, pansiyon ve diğer konaklama tarzı
yerlerdeki müşteriler tarafından
• Cihazın çevresindeki veya ankastre yapıdaki
havalandırma menfezlerinin tıkanmasını önleyin.
• Buz çözme sürecini hızlandırmak için üretici tarafından
önerilenin dışında mekanik bir alet veya başka suni bir
yöntem kullanmayın.
• Soğutucu devresine zarar vermeyin.
• Üretici tarafından önerilen tipte olmadıkları sürece,
cihazın yiyecek saklama bölmelerinde elektrikli
cihazlar kullanmayın.
TÜRKÇE 19

• Cihazı temizlemek için su spreyi ve buhar
kullanmayın.
• Cihazı yumuşak, nemli bir bezle temizleyin. Sadece
nötr deterjanlar kullanın. Aşındırıcı ürünleri, aşındırıcı
temizleme bezlerini, çözücüleri veya metal cisimleri
kullanmayın.
• Yanıcı itici gazlı aerosol teneke kutular gibi patlayıcı
maddeleri bu cihazda saklamayın.
• Elektrik kablosunun zarar görmesi durumunda, bir
kazanın meydana gelmesine engel olmak için,
kablonun değişimi, üretici, Yetkili Servis veya benzer
nitelikteki kalifiye bir kişi tarafından yapılmalıdır.
2. GÜVENLIK TALIMATLARI
2.1 Montaj
UYARI!
Cihazın montajı sadece
kalifiye bir kişi tarafından
yapılmalıdır.
• Tüm ambalajları çıkarın.
• Hasarlı bir cihazı monte etmeyin ya
da kullanmayın.
• Cihazla birlikte verilen montaj
talimatlarına uyun.
• Ağır olduğundan, cihazı taşırken
daima dikkat edin. Her zaman
güvenlik eldivenleri kullanın.
• Cihaz çevresinde hava sirkülasyonu
olduğundan emin olun.
• Cihazı elektrik beslemesine
bağlamadan önce en az 4 saat
bekleyin. Bu işlem, yağın kompresöre
geri akmasını sağlar.
• Cihazı, radyatörler, fırınlar, ankastre
fırın ya da ocakların yakınına monte
etmeyin.
• Cihazın arkası duvara dönük
olmalıdır.
• Doğrudan güneş ışığı alan yerlere
cihazı monte etmeyin.
• Bu cihazı, inşaat alanları, garajlar
veya şarap mahzenleri gibi çok nemli
veya çok soğuk yerlerde monte
etmeyin.
• Zeminin çizilmemesi için cihazı
taşırken cihazın ön kenarından
kaldırın.
2.2 Elektrik bağlantısı
UYARI!
Yangın ve elektrik çarpması
riski vardır.
• Cihaz topraklanmalıdır.
• Bilgi etiketindeki elektrik bilgilerinin
elektrik beslemesine uygun
olduğundan emin olun. Aksi durumda,
bir elektrik teknisyenini arayın.
• Her zaman doğru monte edilmiş,
darbeye dayanıklı bir priz kullanın.
• Priz çoğaltıcıları ve uzatma kabloları
kullanmayın.
• Elektrik aksamlarına (ör., fiş, elektrik
kablosu, kompresör) zarar
vermemeye özen gösterin. Elektrik
aksamlarını değiştirmek için Yetkili
Servise ya da bir elektrikçiye
başvurun.
• Elektrik kablosu fiş seviyesinin altında
kalmalıdır.
• Fişi prize sadece montaj
tamamlandıktan sonra takın.
Montajdan sonra elektrik fişine
erişilebildiğinden emin olun.
• Cihazı kapatmak için elektrik
kablosunu çıkarırken kablodan
çekmeyin. Her zaman fişten tutarak
çekin.
www.electrolux.com20
Sayfa yükleniyor ...
Sayfa yükleniyor ...
Sayfa yükleniyor ...
Sayfa yükleniyor ...
Sayfa yükleniyor ...
Sayfa yükleniyor ...
Sayfa yükleniyor ...
Sayfa yükleniyor ...
Sayfa yükleniyor ...
Sayfa yükleniyor ...
Sayfa yükleniyor ...
Sayfa yükleniyor ...
Sayfa yükleniyor ...
Sayfa yükleniyor ...
Sayfa yükleniyor ...
Sayfa yükleniyor ...
Sayfa yükleniyor ...
Sayfa yükleniyor ...
Sayfa yükleniyor ...
Sayfa yükleniyor ...
Sayfa yükleniyor ...
Sayfa yükleniyor ...
Sayfa yükleniyor ...
Sayfa yükleniyor ...
Sayfa yükleniyor ...
Sayfa yükleniyor ...
Sayfa yükleniyor ...
Sayfa yükleniyor ...
Sayfa yükleniyor ...
Sayfa yükleniyor ...
Sayfa yükleniyor ...
Sayfa yükleniyor ...
Sayfa yükleniyor ...
Sayfa yükleniyor ...
Sayfa yükleniyor ...
Sayfa yükleniyor ...
-
 1
1
-
 2
2
-
 3
3
-
 4
4
-
 5
5
-
 6
6
-
 7
7
-
 8
8
-
 9
9
-
 10
10
-
 11
11
-
 12
12
-
 13
13
-
 14
14
-
 15
15
-
 16
16
-
 17
17
-
 18
18
-
 19
19
-
 20
20
-
 21
21
-
 22
22
-
 23
23
-
 24
24
-
 25
25
-
 26
26
-
 27
27
-
 28
28
-
 29
29
-
 30
30
-
 31
31
-
 32
32
-
 33
33
-
 34
34
-
 35
35
-
 36
36
-
 37
37
-
 38
38
-
 39
39
-
 40
40
-
 41
41
-
 42
42
-
 43
43
-
 44
44
-
 45
45
-
 46
46
-
 47
47
-
 48
48
-
 49
49
-
 50
50
-
 51
51
-
 52
52
-
 53
53
-
 54
54
-
 55
55
-
 56
56


Electrolux EUF2042AOX Kullanım kılavuzu
- Kategori
- Dondurucular
- Tip
- Kullanım kılavuzu
Diğer dillerde
- English: Electrolux EUF2042AOX User manual
İlgili Makaleler
-
Electrolux EUF2748AOX Kullanım kılavuzu
-
-
Electrolux EUN2244AOW Kullanım kılavuzu
-
-
-
Electrolux EUF2744AOW Kullanım kılavuzu
-
-
Electrolux EUF2042AOW Kullanım kılavuzu
-
-