
S 46 B

S 46 B
TR
2 Yýldýzlý Soðutucu
Yerleþtirme ve kullaným bilgileri
GB
2 Star Refrigerator
Instructions for installation and use
1
7

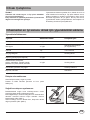
Emniyet, sahip olunabilecek iyi bir alýþkanlýktýr
Cihazý Yerleþtirme
ÖNEMLÝ
Cihazýnýzý kullanmadan önce, cihazýnýzýn güvenli yerleþimi
ve kullanýmý ile ilgili bilgileri kapsayan kullaným kýlavuzunu
okuyunuz.
Buzdolabýnýz uluslararasý standardlarda (EN60) ve Avrupa
Elektrik Emniyet kurallarý çerçevesinde üretilmiþtir. Ayrýca,
radio frekans etkilerini ortadan kaldýran EC direktiflerine
uygundur.
1. Cihaz, kapalý yerlerde kullaným için tasarlanmýþ olup,
hiçbir þekilde açýk alanda kullanýlmamalýdýr.
2. Cihaz, kullaným kýlavuzunda bahsedildiði bilgiler
dahilinde, yiyeceklerin saklanmasý için yalnýzca yetiþkinler
tarafýndan kullanýlmalýdýr. Ayrýca, çocuklarýn cihazý kullan-
masýna ve kurcalamasýna müsade edilmemelidir.
3. Elektrik emniyeti için, cihaza ýslak elle ve ayakla
dokunmayýnýz.
4. Cihazý, uzatma baðlantýsý ile çalýþtýrmayýnýz. Eðer uzat-
ma kablosu kullanmak gerekiyorsa, ayný özellikleri taþýyan
elektrik baðlantýsýnýn yapýlmasý gerekmektedir. Bu iþlem
yetkili kiþiler tarafýndan yapýlmalýdýr. Kablonun, cihazýn
yerleþtirilmesi esnasýnda herhangi bir hasar veya
yýrtýlmaya uðramadýðýndan emin olunmalýdýr.
5. Fiþi prizden çýkarmak için kabloyu veya cihazý
çekmeyin.
6. Özellikle elleriniz ýslak ise, cihazýnýzýn iç soðutma
elemanlarýna dokunmayýnýz. Elektrik çarpmasýna veya
yaralanmaya neden olabilirsiniz.
7. Cihazýnýzýn temizliðini yapmadan önce, elektrik baðlan-
týsýný kesin. (fiþi çekerek veya ana sigortayý kapatarak.)
Cihazýnýzýn termostat düðmesini 0 konumuna getirmek
yeterli deðildir.
8. Eski cihazýnýzý kaldýrmadan önce, çocuklarýn oynarken
içine girip kendilerini kilitlemelerini önlemek için cihazýn
kilidini kýrýn veya sökün.
9. Eðer cihazýnýz tam olarak çalýþmýyor ise, servisi
çaðýrmadan önce, sorunu çözmenize yardýmcý olabilecek
"Arýza Prosedürü'nü" okuyun. Dahili elemanlar ile ilgili
sorunu sözmek için tamirat yapmayýn.
Cihazýn tam olarak çalýþmasý ve enerji tüketiminin
azaltýlmasý için, cihazýn doðru bir þekilde yerleþti-
rilmesi önemlidir.
Havalandýrma
Kompresör ve kondenser ýsý üretir, bu nedenle havalandýr-
ma gerekmektedir. Ýyi havalandýrma yapýlmayan
odalarda, cihazýn kullanýlmasý uygun deðildir. Bu nedenle,
cihaz hava sirkülasyonunun olduðu ve pencereli bir odada
kullanýlmalýdýr.
Ayrýca ortamýn rutubetli olmamasý gerekmektedir.
Yerleþtirme süresince, cihazýn havalandýrmasýnýn gerçek-
leþtiði ýzgaralarýn kapanmamasýna dikkat ediniz.
Uygun havalandýrma için,
-cihaz ile tavan arasýnda en az 10 cm. mesafe olmalýdýr.
-cihazýn yan kýsýmlarýnda en az 5 cm. mesafe býrakýlmalýdýr.
Isýdan uzak olmalý
Cihazýnýzý, güneþ ýþýðýný direkt alan bölgelerden, ocak, fýrýn
v.b. gibi aletlerin yanýndan uzak bir bölgeye yerleþtirin.
Düzlem
Cihaz düz bir yere konulmalýdýr. Eðer taban düz deðil ise
ön tarafta bulunan ayarlanabilir ayaklar, cihazýn düz bir
seviyeye getirilmesi için kullanýlabilir.
Elektrik baðlantýsý ve topraklama
Elektrik baðlantýsýný yapmadan önce, sebzeliðin sol alt
yanýnda bulunan soðutucu plaket üzerinde gösterilen
voltajýn kullanýlan þebeke voltajýna uygunluðundan ve
kullanýlan prizin topraklý olduðundan emin olunuz.
Eðer topraklama yoksa, üretici cihaz kullanýmý dýþýndaki
olasý zarar ve yaralanmalardan hiçbir þekilde sorumlu
deðildir.
Çoklu priz ve adaptörler kullanmayýnýz.
Yetersiz güç
Elektrik prizi, sebzeliðin sol alt yanýnda bulunan soðutucu
plaket üzerinde gösterilen, cihazýn maximum güç deðerine
uygun olmalýdýr.
Elektrik baðlantýsýndan önce
Dolabýnýz geldikten sonra, dik bir þekilde yerleþtirin ve
dolabý çalýþtýrmadan önce en az üç saat bekleyiniz.
TR
1

Emniyet, sahip olunabilecek iyi bir alýþkanlýktýr
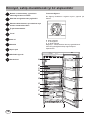
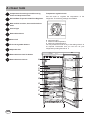
Buzluk ve dondurulmuþ yiyeceklerin
saklandýðý dondurucu bölüm
Damlalýk ve soðuk hava akýþ regülatörü
Et/balýk saklama kutusu, ayrýca defrost suyu
haznesi olarak kullanýlabilir.
Ýç aydýnlatma lambasý
Tel raf
Cam raf
Sebzelik
Ayarlý ayak
Sökülebilir þiþe rafý
Hareketli raf
Termostat düðmesi
TR
2
Bu düðmeyi dolabýnýzýn soðutma ayarýný yapmak için
kullanýn.
0 dolap çalýþmaz
1 en az soðutma
3 en fazla soðutma
Düðmeyi 1 - 3 arasý istenilen dereceye getirebilirsiniz.
0 konuma getirdiðinizde dolap soðutma iþlemi
kapanacaktýr.
A
D
E
E
E
E
G
I
I
J
J
F
J
C
B
H H

Cihazý Çalýþtýrma
Cihazýnýzdan en iyi sonucu almak için yiyeceklerinizi saklama
ÖNEMLÝ
Cihazýnýzý dik olarak koyun ve fiþi prize takmadan
önce en az 3 saat bekleyin
Enerji tasarrufu ve optimum performans için termostat
düðmesini orta deðerlere ayarlayýn.
Yiyeceklerinizi dolaba koymadan önce, dolabý ýlýk su ile ve
soda bikarbonat ile temizleyin. Fiþi prize taktýktan sonra,
dolabýn lambasýnýn yandýðýný göreceksiniz. Daha sonra,
termostat düðmesini "2" ye getirin. Bir kaç saat sonra,
yiyeceklerinizi dolaba yerleþtirebilirsiniz. Buz kaplarýný su
ile doldurup, dondurucuya koyabilirsiniz.
Dolapta neler saklanmaz
Sarýmsak (koku salar), soðan ve pýrasa
Patates ve köklü sebzeler (karanlýk ve kuru yerde
saklayýnýz.)
Soðuk hava akýþýnýn ayarlanmasý
Buzdolabýndaki soðuk hava sirkulasyonunun ortam
sýcaklýðýna baðlý olarak ayarlanmasý gerekir.
Bunu saðlamak için, ortam sýcaklýðý 35°C'nin üzerinde iken
damlalýk üzerinde bulunan klape damlalýk üzerine
kapatýlmalýdýr. (Bkz. Þekil 1)
Ortam sýcaklýðý 35°C'nin altýnda iken, klape arka tarafa
doðru açýlmalýdýr. (Bkz. Þekil 2)
Yiyecek
Sarýlmýþ et ve temizlenmiþ balýk
Taze peynir
Yumurta
Tereyað / Margarin
Piþirilmiþ yemek (Kapalý kaplarda)
Sandwich etleri, taze pasta,
puding, sütlü tatlýlar, çikolata, kremalý
pastalar, kuru pasta, ekmek, domates
Konserveler, içecekler, süt, yoðurt
Meyveler, sebzeler
TR
3
Yiyeceklerin Saklanmasý
Saklama Zamaný
2 / 3 gün
3 / 4 gün
1 ay
3 / 4 gün
3 / 4 gün
Dolaptaki yeri
Et / balýk bölümü
Sebzeliðin üzerindeki raf
(en soðuk bölme)
Yumurtalýk rafý
Herhangi bir raf
Herhangi bir raf
Herhangi bir raf
Özel kapý raflarýna
Sebzelikte
Þekil 1 Þekil 2

Enerji tasarrufu yöntemleri
- Sýcak yiyeceklerinizi soðutmadan dolaba koyma-
yýnýz. Aksi takdirde, dolabýnýzýn iç sýcaklýðý yükselecek,
kompresörün uzun çalýþmasýna ve fazla enerji sarfiyatýna
neden olacaktýr.
- Dolabýn içindeki hava doðal sirküle eder, yani soðuk, aðýr
hava aþaðýya iner. Et ve balýðýn, sebzeliðin hemen
üzerinde saklanma sebebi budur.
- Yiyeceklerin saklama ömrü ile ilgili açýklamalarýmýzý
hatýrlayýnýz : Eðer doðru bir þekilde saklanmazsa, taze
yiyecekler dahi kýsa sürede bozulabilir.
Saklama bölümünün kullanýmý
Dolapta kapý üzerindeki, iþareti bulunan bö-
lümde dondurulmuþ yiyecekler saklanabilir.
Yiyeceklerin saklama ömrü, kendi paketleri üzerinde
gösterilmiþtir.
Yiyecekleri satýn alýrken, uygun derecede saklanabilecek-
lerine ve paketlerin bozulmamýþ olmalarýna dikkat edin.
- Cihazý doðru yerleþtirin
Cihazýnýzý ýsý kaynaklarýndan ve direkt güneþ ýþýðý alan
bölgelerden uzak, iyi havalandýrýlan bir yere yerleþtirin.
- Doðru termostat ayarlarý
Dolabýnýzýn termostat ayar düðmesini orta ayara getirin.
Çok soðuk derece ayarlarý yalnýzca fazla enerji tüketimine
deðil ayný zamanda yiyeceðinizin ömrünün kýsalmasýna da
sebebiyet verir. Çok soðuk derece, sebze ve peynirin
bozulmasýna neden olur.
- Cihazý çok fazla doldurmayýn
Yiyeceklerin uygun saklanmasý için iyi bir hava
sirkülasyonu gerekmektedir. Dolabýnýzý çok fazla
doldurmanýz hava sirkülasyonunun bozulmasýna ve
kompresörün zorlanmasýna sebebiyet verir.
- Cihazýn kapýsýný kapalý tutun
Dolabý yalnýzca ihtiyacýnýz olduðunda açýn; kapýnýn çok sýk
açýlýp kapanmasý hava kaybýna sebebiyet verir. Soðuk
havanýn kaybý kompresörün çok fazla çalýþmasýna, bu da
fazla enerji tüketimine neden olur.
- Kapý contasýný kontrol edin
Soðuk hava kaybýný önlemek için kapý contasýný temiz tutun.
- Dolaba sýcak yemek koymayýnýz
Dolaba sýcak yiyecek konulmasý durumunda, dolap uzun
süre çalýþacaktýr. Bu nedenle, yiyecekler oda sýcaklýðý
ýsýsýna geldiðinde dolaba koyunuz.
- Cihazýn dondurucu bölümdeki buzlarýn
eritilmesi
Dondurucu bölüm duvarýndaki buz kalýnlýðý fazlalaþtýðýnda
acilen buzlarýn çözülmesini saðlayýnýz.
(Bakým Bilgileri'ne bakýnýz.)
TR
4

Cihazýnýzýn bakýmý
Cihazýnýzýn temizliðini yapmadan önce, cihazýn
elektriðini kesin. (fiþi prizden çekin veya evin
þebekesini kapatýn.)
Buzlarýn eritilmesi (Defrost)
Dondurucu bölümdeki buz kalýnlýðý arttýðýnda buzlarýn
temizlenmesi tavsiye edilir. Bu iþlem için kesinlikle keskin
aletler kullanýlmamalýdýr. Keskin aletler soðutma devresine
ve cihaza zarar verir. Böyle bir temizleme iþlemi soðutma
devresi ve enerji tüketimi için çok önemlidir. Cihazýn
buzlarýný eritmeye baþlamadan önce tüm yiyecekler
boþaltýlmalýdýr.
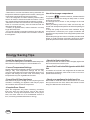
Buzlarý eritmek için, termostat düðmesinin ortasýnda
bulunan butona basýn. (Þekil 3) Eriyen buzlarýn suyu,
damlalýktan (B) etlik kutusunun arka tarafýnda bulunan özel
bölmeye boþalýr. Erime iþlemi 4 - 6 saat sürer. Erime iþlemi
tamamlandýktan sonra, etlik kutusunun alt tarafýnda
bulunan tapa çýkarýlarak defrost suyu yaklaþýk 4 - 5 lt.'lik bir
kaba boþaltýlýr. Tapa yerine takýlýr. (Þekil 4) Temizlik için
etlik kutusu çýkarýlýr, yýkanýr ve kurutulur.
Buz erime iþlemi tamamlandýktan sonra (bu iþlem
dolabýn kapýsý kapalý iken yapýlacaktýr), dolap otomatik
olarak çalýþmaya baþlayacaktýr.
ÖNEMLÝ: Buzlarý eritirken, donmuþ yiyeceði dolaptan
çýkarýn, gazeteye sarýn ve soðuk bir yerde muhafaza edin.
Dýþarý alýnan donmuþ gýdalarýn sýcaklýðýnýn yükselmesi
ömrünü kýsaltacaktýr. Bu nedenle kýsa süre içinde bu
gýdalar tüketilmelidir.
Temizlik ve Bakým
- Cihaz, kokusuz, hijyenik maddelerden yapýlmýþtýr. Bu
özellikleri koruyabilmek için her zaman plastik kaplar
kullanýn.
- Cihazýnýzýn temizliði için iyi bir dezenfektan olan su ve
bikarbonat kullanýn. Eðer evinizde sodyum bikarbonat
yoksa doðal sabun kullanýn.
- Dolabýnýzýn temizliðinde aþýndýrýcý deterjanlar, beyazlatýcý
ve amonyaklý deterjanlar kullanmayýnýz. Asla eritken
malzemeler kullanmayýnýz.
- Sökülebilen tüm parçalar sýcak sabunlu veya deterjanlý
su ile yýkanabilir. Parçalar yerlerine yerleþtirilmeden önce
kurulanmalýdýr.
- Eðer cihazýnýzý uzun bir süre kullanmayacaksanýz, fiþini
çekiniz. Ýçini temiz ve kuru, koku ve küf oluþumunu
önlemek için kapýsýný açýk býrakýnýz.
- Ampül deðiþimi: Ýç aydýnlatma için kullanýlan ampül
termostat kutusunun arkasýna yerleþtirilmiþtir. Yanmýþ
ampülü çýkarýn ve 15 Watt'tan fazla olmayan bir ampül
takýn. (Þekil 5)
Bu iþlemi yapmadan önce, cihazýn elektrik baðlantýsýný
kesin. (Bunun için evinizin þebekesini kapatýn veya fiþi
prizden çýkarýn.)
TR
5
Þekil 3 Þekil 4
Þekil 5

Dolabýnýz çalýþmýyor ise aþaðýdaki kontrol-
leri yapýn;
- Þebekenizin açýk olup olmadýðýna bakýn.
- Fiþin prize tam olarak takýlý olup-olmadýðýna bakýn.
- Prizin çalýþýp çalýþmadýðýný, evinizdeki baþka bir aletin
fiþi ile kontrol edin.
Dolabýnýz tam soðutma yapmýyor ise aþaðý-
daki kontrolleri yapýn;
- Dolap kapýsýnýn tam olarak kapalý olup-olmadýðýný ve kapý
contasýný kontrol edin.
- Termostat derece düðmesinin ayarýný kontrol edin.
- Buzdolabý çok fazla dolu olmamalýdýr.
Dolabýnýzdaki yiyecekler çok soðuk ise
aþaðýdaki kontrolleri yapýn;
- Termostat düðmesinin ayarýný kontrol edin.
- Damlalýðýn (B) doðru pozisyonda olup olmadýðýný kontrol
edin.
Motor sürekli çalýþýyor ise aþaðýdaki
kontrolleri yapýn;
- Dolabýn kapýsýnýn açýk olup-olmadýðýný kontrol edin.
- Oda sýcaklýðýnýn çok yüksek olup-olmadýðýný kontrol edin.
Cihaz sesli çalýþýyor ise aþaðýdaki kontrolleri
yapýn;
- Cihazýn düz olup-olmadýðýný kontrol edin.
- Cihazýn yakýnýnda sesli veya titreþimli aletler olup-
olmadýðýný kontrol edin.
- Kompresör çalýþmadýðýnda, cihazýn soðutma devresinin
biraz ses yapmasý normaldir.
Tüm kontrollerden sonra, cihazýnýz hala problemli ise, en
yakýn servisi çaðýrýn ve cihazýnýzýn seri numarasý ve modeli
ile ilgili bilgileri iletin.
Asla servis yetkilisi olmayan teknisyenleri çaðýrmayýn
ve orijinal olmayan yedek parçalarýn kullanýmýna
müsade etmeyin.
TR
6
Arýza

Safety a good habit to get into
Installation
ATTENTION
Read your handbook carefully since it contains instructions
which will ensure safe installation, use and maintenance
of your appliance.
Your refrigerator is built to International standards (EN60)
and has been awarded the European approval mark for
compliance to UK electrical safety requirements. It also
meets the EC standards on the prevention and elimina-
tion of radio interference.
1. This appliance is designed to be used indoors and
under no circumstances should it be installed outside.
2. The appliance should be used only by adults exclusively
for storing foodstuffs in compliance with the instructions
provided in the handbook. Under no circumstances
should children be allowed to operate, or tamper with, this
product.
3. For electrical safety, do not attempt to operate this ap-
pliance with wet hands or feet.
4. Do not operate this appliance connected to an
extension lead. If a longer supply cable is required, this
must be replaced with one of the same specifications in
compliance with the current electrical regulations. This
operation should be carried out by a qualified person.
Ensure that the cable is not trapped or damaged during the
installation.
5. Never pull the cable or the appliance to remove the
plug from the socket
6. Do not touch the internal cooling elements, especially if
your hands are wet, since you could burn or hurt yourself.
Do not eat ice cubes straight out of the freezer.
7. Before doing any cleaning, disconnect the appliance
from the electricity (by pulling out the plug or turning off the
general switch in your home); it is not sufficient to place the
temperature regulation knob on 0 to cut off the power.
8. Before disposing of your old appliance, remember to
break or remove the lock as a safety measure to protect
children who might lock themselves inside the appliance
when playing.
9. If your appliance is not operating properly, before calling
your after-sales service read the chapter on "Trouble
Shooting" which might help you resolve the problem. Do
not attempt to repair the fault by intervening on the internal
components.
To ensure that the appliance operates properly and to
reduce energy consumption, it is important that the
appliance is installed correctly.
Ventilation
The compressor and condenser generate heat and, there-
fore, need to be ventilated properly. Rooms with less than
prefect ventilation are not very suited for installation of the
appliance. Therefore, it should be installed in a room with
an opening (window or French window) that provide the
appropriate amount of air re-circulation. It is also important
that the room not be too humid.
During installation, make sure not to cover or obstruct the
grates that allow for proper ventilation of the appliance.
For proper ventilation of the appliance, you must leave:
- a space of at least 10 cm between the top part and any
cabinets above it;
- a space of at least 5 cm between the sides of the appliance
and any adjacent cabinets/walls
Away from Heat
Avoid positioning the appliance in a place where it is directly
exposed to sunlight or near an oven, cook top or the like.
Level
The appliance must be level. If the floor is not level, the
adjustable feet located in front can be used to level the ap-
pliance.
Electrical Connection and Earthing
Before proceeding with the electrical connection, make sure
that the voltage indicated on the rating plate, located at
the bottom left near the vegetable crisper, corresponds to
the mains voltage in your home and that the socket is fit-
ted with a standard earthing wire in accordance with safety
standards for 46/90 systems. If the socket is not fitted with
an earthing wire, the manufacturer will not be held liability
for any damages and or injuries arising out of the use of the
appliance. Do not use multiple sockets or adapters.
Insufficient power?
The electrical socket must be able to handle the maximum
power load of the appliance, which is indicated on the rat-
ing plate located at the bottom left next to the vegetable
crisper.
Before making the electrical connection...
After the appliance has been delivered, place it in the ver-
tical upright position and wait at least 3 hours before insert-
ing the plug into the socket in order to ensure that it func-
tions properly.
GB
7

A closer look
Compartment for making ice and for storing
frozen and deep frozen foods
Defrost Water Tray and Cold Air Flow Regulator
Meat and fish container, also used for defrost
water
Internal light
Removable shelves
Glass shelf
Fruit and vegetable drawers
Adjustable feet
Removable door shelf for bottles
Removable door shelves
Temperature regulation knob
GB
8
Use this knob to regulate the temperature of the
refrigerator. The following settings are available:
0 refrigerator OFF;
1 minimum cold temperature;
3 maximum cold temperature;
You can position the knob on any of the settings from 1 - 3
as required. Remember that you can turn off your
refrigerator by setting the knob to 0.
A
D
E
E
E
E
G
I
I
J
J
F
J
C
B
H H

Setting up Your Appliance
Storage - getting the most out of your appliance.
ATTENTION
After transport stand the appliance upright and wait at
last 3 hours before plugging the appliance into the
mains to ensure proper performance.
Use these average temperature settings to ensure op-
timum performance and to save energy.
Before storing food in your refrigerator wipe the interior with
a solution of warm water and bicarbonate of soda.
After having plugged the appliance into the socket, make
sure that the refrigerator light has turned on. Then turn the
thermostat knob to setting "2". After a couple of hours, you
can place fresh food into the refrigerator.
Fill the ice trays and place them in the compartment "A".
What Not to Store in the Refrigerator
Garlic (transmits odour), onions and leeks.
Bananas (they will turn black).
Citrus fruits.
Potatoes and root vegetables (store in dark, dry places).
Adjusting the Flow of Cold Air
It is necessary that the circulation of cold air within the
refrigerator be regulated based on the room temperature.
To do so, the flap located on the defrost water tray must be
closed towards to the tray (as shown in Fig.1) when the
ambient temperature is above 35°C and must be opened
towards to the rear side when below 35°C. (as shown in
Fig.2)
Food
Wrapped meat and cleaned fish
(use plastic wrap or pack in plastic bags)
Fresh cheese
Eggs
Butter, margarine
Cooked or precooked food
(place in air-tight containers and when cool store in
refrigerator)
Sandwich meats in general, fresh pasta,
custards, puddings, chocolates, cream pastries,
bread, dry pastries, red tomatoes
Bottled products, milk, drinks, yoghurt
Fruits and legumes
9
Storing Food in the Refrigerator Compartment
Storage Time
2 or 3 days
3 or 4 days
1 month
3 or 4 days
3 or 4 days
Location in the Refrigerator
On the meat and fish container
On the shelf above the vegetable crisper
(which is the coldest area.)
In special egg rack on door
On any shelf
On any shelf
On any shelf
On special door shelves
In vegetable crisper
Fig.1 Fig.2
GB

Energy Saving Tips
- Remember to cool hot food before storing otherwise the
temperature inside the appliance will increase, causing the
compressor to work harder and use more energy.
- Air in the refrigerator circulates naturally so that colder,
heavier air tends to descend towards the bottom. This is
why meat and fish should be stored just above the crisper.
- Remember to follow our instructions on the storage life of
foods: If not stored correctly, even the freshest food will
deteriorate quite quickly.
- Contrary to popular belief, cooked foods do not keep
longer than fresh food.
- Do not store liquids in unsealed containers since this will
increase the humidity and lead to the formation of frost in
the refrigerator.
Use of the storage compartment
The symbol , marked on the door, indicates that this
compartment allows the storage of deep frozen or frozen
food for short periods.
The storage time is shown on the packages of the food
themselves.
When purchasing frozen food, make sure that they are
stored at an adequate temperature and that the package is
intact.
To keep the quality of the frozen food unaltered, during
transportation it should be put in proper containers and
placed as soon as possible on the refrigeration plates of the
appliance.
Should the package have traces of humidity and abnormal
bulges, it could have been previously stored at an inade-
guate temperature and the contents could be deteriorate.
- Install the Appliance Correctly
This means that the appliance should be installed away from
heat sources or direct sunlight in a well ventilated room.
- Correct Temperature Settings
Set the refrigerator temperature knob to one of the middle
settings. Very cold temperature settings will not only
consume a great deal of energy but will neither improve nor
lengthen the storage life of the food. Excessively cold
temperatures may ruin vegetables and cheese.
- Do not Overfill Your Appliance
Remember that proper storage of food requires good air
circulation. Overfilling your appliance will hamper proper
air circulation and overwork the compressor.
- Keep the Door Closed
Open the refrigerator only when necessary; remember
that every time you open the door most of the cold air
will be lost. To bring the temperature back to the proper
level, the motor must run for a considerable amount of
time, consuming a substantial amount of energy.
- Check the Seal on the Door
Keep the seal clean and soft so that it fits tightly against the
door to ensure that no cold air is lost.
- Never Put Food in the Refrigerator while Still
Hot
A container of hot food in the refrigerator will increase the
temperature significantly; allow food to cool to room tem-
perature before storing.
- Check your appliance for build up of ice
Remember to check the walls of the freezer for ice; when
the layer becomes too thick, defrost the freezer immedi-
ately (see "Maintenance instructions").
10
GB

Caring for Your Appliance
Before doing any cleaning, disconnect the appliance
from the electricity (by pulling out the plug or turning
off the general switch in your home)
Defrosting
It is advisable now and then to remove the ice which
forms on the evaporator. Take care to not use sharp object
for this purpose since they could perforate the refrigeration
circuit and permanently damage the appliance. Such
cleaning is very important to guarantee a good operation of
the refrigeration and avoid useless energy consumption.
Before beginning to defrost the appliance, all foodstuffs
must be removed from "2 Star" compartment.
To defrost the appliance, press the button located at the
center of the thermostat knob (Fig.3).
The defrost water will be channeled through the defrost
water tray into (B) a special compartment located at the
rear side of the meat and fish bin. Defrosting takes 4-6
hours on average. When defrosting is completed, the plug
under the meat and fish bin should be removed, the defrost
water must be channeled into a 4-5 lt. cup and the plug
must be mounted again (Fig.4). To clean the appliance
thoroughly, this bin must be removed, washed and dried.
Once the defrosting process has finished (which
should be done with the door closed), the appliance
will automatically turn back on.
IMPORTANT: When defrosting, remove the frozen food,
wrap in newspaper and keep in a cool place. Since the rise
in temperature will shorten the storage life of the food, it
should be used as soon as possible.
Cleaning and Maintenance
- Your appliance is manufactured with hygienic, odourless
materials. To preserve these characteristics, always use
sealed containers to store foods in order to prevent spills,
stains and the formation of difficult to remove odours.
- Only use a water and bicarbonate solution to clean the
appliance. Clean the internal and exterior of your appliance
with a sponge soaked in a warm water and sodium
bicarbonate solution, which is also a good disinfectant. If
you do not have any sodium bicarbonate at home, use a
neutral soap.
- What not to use: Do not use abrasive detergents, bleach
or detergents containing ammonia. Never use solvent
based products.
- All removable parts can be cleaned by soaking them in hot
soapy water or detergent. Remember to dry them
thoroughly before replacing them.
- Discontinued use of the appliance: If the appliance is not
in use for any length of time, remember to clean the interior
and dry thoroughly, leaving the door open to prevent the
formation of odours and mould.
- Replacing the light bulb. The bulb for lighting the interior of
the appliance is located at the back of the thermostat box.
Unscrew the burned out bulb and replace it with another
bulb with a wattage no higher than 15 Watt, follow the
instructions illustrated in fig. 5.
Before carrying out this operation, disconnect the
appliance from the electricity (to do so, turn off the general
switch in the house or remove the plug for the appliance
from the socket).
11
Fig. 5
GB
Fig. 3 Fig. 4

The Refrigerator does not Work
Check that:
• The mains switch in your home is on;
• The plug is inserted correctly in the socket;
• The socket is working; to check this, connect the
appliance to another socket in the room.
The Appliance does not Refrigerate Properly
Check that:
• The door is shut properly and that the door seal is not
damaged;
• The thermostat temperature knob is on the correct setting;
• The refrigerator has not been overfilled.
Food in the Refrigerator is too Cold
Check that:
• The thermostat knob is on the correct setting;
• The defrost water tray (B) is in the right position.
The Motor Runs Continuously
Check whether:
• The door is not closed properly or has been left open;
• The room temperature is not too high.
The Appliance is Noisy
Check whether:
• The appliance is perfectly level;
• The appliance has been installed between cabinets or
other objects that vibrate or make noise;
• Remember that the refrigerant in the cooling circuit
causes a slight bubbling sound, even when the compressor
is not running (this is quite normal).
If after all the checks, the appliance still does not operate or
the problem persists, call the nearest Service Center and
inform them of: the type of problem, the abbreviation of the
model name and the relative numbers.
Never call on unauthorized technicians and always
refuse spare parts which are not originals.
12
Trouble Shooting
GB

.

08/2004 - 195046774 .00
-
 1
1
-
 2
2
-
 3
3
-
 4
4
-
 5
5
-
 6
6
-
 7
7
-
 8
8
-
 9
9
-
 10
10
-
 11
11
-
 12
12
-
 13
13
-
 14
14
-
 15
15
-
 16
16


diğer dillerde
- English: Whirlpool S 46 B User guide
İlgili makaleler
-
Whirlpool RG 1380 C (TK) Kullanici rehberi
-
-
-
-
-
-
-
Whirlpool BAAN 40 FNF NXH (TK) Kullanici rehberi