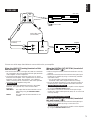
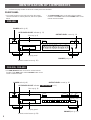
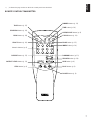
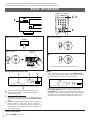
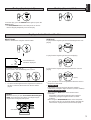
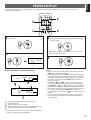
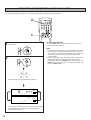
Aşağıda CDX-890, CDX-590 ve CDX-490 için kısa bilgiler bulacaksınız. Bu cihazlar, rastgele erişimli programlanabilir oynatma, rastgele sıralı oynatma ve tek parça veya tüm disk tekrar oynatma özelliklerine sahiptir. Otomatik aralık verme yeteneği ile birlikte gelirler ve teybe kayıt için otomatik programlama yapabilirler. Cihaz, otomatik tepe seviyesi arama yeteneği sunar ve uyumlu bir YAMAHA teyp güvertesi ile CD senkronize kaydı yapabilir. Ek olarak, ekran parlaklığını değiştirme ve uzaktan kumanda özelliklerine sahiptirler. CDX-890 ve CDX-590 modelleri optik ve koaksiyel dijital çıkışlara sahipken, CDX-490 yalnızca optik dijital çıkışa sahiptir.
Aşağıda CDX-890, CDX-590 ve CDX-490 için kısa bilgiler bulacaksınız. Bu cihazlar, rastgele erişimli programlanabilir oynatma, rastgele sıralı oynatma ve tek parça veya tüm disk tekrar oynatma özelliklerine sahiptir. Otomatik aralık verme yeteneği ile birlikte gelirler ve teybe kayıt için otomatik programlama yapabilirler. Cihaz, otomatik tepe seviyesi arama yeteneği sunar ve uyumlu bir YAMAHA teyp güvertesi ile CD senkronize kaydı yapabilir. Ek olarak, ekran parlaklığını değiştirme ve uzaktan kumanda özelliklerine sahiptirler. CDX-890 ve CDX-590 modelleri optik ve koaksiyel dijital çıkışlara sahipken, CDX-490 yalnızca optik dijital çıkışa sahiptir.


-
 1
1
-
 2
2
-
 3
3
-
 4
4
-
 5
5
-
 6
6
-
 7
7
-
 8
8
-
 9
9
-
 10
10
-
 11
11
-
 12
12
-
 13
13
-
 14
14
-
 15
15
-
 16
16
-
 17
17
-
 18
18
-
 19
19
-
 20
20
-
 21
21
-
 22
22
-
 23
23


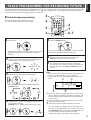
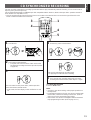
Aşağıda CDX-890, CDX-590 ve CDX-490 için kısa bilgiler bulacaksınız. Bu cihazlar, rastgele erişimli programlanabilir oynatma, rastgele sıralı oynatma ve tek parça veya tüm disk tekrar oynatma özelliklerine sahiptir. Otomatik aralık verme yeteneği ile birlikte gelirler ve teybe kayıt için otomatik programlama yapabilirler. Cihaz, otomatik tepe seviyesi arama yeteneği sunar ve uyumlu bir YAMAHA teyp güvertesi ile CD senkronize kaydı yapabilir. Ek olarak, ekran parlaklığını değiştirme ve uzaktan kumanda özelliklerine sahiptirler. CDX-890 ve CDX-590 modelleri optik ve koaksiyel dijital çıkışlara sahipken, CDX-490 yalnızca optik dijital çıkışa sahiptir.
diğer dillerde
- español: Yamaha CDX-490 El manual del propietario
- français: Yamaha CDX-490 Le manuel du propriétaire
- italiano: Yamaha CDX-490 Manuale del proprietario
- svenska: Yamaha CDX-490 Bruksanvisning
- čeština: Yamaha CDX-490 Návod k obsluze
- polski: Yamaha CDX-490 Instrukcja obsługi
- Deutsch: Yamaha CDX-490 Bedienungsanleitung
- português: Yamaha CDX-490 Manual do proprietário
- English: Yamaha CDX-490 Owner's manual
- dansk: Yamaha CDX-490 Brugervejledning
- русский: Yamaha CDX-490 Инструкция по применению
- suomi: Yamaha CDX-490 Omistajan opas
- Nederlands: Yamaha CDX-490 de handleiding
- română: Yamaha CDX-490 Manualul proprietarului