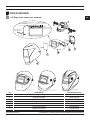
MKM 720S / TURBO
(+90) 444 93 53
magmaweld.com
info@magmaweld.com (+90) 538 927 12 62
USER MANUAL

All rights reserved. It is prohibited to reproduce this documentation, or any part thereof, without the prior written
authorisation of Magma Mekatronik Makine Sanayi ve Ticaret A.Ş.
Magma Mekatronik may modify the information and the images without any prior notice.
Tüm hakları saklıdır. Magma Mekatronik Makine Sanayi ve Ticaret A.Ş.’nin yazılı izni olmaksızın bu dökümanın
tamamının yada bir bölümünün kopyalanması yasaktır.
Magma Mekatronik önceden haber vermeksizin bilgilerde ve resimlerde değişiklik yapılabilir.

AUTO DARKENING WELDING HELMET
SOLARMATİK KAYNAK MASKESİ
EN
RU
TR
3MKM 720S / TURBO
СВАРОЧНЫЙ ШЛЕМ С АВТОЗАТЕМНЕНИЕМ
EN 379 EN 175 ANSI/ISEA Z87.1CSA Z94.3

4
www.magmaweld.comUSER MANUAL | РУКОВОДСТВО ПО ЭКСПЛУАТАЦИИ | KULLANIM KILAVUZU
MKM 720S / TURBO
EN CONTENTS
Contents
1
1.1
2
2.1
2.2
2.3
2.4
2.5
2.6
2.7
2.8
2.9
3
3.1
3.2
3.3
3.4
4
4.1
SAFETY PRECAUTIONS
TECHNICAL INFORMATION
Technical Data
OPERATION
Adjusting the Fit of the Helmet
Adjusting the Distance Between the Helmet and the Face
Select Blackening Level
Set Enlightenment Time
Set Sensitivity
Selection of Grinding Option
Test
Power
Blackening Selection Table
MAINTENANCE AND SERVICE
To Replace the Solarmatik Cartridge
To Replace Lenses
Cleaning
Troubleshooting
ANNEX
5
6
7
7
7
7
8
8
8
8
9
10
10
10
11
12

5
www.magmaweld.com USER MANUAL | РУКОВОДСТВО ПО ЭКСПЛУАТАЦИИ | KULLANIM KILAVUZU
MKM 720S / TURBO
EN
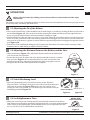
• Auto-Darkening welding helmets are designed to protect the eye and face from
sparks, spatter and harmful radiation under normal welding conditions.
an arc is struck and it returns to the light state when welding stops.
• Auto-Darkening welding helmets come ready for use. The only thing you need to do
before your welding is to adjust the position of the headband and select the correct
shade number for your application.
• This Auto-Darkening welding helmet is not suitable for laser welding and
oxyacetylene welding / cutting processes.
• This Auto-Darkening welding helmet will not protect against severe impact hazards.
• This helmet will not protect against explosive devices or corrosive liquids.
manual. Do not use replacement parts will void the warranty and expose the
operator the risk of personal injury.
• Shoul this helmet not darken upon striking an arc, stop welding immediately and
contact your supervisor or your dealer.
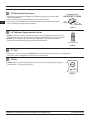
• Use only at temperatures; -10 °C ~ +60 °C (14 °F ~ 140 °F).
• Storing temperature; -20 °C ~ +70 °C (-4 °F ~ 158 °F).
• The helmet should be stored in dry cool and dark area, when not using it for a long
time.
the sensors and solar cells clean using a clean lint-free tissue.
• Regularly replace the cracked / scratched / pitted front cover lens.
• The materials which may come into contact with the wearer’s skin can cause allergic
“reactions in some circumstances.
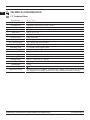
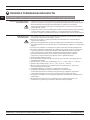
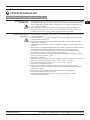
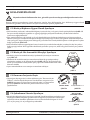
Comprehending Safety
Precautions
Explanation Of Safety
Information
Be Sure To Follow All Safety Rules In This Manual!
Safety Precautions
SAFETY PRECAUTIONS

6
www.magmaweld.comUSER MANUAL | РУКОВОДСТВО ПО ЭКСПЛУАТАЦИИ | KULLANIM KILAVUZU
MKM 720S / TURBO
EN
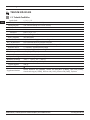
Optical Class
Dark State
Power On/Off
Power Supply
Operating Temp.
Grinding
Viewing Area
Arc Sensor
Sensitivity Control
Switching Time
Storing Temp.
Cartridge Size
Shade Control
Light State
UV / IR Protection
Low Amperage TIG Rated
Total Weight
Delay (Dark to Light)
Helmet Material
1 / 1 / 1 / 2
DIN 5 - 8 / 9 - 13
Fully Automatic
Solar cell. Battery change required. 1 x CR2450 Lithium Battery
-10°C ~ +60°C (14°F ~ 140°F)
Yes
100 x 60 mm (3.94” x 2.36”)
4
1 / 30,000 s. from Light to Dark
-20°C ~ +70°C (- 4°F ~ 158°F)
110 x 90 x 9 mm (4.33” x 3.54” x 0.35”)
External, Variable Shade
DIN 4
Up to Shade DIN 16 at all times
500 g
High Impact Resistance Nylon
True Color
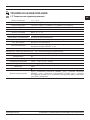
TECHNICAL INFORMATION
1.1 Technical Data
Technical Information
Application Range Shielded Metal Arc (SMAW), Gas Metal Arc (GMAW), Flux Cored Arc (FCAW),
Gas Tungsten Arc (GTAW), Carbon Arc (CAW), Plasma Arc (PAW), Grinding

7
www.magmaweld.com USER MANUAL | РУКОВОДСТВО ПО ЭКСПЛУАТАЦИИ | KULLANIM KILAVUZU
MKM 720S / TURBO
EN
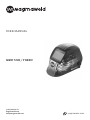
DELAY TIME
DELAY SETTING
min. max.
SHADE / DECISION 5 - 8
SHADE / DECISION 9 - 13
LEVEL ADJUSTMENT
SHADE
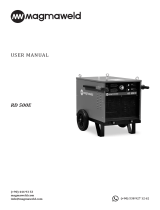
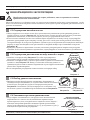
• The overall circumference of the headband can be made larger or smaller by rotating the knob on the back of
the headband Figure 1-Y. This can be done whilst wearing the helmet and allows just the right tension to
• If the headband is riding too high or too low on your head, adjust the strap which passes over the top of your
head. To do this, release the end of the band by pushind the locking pin out of the hole in the band. Slide the
two portions of the band to a greater or lesser width as required and push the locking pin through the nearest
hole Figure 1-W.
headband moves while tilting, re-adjust it until it is stable.
• Undo the block nut Figure 1-T to adjust the distance between the helmet and
your face in the down position
• Loosen the block nut on either side of the helmet and slide it nearer or further
from your face Figure 1-Z. It is important that your eyes are each the same
distance from the lens. Otherwise the darkening effect may appear uneven.
• Re-tighten the block nut when adjustment is complete.
up for delay time, sensitivity and shade level.
2.1 Adjusting the Fit of the Helmet
2.2 Adjusting the Distance Between the Helmet and the Face
Before using the helmet for welding, ensure that you have read and understood the safety
instructions.
Figure 1
• Select the blackening level you need by referring to the “Blackout
Selection Table” according to the type of source and current intensity you
will make. By turning the Figure 2b button to the 5-8 position or by
turning it to the 9-13 position, you can make a precise selection from the
darkening potential in Figure 2a.
2.3 Select Blackening Level
• When the source stops, the viewing window automatically switches from dark to
light. Measures can be taken against the red light that may occur after welding thanks
to the setting of the lighting time. The illumination time can be adjusted from “fast”
2.4 Set Enlightenment Time
Figure 2a Figure 2b
Figure 3
OPERATION
Operation
‘W’
‘Z’
‘Y’
‘Z’
‘T’
‘T’
TOP

8
www.magmaweld.comUSER MANUAL | РУКОВОДСТВО ПО ЭКСПЛУАТАЦИИ | KULLANIM KILAVUZU
MKM 720S / TURBO
EN
SENSITIVITY
SENSITIVITY ADJUSTMENT
LO
Düşük HI
Yüksek
Welding / Kaynak
Grinding / Taşlama
Figure 4
Figure 5
the rotary knob.
• The medium setting is normal for daily use.
• If the ambient light is too high or there is another machine welding nearby, set
the sensitivity to low.
2.5 Set Sensitivity
• When you move the Figure 5 button to the grinding position, you will get
a tarnish-free image This function will protect your face against splashes.
• You can re-adjust using the Figure 5 buttons to during welding.
2.6 Selection of Grinding Option
TEST
LOW
BATTERY
Figure 6
• You can test your dimming settings by holding down the Test button in Figure 6. It will return to its normal
position when you take your hand off the button.
2.7 Test
• When the Low Battery warning led in Figure 6 lights red, the battery should be replaced.
1 x CR 2032 Lithium Battery
2.8 Power
Operation

9
www.magmaweld.com USER MANUAL | РУКОВОДСТВО ПО ЭКСПЛУАТАЦИИ | KULLANIM KILAVUZU
MKM 720S / TURBO
EN
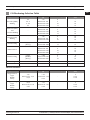
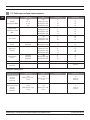
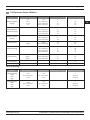
Material Thickness
Application
Application
Electrode Size (mm)
Electrode Size (mm)
Welding Current
(A)
Welding Current
(A)
Minimum Blackening Value
Minimum Blackening Value
Recommended Blackening
Value
Recommended Blackening
Value
Electrode (MMA)
Welding
Under Gas (MIG)
and
Core Wire Welding
Tungsten (TIG)
Welding
Carbon Cutting
Plasma Source
Plasma Cutting
Brazing
Carbon Source
(Light)
(Heavy)
< 60
Between 60 - 160
Between 160 - 250
Between 250 - 550
< 60
Between 60 - 160
Between 160 - 250
Between 250 - 550
< 50
Between 50 - 150
Between 150 - 500
< 500
Between 500 - 1000
< 20
Between 20 - 100
Between 100 - 400
Between 400 - 800
< 300
Between 300 - 400
Between 400 - 800
(Light)
(Middle)
(Heavy)
Oxygen Source
Light
Middle
Heavy
Oxygen Cutting
Light
Middle
Heavy
2.5
2.5 - 4
4 - 6.4
6.4
-
-
-
-
-
-
-
8
9
10
11
8
9
10
11
8
8
10
10
11
6
8
10
11
8
9
10
-
-
-
10
12
14
-
11
12
14
10
12
14
12
14
Between 6 - 8
10
12
14
8
12
14
5
10 max.
<3,2
Between 3,2 - 12,5
>12,5
< 3.2
Between 3.2 - 12.7
> 12.7
<25,4
Between 25,4 - 152
>152
< 25
Between 25 - 150
> 150
-
-
5
5 or 6
6 or 8
5
4 or 5
5 or 6
2.9 Blackening Selection Table
Operation

10
www.magmaweld.comUSER MANUAL | РУКОВОДСТВО ПО ЭКСПЛУАТАЦИИ | KULLANIM KILAVUZU
MKM 720S / TURBO
EN
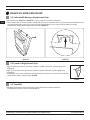
Figure 8
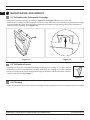
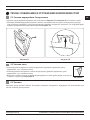
• Remove the existing cartridge according to Figure 7a and Figure 7b and insert a new one.
• Take the new cartridge and thread the potentiometer cable under the wire frame before placing the cartridge
in its slot inside the mask. Press down the wireframe and make sure the leading edge of the wireframe is
Figure 7b.
3.1 To Replace the Solarmatik Cartridge
• If the front surface lens is damaged (cracking, scratching, dirt, scoring, etc.), replace the lens.
• If the inner surface lens is damaged (cracking, scratching, dirt, scoring etc.), replace the lens.
until it comes off one edge Figure 7.
3.2 To Replace Lenses
• Wipe the mask with a soft cloth. Clean the cartridge surface regularly. Do not use strong solvents for cleaning.
3.3 Cleaning
Figure 7a Figure 7b
MAINTENANCE AND SERVICE
Maintenance and Service

11
www.magmaweld.com USER MANUAL | РУКОВОДСТВО ПО ЭКСПЛУАТАЦИИ | KULLANIM KILAVUZU
MKM 720S / TURBO
EN
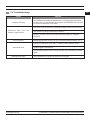
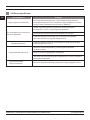
Irregular dimming
darken or light Shivers
Welding mask slips
Slow response
Restricted view
• The headband is unbalanced and there is an inappropriate distance
• Welding current is too low. Set the sensitivity setting to “Highest”
direction.
• The sensors are dirty. Clean sensor surfaces.
• The front cover lens is dirty or damaged. Replace the front cover lens.
• Blackening speed is too low. Do not use at temperatures below -10 ° C.
• The lens on the front cover and / or inside is dirty. Replace lenses.
• The blackout number is incorrectly selected. Set the dimming number
again.
• The headband is not properly adjusted. Set it again.
Failure Solution
3.4 Troubleshooting
Maintenance and Service

12
www.magmaweld.comUSER MANUAL | РУКОВОДСТВО ПО ЭКСПЛУАТАЦИИ | KULLANIM KILAVUZU
MKM 720S / TURBO
EN
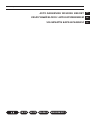
Shade Range
Sensitivity Knob Delay Time Knob
Li-Batt
change required
Variable Shade
Control Knob
8501304020
8501405BAS
8501LCD720
8501304015
85010718IC
8500405003
8501304019
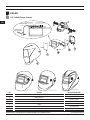
DEFINITION MATERIAL CODENO
Front Surface Lens
Adjustable Headband
Screw
MKM Cartridge
Welding Mask
Inner Lens
Lens Holder
1
4
2
5
3
6
7
ANNEX
4.1 Spare Parts List
Annex

13
www.magmaweld.com USER MANUAL | РУКОВОДСТВО ПО ЭКСПЛУАТАЦИИ | KULLANIM KILAVUZU
RU
MKM 720S / TURBO
1
1.1
2
2.1
2.2
2.3
2.4
2.5
2.6
2.7
2.8
2.9
3
3.1
3.2
3.3
3.4
4
4.1
ТЕХНИЧЕСКАЯ ИНФОРМАЦИЯ
ИНФОРМАЦИЯ ПО ЭКСПЛУАТАЦИИ
ТЕХОБСЛУЖИВАНИЕ И УСТРАНЕНИЕ НЕИСПРАВНОСТЕЙ
ПРИЛОЖЕНИЯ
14
15
16
16
16
16
17
17
17
17
18
19
19
19
20
21
СОДЕРЖАНИЕ
Содерaжание

14
www.magmaweld.comUSER MANUAL | РУКОВОДСТВО ПО ЭКСПЛУАТАЦИИ | KULLANIM KILAVUZU
RU
MKM 720S / TURBO
Понимание мер
безопасности
Разъяснение информации
по безопасности
ПРАВИЛА ТЕХНИКИ БЕЗОПАСНОСТИ
Соблюдайте все правила техники безопасности, указанные в этом руководстве!
Правила техники безопасности

15
www.magmaweld.com USER MANUAL | РУКОВОДСТВО ПО ЭКСПЛУАТАЦИИ | KULLANIM KILAVUZU
RU
MKM 720S / TURBO
ТЕХНИЧЕСКАЯ ИНФОРМАЦИЯ
Техническая информация
1.1 Технические характеристики
1 / 1 / 1 / 2
DIN 5 - 8 / 9 - 13
-10°C ~ +60°C (14°F ~ 140°F)
4
-20°C ~ +70°C (- 4°F ~ 158°F)
DIN 4

16
www.magmaweld.comUSER MANUAL | РУКОВОДСТВО ПО ЭКСПЛУАТАЦИИ | KULLANIM KILAVUZU
RU
MKM 720S / TURBO
Рисунок 1-Y
Рисунок 1-W.
Рисунок 1-T
Рисунок 1-Z
2.1 Регулировка посадки шлема
2.2 Регулировка расстояния между маской и лицом
Перед использованием маски для сварки убедитесь, что вы прочитали и поняли
правила техники безопасности.
Рисунок 1
Рисунок 3
Рисунок 2b
Рисунок 2a.
2.3 Выбор уровня затемнения
2.4 Установка времени просветления
ИНФОРМАЦИЯ ПО ЭКСПЛУАТАЦИИ
Информация по эксплуатации
ВРЕМЯ ЗАДЕРЖКИ
НАСТРОЙКА ЗАДЕРЖКИ
мин. Максимум.
ТЕНЬ / РЕШЕНИЕ 5-8
ТЕНЬ / РЕШЕНИЕ 9 - 13
РЕГУЛИРОВКА УРОВНЯ
ОТТЕНОК
Рисунок 2a Рисунок 2b
‘W’
‘Z’
‘Y’
‘Z’
‘T’
‘T’
ВЕРШИНА

17
www.magmaweld.com USER MANUAL | РУКОВОДСТВО ПО ЭКСПЛУАТАЦИИ | KULLANIM KILAVUZU
RU
MKM 720S / TURBO
Рисунок 4
Рисунок 5
2.5 Установка чувствительности
2.6 Выбор вида шлифования
Информация по эксплуатации
ЧУВСТВИТЕЛЬНОСТЬ
РЕГУЛИРОВКА ЧУВСТВИТЕЛЬНОСТИ
LO
Дюшюк
HI
Средняя школа
Сварка
Шлифовка
Рисунок 5
Рисунок 5
2.7 Тест
Рисунок 6
Рисунок 6
2.8 Питание
ТЕСТ
НИЗКИЙ
АККУМУЛЯТОР
Рисунке 6

18
www.magmaweld.comUSER MANUAL | РУКОВОДСТВО ПО ЭКСПЛУАТАЦИИ | KULLANIM KILAVUZU
RU
MKM 720S / TURBO
Толщина материала
Назначение
Назначение
Размер электрода
дюйма (мм)
Размер электрода
дюйма (мм)
Сварочный ток
(А)
Сварочный
ток (А)
Минимальное значение
затемнения
Минимальное значение
затемнения
Рекомендуемое
затемнение
Рекомендуемое
затемнение
MIG
< 60
< 60
< 50
< 500
< 20
< 300
2.5
2.5 - 4
4 - 6.4
6.4
-
-
-
-
-
-
-
8
9
10
11
8
9
10
11
8
8
10
10
11
6
8
10
11
8
9
10
-
-
-
10
12
14
-
11
12
14
10
12
14
12
14
10
12
14
8
12
14
5
<3,2
>12,5
< 3.2
> 12.7
<25,4
>152
< 25
> 150
-
-
5
5
Информация по эксплуатации
2.9 Таблица выбора затемнения

19
www.magmaweld.com USER MANUAL | РУКОВОДСТВО ПО ЭКСПЛУАТАЦИИ | KULLANIM KILAVUZU
RU
MKM 720S / TURBO
3.2 Замена линз
3.3 Чистка
Рисунок 7a Рисунок 7b
3.1 Замена картриджа Соларматик
ТЕХОБСЛУЖИВАНИЕ И УСТРАНЕНИЕ НЕИСПРАВНОСТЕЙ
Рисунок 8
Рисунок 7aРисунок 7b
Рисунок 7b.
Рисунок 8.
Техобслуживание и устранение неисправностей

20
www.magmaweld.comUSER MANUAL | РУКОВОДСТВО ПО ЭКСПЛУАТАЦИИ | KULLANIM KILAVUZU
RU
MKM 720S / TURBO
Неисправность Решение
Техобслуживание и устранение неисправностей
3.4 Поиск проблемы
Sayfa yükleniyor ...
Sayfa yükleniyor ...
Sayfa yükleniyor ...
Sayfa yükleniyor ...
Sayfa yükleniyor ...
Sayfa yükleniyor ...
Sayfa yükleniyor ...
Sayfa yükleniyor ...
Sayfa yükleniyor ...
Sayfa yükleniyor ...
Sayfa yükleniyor ...
Sayfa yükleniyor ...
Sayfa yükleniyor ...
Sayfa yükleniyor ...
Sayfa yükleniyor ...
Sayfa yükleniyor ...
-
 1
1
-
 2
2
-
 3
3
-
 4
4
-
 5
5
-
 6
6
-
 7
7
-
 8
8
-
 9
9
-
 10
10
-
 11
11
-
 12
12
-
 13
13
-
 14
14
-
 15
15
-
 16
16
-
 17
17
-
 18
18
-
 19
19
-
 20
20
-
 21
21
-
 22
22
-
 23
23
-
 24
24
-
 25
25
-
 26
26
-
 27
27
-
 28
28
-
 29
29
-
 30
30
-
 31
31
-
 32
32
-
 33
33
-
 34
34
-
 35
35
-
 36
36