Tenda PH6 Yükleme Rehberi
- Kategori
- PowerLine ağ adaptörleri
- Tip
- Yükleme Rehberi

Español
AV1000 Gigabit Passthrough Powerline Adapter Kit
Model: PH6
Quick Installation Guide
*Applicable to P6 and its kit
This Installation Guide is for installation instruction only. For more
product or function details, please visit http://www.tendacn.com.
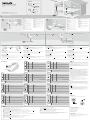
Plug and Play
2
Português:
Conecte o outro adaptador a um computador ou
outros dispositivos com fio, e conecte-o a uma
tomada de parede.
Deutsch:
Verbinden Sie den Adapter mit einem Computer
oder anderen, verdrahteten Geräten, und
verbinden Sie diesen mit einer Wandsteckdose in
der Nähe.
Español:
Conecte el otro adaptador a un ordenador u otro
dispositivo con cable, y enchúfelo a una toma
de corriente.
Italiano:
Collegare l'altro adattatore a un computer o ad
altri dispositivi con cavo, e collegarlo ad una
presa a muro.
Français:
Connectez l'autre adaptateur à un ordinateur ou
un autre appareil et branchez-le à une prise
murale.
Română:
Conectați celălalt adaptor la un computer sau alte
dispozitive cu fir, și conectați-l la o priză de perete.
Magyar:
A másik adaptert csatlakoztassa egy számítógéphez
vagy más vezetékes eszközhöz, és dugja be egy fali
csatlakozóaljzatba.
Русский:
Подключите другой адаптер к компьютеру или
другим проводных устройств, и подключите его к
сетевой розетке.
Türkçe:
Diğer adaptörü bir bilgisayara veya başka bir kablolu
cihaza bağlayın ve duvar prizine takın.
English:
Connect the other adapter to a wired device such as
a set-top box of a TV, and plug it to a wall receptacle.
Polski:
Podłącz drugi adapter do komputera lub innych
urządzeń przewodowych i włącz go do gniazdka
elektrycznego.
Polski:
Podłącz adapter do jednego z gniazd LAN routera,
aby uzyskać dostęp do Internetu i włącz go do
pobliskiego gniazdka elektrycznego.
Română:
Conectați un adaptor la unul din porturile LAN ale
unui router pentru acces la Internet, și conectați-l
la o priză de perete din apropiere.
Magyar:
Az internethez való kapcsolódáshoz csatlakoztassa
az egyik adaptert a vezeték nélküli router egyik LAN
portjához, és dugja be egy közeli fali csatlakozóaljzatba.
Русский:
Подключите один адаптер к порту локальной
сети(LAN) маршрутизатора для доступа в Интернет,
и подключите его к электрической розетке рядом.
Türkçe:
İnternete erişim için bir adaptörü router'ın LAN
portlarından birine bağlayın ve yakındaki bir
duvar prizine takın.
(Optional) English:
Secure Your Powerline Network
1. Plug in your adapters.
2. Hold down the Pair/Reset button on one adapter for 1 second, and the PLC LED indicator on the
adapter starts blinking.
3. Hold down the Pair/Reset button on the other adapter for 1 second within 2 minutes after the previous step.
Observe the PLC LEDs on the two adapters until they light up and keep on.
(Optionnel) Français:
Sécurisez votre réseau Powerline
1. Branchez vos adaptateurs
2. Appuyez sur la touche Pair/Reset (Appairer/Réinitialiser) sur un des adaptateurs pendant une seconde,
et la LED PLC de l'adaptateur commence à clignoter.
3. Puis appuyer sur la touche Pair/Reset (Appairer/Réinitialiser) sur l'autre adaptateur pendant 1 seconde.
Les deux touches doivent être appuyées dans les deux minutes.
Observez les LED PLC sur les deux adaptateurs jusqu'à ce qu'elles se rallument.
(Опционально) Русский:
Защитите свою powerline сеть.
1. Включите адаптеры.
2. Нажмите на кнопку Pair/Reset на одном из адаптеров, PLC индикатор на нем начнет мигать.
3. Затем нажмите на кнопку Pair/Reset на другом адаптере. Обе кнопки должны быть нажаты в
течение двух минут.
Дождитесь, когда PLC индикаторы двух адаптеров загорятся.
(Opcional) Português:
Proteja sua rede Powerline
1. Conecte seus adaptadores.
2. Pressione o botão Pair/Reset (Emparelhar/Reset) em um adaptador por 1 segundo e o LED de PLC
no adaptador começará a piscar.
3. Em seguida pressione o botão Pair/Reset (Emparelhar/Reset) no outro adaptador por 1 segundo.
Ambos os botões devem ser pressionados dentro do período de 2 minutos.
Observe os LEDs de PLC nos dois adaptadores até que eles acendam novamente.
(Optional) Deutsch:
Sichern Ihres Powerline-Netzwerks
1. Schließen Sie Ihre Adapter an.
2. Drücken Sie auf die Pair/Reset (Paaren/Zurücksetzen)-Taste an einem Adapter für eine Sekunde. Das
SPS-LED des Adapters beginnt zu blinken.
3. Drücken Sie dann die Pair/Reset (Paaren/Zurücksetzen)-Taste am anderen Adapter für eine Sekunde.
Beide Tasten müssen innerhalb von zwei Minuten gedrückt werden.
Beobachten Sie die SPS-LEDs an beiden Adaptern, bis diese erneut leuchten.
(Optional) Română:
Securizați rețeaua dvs. Powerline
1. Conectați adaptoarele dvs.
2. Apăsați butonul Pair/Reset (Asociere/Resetare) de pe un adaptor timp de 1 secundă, și LED-ul PLC
de pe adaptor începe să clipească.
3. Apoi apăsați butonul Pair/Reset (Asociere/Resetare) de pe celălalt adaptor pentru 1 secundă. Ambele
butoane trebuie să fie apăsate timp de două minute.
Observați LED-urile PLC de pe cele două adaptoare până când acestea sunt aprinse din nou.
(Opcional) Español:
Proteja su red powerline
1. Enchufe los adaptadores
2. Pulse el botón Pair/Reset (Emparejar/Restablecer) de uno de los adaptadores durante 1 segundo, y el
led del PLC del adaptador empezará a parpadear.
3. A continuación, pulse el botón Pair/Reset (Emparejar/Restablecer) en el otro adaptador durante 1
segundo. Ambos botones deben ser presionados en menos de dos minutos.
Observe las luces led de los PLC en los dos adaptadores hasta que se iluminen de nuevo.
(Opcjonalne) Polski:
Zabezpiecz sieć linii energetycznej.
1. Podłącz adaptery.
2. Naciśnij przycisk Pair/Reset (Paruj/Resetuj) na jednym z adapterów na 1 sekundę- dioda PLC
zacznie migać.
3. Naciśnij przycis k Pair/Reset (Paruj/Resetuj) na drugim adapterze na 1 sekundę. Oba przyciski muszą
być naciśnięte w przeciągu dwóch minut.
Obserwuj diody PLC na obu adapterach aż zapalą się ponownie.
(Opsiyonel) Türkçe:
Güç Hattı Ağınızı Güven Altına Alın
1. Adaptörlerinizi takın.
2. Adaptörlerden birinde Pair/Reset (Eşle/Sıfırla) düğmesine 1 saniye basın; adaptörde PLC LED ışığı
yanıp sönmeye başlar.
3. Ardından diğer adaptörde Pair/Reset (Eşle/Sıfırla) düğmesine 1 saniye basın. İki düğmeye de iki dakika
içinde basılması gerekmektedir.
İki adaptörde PLC LED ışıklarını tekrar yanana kadar gözlemleyin.
(Opzionale) Italiano:
Mettere in sicurezza il Powerline Network
1. Collegare gli adattatori.
2. Premere il tasto Pair/Reset su un adattatore per 1 secondo, e il LED PLC sull'adattatore inizia a
lampeggiare.
3. Quindi premere il Pair/Reset (accoppiamento/tasto RESET) sul altro adattatore per 1 secondo.
Entrambi i tasti devono essere premuti entro due minuti.
Osservare i LED PLC sugli adattatori fino a quando non sono nuovamente accesi.
(Opcionális) Magyar:
Biztosítsa Powerline hálózatát
1. Dugja be az adaptereket.
2. Nyomja le a Pair/Reset gombot az egyik adapteren 1 másodpercig, amíg az adapter PLC LED-je
villogni nem kezd.
3. Ezután nyomja le a Pair/Reset gombot a másik adapteren is 1 másodpercig. A két gombot két percen
belül kell lenyomnia.
Várjon, amíg a két adapter PLC LED-jei újra világítani kezdenek.
Powerline
Internet
Powerline
Ethernet Cable
Internet
Internet
1
Attention
Wall Receptacle
Power Strip
Deutsch:
Verbinden Sie zum Zugriff auf das Internet einen
Adapter mit einem der LAN-Ports eines router und
verbinden Sie diesen mit einer Wandsteckdose
in der Nähe.
Français:
Connectez un adaptateur à un des ports LAN
du routeur pour accès Internet, et branchez-le
à une prise murale proche.
Italiano:
Collegare un adattatore a una delle porte LAN
di un router per l'accesso a Internet, quindi
inserirlo in una presa a muro nelle vicinanze.
Español:
Conecte uno de los adaptadores a uno de los
puertos LAN del router para acceder a Internet,
y enchúfelo a una toma de corriente cercana.
Português:
Conecte um adaptador a uma das portas LAN de
um roteador para acesso à Internet, e conecte-o
em uma tomada de parede.
English:
Connect one adapter to one of the LAN ports of a
router for internet access, and plug it into a wall
receptacle nearby.
*Images herein are for reference only.
Please refer to the actual product.
Wait until the PLC LEDs of the two adapters light up and keep on.
Powerline
Ethernet Cable
CE Mark Warning
This is a Class B product. In a domestic environment, this product may cause
radio interference, in which case the user may be required to take adequate
measures.
-For PLUGGABLE EQUIPMENT, the socket-outlet shall be installed near the
equipment and shall be easily accessible.
NOTE: (1) The manufacturer is not responsible for any radio or TV interference
caused by unauthorized modifications to this equipment. (2) To avoid
unnecessary radiation interference, it is recommended to use a shielded RJ45
cable.
FCC Statement
This device complies with Part 15 of the FCC Rules. Operation is subject to the
following two conditions: (1) This device may not cause harmful interference,
and (2) this device must accept any interference received, including
interference that may cause undesired operation.
This equipment has been tested and found to comply with the limits for a Class
B digital device, pursuant to Part 15 of the FCC Rules. These limits are
designed to provide reasonable protection against harmful interference in a
residential installation. This equipment generates, uses and can radiate radio
frequency energy and, if not installed and used in accordance with the
instructions, may cause harmful interference to radio communications.
However, there is no guarantee that interference will not occur in a particular
installation. If this equipment does cause harmful interference to radio or
television reception, which can be determined by turning the equipment off and
on, the user is encouraged to try to correct the interference by one of the
following measures:
— Reorient or relocate the receiving antenna.
— Increase the separation between the equipment and receiver.
— Connect the equipment into an outlet on a circuit different from that to which
the receiver is connected.
— Consult the dealer or an experienced radio/TV technician for help.
Caution!
Any changes or modifications not expressly approved by the party responsible
for compliance could void the user's authority to operate the equipment.
NOTE: (1) The manufacturer is not responsible for any radio or TV interference
caused by unauthorized modifications to this equipment. (2) To avoid
unnecessary radiation interference, it is recommended to use a shielded RJ45
cable.
RECYCLING
This product bears the selective sorting symbol for Waste electrical and
electronic equipment (WEEE). This means that this product must be handled
pursuant to European directive 2012/19/EU in order to be recycled or
dismantled to minimize its impact on the environment.
User has the choice to give his product to a competent recycling organization or
to the retailer when he buys a new electrical or electronic equipment.
Technical Support
Shenzhen Tenda Technology Co., Ltd.
6-8 Floor, Tower E3, NO.1001, Zhongshanyuan Road, Nanshan District,
Shenzhen, China. 518052
United States Hotline: 1-800-570-5892
Canada Hotline: 1-888-998-8966
HongKong Hotline: 00852-81931998
Skype: Tendasz
Website: http:// www.tendacn.com
E-mail: support@tenda.com.cn
Copyright
© 2017 Shenzhen Tenda Technology Co., Ltd. All rights reserved.
Tenda is a registered trademark legally held by Shenzhen Tenda Technology Co., Ltd. Other
brand and product names mentioned herein are trademarks or registered trademarks of their
respective holders. Specifications are subject to change without notice.
Operating Temperature: 0 °C~40 °C
Operating Humidity: (10~90) % RH, non-condensing
LED & Button
Pусский
Türkçe
Magyar
Română
Attention
The adapter can only be used in vertical directions.
Italiano
LED
Colore
Stato
Descrizione
/
Spento
Il dispositivo non è alimentato.
Verde
Solido
Alimentazione attiva.
Verde
lampeggio lento
Il dispositivo è in modalità di risparmio energetico.
/
Spento
Il dispositivo non si accoppia con altri dispositivi powerline, oppure è
spento.
Verde
Solido
Il dispositivo è collegato ad una rete powerline.
Verde
lampeggio veloce
Il dispositivo è accoppiato ad un dispositivo Powerline.
Rosso
Solido
L'estensore è in cattive condizioni; provare a cambiare presa a muro fino a
quando la luce diventa verde.
/
Spento
Nessun cavo Ethernet viene rilevato sulla porta di rete.
Verde
Solido
Il cavo Ethernet è stato collegato correttamente.
Pulsanti
Descrizione
Pair/Reset
Premere e tenere premuto per 1 secondo per avviare il processo di accoppiamento.
Premere e tenere premuto per circa 6 secondi (il LED di alimentazione si spegne e poi si
riaccende) per ripristinare impostazioni di fabbrica sull'adattatore.
LED
Szín
Állapot
Leírás
/
Ki
Az eszköz NEM kap elektromos áramot.
Zöld
Szilárd
Az eszköz elektromos áram alatt van.
Zöld
Lassú villogás
A készülék energiatakarékos üzemmódban.
/
Ki
A készülék nem párosítása Powerline eszközt, vagy ki van
kapcsolva.
Zöld
Szilárd
A készülék csatlakozik a hálózathoz csatlakoztatja.
Zöld
Gyors villogás
Folyamatban van az eszköz párosítása a powerline eszközökkel.
Piros
Szilárd
A extender rossz állapotban van; próbálja megváltoztatni egy másik
fali aljzatba, amíg a lámpa zöldre vált.
/
Ki
Nem észlelhető ethernet kábel az ethernet porton.
Zöld
Szilárd
Az ethernet kábel megfelelően csatlakoztatva van.
GOMB
Leírás
Pair/Reset
Nyomja meg és tartsa az 1 másodpercig, hogy elindítsa párosítást.
Az adapter gyári beállításainak visszaállításához nyomja le és tartsa lenyomva kb. 6
másodpercig (a Power LED kikapcsol, majd újra világítani kezd).
English
Français
LED
Color
Status
Description
/
Off
The device is not connected to a power supply.
Green
Solid on
The device is powered on.
Green
Slow Blinking
The device is in power saving mode.
/
Off
The device Is not paired with another powerline device, or is powered off.
Green
Solid on
The device is connected to a powerline network.
Green
Fast Blinking
The device is pairing with a powerline devices.
Red
Solid on
The device is in poor condition. Try changing another wall receptacle until
the LED indicator turns to green.
/
Off
No Ethernet cable is detected on the Ethernet port.
Green
Solid on
An Ethernet cable is connected properly.
Button
Descriptipn
Pair/Reset
Hold it down for about 1 second to start pairing.
Hold it down for about 6 seconds (the Power LED will be turned off and then turned on again) to
restore the adapter to factory settings.
LED
Couleur
Etat
Description
/
Etein
L'appareil NE reçoit PAS de courant.
Vert
Solid
L'alimentation électrique est sur On.
Vert
Clignotement lent
L'adaptateur est en mode d'économie d'énergie.
/
Etein
L'adaptateur ne s'appareille pas avec d'autres adaptateurs CPL,
ou bien se débranche d'électricté.
Vert
Solid
L'adaptateur a été connecté avec un réseau powerline.
Vert
Clignotement rapide
L'appareil est en cours d'appairage avec les appareils powerline.
Rouge
Solid
L'extenseur est en panne; Veuillez changer une autre prise murale
jusqu'au moment où LED devient vert.
/
Etein
Aucun câble Ethernet n'est détecté sur le port Ethernet.
Vert
Solid
Le câble Ethernet est branché correctement.
Bouton
Description
Pair/Reset
Appuyez sur le bouton pour 1 seconde pour s'appareiller de nouveau.
Appuyez et maintenez-le pendant environ 6 secondes (la LED d'alimentation s'éteint et se
rallume) pour restaurer l'adaptateur aux réglages d'usine par défaut.
Индикатор
Цвет
Состояние
Значение
/
Не горит
Устройство не получает электропитание.
Зеленый
Горит
Электропитание включено.
Зеленый
Медленно мигает
Устройство находится в режиме энергосбережения.
/
Не горит
Устройство не сопряжено с другими устройствами powerline или
выключено.
Зеленый
Горит
Устройство подключено к сети powerline.
Зеленый
Быстро мигает
Устройство сопряжено с другими powerline устройствами.
Красный
Горит
Усилитель в плохом состоянии, попробуйте включить его в другую
электророзетку, до тех пор пока индикатор не загорится зеленым.
/
Не горит
Ни один кабель Ethernet не подключен к порту Ethernet.
Зеленый
Горит
Кабель Ethernet подключен правильно.
Кнопка
Значение
Pair/Reset
Нажмите и удерживайте кнопку нажатой в течение 1 секунду, чтобы начать сопряжение.
Нажмите и удерживайте кнопку нажатой примерно 6 секунд(индикатор питания выключится,
а затем снова загорится), чтобы вернуть настройки адаптера к заводским значениям.
Português
Deutsch
LED
Cores
Status
Descrição
/
Desligado
O dispositivo NÃO está recebendo energia elétrica.
Verde
Aceso
A energia elétrica está ligada.
Verde
Pisca lento
O equipamento esta em modo de economia de energia.
/
Desligado
O equipamento não pode parear com outro equipamento através da rede
elétrica, ou esta desligado.
Verde
Aceso
O equipamento esta conectado a outro equipamento powerline.
Verde
Piscando rápido
O dispositivo está emparelhando com um dispositivo powerline.
Vermelho
Aceso
O extensor esta em más condições, altere-o para outra tomada até que o
led fique verde.
/
Desligado
Não foi detectado cabo de Ethernet na porta Ethernet.
Verde
Aceso
O cabo de Ethernet está conectado corretamente.
Botão
Descrição
Pair/Reset
Pressione e segure entre 1 segundo para iniciar o processo de pareamento.
Mantenha pressionado por cerca de 6 segundos (o LED de energia será desligado e acenderá
novamente) para restaurar o adaptador para suas configurações de fábrica.
LED
Farbe
Status
Beschreibung
/
Aus
Das Gerät erhält KEINEN Strom.
Grün
Solide
Strom ist angeschaltet.
Grün
Langsames Blinken
Das Gerät befindet sich im Energiesparmodus.
/
Aus
Der Adapter hat noch nicht mit anderem Power Kabel Adapter
verbunden, oder kein Strom.
Grün
Solide
Der Adapter ist mit dem Powerlinenetz verbunden.
Grün
Schnelles Blinken
Das Gerät paart sich mit einem Powerline-Gerät.
Rot
Solide
In einem schlechten Zustand versuchen Sie eine andere Steckdose
an.
/
Aus
Am Ethernet-Port wurde kein Ethernet-Kabel erkannt.
Grün
Solide
Das Ethernet-Kabel ist korrekt verbunden.
Taste
Beschreibung
Pair/Reset
Drücken Sie die Taste 1 Sekunden, um mit anderem ein Powerlinenetz zu koppeln.
Zum Zurücksetzen des Adapters auf Werkseinstellungen drücken und halten Sie die Taste für
ca. 6 Sekunden (das LED für die Stromzufuhr erlischt und leuchtet erneut).
LED
Culoare
Status
Descriere
/
Oprit
Dispozitivul NU recepționează curent electric.
Verde
Aprins
Curentul electric este pornit.
Verde
Clipire înceată
Dispozitivul este in modul de economisire a energiei.
/
Oprit
Dispozitivul nu se asociaza cu alte dispozitive powerline, sau este
oprit.
Verde
Aprins
Dispozitivul este conectat la o retea powerline.
Verde
Clipire rapidă
Dispozitivul se asociază cu un dispozitiv powerline.
Rosu
Aprins
Amplificatorul nu este functional; incercati sa schimbati priza si
asigurati-va ca lumina sa fie verde.
/
Oprit
Nu este detectat niciun cablu Ethernet pe portul Ethernet.
Verde
Aprins
Cablul Ethernet este conectat corect.
Butoane
Descriere
Pair/Reset
Apasati si mentineti apasat timp de 1 secunda pentru a porni procesul de asociere.
Apăsați și țineți-l apăsat timp de aproximativ 6 secunde (LED-ul Conectare se va opri și apoi se
va aprinde din nou), pentru a restabili adaptorul implicit din fabrică.
LED
Renk
Durum
Açıklama
/
Kapalı
Cihaz elektrik gücü ALAMIYOR.
Yeşil
Durağan ışık
Elektrik gücü devrede.
Yeşil
Yavaş Yanıp Sönme
Cihaz, güç tasarrufu modunda.
/
Kapalı
Cihaz, diğer güç cihazları ile eşleşmiyor veya kapalı.
Yeşil
Durağan ışık
Cihaz, bir güç ağına bağlı.
Yeşil
Hızlı Yanıp Sönme
Cihaz bir güç hattı cihazıyla eşleniyor.
Kırmızı
Durağan ışık
Uzatıcı kötü bir durumda; ışık yeşile dönünceye kadar başka priz
deneyin.
/
Kapalı
Ethernet portunda Ethernet kablosu tespit edilemedi.
Yeşil
Durağan ışık
Ethernet kablosu düzgünce bağlandı.
Düğme
Açıklama
Pair/Reset
Eşleştirme işlemini başlatmak için 1 saniye boyunca basılı tutun.
Adaptörü fabrika ayarlarına geri yüklemek için 6 saniye boyunca buna basılı tutun (Güç LED
ışığı kapanacak ve tekrar açılacaktır).
Español
Polski
Dioda LED
Kolor
Status
Opis
/
Wyłączony
Urządzenie NIE otrzymuje zasilania.
Zielony
Stały
Zasilanie jest włączone.
Zielony
Powolne miganie
Urządzenie jest w trybie oszczędzania energii.
/
Wyłączony
Urządzenie nie tworzy pary się z innym urządzeniem lub jest odłączone
od zasilania.
Zielony
Stały
Urządzenie jest podpięte do sieci elektrycznej.
Zielony
Szybkie miganie
Urządzenie jest w trakcie parowania z urządzeniami linii energetycznej.
Czerw
ony
Stały
Urządzenie pracuje w złych warunkach; spróbuj podłączyć do innego
gniazdka, aż dioda zaświeci się na zielono.
/
Wyłączony
Nie wykryto kabla Ethernet w gnieździe.
Zielony
Stały
Kabel Ethernet jest podłączony nieprawidłowo.
Przyciski
Opis
Pair/Reset
Przytrzymaj 1 sekundę by rozpocząć proces tworzenia pary urządzeń.
Naciśnij i przytrzymaj przez około 6 sekund (dioda LED zasilania zgaśnie i zapali się
ponownie), aby przywrócić adapter do ustawień fabrycznych.
LED
Color
Estado
Descripción
/
Apagado
El dispositivo NO está recibiendo energía eléctrica.
Verde
Sólido
Está encendido.
Verde
Parpadeo lento
El dispositivo se encuentra en modo de ahorro de energía.
/
Apagado
El dispositivo no vincula con otros dispositivos powerline, o está
apagado.
Verde
Sólido
El dispositivo está conectado a una red de líneas powerline.
Verde
Parpadeo rápido
El dispositivo se está emparejando con otros dispositivos powerline.
Rojo
Sólido
El extensor está en malas condiciones; prueba cambiar otra toma de
pared hasta que la luz cambie a verde.
/
Apagado
No se ha detectado ningún cable Ethernet en el puerto Ethernet.
Verde
Sólido
El cable Ethernet está conectado correctamente.
Botones
Descripción
Pair/Reset
Mantenga pulsado de 1 segundo para iniciar el proceso de vinculación.
Manténgalo pulsado durante unos 6 segundos (el led de encendido se apagará y luego se
volverá a encender) para restaurar el adaptador a los valores de fábrica.
LAN
Pair/Reset
FAQ
Q1: I cannot access the internet after finishing the installation. What should I do?
A1: Try the following methods:
Verify that your router and the adapters are connected properly.
Verify that you can access the internet normally by connecting your computer directly to the router or modem.
Verify that your computer has been set to obtain an IP address automatically.
Verify that the PLC LEDs on the adapters are solid green. If they are not, reset all adapters and then observe the PLC LEDs again.
Verify that all powerline adapters are in the same electrical circuit.
Q2: I cannot access the internet after finishing the operations in Secure Your Powerline Network, what should I do?
A2: Try the following methods:
Verify that you can access the internet before using the Pair/Reset button to secure your powerline network.
Verify that the PLC LEDs on the adapters are solid green. If they are not, reset all adapters and then use the Pair/Reset button to pair
the adapters again.
Verify that all powerline adapters are on the same electrical circuit.
Q3: An adapter failed to connect to the powerline network after I moved it to a new location, what should I do?
A3: Try the following methods:
Verify that all powerline adapters are on the same electrical circuit.
Verify that the PLC LED on the adapter is solid green before you move it to a new location.
Use the Pair/Reset button to pair it with another adapter in the powerline network again.
Q4: The PLC LED does not light up. What should I do?
A4: Try the following methods:
Verify that all powerline adapters are on the same electrical circuit.
Refer to Secure Your Powerline Network to pair the powerline adapters.
Reset all powerline adapters to factory settings by holding down the Pair/Reset button for 6 seconds.
Q5: Can a single powerline adapter establish a Powerline network?
A5: No, it cannot. A minimum of two powerline adapters are required.
Q6: Can this Powerline device communicate with other adapters of different manufacturers or types?
A6: Yes. This Tenda powerline adapter kit complies with HomePlugAV/Homeplug AV2 standard and can communicate with
other manufacturers' HomePlugAV//Homeplug AV-compliant Powerline devices.
-
 1
1

Tenda PH6 Yükleme Rehberi
- Kategori
- PowerLine ağ adaptörleri
- Tip
- Yükleme Rehberi
diğer dillerde
- italiano: Tenda PH6 Guida d'installazione
- polski: Tenda PH6 Instrukcja instalacji
- português: Tenda PH6 Guia de instalação
- English: Tenda PH6 Installation guide
- русский: Tenda PH6 Инструкция по установке
- română: Tenda PH6 Ghid de instalare
İlgili makaleler
Diğer belgeler
-
Conceptronic MediaGiant Plus Kullanım kılavuzu
-
Conceptronic CM3GD1T Kullanım kılavuzu
-
Hama 00053143 El kitabı
-
-
ANSMANN POWERLINE 4 TRAVELLER El kitabı
-
SAGEMCOM F@st Plug 502W Hızlı başlangıç Kılavuzu
-
TP-LINK TL-WPA4220 Quick Installation Manual
-
-
Allnet ALL168208 El kitabı
-
TP-LINK TL-WA850RE Quick Installation Manual