
ENGLISH
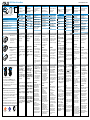
Installing the battery.
Connecting to PC.
1. Remove the cover.
2. Insert the batteries into
the slot, taking note of the
correct polarity.
3. Replace the cover.
CAUTION:
• The bundled batteries are
not chargeable.
• If you do not use the mouse
for a long time, remove the
batteries.
• Use new and similar-type
batteries.
1. Turn on the power switch.
2. Press and release the
CONNECT button at the
bottom of the mouse. The power LED turns red.
3. Pair your mouse with your computer. Use a
Bluetooth adapter if your computer does not have a
built-in Bluetooth capability.
NOTES:
• The Bluetooth adapter is purchased separately.
• For details on pairing your computer with other
Bluetooth devices, refer to the documentation that came
with your computer or your Bluetooth adapter.
• To save power, turn off the power when you are not
using the mouse.
• When idle or not in use for eight minutes, the mouse
automatically goes from standby to sleep mode to save
power. Move the mouse to wake it up from sleep mode.
1
ON/OFF
switch
Features
1 Left button: Left-click
2 Right button: Right-click
3 Wheel: Scroll up/down and middle-click
4 Left side upper button: Forward (Internet)
5 Left side lower button: Back (Internet)
6 Power LED: Indicates the battery level.
Your package includes: a. Bluetooth Laser Mouse /
b. 2 x AAA batteries / c. Quick Start Guide
1
2
3
2
CONNECT
button
a
b
c
Quick Start
Guide
1
1
2
3
4
5
6
繁體中文
包裝內容物:
a. 藍芽鐳射滑鼠
b. 2 x 4號(AAA)電池
c. 快速安裝指南
安裝電池
1. 移除上蓋。
2. 將電池放入電池槽並
注意正負極。
3.
裝回上蓋。
注意:
• 附贈的電池不能充
電。
• 若您在長時間內不會
使用電池,請移除電
池。
• 使用新的同一型號的
電池。
連接電腦
1. 打開電源開關。
2. 按下並放開位於滑
鼠底部的 連接(
Connect)按鈕。電源
指示燈呈紅色。
3. 將您的電腦與滑鼠配
對。若您的電腦未內
建藍芽功能,請使用
藍芽接收器。
注意:
• 藍芽接收器需另行購
買。
• 更多藍芽裝置配對資
訊,請參考您的電腦
或藍芽接收器的使用
手冊。
• 當您不使用滑鼠時請
關閉電源,以節省電
能。
• 當滑鼠閒置或未使用
八分鐘,它將自動由
待機模式轉為睡眠模
式,以節省電能。移
動滑鼠,將其由睡眠
模式中喚醒。
按鍵功能
1 左鍵: 左鍵點選
2 右鍵:右鍵點選
3 滾輪: 向上/下滾動與
中鍵點選
4 左前側按鈕:向前
(網路)
5
左後側按鈕:向後
(網路)
6
電源指示燈:顯示電池
容量
簡體中文
包裝內容物:
a. 藍牙激光鼠標
b. 2 x 7號(AAA)電池
c. 快速安裝指南
安裝電池
1. 打開上蓋。
2. 將電池放入電池槽並
注意正負極。
3. 裝回上蓋。
注意:
• 附贈的電池不能充
電。
• 若您在長時間內不會
使用電池,請移除電
池。
• 使用新的同一型號的
電池。
連接電腦
1. 打開電源開關。
2. 按下並放開位於鼠
標底部的 連接(
Connect)按鈕。電
源指示燈呈紅色。
3. 將您的電腦與鼠標配
對。若您的電腦未內
置藍牙功能,請使用
藍牙適配器。
注意:
• 藍牙適配器需另行購
買。
• 更多藍牙設備配對信
息,請參考您的電腦
或藍牙適配器的使用
手冊。
• 當您不使用鼠標時請
關閉電源,以節省電
能。
• 當鼠標閒置或未使用
八分鐘,它將自動由
待機模式轉為睡眠模
式,以節省電能。移
動滑鼠,將其由睡眠
模式中喚醒。
按鍵功能
1
左鍵: 左鍵點擊
2
右鍵:右鍵點擊
3
滾輪: 向上/下滾動與
中鍵點擊
4
左前側按鈕: 向前
(網絡)
5
左後側按鈕: 向後
(網絡)
6
電源指示燈: 顯示電池
容量
FRANÇAIS
La boîte contient :
a. Souris laser Bluetooth
b. 2 x piles AAA
c. Guide de démarrage
rapide
Installer les piles
1. Retirez le couvercle du
compartiment à pile.
2. Insérez les piles en
prenant garde à bien
respecter la polarité.
3. Replacez le couvercle
du compartiment à pile.
ATTENTION :
• Les piles incluses ne
sont pas rechargeables.
• Si vous ne comptez
pas utiliser la souris
pendant une longue
période, il est
recommandé de retirer
les piles.
• N’utilisez que des piles
neuves et de même
type.
Connexion à un PC
1. Allumez la souris.
2. Appuyez sur le bouton
CONNECT situé sous
la souris. Le voyant
d’alimentation s’allume
(rouge).
3. Jumelez la souris à votre
ordinateur. Utilisez un
adaptateur Bluetooth
si votre ordinateur
ne possède pas de
fonction Bluetooth.
REMARQUES :
• L’adapateur Bluetooth est
vendu séparément.
• Pour plus de détails
sur le jumelage de
votre ordinateur avec
d’autres dispositifs
Bluetooth, consultez
la documentation
accompagnant votre
ordinateur ou votre
adaptateur Bluetooth.
• Pour économiser de
l’énergie, éteignez la
souris lorsque celle-ci n’est
pas utilisée.
• Après une période
d’inactivité de 8 minutes,
la souris basculera
automatiquement en
veille pour économiser
de l’énergie. Déplacez
la souris pour la sortir la
souris du mode veille.
Fonctions
1 Bouton gauche : clic
gauche
2 Bouton droit : clic droit
3
Molette : défilement
haut/bas et clic central
4
Bouton latéral gauche
arrière : suivant (Internet)
5
Bouton latéral gauche
avant : retour (Internet)
6 Voyant d’alimentation
:
Indique le niveau de
charge des piles.
DEUTSCH
Verpackungsinhalt:
a. Bluetooth-Laser-Maus
b. 2x AAA-Batterien
c. Schnellstartanleitung
Einlegen der Batterien.
1. Entfernen Sie die
Abdeckung.
2. Legen Sie die Batterien
unter Beachtung der
richtigen Polung in das
Batteriefach ein.
3. Schließen Sie die
Abdeckung.
ACHTUNG:
• Die mitgelieferten
Batterien sind nicht
wiederaufladbar.
• Entfernen Sie die
Batterien, wenn Sie die
Maus längere Zeit nicht
benutzen.
• Verwenden Sie neue
gleichwertige Batterien.
Anschluss an Computer.
1. Schalten Sie den
Stromschalter ein.
2. Drücken Sie auf der
Unterseite der Maus die
Taste CONNECT und
lassen sie wieder los.
Die Strom-LED sollte
nun rot leuchten.
3. Gruppieren Sie die
Maus mit Ihrem
Computer. Verwenden
Sie einen Bluetooth-
Adapter, wenn Ihr
Computer kein
eingebautes Bluetooth
besitzt.
HINWEISE:
• Der Bluetooth-Adapter
muss separat gekauft
werden.
• Für Details zur
Gruppierung von
Bluetooth-Geräten
mit Ihrem Computer
beziehen Sie sich auf
die Dokumentation
Ihres Computers oder
Bluetooth-Adapters.
• Um Strom zu sparen,
schalten Sie die Maus bei
aus, wenn Sie sie nicht
benutzen.
• Im Leerlaufmodus oder
nach 8 Minuten der
Nichtbenutzung wird
die Maus automatisch
vom Standby- in den
Schlafmodus versetzt, um
Strom zu sparen. Bewegen
Sie die Maus, um sie
wieder zu aktivieren..
Funktionen
1 Linke Taste: Linksklick
2 Rechte Taste: Rechtsklick
3
Mausrad: Bildlauf auf/ab
und Mittelklick
4 Linke Seite obere Taste
:
Weiter (Internet)
5 Linke Seite untere Taste
:
Zurück (Internet)
6 Strom-LED
: Zeigt den
Batteriestatus an.
ITALIANO
Contenuto della confezione:
a. Mouse Laser Bluetooth
b. 2x batterie AAA
c. Guida rapida
Installazione batteria.
1. Rimuovere la copertura.
2. Inserire le batterie
nell’apposito scomparto,
facendo attenzione alla
corretta polarità.
3. Rimontare la copertura.
ATTENZIONE:
• Le batterie in dotazione
non sono ricaricabili.
• Se non si usa il mouse
per lungo tempo,
rimuovere le batterie.
• Utilizzare batterie
nuove e di tipo simile.
Connessione al PC.
1. Accendere il mouse.
2. Premere e rilasciare il
pulsante CONNECT,
sul lato inferiore
del mouse. Il LED
dell’alimentazione si
illumina di colore rosso.
3. Associare il mouse con il
computer e utilizzare un
adattatore Bluetooth,
se nel computer non
è integrata questa
funzionalità.
NOTE:
• L’adattatore Bluetooth
non è compreso nella
confezione.
• Per approfondimenti
sull’associazione
del computer
con altri dispositivi
Bluetooth, consultare la
documentazione fornita
con il computer o con
l’adattatore Bluetooth.
• Per risparmiare energia,
spegnere il mouse quando
non è utilizzato.
• Quando a riposo o
inutilizzato per otto
minuti, il mouse entra
automaticamente in
modalità sospensione.
Spostare il mouse per
riattivarlo.
Descrizione
1 Tasto sx: clic di sinistra
2 Tasto dx: clic di destra
3 Rotellina
: Scorrimento
su/giù e clic al centro.
4 Tasto in alto a sinistra:
Avanti (Internet)
5 Tasto in basso a sinistra
:
Indietro (Internet)
6 Power LED
: Indica il
livello di carica della
batteria.
日本語
パッケージに含まれるもの:
a. Bluetooth レーザーマウス
b. 単四乾電池×2
c. ユーザーマニュアル
電池を取り付ける
1. 底面の電池カバーを外
します。
2. 電池の向きを確認し、
電池を電池収納部にい
れます。
3. 電池カバーを元の位置
に戻します。
注意:
• 付属の電池は試供品と
なります。また、付属の
電池は充電式ではあり
ません。液漏れや発火
する危険性があります
ので、絶対に充電しな
いでください。
• マウスを長時間使用し
ない場合はマウスから
電池を取り外してくだ
さい。
• 電池交換の際は、同じ
タイプの電池をご使用
ください。
コンピューターに接続する
1. マウスの電池をONにし
ます。
2. マウスの底面にある
「Connect」ボタンを
押してください。電源
LEDが赤く点灯します。
3. マウスとコンピュータ
ーをペアリングします。
ご使用のコンピュータ
ーにBluetooth機能が
搭載されてない場合
は、Bluetoothアダプタ
ーをご使用ください。
注意:
• Bluetoothアダプターは
別売りです。
• コンピューターと
Bluetoothデバイスのペ
アリングについての詳細
は、コンピューター、また
はBluetoothアダプター
に同梱のユーザーマニュ
アルをご参照ください。
• 節電のため、マウスを使
用しない場合は電源を
OFFにしてください。
• マウスは一定時間(約
8分)操作が行われない
と、自動的にスリープモー
ドから節電モードに移行
します。節電モードはマウ
スを再度操作することで
解除されます。
機能
1 左ボタン:左クリック
2 右ボタン:右クリック
3 ホイール:
上下スクロー
ル/クリック
4 左上ボタン:
進む(インタ
ーネット)
5 左下ボタン:
戻る(インタ
ーネット)
6 電源LED:
電池残量通知
한국어
패키지 내용물
:
a. Bluetooth 레이저
마우스
b.
2개의 AAA 배터리
c.
사용 설명서
배터리 설치하기.
1. 커버를 분리해 주십시
오.
2. (+), (-)에 맞춰 배터리
를 슬롯에 설치해 주십
시오.
3. 커버를 다시 덮어 주십
시오.
주의:
• 제품에 포함된 배터리
는 재충전이 불가능합
니다.
• 장시간 마우스를 사용
하지 않을 경우 배터리
를 분리해 보관해 주십
시오.
• 동일한 규격의 배터리
를 사용해 주십시오.
PC에 연결하기.
1. 전원 스위치를 켜 주십
시오.
2. 마우스의 바닥에 위치
한 Connect를 눌러 주
십시오. 전원 LED에
빨간 불이 들어옵니다.
3. 마우스와 컴퓨터를
연결하십시오. 컴퓨
터에 Bluetooth가 내
장되어 있지 않으면,
Bluetooth 어댑터를 사
용하십시오.
참고:
•
Bluetooth 어댑터는 별
도로 구매해야 합니다.
• 컴퓨터와 다른
Bluetooth
장치를 연결하기 위해서
컴퓨터 또는Bluetooth
어댑터와 관련된 문
서 자료를 참고해 주십
시오.
• 마우스를 사용하지 않는
동안 전원을 꺼 두면 배
터리 전원을 절약할 수
있습니다.
• 8분 동안 사용하지 않을
경우, 전원 절약을 위해
마우스는 대기 모드로
자동 전환됩니다. 마우
스를 움직이면 정상 모
드로 복귀합니다.
기능
1 왼쪽 버튼: 왼쪽 클릭
2 오른쪽 버튼: 오른쪽
클릭
3 휠: 스크롤 위/아래 및
중간 클릭
4 왼쪽 위 버튼: 이전 페
이지 (인터넷)
5 왼쪽 아래 버튼: 뒤로
(인터넷)
6 전원 LED: 배터리 수준
을 표시.
РУССКИЙ
Комплект поставки включает:
a. Bluetooth лазерная мышь
b. 2x элемента питания типа ААА
c. Краткое руководство
Установка батареек
1. Снимите крышку.
2. Вставьте батарейки,
соблюдая полярность.
3. Закройте крышку.
ОСТОРОЖНО:
• В комплекте
поставляются обычные
элементы питания.
• Извлеките батарейки,
если Вы не пользуетесь
мышью длительное
время.
• Используйте
однотипные элементы
питания.
Подключение к ПК
1. Включите
переключатель
питания.
2. Нажмите и отпустите
кнопку Connect на
нижней стороне мыши.
Индикатор загорится
красным.
3. Выполните сопряжение
мыши с компьютером.
Если на Вашем
компьютере нет
встроенного Bluetooth,
используйте Bluetooth
адаптер.
ПРИМЕЧАНИЯ:
• Bluetooth адаптер
приобретается отдельно.
• Подробную информацию
о подключении устройств
Bluetooth к Вашему
компьютеру смотрите
в документации,
поставляемой с
компьютером или
Bluetooth адаптером.
• Для экономии энергии,
выключите питание,
когда не используете
мышь.
• В ждущем режиме или
при неиспользовании
мыши в течение 8 минут,
мышь автоматически
переключается в спящий
режим. Для выведения
мыши из спящего режима
просто переместите ее.
Возможности
1 Левая кнопка: Щелчок
левой кнопкой
2 Правая кнопка:
Щелкните правой кнопкой
3 Колесико
: Прокрутка
вверх / вниз и щелчок
средней кнопкой мыши
4 Верхняя кнопка на левой
стороне: Вперед (Internet)
5 Нижняя кнопка на левой
стороне: Назад (Internet)
6 Индикатор питания
:
Показывает состояние
элементов питания.
ČEŠTINA
Obsah krabice:
a. Laserová myš Bluetooth
b. 2x baterie AAA
c. Stručná příručka
Vložení baterie
1. Sejměte kryt.
2. Vložte baterie do
přihrádky tak, aby byla
dodržena správná
polarita.
3. Nasaďte kryt.
UPOZORNĚNÍ
:
• Přiložené baterie nejsou
nabíjecí.
• Nebudete-li myš delší
dobu používat, vyjměte
baterie.
• Použijte nové baterie a
baterie stejného typu.
Připojení k POČÍTAČI
1. Zapněte vypínač.
2. Potom stiskněte a
uvolněte tlačítko
CONNECT (PŘIPOJIT)
na dolní straně myši.
Indikátor LED napájení
svítí červeně.
3. Spárujte myš s
počítačem. Pokud ve
vašem počítači není
integrována funkce
Bluetooth, použijte
adaptér Bluetooth.
POZNÁMKY:
• Adaptér Bluetooth je třeba
zakoupit samostatně.
• Podrobnosti o párování
počítače s ostatními
zařízeními Bluetooth viz
dokumentace dodaná
s počítačem nebo s
adaptérem Bluetooth.
• Jestliže myš nepoužíváte,
vypněte napájení pro
úsporu energie.
• V případě nečinnosti nebo
pokud myš nepoužijete
po dobu osmi minut
myš automaticky přejde
z pohotovostního do
úsporného režimu.
Pohybem probudíte myš z
režimu spánku.
Funkce
1 Levé tlačítko: klepnutí
levým tlačítkem
2 Pravé tlačítko: klepnutí
pravým tlačítkem
3 Kolečko: posouvání nahoru/
dolů a klepnutí prostředním
tlačítkem
4 Levé horní tlačítko:
Dopředu (Internet)
5 Levé dolní tlačítko
:
Zpět (Internet)
6 Indikátor LED
napájení: Ukazuje stav
akumulátoru.
Q8219 / First Edition / March 2013
China RoHS EFUP
Labeling
N13219
BSMI
Certification
BX701 Bluetooth Laser Mouse

BX701 Bluetooth Laser Mouse
PORTUGUÊS
A embalagem inclui:
a. Rato a laser Bluetooth
b. 2x pilhas AAA
c. Guia de consulta rápida
Instalar a bateria
1. Remova a tampa.
2. Coloque as pilhas
no respectivo
compartimento
respeitando a
polaridade correcta.
3. Volte a colocar a tampa.
ATENÇÃO
:
• As pilhas fornecidas não
são recarregáveis.
• Se não pretender
utilizar o rato durante
um longo período
de tempo, remova as
pilhas.
• Utilize pilhas novas e do
mesmo tipo.
Ligação ao PC
1. Coloque o interruptor
na posição On (Ligado).
2. Pressione e liberte
o botão CONNECT
(LIGAR) na parte
inferior do rato. O LED
de alimentação cará
vermelho.
3. Emparelhe o rato com o
computador. Utilize um
adaptador Bluetooth se
o seu computador não
possuir conectividade
Bluetooth incorporada.
NOTAS:
• O adaptador Bluetooth
deverá ser adquirido
separadamente.
• Para obter mais
detalhes acerca do
emparelhamento do seu
computador com outros
dispositivos Bluetooth,
consulte a documentação
fornecida com o
computador ou com o
adaptador Bluetooth.
• Para poupar energia,
desligue o rato quando
não estiver a utilizá-lo.
• Quando o rato estiver
inactivo ou não for
utilizado durante
8 minutos, entrará
automaticamente em
modo de suspensão para
poupar energia. Desloque
o rato para o reactivar.
Características
1 Botão esquerdo: Clique
esquerdo
2 Botão direito: Clique direito
3 Roda: Deslocamento para
cima/baixo e clique com o
botão do meio
4 Botão lateral superior:
Avançar (Internet)
5 Botão lateral inferior
:
Voltar (Internet)
6 LED de Energia:
Indica o
nível da bateria.
ROMÂNĂ
Pachetul dvs include:
a. Mouse laser Bluetooth
b. 2 baterii AAA
c. Ghid de pornire rapidă
Instalarea bateriei
1. Scoateţi capacul.
2. Introduceţi bateriile
în compartiment,
respectând polaritate.
3. Repuneţi capacul.
ATENŢIE:
• Bateriile furnizate nu
sunt reîncărcabile.
• În cazul în care nu
veţi utiliza mouse-ul o
perioadă mai lungă de
timp, scoateţi bateriile.
• Utilizaţi baterii noi şi de
acelaşi tip.
Conectarea la PC
1. Apăsaţi pe butonul de
alimentare.
2. Apăsaţi şi eliberaţi
butonul CONNECT
(Conectare) din partea
inferioară a mouse-ului.
Ledul de alimentare se
va aprinde şi va roşu.
3. Împerecheaţi mouse-ul
cu computerul. Utilizaţi
un adaptor pentru
Bluetooth în cazul
în care computerul
nu dispune de o
capabilitate integrată
Bluetooth.
NOTE:
• Adaptorul Bluetooth se
achiziţionează separat.
• Pentru detalii referitoare
la împerecherea
computerului cu alte
dispozitive Bluetooth,
consultaţi documentaţia
livrată odată cu
computerul sau cu
adaptorul Bluetooth.
• Pentru a economisi
energie, opriţi alimentarea
atunci când nu utilizaţi
mouse-ul.
• Atunci când este inactive
sau nu a fost utilizat de
opt minute, mouse-ul
intră automat din modul
standby în modul repaus
pentru a economisi
energie. Mişcaţi mouse-ul
pentru a-l reactiva din
modul repaus.
Caracteristici
1 Buton stânga: Click stânga
2 Buton dreapta: Click dreapta
3 Rotiţă: Rulare în sus/jos şi
click mijloc
4 Buton stânga sus:
Înainte (Internet)
5 Buton stânga jos
:
Înapoi (Internet)
6 LED alimentare:
Indică
nivelul bateriei.
SLOVENSKY
Vaše balenie obsahuje:
a. Laserová myš s podporou
Bluetooth
b. 2x batérie typu AAA
c. Stručný návod na
používanie
Inštalácia batérie
1. Snímte kryt.
2. Do štrbiny vložte
batérie; dávajte pritom
pozor na polaritu.
3. Znovu nasaďte kryt.
UPOZORNENIE:
• Dodávané batérie nie sú
nabíjateľné.
• Pokiaľ nebudete myš
dlhodobo používať,
vyberte z nej batérie.
• Použite nové batérie
alebo batérie
podobného typu.
Pripojenie k PC
1. Zapnite hlavný vypínač.
2. Stlačte a uvoľnite
tlačidlo CONNECT
(PRIPOJIŤ) na spodku
myši. LED indikátor
napájania sa rozsvieti
na červeno.
3. Spárujte svoju myš
s počítačom. Ak váš
počítač neobsahuje
zabudovanú možnosť
pripojenia pomocou
technológie Bluetooth,
použite adaptér
Bluetooth.
POZNÁMKY:
• Adaptér Bluetooth sa
predáva samostatne.
• Informácie o párovaní
počítača s inými
zariadeniami s podporou
Bluetooth nájdete v
dokumentácii, ktorá sa
dodáva sa počítačom
alebo s adaptérom
Bluetooth.
• Kvôli úspore energie
vypnite napájanie
počas doby, kedy myš
nepoužívate.
• Pri nečinnosti alebo
nepoužívaní počas ôsmich
minút myš automaticky
prejde z pohotovostného
režimu do režimu úspory
energie. Myš zo spánku
zobudíte jej pohybom.
Funkcie
1 Ľavé tlačidlo: Kliknutie
ľavým tlačidlom
2 Pravé tlačidlo: Kliknutie
pravým tlačidlom
3 Koliesko: Rolovanie nahor/
nadol a kliknutie stredným
tlačidlom
4 Ľavé horné tlačidlo:
Dopredu (Internet)
5 Ľavé spodné tlačidlo
:
Naspäť (Internet)
6 Indikačná LED dióda
napájania: Indikuje stav
nabitia batérie.
SLOVENŠČINA
Vaš paket vsebuje:
a. Laserska Bluetooth miška
b. 2x bateriji AAA
c. Vodilč za hitri začetek
Namestitev baterije
1. Odstranite pokrov.
2. Vstavite bateriji v režo
in pazite na pravilno
polarnost.
3. Ponovno namestite
pokrov.
POZOR:
• Priložene baterije niso
polnilne.
• Če miške dalj časa
ne boste uporabljali,
odstranite baterije.
• Uporabite nove baterije
podobne vrste.
Povezovanje z računalnikom
1. Vključite napajalno
stikalo.
2. Pritisnite in spustite
gumb CONNECT
(Poveži) na dnu miške.
LED napajanja zasveti
rdeče.
3. Povežite miško
z računalnikom.
Uporabite vmesnik
Bluetooth, če vaš
računalnik nima
vgrajene funkcije
Bluetooth.
OPOMBE:
• Vmesnik Bluetooth lahko
kupite ločeno.
• Za podrobnosti o
povezovanju računalnika
z ostalimi napravami
Bluetooth glejte
dokumentacijo, ki
ste jo prejeli skupaj
z računalnikom ali
vmesnikom Bluetooth.
• Za varčevanje energije
vedno izključite miško,
kadar je ne uporabljate.
• Če miška miruje oz. ni v
uporabi dlje kot 8 minut,
samodejno preide v način
varčevanja z energijo.
Miško premaknite, če jo
želite zbuditi iz stanja
mirovanja.
Funkcije
1 Levi gumb: Levi klik
2 Desni gumb: Desni klik
3 Kolesce: Podrsajte gor/dol in
sredinski klik
4 Levi zgornji gumb:
Naprej (Internet)
5 Levi spodnji gumb
:
Nazaj (Internet)
6 LED napajanja:
prikazuje
stanje baterije.
ESPAÑOL
Su paquete incluye:
a. Ratón láser Bluetooth
b. 2x Pilas AAA
c. Guía de inicio rápido
Instalación de las baterías
1. Retire la tapa.
2. Inserte las pilas en la
ranura teniendo en
cuenta la polaridad
correcta.
3. Vuelva a colocar la tapa.
PRECAUCIÓN
:
• Las pilas incluidas no
son recargables.
• Si no va a utilizar el
ratón durante un
prolongado período de
tiempo, retire las pilas.
• Utilice pilas nuevas y de
tipo similar.
Conexión a un PC
1. Coloque el conmutador
de alimentación en la
posición de encendido
(ON).
2. Presione y suelte el
botón CONNECT
(CONECTAR) situado
en la parte de abajo
del ratón. El LED de
encendido se ilumina
en color rojo.
3. Asocie el ratón con
su PC. Utilice un
adaptador Bluetooth
si su PC no dispone
de la funcionalidad
Bluetooth.
NOTAS:
• El adaptador Bluetooth se
compra por separado.
• Para obtener detalles
sobre la asociación de su
PC con otros dispositivos
Bluetooth, consulte la
documentación que
se incluye con su PC o
adaptador Bluetooth.
• Para ahorrar energía,
desconecte la
alimentación cuando no
utilice el ratón.
• Si el dispositivo está
inactivo o no se
utiliza durante ocho
minutos, el ratón pasa
automáticamente del
modo de espera al modo
de suspensión para
ahorrar energía. Mueva
el ratón para reactivarlo
y sacarlo del modo de
suspensión.
Características
1 Botón izquierdo: Clic a la
izquierda
2 Botón derecho: Clic a la derecha
3 Rueda: Desplazamiento
hacia arriba/abajo y clic en
el centro
4 Botón superior lateral
izquierdo: Adelante
(Internet)
5 Botón inferior lateral
izquierdo: Atrás (Internet)
6 LED de alimentación:
indica el nivel de carga de
la batería.
TÜRKÇE
Ambalaj aăaăıdakileri içerir:
a. Bluetooth Lazer Fare
b. 2x AAA pil
c. Hızlı Başlangıç Kılavuzu
Pili takma
1. Kapağı çıkarın.
2. Kutuplarına dikkat
ederek pilleri yuvaya
yerleştirin.
3. Kapağı yerleştirin.
DİKKAT
:
• Verilen piller yeniden
şarj edilemez.
• Eğer fareyi uzun süre
kullanmayacaksanız,
pilleri çıkarın.
• Yeni olan ve aynı tipteki
pilleri kullanın.
PC’ye Bağlama
1. Güç anahtarını açın.
2. Farenin alt kısmındaki
CONNECT (BAĞLAN)
düğmesine basın ve
çekin. Güç LED’i kırmızı
yanar.
3. Farenizi bilgisayarınız
ile eşleştirin. Eğer
bilgisayarınızda dahili
Bluetooth özelliği yoksa
bir Bluetooth adaptörü
kullanın.
NOTLAR:
• Bluetooth adaptörü ayrıca
satın alınır.
• Bilgisayarınızı diğer
Bluetooth aygıtları ile
eşleştirmenin ayrıntıları
için bilgisayarınız veya
Bluetooth adaptörünüz
ile birlikte gelen belgelere
bakınız.
• Güçten tasarruf
etmek için, fareyi
kullanmadığınızda gücü
kapatın.
• Boşta iken ya da sekiz
dakika kullanılmadığında,
fare otomatik olarak
bekleme modundan
uyku moduna geçerek
güçten tasarruf eder. Uyku
modundan kaldırmak için
fareyi hareket ettirin.
Özellikler
1 Sol düğme: Sol tık
2 Sağ düğme: Sağ tık
3 Tekerlek: Yukarı/Aşağı
kaydırma ve orta tık
4 Sol taraf yukarı
düğmesi: İleri (İnternet)
5 Sol taraf aşağı düğmesi
:
Geri (İnternet)
6 Güç LED’i:
Pilin güç
seviyesini gösterir.
Українська
До комплекту входять:
a. Лазерна миша з Bluetooth
b. 2 x батареї AAA
c. Керівництво для
швидкого початку
експлуатації
Встановлення акумулятора
1. Зніміть кришку.
2. Вставте батареї до
отвору дотримуючись
полярності.
3. Поверніть кришку на
місце.
ОБЕрЕЖнО
:
• Батареї з комплекту
не підлягають
зарядженню.
• Якщо Ви протягом
тривалого часу не
користуєтеся мишею,
вийміть батареї.
• Використовуйте нові
батареї цього ж типу.
Підключення до ПК
1. Увімкніть перемикач
живлення.
2. Натисніть і відпустіть
кнопку CONNECT
(Підключення) внизу
на миші. Світлодіод
живлення стає
червоним.
3. Поєднайте мишу в
пару із комп’ютером.
Користуйтеся
адаптером Bluetooth,
якщо комп’ютер не має
вбудованого пристрою
Bluetooth.
ПРИМІТКИ:
• Адаптер Bluetooth слід
купувати окремо.
• Детальніше про
поєднання комп’ютера
в пару з іншими
пристроями Bluetooth
див. у документації до
комп’ютера або адаптера
Bluetooth.
• Щоб заощаджувати
енергію, вимикайте
живлення, коли Ви не
користуєтеся мишею.
• Бездіяльна протягом
восьми хвилин миша
автоматично переходить
з режиму очікування
в режим паузи, щоб
заощадити енергію.
Порухайте мишею, щоб
вивести її з режиму
очікування.
Особливі характеристики
1 Ліва кнопка: типові
функції лівої кнопки миші
2 Права кнопка: типові
функції правої кнопки миші
3 Коліщатко: Вертикальне
прокручення і функція
середньої кнопки
4 Верхня кнопка з лівого
боку: Вперед (Internet)
5 Нижня кнопка з лівого
боку: Назад (Internet)
6 Світлодіод живлення:
Позначає рівень заряду
батареї.
POLSKI
Opakowanie zawiera:
a. Laserowa mysz Bluetooth
b. baterie AAA
c. Instrukcja szybkiego
uruchomienia
Montaż/wymiana baterii
1. Zdejmij pokrywę.
2. Włóż do gniazda
baterie, sprawdzając
prawidłowy kierunek
biegunów.
3. Załóż z powrotem
pokrywę.
PRZESTROGA
:
• Dostarczonych baterii
nie można ładować.
• Jeśli mysz nie będzie
długo używana należy
wyjąć baterie.
• Należy użyć baterie
nowe i podobnego
typu.
Podłączanie do komputera
1. Włącz przełącznik
zasilania.
2. Naciśnij i zwolnij
przycisk CONNECT
(POŁĄCZ) na spodzie
myszy. Za świeci się
czerwone światło LED
zasilania.
3. Wykonaj parowanie
myszy i komputera. Użyj
adaptera Bluetooth, jeśli
komputer nie posiada
wbudowanej obsługi
Bluetooth.
UWAGI:
• Adapter Bluetooth należy
zakupić oddzielnie.
• Szczegółowe informacje
dotyczące parowania
komputera z innymi
urządzeniami Bluetooth,
sprawdź w dokumentacji
dostarczonej z
komputerem lub z
adapterem Bluetooth.
• W celu oszczędzania
energii należy wyłączyć
zasilanie jeśli mysz nie
będzie używana.
• W stanie bezczynności
lub po ośmiu minutach
nie używania, mysz
automatycznie przechodzi
z trybu oczekiwania do
trybu uśpienia w celu
oszczędzania energii.
Aby wybudzić mysz z
trybu uśpienia należy ją
przesunąć.
Funkcje
1 Lewy przycisk: Kliknięcie
lewym przyciskiem
2 Prawy przycisk: Kliknięcie
prawym przyciskiem
3 Kółko: Przewijanie do
góry/do dołu i kliknięcie
środkowym przyciskiem
4 Lewy, górny przycisk:
Dalej (Internet)
5 Lewy, dolny przycisk
:
Wstecz (Internet)
6 Wskačnik LED zasilania:
Wskazuje poziom
naładowania baterii.
MAGYAR
A csomagja a következăket
tartalmazza:
a. Bluetooth lézeres egér
b. 2x AAA elem
c. Gyors üzembe helyezési
útmutató
Az elem beszerelése
1. Távolítsa el a burkolatot.
2. A megfelelő polaritás-
jelzés szerint helyezze
be az elemet a rekeszbe.
3. Helyezze vissza fedelet.
VIGYÁZAT
:
• A mellékelt elemek nem
újratölthetőek.
• Ha hosszabb ideig nem
használja az egeret,
távolítsa el az elemeket.
• Új, vagy hasonló típusú
elemeket használjon.
Podłączanie do komputera
1. Kapcsolja be a
főkapcsolót.
2. Ezután nyomja meg
és engedje del az egér
alján lévő CONNECT
(Csatlakoztatás)
gombot. A
működésjelző LED színe
vörösre változik.
3. Párosítás az egeret
a számítógéppel.
Használjon Bluetooth
adaptert, ha
számítógépe nem
rendelkezik beépített
Bluetooth-funkcióval.
MEGJEGYZÉSEK:
• A Bluetooth adapter külön
kapható.
• A számítógép és
egyéb Bluetooth-
eszközök párosításával
kapcsolatos részleteket
illetően tekintse meg
a számítógéphez vagy
Bluetooth-adapterhez
mellékelt dokumentációt.
• Az energiatakarékosság
érdekében kapcsolja ki a
tápellátást, amikor nem
használja az egeret.
• Ha üresjáratban van,
vagy nyolc percig nem
használják, az egér
energiatakarékosság
érdekében automatikusan
készenléti módról alvó
módra vált. Mozgassa az
egeret, hogy feléledjen az
alvó üzemmódból.
Jellemzők
1 Bal gomb: Bal kattintás
2 Jobb gomb: Jobb kattintás
3 Kerék: Görgetés fel/le és
középső kattintás
4 Bal oldali felső gomb:
Előre (Internet)
5 Bal oldali alsó gomb
:
Vissza (Internet)
6 Hálózati LED:
Az
akkumulátor töltöttségi
szintjét jelzi.
1 ปุ่มซ้าย: คลิกซ้าย
2 ปุ่มขวา: คลิกขวา
3 ล้อ: เลื่อนขึ้น/ลง
และคลิกกลาง
6 LED เพาเวอร์: ระบุระดั
บพลังงานแบตเตอรี่
ไทย
แพคเกจของคุณประกอบด้วย:
การติดตั้งแบตเตอรี่
ข้อควรระวัง:
เชื่อมต่อกับคอมพิวเตอร์
Federal Communications
Commission Interference
Statement
This equipment has been tested and
found to comply with the limits for a Class
B digital device, pursuant to Part 15 of
the FCC Rules.
These limits are designed to provide
reasonable protection against harmful
interference in a residential installation.
This equipment generates, uses and can
radiate radio frequency energy and, if
not installed and used in accordance
with the instructions, may cause harmful
interference to radio communications.
However, there is no guarantee that
interference will not occur in a particular
installation.
If this equipment does cause harmful
interference to radio or television
reception, which can be determined
by turning the equipment off and on,
the user is encouraged to try to correct
the interference by one or more of the
following measures:
--Reorient or relocate the receiving
antenna.
--Increase the separation between the
equipment and receiver.
--Connect the equipment into an outlet
on a circuit different from that to which
the receiver is connected.
--Consult the dealer or an experienced
radio/TV technician for help.
This device complies with part 15 of the
FCC Rules.
Operation is subject to the following two
conditions:
(1) This device may not cause harmful
interference, and
(2) this device must accept any
interference received, including
interference that may cause undesired
operation.
CAUTION: Any changes or modifications
not expressly approved by the grantee of
this device could void the user’s authority
to operate the equipment.
FCC Radiation Exposure
Statement
This equipment complies with FCC
radiation exposure limits set forth for
an uncontrolled environment. End
users must follow the specific operating
instructions for satisfying RF exposure
compliance.
This transmitter must not be co-located
or operating in conjunction with any
other antenna or transmitter.
CE Mark Warning
This is a Class B product, in a domestic
environment, this product may cause
radio interference, in which case the
user may be required to take adequate
measures.
Declaration of Conformity (RT&TTE
directive 1999/5/CE)
The following items were completed and
are considered relevant and sufficient:
• Essential requirements as in [Article 3]
• Protection requirements for health and
safety as in [Article 3.1a]
• Testing for electric safety according to
[EN60950]
• Protection requirements for
electromagnetic compatibility in [Article
3.1b]
• Testing for electromagnetic
compatibility according to [Article 3.1b]
• Effective use of the radio spectrum as
in [Article 3.2].
• Radio test suites according to
[EN300440]
CAUTION! DO NOT throw the product in
municipal waste. This product has been
designed to enable proper reuse of parts
and recycling. This symbol of the crossed
out wheeled bin indicates that
the product (electrical and
electronic equipment) should
not be placed in municipal
waste. Check local regulations for
disposal of electronic products.
Manufacturer
ASUSTeK Computer Inc.
Tel: +886-2-2894-3447
Address: No. 150, LI-TE RD., PEITOU,
TAIPEI 112, TAIWAN
Authorised representative in
Europe
ASUS Computer GmbH
Address: HARKORT STR. 21-23,
D-40880 RATINGEN,
DEUTSCHLAND
Authorised distributor in Turkey
PENTA TEKNOLOJI URUNLERI
DAGITIM TICARET A.S.
Address: DUDULLU ORGANIZE
SANAYI BOLGESI NATO
YOLU 4.CAD.NO:1
DUDULLU UMRANIYE
34775 ISTANBUL, TURKEY
Tel: 0216 645 8200
EEE Yönetmeliğine Uygundur.
Q8219 / First Edition / March 2013
-
 1
1
-
 2
2


diğer dillerde
- slovenčina: Asus BX701 Používateľská príručka
- español: Asus BX701 Manual de usuario
- français: Asus BX701 Manuel utilisateur
- italiano: Asus BX701 Manuale utente
- 日本語: Asus BX701 ユーザーマニュアル
- čeština: Asus BX701 Uživatelský manuál
- polski: Asus BX701 Instrukcja obsługi
- Deutsch: Asus BX701 Benutzerhandbuch
- português: Asus BX701 Manual do usuário
- English: Asus BX701 User manual
- русский: Asus BX701 Руководство пользователя
- română: Asus BX701 Manual de utilizare