Worx WG300E Kullanım kılavuzu
- Kategori
- Akülü motorlu testereler
- Tip
- Kullanım kılavuzu

WG300E WG301E WG302E WG303E
P07
P21
P37
P54
P71
P87
P103
P119
P135
P148
P163
P177
P192
P209
Chain saw
Kettensäge
Tronçonneuse
Motosega
Sierra de cadena
Motosserra
Kettingzaag
Kædesav
Moottorisaha
Motorsag
Kedjesåg
Zincir testere
EN
D
F
I
ES
PT
NL
DK
FIN
NOR
SV
TR
GR
RU

Original instructions EN
Übersetzung der Originalanleitung D
Traduction des instructions initiales F
Traduzione delle istruzioni originali I
Traducción de las instrucciones originales ES
Tradução das instruções originais PT
Vertaling van de oorspronkelijke instructies NL
Oversættelse af de oprindelige instruktioner DK
Alkuperäisten ohjeiden käännös FIN
Oversettelse av de opprinnelige instruksjonene NOR
Översättning av originalinstruktionerna SV


A1
4 5 6
7
8
9
10
13 14 15
17
16
11
12
3
2
1
18
14

18
17
15
14
13
78
11 20
19
3-6mm
a
1
1
2
5
Z
Y
kg
Z
Y
a
2 2
WYZ
X50 mm
50 mm
1
1
1
12
1/3
2/3
b
2
2/3
1
1/3
A2 C1
C2 DE1
E2 F G
JIH
B

76
18
17
15
14
13
78
11 20
19
3-6mm
a
1
1
2
5
Z
Y
kg
Z
Y
a
2 2
WYZ
X50 mm
50 mm
1
1
1
12
1/3
2/3
b
2
2/3
1
1/3
M
P
S
L
O
R
K
N
Q

Chain saw EN
76
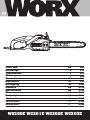
1. REAR HANDLE
2. ON/OFF SWITCH
3. LOCK-OFF BUTTON
4. OIL FILLER CAP
5. ACTIVATION LEVER FOR KICKBACK BRAKE(HAND GUARD)
6. FRONT HANDLE
7. GUIDE BAR
8. CHAIN
9. GRIPPING TEETH
10. LOCKING KNOB/ CHAIN TENSIONING KNOB
11. COVER PLATE
12. BLADE PROTECTION COVER
13. DRIVE SPROCKET
14. SYMBOL FOR ROTATION AND CUTTING DIRECTION
15. GUIDE FINS FOR CHAIN BAR
16. OIL OUTLET
17. FASTENING BOLT
18. CHAIN TENSIONING CATCH
19. OIL LEVEL GAUGE (See Fig. H)
20. CHAIN CATCH BOLT (See Fig. C2)
* Not all the accessories illustrated or described are included in standard delivery.

Chain saw EN
98
98
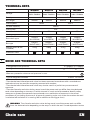
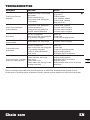
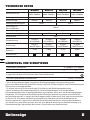
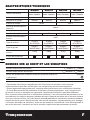
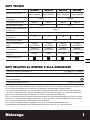
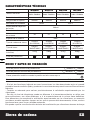
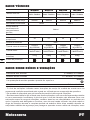
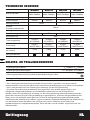
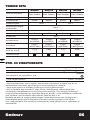
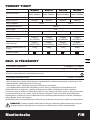
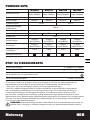
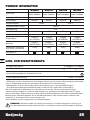
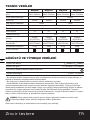
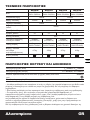
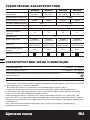
TECHNICAL DATA
WG300E WG301E WG302E WG303E
Voltage 220-
240V~50/60Hz
220-
240V~50/60Hz
220-
240V~50/60Hz
220-
240V~50/60Hz
Rated power 1800W 2000W
Bar length 350mm 400mm 350mm 400mm
Chain speed 10m/s 12m/s
Oil tank capacity 200ml
Chain pitch 3/8”
Number of chain links 53 57 53 57
Chain gauge 0.05”
Saw chain type Oregon
(91VG053X)
Oregon
(91VG057X)
Oregon
(91VG053X)
Oregon
(91VG057X)
Bar type Oregon,
(140SCEA041)
Oregon,
(160SCEA041)
Oregon,
(140SCEA041)
Oregon,
(160SCEA041)
Weight (chain & bar
included) 4.7kg 4.8kg 4.7kg 4.8kg
Protection class /II /II /II /II
NOISE AND TECHNICAL DATA
A weighted sound pressure LpA:93dB(A) KPA=3dB(A)
A weighted sound power LwA:105dB(A) KWA=3dB(A)
Wear ear protection when sound pressure is over 80dB(A)
Typical weighted vibration 5.2m/s2 K=1.5m/s2
- That the declared viberation total value has been measured accordance with a standard test
method and may be used for comparing one tool with another;
- That the declared viberation total value may also be used in a preliminary assessment of
exposure.
- That the viberation emission during actual use of the power tool can differ from the decleared
total value depending on the ways in which the tool is used; and of the need to identify safety
measures to protect the operator that are based on an estimation of exposure in the actual
conditions of use (taking accounts of all parts of operating cycle such as the times when the tool
is switched off and when it is running idle in addition to the trigger time.)
WARNING: The vibration emission value during actual use of the power tool can differ
from the declared value depending on the ways in which the tool is used dependant on the

98
Chain saw EN
98
following examples and other variations on how the tool is used:
How the tool is used and the materials are cut or drilled.
The tool being in good condition and well maintained
The use the correct accessory for the tool and ensuring it is sharp and in good condition.
The tightness of the grip on the handles and any anti vibration accessories are used.
And the tool is being used as intended by its design and these instructions.
This tool may cause hand-arm vibration syndrome if its use is not adequately
managed
WARNING: To be accurate, an estimation of exposure level in the actual conditions of use
should also take account of all parts of the operating cycle such as the times when the tool
is switched off and when it is running idle but not actually doing the job. This may significantly
reduce the exposure level over the total working period.
Help to minimize your vibration exposure risk.
ALWAYS use sharp chisels, drills and blades.
Maintain this tool in accordance with these instructions and keep well lubricated (where
appropriate).
If the tool is to be used regularly then invest in anti vibration accessories.
Avoid using tools in temperatures of 10ºC or less.
Plan your work schedule to spread any high vibration tool use across a number of days.
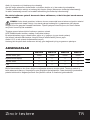
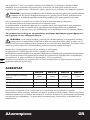
ACCESSORIES
WG300E WG301E WG302E WG303E
lubrication oil 100ml 100ml 100ml 100ml
Blade protection cover 1 1 1 1
chain 1 1 1 1
Guide bar 1 1 1 1
We recommend that you purchase your accessories from the same store that sold you the tool.
Use good quality accessories marked with a well-known brand name. Choose the type according
to the work you intend to undertake. Refer to the accessory packaging for further details. Store
personnel can assist you and offer advice.

Chain saw EN
1110
1110
GENERAL POWER TOOL
SAFETY WARNINGS
WARNING Read all safety
warnings and all instructions.
Failure to follow the warnings and
instructions may result in electric shock, fire
and/or serious injury.
WARNING Read all safety
warnings designated by the
symbol and all instructions.
Save all warnings and instructions for future
reference.
The term “power tool” in the warnings refers
to your mains-operated (corded) power tool
or battery-operated (cordless) power tool.
GENERAL POWER TOOL SAFETY
WARNINGS - WORK AREA SAFETY
1) Keep work area clean and well lit.
Cluttered or dark areas invite accidents.
2) Do not operate power tools in
explosive atmospheres, such as in
the presence of flammable liquids,
gases or dust. Power tools create sparks
which may ignite the dust or fumes.
3) Keep children and bystanders
away while operating a power tool.
Distractions can cause you to lose control.
GENERAL POWER TOOL SAFETY
WARNINGS - ELECTRICAL SAFETY
1) Power tool plugs must match the
outlet. Never modify the plug in any
way. Do not use any adapter plugs
with earthed (grounded) power tools.
Unmodified plugs and matching outlets
will reduce risk of electric shock.
2) Avoid body contact with earthed or
grounded surfaces, such as pipes,
radiators, ranges and refrigerators.
There is an increased risk of electric shock
if your body is earthed or grounded.
3) Do not expose power tools to rain or
wet conditions. Water entering a power
tool will increase the risk of electric shock.
4) Do not abuse the cord. Never use
the cord for carrying, pulling or
unplugging the power tool. Keep
cord away from heat, oil, sharp
edges or moving parts.
Damaged or entangled cords increase the
risk of electric shock.
5) When operating a power tool
outdoors, use an extension cord
suitable for outdoor use. Use of a cord
suitable for outdoor use reduces the risk
of electric shock.
6) If operating a power tool in a
damp location is unavoidable, use
a residual current device (RCD)
protected supply. Use of an RCD
reduces the risk of electric shock.
NOTE The term “residual current device
(RCD)” may be replaced by the term
“ground fault circuit interrupter (GFCI)” or
“earth leakage circuit breaker (ELCB)”.
GENERAL POWER TOOL SAFETY
WARNINGS -PERSONAL SAFETY
1) Stay alert, watch what you are
doing and use common sense when
operating a power tool. Do not use
a power tool while you are tired or
under the influence of drugs, alcohol
or medication. A moment of inattention
while operating power tools may result in
serious personal injury.
2) Use personal protective equipment.
Always wear eye protection.
Protective equipment such as dust mask,
non-skid safety shoes, hard hat, or
hearing protection used for appropriate
conditions will reduce personal injuries.
3) Prevent unintentional starting.
Ensure the switch is in the off-
position before connecting to power
source and/or battery pack, picking
up or carrying the tool.
Carrying power tools with your finger on
the switch or energising power tools that
have the switch on invites accidents.
4) Remove any adjusting key or wrench
before turning the power tool on. A
wrench or a key left attached to a rotating
part of the power tool may result in
personal injury.
5) Do not overreach. Keep proper
footing and balance at all times. This
enables better control of the power tool in

1110
Chain saw EN
1110
unexpected situations.
6) Dress properly. Do not wear loose
clothing or jewellery. Keep your hair
and clothing away from moving parts.
Loose clothes, jewellery or long hair can
be caught in moving parts.
7) If devices are provided for the
connection of dust extraction and
collection facilities, ensure these are
connected and properly used. Use of
dust collection can reduce dust-related
hazards.
GENERAL POWER TOOL SAFETY
WARNINGS -POWER TOOL USE
AND CARE
1) Do not force the power tool. Use
the correct power tool for your
application. The correct power tool will
do the job better and safer at the rate for
which it was designed.
2) Do not use the power tool if the
switch does not turn it on and off.
Any power tool that cannot be controlled
with the switch is dangerous and must be
repaired.
3) Disconnect the plug from the power
source and/or the battery pack from
the power tool before making any
adjustments, changing accessories,
or storing power tools. Such preventive
safety measures reduce the risk of starting
the power tool accidentally.
4) Store idle power tools out of the
reach of children and do not allow
persons unfamiliar with the power
tool or these instructions to operate
the power tool.
Power tools are dangerous in the hands of
untrained users.
5) Maintain power tools. Check for
misalignment or binding of moving
parts, breakage of parts and any
other condition that may affect the
power tool’s operation. If damaged,
have the power tool repaired before
use. Many accidents are caused by poorly
maintained power tools.
6) Keep cutting tools sharp and clean.
Properly maintained cutting tools with
sharp cutting edges are less likely to bind
and are easier to control.
7) Use the power tool, accessories
and tool bits etc. in accordance
with these instructions, taking into
account the working conditions and
the work to be performed. Use of the
power tool for operations different from
those intended could result in a hazardous
situation.
8) Keep handles dry, clean and free from
oil and grease. Slippery handles do not
allow for safe handling and control of the
tool in unexpected situations.
GENERAL POWER TOOL SAFETY
WARNINGS -SERVICE
a) Have your power tool serviced by
a qualified repair person using only
identical replacement parts. This will
ensure that the safety of the power tool is
maintained.
b) If the replacement of the supply cord
is necessary, this has to be done
by the manufacturer or his agent in
order to avoid a safety hazard.
ADDITIONAL SAFETY
POINTS FOR YOUR
ELECTRIC CHAIN SAW
1. Keep all parts of the body away from
the saw chain when the chain saw
is operating. Before you start the
chain saw, make sure the saw chain
is not contacting anything. A moment
of inattention while operating chain saws
may cause entanglement of your clothing
or body with the saw chain.
2. Always hold the chain saw with your
right hand on the rear handle and
your left hand on the front handle.
Holding the chain saw with a reversed
hand configuration increases the risk of
personal injury and should never be done.
3. Wear safety glasses and hearing
protection. Further protective
equipment for head, hands, legs
and feet is recommended. Adequate

Chain saw EN
1312
1312
protective clothing will reduce personal
injury by flying debris or accidental
contact with the saw chain.
4. Do not operate a chain saw in a tree.
Operation of a chain saw while up in a tree
may result in personal injury.
5. Always keep proper footing and
operate the chain saw only when
standing on fixed, secure and level
surface. Slippery or unstable surfaces
such as ladders may cause a loss of
balance or control of the chain saw.
6. When cutting a limb that is under
tension be alert for spring back. When
the tension in the wood fibres is released
the spring loaded limb may strike the
operator and/or throw the chain saw out
of control.
7. Use extreme caution when cutting
brush and saplings. The slender
material may catch the saw chain and
be whipped toward you or pull you off
balance.
8. Carry the chain saw by the front
handle with the chain saw switched
off and away from your body. When
transporting or storing the chain saw
always fit the guide bar cover. Proper
handling of the chain saw will reduce the
likelihood of accidental contact with the
moving saw chain.
9. Follow instructions for lubricating,
chain tensioning and changing
accessories. Improperly tensioned
or lubricated chain may either break or
increase the chance for kickback.
10.Keep handles dry, clean, and free
from oil and grease. Greasy, oily
handles are slippery causing loss of
control.
11. Cut wood only. Do not use chain
saw for purposes not intended. For
example: do not use chain saw for
cutting plastic, masonry or non-wood
building materials. Use of the chain saw
for operations different than intended
could result in a hazardous situation.
12.Using of a residual cuttent device with
a tripping current of 30 mA or less is
recommendated.
CAUSES AND OPERATOR PREVENTION
OF KICKBACK:
Kickback may occur when the nose or tip of
the guide bar touches an object, or when the
wood closes in and pinches the saw chain in
the cut.
Tip contact in some cases may cause a
sudden reverse reaction, kicking the guide bar
up and back towards the operator.
Pinching the saw chain along the top of the
guide bar may push the guide bar rapidly back
towards the operator.
Either of these reactions may cause you to
lose control of the saw which could result in
serious personal injury. Do not rely exclusively
upon the safety devices built into your saw.
As a chain saw user, you should take several
steps to keep your cutting jobs free from
accident or injury.
Kickback is the result of tool misuse and/or
incorrect operating procedures or conditions
and can be avoided by taking proper
precautions as given below:
- Maintain a firm grip, with thumbs
and fingers encircling the chain saw
handles, with both hands on the saw
and position your body and arm to
allow you to resist kickback forces.
Kickback forces can be controlled by the
operator, if proper precautions are taken.
Do not let go of the chain saw.
- Do not overreach and do not cut
above shoulder height. This helps
prevent unintended tip contact and
enables better control of the chain saw in
unexpected situations.
- Only use replacement bars and
chains specified by the manufacturer.
Incorrect replacement bars and chains
may cause chain breakage and/or kickback.
- Follow the manufacturer’s sharpening
and maintenance instructions for the
saw chain. Decreasing the depth gauge
height can lead to increased kickback.
ATTENTION: Through poor conditions
of the electrical MAINS, shortly
voltage drops can appear when starting
the EQUIPMENT. This can influence other
equipment (Eg. Blinking of a lamp). If the
MAINS-IMPEDANCE Zsysmax = 0.22+0.13j,
such disturbances are not expected. (In case
of need, you may contact your local supply
authority for further information).

1312
Chain saw EN
1312
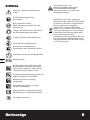
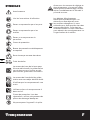
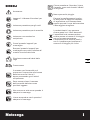
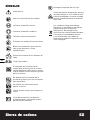
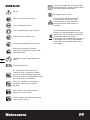
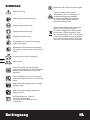
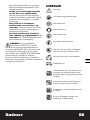
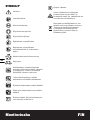
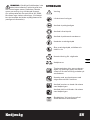
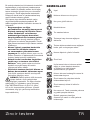
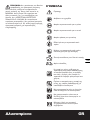
SYMBOLS
Warning
Read the manual
Wear eye protection
Wear ear protection
Wear dust mask
Gloves with saw protection
Boots with saw protection, steel toe-
cap and non-slip sole
Correct direction of cutting-teeth
Chain brake
Tip contact may cause the guide
bar to move suddenly upward and
backwards, which may cause serious
injury to user.
Contact of the guide bar tip with any
object should be avoided
Do not use one handed when
operating the chain saw.
Always use two hands when
operating the chain saw.
Double insulation. When servicing,
use only identical replacement parts.
Do not expose to rain
Remove plug from the mains
immediately if the cable is damaged
or cut.
Recycle unwanted materials instead
of disposing of them as waste.
All tools and packaging should be
sorted, taken to the local recycling
centre and disposed of in an
environmentally safe way.

Chain saw EN
1514
1514
INTENDED USE
The chain saw is intended for sawing of trees,
tree trunks, branches, wooden beams, planks,
etc. Cuts can be sawed with or across the
grain. This product is not suitable for sawing
mineral materials.
ASSEMBLY
WARNING! Do not connect the
chain saw to mains before it is
completely assembled.
Always use gloves when handling the
chain.
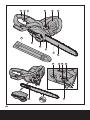
CHAIN AND CHAIN BAR ASSEMBLY
1. Unpack all parts carefully.
2. Place the chain saw on any suitable flat
surface.
3. Use only genuine WORX chains
designed for chainbar.
4. Slide the chain (8) in the slot around the
chain bar (7). Ensure chain is in correct
running direction by comparing with chain
symbol (14). Ensure the chain tensioning catch
(18) is facing outwards. (See Fig. A)
5. Fit the chain onto the drive sprocket (13) and
guide the chain bar (7), so that the fastening
bolt (17) and the two guide fins (15) fit into the
keyway of the chain bar(7). (See Fig. B)
6. Check if all parts are seated properly and
hold chain and chain bar in a level position.
(See Fig. C1)
7. Fit cover plate, ensure that the chain catcher
(20) fits into the groove of the cover plate(11).
(See Fig. C2)
8. Screw on the cover plate (11) with the
locking knob (10). (See Fig. D)
The chain is not yet tensioned. Tensioning the
chain applies as described under “Tensioning
chain”.
TENSIONING CHAIN
Always check the chain tension before use,
after the first cuts and regularly during
use, approx. every 10 minutes. Upon
initial operation, new chains can lengthen
considerably.
WARNING: Unplug chain saw from
power source before adjusting saw
chain tension.
WARNING: Cutting edges on chain
are sharp. Use protective gloves
when handling chain.
WARNING: Maintain proper chain
tension always. A loose chain will
increase the risk of kickback. A loose
chain may jump out of guide bar groove.
This may injure operator and damage
chain. A loose chain will cause chain,
chain bar, and sprocket to wear rapidly.
The chain life of the saw chain
mainly depends upon sufficient
lubrication and correct tensioning.
Avoid tensioning the chain if it is
hot, as this will cause the chain to
become over tensioned when it cools
down.
1. Place the chain saw on any suitable flat
surface.
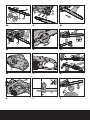
2. Turn the locking knob/ chain tensioning
knob (10) clockwise until the locking knob
is screwed tightly. The correct chain tension
will be reached automatically. The ratchet
mechanism prevents the chain tension from
loosening. (See Fig. E2)
3. The correct chain tension is reached when
the chain (8) can be raised approx. 3 – 6 mm
from the chain bar in the centre. This should
be done by using one hand to raise the chain
against the weight of the machine. (See Fig.
E1)
4. When the chain looses, unscrew the locking
knob/ chain tensioning knob absolutely and
then Screw on the cover plate with the locking
knob tightly again.
LUBRICATION
IMPORTANT: The chain saw is
not supplied filled with oil. It is
essential to fill with oil before use. Never
operate the chain saw without chain
oil or at an empty oil tank level, as this
will result in extensive damage to the
product.
Chain life and cutting capacity depend on
optimum lubrication. Therefore, the chain is

1514
Chain saw EN
1514
automatically oiled during operation via oil
outlet (16).
Filling oil tank:
1. Set chain saw on any suitable surface with
oil filler cap facing upward.
2. Clean area around the oil filler cap with
cloth unscrew cap.
3. Add WORX chain saw oil until reservoir is
full.
4. Avoid dirt or debris entering oil tank, refit
oil filler cap (4) and tighten.
IMPORTANT: To allow venting of
the oil reservoir, small breather
channels are provided between the oil
filler cap and the strainer, to prevent
leakage ensure machine is left in a
horizontal position (oil filler cap (4)
uppermost) when not in use.
It is important to use only the
recommended oil to avoid damage to the
chain saw. Never use recycled/old oil.
Use of non approved oil will invalidate
the warranty.
OPERATION
1. SWITCHING ON AND OFF (See Fig. F)
ATTENTION: Check the voltage and
current supply: The voltage and
current supply must comply with the
ratings on the type plate.
For switching on the machine, press the
lock-off (3) button, then fully press the on/off
switch (2) and hold in this position. The lock-
off button (3) can now be released.
For switching off, release the on/off switch
(2).
Do not stop chain saw after sawing by
activating the front hand guard (chain brake).
2. CHAIN BRAKE (See Fig. G)
The chain brake is a safety mechanism
activated through the front hand guard
(5), when kickback occurs. Chain stops
immediately.
The following function check should be
carried out at regular intervals. Push front
hand guard (5) forwards (position ) and start
the chain saw. The chain must not start. To
deactivate the kickback brake, pull hand guard
(5) backwards (position ). and
release On/Off switch (2)
Cutting
-Is the oil reservoir filled? Check oil level
gauge (19) prior to starting and regularly
during operation. Refill oil when oil level
is low. The oil tank filling will last approx.
16minutes, depending on sawing intensity
and stops. (See Fig. H)
- Is the chain tension in order and is the chain
sharp? Check new replaced chain tension
approx. every 10 minutes during operation.
Upon initial operation, new chains can
lengthen considerably. The condition of the
chain influences the cutting performance.
Only a sharp chain protects from overload.
- Is the kickback deactivated and its function
ensured?
- Are you wearing the necessary protective
equipment? Wear safety glasses /goggles/
visor –safety helmet and hearing protection.
Further protective equipment for head,
hand, legs and feet is highly recommended.
Adequate protective clothing will reduce
personal injury by flying debris or accidental
contact with saw chain.
Proper functioning of the automatic oiler can
be checked by running the chain saw and
pointing the tip of the chain bar towards a
piece of cardboard or paper on the ground.
Caution: Do not touch the ground with the
chain. Ensure safety clearance of 20 cm.
If an increasing oil pattern developes, the
automatic
oiler is operating fine. If there is no oil
pattern, despite a full oil reservoir, see
“Troubleshooting” or contact WORX customer
service agent or approved service agent.
Kickback (See Fig. G)
Kickback is the sudden backward/upward
motion of the chain saw, occurring when the
chain (at the tip of the chain bar) comes in
contact with a log or wood, or when the chain
becomes jammed.
When kickback occurs the chainsaw reacts
unpredictably and can cause severe injuries to

Chain saw EN
1716
1716
the operator or bystanders.
Particular attention must be given when
sawing sideward, slanted or during length
cuts, as the spiked bumper usually can not be
applied.
To avoid kickback:
- Saw with guide bar at a flat angle.
- Never work with a loose, widely stretched or
the heavily worn out chain.
- Ensure chain is sharpened correctly.
- Never saw above shoulder height.
- Never work with the tip of the guide bar.
- Always hold the chain saw firmly with both
hands.
- Always use a low kickback chain.
- Apply the metal gripping teeth for leverage.
- Ensure correct chain tension.
General behavior
Always hold the chain saw firmly with both
hands. Front grip with the left hand and
rear grip with the right hand. Fully grip both
handles at all times during operation. Never
operate chain saw using only one hand.
Ensure power cord is located to the rear, away
from the chain and wood and so positioned
that it will not be caught on branches or the
like during cutting. (See Fig. G)
Use the chain saw only with secure footing.
Hold the chain saw at the right-hand side of
your body. (See Fig. I)
The chain must be running at full speed
before it makes contact with the wood. Use
the metal gripping teeth to secure the saw
onto the wood before starting to cut. Use
the gripping teeth (9) as a leverage point “a”
while cutting. (See Fig. J)
Reset the gripping teeth at a low point when
sawing thicker logs by pulling the chain
saw slightly backwards until the gripping
teeth release, and reposition at lower level
to continue sawing. Do not remove the saw
completely from the wood.
Do not force the chain while cutting, let the
chain do the work, using the gripping teeth to
apply minimal leverage pressure.
Do not operate the chain saw with arms fully
extended or attempt to saw areas which are
difficult to reach, or on a ladder. Never use the
chain saw above shoulder height. (See fig. K)
Sawing is optimized when the chain speed
remains steady during cutting.
Beware when reaching the end of the cut. The
weight of the saw may change unexpectedly
as it cuts free from the wood. Accidents can
occur to the legs and feet.
Always remove the saw from a wood cut
while the saw is running.
Cutting logs
Observe the following safety instructions:
Support logs so that the face sides at the
cut do not close in against each other, which
would result in the chain being jammed or
pinched. (See Fig. I,L)
Position and set short logs safety prior to
sawing. Saw only wood or wooden objects.
When sawing, always take care to avoid
hitting stones, nails, ect, as these could be
thrown up or cause damage to the chain or
serious injury to the operator or bystanders.
Keep a running saw clear or wire fencing or
the ground.
Use of the saw to thin out branches or bushes
is not approved.
Length cuts must be carried out with care,
as leverage with the gripping teeth (9) is not
possible. Saw at a flat angle to avoid kickback.
When working on a slope, operate above or to
the side of the trunk or laying tree.
Be careful not to trip over tree stumps,
branches, roots, etc.
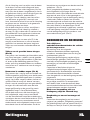
Cutting wood under tension (See Fig. L)
There is a high risk of accidents when sawing
wood, branch or trees under tension. Be
extremely careful.
Leave saw jobs like these to professionals.
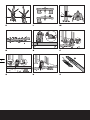
When sawing logs supported on both ends,
start the cut from above(Y) about 1/3 of the
diameter into the log and then finish the cut
(Z) from below, in order to avoid contact of
the chain saw with the ground. When sawing
logs supported on only one end, start the cut
from below (Y) about 1/3 of the diameter into
the log and finish the cut from above (Z) in
order to avoid log splitting or jamming of the
chain saw.

1716
Chain saw EN
1716
Felling trees (See Fig. M)
Always wear hard hat to protect head
against falling branches.
The chain saw can only be used to fell
trees smaller in diameter than the length
of the guide bar.
Secure work area. Ensure no persons
or animals are in the vicinity of the
falling tree.
Never attempt to free a jammed saw
with the motor running. Use wooden
wedges to free chain and guide bar.
When cutting and felling operations are being
performed by two or more persons, at the
same time, the felling operations should be
separated from the cutting operation by a
distance of at least twice the height of the
tree being felled. Trees should not be felled in
a manner that would endanger any person,
strike any utility line or cause any property
damage. If the tree does make contact with
any utility line, the company should be
notified immediately.
The chain saw operator should keep on the
uphill side of the terrain as the tree is likely to
roll or slide downhill after it is felled.
An escape path should be planned and
cleared as necessary before cuts are started.
The escape path should extend back and
diagonally to the rear of the expected line of
fall.
Before felling is started, consider the
natural lean of the tree, the location of larger
branches and the wind direction to judge
which way the tree will fall.
Remove dirt, stones, loose bark, nails staples,
and wire from the tree.
Notching undercut: Make the notch (x-w)1/3
the diameter of the tree, perpendicular to the
direction of falls as make the lower horizontal
notching cut first. This will help to avoid
pinching either the saw chain or the guide bar
when the second notch is being made.
Felling back cut: make the felling back
cut(Y)at least 50 mm higher than the
horizontal notching cut. Keep the felling back
cut parallel to the horizontal notching cut.
Make the felling back cut so enough wood is
left to act as a hinge. The hinge wood keeps
the tree from twisting and falling in the wrong
direction. Do not cut through the hinge.
As the felling gets close to the hinge the tree
should begin to fall. If there is any chance
that the tree may not fall in desired direction
or it may rock back and bind the saw chain,
stop cutting before the felling back cut is
complete and use wedges of wood, plastic, or
aluminum to open the cut and drop the tree
along the desired line of fall.
When the tree begins to fall remove the chain
saw from the cutting, stop the motor, put the
chain saw down, and then use the retreat path
planned. Be alert for overhead limbs falling
and watch your footing.
To complete the felling operation, drive a
wedge (Z) into the horizontal cut.
Beware of falling branches when the tree
starts to move.
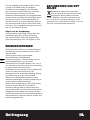
Limbing a tree (See Fig. N)
Limbing is removing the branches from a
fallen tree. When limbing leave larger lower
limbs to support the log off the ground.
Remove the small limbs in one cut as
illustrated. Branches under tension should be
cut from the bottom up to avoid binding the
chain saw.
Bucking a log (See Fig. O)
Bucking is cutting a log into lengths. It is
important to make sure your footing is firm
and your weight is evenly distributed on both
feet. When possible, the log should be raised
and supported by the use of limbs, logs or
chocks. Follow the simple directions for easy
cutting.
When the log is supported along its entire as
illustrated, it is cut from the top (overbuck).
When the log is supported on one end,
as illustrated, cut 1/3 the diameter from
the underside (underbuck). Then make the
finished cut by overbucking to meet the first
cut. (See Fig. P)
When the log is supported on both ends,
as illustrated, cut 1/3 the diameter from the
top overbuck. Then make the finished cut by
underbucking the lower 2/3 to meet the first
cut. (See Fig. Q)
When bucking on a slope always stand on
the uphill side of the log, as illustrated. When

Chain saw EN
1918
1918
“cutting through”, to maintain complete
control release the cutting pressure near the
end of the cut without relaxing your grip on
the chain saw handles. Don’t let the chain
contact the ground. After completing the cut,
wait for the saw chain to stop before you
move the chain saw. Always stop the motor
before moving from tree to tree. (See Fig. R)
MAINTENANCE
Before any work on the machine itself,
pull the mains plug from the socket.
Note: To ensure long and reliable service,
carry out the following maintenance regularly.
Regularly check for obvious defects such as
loose, dislodged or damaged chain and guide
bar, loose fixings and worn or damaged
components.
Check that covers and guards are undamaged
and correctly fitted. Carry out necessary
maintenance or repairs before using the chain
saw.
If the chain saw should happen to fail despite
the care taken in manufacturing and testing,
repair should be carried out by an authorized
customer service agent.
Before returning, ensure all oil in the oil
tank has been emptied.
Replacing/Changing Chain and guide bar
Fit the chain and guide bar as described in
“Assembly and Tensioning Chain”.
The circular groove of the guide bar will wear
particularly on the lower edge with time.
When replacing the chain turn the chain bar
180° to allow even wear, thus extending chain
bar life.
Check drive sprocket. If it is worn out or
damaged due to strain, have it exchanged by
an authorized service agent.
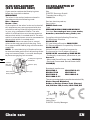
If the chain bar is worn out or damaged,
take the chain tensioning catch off the bar
by loosing the screw anti-clockwise. Then
fit the tensioning catch into the new bar by
tightening the screw clockwise. The catch
protrude (a) must be fitted into the bar hole.
(See Fig S)
Sharpening chain
Have your chain sharpened professionally
at your approved service agent or sharpen
the chain yourself using the sharpening kit.
Follow the sharpening instructions supplied
with the sharpening kit.
CLEANING/STORAGE
Clean the moulded plastic housing of the
chain saw using a soft brush and clean
cloth. Do not use water, solvents or polishes.
Remove all debris, especially
from the motor cooling vents.
Remove and brush clean the cover plate,
chain and chain bar after 1 to 3 hours of use.
Clean the area under the cover plate, the drive
sprocket and chain bar assembly using a soft
brush. Clean oil outlet with a clean cloth.
If the chain saw is to be stored for a longer
period of time, clean chain and chain bar.
Store in a secure, dry place out of the reach of
children.
Do not place other objects on the chain saw.
To prevent leakage ensure machine is left in a
horizontal position (oil filler cap 4 uppermost).
When storing machine in original packaging
the oil tank must be completely emptied.
ENVIRONMENTAL
PROTECTION
Recycle unwanted materials instead of
disposing of them as waste. All tools and
packaging should be sorted, taken to the
local recycling centre and disposed of in an
environmentally safe way.

1918
Chain saw EN
1918
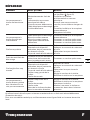
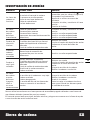
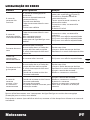
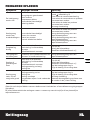
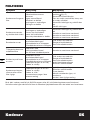
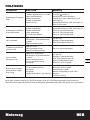
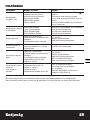
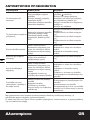
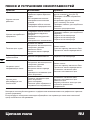
TROUBLESHOOTING
Symptom Possible Cause
Chain saw fails to
operate
Kickback brake is activated
No power
Mains socket faulty
Extension cord damaged
Fuse faulty
Pull hand guard back in position
(Figure G)
Check power
Use another socket
Check cord, replace
Replace fuse
Chain saw operates
intermittently
Extension cord damaged
Loose connection
Internal wiring defective
On/Off switch defective
Check cord, replace
Contact service agent
Contact service agent
Contact service agent
Dry chain
No oil in reservoir
Vent in oil filler cap clogged
Oil passage clogged
Refill oil
Clean cap
Clean oil passage outlet
Kickback Brake / Run
down brake Brake does not stop chain Contact service agent
Chain/chain bar
overheats
No oil in reservoir
Vent in oil filler cap clogged
Oil passage clogged
Chain is over tensioned
Dull chain
Refill oil
Clean cap
Clean oil passage outlet
Adjust locking knob
Sharpen chain or replace
Chain saw rips, vibrates,
does not saw properly
Chain tension too loose
Dull chain
Chain worn out
Chain teeth are facing in the
wrong direction
Adjust locking knob
Sharpen chain or replace
Replace chain
Reassemble with chain in correct
direction
Never use tools with defective On/Off switches or defective Kickback brake (Hand Guard).
In the case of all other types of technical faults, please contact helpline or local service center.

Chain saw EN
2120 2120
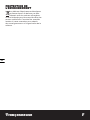
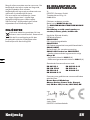
PLUG REPLACEMENT
(UK & IRELAND ONLY)
If you need to replace the fitted plug then
follow the instructions below.
IMPORTANT
The wires in the mains lead are colored in
accordance with the following code:
Blue – Neutral
Brown – Live
As the colors of the wires in the mains lead of
this appliance may not correspond with the
coloured markings identifying the terminals
in your plug, proceed as follows. The wire
which is coloured blue must be connected to
the terminal which is marked with N. The wire
which is coloured brown must be connected to
the terminal which is marked with L.
WARNING: Never connect live or neutral
wires to the earth terminal of the plug. Only
fit an approved BS1363/A plug and the correct
rated fuse.
NOTE: If a moulded plug is fitted and has to
be removed take great care in disposing of the
plug and severed cable, it must be destroyed
to prevent engaging into a socket.
Connect
Blue to N
(neutral)
Outer sleeve
firmly clamped
Cable grip
Brown L (live)
13 Amp fuse approved
to BS1362
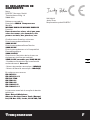
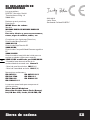
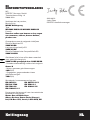
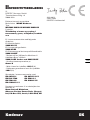
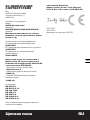
EC DECLARATION OF
CONFORMITY
We,
POSITEC Germany GmbH
Theodor-Heuss-Ring 1-3
50668 Köln
Declare that the product,
Description
WORX Chain saw
Type
WG300E WG301E WG302E WG303E
Function For sawing of trees, tree trunks,
branches, wooden beams, planks, etc.
Complies with the following Directives,
EC Machinery Directive
2006/42/EC
EC Low Voltage Directive 2006/95/EC
EC Electromagnetic Compatibility Directive
2004/108/EC
Noise Emission in the Environment by
Equipment for Use Outdoors Directive
2000/14/EC amended by 2005/88/EC.
–Conformity assessment procedure as per
Annex V
–Measured Sound Power Level 105dB(A)
–Declared Guaranteed Sound Power Level
108dB(A)
Standards conform to:
EN 60745-1 EN 60745-2-13
EN ISO 3744 EN 55014-1
EN 55014-2 EN 61000-3-2
EN 61000-3-11
The person authorized to compile the technical file,
Name: Russell Nicholson
Address: Positec Power Tools (Europe)
Ltd, PO Box 152, Leeds, LS10 9DS, UK
2011/09/13
Jacky Zhou
POSITEC Quality Manager
Sayfa yükleniyor...
Sayfa yükleniyor...
Sayfa yükleniyor...
Sayfa yükleniyor...
Sayfa yükleniyor...
Sayfa yükleniyor...
Sayfa yükleniyor...
Sayfa yükleniyor...
Sayfa yükleniyor...
Sayfa yükleniyor...
Sayfa yükleniyor...
Sayfa yükleniyor...
Sayfa yükleniyor...
Sayfa yükleniyor...
Sayfa yükleniyor...
Sayfa yükleniyor...
Sayfa yükleniyor...
Sayfa yükleniyor...
Sayfa yükleniyor...
Sayfa yükleniyor...
Sayfa yükleniyor...
Sayfa yükleniyor...
Sayfa yükleniyor...
Sayfa yükleniyor...
Sayfa yükleniyor...
Sayfa yükleniyor...
Sayfa yükleniyor...
Sayfa yükleniyor...
Sayfa yükleniyor...
Sayfa yükleniyor...
Sayfa yükleniyor...
Sayfa yükleniyor...
Sayfa yükleniyor...
Sayfa yükleniyor...
Sayfa yükleniyor...
Sayfa yükleniyor...
Sayfa yükleniyor...
Sayfa yükleniyor...
Sayfa yükleniyor...
Sayfa yükleniyor...
Sayfa yükleniyor...
Sayfa yükleniyor...
Sayfa yükleniyor...
Sayfa yükleniyor...
Sayfa yükleniyor...
Sayfa yükleniyor...
Sayfa yükleniyor...
Sayfa yükleniyor...
Sayfa yükleniyor...
Sayfa yükleniyor...
Sayfa yükleniyor...
Sayfa yükleniyor...
Sayfa yükleniyor...
Sayfa yükleniyor...
Sayfa yükleniyor...
Sayfa yükleniyor...
Sayfa yükleniyor...
Sayfa yükleniyor...
Sayfa yükleniyor...
Sayfa yükleniyor...
Sayfa yükleniyor...
Sayfa yükleniyor...
Sayfa yükleniyor...
Sayfa yükleniyor...
Sayfa yükleniyor...
Sayfa yükleniyor...
Sayfa yükleniyor...
Sayfa yükleniyor...
Sayfa yükleniyor...
Sayfa yükleniyor...
Sayfa yükleniyor...
Sayfa yükleniyor...
Sayfa yükleniyor...
Sayfa yükleniyor...
Sayfa yükleniyor...
Sayfa yükleniyor...
Sayfa yükleniyor...
Sayfa yükleniyor...
Sayfa yükleniyor...
Sayfa yükleniyor...
Sayfa yükleniyor...
Sayfa yükleniyor...
Sayfa yükleniyor...
Sayfa yükleniyor...
Sayfa yükleniyor...
Sayfa yükleniyor...
Sayfa yükleniyor...
Sayfa yükleniyor...
Sayfa yükleniyor...
Sayfa yükleniyor...
Sayfa yükleniyor...
Sayfa yükleniyor...
Sayfa yükleniyor...
Sayfa yükleniyor...
Sayfa yükleniyor...
Sayfa yükleniyor...
Sayfa yükleniyor...
Sayfa yükleniyor...
Sayfa yükleniyor...
Sayfa yükleniyor...
Sayfa yükleniyor...
Sayfa yükleniyor...
Sayfa yükleniyor...
Sayfa yükleniyor...
Sayfa yükleniyor...
Sayfa yükleniyor...
Sayfa yükleniyor...
Sayfa yükleniyor...
Sayfa yükleniyor...
Sayfa yükleniyor...
Sayfa yükleniyor...
Sayfa yükleniyor...
Sayfa yükleniyor...
Sayfa yükleniyor...
Sayfa yükleniyor...
Sayfa yükleniyor...
Sayfa yükleniyor...
Sayfa yükleniyor...
Sayfa yükleniyor...
Sayfa yükleniyor...
Sayfa yükleniyor...
Sayfa yükleniyor...
Sayfa yükleniyor...
Sayfa yükleniyor...
Sayfa yükleniyor...
Sayfa yükleniyor...
Sayfa yükleniyor...
Sayfa yükleniyor...
Sayfa yükleniyor...
Sayfa yükleniyor...
Sayfa yükleniyor...
Sayfa yükleniyor...
Sayfa yükleniyor...
Sayfa yükleniyor...
Sayfa yükleniyor...
Sayfa yükleniyor...
Sayfa yükleniyor...
Sayfa yükleniyor...
Sayfa yükleniyor...
Sayfa yükleniyor...
Sayfa yükleniyor...
Sayfa yükleniyor...
Sayfa yükleniyor...
Sayfa yükleniyor...
Sayfa yükleniyor...
Sayfa yükleniyor...
Sayfa yükleniyor...
Sayfa yükleniyor...
Sayfa yükleniyor...
Sayfa yükleniyor...
Sayfa yükleniyor...
Sayfa yükleniyor...
Sayfa yükleniyor...
Sayfa yükleniyor...
Sayfa yükleniyor...
Sayfa yükleniyor...
Sayfa yükleniyor...
Sayfa yükleniyor...
Sayfa yükleniyor...
Sayfa yükleniyor...
Sayfa yükleniyor...
Sayfa yükleniyor...
Sayfa yükleniyor...
Sayfa yükleniyor...
Sayfa yükleniyor...
Sayfa yükleniyor...
Sayfa yükleniyor...
Sayfa yükleniyor...
Sayfa yükleniyor...
Sayfa yükleniyor...
Sayfa yükleniyor...
Sayfa yükleniyor...
Sayfa yükleniyor...
Sayfa yükleniyor...
Sayfa yükleniyor...
Sayfa yükleniyor...
Sayfa yükleniyor...
Sayfa yükleniyor...
Sayfa yükleniyor...
Sayfa yükleniyor...
Sayfa yükleniyor...
Sayfa yükleniyor...
Sayfa yükleniyor...
Sayfa yükleniyor...
Sayfa yükleniyor...
Sayfa yükleniyor...
Sayfa yükleniyor...
Sayfa yükleniyor...
Sayfa yükleniyor...
Sayfa yükleniyor...
Sayfa yükleniyor...
Sayfa yükleniyor...
Sayfa yükleniyor...
Sayfa yükleniyor...
Sayfa yükleniyor...
Sayfa yükleniyor...
Sayfa yükleniyor...
Sayfa yükleniyor...
Sayfa yükleniyor...
Sayfa yükleniyor...
Sayfa yükleniyor...
Sayfa yükleniyor...
Sayfa yükleniyor...
Sayfa yükleniyor...
Sayfa yükleniyor...
Sayfa yükleniyor...
Sayfa yükleniyor...
Sayfa yükleniyor...
-
 1
1
-
 2
2
-
 3
3
-
 4
4
-
 5
5
-
 6
6
-
 7
7
-
 8
8
-
 9
9
-
 10
10
-
 11
11
-
 12
12
-
 13
13
-
 14
14
-
 15
15
-
 16
16
-
 17
17
-
 18
18
-
 19
19
-
 20
20
-
 21
21
-
 22
22
-
 23
23
-
 24
24
-
 25
25
-
 26
26
-
 27
27
-
 28
28
-
 29
29
-
 30
30
-
 31
31
-
 32
32
-
 33
33
-
 34
34
-
 35
35
-
 36
36
-
 37
37
-
 38
38
-
 39
39
-
 40
40
-
 41
41
-
 42
42
-
 43
43
-
 44
44
-
 45
45
-
 46
46
-
 47
47
-
 48
48
-
 49
49
-
 50
50
-
 51
51
-
 52
52
-
 53
53
-
 54
54
-
 55
55
-
 56
56
-
 57
57
-
 58
58
-
 59
59
-
 60
60
-
 61
61
-
 62
62
-
 63
63
-
 64
64
-
 65
65
-
 66
66
-
 67
67
-
 68
68
-
 69
69
-
 70
70
-
 71
71
-
 72
72
-
 73
73
-
 74
74
-
 75
75
-
 76
76
-
 77
77
-
 78
78
-
 79
79
-
 80
80
-
 81
81
-
 82
82
-
 83
83
-
 84
84
-
 85
85
-
 86
86
-
 87
87
-
 88
88
-
 89
89
-
 90
90
-
 91
91
-
 92
92
-
 93
93
-
 94
94
-
 95
95
-
 96
96
-
 97
97
-
 98
98
-
 99
99
-
 100
100
-
 101
101
-
 102
102
-
 103
103
-
 104
104
-
 105
105
-
 106
106
-
 107
107
-
 108
108
-
 109
109
-
 110
110
-
 111
111
-
 112
112
-
 113
113
-
 114
114
-
 115
115
-
 116
116
-
 117
117
-
 118
118
-
 119
119
-
 120
120
-
 121
121
-
 122
122
-
 123
123
-
 124
124
-
 125
125
-
 126
126
-
 127
127
-
 128
128
-
 129
129
-
 130
130
-
 131
131
-
 132
132
-
 133
133
-
 134
134
-
 135
135
-
 136
136
-
 137
137
-
 138
138
-
 139
139
-
 140
140
-
 141
141
-
 142
142
-
 143
143
-
 144
144
-
 145
145
-
 146
146
-
 147
147
-
 148
148
-
 149
149
-
 150
150
-
 151
151
-
 152
152
-
 153
153
-
 154
154
-
 155
155
-
 156
156
-
 157
157
-
 158
158
-
 159
159
-
 160
160
-
 161
161
-
 162
162
-
 163
163
-
 164
164
-
 165
165
-
 166
166
-
 167
167
-
 168
168
-
 169
169
-
 170
170
-
 171
171
-
 172
172
-
 173
173
-
 174
174
-
 175
175
-
 176
176
-
 177
177
-
 178
178
-
 179
179
-
 180
180
-
 181
181
-
 182
182
-
 183
183
-
 184
184
-
 185
185
-
 186
186
-
 187
187
-
 188
188
-
 189
189
-
 190
190
-
 191
191
-
 192
192
-
 193
193
-
 194
194
-
 195
195
-
 196
196
-
 197
197
-
 198
198
-
 199
199
-
 200
200
-
 201
201
-
 202
202
-
 203
203
-
 204
204
-
 205
205
-
 206
206
-
 207
207
-
 208
208
-
 209
209
-
 210
210
-
 211
211
-
 212
212
-
 213
213
-
 214
214
-
 215
215
-
 216
216
-
 217
217
-
 218
218
-
 219
219
-
 220
220
-
 221
221
-
 222
222
-
 223
223
-
 224
224
-
 225
225
-
 226
226
-
 227
227
-
 228
228


Worx WG300E Kullanım kılavuzu
- Kategori
- Akülü motorlu testereler
- Tip
- Kullanım kılavuzu
diğer dillerde
- español: Worx WG300E Manual de usuario
- français: Worx WG300E Manuel utilisateur
- italiano: Worx WG300E Manuale utente
- svenska: Worx WG300E Användarmanual
- português: Worx WG300E Manual do usuário
- dansk: Worx WG300E Brugermanual
- Nederlands: Worx WG300E Handleiding
Diğer belgeler
-
Bosch Ake 35-19 S Kullanma talimatları
-
Hitachi CS 30Y Handing Instructions
-
DeWalt DCM565 Kullanım kılavuzu
-
Bosch AKE 35 S El kitabı
-
Bosch AKE45 El kitabı
-
-
AL-KO BKS 2625 TSB Kullanım kılavuzu
-
Hikoki TCS 33EB Kullanım kılavuzu
-
Hitachi CS51EAP Handling Instructions Manual
-
Hitachi CS 33EDT Handling Instructions Manual