
19
hunterindustries.com
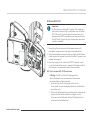
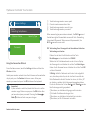
Retrot Your Pro-C Controller
With the HPC-FP Kit
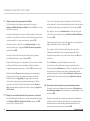
1. Do not plug the transformer into the power source until
controller is mounted and all wiring has been connected.
2. Open the controller facepack to access cabinet, detach ribbon
cable, release the hinge on the back of the Pro-C facepack, and
remove the facepack.
3. Press the hinges on the side of the HPC-FP facepack, insert
pins into the controller cabinet, reconnect the ribbon cable to
new facepack, and reconnect power to the controller.
DE Pro-C mit dem HPC-FP-Kit aufrüsten
! Wichtig: Die HPC und Pro-HC Steuergeräte für
den Außenbereich müssen von einem autorisierten
Servicetechniker installiert werden.
1. Verbinden Sie den Transformator nicht mit der
Stromquelle, bis das Steuergerät montiert und alle Kabel
verbunden sind.
2. Önen Sie die Bedienfront vom Gehäuse des Steuergeräts,
trennen Sie das Flachbandkabel, entriegeln Sie das
Scharnier auf der Rückseite der Pro-C Bedienfront und
entfernen Sie die Bedienfront.
Important:
Ensure you have a strong Wi-Fi signal. Wi-Fi coverage
can be easily tested using a smartphone and the Hunter
Wi-Fi Wizard. A signal strength of two or three bars is
recommended. Wi-Fi connectivity can also be tested on
the HPC itself (signal strength is shown when you select
a wireless network).

20 hydrawise.com
Retrot Your Pro-C Controller
3. Drücken Sie auf die Scharniere seitlich an der HPC-FP
Bedienfront, stecken Sie die Stie in das Gehäuse des
Steuergeräts, verbinden Sie das Flachbandkabel mit der
neuen Bedienfront und verbinden Sie das Steuergerät
erneut mit der Stromquelle.
ES Actualice su Pro-C con el kit HPC-FP
! Importante: Los programadores HPC y Pro-HC para
exteriores deben ser instalados por un técnico de
servicio autorizado.
1. No conecte el transformador a la toma de corriente hasta
que el programador esté montado y haya conectado todos
los cables.
2. Abra la carátula para acceder a la caja, desconecte el cable
plano, libere la bisagra en la parte posterior de la carátula
del Pro-C y retire la carátula.
3. Presione las bisagras en el lado de la carátula del HCP-FP,
inserte las clavijas en la caja del programador, reconecte el
cable plano a la nueva carátula y reconecte la corriente al
programador.
FR Modernisez votre Pro-C à l'aide du kit HPC-FP
! Important : Les programmateurs HPC et les
programmateurs d'extérieur Pro-HC doivent être installés
par un technicien d'entretien agréé.
1. Ne branchez pas le transformateur à la source
d'alimentation tant que le programmateur n'est pas xé et
que tous les branchements ne sont pas eectués.
2. Ouvrez la façade du programmateur pour accéder au
boîtier, décrochez le câble ruban, libérez la charnière à
l'arrière de la façade du Pro-C et retirez la façade.
3. Appuyez sur les charnières situées sur le côté de la
façade HPC-FP, insérez les broches dans le boîtier du
programmateur, rebranchez le câble ruban à la nouvelle
façade et rebranchez le programmateur à l'alimentation.
IT Aggiornamento di Pro-C con il kit HPC-FP
! Importante: I programmatori HPC e Pro-HC devono essere
installati da un tecnico autorizzato.
1. Non collegate il trasformatore alla presa di corrente nché
il programmatore non è montato e tutti i cavi sono stati
collegati.
2. Aprite il frontalino del programmatore per accedere
all'interno, staccate il cavo a nastro, rilasciate il cardine sul
retro del frontalino di Pro-C, quindi rimuovete il frontalino.
3. Premete i cardini sul lato del frontalino di HPC-FP,
inserite i perni nell'armadietto del programmatore,
ricollegate il cavo a nastro al nuovo frontalino e riattivate
l'alimentazione del programmatore.
PT Atualize seu Pro-C com o kit HPC-FP
! Importante: os controladores HPC e Pro-HC externo devem
ser instalados por um técnico autorizado.
1. Não conecte o transformador à fonte de alimentação até
que o controlador esteja montado e toda a ação esteja
conectada.
2. Abra o painel frontal do controlador para acessar o
gabinete, desconecte o cabo plano, solte a dobradiça na
parte traseira do painel frontal do Pro-C e remova o painel
frontal.

21
hunterindustries.com
Retrot Your Pro-C Controller
3. Pressione as dobradiças na lateral do painel frontal do
HPC-FP, insira os pinos no gabinete do controlador,
reconecte o cabo plano ao novo painel frontal e religue a
alimentação ao controlador.
RU Модернизация контроллера Pro-C с использованием
комплекта HPC-FP
Важная информация! Установку контроллера HPC и
контроллера Pro-HC для наружного монтажа должен
выполнять уполномоченный сервисный специалист.
1. Не подключайте трансформатор к источнику питания
до окончания процесса установки контроллера и
подключения всех проводов.
2. Откройте лицевую панель, чтобы получить доступ
к корпусу контроллера, отсоедините шлейф,
разблокируйте петлю с обратной стороны лицевой
панели Pro-C и снимите лицевую панель.
3. Нажмите на петли по бокам лицевой панели HPC-FP,
вставьте штифты в корпус контроллера, подсоедините
шлейф к новой лицевой панели и подайте питание на
контроллер.
TR Pro-C ünitenizi HPC-FP kiti ile iyileştirme
! Önemli: HPC ve Pro-HC dış mekan kontrol ünitelerinin
yetkili bir servis teknisyeni tarafından kurulması gerekir.
1. Kontrol ünitesi monte edilip tüm kablolar bağlanmadan
transformatörü güç kaynağına takmayın.
2. Kabine ulaşmak için kontrol ünitesi arayüzünü açın, şerit
kabloyu yerinden çıkarın, Pro-C arayüzünün arkasındaki
açma pimine basarak arayüzü çıkarın.
3. HPC-FP arayüzünün yan tarafındaki pime bastırın, pimleri
kontrol ünitesi kabinine takın, şerit kabloyu yeni arayüze
yeniden bağlayın ve kontrol ünitesine yeniden güç verin.

22 hydrawise.com
Hydrawise Controller Touchscreen
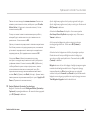
Welcome to Hydrawise!
To congure your controller via our app you will
need to connect it to your wireless network.
Press OK to start or press Congure Oine if
you don’t have a wireless network and want
to congure without internet.
Connection Wizard
OK Exit
Wizard
Congure
Oine
Congure Your Controller Oine
From the Connection Wizard screen, touch Congure Oine. Tap
OK to move on to the next step.
Enter in today’s date if it hasn’t already been set or if it is
incorrect. Enter today’s time if it hasn’t already been set or if it is
incorrect. From this screen, touch OK.
Next, enable a Master Valve. If you don't have a master valve
then choose Disable Master Valve. Then touch OK.
You can now enter the run length you want for your default zone
run time. Then touch OK.
Next, set how oen each zone will run. As advised on the previous
screen, you can set individual frequencies for each zone. Touch
OK to proceed.
From the Zones screen, you can manually congure each zone
according to your desired schedule. Touch the Add button to add
a program start time and follow the steps below. You can toggle
between zones by touching the Next or Previous buttons or you
can leave the start time to Apply to All Zones.
DE Steuergerät oine kongurieren
Klicken Sie im Bildschirm des Verbindungsassistenten auf
Congure Oine (Oine kongurieren). Klicken Sie auf OK,
um mit dem nächsten Schritt fortzufahren.
Geben Sie das aktuelle Datum an, falls dies noch nicht erfolgt
oder falsch ist. Geben Sie die aktuelle Uhrzeit an, falls dies
noch nicht erfolgt oder diese falsch ist. Klicken Sie in diesem
Bildschirm auf OK.
Aktivieren Sie als nächstes ein Hauptventil. Wenn Sie
über kein Hauptventil verfügen, wählen Sie Hauptventil
deaktivieren. Drücken Sie OK.
Geben Sie die gewünschte Lauänge Ihrer Standard-
Zonenlaufzeit ein. Drücken Sie OK.
Wählen Sie als nächstes, wie lange jede Zone ausgeführt
werden soll. Wie Sie bereits auf dem vorherigen Bildschirm
gelesen haben, können Sie individuelle Frequenzen für jede
Zone einstellen. Klicken Sie auf OK, um fortzufahren.
Über den Bildschirm Zonen können Sie nun manuell jede
Zone nach Ihrem gewünschten Zeitplan kongurieren.
Klicken Sie auf die Taste Hinzufügen, um eine
Programmstartzeit hinzuzufügen und befolgen Sie die

23
hunterindustries.com
Hydrawise Controller Touchscreen
nachfolgenden Schritte. Über die Tasten Nächste oder
Vorherige können Sie zwischen den Zonen umschalten oder
die Startzeit mit Auf alle Zonen anwenden festlegen.
ES Congure su programador sin conexión a Internet
En la pantalla del asistente de conexión, pulse Congure
Oine (Conguración en modo desconectado). Pulse OK
para pasar al siguiente paso.
Introduzca la fecha de hoy si es que no ha sido congurada o
si es incorrecta. Introduzca la hora actual si es que no ha sido
congurada o si es incorrecta. Desde esta pantalla, pulse OK.
A continuación, habilite una Válvula maestra. Si no tiene una
válvula maestra, seleccione Deshabilitar válvula maestra.
Luego toque OK.
Ahora puede introducir el tiempo que desee para el riego de
la zona predeterminada. Luego pulse OK.
A continuación, congure la frecuencia con que cada zona
regará. Como se indicó en la pantalla anterior, puede
congurar frecuencias individuales para cada zona. Pulse OK
para continuar.
En la pantalla Zonas, puede congurar manualmente cada
zona de acuerdo a su horario deseado. Toque el botón
Agregar para agregar una hora de arranque del programa
y siga los pasos a continuación. Puede alternar las zonas
tocando los botones Siguiente o Anterior, o puede dejar la
hora de arranque en Aplicarse a todas las zonas.
FR Congurer votre programmateur hors connexion
Sur l'écran de l'assistant de connexion, appuyez sur
Congure Oine (congurer hors connexion). Appuyez sur
OK pour passer à l'étape suivante.
Saisissez la date du jour si elle n'a pas encore été paramétrée
ou si elle est incorrecte. Saisissez l'heure actuelle si elle n'a
pas encore été paramétrée ou si elle est incorrecte. Sur cet
écran, appuyez sur OK.
Ensuite, activez une Électrovanne principale. Si vous
n'avez pas d'électrovanne principale, choisissez Désactiver
l'électrovanne principale. Appuyez ensuite sur OK.
Vous pouvez maintenant saisir la durée d'arrosage par défaut
que vous voulez pour vos zones. Appuyez ensuite sur OK.
Maintenant, paramétrez la fréquence d'arrosage de chaque
zone. Comme conseillé à l'écran précédent, vous pouvez
paramétrer des fréquences individuelles pour chaque zone.
Appuyez sur OK pour continuer.
Sur l'écran Zones, vous pouvez congurer manuellement
chaque zone en fonction du calendrier que vous souhaitez.
Appuyez sur le bouton Ajouter pour ajouter une heure de
début du programme, puis suivez les étapes ci-dessous. Vous
pouvez passer d'une zone à l'autre en appuyant sur le bouton
Suivant ou Précédent, ou vous pouvez laisser l'heure de
début pour qu'elle s'applique à toutes les zones.

24 hydrawise.com
IT Congurazione del programmatore oine
Dalla schermata della connessione guidata, toccate
Congure Oine (Congura oine). Toccate OK per passare
alla fase successiva.
Inserite la data odierna se non risulta già impostata o se non
è corretta. Inserite l’ora attuale se non risulta già impostata o
se non è corretta. In questa schermata, toccate OK.
Successivamente, abilitate una valvola principale. Se non
ne è disponibile una, scegliete Disabilita valvola principale,
quindi toccate OK.
Inserite la durata desiderata per il tempo di irrigazione
predenito della zona, quindi toccate OK.
Impostate la frequenza di irrigazione di ciascuna zona. Come
indicato nella schermata precedente, potete impostare
singole frequenze per ogni zona. Toccate OK per continuare.
Dalla schermata Zone, potete congurare manualmente
ciascuna zona in base alla programmazione desiderata.
Toccate il pulsante Aggiungi per aggiungere un orario
di avvio dei programmi e procedete come segue. Potete
passare da una zona all’altra toccando i pulsanti Avanti o
Prec. oppure potete impostare l’orario di avvio su Applica a
tutte le zone.
PT Congure seu controlador o-line (sem acesso a internet)
Na tela do Connection Wizard (assistente de conexão), toque
em Congure Oine (Congurar o-line). Toque em OK
para ir para a próxima etapa.
Hydrawise Controller Touchscreen
Insira a data de hoje caso ainda não tenha sido denida ou
esteja incorreta. Insira o horário de hoje caso ainda não tenha
sido denido ou esteja incorreto. Nessa tela, toque em OK.
Em seguida, ative uma válvula mestre. Caso não haja uma
válvula mestre, selecione a opção Desativar Válvula Mestre.
Pressione OK.
Agora você pode inserir a duração desejada para o tempo de
rega padrão dos setores. Toque em OK.
Em seguida, dena a frequência de rega de cada setor.
Conforme informado na tela anterior, você pode denir
frequências especícas para cada setor. Toque em OK para
continuar.
Na tela Setores, é possível congurar cada setor
manualmente de acordo com a programação desejada.
Pressione o botão Adicionar para incluir um horário de início
do programa e siga os passos abaixo. Você pode alternar
entre os setores usando os botões Próximo ou Anterior, ou
pode deixar o horário de início na opção Aplicar a todos os
setores.
RU Настройте ваш контроллер в автономном режиме.
На экране мастера подключения нажмите Настроить в
автономном режиме. Для перехода к следующему этапу
нажмите OK.
Введите текущую дату, если она еще не была введена
или отличается от реальной. Введите текущее время,
если время еще не было введено или отличается от
реального. На этом экране нажмите OK.

25
hunterindustries.com
Hydrawise Controller Touchscreen
После этого активируйте главный клапан. Если вы не
используете главный клапан, выберите пункт Disable
Master Valve («Отключить главный клапан»). Затем
нажмите кнопку OK.
Теперь вы можете ввести желаемое время работы,
которое будет использоваться для полива зон по
умолчанию. Затем нажмите OK.
Далее установите периодичность полива каждой зоны.
Как было указано на предыдущем экране, вы можете
установить периодичность полива для каждой зоны
индивидуально. Для продолжения нажмите OK.
На экране Zones («Зоны») вы можете вручную
настроить каждую зону в соответствии с требуемым
графиком полива. Нажмите кнопку Add («Добавить»),
чтобы добавить время запуска программы, после
чего выполните описанные ниже действия. Для
переключения между зонами можно использовать
кнопки Next («Далее») или Back («Назад»). Кроме того, в
поле времени запуска можно выбрать пункт Apply to All
Zones («Применить ко всем зонам»).
TR Kontrol Ünitenizi Çevrimdışı Yapılandırma
Bağlantı Sihirbazı ekranında Congure Oine (Çevrimdışı
Yapılandır) seçeneğine dokunun. Bir sonraki adıma geçmek
için OK (Tamam)’a dokunun.
Ayarlı değilse veya girilen tarih yanlışsa güncel tarihi girin.
Ayarlı değilse veya girilen saat yanlışsa saati girin. Bu ekranda
OK (Tamam)’a dokunun.
Ardından bir Ana Vana etkinleştirin. Ana vananız yoksa
Ana Vanayı Devre Dışı Bırak seçeneğini seçin. Daha sonra
Tamam’a dokunun.
Artık varsayılan bölgenizin çalışma süresi için çalışma
uzunluğunu girebilirsiniz. Daha sonra OK (Tamam)’a
dokunun.
Ardından her bir bölgenin ne sıklıkta çalışacağını ayarlayın.
Önceki ekranda tavsiye edildiği üzere her bir bölge için
ayrı çalışma sıklığı ayarlayabilirsiniz. Devam etmek için OK
(Tamam)’a dokunun.
Bölgeler ekranında, her bir bölgeyi istediğiniz programa göre
manüel olarak kongüre edebilirsiniz. Program başlangıç
zamanı eklemek için Ekle tuşuna dokunun ve aşağıdaki
adımları takip edin. Sonraki veya Önceki tuşlarına dokunarak
bölgeler arasında geçiş yapabilirsiniz veya başlangıç zamanını
Tüm Bölgelere Uygula olarak bırakabilirsiniz.

26 hydrawise.com
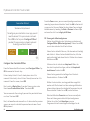
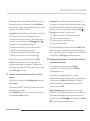
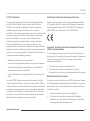
Zones
Settings
Status
Security TypeWireless Name
Password
Status
Connecting to hydrawise...
Wireless Settings
➊
➍ ➎
➏
➋
➐
➌
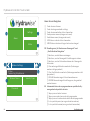
Home Screen Navigation
① Touch to view all zones.
② Touch to change controller settings.
③ Touch to view controller status information.
④ Go to previous screen (changes not saved).
⑤ Go to Home screen (changes not saved).
➅ GRAY items indicate status information.
➆ GREEN items indicate settings which can be changed.
DE Grundlagen zu „Ihr Touchscreen-Steuergerät“ und
„Startbildschirm Navigation“
① Berühren, um alle Zonen anzuzeigen.
② Berühren, um die Steuergerät-Einstellungen zu ändern.
③ Berühren, um die Statusinformationen des Steuergeräts
aufzurufen.
④ Zum vorherigen Bildschirm wechseln (Änderungen
werden nicht gespeichert).
⑤ Zum Startbildschirm wechseln (Änderungen werden nicht
gespeichert).
➅ GRAUE Elemente zeigen Statusinformationen an.
➆ GRÜNE Elemente zeigen Einstellungen an, die geändert
werden können.
ES Información básica de su programador con pantalla táctil y
navegación de la pantalla de inicio
① Toque para ver todas las zonas.
② Toque para cambiar los ajustes del programador.
③ Toque para ver la información del estado del programador.
④ Ir a la pantalla previa (no se guardarán los cambios).
⑤ Ir a la pantalla de inicio (no se guardarán los cambios).
Hydrawise Controller Touchscreen

27
hunterindustries.com
➅ Los elementos color GRIS indican la información del
estado.
➆ Los elementos color VERDE indican los ajustes que
pueden cambiarse.
FR Principes de navigation de base pour votre programmateur
à écran tactile et pour l'écran d'accueil
① Appuyez pour acher toutes les zones.
② Appuyez pour modier les paramètres du programmateur.
③ Appuyez pour consulter des informations sur l'état du
programmateur.
④ Aller à l'écran précédent (les modications ne sont pas
enregistrées).
⑤ Aller à l'écran d'accueil (les modications ne sont pas
enregistrées).
➅ Les éléments en GRIS indiquent des informations sur
l'état.
➆ Les éléments en VERT indiquent des paramètres pouvant
être modiés.
IT Informazioni di base sul touchscreen e la navigazione nella
schermata principale
① Toccate per visualizzare tutte le zone.
② Toccate per modicare le impostazioni del
programmatore.
③ Toccate per visualizzare le informazioni sullo stato del
programmatore.
④ Consente di tornare alla schermata precedente (senza
salvare le modiche).
⑤ Consente di tornare alla schermata principale (senza
salvare le modiche).
➅ Le voci in GRIGIO indicano informazioni sullo stato.
➆ Le voci in VERDE indicano impostazioni che è possibile
modicare.
PT Noções básicas do seu controlador e da navegação pela tela
inicial
① Toque para ver todos os setores.
② Toque para alterar as congurações do controlador.
③ Toque para ver as informações do status do controlador.
④ Ir para a tela anterior (as alterações não são salvas).
⑤ Ir para a tela inicial (as alterações não são salvas).
➅ Os itens em CINZA indicam as informações do status.
➆ Os itens em VERDE indicam as congurações que podem
ser alteradas.
RU Общая информация о навигации по меню вашего
контроллера с сенсорным экраном и о перемещении
между пунктами на главном экране
① Нажмите для просмотра всех зон.
② Нажмите для изменения настроек контроллера.
③ Нажмите для просмотра информации о статусе
контроллера.
④ Переход к предыдущему экрану (без сохранения
изменений).
⑤ Переход к главному экрану (без сохранения
изменений).
➅ СЕРЫМ цветом выделена информация о статусе.
➆ ЗЕЛЕНЫМ цветом выделены настройки, которые
можно изменить.
Hydrawise Controller Touchscreen

28 hydrawise.com
TR Dokunmatik Ekranlı Kontrol Üniteniz ve Ana Ekranda
Gezinti Hakkında Temel Bilgiler
① Tüm bölgeleri görüntülemek için dokunun.
② Kontrol ünitesi ayarlarını değiştirmek için dokunun.
③ Kontrol ünitesi durum bilgilerini görüntülemek için
dokunun.
④ Önceki ekrana gidin (değişiklikler kaydedilmez).
⑤ Ana Ekrana gidin (değişikler kaydedilmez).
➅ GRİ öğeler durum bilgilerini belirtir.
➆ YEŞİL öğeler, değiştirilebilecek ayarları belirtir.
Hydrawise Controller Touchscreen

29
hunterindustries.com
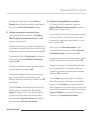
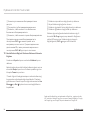
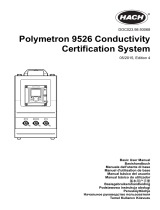
Security TypeWireless Name
Password
Status
Connecting to hydrawise...
Wireless Settings
➊
➍
➋
➌
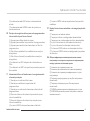
Using the Connection Wizard
From the Home screen, touch the Settings button and then the
Wireless button.
Select your wireless network from the list shown on the controller
display and press the Conrm button on screen. Enter your
wireless password and press the OK button on the keyboard.
① Touch to change wireless access point.
② Current wireless connection status.
③ Touch to change wireless security type.
④ Touch to change wireless password.
When connecting to your wireless network, the Wi-Fi icon at
the bottom right of the controller screen will ash. Connecting
takes about 30 seconds. When successfully connected, the
Wi-Fi icon will remain solid.
DE Verbindung Ihres Steuergeräts mit dem Internet über den
Verbindungsassistenten
Klicken Sie auf dem Startbildschirm auf die Taste
Einstellungen und anschließend auf WLAN.
Wählen Sie Ihr Drahtlosnetzwerk aus der Liste im Display
des Steuergeräts und drücken Sie auf die Taste Bestätigen.
Geben Sie Ihr Kennwort ein und drücken Sie auf die Taste OK
auf dem Tastenfeld.
! Wichtig: Sollte Ihr Netzwerk nicht in der Liste aufgeführt
sein, dann überprüfen Sie, ob sich das Gerät innerhalb der
Netz-Reichweite bendet. Denken Sie daran, die Taste „OK“
zu drücken, nachdem Sie Ihr Kennwort eingegeben haben.
Durch das Drücken der Tasten Start oder Zurück werden
Ihre Änderungen nicht gespeichert.
① Berühren, um drahtlosen Zugangspunkt zu ändern.
② Aktueller Drahtlosverbindungsstatus.
③ Berühren, um drahtlosen Sicherheitstyp zu ändern.
④ Berühren, um Wi-Fi-Kennwort zu ändern.
Important:
If your network is not listed, check that the unit is within
wireless range. Make sure you press the OK button aer
you’ve entered your password. Pressing the Home or
Back buttons will not save your changes.
Hydrawise Controller Touchscreen

30 hydrawise.com
Wenn Sie sich mit Ihrem Drahtlosnetzwerk verbinden,
blinkt das Wi-Fi-Symbol unten rechts auf dem Display
des Steuergeräts auf. Der Verbindungsauau dauert ca.
30 Sekunden. Ist die Verbindung erfolgreich hergestellt,
leuchtet das Wi-Fi-Symbol auf zu blinken und leuchtet
konstant.
ES Conecte su programador a Internet usando el asistente de
conexión
En la pantalla de inicio, toque el botón Ajustes y luego el
botón Inalámbrico.
Seleccione su red inalámbrica de la lista mostrada en la
pantalla del programador y presione el botón Conrmar en la
pantalla. Introduzca su contraseña inalámbrica y presione el
botón OK en el teclado.
! Importante: Si su red no aparece en la lista, compruebe
que la unidad se encuentra dentro del alcance de la señal
inalámbrica. Asegúrese de presionar el botón OK tras
introducir la contraseña. Si presiona los botones Inicio o
Atrás , no se guardarán los cambios.
① Toque para cambiar el punto de acceso inalámbrico.
② Estado actual de la conexión inalámbrica.
③ Toque para cambiar el tipo de seguridad inalámbrica.
④ Toque para cambiar la contraseña de la red inalámbrica.
Al conectarse a su red inalámbrica, el ícono Wi-Fi en
la parte inferior derecha del programador parpadeará. La
conexión tarda aproximadamente 30 segundos. Cuando se
haya conectado con éxito, el ícono Wi-Fi permanecerá jo.
FR Connectez votre programmateur à Internet à l'aide de
l'assistant de connexion
Sur l'écran d'accueil, appuyez sur le bouton Paramètres, puis
sur le bouton Sans l.
Sélectionnez votre réseau sans l dans la liste qui apparaît
sur l'écran du programmateur et appuyez sur le bouton
Conrmer à l'écran. Saisissez votre mot de passe sans l et
appuyez sur le bouton OK du clavier.
! Important: Si votre réseau n'est pas répertorié, assurez-
vous que l'unité est à portée du réseau sans l. Assurez-vous
d'appuyer sur le bouton OK une fois que vous avez saisi votre
mot de passe. Si vous appuyez sur le bouton Accueil ou
Précédent , vos modications ne seront pas enregistrées.
① Appuyez pour modier le point d'accès sans l.
② État actuel de la connexion sans l.
③ Appuyez pour modier le type de sécurité sans l.
④ Appuyez pour modier le mot de passe sans l.
Lors de la connexion à votre réseau sans l, l'icône Wi-
Fi située dans le coin inférieur droit de l'écran du
programmateur clignote. La connexion prend environ 30
secondes. Une fois la connexion Wi-Fi établie, l'icône cesse
de clignoter.
IT Connessione del programmatore a Internet con la
connessione guidata
Nella schermata principale, toccate il pulsante Impostazioni,
quindi il pulsante Wireless.
Hydrawise Controller Touchscreen

31
hunterindustries.com
Selezionate la rete wireless dall’elenco mostrato sul display
del programmatore, quindi premete il pulsante Conferma
sullo schermo. Inserire la password della rete wireless, quindi
premere il pulsante OK sulla tastiera.
! Importante: se la rete non è presente nell’elenco, vericate
che l’unità si trovi nella portata del segnale wireless.
Accertatevi di premere il pulsante OK dopo aver inserito la
password. La pressione dei pulsanti Home o Indietro
non comporta il salvataggio delle modiche.
① Toccate per modicare il punto di accesso wireless.
② Stato corrente della connessione wireless.
③ Toccate per modicare il tipo di sicurezza wireless.
④ Toccate per modicare la password wireless.
Durante la connessione alla rete wireless, l’icona Wi-
Fi nella parte inferiore destra della schermata del
programmatore inizierà a lampeggiare. Il collegamento
richiede circa 30 secondi. Una volta stabilita la connessione,
l'icona Wi-Fi risulterà ssa.
PT Conecte o controlador à internet usando o assistente de
conexão
Na tela inicial, pressione o botão Congurações e depois no
botão Sem o.
Selecione sua rede Wi-Fi sem o na lista mostrada no visor
do controlador e pressione
o botão Conrmar na tela. Insira a senha da rede sem o e
pressione o botão OK no teclado.
! Importante: se sua rede não estiver aparecendo na lista,
verique se a unidade está dentro do raio de alcance da rede
sem o. Não se esqueça de pressionar o botão OK depois
de inserir a senha. Se você pressionar os botões Início ou
Voltar , suas alterações não serão salvas.
① Pressione para alterar o ponto de acesso sem o.
② Status atual da conexão sem o.
③ Toque para alterar o tipo de segurança.
④ Toque para alterar a senha.
Durante a conexão com a rede sem o, o ícone do Wi-Fi,
localizado na parte inferior direita da tela do controlador, irá
piscar. A conexão leva cerca de 30 segundos. Após a conexão
ser estabelecida, o Wi-Fi permanecerá constante.
RU Подключение контроллера к сети Интернет с помощью
специальной программы
На главном экране нажмите кнопку Settings
(«Настройки»), а затем выберите пункт Wireless
(«Беспроводная сеть»).
Выберите вашу беспроводную сеть из списка,
отображаемого на экране контроллера, а затем нажмите
на экране кнопку Conrm («Подтвердить»). Введите
пароль для вашей беспроводной сети и нажмите на
клавиатуре кнопку OK.
Важная информация! Если вашей сети нет в списке,
убедитесь, что устройство находится в зоне ее действия.
После ввода пароля обязательно нажмите кнопку OK.
При нажатии кнопок Home («Главный экран») или Back
(«Назад») изменения не сохраняются.
Hydrawise Controller Touchscreen

32 hydrawise.com
① Нажмите для изменения беспроводной точки
доступа.
② Текущий статус беспроводного соединения.
③ Нажмите, чтобы изменить тип обеспечения
безопасности беспроводной сети.
④ Нажмите, чтобы изменить пароль беспроводной сети.
При подключении к вашей беспроводной сети
пиктограмма Wi-Fi в нижней правой части
контроллера начнет мигать. Процесс подключения
длится около 30с, после успешного подключения
пиктограмма Wi-Fi будет гореть постоянно.
TR Kontrol Ünitenizi Bağlantı Sihirbazını Kullanarak İnternete
Bağlama
Ana ekranda Ayarlar tuşuna ve ardından Kablosuz tuşuna
dokunun.
Kontrol ünitesi ekranındaki listeden kablosuz ağınızı seçin ve
ekrandaki Onayla tuşuna basın. Kablosuz parolanızı girin ve
klavyede Tamam tuşuna basın.
! Önemli: Ağınız listede görünmüyorsa ünitenin kablosuz ağ
kapsama alanında olup olmadığını kontrol edin. Parolanızı
girdikten sonra Tamam tuşuna bastığınızdan emin olun. Ana
Ekran veya Geri tuşlarına basarsanız değişiklikleriniz
kaydedilmez.
Hydrawise Controller Touchscreen
① Kablosuz erişim noktasını değiştirmek için dokunun.
② Geçerli kablosuz ağ bağlantısı durumu.
③ Kablosuz ağ güvenlik türünü değiştirmek için dokunun.
④ Kablosuz ağ parolasını değiştirmek için dokunun.
Kablosuz ağınıza bağlanırken kontrol ünitesinin sağ alt
kısmındaki Wi-Fi simgesi yanıp sönecektir. Bağlanma
yaklaşık 30 saniye sürer. Kablosuz ağınıza başarıyla
bağlandığınızda, Wi-Fi simgesi sabit kalacaktır.
Apple and the Apple logo are trademarks of Apple Inc., registered in the
U.S. and other countries. App Store is a service mark of Apple Inc. Google,
the Google logo, and Google Play are trademarks of Google LLC.

33
hunterindustries.com
U.S. FCC Statement
This equipment has been tested and found to comply with the
limits for a Class B digital device, pursuant to part 15 of the
FCC Rules. These limits are designed to provide reasonable
protection against harmful interference in a residential
installation. This equipment generates, uses and can radiate radio
frequency energy, and if not installed and used in accordance
with the instructions, may cause harmful interference to
radio communications. However, there is no guarantee that
interference will not occur in a particular installation. If this
equipment does cause harmful interference to radio or television
reception, which can be determined by turning the equipment o
and on, the user is encouraged to try to correct the interference
by one or more of the following measures:
• Reorient or relocate the receiving antenna.
• Increase the separation between the equipment and receiver.
• Connect the equipment into an outlet on a circuit dierent
from where the receiver is connected.
• Consult the dealer or an experienced radio/TV technician for
help.
To satisfy FCC RF Exposure requirements for mobile and base
station transmission devices, a separation distance of 8" (20 cm)
or more should be maintained between the antenna of this device
and persons during operation. To ensure compliance, operation
at closer than this distance is not recommended. The antenna(s)
used for this transmitter must not be co-located or operating in
conjunction with any other antenna or transmitter.
Notices
Certicate of Conformity to European Directives
Hunter Industries declares that the irrigation controller Model
HCC complies with the standards of the European Directives of
“electromagnetic compatibility” (2014/30/EU), “low voltage”
(2014/35/EU) and “radio equipment” (2014/53/EU).
Innovation, Science and Economic Development Canada
(ISED) Compliance Notice
This device contains licence-exempt transmitter(s)/receiver(s)
that comply with Innovation, Science and Economic Development
Canada’s licence-exempt RSS(s). Operation is subject to the
following two conditions:
1. This device may not cause interference, and
2. This device must accept any interference, including
interference that may cause undesired operation of the device.
Déclaration d'Industrie Canada
Le présent appareil est conforme aux CNR d’Innovation, Sciences
et Développement économique Canada applicables aux appareils
radio exempts de licence. L’exploitation est autorisée aux deux
conditions suivantes:
1. L’appareil ne doit pas produire de brouillage, et
2. L’utilisateur de l’appareil doit acceptertout brouillage
radioélectrique subi, même si le brouillage est susceptible
d’en compromettre le fonctionnement.
-
 1
1
-
 2
2
-
 3
3
-
 4
4
-
 5
5
-
 6
6
-
 7
7
-
 8
8
-
 9
9
-
 10
10
-
 11
11
-
 12
12
-
 13
13
-
 14
14
-
 15
15


diğer dillerde
- español: Hunter HPC-FP Guía de instalación
- français: Hunter HPC-FP Guide d'installation
- italiano: Hunter HPC-FP Guida d'installazione
- Deutsch: Hunter HPC-FP Installationsanleitung
- português: Hunter HPC-FP Guia de instalação
- English: Hunter HPC-FP Installation guide
İlgili makaleler
Diğer belgeler
-
Rain Bird RC2-230V WiFi Smart Controller Kullanım kılavuzu
-
-
-
-
 Hach Polymetron 9526 Basic User Manual
-
Rain Bird 100-HVF-SS Kullanım kılavuzu
-
MB QUART DV and DVF 9vdc Solenoid Valves El kitabı
