Braun Genius 8000 - 9000 Kullanım kılavuzu
- Kategori
- Elektrikli diş fırçaları
- Tip
- Kullanım kılavuzu
Bu kılavuz için de uygundur

Charger Type 3757
Handle Type 3765
Travel Case Type 3760
Smart Plug Type 492-5214
8000-9000
SMART
6000
91105055_D700_CEEMEA_S1.indd 191105055_D700_CEEMEA_S1.indd 1 18.04.17 11:2518.04.17 11:25
Stapled booklet, 120 x 170 mm, 140 pages (incl. 8 pages cover), 2/2c = black + PMS300u
CSS APPROVED Effective Date 27Apr2017 GMT - Printed 04Sep2017 Page 1 of 139

English 6
Polski 15
Česk 27
Slovensk 37
Magyar 47
Srbija 58
Türkçe 67
România Moldova 76
Ελληνικά 86
България 97
Русский 108
Українська 119
תירבע 130
Internet:
www.oralb.com
www.braun.com
www.service.braun.com
Braun GmbH
Frankfurter Straße 145
61476 Kronberg/Germany
Charger Type 3757
Handle Type 3765
Travel Case Type 3760
Smart Plug Type 492-5214
91105055/III-17
EN/PL/CZ/SK/HU/RS/TR/RO/MD/GR/BG/
RU/UA/IL
GB
0 800 731 1792
IE
1 800 509 448
PL
801 127 286
801 1 BRAUN
CZ
800 11 33 22
SK
800 333 233
HU
(06-1) 451-1256
TR
0850 220 0911
GR
800 801 3457
RU
8-800-200-20-20
UA
0 800 505 000
IL
1-800-666-775
ZA
Consumer Care Line 0860 112 188
(Sharecall charged at local rates)
91105055_D700_CEEMEA_S2.indd 191105055_D700_CEEMEA_S2.indd 1 29.03.17 10:3929.03.17 10:39
CSS APPROVED Effective Date 27Apr2017 GMT - Printed 04Sep2017 Page 2 of 139
91105055

9
1.
2.
M
I
N
S
EK
I
I Pau
s
e
D
o
n
e
9
10b10a
12a
12d
12
12e
12b
12c
13
11b11a
11c
11d
Oral-B
O
ra
l
-
B
Or
a
l
-
B
O
ra
l
-
B
I
I
P
a
u
s
e
D
o
n
e
M
IN
S
E
K
1
2
3
4
5
6
7
8
11
1
1
1
2
2
2
3
3
click!
3.
!
Ora
l
-
B
B
D
E
14
15
MI
N
S
E
K
I
I P
aus
e
Done
1.
2.
4
16
I
I
Pau
s
e
D
one
MI
N
S
E
K
C
A
4
91105055_D700_CEEMEA_S4.indd 191105055_D700_CEEMEA_S4.indd 1 29.03.17 10:4029.03.17 10:40
CSS APPROVED Effective Date 27Apr2017 GMT - Printed 04Sep2017 Page 3 of 139

O
ra
l
-
B
4
1
3
0
s
3
0
s
3
0
s
3
0
s
2
3
35°C
5
5
91105055_D700_CEEMEA_S5.indd 191105055_D700_CEEMEA_S5.indd 1 29.03.17 10:4029.03.17 10:40
CSS APPROVED Effective Date 27Apr2017 GMT - Printed 04Sep2017 Page 4 of 139

6
English
Welcome to Oral-B!
Before operating this toothbrush, please
read these instructions and save this manual
for future reference.
IMPORTANT
•
Periodically check the entire
product/cords/accessories
for damage. A damaged or
non-functioning unit should no
longer be used. If the product/
cords/accessories are dam-
aged, take it to an Oral-B
Service Centre. Do not modify
or repair the product. This may
cause fire, electric shock or
injury.
•
Usage by children under age
3 is not recommended. Tooth-
brushes can be used by children
and persons with reduced
physical, sensory or mental
capabilities or lack of experience
and knowledge, if they have
been given supervision or in-
struction concerning use of the
appliance in a safe way and
understand the hazards involved.
•
Cleaning and maintenance
shall not be performed by
children.
•
Children shall not play with the
appliance.
•
Use this product only for its
intended use as described in
this manual. Do not use attach-
ments which are not recom-
mended by the manufacturer.
WARNING
• If the product is dropped, the brush head
should be replaced before the next use
even if no damage is visible.
• Do not place the charger, smart plug or
charging travel case in water or liquid or
store where it can fall or be pulled into a
tub or sink. Do not reach for it when fallen
into water. Unplug immediately.
• Do not open and disassemble device. For
battery recycling please dispose whole
device according to local environmental
regulations. Opening the handle will
destroy the appliance and invalidate the
warranty.
• When unplugging, always hold the power
plug instead of the cord. Do not touch the
power plug with wet hands. This can cause
an electric shock.
• If you are undergoing treatment for any
oral care condition, consult your dental
professional prior to use.
• This toothbrush is a personal care device
and is not intended for use on multiple
patients in a dental practice or institution.
• Replace brush head every 3 months or
sooner if brush head becomes worn.
• Your charging travel case is provided with
a special cord set (smart plug), which has
an integrated Safety Extra Low Voltage
power supply. Do not exchange or tamper
with any part of it, otherwise there is risk
of an electric shock. Only use the special
cord set provided with your appliance.
Important Information
• Your Oral-B toothbrush can be used with
your smartphone (find details under
«Connecting your toothbrush to your
Smartphone»).
• To avoid electromagnetic interference
and/or compatibility conflicts, deactivate
the radio transmission of your toothbrush
handle (5) before using it in restricted
surroundings, such as aircrafts or
specially marked areas in hospitals.
• Deactivate radio transmission by simul-
taneously pressing the on/off (3) and
mode button (4) for 2 seconds until the
radio transmission display (7) goes off.
Follow the same procedure to reactivate
transmission again.
• Persons with pacemakers should always
keep the toothbrush more than six inches
91105055_D700_CEEMEA_S6-140.indd 691105055_D700_CEEMEA_S6-140.indd 6 20.04.17 08:2620.04.17 08:26
CSS APPROVED Effective Date 27Apr2017 GMT - Printed 04Sep2017 Page 5 of 139

7
(15 centimeters) from the pacemaker
while turned on. Anytime you suspect
interference is taking place, deactivate
the radio transmission of your handle.
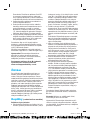
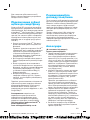
Description
1 Brush head
2 Smart Ring
3 On/off button
4 Brushing mode button
5 Handle
6 Brushing mode display
7 Radio transmission display (with
Bluetooth
®
wireless technology)
8 Charge level display
9 Charger
Accessories (depending on model):
10a Brush head holder
10b Brush head compartment with protec-
tive cover
11 Smartphone holder (for mirror)
11a Holding brackets
11b Lever arm
11c Pull tab
11d Suction cup
12 Charging travel case
12a Charge indicator light
12b USB port
12c Smart plug port
12d Inner lid (with smartphone holder)
12e Removable inlay
13 Smart plug
14 Beauty bag
15 Travel case
16 Smartphone holder (stand)
Note: Content may vary based on the model
purchased.
Specifications
For voltage specifications refer to the bot-
tom of the charging unit.
Noise level: 68 dB (A)
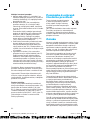
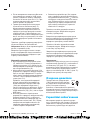
Charging and Operating
Your toothbrush has a waterproof handle, is
electrically safe and designed for use in the
bathroom.
• You may use your toothbrush right away
or charge it briefly by placing it on the
plugged-in charger (9).
Note: In case the battery is empty (no
lights illuminated on charge level display
(8) while charging or no reaction when
pressing the on/off button (3)), charge at
least for 30 minutes.
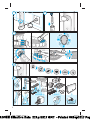
• The charge level is indicated on the
charge level display (8). Flashing lights
indicate that the battery is charging (pic-
ture
1
); once it is fully charged, the lights
turn off. A full charge takes typically
15 hours and enables up to 12 days of
regular brushing (twice a day, 2 minutes).
Note: At a very low charge level, the lights
might not flash immediately; it can take up
to 30 minutes.
• If the battery is running low, a red light is
flashing on the charge level display and
the motor is reducing its speed. Once the
battery is empty, the motor will stop; it will
need at least a 30-minute charge for one
usage.
• You can always store the handle on the
plugged-in charging unit to maintain it at
full power; a battery overcharge is pre-
vented by device.
Note: Store handle at room temperature
for optimal battery maintenance.
Caution: Do not expose handle to tem-
peratures higher than 50 °C.
Using your toothbrush
Brushing technique
Wet brush head and apply any kind of tooth-
paste. To avoid splashing, guide the brush
head to your teeth before switching on the
handle (picture
2
). When brushing your
teeth with one of the Oral-B oscillating-
rotating brush heads guide the brush head
slowly from tooth to tooth, spending a few
seconds on each tooth surface (picture
3
).
When using the Oral-B «TriZone» brush
head place the toothbrush bristles against
the teeth at a slight angle towards the gum-
line. Apply light pressure and start brushing
in back and forth motions, just like you
would do with a manual toothbrush.
With any brush head start brushing the
outsides, then the insides and finally the
chewing surfaces. Brush all four quadrants
of your mouth equally. You may also consult
your dentist or dental hygienist about the
right technique for you.
In the first days of using any electric tooth-
brush, your gums may bleed slightly.
In general, bleeding should stop after a few
days. Should it persist after 2 weeks, please
consult your dentist or dental hygienist.
91105055_D700_CEEMEA_S6-140.indd 791105055_D700_CEEMEA_S6-140.indd 7 20.04.17 08:2620.04.17 08:26
CSS APPROVED Effective Date 27Apr2017 GMT - Printed 04Sep2017 Page 6 of 139

8
If you have sensitive teeth and/or gums,
Oral-B recommends using the «Sensitive»
mode (optional in combination with an
Oral-B «Sensitive» brush head).
Smart Ring features
Your toothbrush is equipped with a Smart
Ring (2) that has various functionalities
indicated via different colors of light:
White (default) = Operating and visual timer
light (choose individual color via Oral-B
TM
App settings)
Red = Pressure sensor light
Blue = Bluetooth
®
pairing indicator
Timer
You can choose between «Professional» or
«2-Minute» timer.
The «2-Minute» timer signals with a long
stuttering sound and a flashing light of the
Smart Ring (2) that the professionally
recommended 2-minute brushing time has
been reached.
The «Professional» timer signals with a short
stuttering sound and a flashing light of the
Smart Ring at 30-seconds intervals to move
to the next quadrant of your mouth (picture
3
). A long stuttering sound and a flashing
light indicate the end of the professionally
recommended 2-minute brushing time.
The timer memorizes the elapsed brushing
time, even when the handle is briefly
switched off during brushing. The timer
resets if pausing longer than 30 seconds,
briefly pressing the mode button (4) during
pause or placing the handle on the
plugged-in charger.
Note: During the use of special Oral-B
TM
App features, the visual timer light may be
deactivated.
Timer setup:
Your toothbrush comes with the «Profes-
sional» timer activated. To change this,
press and hold the mode button (4) for 2
seconds. Toggle between timer selection by
pressing the on/off button (3). Confirm
selection by pressing the mode button.
• 2 LED’s illuminated indicate «2-Minute»
timer
• 4 LED’s illuminated indicate «Professio-
nal» timer
Note: You can also set/advance the timer
functionality via Oral-B
TM
App.
Pressure sensor
If too much pressure is applied, the Smart
Ring (2) will light up in red, reminding you to
reduce pressure. In addition the pulsation of
the brush head will stop and the oscillation
movement of the brush head will be reduced
(during «Daily Clean», «Pro Clean» and
«Sensitive» mode) (picture
3
).
Periodically check the operation of the pres-
sure sensor by pressing moderately on the
brush head during use.
Brushing modes (depending on model)
Your toothbrush offers different brushing
modes indicated on the brushing mode
display (6) on your handle («Daily Clean»
mode does not illuminate on the brushing
mode display):
«Daily Clean» – Standard mode for daily
mouth cleaning
«Pro Clean» – For an extraordinary
clean feeling (operated
with a higher frequency)
«Sensitive» – Gentle, yet thorough
cleaning for sensitive
areas
«3D White» – Polishing for occasional
or everyday use
«Gum Care» – Gentle massage of
gums
«Tongue Clean» – Tongue cleaning for
occasional or everyday
use
When operating the «Tongue Clean» mode,
we recommend using the «Sensitive» brush
head. You can brush your tongue either with
or without toothpaste. Brush the whole area
of your tongue systematically in gentle
movements. The recommended brushing
time is 20 seconds; indicated with a flashing
light of the Smart Ring.
Your toothbrush automatically starts in the
mode selected last. To switch to other
modes, successively press the mode button
during use (picture
4
). To return from any
mode back to «Daily Clean» mode, press
and hold the mode button (4).
Note: You can also set/advance the mode
functionality via Oral-B
TM
App.
91105055_D700_CEEMEA_S6-140.indd 891105055_D700_CEEMEA_S6-140.indd 8 20.04.17 08:2620.04.17 08:26
CSS APPROVED Effective Date 27Apr2017 GMT - Printed 04Sep2017 Page 7 of 139

9
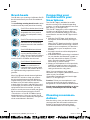
Brush heads
Oral-B offers you a variety of different Oral-B
brush heads that fit your Oral-B toothbrush
handle.
Our oscillating-rotating brush heads can be
used for tooth-by-tooth precision cleaning.
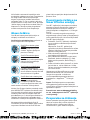
Oral-B CrossAction brush head
Our most advanced brush head.
Angled bristles for a precise
clean. Lifts and powers away
plaque.
Oral-B FlossAction brush head
features micropulse bristles
that allow for an outstanding
plaque removal in the interden-
tal areas.
Oral-B 3D White brush head
features a special polishing
cup to naturally whiten your
teeth. Please note that children
under 12 years old should not
use the Oral-B «3D White» brush head.
Oral-B Sensi Ultrathin brush
head
features a combination of
regular bristles to clean teeth
surfaces and ultrathin bristles
for a gentle brushing experience on the
gumline.
Most Oral-B brush heads feature light blue
INDICATOR
®
bristles to help you monitor
brush head replacement need. With thor-
ough brushing, twice a day for two minutes,
the blue color will fade halfway approxi-
mately within 3 months, indicating the need
to exchange your brush head. If the bristles
splay before the color recedes, you may
exert too much pressure on teeth and gums.
We do not recommend using the Oral-B
«FlossAction» or Oral-B «3D White» brush
head with braces. You may use the Oral-B
«Ortho» brush head, specifically designed to
clean around braces and wires.
Connecting your
toothbrush to your
Smartphone
The Oral-B
TM
App is available for mobile
devices running iOS or Android operating
systems. It can be downloaded for free from
App Store
(SM)
or Google Play™.
The Oral-B™ App gives you the opportunity
to chart your brushing progress and cus-
tomize your toothbrush settings (for many
more benefits see the Oral-B™ App instruc-
tions).
• Start the Oral-B™ App. It will guide you
through the entire Bluetooth pairing pro-
cedure.
Note: Oral-B™ App functionality is limited
if Bluetooth wireless technology is deacti-
vated on your smartphone (for directions
please refer to your smartphone’s user
manual).
• Any app instructions will be displayed on
your smartphone.
• If Bluetooth wireless technology is activated
on your handle, the Bluetooth symbol on
the radio transmission display (7) illumi-
nates. Once the handle is paired, the
Smart Ring (2) flashes briefly.
• Keep your smartphone in close proximity
(within 5 m distance) when using it with
the handle. Make sure the smartphone is
safely positioned in a dry place.
Note: Your smartphone must support
Bluetooth 4.0 (or higher)/Bluetooth Smart in
order to pair your handle.
Compatible smartphones are listed in App
Store
(SM)
or Google Play™.
Caution: Follow your smartphone’s user
manual to ensure your phone/charger is
designed for use in a bathroom environment.
Check www.oralbappavailability.co.uk for
country availability of the Oral-B
TM
App.
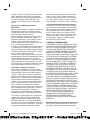
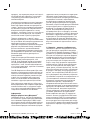
Cleaning recommen-
dations
After brushing, rinse your brush head under
running water with the handle switched on.
Switch off and remove the brush head.
Clean handle and brush head separately;
91105055_D700_CEEMEA_S6-140.indd 991105055_D700_CEEMEA_S6-140.indd 9 20.04.17 08:2620.04.17 08:26
CSS APPROVED Effective Date 27Apr2017 GMT - Printed 04Sep2017 Page 8 of 139

10
wipe them dry before reassembling. Unplug
the charger before cleaning. Brush head
holder (10a), compartment and protective
cover (10b), as well as smartphone holder
stand (16) are dishwasher-safe. Charger (9)
should be cleaned with a damp cloth only
(picture
5
).
Accessories
(depending on model)
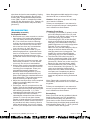
Smartphone Holder
• Before each use, make sure mirror, suction
cup surface (11d) and holding brackets
(11a) are always clean and dry (picture
B1). Use a fuzz-free cloth for cleaning
suction cup surface and mirror. In particu-
lar make sure suction cup surface and
mirror are free from any contamination
(e.g. hair, dust, oil, fuzz, dirt etc.).
• Press your smartphone holder (11) just
with enough pressure, centered at nose
level on a sturdy mirror. Then mount the
holder by pressing the lever arm (11b)
towards the mirror until it snaps in (picture
B2).
Note: Only affix on mirror to ensure safe
and correct conditions. For use in bath-
room only. Do not use in automobiles.
• Always make sure the smartphone holder
is securely mounted on the mirror before
inserting your smartphone. Place your
smartphone (portrait) sideways in
between the holding brackets (11a) by
pressing against one bracket with your
phone and sliding the other bracket to the
side (picture B2). Follow the same proce-
dure to remove your phone again.
• Adjust the overall position for the required
angle by moving the ball joint of the
holder (picture B3).
• Once done, remove your phone from the
holder. Take off the smartphone holder by
flipping the lever arm back and pulling the
tab carefully (picture B4 1./2.). Affix
smartphone holder with each use again.
• The smartphone holder should be
cleaned with a damp fuzz-free cloth only
(picture
5
). You may use glass cleaner,
alcohol or similar products (avoid products
with silicone oil). Make sure the surface is
dry and dust free after cleaning. Store in
clean and dry place. If not in use, always
remove your smartphone from the holder.
Note: Smartphone width required for usage:
minimum 58 mm, maximum 83 mm.
Caution: Small parts may come off, keep
out of reach of children.
Follow your smartphone’s user manual to
ensure your phone/charger is designed for
use in a bathroom environment.
Charging Travel Case
• To charge your handle (5) place it on the
pin in the charging travel case (12) and
connect it to an electric outlet, using the
extra smart plug (13) provided.
• The flashing light (12a) of the charging
travel case indicates that the handle is
charging. Once the handle is fully char-
ged the light turns off. A full charge takes
typically 12 hours (picture D1).
Note: You may use the USB port (12b) to
charge an electric device while the
charging travel case is plugged in. The
handle can only be charged with the
smart plug (13)/(12c) not via USB port.
• The inner lid of the travel case has a
built-in smartphone holder (12d), which
can hold your smartphone while using
(picture D2). Before use, make sure your
phone fits the stand and keeps stable.
• The removable inlay (12e) of the travel
case is dishwasher-safe (picture
5
). The
outer case should be cleaned with a
damp cloth only. Make sure that travel
case parts are completely dry before
reassembling and toothbrush/brush
heads are dry before storing in the travel
case.
Note: Clean stains on travel case surface
immediately. Store travel case in a clean and
dry place.
Follow your smartphone’s user manual to
ensure your phone/charger is designed for
use in a bathroom environment.
Beauty Bag
Store your clean and dry toothbrush/brush
heads in the travel case (15) and place it
inside the beauty bag (14) (picture E1/2).
Clean stains on the surface immediately.
The beauty bag should be hand washed only
with lukewarm water (30 °C – 40 °C) (picture
5
). Store in clean and dry place.
91105055_D700_CEEMEA_S6-140.indd 1091105055_D700_CEEMEA_S6-140.indd 10 20.04.17 08:2620.04.17 08:26
CSS APPROVED Effective Date 27Apr2017 GMT - Printed 04Sep2017 Page 9 of 139

11
Subject to change without notice.
Environmental Notice
Product contains batteries and/or
recyclable electric waste. For
environment protection do not
dispose in household waste, but
for recycling take to electric waste collection
points provided in your country.
Guarantee
We grant 2 years guarantee on the product
commencing on the date of purchase.
Within the guarantee period we will elimi-
nate, free of charge, any defects in the
appliance resulting from faults in materials
or workmanship, either by repairing or
replacing the complete appliance as we may
choose.
This guarantee extends to every country
where this appliance is supplied by Braun or
its appointed distributor. This guarantee
does not cover: damage due to improper
use, normal wear or use, especially regard-
ing the brush heads, as well as defects that
have a negligible effect on the value or oper-
ation of the appliance.
The guarantee becomes void if repairs are
undertaken by unauthorised persons and if
original Braun parts are not used.
This appliance is equipped with a Bluetooth
Smart approved radio module. Failure to
establish a Bluetooth Smart connection to
specific smart phones is not covered under
the device guarantee, unless the Bluetooth
radio module of this appliance is damaged.
The Bluetooth devices are warranted by
their own manufacturers and not by Oral-B.
Oral-B does not influence or make any
recommendations to device manufacturers,
and therefore Oral-B does not assume any
responsibility for the number of compatible
devices with our Bluetooth systems.
Oral-B reserves the right, without any prior
notice, to make any technical modifications
or changes to system implementation of
device features, interface, and menu struc-
ture changes that are deemed necessary to
ensure that Oral-B systems function reliably.
To obtain service within the guarantee
period, hand in or send the complete appli-
ance with your sales receipt to an authorised
Oral-B Braun Customer Service Centre.
Information Bluetooth
®
radio module
Although all indicated functions on the
Bluetooth device are supported, Oral-B
does not ensure 100% reliability in connec-
tion, and feature operation consistency.
Operation performance and connection
reliability are direct consequences of each
individual Bluetooth device, software version,
as well as the operating system of those
Bluetooth devices and company security
regulations implemented on the device.
Oral-B adheres to and strictly implements
the Bluetooth standard by which Bluetooth
devices can communicate and function in
Oral-B toothbrushes.
However, if device manufacturers fail to
implement this standard, Bluetooth compat-
ibility and features will be further compro-
mised and the user may experience func-
tional and feature-related issues. Please
note that the software on the Bluetooth
device can significantly affect compatibility
and operation.
1) Warranty – Exclusions and Limitations
This limited warranty applies only to the new
products manufactured by or for The Procter
& Gamble Company, its Affiliates or Subsidi-
aries («P&G») that can be identified by the
Braun / Oral-B trademark, trade name, or
logo affixed thereto. This limited warranty
does not apply to any non-P&G product
including hardware and software. P&G is not
liable for any damage to or loss of any pro-
grams, data, or other information stored on
any media contained within the product, or
any non-P&G product or part not covered by
this limited warranty. Recovery or reinstalla-
tion of programs, data or other information
is not covered under this limited warranty.
This limited warranty does not apply to (i)
damage caused by accident, abuse, misuse,
neglect, misapplication, or non-P&G product;
(ii) damage caused by service performed by
anyone other than Braun or authorized
Braun service location; (iii) a product or part
that has been modified without the written
permission of P&G, and (iv) damage arising
out of the use of or inability to use the Oral-B
Smartphone stand/puck, Smartphone mirror
91105055_D700_CEEMEA_S6-140.indd 1191105055_D700_CEEMEA_S6-140.indd 11 20.04.17 08:2620.04.17 08:26
CSS APPROVED Effective Date 27Apr2017 GMT - Printed 04Sep2017 Page 10 of 139

12
holder, or charging travel case («Acces-
sories»).
2) Using your smartphone holder
The Oral-B Accessories included in the
package has been designed to provide you
with a convenient way to position your smart-
phone while you are using the Oral-B app.
Try multiple orientations of your smartphone
in the Oral-B smartphone holder prior to use
to determine the best positioning of your
smartphone in the holder. Be sure to try this
in a manner which will not harm your smart-
phone if it falls out of the stand. Do not use in
automobiles.
LIMITATION OF LIABILITY
TO THE EXTENT PERMITTED BY APPLICABLE
LAW, IN NO EVENT SHALL P&G ITS
DISTRIBUTORS OR SUPPLIERS BE LIABLE
TO YOU OR ANY THIRD PARTY FOR ANY
DIRECT, INDIRECT, INCIDENTAL,
CONSEQUENTIAL, SPECIAL, EXEMPLARY
OR PUNITIVE DAMAGES, OF ANY NATURE
WHATSOEVER, ARISING OUT OF THE USE
OF OR INABILITY TO USE THE ORAL-B
ACCESSORIES, INCLUDING, WITHOUT
LIMITATION, INJURY TO PERSONS,
PROPERTY DAMAGE, LOSS OF VALUE
OF ANY THIRD PARTY PRODUCTS THAT
ARE USED IN OR WITH THE ORAL-B
ACCESSORIES, OR LOSS OF USE OF THE
ORAL-B ACCESSORIES OR ANY THIRD
PARTY PRODUCTS THAT ARE USED IN
OR WITH THE ORAL-B ACCESSORIES,
EVEN IF P&G HAS BEEN ADVISED OF
THE POSSIBILITY OF SUCH DAMAGES.
WITHOUT LIMITING THE FOREGOING,
YOU UNDERSTAND AND AGREE THAT
P&G HAS NO LIABILITY FOR ANY DAMAGE
OR DESTRUCTION TO CONSUMER
ELECTRONICS DEVICES OR OTHER
PERSONAL PROPERTY THAT ARE
CONTAINED ON OR EXTERIOR TO THE
ORAL-B ACCESSORIES, OR ANY LOSS OF
DATA CONTAINED IN THE FOREGOING
DEVICES. IN NO EVENT SHALL ANY
RECOVERY AGAINST ORAL-B EXCEED THE
ACTUAL PRICE PAID FOR THE PURCHASE
OF THE PRODUCT.
Warranty replacement brush heads
Oral-B warranty will be voided if electric
rechargeable handle damage is found to be
attributed to the use of non-Oral-B replace-
ment brush heads.
Oral-B does not recommend the use of
non-Oral-B replacement brush heads.
• Oral-B has no control over the quality of
non-Oral-B replacement brush heads.
Therefore, we cannot ensure the cleaning
performance of non-Oral-B replacement
brush heads, as communicated with the
electric rechargeable handle at time of ini-
tial purchase.
• Oral-B cannot ensure a good fit of non-
Oral-B replacement brush heads.
• Oral-B cannot predict the long-term effect
of non-Oral-B replacement brush heads
on handle wear.
All Oral-B replacement brush heads carry
the Oral-B logo and meet Oral-B’s high qual-
ity standards. Oral-B does not sell replace-
ment brush heads or handle parts under any
other brand name.
91105055_D700_CEEMEA_S6-140.indd 1291105055_D700_CEEMEA_S6-140.indd 12 20.04.17 08:2620.04.17 08:26
CSS APPROVED Effective Date 27Apr2017 GMT - Printed 04Sep2017 Page 11 of 139

13
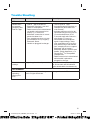
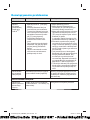
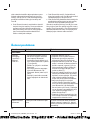
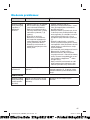
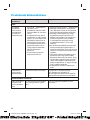
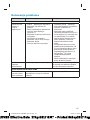
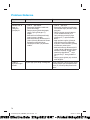
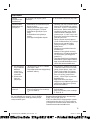
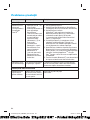
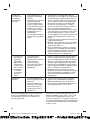
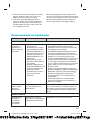
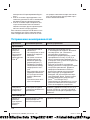
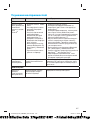
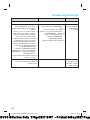
Trouble Shooting
Problem Possible reason Remedy
APP
Handle does
not operate
(properly) with
Oral-B
TM
App.
1. Oral-B
TM
App is turned off.
2. Bluetooth interface is not acti-
vated on smartphone.
3. Radio transmission is deactivated
on handle; radio transmission
display (7) is turned off.
4. Bluetooth connection to smart-
phone has been lost.
5. Your smartphone does not sup-
port Bluetooth 4.0 (or higher)/
Bluetooth Smart.
6. Handle on plugged-in charger.
1. Turn on Oral-B
TM
App.
2. Activate Bluetooth interface on
smartphone (described in its
user manual).
3. Activate radio transmission by
simultaneously pressing on/off
(3) and mode button (4) for
2 seconds until radio transmis-
sion display (7) turns on.
4. Pair handle and smartphone
again via app settings. Keep
your smartphone in close prox-
imity when using it with handle.
5. Your smartphone must support
Bluetooth 4.0 (or higher)/
Bluetooth Smart in order to pair
handle. Check App Store
(SM)
or
Google Play
TM
for compatible
smartphones.
6. Radio transmission is deactivated
while handle is placed on
plugged-in charger.
Reset to factory
settings.
Original app functionality wanted. Press and hold on/off button (3)
for 10 seconds until all indicator
lights double blink simultaneously.
TOOTHBRUSH
Handle is not
operating
(during first
use).
Battery has a very low charge
level; no lights illuminate.
Charge at least for 30 min.
91105055_D700_CEEMEA_S6-140.indd 1391105055_D700_CEEMEA_S6-140.indd 13 20.04.17 08:2620.04.17 08:26
CSS APPROVED Effective Date 27Apr2017 GMT - Printed 04Sep2017 Page 12 of 139

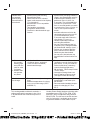
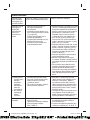
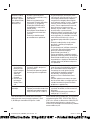
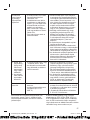
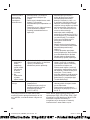
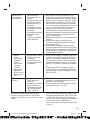
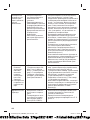
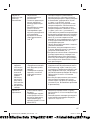
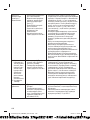
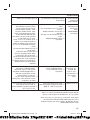
14
Handle does
not operate
with existing
SmartGuide in
household.
1. Synchronizing with existing
SmartGuide failed.
2. Radio transmission is deacti-
vated; radio transmission display
(7) is turned off.
3. SmartGuide is not compatible
with handle.
4. Two handles are already
assigned to SmartGuide.
5. Function is deactivated via app
feature.
1. Synchronize (existing) handle(s)
(again) via SmartGuide settings
in SmartGuide’s battery com-
partment: Press «h/min» for
3 seconds. Turn on handle that
you want to synchronize. Then
turn on second handle you want
to synchronize. Press «h/min» or
«set» to exit synchronization
mode.
2. Activate radio transmission by
simultaneously pressing on/off
(3) and mode button (4) for
2 seconds until radio transmis-
sion display (7) turns on.
3. Handle cannot be used with
excisting SmartGuide.
4. You can synchronize a total of
2 handles only. Change handles
via SmartGuide settings (see 1.)
5. During use of special app fea-
tures, transmission to Smart-
Guide may be deactivated.
You can also (de)activate any
SmartGuide communication via
app.
1. Short stutter-
ing sounds/
flashing light
every 30 sec-
onds or after
2 minutes.
2. Handle does
not operate
any timer.
1. «Professional timer» or
«2-Minute timer» activated.
2. Timer has been modified/
deactivated via app.
1. Set your timer to 2-Minute timer
(stuttering sounds/flashing light
after 2min); or set your timer to
Professional timer (stuttering
sounds/flashing light every
30 seconds). Follow steps under
«Timer setup».
2. Use app to change timer set-
tings or perform factory reset
(see App Trouble Shootings).
Handle does
not charge.
1. Battery is at a very low charger
level.
2. Ambient temperature for charg-
ing is out of valid range (
≤
0 °C
and
≥
60 °C).
1. Charging lights might not flash
immediately; it can take up to
30 minutes.
2. Recommended ambient tempe-
rature for charging is 5 °C to
35 °C.
This rechargeable toothbrush contains a
radio module which operates in the 2.4 to
2.48 GHz band with a maximum power of
1mW.
Hereby, Braun GmbH declares that the radio
equipment types 3765, 3754, 3764, 3762
and 3767 are in compliance with Directive
2014/53/EU. The full text of the EU declara-
tion of conformity is available at the follow-
ing internet address: www.oralb.com/ce.
91105055_D700_CEEMEA_S6-140.indd 1491105055_D700_CEEMEA_S6-140.indd 14 20.04.17 08:2620.04.17 08:26
CSS APPROVED Effective Date 27Apr2017 GMT - Printed 04Sep2017 Page 13 of 139

15
Polski
Witamy w Oral-B!
Przed użyciem szczoteczki zapoznaj się z
instrukcją i zachowaj ją na przyszłość.
WAŻNE
•
Należy regularnie sprawdzać
cały produkt/przewody/akce-
soria pod kątem uszkodzeń.
Jeżeli urządzenie jest uszko-
dzone lub nie działa, nie wolno
z niego korzystać. W przy-
padku stwierdzenia uszkodze-
nia produktu/przewodów/
akcesoriów należy zabrać je do
punktu serwisowego Oral-B.
Nie wolno modyfikować ani
samodzielnie naprawiać pro-
duktu, ponieważ może to
spowodować pożar, porażenie
prądem lub inne uszkodzenie
ciała.
•
Szczoteczka do zębów nie jest
przeznaczona do użytkowania
przez dzieci poniżej 3 roku
życia. Dzieci oraz osoby o
ograniczonych możliwościach
fizycznych, sensorycznych lub
umysłowych, a także osoby
nieposiadające stosownego
doświadczenia i wiedzy mogą
używać szczoteczki tylko pod
nadzorem osoby odpowie-
dzialnej za ich bezpieczeństwo
lub jeśli otrzymały instrukcje
dotyczące jej bezpiecznego
używania i rozumieją związane
z tym zagrożenia.
•
Czyszczenie i konserwacja nie
powinny być wykonywane
przez dzieci.
•
Dzieci nie mogą bawić się tym
urządzeniem.
•
Należy używać tego produktu
wyłącznie zgodnie z jego prze-
znaczeniem, w sposób opisany
w instrukcji obsługi. Nie należy
używać dodatków, które nie są
rekomendowane przez produ-
centa.
OSTRZEŻENIE
• Jeśli produkt zostanie upuszczony, koń-
cówka szczotki powinna zostać wymie-
niona przed ponownym użyciem nawet,
jeśli nie ma widocznych uszkodzeń.
• Nie należy umieszczać stacji ładującej,
wtyczki Smart ani etui podróżnego z funk-
cją ładowania szczoteczki w wodzie lub
innej cieczy a także umieszczać lub prze-
chowywać w miejscu, z którego może
spaść lub zostać strącona do wanny lub
umywalki. Nie sięgaj po stację ładującą,
która wpadła do wody. Natychmiast
odłącz ją od zasilania.
• Nie wolno otwierać i demontować urzą-
dzenia. W przypadku utylizacji akumula-
tora należy postępować zgodnie z lokal-
nymi przepisami w zakresie ochrony
środowiska. Otwieranie rączki może spo-
wodować zniszczenie urządzenia i unie-
ważnienie gwarancji.
• Podczas odłączania należy zawsze trzy-
mać za wtyczkę, nie za przewód. Nie
należy dotykać wtyczki mokrymi rękoma.
Może to spowodować porażenie prądem.
• Jeśli jesteś w trakcie leczenia stomatolo-
gicznego skonsultuj się ze swoim leka-
rzem stomatologiem przed użyciem.
• Szczoteczka elektryczna jest przezna-
czona do indywidualnej pielęgnacji jamy
ustnej. Nie powinna być używana przez
wielu pacjentów lecznic i gabinetów sto-
matologicznych.
• Wymieniaj szczotki (główki), co 3 miesiące
lub wcześniej, jeśli główka szczoteczki
ulegnie zużyciu.
91105055_D700_CEEMEA_S6-140.indd 1591105055_D700_CEEMEA_S6-140.indd 15 20.04.17 08:2620.04.17 08:26
CSS APPROVED Effective Date 27Apr2017 GMT - Printed 04Sep2017 Page 14 of 139

16
• Etui podróżne z funkcją ładowania szczo-
teczki jest dostarczane razem ze specjal-
nym zestawem przewodów (wtyczka
Smart), ze zintegrowanym zasilaczem
niskonapięciowym. Jego wymiana lub
ingerencja w jego konstrukcję wiąże się
z ryzykiem porażenia prądem. Należy
korzystać wyłącznie ze specjalnego
zestawu przewodów dostarczonego wraz
z urządzeniem.
Ważne informacje
• Możesz używać swojej szczoteczki do
zębów Oral-B razem ze swoim smart-
fonem (szczegółowe informacje znaj-
dziesz w rozdziale «Łączenie szczo-
teczki ze smartfonem»).
• Aby uniknąć zakłóceń elektromagne-
tycznych i/lub konfliktów kompatybil-
ności, wyłącz transmisję sygnału radio-
wego z rączki Twojej szczoteczki (5),
zanim będziesz korzystać z niej w miej-
scach, w których obowiązują ograni-
czenia używania pewnych urządzeń –
np. w samolocie lub w specjalnie
oznakowanych obszarach szpitalnych.
• Wyłącz transmisję sygnału radiowego
wciskając jednocześnie przycisk „on/
off“ (3) i przycisk wyboru trybu (4)
przez 2 sekundy, dopóki wyświetlenie
transmisji sygnału radiowego (7) nie
zostanie wyłączone. Wykonaj te same
czynności, aby reaktywować transmisję.
• Osoby, które mają wszczepiony roz-
rusznik serca powinny zawsze trzymać
włączoną szczoteczkę w odległości
ponad 15 cm od rozrusznika. Zawsze
gdy podejrzewasz zakłócenia w działaniu
urządzenia, wyłącz transmisję sygnału
radiowego w swojej szczoteczce.
Opis
1 Końcówka szczoteczki
2 Smart Ring
3 Przycisk on/off
4 Przycisk wyboru trybu szczotkowania
5 Rączka
6 Wyświetlacz trybu szczotkowania
7 Wyświetlacz transmisji radiowej (dzięki
bezprzewodowej technologii
Bluetooth
®
)
8 Wyświetlacz poziomu naładowania
akumulatora
9 Stacja akumulatorowa
Akcesoria (w zależności od modelu):
10a Uchwyt na końcówki szczoteczki
10b Pojemnik na końcówki szczoteczki z
pokrywą ochronną
11 Uchwyt na smartfon (na lustro)
11a Obejmy
11b Ramię dźwigni
11c Zawleczka
11d Przyssawka
12 Etui podróżne z funkcją ładowania
szczoteczki
12a Wskaźnik poziomu naładowania
akumulatora
12b Port USB
12c Port wtyczki Smart
12d Pokrywa wewnętrzna (z uchwytem na
smartfona)
12e Wyjmowana wkładka
13 Wtyczka Smart
14 Kosmetyczka
15 Etui podróżne
16 Uchwyt na smartfon (podstawka)
Uwaga: Zawartość zestawu może różnić się
w zależności od zakupionego modelu szczo-
teczki.
Dane techniczne
Dane dotyczące napięcia są podane na
spodzie ładowarki.
Poziom hałasu: 68 dB (A)
Ładowanie i używanie
szczoteczki
Twoja szczoteczka jest wyposażona w
wodoodporną rączkę, jest bezpieczna pod
względem elektrycznym i przeznaczona do
użycia w łazience.
• Możesz od razu korzystać ze swojej
szczoteczki lub krótko ją podładować,
umieszczając we włączonej do kontaktu
ładowarce (9).
Uwaga: Jeżeli akumulator jest rozłado-
wany (podczas ładowania szczoteczki na
wyświetlaczu poziomu naładowania nie
zapalają się diody (8) lub wciśnięcie przy-
cisku on/off nie powoduje żadnej reakcji
urządzenia (3)), należy ładować szczo-
teczkę co najmniej przez 30 minut.
• Poziom naładowania akumulatora jest
wskazany na wyświetlaczu poziomu
naładowania (8). Migająca dioda oznacza,
91105055_D700_CEEMEA_S6-140.indd 1691105055_D700_CEEMEA_S6-140.indd 16 20.04.17 08:2620.04.17 08:26
CSS APPROVED Effective Date 27Apr2017 GMT - Printed 04Sep2017 Page 15 of 139

17
że szczoteczka ładuje się (rys.
1
); kiedy
zostanie w pełni naładowana, dioda
wyłączy się. Pełne naładowanie akumula-
tora zajmuje zazwyczaj ok. 15 godzin i
umożliwia nawet do 12 dni regularnego
szczotkowania zębów (dwa razy dziennie,
przez 2 minuty).
Uwaga: Przy bardzo niskim poziomie
naładowania dioda może nie zapalić się
od razu – może to potrwać nawet
30 minut.
• W przypadku niskiego poziomu nałado-
wania akumulatora na wyświetlaczu
poziomu naładowania zapala się czer-
wona dioda, a prędkość silniczka zmniej-
sza się. Kiedy akumulator zostanie rozła-
dowany, silniczek zatrzyma się, zaś
jednorazowe użycie szczoteczki będzie
wymagało co najmniej 30-minutowego
ładowania akumulatora.
• Można zawsze przechowywać rączkę w
podłączonej do sieci stacji akumulatoro-
wej, aby utrzymać pełną moc akumula-
tora. Nie ma ryzyka przeładowania aku-
mulatora.
Uwaga: Należy przechowywać rączkę
szczoteczki w temperaturze pokojowej,
aby zapewnić optymalne warunki dla aku-
mulatora.
Uwaga: Nie wolno wystawiać szczoteczki
na działanie temperatur wyższych niż
50 °C.
Używanie szczoteczki
do zębów
Technika szczotkowania zębów
Zmocz końcówkę szczoteczki i nałóż na nią
dowolny rodzaj pasty do zębów. Aby uniknąć
rozchlapywania pasty, włóż końcówkę
szczoteczki do ust, zanim włączysz urządze-
nie (rys.
2
). Jeżeli szczotkujesz zęby jedną
ze szczoteczek oscylacyjno-rotacyjnych
Oral-B, powoli przesuwaj końcówkę szczo-
teczki od jednego zęba do następnego,
czyszcząc powierzchnię każdego zęba
przez kilka sekund (rys.
3
). Jeżeli używasz
końcówki Oral-B «TriZone», zbliż włókna
szczoteczki do zębów pod lekkim kątem w
stosunku do linii dziąseł. Lekko dociśnij i
zacznij szczotkowanie ruchami do tyłu i do
przodu – tak jak przy użyciu szczoteczki
manualnej.
W przypadku każdej końcówki szczoteczki
zacznij szczotkowanie od powierzchni
zewnętrznych, następnie przejdź do
powierzchni wewnętrznych, a na końcu do
powierzchni żujących. Szczotkuj wszystkie
cztery kwadranty jamy ustnej w ten sam
sposób. Możesz również skonsultować się
ze swoim dentystą lub higienistką stomato-
logiczną w kwestii odpowiedniej dla Ciebie
techniki szczotkowania zębów.
W pierwszych dniach używania każdej elek-
trycznej szczoteczki do zębów Twoje dziąsła
mogą lekko krwawić. Krwawienie powinno
ustąpić po kilku dniach. Jeżeli po 2 tygo-
dniach Twoje dziąsła nadal krwawią przy
szczotkowaniu, skonsultuj się ze swoim den-
tystą lub higienistką stomatologiczną. Jeżeli
masz wrażliwe zęby i/lub dziąsła, Oral-B
zaleca stosowanie trybu delikatnego czysz-
czenia Sensitive (opcjonalnie w połączeniu z
końcówką Oral-B Sensitive).
Smart Ring
Twoja szczoteczka do zębów została wypo-
sażona w Smart Ring (2), który ma różne
funkcje, sygnalizowane osobnymi kolorami:
Kolor biały (ustawienie domyślne) – dioda
uruchomienia i wizualnego timera (możesz
wybrać kolor, korzystając z ustawień aplika-
cji Oral-B
TM
)
Czerwony – dioda czujnika siły nacisku
Niebieski – wskaźnik synchronizacji
Bluetooth
®
Timer
Możesz wybrać pomiędzy timerem profesjo-
nalnym a 2-minutowym.
W timerze 2-minutowym, upłynięcie zaleca-
nego przez dentystów 2-minutowego czasu
szczotkowania sygnalizowane jest dłuższą
przerwą w pracy napędu szczoteczki i miga-
niem diody Smart Ring (2).
W timerze profesjonalnym krótkie przerwy w
pracy napędu szczoteczki i migająca dioda
Smart Ring w 30-sekundowych odstępach
przypominają, że należy przejść do szczot-
kowania następnego obszaru jamy ustnej
(rys.
3
). Dłuższe przerwy w pracy napędu
szczoteczki i migająca dioda oznaczają
koniec zalecanego przez dentystów 2-minu-
towego czasu szczotkowania zębów.
Czas rzeczywistego szczotkowania zębów
zostaje zapisany w pamięci urządzenia,
91105055_D700_CEEMEA_S6-140.indd 1791105055_D700_CEEMEA_S6-140.indd 17 20.04.17 08:2620.04.17 08:26
CSS APPROVED Effective Date 27Apr2017 GMT - Printed 04Sep2017 Page 16 of 139

18
nawet jeśli rączka zostanie na chwilę wyłą-
czona w czasie szczotkowania. Timer się
zresetuje, jeśli przerwa będzie dłuższa niż
30 sekund – wystarczy na chwilę wcisnąć
przycisk wyboru trybu szczotkowania (4)
podczas przerwy lub umieścić rączkę
szczoteczki w podłączonej do sieci stacji
akumulatorowej.
Uwaga: Podczas korzystania ze specjalnych
aplikacji funkcji Oral-B
TM
, dioda wizualnego
timera może być wyłączona.
Ustawienie timera:
Twoją szczoteczkę do zębów wyposażono w
aktywny profesjonalny timer. Aby to zmienić,
wciśnij i przytrzymaj przycisk wyboru trybu
szczotkowania (4) przez 2 sekundy. Możesz
przełączać opcje wyboru timera, wciskając
przycisk on/off (3). Potwierdź wybór, wci-
skając przycisk wyboru trybu szczotkowa-
nia.
• 2 podświetlone diody oznaczają timer
2-minutowy
• 4 podświetlone diody oznaczają timer
profesjonalny
Uwaga: Możesz również ustawić/zmienić
funkcję timera, korzystając z aplikacji
Oral-B
TM
.
Czujnik siły nacisku
W przypadku zbyt mocnego szczotkowania
czerwona dioda w Smart Ring (2) zapali się,
przypominając o konieczności zmniejszenia
siły nacisku. Ponadto ruchy pulsacyjne koń-
cówki szczoteczki zostaną zatrzymane, a
ruchy oscylacyjne zredukowane (w trybie
czyszczenia codziennego, w trybie Pro
Clean oraz w trybie delikatnego czyszczenia)
(rys.
3
).
Należy regularnie sprawdzać działanie czuj-
nika siły nacisku, lekko dociskając koń-
cówkę szczoteczki podczas szczotkowania.
Tryby szczotkowania (w zależności od
modelu)
Twoja szczoteczka do zębów oferuje różne
tryby szczotkowania wskazane na wyświe-
tlaczu trybu szczotkowania (6), który znaj-
duje się na rączce szczoteczki (tryb czysz-
czenia codziennego Daily Clean nie jest
pokazany na wyświetlaczu trybu szczotko-
wania):
«Daily Clean» – Tryb czyszczenia codzien-
nego – standardowy tryb
do codziennego czysz-
czenia jamy ustnej
«Pro Clean» – Tryb dla nadzwyczajnego
uczucia czystości (działa
ze zwiększoną częstotli-
wością)
«Sensitive» – Tryb delikatnego czysz-
czenia – delikatne, ale
dokładne czyszczenie
wrażliwych obszarów
«3D White» – Tryb wybielania – polero-
wanie, do użytku okazjo-
nalnego lub codziennego
«Gum Care» – Tryb pielęgnacji dziąseł –
delikatny masaż dziąseł
«Tongue
Clean»
– Tryb czyszczenia języka –
okazjonalne lub codzienne
czyszczenie języka
Przy uruchamianiu trybu Tongue Clean zale-
camy używanie końcówki Sensitive. Możesz
szczotkować język również bez użycia pasty
do zębów. Systematycznie szczotkuj całą
powierzchnię języka delikatnymi ruchami.
Zalecany czas szczotkowania wynosi
20 sekund - jest wskazany migającą diodą
Smart Ring.
Po włączeniu szczoteczki automatycznie
ustawia się ostatnio wybierany tryb. Aby
włączyć inne tryby, sukcesywnie wciskaj
przycisk wyboru trybu szczotkowania pod-
czas używania szczoteczki (rys.
4
). Aby
wrócić do trybu czyszczenia codziennego,
wciśnij i przytrzymaj przycisk wyboru trybu
szczotkowania (4).
Uwaga: Możesz również ustawić/zmienić
funkcję trybu, korzystając z aplikacji Oral-B
TM
.
Końcówki szczoteczki
Oral-B oferuje szeroki wybór końcówek,
które pasują do Twojej szczoteczki Oral-B.
Nasze oscylacyjno-rotacyjne końcówki
wymienne mogą być stosowane do precy-
zyjnego szczotkowania zębów.
Końcówka Oral-B CrossAction
Nasza najbardziej zaawanso-
wana końcówka do szczote-
czek elektrycznych. Włókna
szczoteczki są ustawione pod
91105055_D700_CEEMEA_S6-140.indd 1891105055_D700_CEEMEA_S6-140.indd 18 20.04.17 08:2620.04.17 08:26
CSS APPROVED Effective Date 27Apr2017 GMT - Printed 04Sep2017 Page 17 of 139

19
kątem, aby zapewnić dokładne czyszczenie.
Doskonale usuwa płytkę nazębną.
Końcówka Oral-B Floss Action
Jest wyposażona w włókna
Micropulse, które sięgają
głęboko do przestrzeni
międzyzębowych, pomagając
w usuwaniu płytki nazębnej
Końcówka Oral-B 3D White
Posiada specjalnie zaprojekto-
waną nasadkę polerującą,
która efektywnie usuwa prze-
barwienia, wybielając zęby w
naturalny sposób. Należy pamiętać, że
dzieci poniżej 12 roku życia nie powinny
używać końcówki Oral-B 3D White.
Końcówka Oral-B Sensi
Ultrathin
Została wyposażona w zwykłe
włókna, które czyszczą
powierzchnię zębów oraz
w ultracienkie włókna, które zapewniają
delikatne szczotkowanie na linii dziąseł.
Większość końcówek Oral-B jest wyposa-
żona w niebieskie włókna INDICATOR
®
, które
pomagają monitorować stan zużycia koń-
cówki szczoteczki i pokazują, kiedy należy ją
wymienić. Przy dokładnym szczotkowaniu
zębów, dwa razy dziennie przez 2 minuty,
niebieski kolor wyblaknie do połowy
długości po około 3 miesiącach. Wtedy też
należy wymienić końcówkę szczoteczki.
Jeśli zauważysz, że włókna zaczynają się
odkształcać, zanim ich kolor wyblaknie,
może to oznaczać, że zbyt mocno dociskasz
szczoteczkę do zębów.
Nie zaleca się korzystania z końcówki Oral-B
Floss Action oraz 3D White w przypadku
noszenia aparatu ortodontycznego. Możesz
wówczas używać końcówki Oral-B Ortho,
przeznaczonej specjalnie do czyszczenia
przestrzeni wokół zamków i łuków.
Łączenie szczoteczki
ze smartfonem
Aplikacja Oral-B
TM
jest dostępna dla urzą-
dzeń mobilnych z systemami operacyjnymi
iOS lub Android. Może być pobrana bezpłat-
nie z App Store
(SM)
lub Google Play™.
Aplikacja Oral-B™ zapewnia Ci możliwość
śledzenia Twoich postępów w szczotkowa-
niu zębów i indywidualnego dostosowania
ustawień szczoteczki (informacje o wielu
innych korzyściach znajdziesz w instrukcji do
aplikacji Oral-B™).
• Uruchom aplikację Oral-B™. Przepro-
wadzi Cię ona przez całą procedurę
synchronizacji systemu Bluetooth.
Uwaga: Funkcjonalność aplikacji Oral-B™
będzie ograniczona, jeżeli bezprzewo-
dowa technologia Bluetooth jest wyłą-
czona na Twoim smartfonie (odpowiednie
wskazówki znajdziesz w instrukcji obsługi
swojego smartfonal).
• Wszelkie zalecenia z aplikacji będą
wyświetlane na Twoim smartfonie.
• Jeżeli bezprzewodowa technologia
Bluetooth zostanie uruchomiona na
rączce szczoteczki, na wyświetlaczu
transmisji radiowej (7) zapali się symbol
Bluetooth. Kiedy rączka szczoteczki
zostanie zsynchronizowana, dioda Smart
Ring (2) zapali się na moment.
• Kiedy korzystasz ze swojego smartfona
przy szczotkowaniu zębów, trzymaj go
blisko szczoteczki (w odległości 5 m).
Upewnij się, że jest bezpiecznie położony
w suchym miejscu.
Uwaga: W celu zapewnienia synchronizacji
z rączką szczoteczki na Twoim smartfonie
musi działać system Bluetooth 4.0 (lub jego
późniejsza wersja)/Bluetooth Smart.
Listę kompatybilnych smartfonów znajdziesz
w App Store
(SM)
lub Google Play™.
Uwaga: Sprawdź instrukcję obsługi swojego
smartfona, aby upewnić się, że Twój telefon/
ładowarka mogą być używane w łazience.
Wejdź na www.oralbappavailability.co.uk,
aby zobaczyć, czy aplikacja Oral-B
TM
jest
dostępna w danym kraju.
Zalecenia dotyczące
czyszczenia
Po szczotkowaniu zębów należy dokładnie
opłukać końcówkę pod bieżącą wodą przez
kilka sekund, z włączoną rączką szczoteczki.
Następnie należy wyłączyć szczoteczkę i
zdjąć jej końcówkę, wyczyścić obie części
osobno pod bieżącą wodą i wytrzeć do
sucha przed ponownym złożeniem szczo-
91105055_D700_CEEMEA_S6-140.indd 1991105055_D700_CEEMEA_S6-140.indd 19 20.04.17 08:2620.04.17 08:26
CSS APPROVED Effective Date 27Apr2017 GMT - Printed 04Sep2017 Page 18 of 139

20
teczki. Wyłącz z sieci ładowarkę przed
czyszczeniem. Uchwyt na końcówki szczo-
teczki (10a), pojemnik na końcówki szczo-
teczki z pokrywą ochronną (10b) a także
uchwyt na smartphone (podstawka) (16)
mogą być myte w zmywarce do naczyń.
Ładowarkę (9) należy czyścić wyłącznie wil-
gotną ściereczką (rys.
5
).
Akcesoria
(w zależności od modelu)
Uchwyt na smartfona
• Przed każdym użyciem upewnij się, że
lustro, powierzchnia przyssawki (11d) i
obejmy (11a) są zawsze czyste i suche
(rys. B1). Użyj gładkiej ściereczki do
wyczyszczenia powierzchni przyssawki i
lustra. W szczególności upewnij się, że na
powierzchni przyssawki i na lustrze nie ma
żadnych zanieczyszczeń (np. włosów, kurzu,
pyłków, tłustych śladów, zabrudzeń itp.).
• Odpowiednio mocno dociśnij swój uchwyt
na smartfon (11) do solidnego i stabilnego
lustra, umieszczając go pośrodku, na
wysokości nosa. Następnie zamocuj uchwyt,
naciskając ramię dźwigni (11b) w kierunku
lustra, aż do zatrzaśnięcia (rys. B2).
Uwaga: Uchwyt należy mocować na lustrze,
aby zapewnić bezpieczne i właściwe warunki
jego użytkowania. Wyłącznie do użycia w
łazience. Nie używać w samochodzie.
• Zawsze upewnij się, że uchwyt na smart-
fon jest bezpiecznie zamocowany na
lustrze, zanim włożysz do niego swój tele-
fon. Umieść smartfon bokiem (w pozycji
pionowej) między obejmami (11a), doci-
skając go do jednej obejmy i przesuwając
drugą na bok (rys. B2). Wykonaj te same
czynności, aby później wyjąć telefon.
• Odpowiednio dostosuj jego położenie i
ustaw wymagany kąt, poruszając przegub
kulowy uchwytu (rys. B3).
• Po skończonym szczotkowaniu zębów
wyjmij telefon z uchwytu. Zdejmij uchwyt
na smartfon, przesuwając ramię dźwigni
do tyłu i ostrożnie ciągnąc zawleczkę
(rys. B4 1./2.). Przy każdym użyciu mocuj
uchwyt na smartfon na nowo.
• Uchwyt na smartfon należy czyścić
wyłącznie przy użyciu wilgotnej, gładkiej
ściereczki (rys.
5
). Możesz użyć środka
do mycia szkła, alkoholu lub podobnych
produktów (z wyjątkiem tych, które zawie-
rają olej silikonowy). Upewnij się, że po
wyczyszczeniu powierzchnia jest sucha i
wolna od pyłów. Przechowuj w czystym i
suchym miejscu. Zawsze wyjmuj smartfon
z uchwytu, jeżeli go nie używasz.
Uwaga: Wymagana szerokość smartfona:
minimum 58 mm, maksymalnie 83 mm.
Uwaga: Ponieważ małe części mogą się
odrywać, produkt należy przechowywać
poza zasięgiem dzieci.
Sprawdź instrukcję obsługi swojego smart-
fona, aby upewnić się, że Twój telefon/łado-
warka mogą być używane w łazience.
Etui podróżne z funkcją ładowania
szczoteczki
• Aby naładować rączkę szczoteczki (5),
umieść ją na bolcu w etui podróżnym do
ładowania szczoteczki (12) i podłącz ją do
gniazdka elektrycznego, korzystając z
dodatkowej wtyczki Smart, dostarczonej
w zestawie (13).
• Migająca dioda (12a) etui podróżnego z
funkcją ładowania szczoteczki oznacza,
że rączka jest ładowana. Po pełnym
naładowaniu rączki dioda wyłącza się.
Pełne naładowanie zajmuje zazwyczaj 12
godzin (rys. D1).Uwaga: Możesz korzy-
stać z portu USB (12b), aby ładować
urządzenie elektryczne, kiedy etui
podróżne z funkcją ładowania szczoteczki
jest podłączone do źródła zasilania.
Rączka może być ładowana wyłącznie
przy użyciu wtyczki Smart (13)/(12c), a
nie przez port USB.
• Pokrywa wewnętrzna etui podróżnego ma
wbudowany uchwyt na smartfona (12d), w
którym możesz trzymać swój smartfon,
kiedy korzystasz z niego przy szczotkowa-
niu zębów (rys. D2). Zanim jednak zacz-
niesz z niego korzystać, upewnij się, że
pasuje do uchwytu i jest w nim stabilnie
umieszczony.
• Wyjmowaną wkładkę (12e) etui podróż-
nego można myć w zmywarce do naczyń
(rys.
5
). Zewnętrzne etui należy czyścić
wyłącznie mokrą szmatką. Upewnij się, że
części etui podróżnego są zupełnie
suche, zanim ponownie je złożysz oraz że
szczoteczka do zębów/końcówki szczo-
teczki są suche, zanim umieścisz je w etui
podróżnym.
91105055_D700_CEEMEA_S6-140.indd 2091105055_D700_CEEMEA_S6-140.indd 20 20.04.17 08:2620.04.17 08:26
CSS APPROVED Effective Date 27Apr2017 GMT - Printed 04Sep2017 Page 19 of 139

21
Uwaga: Natychmiast usuwaj plamy i
zabrudzenia z powierzchni etui podróżnego.
Przechowuj etui podróżne w czystym i
suchym miejscu.
Sprawdź instrukcję obsługi swojego
smartfona, aby upewnić się, że Twój telefon/
ładowarka mogą być używane w łazience.
Kosmetyczka
Przechowuj czystą i suchą szczoteczkę/
końcówkę szczoteczki w etui podróżnym
(15). Włóż je do kosmetyczki (14) (rys. E1/2).
Natychmiast usuwaj plamy z powierzchni
produktu. Kosmetyczkę należy prać ręcznie,
w letniej wodzie (30°C – 40°C) (rys.
5
).
Przechowuj w czystym i suchym miejscu.
Treść może ulec zmianie bez uprzedzenia.
Uwagi dotyczące
ochrony środowiska
Ten symbol oznacza, że zużytego
sprzętu nie można wyrzucać
łącznie z odpadami socjalnymi.
Produkt zawiera akumulatory i/ lub
recyklowalne odpady elektryczne.
W celu ochrony środowiska, zużyty produkt
należy zostawić w jednym z punktów zbiórki
zużytego sprzętu elektrycznego i
elektronicznego.
Warunki limitowanej
gwarancji
1. Procter & Gamble International Opera-
tions SA, z siedzibą w Route de St-Geor-
ges 47, 1213 Petit Lancy w Szwajcarii,
gwarantuje sprawne działanie sprzętu w
okresie 2 lat od daty jego wydania Kupu-
jącemu. Ujawnione w tym okresie wady
będą usuwane bezpłatnie przez autory-
zowany punkt serwisowy.
2. Kupujący może wysłać sprzęt (wraz z
dowodem zakupu) do najbliższego auto-
ryzowanego punktu serwisowego Braun
Oral-B lub skorzystać z pośrednictwa
sklepu, w którym dokonał zakupu
sprzętu. W takim wypadku termin
naprawy ulegnie wydłużeniu o czas
niezbędny do dostarczenia i odbioru
sprzętu.
3. Kupujący powinien dostarczyć sprzęt w
opakowaniu należycie zabezpieczonym
przed uszkodzeniem. Uszkodzenia spo-
wodowane niedostatecznym zabezpie-
czeniem sprzętu nie podlegają naprawom
gwarancyjnym. Naprawom gwarancyjnym
nie podlegają także inne uszkodzenia
powstałe w następstwie okoliczności,
za które Gwarant nie ponosi odpowie-
dzialności, w szczególności zawinione
przez Pocztę Polską lub firmy kurierskie.
4. Niniejsza gwarancja jest ważna jedynie
z dokumentem zakupu i obowiązuje w
każdym kraju, w którym, to urządzenie
jest rozprowadzane przez firmę Procter &
Gamble lub upoważnionego przez nią
dystrybutora. Dokument zakupu (para-
gon lub faktura) musi być opatrzony datą
i numerem oraz określać nazwę i model
sprzętu.
5. Okres gwarancji przedłuża się o czas od
zgłoszenia wady lub uszkodzenia do
naprawy sprzętu i przekazania go do
dyspozycji Kupującego.
6. Naprawa gwarancyjna nie obejmuje
czynności przewidzianych w instrukcji, do
wykonania których, Kupujący zobowiązany
jest we własnym zakresie i na własny koszt.
7. Ewentualne oczyszczenie sprzętu doko-
nywane jest na koszt Kupującego według
cennika danego autoryzowanego punktu
serwisowego i nie będzie traktowane jako
naprawa gwarancyjna, chyba, że oczysz-
czenie jest niezbędne do usunięcia wady
w ramach świadczeń objętych niniejszą
gwarancją i nie stanowi czynności, o
których mowa w punkcie 6.
8. Gwarancją nie są objęte
a) mechaniczne uszkodzenia sprzętu
spowodowane w czasie jego użytko-
wania lub w czasie dostarczania
sprzętu do naprawy;
b) uszkodzenia i wady wynikłe na skutek:
– niewłaściwego lub niezgodnego
z instrukcją użytkowania, konser-
wacji, przechowywania lub instala-
cji;
– używania niewłaściwych materiałow
eksploatacyjnych;
– napraw dokonywanych przez nie-
uprawnione osoby;
– przeróbek, zmian konstrukcyjnych
lub używania do napraw nieorygi-
91105055_D700_CEEMEA_S6-140.indd 2191105055_D700_CEEMEA_S6-140.indd 21 20.04.17 08:2620.04.17 08:26
CSS APPROVED Effective Date 27Apr2017 GMT - Printed 04Sep2017 Page 20 of 139
Sayfa yükleniyor ...
Sayfa yükleniyor ...
Sayfa yükleniyor ...
Sayfa yükleniyor ...
Sayfa yükleniyor ...
Sayfa yükleniyor ...
Sayfa yükleniyor ...
Sayfa yükleniyor ...
Sayfa yükleniyor ...
Sayfa yükleniyor ...
Sayfa yükleniyor ...
Sayfa yükleniyor ...
Sayfa yükleniyor ...
Sayfa yükleniyor ...
Sayfa yükleniyor ...
Sayfa yükleniyor ...
Sayfa yükleniyor ...
Sayfa yükleniyor ...
Sayfa yükleniyor ...
Sayfa yükleniyor ...
Sayfa yükleniyor ...
Sayfa yükleniyor ...
Sayfa yükleniyor ...
Sayfa yükleniyor ...
Sayfa yükleniyor ...
Sayfa yükleniyor ...
Sayfa yükleniyor ...
Sayfa yükleniyor ...
Sayfa yükleniyor ...
Sayfa yükleniyor ...
Sayfa yükleniyor ...
Sayfa yükleniyor ...
Sayfa yükleniyor ...
Sayfa yükleniyor ...
Sayfa yükleniyor ...
Sayfa yükleniyor ...
Sayfa yükleniyor ...
Sayfa yükleniyor ...
Sayfa yükleniyor ...
Sayfa yükleniyor ...
Sayfa yükleniyor ...
Sayfa yükleniyor ...
Sayfa yükleniyor ...
Sayfa yükleniyor ...
Sayfa yükleniyor ...
Sayfa yükleniyor ...
Sayfa yükleniyor ...
Sayfa yükleniyor ...
Sayfa yükleniyor ...
Sayfa yükleniyor ...
Sayfa yükleniyor ...
Sayfa yükleniyor ...
Sayfa yükleniyor ...
Sayfa yükleniyor ...
Sayfa yükleniyor ...
Sayfa yükleniyor ...
Sayfa yükleniyor ...
Sayfa yükleniyor ...
Sayfa yükleniyor ...
Sayfa yükleniyor ...
Sayfa yükleniyor ...
Sayfa yükleniyor ...
Sayfa yükleniyor ...
Sayfa yükleniyor ...
Sayfa yükleniyor ...
Sayfa yükleniyor ...
Sayfa yükleniyor ...
Sayfa yükleniyor ...
Sayfa yükleniyor ...
Sayfa yükleniyor ...
Sayfa yükleniyor ...
Sayfa yükleniyor ...
Sayfa yükleniyor ...
Sayfa yükleniyor ...
Sayfa yükleniyor ...
Sayfa yükleniyor ...
Sayfa yükleniyor ...
Sayfa yükleniyor ...
Sayfa yükleniyor ...
Sayfa yükleniyor ...
Sayfa yükleniyor ...
Sayfa yükleniyor ...
Sayfa yükleniyor ...
Sayfa yükleniyor ...
Sayfa yükleniyor ...
Sayfa yükleniyor ...
Sayfa yükleniyor ...
Sayfa yükleniyor ...
Sayfa yükleniyor ...
Sayfa yükleniyor ...
Sayfa yükleniyor ...
Sayfa yükleniyor ...
Sayfa yükleniyor ...
Sayfa yükleniyor ...
Sayfa yükleniyor ...
Sayfa yükleniyor ...
Sayfa yükleniyor ...
Sayfa yükleniyor ...
Sayfa yükleniyor ...
Sayfa yükleniyor ...
Sayfa yükleniyor ...
Sayfa yükleniyor ...
Sayfa yükleniyor ...
Sayfa yükleniyor ...
Sayfa yükleniyor ...
Sayfa yükleniyor ...
Sayfa yükleniyor ...
Sayfa yükleniyor ...
Sayfa yükleniyor ...
Sayfa yükleniyor ...
Sayfa yükleniyor ...
Sayfa yükleniyor ...
Sayfa yükleniyor ...
Sayfa yükleniyor ...
Sayfa yükleniyor ...
Sayfa yükleniyor ...
-
 1
1
-
 2
2
-
 3
3
-
 4
4
-
 5
5
-
 6
6
-
 7
7
-
 8
8
-
 9
9
-
 10
10
-
 11
11
-
 12
12
-
 13
13
-
 14
14
-
 15
15
-
 16
16
-
 17
17
-
 18
18
-
 19
19
-
 20
20
-
 21
21
-
 22
22
-
 23
23
-
 24
24
-
 25
25
-
 26
26
-
 27
27
-
 28
28
-
 29
29
-
 30
30
-
 31
31
-
 32
32
-
 33
33
-
 34
34
-
 35
35
-
 36
36
-
 37
37
-
 38
38
-
 39
39
-
 40
40
-
 41
41
-
 42
42
-
 43
43
-
 44
44
-
 45
45
-
 46
46
-
 47
47
-
 48
48
-
 49
49
-
 50
50
-
 51
51
-
 52
52
-
 53
53
-
 54
54
-
 55
55
-
 56
56
-
 57
57
-
 58
58
-
 59
59
-
 60
60
-
 61
61
-
 62
62
-
 63
63
-
 64
64
-
 65
65
-
 66
66
-
 67
67
-
 68
68
-
 69
69
-
 70
70
-
 71
71
-
 72
72
-
 73
73
-
 74
74
-
 75
75
-
 76
76
-
 77
77
-
 78
78
-
 79
79
-
 80
80
-
 81
81
-
 82
82
-
 83
83
-
 84
84
-
 85
85
-
 86
86
-
 87
87
-
 88
88
-
 89
89
-
 90
90
-
 91
91
-
 92
92
-
 93
93
-
 94
94
-
 95
95
-
 96
96
-
 97
97
-
 98
98
-
 99
99
-
 100
100
-
 101
101
-
 102
102
-
 103
103
-
 104
104
-
 105
105
-
 106
106
-
 107
107
-
 108
108
-
 109
109
-
 110
110
-
 111
111
-
 112
112
-
 113
113
-
 114
114
-
 115
115
-
 116
116
-
 117
117
-
 118
118
-
 119
119
-
 120
120
-
 121
121
-
 122
122
-
 123
123
-
 124
124
-
 125
125
-
 126
126
-
 127
127
-
 128
128
-
 129
129
-
 130
130
-
 131
131
-
 132
132
-
 133
133
-
 134
134
-
 135
135
-
 136
136


Braun Genius 8000 - 9000 Kullanım kılavuzu
- Kategori
- Elektrikli diş fırçaları
- Tip
- Kullanım kılavuzu
- Bu kılavuz için de uygundur
Diğer dillerde
İlgili Makaleler
-
Braun Genius 8000 - 9000 Kullanım kılavuzu
-
Braun Genius Kullanım kılavuzu
-
-
-
-
Braun Smart, Teen, Junior Kullanım kılavuzu
-
-
-
-