
MGB 25332 BG
MGB 25333 BG
Mcrowave Oven
User Manual
Mkrodalga Fırın
Kullanma Kılavuzu
Mkrowellenherd
Bedenungsanletung
Four à mcro-ondes
Manuel d’utlsaton
EN
ES
HR
TR
PT
S
DE
NL
FR
PL
ET BG
IT
CZ
K LT

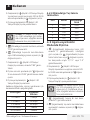
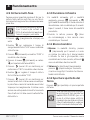
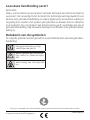
Please read this manual first!
Dear Customer,
Thank you for preferring a Beko product. We hope that you get the best results from
your product which has been manufactured with high quality and state-of-the-art
technology. Therefore, please read this entire user manual and all other accompanying
documents carefully before using the product and keep it as a reference for future use.
If you handover the product to someone else, give the user manual as well. Follow all
warnings and information in the user manual.
Meanings of the symbols
Following symbols are used in the various section of this user manual:
C
Important information and useful
hints about usage.
A
Warnings for dangerous situations
concerning the safety of life and
property.
Warning for hot surfaces.
This product has been manufactured in environmental friendly modern plants without giving any harm to the nature.
This appliance conforms to the WEEE regulation.
It does not contain PCB.

Microwave Oven / User Manual
3 / 371 EN
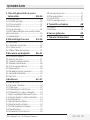
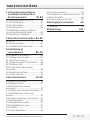
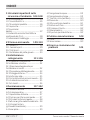
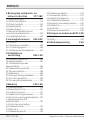
CONTENTS
01M-8847913200-1415-05
01M-8847893200-1415-05
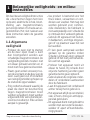
1 Important safety and
environmental instructions 4-9
1.1 General safety ..........................................................4
1.1.1 Electrical safety....................................................5
1.1.2 Product safety ......................................................7
1.2 Intended use ............................................................7
1.3 Children’s safety......................................................8
1.4 Compliance with the WEEE Directive and
disposal of waste products ......................................9
1.5 Package information ............................................9
2 Your microwave oven 10-11
2.1 Overview ....................................................................10
2.1.1. Controls and parts .............................................10
2.1.2. Technical data .....................................................10
2.1.3 Installing the turntable ....................................11
3 Installation and
connection 12-17
3.1 Installation and connection ...............................12
3.2 Built-in installation ................................................13
3.2.1 Furniture dimensions for built-in
installation .......................................................................13
3.2.2 Preparing the cabinet .......................................14
3.2.3 Fixing the oven....................................................15
3.3 Radio interference .................................................16
3.4 Microwave cooking principles ...........................16
3.5 Grounding instructions........................................16
3.6 Utensil test ...............................................................17
4 Operation 18-23
4.1 Control panel ............................................................18
4.2 Operating instructions ........................................18
4.2.1 Setting the time ..................................................18
4.2.2 Cooking with microwave oven ......................18
4.2.3 Microwave keypad instructions ...................19
4. 3 Cooking with grill or combination mode ......19
4.3.1 (Grill/Combination) Keypad instructions ..20
4.4 Quick start ................................................................20
4.5 Defrost by weight .................................................. 20
4.6 Defrost by time .......................................................20
4.7 Kitchen timer (counter) ....................................... 20
4.8 Auto menu ................................................................21
4.8.1 Auto cooking menu ...........................................22
4.9 Multi-step cooking ................................................23
4.10 Query function .....................................................23
4.11 Child lock ..................................................................23
4.12 Opening the oven door .....................................23
5 Cleaning and maintenance 24
5.1 Cleaning ......................................................................24
5.2 Storage .......................................................................24
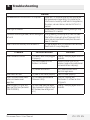
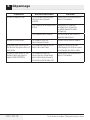
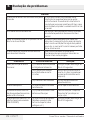
6 Troubleshooting 25

Microwave Oven / User Manual
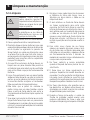
4 / 371 EN
This section contains safety in-
structions that will help protect
from risk of fire, electric shock, ex-
posure to leak microwave energy,
personal injury or property dam-
age. Failure to follow these instruc-
tions invalidates the granted war-
ranties.
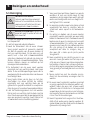
1.1 General safety
• Do not attempt to start the oven
when its door is open; otherwise
you may be exposed to harmful
microwave energy. Safety locks
should not be disabled or tam-
pered with.
• Do not place any object between
the front side and the door of the
oven. Do not allow dirt or clean-
ing agent remnants built-up on
the closure surfaces.
• Any service works involving re-
moval of the cover that provides
protection against exposure to
microwave energy must be per-
formed by authorized persons/
service. Any other approach is
dangerous.
• Your product is intended for
cooking, heating and defrost
food at home. It must not be
used for commercial purposes.
Manufacturer shall not be held li-
able for damages that have arisen
from misuse.
• Do not use this appliance out-
doors, bathrooms, humid envi-
ronments or in places where the
it can get wet.
• No responsibility or warranty
claim shall be assumed for dam-
ages arising from misuse or im-
proper handling of the appliance.
• Never attempt to dismantle the
appliance. No warranty claims are
accepted for damage caused by
improper handling.
• Only use the original parts or
parts recommended by the man-
ufacturer.
• Do not leave this appliance unat-
tended while it is in use.
• Always use the appliance on a
stable, flat, clean dry, and non-slip
surface.
• The appliance should not be oper-
ated with an external clock timer
or separate remote control sys-
tem.
• Before using the appliance for
the first time, clean all parts.
Please see the details given in
the "Cleaning and Maintenance"
section.
1
Important safety and environmental
instructions

Microwave Oven / User Manual
5 / 371 EN
• Operate the appliance for its in-
tended purpose only as described
in this manual. Do not use abra-
sive chemicals or steam on this
appliance. This oven is particularly
intended for heating and cooking
the food. It is not intended for in-
dustrial or laboratory use.
• Do not use your appliance to dry
clothes or kitchen towels.
• Appliance becomes very hot
while it is in use. Pay attention
not to touch the hot parts inside
the oven.
• Your oven is not designed to dry
any living being.
• Do not operate the oven empty.
• Cooking utensil may get hot due
to the heat transferred from the
heated food to the utensil. You
may need oven gloves to hold the
utensil.
• Utensils shall be checked to en-
sure that they are suitable for use
in microwave ovens.
• Do not place the oven on stoves
or other heat generating appli-
ances. Otherwise, it may be dam-
aged and the warranty becomes
void.
• Microwave oven must not be
placed in a cabinet that is not in
compliance with the installation
instructions.
• Steam may come out while open-
ing the covers or the foil after
cooking the food.
• Use gloves while taking any kind
of heated food out.
• The appliance and its accessible
surfaces may be very hot when
the appliance is in use.
• Door and outer glass may be very
hot when the appliance is in use.
1.1.1 Electrical safety
• Beko Microwave Oven complies
with the applicable safety stan-
dards; therefore, in case of any
damage on the appliance or
power cable, it should be repaired
or replaced by the dealer, service
center or a specialist and autho-
rized service alike to avoid any
danger. Faulty or unqualified re-
pair work may be dangerous and
cause risk to the user.
• Make sure that your mains power
supply complies with the informa-
tion supplied on the rating plate
of the appliance.
1
Important safety and environmental
instructions

Microwave Oven / User Manual
6 / 371 EN
The only way to disconnect the
appliance from the power supply
is to pull the power plug out of
the power outlet.
• Use the appliance with a
grounded outlet only.
• Never use the appliance if the
power cable or the appliance it-
self is damaged.
• Do not use this appliance with an
extension cord.
• Never touch the appliance or its
plug with damp or wet hands.
• Place the appliance in a way so
that the plug is always accessible.
• Prevent damage to the power
cable by not squeezing, bend-
ing, or rubbing it on sharp edges.
Keep the power cable away from
hot surfaces and naked flame.
• Make sure that there is no danger
that the power cable could be ac-
cidentally pulled or that someone
could trip over it when the appli-
ance is in use.
• Unplug the appliance before each
cleaning and when the appliance
is not in use.
• Do not pull the power cable of the
appliance to disconnect it from its
power supply and never wrap its
power cable around the appliance.
• Do not immerse the appliance,
power cable, or power plug in
water or any other liquids. Do not
hold it under running water.
• When heating food in plastic or
paper containers, check the oven
frequently due to the possibility
of ignition.
• Remove the wire strings and/or
metal handles of paper or plastic
bags before placing bags suitable
for use in microwave oven to the
oven.
• Turn off the appliance or unplug it
and hold its door closed to prevent
ignition if you observe smoke.
• Do not use inside of the oven to
store something. Do not leave
paper items, cooking material or
food inside the oven when it is
not being used.
• The contents of feeding bottles
and baby food jars must be stirred
or shaken and the temperature
must be checked before con-
sumption, in order to avoid burns.
1
Important safety and environmental
instructions

Microwave Oven / User Manual
7 / 371 EN
• This appliance is a Group 2 Class
B ISM equipment. Group 2 con-
tains all ISM (Industrial, Scientific
and Medical) equipment in which
radio-frequency energy is inten-
tionally generated and/or used in
the form of electromagnetic radi-
ation for the treatment of mate-
rial, and spark erosion equipment.
• Class B equipment is suitable for
use in domestic establishments
and establishments directly con-
nected to a low voltage power
supply network.
• Door or outer surface of the ap-
pliance may become hot when it
is in use.
1.1.2 Product safety
• Liquids or other food must not
be heated in closed container as
there is a risk of exploding.
• Heating the beverages with mi-
crowave may cause them to boil
by splashing around after they
have been taken out of the oven;
so be careful when you are hold-
ing the containers.
• Do not roast anything in the oven.
Hot oil may damage the compo-
nents and materials of the oven,
and it may even cause skin burns.
• Pierce food with thick crust such
as potatoes, zucchinis, apples and
chestnuts.
• Appliance must be placed so that
the rear side is facing the wall.
• If the door or door seals are dam-
aged, the oven must not be oper-
ated until it has been repaired by
a qualified person.
• Before moving the appliance,
please secure the turntable to
prevent damage to it.
• Do not use your microwave oven
to cook or heat the unscrambled
eggs either with or without shell.
• Never remove the parts at the
rear and sides of the appliance,
which protect the minimum dis-
tances between the cabinet walls
and the appliance in order to allow
for the required air circulation.
1.2 Intended use
• Microwave oven is intended for
built-in use only.
• Do not use the appliance for any-
thing other than its intended use.
• Do not use the appliance as a
heat source.
• Microwave oven is intended to
thaw, cook and stew food only.
1
Important safety and environmental
instructions

Microwave Oven / User Manual
8 / 371 EN
• Do not over-cook the foods; oth-
erwise, you may cause a fire.
• Do not use steam assisted clean-
ers to clean the appliance.
1.3 Children’s safety
• Extreme caution is advised when
being used near children and per-
sons who are restricted in their
physical, sensory or mental abili-
ties.
• This appliance can be used by the
children who are at the age of 8 or
over and by the people who have
limited physical, sensory or men-
tal capacity or who do not have
knowledge and experience, as
long as they are supervised with
regard to safe use of the product
or they are instructed accordingly
or understand the risks of using
the product. Children should not
play with the appliance. Clean-
ing and user maintenance proce-
dures should not be performed
by children unless they are con-
trolled by their elders.
• Danger of choking! Keep all the
packaging materials away from
children.
• Only allow children to use the
oven without supervision when
adequate instructions have been
given so that the child is able to
use the microwave oven in a safe
way and understands the hazards
of improper use.
• Due to excessive heat that arises
in grill and combination modes,
children should only be allowed to
use these modes under supervi-
sion of an adult.
• Keep the product and its power
cable so that they are inaccessi-
ble by children under 8 years old.
• The appliance and its accessible
surfaces may be very hot when
the appliance is in use. Keep chil-
dren away.
1
Important safety and environmental
instructions

Microwave Oven / User Manual
9 / 371 EN
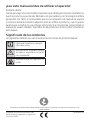
1.4 Compliance with the
WEEE Directive and disposal
of waste products
This product does not include harmful
and prohibited materials specified in
the “Regulation for Supervision of the
Waste Electric and Electronic
Appliances” issued by the Ministry of
Environment and Urban Planning. Complies with
the WEEE Directive. This product has been man-
ufactured with high quality parts and materials
which can be reused and are suitable for recy-
cling.
Therefore, do not dispose the product with nor-
mal domestic waste at the end of its service life.
Take it to a collection point for the recycling of
electrical and electronic equipment. Ask the local
authority in your area for these collection points.
Help protect the environment and natural re-
sources by recycling used products.
1.5 Package information
Package of the product is made of re-
cyclable materials in accordance with
our National Legislation. Do not dis-
pose of the packaging materials to-
gether with the domestic or other wastes. Take
them to the packaging material collection points
designated by the local authorities.
1
Important safety and environmental
instructions

Microwave Oven / User Manual
10 / 371 EN
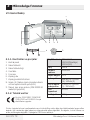
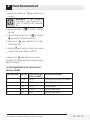
Markings on the product or the values stated in other documents supplied with the product are values obtained
under laboratory conditions as per relevant standards. These values may vary according to the usage of the
appliance and ambient conditions. Power values are tested at 230V.
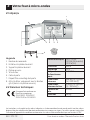
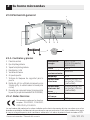
2 Your microwave oven
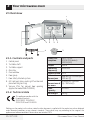
2.1 Overview
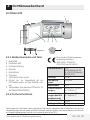
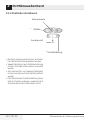
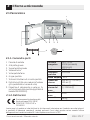
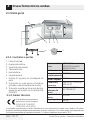
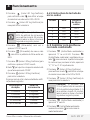
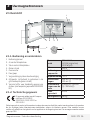
2.1.1. Controls and parts
1. Control panel
2. Turntable shaft
3. Turntable support
4. Glass tray
5. Oven window
6. Door group
7. Door safety interlock system
8. Grill rack (only to be used in grill function and
placed on the glass tray)
9. Vacuum lifter for manual door opening
(applies for model MGB 25333 BG.)
2.1.2. Technical data
This appliance complies with the
European Directives
2004/108/EC, 2006/95/EC,
2009/125/EC and 2011/65/EU.
Power con-
sumption
230 V~50 Hz,
1450 W (Microwave)
1000 W (Grill)
Output
900 W
Operating
frequency
2450 MHz
Ampere value
6.4 A
External
dimensions
388 mm (H) / 595 mm (W) /
400 mm (D)
Internal
dimensions of
the oven
206 mm (H) / 328 mm
(G) / 368 mm (D)
Oven
Capacity
25 Liters
Net weight
18.5 kg
6
7
1
235 4
9
8

Microwave Oven / User Manual
11 / 371 EN
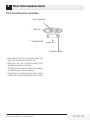
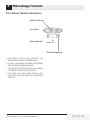
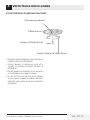
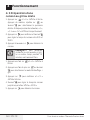
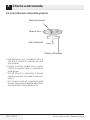
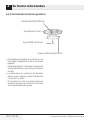
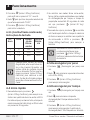
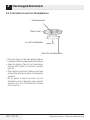
2.1.3 Installing the turntable
Göbek (alt kısım)
Cam tabla
Döner tabla desteği
Döner tabla mili
• Never place the glass tray upside down. The
glass tray should never be restricted.
• Both glass tray and turntable support must
always be used during cooking.
• All food and containers of food must always
place on the glass tray for cooking.
• If glass tray or turntable support crack or break,
contact your nearest authorized service center.
2 Your microwave oven
Hub (underside)
Glass tray
Turntable shaft
Turntable support

Microwave Oven / User Manual
12 / 371 EN
3 Installation and connection
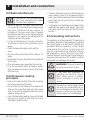
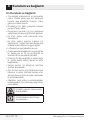
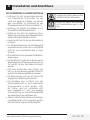
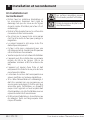
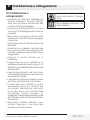
3.1 Installation and
connection
• Remove all packing material and accessories.
Examine the oven for any damage such as
dents or broken door. Do not install if oven is
damaged.
• Remove any protective film found on the
microwave oven cabinet surface.
• Do not remove the light brown Mica cover that
is attached to the oven cavity to protect the
magnetron.
• This appliance has been designed for domestic
use only.
• This oven is intended for built-in use only. It
is not intended for counter-top use or for use
inside a cabinet.
• Please observe the special installation
instructions.
• The appliance can be installed in a 60cm wide
wall-mounted cabinet (at least 50 cm deep and
85 cm off the floor).
• The appliance is fitted with a plug and must
only be connected to a properly installed
grounded socket.
• The mains voltage must correspond to the
voltage specified on the rating plate.
• If the plug is no longer accessible after
installation, an all-pole isolating switch must be
present on the installation side with a contact
gap of at least 3 mm.
• Adapters, multi-way sockets and extension
cords must not be used. Overloading can result
with a risk of fire.
The accessible surface may be hot
during operation.
C
Do not trap or bend the power ca-
ble.

Microwave Oven / User Manual
13 / 371 EN
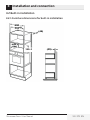
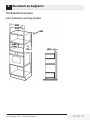
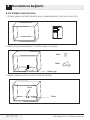
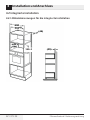
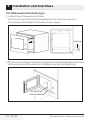
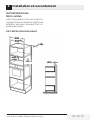
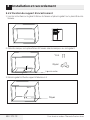
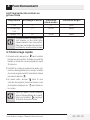
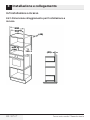
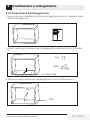
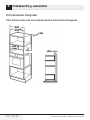
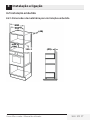
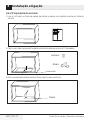
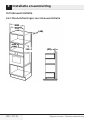
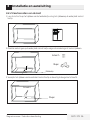
3.2 Built-in installation
3.2.1 Furniture dimensions for built-in installation
380+2
3 Installation and connection

Microwave Oven / User Manual
14 / 371 EN
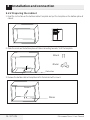
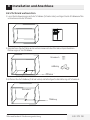
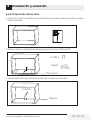
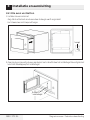
3.2.2 Preparing the cabinet
1. Read the instruction on the bottom cabinet template and put the template on the bottom plane of
cabinet.
a
a
CENTER LINE
FRONT EDGE
LEFT EDGE
T EDGE RIGH
2. Make the marks on the bottom plane of cabinet according to marks "a" of the template.
a
a
Vida A
Braket
Merkez çizgi
Screw A
Centre line
Bracket
3. Remove the bottom cabinet template and fix the bracket with screw A.
Braket
Vida A
Screw A
Bracket
3 Installation and connection

Microwave Oven / User Manual
15 / 371 EN
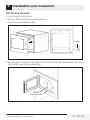
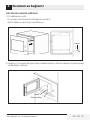
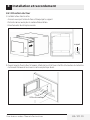
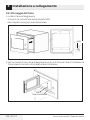
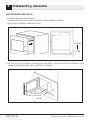
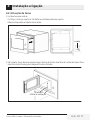
3.2.3 Fixing the oven
1. Install the oven into the cabinet.
- Make sure the back of the oven is locked by bracket.
- Do not trap or bend the power cable.
braket
bracket
2. Open the door, fix the oven to the cabinet with Screw B through the installation hole. Then fix the
trim-kit plastic cover to the installation hole.
Montaj deliği
Vida B
Screw B
Installation hole
3 Installation and connection

Microwave Oven / User Manual
16 / 371 EN
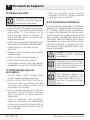
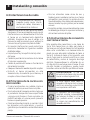
3.3 Radio interference
C
Operation of the microwave oven
may cause interference on radios,
TVs and similar appliances.
• Place the oven as far away from radios and
TVs as possible. Operation of microwave oven
may cause interference to your radio or TV
reception. 2. Plug your oven into a standard
household outlet. Be sure the voltage and the
frequency is the same as the voltage and the
frequency on the rating plate.
• In case of interference, it may be reduced or
eliminated by taking the precautions given
below:
• Clean the door and sealing surface of the
oven.
• Set the antenna direction of the radio or TV
again.
• Reposition the oven based on the location of
the receiver.
• Place microwave oven away from the receiver.
• Plug the microwave oven to another outlet,
thus microwave oven and receiver shall be on
different lines.
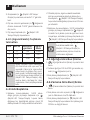
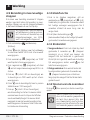
3.4 Microwave cooking
principles
• Prepare the food carefully. Place the remaining
parts to the outside of the dish.
• Pay attention to the cooking time. Cook in the
shortest time specified and add some more
time if required. Overcooked food may cause
smoke or may be burnt.
• Cover the food while cooking. Covering the food
prevents any splashing and helps to ensure
that food is cooked evenly.
• Turn over food such as poultry and hamburgers
while cooking them in a microwave oven in
order to accelerate cooking of this kind of food.
Larger food such as roast must be turned over
at least once.
• Turn food such as meatballs upside down in the
middle of the cooking and replace them with
each other from the center of the dish to the
outside.
3.5 Grounding instructions
This appliance must be grounded. This oven has a
grounding cable with a grounded plug. Appliance
must be plugged to a wall outlet installed and
grounded correctly. Grounding system allows
a leak wire for the electrical current in case of a
short circuit and reduces the risk of electric shock.
We recommend using an electrical circuit dedi-
cated to the oven. Operating with high voltage is
dangerous and may cause fire or other accidents
that would cause damage to the oven.
A
WARNING:
Misuse of grounding
plug may cause electric shock.
C
If you have any questions on
grounding and electrical instruc-
tions, please consult a qualified
electric technician or service per-
sonnel.
C
Manufacturer and/or dealer would
not accept any responsibility for in-
juries or damages on the oven that
may occur when electrical connec-
tion procedures are not followed.
3 Installation and connection

Microwave Oven / User Manual
17 / 371 EN
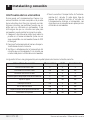
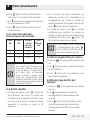
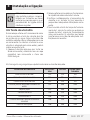
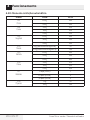
3.6 Utensil test
Never operate the microwave oven empty. The
only exception is the utensil test described in the
following section. Some certain non-metal uten-
sils may not be suitable for using in microwave. If
you are not sure whether your utensil is suitable
for microwave, you can perform the following
test.
1. Place the empty utensil to be tested into the
microwave oven together with a microwave-
compatible glass filled with 250 ml water.
2. Operate the microwave oven at max power for
1 minute.
3. Check carefully the temperature of the utensil
being tested. If it is warmed up, it is not suitable
for use in microwave.
4. Never exceed the operating time limit of 1
minute. If you notice arcing during 1 minute
of operation, stop the microwave. Utensils
causing arcing are not suitable for use in
microwave.
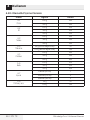
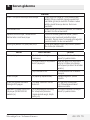
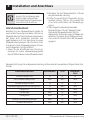
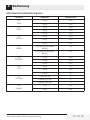
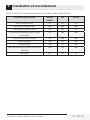
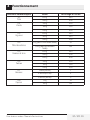
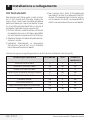
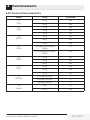
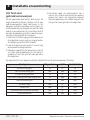
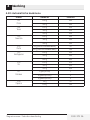
Following list is a general guide that would help you in selecting the right utensil.
Cooking utensil Microwave Grill Combination
Heat-resistant glass Yes Yes Yes
Non-heat-resistant glass No No No
Heat-resistant ceramics Yes Yes Yes
Plastic dish suitable for microwave oven Yes No No
Paper kitchenware Yes No No
Metal tray No Yes No
Metal rack No Yes No
Aluminum foil and foil covers No Yes No
Foam materials No No No
3 Installation and connection

Microwave Oven / User Manual
18 / 371 EN
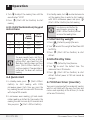
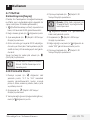
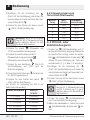
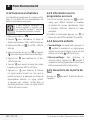
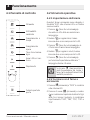
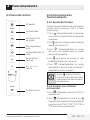
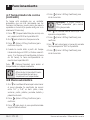
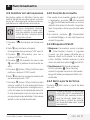
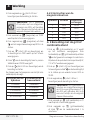
4.2 Operating instructions
4.2.1 Setting the time
When the microwave oven is energized, "0:00”
will be displayed in LED screen and buzzer will
ring once.
1. Press (Kitchen Timer/Clock) twice and the
figures for hours will start flashing.
2. Turn to adjust the hour; the input value
should be between 0 and 23.
3. Press (Kitchen Timer/Clock) and the
figures for minutes will start flashing.
4. Turn to adjust the minutes; the input value
should be between 0 and 59.
5. Press (Kitchen Timer/Clock) to finish time
setting. ":" symbol will flash, and the time will
light.
C
If you press (Stop/Cancel) dur-
ing time setting, oven will auto-
matically return back to previous
mode.
4.2.2 Cooking with microwave
oven
1. Press (Microwave) and “P100” will be
displayed in LED screen.
2. Press (Microwave) again or turn to
select the desired power. Each time you press
the key, “P100”, “P80”, ”P50”, “P30” or “P10” will
be displayed respectively.
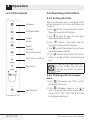
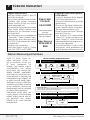
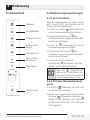
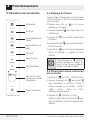
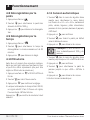
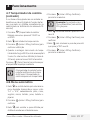
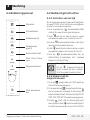
Microwave
Grill/Combination
Defrost
by time
Defrost
by weight
Kitchen Timer/Clock
Start/+30 sec./Confirm
Stop/Cancel
Door Open Key
4 Operation
4.1 Control panel

Microwave Oven / User Manual
19 / 371 EN
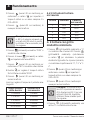
3. Press (Start/+30 Sec./Confirm) to confirm
and turn to set the cooking time to a value
between 0:05 and 95:00.
4. Press (Start/+30 Sec./Confirm) again to
start cooking.
5. Press (Microwave) once and “P100” will be
displayed in the screen.
6. Press (Microwave) once again or turn to
set 80% microwave power.
7. Press (Start/+30Sec./Confirm) to confirm
and "P 80” will be displayed in the screen.
8. Turn to adjust the cooking time until the
oven displays "20:00".
9. Press (Start/+30 Sec./Confirm) to start
cooking.
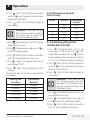
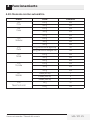
The steps for adjusting the time in coding button
are as below:
Setting the
duration
Increment
amount
0-1 minute 5 seconds
1-5 minutes 10 seconds
5-10 minutes 30 seconds
10-30 minutes 1 minute
30-95 minutes 5 minutes
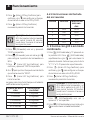
4.2.3 Microwave keypad
instructions
Order Screen Microwave
Power
1 P100 100%
2 P80 80%
3 P50 50%
4 P30 30%
5 P10 10%
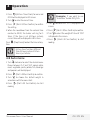
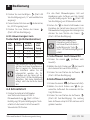
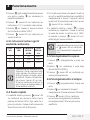
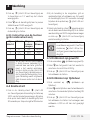
4. 3 Cooking with grill or
combination mode
1. Press (Grill/Combination) and "G” will
be displayed in LED screen. Press (Grill/
Combination) repeatedly or turn to select
the desired power. Each time you press the key,
“G”, ”C-1” or “C-2” will be displayed respectively.
2. Press (Start/+30 Sec./Confirm) to confirm
and turn to set the cooking time to a value
between 0:05 and 95:00.
3. Press (Start/+30 Sec./Confirm) again to
start cooking.
C
Example:
If you want to use
55% microwave power and 45%
grill power (C-1) to cook for 10 min-
utes, you can operate the oven with
the following steps.
1. Press (Grill/Combination) once and "G” will
be displayed in the screen.
2. Press (Grill/Combination) once again or
turn to select the Combination 1 mode.
3. Press (Start/+30Sec./Confirm) to confirm
and “C-1” will be displayed in the screen.
4 Operation
C
Example:
If you want to use
80% microwave power to cook for
20 minutes, you can operate the
oven with the following steps.

Microwave Oven / User Manual
20 / 371 EN
4. Turn to adjust the cooking time until the
oven displays "10:00".
5. Press (Start/+30 Sec./Confirm) to start
cooking.
4.3.1 (Grill/Combination) Keypad
instructions
Order Screen Micro-
wave
Power
Grill
Power
1 G 0% 100%
2 C-1 55% 45%
3 C-2 36% 64%
C
When half the grill time passes,
the oven sounds twice, and this is
normal. In order to have a better
grilling effect, you should turn the
food over, close the door, and then
press (Start/+30Sec./Confirm) to
continue cooking. If no operation is
performed, the oven will continue
cooking.
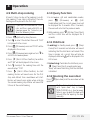
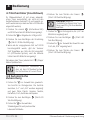
4.4 Quick start
1. In standby mode, press (Start/+30Sec./
Confirm) to start cooking with 100%
microwave power. Each time you press the
key, cooking time will increase until 95 minutes
with steps of 30 seconds.
2. In microwave oven cooking, grill and combi-
nation cooking or defrost by time modes, the
cooking time will increase by 30 seconds each
time you press (Start/+30 Sec/Confirm).
3. In standby mode, turn counterclockwise to
set the cooking time in order to start cooking
with 100% microwave power and press
(Start/+30Sec./Confirm) to start cooking.
C
In auto menu and defrost by
weight modes, pressing
(Start/+30Sec/Confirm) will not
increase the cooking time.
4.5 Defrost by weight
1. Press (Defrost by weight) for once.
2. Turn to select the weight of food from 100
to 2000 g.
3. Press (Start/+30 Sec./Confirm) to start
defrost.
4.6 Defrost by time
1. Press (Defrost by time) for once.
2. Turn to select the defrost time. The
maximum time is 95 minutes.
3. Press (Start/+30 Sec./Confirm) to start
defrost. Defrost power is P30 and cannot be
changed.
4.7 Kitchen timer (counter)
Your oven is equipped with an automatic counter
which is not linked with the oven functions and
can be used separately at the kitchen ( it can be
set to max. 95 minutes.)
4 Operation
Sayfa yükleniyor...
Sayfa yükleniyor...
Sayfa yükleniyor...
Sayfa yükleniyor...
Sayfa yükleniyor...
Sayfa yükleniyor...
Sayfa yükleniyor...
Sayfa yükleniyor...
Sayfa yükleniyor...
Sayfa yükleniyor...
Sayfa yükleniyor...
Sayfa yükleniyor...
Sayfa yükleniyor...
Sayfa yükleniyor...
Sayfa yükleniyor...
Sayfa yükleniyor...
Sayfa yükleniyor...
Sayfa yükleniyor...
Sayfa yükleniyor...
Sayfa yükleniyor...
Sayfa yükleniyor...
Sayfa yükleniyor...
Sayfa yükleniyor...
Sayfa yükleniyor...
Sayfa yükleniyor...
Sayfa yükleniyor...
Sayfa yükleniyor...
Sayfa yükleniyor...
Sayfa yükleniyor...
Sayfa yükleniyor...
Sayfa yükleniyor...
Sayfa yükleniyor...
Sayfa yükleniyor...
Sayfa yükleniyor...
Sayfa yükleniyor...
Sayfa yükleniyor...
Sayfa yükleniyor...
Sayfa yükleniyor...
Sayfa yükleniyor...
Sayfa yükleniyor...
Sayfa yükleniyor...
Sayfa yükleniyor...
Sayfa yükleniyor...
Sayfa yükleniyor...
Sayfa yükleniyor...
Sayfa yükleniyor...
Sayfa yükleniyor...
Sayfa yükleniyor...
Sayfa yükleniyor...
Sayfa yükleniyor...
Sayfa yükleniyor...
Sayfa yükleniyor...
Sayfa yükleniyor...
Sayfa yükleniyor...
Sayfa yükleniyor...
Sayfa yükleniyor...
Sayfa yükleniyor...
Sayfa yükleniyor...
Sayfa yükleniyor...
Sayfa yükleniyor...
Sayfa yükleniyor...
Sayfa yükleniyor...
Sayfa yükleniyor...
Sayfa yükleniyor...
Sayfa yükleniyor...
Sayfa yükleniyor...
Sayfa yükleniyor...
Sayfa yükleniyor...
Sayfa yükleniyor...
Sayfa yükleniyor...
Sayfa yükleniyor...
Sayfa yükleniyor...
Sayfa yükleniyor...
Sayfa yükleniyor...
Sayfa yükleniyor...
Sayfa yükleniyor...
Sayfa yükleniyor...
Sayfa yükleniyor...
Sayfa yükleniyor...
Sayfa yükleniyor...
Sayfa yükleniyor...
Sayfa yükleniyor...
Sayfa yükleniyor...
Sayfa yükleniyor...
Sayfa yükleniyor...
Sayfa yükleniyor...
Sayfa yükleniyor...
Sayfa yükleniyor...
Sayfa yükleniyor...
Sayfa yükleniyor...
Sayfa yükleniyor...
Sayfa yükleniyor...
Sayfa yükleniyor...
Sayfa yükleniyor...
Sayfa yükleniyor...
Sayfa yükleniyor...
Sayfa yükleniyor...
Sayfa yükleniyor...
Sayfa yükleniyor...
Sayfa yükleniyor...
Sayfa yükleniyor...
Sayfa yükleniyor...
Sayfa yükleniyor...
Sayfa yükleniyor...
Sayfa yükleniyor...
Sayfa yükleniyor...
Sayfa yükleniyor...
Sayfa yükleniyor...
Sayfa yükleniyor...
Sayfa yükleniyor...
Sayfa yükleniyor...
Sayfa yükleniyor...
Sayfa yükleniyor...
Sayfa yükleniyor...
Sayfa yükleniyor...
Sayfa yükleniyor...
Sayfa yükleniyor...
Sayfa yükleniyor...
Sayfa yükleniyor...
Sayfa yükleniyor...
Sayfa yükleniyor...
Sayfa yükleniyor...
Sayfa yükleniyor...
Sayfa yükleniyor...
Sayfa yükleniyor...
Sayfa yükleniyor...
Sayfa yükleniyor...
Sayfa yükleniyor...
Sayfa yükleniyor...
Sayfa yükleniyor...
Sayfa yükleniyor...
Sayfa yükleniyor...
Sayfa yükleniyor...
Sayfa yükleniyor...
Sayfa yükleniyor...
Sayfa yükleniyor...
Sayfa yükleniyor...
Sayfa yükleniyor...
Sayfa yükleniyor...
Sayfa yükleniyor...
Sayfa yükleniyor...
Sayfa yükleniyor...
Sayfa yükleniyor...
Sayfa yükleniyor...
Sayfa yükleniyor...
Sayfa yükleniyor...
Sayfa yükleniyor...
Sayfa yükleniyor...
Sayfa yükleniyor...
Sayfa yükleniyor...
Sayfa yükleniyor...
Sayfa yükleniyor...
Sayfa yükleniyor...
Sayfa yükleniyor...
Sayfa yükleniyor...
Sayfa yükleniyor...
Sayfa yükleniyor...
Sayfa yükleniyor...
Sayfa yükleniyor...
Sayfa yükleniyor...
Sayfa yükleniyor...
Sayfa yükleniyor...
Sayfa yükleniyor...
Sayfa yükleniyor...
Sayfa yükleniyor...
Sayfa yükleniyor...
Sayfa yükleniyor...
Sayfa yükleniyor...
Sayfa yükleniyor...
Sayfa yükleniyor...
Sayfa yükleniyor...
Sayfa yükleniyor...
Sayfa yükleniyor...
Sayfa yükleniyor...
Sayfa yükleniyor...
Sayfa yükleniyor...
Sayfa yükleniyor...
Sayfa yükleniyor...
Sayfa yükleniyor...
Sayfa yükleniyor...
-
 1
1
-
 2
2
-
 3
3
-
 4
4
-
 5
5
-
 6
6
-
 7
7
-
 8
8
-
 9
9
-
 10
10
-
 11
11
-
 12
12
-
 13
13
-
 14
14
-
 15
15
-
 16
16
-
 17
17
-
 18
18
-
 19
19
-
 20
20
-
 21
21
-
 22
22
-
 23
23
-
 24
24
-
 25
25
-
 26
26
-
 27
27
-
 28
28
-
 29
29
-
 30
30
-
 31
31
-
 32
32
-
 33
33
-
 34
34
-
 35
35
-
 36
36
-
 37
37
-
 38
38
-
 39
39
-
 40
40
-
 41
41
-
 42
42
-
 43
43
-
 44
44
-
 45
45
-
 46
46
-
 47
47
-
 48
48
-
 49
49
-
 50
50
-
 51
51
-
 52
52
-
 53
53
-
 54
54
-
 55
55
-
 56
56
-
 57
57
-
 58
58
-
 59
59
-
 60
60
-
 61
61
-
 62
62
-
 63
63
-
 64
64
-
 65
65
-
 66
66
-
 67
67
-
 68
68
-
 69
69
-
 70
70
-
 71
71
-
 72
72
-
 73
73
-
 74
74
-
 75
75
-
 76
76
-
 77
77
-
 78
78
-
 79
79
-
 80
80
-
 81
81
-
 82
82
-
 83
83
-
 84
84
-
 85
85
-
 86
86
-
 87
87
-
 88
88
-
 89
89
-
 90
90
-
 91
91
-
 92
92
-
 93
93
-
 94
94
-
 95
95
-
 96
96
-
 97
97
-
 98
98
-
 99
99
-
 100
100
-
 101
101
-
 102
102
-
 103
103
-
 104
104
-
 105
105
-
 106
106
-
 107
107
-
 108
108
-
 109
109
-
 110
110
-
 111
111
-
 112
112
-
 113
113
-
 114
114
-
 115
115
-
 116
116
-
 117
117
-
 118
118
-
 119
119
-
 120
120
-
 121
121
-
 122
122
-
 123
123
-
 124
124
-
 125
125
-
 126
126
-
 127
127
-
 128
128
-
 129
129
-
 130
130
-
 131
131
-
 132
132
-
 133
133
-
 134
134
-
 135
135
-
 136
136
-
 137
137
-
 138
138
-
 139
139
-
 140
140
-
 141
141
-
 142
142
-
 143
143
-
 144
144
-
 145
145
-
 146
146
-
 147
147
-
 148
148
-
 149
149
-
 150
150
-
 151
151
-
 152
152
-
 153
153
-
 154
154
-
 155
155
-
 156
156
-
 157
157
-
 158
158
-
 159
159
-
 160
160
-
 161
161
-
 162
162
-
 163
163
-
 164
164
-
 165
165
-
 166
166
-
 167
167
-
 168
168
-
 169
169
-
 170
170
-
 171
171
-
 172
172
-
 173
173
-
 174
174
-
 175
175
-
 176
176
-
 177
177
-
 178
178
-
 179
179
-
 180
180
-
 181
181
-
 182
182
-
 183
183
-
 184
184
-
 185
185
-
 186
186
-
 187
187
-
 188
188
-
 189
189
-
 190
190
-
 191
191
-
 192
192
-
 193
193
-
 194
194
-
 195
195
-
 196
196
-
 197
197
-
 198
198
-
 199
199
-
 200
200


diğer dillerde
- español: Beko MGB 25332 BG El manual del propietario
- français: Beko MGB 25332 BG Le manuel du propriétaire
- italiano: Beko MGB 25332 BG Manuale del proprietario
- Deutsch: Beko MGB 25332 BG Bedienungsanleitung
- português: Beko MGB 25332 BG Manual do proprietário
- Nederlands: Beko MGB 25332 BG de handleiding
İlgili makaleler
Diğer belgeler
-
Haier HWO38MG4HXB Kullanım kılavuzu
-
Hoover HMIG20GDFN Kullanım kılavuzu
-
-
IKEA TILLREDA Kullanım kılavuzu
-
Electrolux LMS4253TMX Kullanım kılavuzu
-
Candy CMW 2070M Kullanım kılavuzu
-
IKEA VÄRMD Microwave Oven Kullanım kılavuzu
-
Hotpoint MP796IXHA El kitabı
-
Franke FMW 250 G XS Installation And Operating Instructions Manual
-
Hotpoint MWHA 2022 B El kitabı