Microlife BP 3AS1-2 Kullanım kılavuzu
- Kategori
- Kan basıncı birimleri
- Tip
- Kullanım kılavuzu

IB BP 3AS1-2 S-V4 1021 - Revision Date: 2021-02-17
Read the instructions carefully before using this device.
Veuillez lire attentivement les instructions avant d’utiliser ce produit.
Aygıtı kullanmadan önce, talimatları dikkatle okuyun.
Microlife AG
Espenstrasse 139
9443 Widnau / Switzerland
www.microlife.com
EC
REP
Microlife UAB
P. Lukšio g. 32
08222 Vilnius
Lithuania

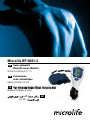
Microlife BP 3AS1-2
Semi-automatic
Blood Pressure Monitor
Instruction Manual (1-11)
Tensiomètre
semi-automatique
Mode d’emploi (12-23)
Yarı Otomatik Koldan Ölçen Tansiyon AletiYarı Otomatik Koldan Ölçen Tansiyon Aleti
Kullan›m K›lavuzu
(24-35)
AR
(47-36)
EN
FR
TR

Semi-automatic Blood Pressure Monitor
Instruction Manual
Important Safety Instructions
Type BF applied part
Batteries and electronic devices must be disposed of in accordance with the locally
applicable regulations, not with domestic waste.
Ensure that children do not use the device unsupervised; some parts are small enough
to be swallowed. Be aware of the risk of strangulation in case this device is supplied with cables
or tubes.
Keep dry
EN
Intended use:
This oscillometric blood pressure monitor is intended for measuring non-invasive blood pressure in people
aged 12 years or older.
It is clinically validated in patients with hypertension, hypotension, diabetes, pregnancy, pre-eclampsia,
atherosclerosis, end-stage renal disease, obesity and the elderly.

1
Table of contents
1. Introduction
1.1. Features
1.2. Important information about self-measurement
2. Important information on the subject of blood pressure and its measurement
2.1. How does high/low blood pressure arise?
2.2. Which values are normal?
2.3. What can be done, if regular high/low values are obtained?
3. The various components of the blood pressure monitor
4. Putting the blood pressure monitor into operation
4.1. Inserting the batteries
4.2. Tube connection
5. Carrying out a measurement
5.1. Before the measurement
5.2. Common sources of error
5.3. Fitting the cuff
5.4. Measuring procedure
5.5. Inflating further
5.6. Discontinuing a measurement
5.7. Memory – displaying the last measurement
6. Error messages/malfunctions
7. Care and maintenance, recalibration
8. Guarantee
9. Technical specifications
10. www.microlife.com

1. Introduction
1.1. Features
The blood pressure monitor is a semi-automatic, digital blood pressure measuring device for use on the
upper arm, which enables very fast and reliable measurement of the systolic and diastolic blood pressure
as well as the pulse frequency by way of the oscillometric method of measuring.
The device offers a very high and clinical tested measurement accuracy and has been designed to provide a
maximum of user-friendliness.
Before using, please read through this instruction manual carefully and then keep it in a safe place. For
further questions on the subject of blood pressure and its measurement, please contact your doctor.
Attention!
1.2. Important information about self-measurement
• Do not forget: self-measurement means control, not diagnosis or treatment. Unusual values must
always be discussed with your doctor. Under no circumstances should you alter the dosages of any
drugs prescribed by your doctor.
• The pulse display is not suitable for checking the frequency of heart pacemakers!
• In cases of cardiac irregularity (Arrhythmia), measurements made with this device should only be evalu-
ated after consultation with the doctor.
Electromagnetic interference
The device contains sensitive electronic components (Microcomputer). Therefore, avoid strong electrical
or electromagnetic fields in the direct vicinity of the device (e.g. mobile telephones, microwave cookers).
These can lead to temporary impairment of the measuring accuracy.
☞ Do not use this device close to strong electromagnetic fields such as mobile telephones or radio
installations. Keep a minimum distance of 3.3 m from such devices when using this device.
2. Important information on the subject of blood pressure and its measurement
2.1. How does high/low blood pressure arise?
The level of blood pressure is determined in a part of the brain, the so-called circulatory centre, and adapt-
ed to the respective situation by way of feedback via the nervous system. To adjust the blood pressure, the
strength and frequency of the heart (Pulse), as well as the width of circulatory blood vessels is altered. The
latter is effected by way of fine muscles in the blood-vessel walls.
The level of arterial blood pressure changes periodically during the heart activity: During the «blood ejec-
tion» (Systole) the value is maximal (systolic blood pressure value), at the end of the heart’s «rest period»
(Diastole) minimal (diastolic blood pressure value).
The blood pressure values must lie within certain normal ranges in order to prevent particular dis eases.
2.2. Which values are normal?
Blood pressure is too high if at rest, the diastolic pressure is above 90 mmHg and/or the systolic blood pres-
sure is over 140 mmHg. In this case, please consult your doctor immediately. Long-term values at this level
endanger your health due to the associated advancing damage to the blood vessels in your body.
With blood pressure values that are too low, i.e. systolic values under 100 mmHg and/or diastolic values
under 60 mmHg, likewise, please consult your doctor.
2

3
Even with normal blood pressure values, a regular self-check with your blood pressure monitor is recom-
mended. In this way you can detect possible changes in your values early and react appropriately.
If you are undergoing medical treatment to control your blood pressure, please keep a record of the level
of your blood pressure by carrying out regular self-measurements at specific times of the day. Show these
values to your doctor. Never use the results of your measurements to alter independently the drug
doses prescribed by your doctor.
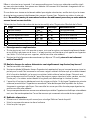
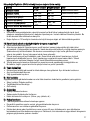
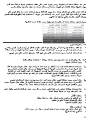
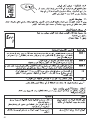
Table for classifying blood pressure values (units mmHg) according to World Health Organization:
Range Systolic Diastolic Recommendation
1. blood pressure normal
< 120 < 80
Self-check
2. blood pressure normal
120 - 129 80 - 84
Self-check
3. blood pressure slightly high
130 - 139 85 - 89
Consult your doctor
4. blood pressure too high
140 - 159 90 - 99
Seek medical advice
5. blood pressure far too high
160 - 179 100 - 109
Seek medical advice
6. blood pressure dangerously high
≥ 180 ≥ 110
Urgently seek medical advice!
☞ Further information
• If your values are mostly standard under resting conditions but exceptionally high under conditions of
physical or psychological stress, it is possible that you are suffering from so-called «labile hyperten-
sion». Please consult your doctor if you suspect that this might be the case.
• Correctly measured diastolic blood pressure values above 120 mmHg require immediate medical
treatment.
2.3. What can be done, if regular increased/low values are obtained?
a) Please consult your doctor.
b) Increased blood pressure values (various forms of hypertension) are associated long- and medium term
with considerable risks to health. This concerns the arterial blood vessels of your body, which are en-
dangered due to constriction caused by deposits in the vessel walls (Arteriosclerosis). A deficient sup-
ply of blood to important organs (heart, brain, muscles) can be the result. Furthermore, with long-term
continuously increased blood pressure values, the heart will become structurally damaged.
c) There are many different causes of the appearance of high blood pressure. We differentiate between
the common primary (essential) hypertension, and secondary hypertension. The latter group can be
ascribed to specific organic malfunctions. Please consult your doctor for information about the possible
origins of your own increased blood pressure values.
d) There are measures which you can take, not only for reducing a medically established high blood pres-
sure, but also for prevention. These measures are part of your general way of life:
A) Eating habits
• Strive for a normal weight corresponding to your age. Reduce overweight!
• Avoid excessive consumption of common salt.
• Avoid fatty foods.
B) Previous illnesses
Follow consistently any medical instructions for treating previous illness such as:
• Diabetes (Diabetes mellitus)
• Fat metabolism disorder
• Gout

C) Habits
• Give up smoking completely
• Drink only moderate amounts of alcohol
• Restrict your caffeine consumption (Coffee)
D) Physical constitution
• After a preliminary medical examination, do regular sport.
• Choose sports which require stamina and avoid those which require strength.
• Avoid reaching the limit of your performance.
•
With previous illnesses and/or an age of over 40 years, please consult your doctor before beginning your
sporting activities. He will advise you regarding the type and extent of types of sport that are possible for you.
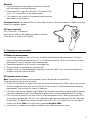
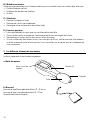
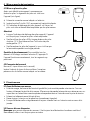
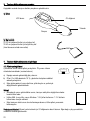
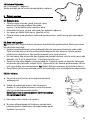
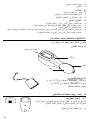
3. The various components of the blood pressure monitor
The illustration shows the blood pressure monitor, consisting of:
a) Measuring unit
b) Cuff
cuff type M for arm circumference 22 - 32 cm or
cuff type L for arm circumference 32 - 42 cm
(available as special accessory)
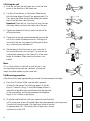
4. Putting the blood pressure monitor into operation
4.1. Inserting the batteries
After you have unpacked your device, first insert the
batteries. The battery compartment is located on the
underside of the device (see illustration).
a) Remove cover as illustrated
b) Insert the batteries (2 x size 1.5 V), thereby observing the indicated polarity.
c) If the battery warning appears in the display, the batteries are empty and must
be replaced by new ones.
4
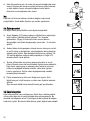
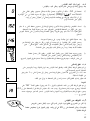
O/I button
LCD-display
Bulb
Handle

Attention!
• After the battery warning appears, the device is blocked
until the batteries have been replaced.
• Please use «AAA» long-life or alkaline 1.5 V batteries. The
use of 1.2 V accumulators is not recommended.
• If this device is left unused for long periods, please remove
the batteries from the device.
Functional check: Press and hold the O/I button down to test all the display elements. When functioning
correctly all segments appear.
4.2. Tube connection
Cuff (1-tube cuff + T-connector):
Insert the cuff tube into the opening provided on the back
of the device, as shown in the diagram.
5. Carrying out a measurement
5.1. Before the measurement
• Avoid eating, smoking as well as all forms of exertion directly before the measurement. All these
factors influence the measurement result. Try to find time to relax by sitting in an armchair in a quiet
atmosphere for about 5 minutes before measurement.
• Remove any garment that fits closely to your upper arm.
• Always measure on the same arm (normally left).
• Attempt to carry out the measurements regularly at the same time of day, since the blood pressure
changes during the course of the day.
5.2. Common sources of error
Note: Comparable blood pressure measurements always require the same conditions!
These are normally always quiet conditions.
• All efforts by the patient to support their arm can increase blood pressure. Make sure you are in a com-
fortable, relaxed position and do not activate any of the muscles in the measurement arm during the
measurement. Use a cushion for support if necessary.
• If the wrist artery lies considerably lower (higher) than the heart, an erroneously higher (lower) blood pres-
sure will be measured! (Each 15 cm difference in height results in a measurement error of 10 mmHg!)
• Cuffs that are too narrow or too short result in false measurement values. Selecting the correct cuff is
of extraordinary importance. The cuff size is dependent upon the circumference of the arm (measured
in the centre). The permissible range is printed on the cuff. If this is not suitable for your use, please
contact your dealer. Note: Only use clinically approved Original-Cuffs!
• A loose cuff or a sideways protruding air-pocket causes false measurement values.
5

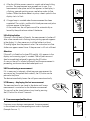
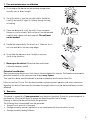
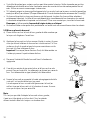
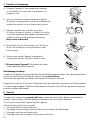
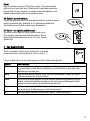
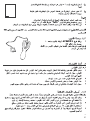
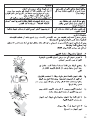
5.3. Fitting the cuff
a) Push the cuff over the left upper arm so that the tube
points in the direction of the lower arm.
b) Lay the cuff on the arm as illustrated. Make certain
that the lower edge of the cuff lies approximately 2 to
3 cm above the elbow and that the rubber tube leaves
the cuff on the inner side of the arm.
Important! The mark (ca. 3 cm long bar) must lie over
the artery which runs down the inner side of the arm.
c) Tighten the free end of the cuff and close the cuff by
affixing the closer.
d) There must be no free space between the arm and the
cuff as this would influence the result. Clothing must
not restrict the arm. Any piece of clothing which does
(e.g. a pullover) must be taken off.
e) Secure the cuff with the closer in such a way that it
lies comfortably and is not too tight. Lay your arm on
a table (palm upwards) so that the cuff is at the same
height as the heart. Make sure that the tube is not
kinked.
Note:
If it is not possible to fit the cuff to your left arm, it can
also be placed on the right one. However, all measure-
ments should be made using the same arm.
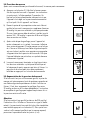
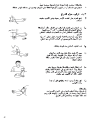
5.4. Measuring procedure
After the cuff has been appropriately positioned, the measurement can begin:
a) Press the O/I button. Make sure the tube is properly
attached to the device. The following appears in the dis-
play for 2 seconds: (Diag.). A short be-be-beep follows to
indicate that the device has equilibrated with the pressure
of the surroundings and the measurement can therefore
begin. A «0» is shown in the display.
b) Grasp the handle and bulb with your free hand and Inflate the
cuff to a pressure at least 40 mmHg higher than the expected systolic pressure.
If you do not know the value of this pressure, inflate to a value
of approximately 160 - 180 mmHg. The cuff pressure is shown
continuously on the LCD.
6
2 - 3 cm
tube

c) After the inflation process remain in a quiet and relaxed sitting
position. The measurement now proceeds on its own. If no
measurement takes place and all that appears in the display is
a flashing, upwards pointing arrow, see below under «Inflate
further». When the device detects a pulse, a heart symbol in the
display starts to flash.
d) A longer beep is sounded when the measurement has been
completed. The systolic, and diastolic blood pressures and pulse
rate now appear in the display.
At the same time, the cuff pressure will be automatically re-
leased by the quick release valve of the device.
5.5. Inflating further
If the cuff is not inflated sufficiently, the measurement is broken off
after a few seconds and a flashing arrow pointing upwards appears
in the display. It is then necessary to inflate further to at least
20 mmHg higher than the previous value. The instruction to inflate
further can appear several times if the pressure is still not sufficient.
Attention:
If the cuff is inflated too far (over 300 mmHg), «HI» appears in the
display and a warning signal is sounded. The cuff pressure must
then be immediately released by pressing the 0/I button.
As soon as the cuff is inflated sufficiently and the measurement is
proceeding, continue as described under points c-d.
5.6. Discontinuing a measurement
If it is necessary to interrupt a blood pressure measurement for
any reason (e.g. the patient feels unwell), the O/I button can be
pressed at any time.
The device immediately lowers the cuff-pressure automatically.
5.7. Memory – displaying the last measurement
The measured results are stored in the device until a new
measurement is carried out or the batteries are removed.
You can call up the stored values at any time by pressing
the O/I button for at least 3 seconds.
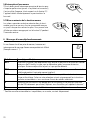
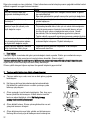
6. Error messages/malfunctions
If an error occurs during a measurement, the measurement
is discontinued and a corresponding error code is displayed.
(Example Error no. 1)
7
MR

* Please consult your doctor, if this or any other problem occurs repeatedly.
Other possible malfunctions and their elimination – If problems occur when using the device, the
following points should be checked and if necessary, the corresponding measures are to be taken:
☞ Further information
The level of blood pressure is subject to fluctuations even with healthy people. Important thereby is, that
comparable measurements always require the same conditions (rest conditions)!
You must consult your specialist dealer or chemist if there are technical problems with the blood pressure
device. Never attempt to repair the device yourself!
Any unauthorised opening of the device invalidates all guarantee claims!
8
Error No. Possible cause(s)
ERR 1
The systolic pressure was determined but after wards the cuff pressure fell below 20 mmHg.
This situation can occur, for example, if the tube becomes unplugged after the systolic blood
pressure has been measured. Further possible cause: No pulse has been detected.
ERR 2
Unnatural pressure impulses influence the measurement result. Reason: The arm was moved
during the measurement (Artefact).
ERR 5
The measured results have indicated an unacceptable difference between the systolic and
diastolic pressure. Take another measurement, carefully following the instructions. Contact
your doctor, if you still obtain unusual results.
HI
The pressure in the cuff is too high (over 299 mmHg) OR the pulse is too high (over 200 beats
per minute). Relax for 5 minutes and repeat the measurement.*
LO
The pulse is too low (less than 40 beats per minute). Repeat the measurement.*
Malfunction Remedy
The display remains empty when the instrument
is switched on although the batteries are in
place.
1. Check whether the batteries are installed with the
correct polarity and correct if necessary.
2. If the display is unusual, re-insert batteries or
exchange them.
The pressure does not rise although the pump
is running.
• Check the connection of the cuff tube and connect
properly if necessary.
The device frequently fails to measure the blood
pressure values, or the values measured are too
low (too high).
1. Fit the cuff correctly on the arm.
2. Before starting the measurement make sure that
the cuff is not fitted too tightly and that there is no
rolled-up sleeve exerting pressure on the arm above
the measuring position. Take off articles of clothing if
necessary.
3. Measure the blood pressure again in complete peace
and quiet.
Every measurement results in different values
although the device functions normally and the
values are displayed.
• Please read the following information and the points
listed under «Common sources of error». Repeat the
measurement.
The blood pressure values measured differ from
those measured by the doctor.
• Record the daily development of the values and
consult your doctor about them.

9
7. Care and maintenance, recalibration
a) Do not expose the device to either extreme temperatures,
humidity, dust or direct sunlight.
b) The cuff contains a sensitive air-tight bubble. Handle this
carefully and avoid all types of straining through twisting
or buckling.
c) Clean the device with a soft, dry cloth. Do not use petrol,
thinners or similar solvent. Spots on the cuff can be removed
carefully with a damp cloth and soapsuds. The cuff must
not be washed!
d) Handle the tube carefully. Do not pull on it. Likewise, this is
not to be buckled or laid over sharp edges.
e) Do not drop the device or treat it roughly in any way.
Avoid strong vibrations.
f) Never open the device! Otherwise the manufacturer
calibration becomes invalid!
Periodical recalibration
Sensitive measuring devices must from time to time be checked for accuracy. We therefore recommend a
periodical inspection of the static pressure display every 2 years.
Your specialist dealer would be pleased to provide more extensive information about this.
Follow instructions for use. This document provides important product operation and safety information
regarding this device. Please read this document thoroughly before using the device and keep for future
reference.
8. Guarantee
This device is covered by a 3 year guarantee from the date of purchase. During this guarantee period, at
our discretion, Microlife will repair or replace the defective product free of charge.
Opening or altering the device invalidates the guarantee.
The following items are excluded from the guarantee:
• Transport costs and risks of transport.
• Damage caused by incorrect application or non-compliance with the instructions for use.
• Damage caused by leaking batteries.
Gasoline

10
• Damage caused by accident or misuse.
• Packaging/storage material and instructions for use.
• Regular checks and maintenance (calibration).
• Accessories and wearing parts: Batteries, pumping ball, power adapter (optional)
The cuff is covered by a functional guarantee (bladder tightness) for 2 years.
Should guarantee service be required, please contact the dealer from where the product was purchased, or
your local Microlife service. You may contact your local Microlife service through our website:
www.microlife.com/support
Compensation is limited to the value of the product. The guarantee will be granted if the complete product
is returned with the original invoice. Repair or replacement within guarantee does not prolong or renew the
guarantee period. The legal claims and rights of consumers are not limited by this guarantee.
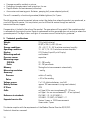
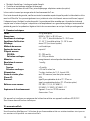
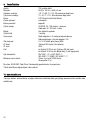
9. Technical specifications
This device complies with the requirements of the Medical Device Directive 93/42/EEC.
Technical alterations reserved.
Weight:
310 g (with batteries)
Size:
68 (W) x 186 (L) x 48.5 (H) mm
Storage conditions:
-20 - +55 °C; 15 - 95 % relative maximum humidity
Operating conditions:
10 - 40 °C; 15 - 95 % relative maximum humidity
Display:
LCD-Display (Liquid Crystal Display)
Measuring method:
oscillometric
Pressure sensor:
capacitive
Measuring range:
SYS/DIA:
20 - 280 mmHg
Pulse:
40 - 200 per minute
Memory:
Storing the last measurements automatically
Measuring resolution:
1 mmHg
Accuracy:
Pressure:
within ± 3 mmHg
Pulse:
± 5% of the reading
Voltage source:
2 x 1.5 V alkaline batteries; size AAA
Battery lifetime:
approx. 780 measurements (using new batteries)
IP Class:
IP20
Cuffs:
cuff type M for arm circumference 22 - 32 cm or
cuff type L for arm circumference 32 - 42 cm (optional)
Reference to standards:
EN 1060-1 /-3 /-4; IEC 60601-1;
IEC 60601-1-2 (EMC); IEC 60601-1-11
Expected service life:
Device: 5 years or 10000 measurements
Accessories: 2 years

11
10. www.microlife.com
Detailed user information about our products and services can be found at www.microlife.com

12
FR
Tensiomètre semi-automatique
Mode d’emploi
I
mportantes precautions d’emploi
Partie appliquée du type BF
Les piles et appareils électroniques doivent être éliminés en conformité avec les prescriptions
locales, séparément des ordures ménagères.
Ne laissez jamais les enfants utiliser l’appareil sans surveillance. Certaines de ses parties sont si
petites qu’elles peuvent être avalées. Possible risque d’étranglement dans le cas où l’appareil est
fourni avec des câbles ou des tuyaux.
A conserver dans un endroit sec
Utilisation:
Ce tensiomètre oscillométrique est conçu pour mesurer la pres-sion artérielle de manière non invasive chez
les personnes âgées de 12 ans et plus.
Il est validé cliniquement chez les patients souffrant d’hyperten-sion, d’hypotension, de diabète, de
grossesse, de pré-éclampsie, d’athérosclérose, d’insuffisance rénale terminale, d’obésité ainsi que pour les
personnes âgées.

13
Table des matières
1. Introduction
1.1. Caractéristiques
1.2. Informations importantes pour prendre soi-même sa tension artérielle
2. Informations importantes concernant la tension artérielle et sa mesure
2.1. Quelle est l’origine d’une tension basse/haute?
2.2. Quelles sont les valeurs normales?
2.3. Que faire lorsque les valeurs déterminées sont régulièrement trop élevées/trop basses?
3. Les différents éléments du tensiomètre
4. Mise en marche du tensiomètre
4.1. Mise en place des piles
4.2. Connexion du brassard
5. Prise de mesure
5.1. Avant d’effectuer une mesure
5.2. Sources d’erreur fréquentes
5.3. Mise en place du brassard
5.4. Procédure de mesure
5.5. Augmentation de la pression du brassard
5.6. Interruption d’une mesure
5.7. Mise en mémoire de la dernière mesure
6. Messages d’erreurs/dysfonctionnements
7. Entretien et réétalonnage
8. Garantie
9. Données techniques
10. www.microlife.fr

14
1. Introduction
1.1. Caractéristiques
Le tensiomètre (avec affichage intégré de l’heure et de la date) est un appareil à affichage digital semi-
automatique qui permet de mesurer très rapidement et avec une grande fiabilité la tension systolique et
diastolique ainsi que la fréquence cardiaque (pouls) au moyen d’un procédé de mesure oscillométrique.
Cet appareil d’une très grande précision de mesure testée en clinique, a été conçu pour offrir un maximum
de confort d’emploi.
Veuillez lire attentivement ce mode d’emploi avant utilisation puis rangez-le dans un endroit sûr. Pour toute
autre question concernant la tension artérielle et sa mesure, veuillez vous adresser à votre médecin.
Attention!
1.2. Informations importantes pour prendre soi-même sa tension artérielle
• N’oubliez pas: en prenant soi-même sa tension, on ne fait qu’un contrôle. Ce n’est ni un diagnostic
ni un traitement. Lorsque les valeurs sont anormales, il faut toujours en parler à un médecin. Ne modi-
fiez sous aucun prétexte par vous-même les doses de médicament prescrites par votre médecin.
• L’affichage du pouls ne permet pas de contrôler la fréquence des stimulateurs cardiaques!
• En cas de troubles du rythme cardiaque (arythmie), vous ne devriez utiliser cet appareil qu’après avoir
consulté le médecin.
Interférences électromagnétiques
L’appareil contient des éléments électroniques sensibles (micro-ordinateur). Il faut donc éviter les forts
champs électriques ou électromagnétiques à proximité immédiate de l’appareil (p. ex. téléphones portables,
four à micro-ondes). Cela peut diminuer temporairement la précision de mesure.
☞ Ne mettez pas l’appareil en service dans un champ électromagnétique de grande intensité, par exemple
à proximité de téléphones portables ou d’installations radio. Garder une distance minimale de 3,3 mètres
de ces appareils lors de toute utilisation.
2. Informations importantes concernant la tension artérielle et sa mesure
2.1. Quelle est l’origine d’une tension basse/haute?
Le niveau de la tension est déterminé dans une partie du cerveau appelée centre cardio-vasculaire et il est
adapté à chaque situation par le biais de réactions passant par le système nerveux. Pour réguler la tension
sont modifiés la force de battement du cœur et sa fréquence (pouls) ainsi que le diamètre des vaisseaux san-
guins. Cette modification est faite par de fins muscles qui se trouvent dans les parois des vaisseaux sanguins.
Le niveau de la tension artérielle change périodiquement au cours de l’activité cardiaque: lorsque le sang est
«éjecté» (systole), la valeur est à son maximum (tension systolique), à la fin de la «phase de relâchement»
(diastole), elle est à son minimum (tension diastolique).
Les valeurs de la tension doivent se situer dans des registres normaux pour prévenir certaines maladies.
2.2. Quelles sont les valeurs normales?
La tension est trop élevée lorsqu’au repos la tension diastolique dépasse 90 mmHg et/ou la tension sys-
tolique 140 mmHg. Dans ce cas, veuillez consulter immédiatement votre médecin. A long terme, un niveau
de tension aussi élevé est un risque pour votre santé parce qu’il s’accompagne de lésions progressives des
vaisseaux sanguins de votre corps.
De même, veuillez consulter votre médecin si la tension est trop basse, c’est-à-dire si les valeurs systo-
liques sont inférieures à 100 mmHg et/ou les valeurs diastoliques inférieures à 60 mmHg.

15
Même si votre tension est normale, il est recommandé que vous fassiez vous-même des contrôles réguli-
ers avec votre tensiomètre. Vous pouvez ainsi détecter suffisamment tôt d’éventuels changements de vos
valeurs et réagir en conséquence.
Si vous deviez vous trouver en traitement médical pour réguler votre tension, veuillez tenir à jour le niveau
de votre tension en prenant régulièrement des mesures à heures fixes. Présentez ces valeurs à votre mé-
decin. Ne modifiez jamais par vous-même les doses de médicament prescrites par votre médecin
en vous basant sur vos résultats.
Tableau de classification des valeurs de tension (en mmHg) selon l’Organisation Mondiale de la Santé:
Plage
Systolique Diastolique
Recommandation
1. Tension normale
< 120 < 80
Contrôle personnel
2. Tension normale
120 - 129 80 - 84
Contrôle personnel
3. Tension légèrement élevée
130 - 139 85 - 89
Consultation médicale
4. Tension trop haute
140 - 159 90 - 99
Consultation médicale
5. Tension nettement trop haute
160 - 179 100 - 109
Consultation médicale
6. Tension dangereusement haute
≥ 180 ≥ 110
Consultation médicale immédiate!
☞ Renseignements complémentaires
• Si votre tension est tout à fait normale au repos, mais que les valeurs sont exceptionnellement élevées
en cas d’efforts physiques ou de stress, il se peut que vous souffriez de ce qu’on appelle une «hyperten-
sion labile». Si c’est ce que vous supposez, veuillez consulter votre médecin.
• Une tension diastolique mesurée correctement qui dépasse 120 mmHg nécessite un traitement
médical immédiat!
2.3. Que faire lorsque les valeurs déterminées sont régulièrement trop élevées/trop basses?
a) Veuillez consulter votre médecin.
b) Une tension élevée (différentes formes d’hypertension) représente à long ou à moyen terme un risque im-
portant pour la santé. Ceci concerne les vaisseaux sanguins artériels de votre corps qu’un rétrécissement
dû à la formation de dépôts sur les parois vasculaires (artériosclérose) met en danger. Cela peut avoir
pour conséquence une insuffisante de l’apport de sang aux organes importants (coeur, cerveau, muscles).
D’autre part, si les valeurs restent élevées à long terme, cela endommage la structure du coeur.
c) L’apparition d’une tension élevée peut avoir des origines multiples. On distingue l’hypertension primaire
commune (essentielle) et l’hypertension secondaire. Cette dernière peut être imputée à des dysfonc-
tionnements organiques spécifiques. Pour connaître les causes possibles de votre propre hypertension,
veuillez consulter votre médecin.
d) Vous pouvez prendre certaines mesures non seulement pour réduire l’hypertension établie par votre médecin
mais aussi de manière préventive. Ce sont des mesures qui concernent votre mode de vie en général:
A) Habitudes alimentaires
• Efforcez-vous d’atteindre un poids normal pour votre âge. Réduisez l’excès de poids!
• Evitez la consommation excessive de sel ordinaire.
• Evitez les plats trop gras.

16
B) Maladies existantes
Suivez consciencieusement tout traitement médical pour les maladies dont vous souffrez déjà telles que:
• Diabète (diabetes mellitus)
• Problèmes de métabolisme lipidique
• Arthrite
C) Stimulants
• Renoncez totalement à fumer
• Ne buvez de l’alcool que modérément
• Restreignez votre consommation de caféine (café)
D) Exercice physique
• Faites régulièrement du sport après un contrôle médical préalable.
• Choisissez des sports qui exigent de l’endurance et évitez ceux qui exigent de la force.
• Ne cherchez pas à aller jusqu’au bout de vos limites physiques.
• Si vous souffrez déjà de maladies et/ou si vous avez plus de 40 ans, veuillez consulter votre médecin
avant de commencer toute activité sportive. Il vous conseillera sur le type de sport et la fréquence qui
vous conviennent.
3. Les différents éléments du tensiomètre
Le dessin représente le tensiomètre comprenant:
a) Unité de mesure
b) Brassard
brassard de type M pour périmètre de bras 22 - 32 cm ou
brassard de type L pour périmètre de bras 32 - 42 cm
(disponible en accessoie spécial)
Bouton O/I
Ecran à cristaux
liquides
Poire
Poignée

17
4. Mise en marche du tensiomètre
4.1. Mise en place des piles
Après avoir déballé votre appareil, commencez par
insérer les piles. Le logement des piles est situé sous
l’appareil (voir figure).
a) Enlevez le couvercle comme indiqué sur le dessin.
b) Insérez les piles (2 x taille 1,5 V), en respectant la polarité indiquée.
c) Si l’indicateur de décharge des piles apparaît sur l’écran, les
piles sont vides et doivent être remplacées par des piles neuves.
Attention!
• Lorsque l’indicateur de décharge des piles apparaît, l’appareil
est bloqué jusqu’à ce que les piles soient remplacées.
• Veuillez utiliser des piles «AAA» longue durée ou des piles
alcalines 1,5 V. Nous déconseillons l’utilisation de piles
rechargeables 1,2 V.
• Veuillez enlever les piles de l’appareil si vous n’utilisez pas
le tensiomètre pendant une longue période.
Contrôle de fonctionnement: Pour contrôler tous les
éléments d’affichage, maintenir le bouton O/I appuyée. Si
l’appareil fonctionne correctement, tous les segments ap-
paraissent.
4.2. Connexion du brassard
Brassard (1-tuyau du brassard + raccord):
Insérez l’embout du tuyau du brassard dans l’ouverture
prévue au dos du boîtier comme indiqué sur le schéma.
5. Prise de mesure
5.1. Avant d’effectuer une mesure
• Evitez de manger, de fumer et de faire tout type d’effort juste avant de prendre votre tension. Tous ces
facteurs influencent le résultat de la mesure. Efforcez-vous de prendre le temps de vous relaxer en vous as-
seyant dans un fauteuil dans une atmosphère calme pendant environ 5 minutes avant la prise de tension.
• Enlevez tout vêtement serrant le haut du bras.
• Prenez toujours la tension sur le même bras (normalement à gauche).
• Essayez d’effectuer celles-ci régulièrement et toujours à heures fixes car la tension varie au cours de la
journée.
5.2. Sources d’erreur fréquentes
Remarque: pour pouvoir comparer les mesures, il faut toujours les effectuer dans les mêmes conditions!
Normalement, celles-ci sont toujours prises au calme.
Sayfa yükleniyor ...
Sayfa yükleniyor ...
Sayfa yükleniyor ...
Sayfa yükleniyor ...
Sayfa yükleniyor ...
Sayfa yükleniyor ...
Sayfa yükleniyor ...
Sayfa yükleniyor ...
Sayfa yükleniyor ...
Sayfa yükleniyor ...
Sayfa yükleniyor ...
Sayfa yükleniyor ...
Sayfa yükleniyor ...
Sayfa yükleniyor ...
Sayfa yükleniyor ...
Sayfa yükleniyor ...
Sayfa yükleniyor ...
Sayfa yükleniyor ...
Sayfa yükleniyor ...
Sayfa yükleniyor ...
Sayfa yükleniyor ...
Sayfa yükleniyor ...
Sayfa yükleniyor ...
Sayfa yükleniyor ...
Sayfa yükleniyor ...
Sayfa yükleniyor ...
Sayfa yükleniyor ...
Sayfa yükleniyor ...
Sayfa yükleniyor ...
Sayfa yükleniyor ...
-
 1
1
-
 2
2
-
 3
3
-
 4
4
-
 5
5
-
 6
6
-
 7
7
-
 8
8
-
 9
9
-
 10
10
-
 11
11
-
 12
12
-
 13
13
-
 14
14
-
 15
15
-
 16
16
-
 17
17
-
 18
18
-
 19
19
-
 20
20
-
 21
21
-
 22
22
-
 23
23
-
 24
24
-
 25
25
-
 26
26
-
 27
27
-
 28
28
-
 29
29
-
 30
30
-
 31
31
-
 32
32
-
 33
33
-
 34
34
-
 35
35
-
 36
36
-
 37
37
-
 38
38
-
 39
39
-
 40
40
-
 41
41
-
 42
42
-
 43
43
-
 44
44
-
 45
45
-
 46
46
-
 47
47
-
 48
48
-
 49
49
-
 50
50


Microlife BP 3AS1-2 Kullanım kılavuzu
- Kategori
- Kan basıncı birimleri
- Tip
- Kullanım kılavuzu
Diğer dillerde
- français: Microlife BP 3AS1-2 Manuel utilisateur
- English: Microlife BP 3AS1-2 User manual
İlgili Makaleler
-
Microlife BP 3AS1-2 Kullanım kılavuzu
-
Microlife BP A50 Kullanım kılavuzu
-
Microlife BP A80 Kullanım kılavuzu
-
Microlife BP B1 Classic Kullanım kılavuzu
-
Microlife AG1-20 El kitabı
-
Microlife BP A90-30 Kullanım kılavuzu
-
Microlife A100 Şartname
-
Microlife BP A130 Kullanım kılavuzu
-
Microlife BP B3 AFIB Kullanım kılavuzu
-

