
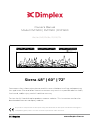
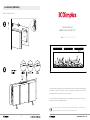
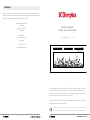
Owner’s Manual
Model: DVF1200 | DVF1500 | DVF1800
Consumer safety information: please read this manual before installing and operating
this appliance. failure to follow these instructions may result in a possible electric shock,
fire hazard, and/or injury and will void the warranty.
To view the full line of dimplex products see our website.. This instruction can be also
downloaded from our company website.
www.dimplex-fires.eu
EN / NL / DE / FR / PL / IT / ES / TR
The product complies with the European Safety Standards and the European Standard Electromagnetic
Compatibility (EMC) These cover the essential requirements of EEC Directives
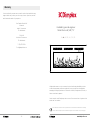
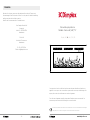
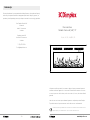
Sierra 48” | 60” | 72”

- 3 - www.dimplex-fires.eu- 2 -
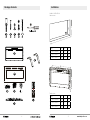
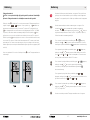
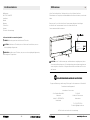
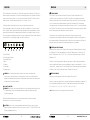
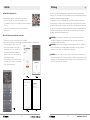
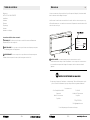
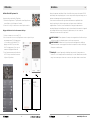
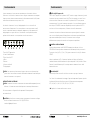
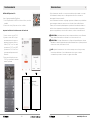
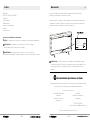
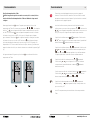
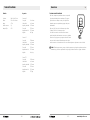
Package Contents Installation
IN-WALL INSTALLATION
Cabinet - mm
A
C
B
Model A B C
DVF 1200 / Sierra 48” 1057 165 470
DVF 1500 / Sierra 60” 1331 165 470
DVF 1800 / Sierra 72” 1636 165 470
Firebox - mm
Model D E F
DVF 1200 / Sierra 48” 1046 119 460
DVF 1500 / Sierra 60” 1318 119 460
DVF 1800 / Sierra 72” 1626 119 460

- 5 - www.dimplex-fires.eu- 4 -
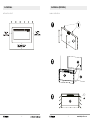
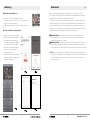
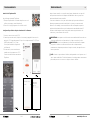
Installation (IN WALL)
IN-WALL INSTALLATION
Installation
INSTALLATION HEIGHT

- 7 - www.dimplex-fires.eu- 6 -
Installation (ON WALL)
ON-WALL INSTALLATION
Installation (IN WALL)
IN-WALL INSTALLATION

- 9 - www.dimplex-fires.eu- 8 -
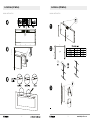
Installation
TABLE TOP INSTALLATION
Installation (ON WALL)
ON-WALL INSTALLATION

- 10 -
Installation (ON WALL)
TABLE TOP INSTALLATION
Owner’s Manual
Model: Sierra 48” | 60” | 72”
Consumer safety information: please read this manual before installing and operating
this appliance. failure to follow these instructions may result in a possible electric shock,
fire hazard, and/or injury and will void the warranty.
To view the full line of dimplex products see our website.. This instruction can be also
downloaded from our company website.
www.dimplex-fires.eu
EN / NL / DE / FR / PL / IT / ES / TR
The product complies with the European Safety Standards and the European Standard Electromagnetic
Compatibility (EMC) These cover the essential requirements of EEC Directives

- 13 - www.dimplex-fires.eu- 12 -
Welcome
IMPORTANT INSTRUCTIONS
Installation
Operation
Maintenance
Troubleshooting
Warranty
Technical Support
Conventions used in this manual:
NOTE: Procedures and techniques considered important enough to us.
CAUTION: Procedures and techniques which, if not carefully followed, will result in
damage to the equipment.
WARNING: Procedures and techniques which, if not carefully followed, will expose
Thank you and congratulations for choosing to purchase an electric fireplace
from Dimplex, the world leader in electric fireplaces.
Please record your model and serial numbers below for future reference:
model and serial numbers can be found on the Model and Serial Number Label
of your fireplace.
Model DVF1200 (Sierra 48”)
Volts220V-240V/50Hz
Effect 17.5 Watt
Watts
Serial NO.
1300W-1600W/6A
Glen Dimplex Benelux B.V.
Saturnus 8
8448 CC HEERENVEEN, THE NETHERLANDS
wk/year
MADE IN CHINA
DDDYYDB1 D XXX
CAUTION: Read all instructions and warnings carefully before starting installation.
Failure to follow these instructions may result in a possible electric shock or fire
hazard and will void the warranty.
NO NEED TO RETURN TO THE STORE
Questions with operation or assembly? Require Parts Information?
Product Under Manufacturer’s Warranty?
Contact us at:
Glen Dimplex Benelux B.V.
Saturnus 8
8448 CC Heerenveen
The Netherlands
PO Box 219
NL-8440 AE Heerenveen
The Netherlands
T. +31(0)513 656500
E. info@dimplex-fires.eu
For Troubleshooting and Technical Support
WelcomeTable of Contents EN

- 15 - www.dimplex-fires.eu- 14 -
IMPORTANT INSTRUCTIONSIMPORTANT INSTRUCTIONS
CAUTION: In order to avoid a hazard due to inadvertent resetting of the thermal cut-
out, this appliance must not be supplied through an external switching device, such
as a timer, or connected to a circuit that is regularly switched on and off by the utility.
• This appliance can be used by children aged from 8 years and above and persons with
reduced physical, sensory or mental capabilities or lack of experience and knowledge
if they have been given supervision or instruction concerning use of the appliance
in a safe way and understand the hazards involved. Children shall not play with the
appliance. Cleaning and user maintenance shall not be made by children without
supervision. A disconnecting switch incorporated in the fixed wiring shall be provided.
WARNING: The appliance carries the Warning Symbol indicating that it must not
be covered or has a Do not cover label. Do not cover or obstruct in any way the heat
outlet grille located at the top of the appliance overheating will result if the appliance is
accidentally covered. Do not place material or garments near the appliance, for instance
by curtains or furniture, as this could cause overheating and a fire risk..
In the event of a fault unplug the heater. Unplug the appliance when not required for
long periods. The supply cord must be placed on the right hand side of the heater away
from the heat outlet underneath the appliance.
Although this appliance complies with safety standards, we do not recommend ots ise
pm deep pile carpets or on long hair type of rugs.
CAUTION
RISK OF ELECTRIC SHOCK
DO NOT OPEN
NO USER-SERVICEABLE PARTS INSIDE
Read this manual before attempting to install or use the electric fireplace. Always follow
the warnings and safety instructions in this manual. When using electrical appliances,
basic precautions should always be followed to reduce the risk of fire, electric shock
following:
• Children of less than 3 years should be kept away unless continuously supervised.
• Children aged from 3 years and less than 8 years shall only switch on/off the appliance
provided that it has been placed or installed in its intended normal operating position
and they have been given supervision or instruction concerning use of the appliance
in a safe way and understand the hazards involved. Children aged from 3 years and
less than 8 years shall not plug in, regulate and clean the appliance or perform user
maintenance.
• If the supply cord is damaged, it must be replaced by the manufacturer, its service
agent or similarly qualified persons in order to avoid a hazard.
WARNING: In order to avoid overheating, do not cover the heater.
• Do not use this heater in the immediate surroundings of a bath, a shower or a
swimming pool.
• The heater must not be located immediately below a socket outlet.
• Do not use this heater with a programmer, timer, separate remotecontrol system or
any other device that switches the heater on automatically, since a fire risk exists if the
heater is covered or positioned incorrectly.
• There is possible danger of installation close to curtains and other combustible
materials.
CAUTION: Some parts of this product can become very hot and cause burns.
Particular attention has to be given where children and vulnerable people are
present.
• Do not use this heater if it has been dropped.
• Do not use if there are visible signs of damage to the heater.
• Use this heater on a horizontal and stable surface, or fix it to the wall, as applicable.
SAVE THESE INSTRUCTIONS
EN

- 17 - www.dimplex-fires.eu- 16 -
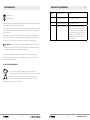
InstallationSpecifications
GROUNDING INSTRUCTIONS
• This product is equipped with a cord that has
an equipment-grounding conductor and a
grounding plug. The plug must be plugged into
an appropriate outlet that is properly installed and
grounded in accordance with all local codes and
ordinances.
• This heater is for use on 220-240 volts.
• A 10 Amp, 220-240 Volt circuit is required.
A dedicated circuit is prefer red, but not essential
in all cases. A dedicated circuit will be required if,
after installation, the circuit breaker trips or the
fuse blows on a regular basis when the heater is operating. Additional appliances on
the same circuit may exceed the current rating of the circuit breaker.
WARNING: Electrical outlet wiring must comply with local building codes and other
applicable regulations to reduce the risk of fire, electric shock, or injury to persons.
Electrical
Voltage: 220V~240V 50Hz
Watts: 1 300~1 600 Watts
Amps: 6-7 A
Wiring: Plug-In
Bulb Type: LED
Dimensions
Sierra 48”
Width: 1046 mm
Height: 460 mm
Height with feet: 547 mm
Depth: 133 mm
Depth with feet: 279 mm
Weight: 18.5 kg
Sierra 60”
Width: 1318 mm
Height: 460 mm
Height with feet: 547 mm
Depth: 133 mm
Depth with feet: 279 mm
Weight: 28.9 kg
Sierra 72”
Width: 1626 mm
Height: 460 mm
Height with feet: 547 mm
Depth: 133 mm
Depth with feet: 279 mm
Weight: 35.3 kg
EN

- 19 - www.dimplex-fires.eu- 18 -
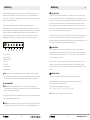
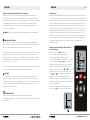
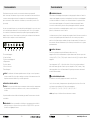
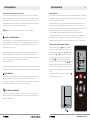
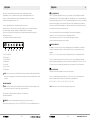
OperationOperation
This fireplace can be operated by both a remote control and touchscreen
controls. Once the fireplace has been properly connected to an earthed electrical
socket-outlet ensure the manual On/Off switch, located on the right hand side of
the fireplace, is in the ‘ON’ position.
Once the fireplace is turned on the digital display and the control icons on the
front glass will illuminate. If no button or icon is pressed within 10 seconds, the
fireplace controls will deactivate by the digital display turning off first and then the
icons. To reactivate the controls press any button on the remote or touch any icon
on the front glass.
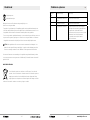
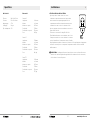
7654 321
1. Power ON/OFF
2. Flame Control
3. Heat ON/OFF
4. Timer
5. Ember Bed
6. Level Selection
7. Digital Display
NOTE: The heater on your fireplace may emit a slight, harmless odour when first
used. This odour is a normal condition caused by initial heating of internal heater
parts and will not occur again.
CUTOFF SWITCH
NOTE: There is a safety temperature cutoff switch (cutout) inside the heater. If the
heater overheats, the cutout will shut off the supply power.
It can be reset by unplugging the unit and waiting 5 minutes before plugging
the unit back on.
CAUTION: If you need to continuously reset the heater, unplug the unit and call
technical service T. +31(0)513 656500 or e-mail: info@dimplex-fires.eu.
POWER ON/OFF
POWER ON/OFF The ON/OFF button turns the fireplace ON and OFF. When the
fireplace is OFF, pressing the ON/OFF button on the remote control or touching the
icon on the front glass will turn on the fireplace. If the ON/OFF button is pressed again
within 10 seconds it will turn OFF the fireplace. With inactive controls, press twice to turn
OFF the fireplace. The first press on the ON/OFF button lights up the touchscreen icons.
The second press is nesscary to activate the controls.
The fireplace has a built-in memory function. When the fireplace is turned back
on, the display will show the last selected function and it will start at the last
used settings (except timer). If the fireplace is disconnected from the main power
source, it will restart at the default settings.
FLAME CONTROL
This button is used to turn flames ON, to alter the flame color and to turn flames
OFF. Press the Flame button multiple times to cycle through 7 solid color options
(L8, L7, L6, L5, L4, L3, L2), color rotation option (L1) and flames OFF.
While L8, L7…or L2 is displayed, press the Level Selection button to change the
brightness of the flames from the available options: 3- High, 2-Medium and 1-Low.
Hold the flame icon for 5 seconds to turn the sound of flame burning ON or OFF.
HEAT ON/OFF
Pressing the Heat control turns the heater on and off.
With Heat ON and set temperature displayed, press the Level Selection button
multiple times to cycle through the 11 temperature settings:
27°C, ON, 18°C, 19°C, 20°C, 21°C, 22°C, 23°C, 24°C, 25°C, 26°C .
‘ON’ means the heater operates continuously.
EN

- 21 - www.dimplex-fires.eu- 20 -
Operation Operation
Heater Enable & Disable Function:
From the touchscreen controls touch and hold the Heat icon for 10 seconds. The
ember bed will flash 6 times to indicate that the heater function is disabled. When
the heat is disabled, pressing the Heat button will cause the ember bed to flash,
but the heater will not operate.
To enable the heater again, touch and hold the Heat icon for 10 seconds.
NOTE: This function cannot be set with the remote control.
TIMER CONTROL
Hold the timer icon for 5 seconds and the heat icon flashes. At this time, TuyaSmart
can connect the fireplace through Bluetooth. The Timer button is used to activate or
deactivate the sleep timer.
Pressing the Timer turns the timer on and ‘8h’ appears on the display. Pressing
the Timer a second time within 10 seconds will turn the timer off. To set the time,
use the Level Selection control to select the desired time from the following:
8h-1h-2h-3h-4h-5h-6h-7h.
The fireplace will shut off after the selected time period. Switching the fireplace
OFF with the Power Button will clear any timer setting.
EMBER BED
The Ember Bed button changes the ember bed by cycling through the seven color
options: color rotation ‘d1’ and smoldering (fluctuating brightness) embers option
‘d9’. With ‘d8’ through ‘d2’ displayed, the Level Selection button will adjust the
brightness of the ember bed from 3- High, 2-Medium, and 1-Low.
LEVEL SELECTION BUTTON
The Level Selection button is used to adjust the heat setting, as well flame and
ember bed brightness and timer setting. See relevant section for more details.
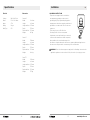
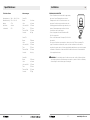
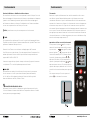
Remote control
Remove the battery cover on the back of the remote by sliding downwards and insert
2 x AAA batteries ensuring that the batteries are fitted correctly. Refit the battery cover.
For remote to function make sure the fireplace is plugged in and the ON / OFF Power
Switch on the fireplace is in the ON position. Each time the fireplace receives a remote
signal, the ember bed blink once. It does not blink when turned on and off.
Point the remote control directly towards the fireplace and press the appropriate
button to operate the fireplace. The remote has a memory function which will restart
the fireplace with the last settings except for the Sleep timer function which will always
reset to OFF.
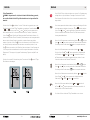
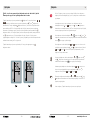
Setting the current time of the remote control
Press and hold the button for 5 seconds to enter
the setting current time state. At this time, ,
will flash. You can press the or button to set the
current day of the week, 1 to 7 is optional. And press
the or button to set the current time of the hour,
0-23 is optional. And press the or button to
set the current time of the minute, 0-59 is optional. For
example, the current time is 8:42 pm on Friday and the
remote control displays as follows show (fig.2).
No action for 5 seconds or press button to confirm
the current time.
EN

- 23 - www.dimplex-fires.eu- 22 -
Operation Operation
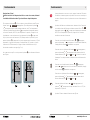
7 day timer function
NOTE: Ensure that the current time setting accurate, otherwise the effective
time of the 7 day timer function will be different from what you set.
Press and hold the button for 5 seconds to enter the 7 day timer function. At this
time, 8 , 27C , 888 , will flash. You can press the or button to set the desire day
of the week, 1 to 7 is optional. And press the . button to set the temperature when
turn on the fireplace, 18-27 and ON is optional, ON means the heating keep working.
And press the button to set the time (hours) to turn on the fireplace, 0-23 is optional.
And press the button to set the time (hours) to turn off the fireplace, 0-23 is optional.
For example, If the temperature is 260C when turn on the fireplace at 7 PM on Tuesday,
and turn off the fireplace at 8 AM on Wednesday, the remote control displays as follows
show(fig.3 & fig.4).
No action for 5 seconds or press button to confirm the 7 day timer function.
This Power Button turn the fireplace on or off. It has a memory function,
pressing the power button once to turn power on. Pressing the power
button again will turn the power off.
The heater button turn the heat on or off. Pressing the Heater Button once
turns the Heat on, and 27C will flash, press or button to set
the desire temperature. 18-27 and ON is optional, ON means the heating
keep working.
Pressing the flame button once, and will flash, press or
button to set the desire flame color, the display on the remote control
will change accordingly.
Pressing the flame button again, and will flash, press or
button to set the desire flame brightness level.( High , Medium , Low
). Hold the flame icon for 5 seconds to turn the sound of flame burning
ON or OFF.
Pressing the ember bed button once, and will flash, press or
button to set the desire ember bed color, the display on the remote
control will change accordingly.
Pressing the ember bed button again, and , will flash, press or
button to set the desire ember bed brightness level.( High , Medium
, Low ).
Pressing the timer button and 888 will flash, press or button
to set the desire timing. 1-8 hour and off is optional.
The sevent button turn the 7 day timer function on or off.
EN

- 25 - www.dimplex-fires.eu- 24 -
TitelOperation
INSTALL TuyaSmart life
There are 2 ways to install TuyaSmart;
1. Search for “TuyaSmart life” in the APP store on your phone,
download and install.
2. Scan the QR code below with your mobile phone.
Bluetooth setting and fireplace operation
1. Create an account and log in. (FIG.1)
2. When you log in, the APP will
scan and add the fireplace to APP
(FIG.2) automatically. Touch “Go to
add” to enter in FIG.3. Touch “NEXT”
to enter FIG.4. Touch “Done” to
finish bluetooth setting.
3. Now you are in the interface like
FIG.5. You can operate the fireplace
via TuyaSmart.
Maintenance
• Clean the metal trim using a water-dampened soft, clean cloth. DO NOT use brass
polish or household cleaners as these products will damage the metal trim.
• The motors used on the fan and the flame generator assembly are prelubricated for
extended bearing life and require no further lubrication. However, periodic cleaning/
vacuuming of the fan/heater and air intake/output vents is recommended. The heater
should be cleaned and inspected regularly, depending on conditions, and at least at
yearly intervals.
WARNING: Any electrical repairs of this unit should be carried out by a licensed
electrician in accordance with national and local codes.
WARNING: Disconnect power by unplugging the power and allowing heater to cool
before attempting any maintenance or cleaning to reduce the risk of fire, electric
shock, or injury.
NOTE: When the heater is not in use, the heater should be stored in a dry location,
away from possible damage. The power cord should be stored properly to avoid
contact with hot or sharp objects.
EN

- 27 - www.dimplex-fires.eu- 26 -
Maintenance
Disposal of
Used Batteries
Batteries may contain hazardous substances that could be endangering to
environment and human health.
• This symbol marked on the battery and/or packaging indicates that used batteries
shall not be treated as municipal waste. Instead they shall be left at the appropriate
collection point for recycling.
• By ensuring the used batteries are properly disposed of, you will help prevent potential
negative consequences for the environment and human health. The recycling of
materials will help to conserve natural resources.
CAUTION: Do not use if the heater’s mains power lead is damaged. Such use
may cause a hazard. If damaged, the mains power lead must be replaced by the
manufacturer or its authorised dealer.
For more information about collection and recycling of used batteries, please contact
your local municipality, your waste disposal service or the point of sale where you
purchased this item.
ENVIRONMENTAL PROTECTION
For electrical products sold within the European Community - At the end
of the electrical product’s useful life, it is not be disposed of with
household waste. Please recycle where facilities exist. Check with your
Local Authority or retailer for recycling advice in your country.
Troubleshooting
Fault code Fault Cause Solution
E1 The heater is overheating Call technical support.
E2 Thermistor is defective. Call technical support.
E3 The heater not working. If the vents are dirty or clogged. Unplug
the power, clean the dust and debris of
the vent area. Wait for 5 minutes, plug
in and turn on the heater. If the heater
still don’t work, please call technical
support.
EN

- 29 - www.dimplex-fires.eu- 28 -
Warranty
Two Year Limited Warranty
Products to which this limited warranty applies
This limited warranty applies to your newly purchased Dimplex Fires. This
limited warranty applies only to purchases made in Europe. This limited warranty
applies to the original purchaser of the
product only and is not transferable.
Products excluded from this limited warranty
Light bulbs are not covered by this limited warranty and are the sole responsibility of
the owner/purchaser.
What this limited warranty covers and for how long
Products covered by this limited warranty have been tested and inspected prior to
shipment and, subject to the provisions of this warranty, Glen Dimplex warrants such
products to be free from defects in material and workmanship for a period of 2 years
from the date of the first purchase of this product. The limited 2 year warranty period
also applies to any implied warranties that may exist under applicable law. Some
jurisdictions do not allow limitations on how long an implied warranty lasts, so the
above limitation may not apply to the purchaser.
What this limited warranty does not cover
This limited warranty does not apply to products that have been repaired (except
by Glen Dimplex or its authorised service representatives) or otherwise altered. This
limited warranty does further not apply to defects resulting from misuse, abuse,
accident, neglect, incorrect installation, improper maintenance or handling, or
operation with an incorrect power source.
What you must do to get service under this limited warranty
Defects must be brought to the attention of Technical Service at T. +31(0)513 656500
or info@dimplex-fires.eu. Please have proof of purchase, catalogue/ model and serial
numbers available when calling. Limited warranty service requires a proof of purchase of
the product.
Warranty
What Glen Dimplex will do in the event of a defect
In the event a product or part covered by this limited warranty is proven to be defective
in material or workmanship during the 2 years limited warranty period you have the
following rights:
1) Glen Dimplex will in its sole discretion either repair or replace such defective product
or part without charge. If Glen Dimplex is unable to repair or replace such product or
part, or if repair or replacement is not commercially practicable or cannot be timely
made, Glen Dimplex may, in lieu of repair or replacement, choose to refund the
purchase price for such product or part.
2) Limited warranty service will be performed solely by dealers or service agents of Glen
Dimplex authorised to provide limited warranty services.
3) The purchaser is responsible for removal and transportation of such product or part
(and any repaired or replacement product or part) to and from the authorised dealer’s
or service agent’s place of business.
4) This limited warranty does not entitle the purchaser to on-site or in-home services.
On-site or in-home services may be performed at the purchaser’s request and
expense at Glen Dimplex’s then-current rates for such services.
5) Glen Dimplex will not be responsible for, and the limited warranty services shall not
include, any expense incurred for installation or removal of the product or part (or any
replacement product or part) or any labour or transportation costs. Such costs shall
be the purchaser’s responsibility.
What Glen Dimplex and its dealers and service agents are also not responsible for:
In no event will Glen Dimplex, or its directors, officers, or agents, be liable to the
purchaser or any third party, whether in contract, in tort, or on any other basis, for any
indirect, special, punitive, exemplary, consequential, or incidental loss, cost, or damage
arising out of or in connection with the sale, maintenance, use, or inability to use the
product, even if Glen Dimplex or its directors, officers, or agents have been advised of
the possibility of such losses, costs or damages, or if such losses, costs, or damages are
foreseeable. in no event will Glen Dimplex, or its officers, directors, or agents be liable
for any direct losses, costs, or damages that exceed the purchase price of the product.
some jurisdictions do not allow the exclusion or limitation of incidental or consequential
damages, so the above limitation or exclusion may not apply to the purchaser.
EN

- 30 -
Warranty
Contact our friendly customer service team for technical and troubleshooting
support. Make sure you have your sales receipt, location of purchase, and the
model and serial number of your product.
Glen Dimplex Benelux B.V.
Saturnus 8
8448 CC Heerenveen
The Netherlands
PO Box 219
NL-8440 AE Heerenveen
The Netherlands
T. +31(0)513 656500
E. info@dimplex-fires.eu
Handleiding voor de eigenaar
Model: Sierra 48” | 60” | 72”
Veiligheidsinformatie voor de consument: lees deze handleiding alstublieft goed door
voordat u het apparaat installeert en gebruikt. Het niet opvolgen van deze gebruiks-
aanwijzing kan mogelijk resulteren in elektrische schokken, brandgevaar en/of letsel, en
leidt tot verval van de garantie.
Om de complete reeks Dimplex-producten te zien. Deze instructie kan ook gedownload
worden van onze website.
www.dimplex-fires.eu
EN / NL / DE / FR / PL / IT / ES / TR
Het product voldoet aan de Europese veiligheidsnormen en aan de Europese standaard voor elektromag-
netische compatibiliteit (EMC). Daarin worden de belangrijkste eisen van de EEG-richtlijnen vastgelegd

- 33 - www.dimplex-fires.eu- 32 -
Titel Titel
- 32 -
Welkom
BELANGRIJKE AANWIJZINGEN
Montage
Bediening
Onderhoud
Problemen oplossen
Garantie
Technische ondersteuning
In deze handleiding toegepaste conventies:
N.B.: Methoden en technieken die door ons belangrijk genoeg geacht worden.
LET OP: Methoden en technieken die, indien zij niet zorgvuldig worden gevolgd, tot
schade aan het apparaat zullen leiden.
WAARSCHUWING: Methoden en technieken die, indien zij niet zorgvuldig worden
gevolgd, de gebruiker blootstellen aan risico's met ernstige verwondingen of de dood
tot gevolg.
Inhoudsopgave
- 33 - www.dimplex-fires.eu
Dank u en van harte gefeliciteerd met de aankoop van een elektrische haard
van Dimplex, de wereldleider in elektrische haarden.
Noteer uw model- en serienummer voor als u deze later nodig heeft:
het model- en serienummer staat op het "etiket model- en serienummer"
van uw haard.
Model DVF1200 (Sierra 48”)
Volts220V-240V/50Hz
Effect 17.5 Watt
Watts
Serial NO.
1300W-1600W/6A
Glen Dimplex Benelux B.V.
Saturnus 8
8448 CC HEERENVEEN, THE NETHERLANDS
wk/year
MADE IN CHINA
DDDYYDB1 D XXX
LET OP: Lees alle aanwijzingen en waarschuwingen aandachtig door voordat u
met de montage begint. Het niet opvolgen van deze aanwijzingen kan leiden tot
elektrische schokken of brandgevaar en leidt tot verval van de garantie.
U HOEFT NIET TERUG NAAR DE WINKEL
Vragen over de bediening of montage? Onderdeelgegevens nodig?
Product valt onder fabrieksgarantie?
Neem contact met ons op via:
Glen Dimplex Benelux B.V.
Saturnus 8
8448 CC Heerenveen
Nederland
Postbus 219
8440 AE Heerenveen
Nederland
T. +31(0)513 656500
E. info@dimplex-fires.eu
Voor probleemoplossing en technische ondersteuning
Welkom NL

- 35 - www.dimplex-fires.eu- 34 -
Titel TitelBELANGRIJKE AANWIJZINGEN
Lees deze handleiding door voordat u de elektrische haard gaat installeren of
gebruiken. Houdt u steeds aan de waarschuwingen en veiligheidsinstructies in deze
gebruiksaanwijzing.Bij het gebruik van elektrische apparaten moeten steeds de
elementaire voorzorgsmaatregelen nageleefd worden ter voorkoming van het risico van
brand, elektrische schokken:
• Kinderen jonger dan 3 jaar uit de buurt houden, tenzij ze onder voortdurend toezicht
staan.
• Kinderen tussen 3 en 8 jaar mogen het apparaat uitsluitend aan- en uitschakelen mits
dit voor normaal gebruik geplaatst of geïnstalleerd is en mits ze toezicht of instructie
hebben ontvangen voor een veilig gebruik van het apparaat en zich bewust zijn van
de bijbehorende risico's. Kinderen tussen 3 en 8 jaar mogen het apparaat niet in het
stopcontact steken, instellen of schoonmaken of andere onderhoudswerkzaamheden
uitvoeren.
• Als de stroomkabel beschadigd is, moet deze worden vervangen door de fabrikant c.q.
diens onderhoudsdienst of door andere hiervoor gekwalificeerde personen. Dit om
gevaarlijke situaties te voorkomen.
WAARSCHUWING: Om oververhitting te voorkomen mag de verwarmer niet
afgedekt worden.
• Gebruik deze verwarmer niet in de nabije omgeving van een bad, douche of zwembad.
• De verwarmer mag niet rechtstreeks onder een stopcontact geplaatst worden.
• Gebruik deze verwarmer niet in combinatie met een programmeerschakeling, timer,
aparte afstandsbediening of een ander apparaat dat de verwarmer automatisch aanzet,
want dit leidt tot brandgevaar als de verwarmer afgedekt is of onjuist geplaatst is.
• Er is sprake van een risico als het apparaat dichtbij gordijnen of andere brandbare
materialen geplaatst wordt.
LET OP: Sommige onderdelen van dit product kunnen zeer heet worden en
brandwonden veroorzaken. Met name dient men voorzichtig te zijn waar kinderen of
kwetsbare personen aanwezig zijn.
• Gebruik deze verwarmer niet wanneer deze gevallen is.
• Niet gebruiken in geval van zichtbare tekenen van schade aan de verwarmer.
• Gebruik deze verwarmer op een stabiel horizontaal oppervlak of bevestig deze aan de
wand (indien van toepassing).
BEWAAR DEZE AANWIJZINGEN
BELANGRIJKE AANWIJZINGEN
LET OP: Om gevaarlijke situaties door het onbedoeld resetten van de thermische
beveiliging te voorkomen, moet dit apparaat geen stroom krijgen via een externe
schakelinrichting, zoals een timer, of worden aangesloten op een stroomkring die
door het nutsbedrijf regelmatig wordt aan- en uitgeschakeld.
• Dit apparaat mag worden gebruikt door kinderen van 8 jaar en ouder en door mensen
met lichamelijke, zintuiglijke of geestelijke beperkingen of met gebrek aan ervaring en
kennis. Ze moeten dan wel onder toezicht staan of instructies hebben gekregen voor
een veilig gebruik van het apparaat en begrijpen welke gevaren dit met zich mee kan
brengen. Kinderen mogen niet met het apparaat spelen. Schoonmaak en onderhoud
mogen door kinderen alleen onder toezicht worden uitgevoerd. De vaste bedrading
moet voorzien zijn van een onderbrekingsschakelaar.
WAARSCHUWING: Het apparaat is voorzien van het waarschuwingssymbool
waarmee duidelijk gemaakt wordt dat het apparaat niet afgedekt mag worden, of het
apparaat is voorzien van een etiket "Niet afdekken". Het warmte-uitlaatrooster bovenop
het apparaat mag absoluut niet worden afgedekt of geblokkeerd; het onbedoeld
afdekken van het apparaat zal leiden tot oververhitting. Plaats geen materialen of
kleding op het apparaat, bijvoorbeeld bij gordijnen of meubilair, want dit kan leiden tot
oververhitting en brandgevaar.
In geval van een storing dient de verwarmer te worden losgekoppeld. Haal het apparaat
uit het stopcontact wanneer het lange tijd niet gebruikt wordt. Het stroomsnoer
moet rechts naast de verwarmer worden gelegd, uit de buurt van de warmte-uitlaat
onderaan het apparaat.
Hoewel dit apparaat aan de veiligheidsnormen voldoet, adviseren wij het niet te
gebruiken op hoogpolige vloerbedekking of tapijten.
VOORZICHTIG
GEVAAR VOOR ELEKTRISCHE SCHOKKEN
NIET OPENEN
AAN DE BINNENZIJDE GEEN GEBRUIKERSONDERHOUD
NL

- 37 - www.dimplex-fires.eu- 36 -
Titel TitelSpecificaties
Elektrische
spanning: 220V~240V 50Hz
watt: 1300~1600 watt
Amp: 6-7 A
Bedrading: Stekker
Lamptype: LED
Afmetingen
Sierra 48”
Breedte: 1046 mm
Hoogte: 460 mm
Hoogte incl. voeten: 547 mm
Diepte: 133 mm
Diepte incl. voeten: 279 mm
Gewicht: 18,5 kg
Sierra 60”
Breedte: 1318 mm
Hoogte: 460 mm
Hoogte incl. voeten: 547 mm
Diepte: 133 mm
Diepte incl. voeten: 279 mm
Gewicht: 28,9 kg
Sierra 72”
Breedte: 1626 mm
Hoogte: 460 mm
Hoogte incl. voeten: 547 mm
Diepte: 133 mm
Diepte incl. voeten: 279 mm
Gewicht: 35,3 kg
Montage
AARDINGSINSTRUCTIES
• Dit product is voorzien van een snoer met een
aardgeleider en een geaarde stekker. De stekker
dient verbonden te worden met een geschikt
stopcontact dat correct geplaatst en geaard
is in overeenstemming met alle plaatselijke
voorschriften en verordeningen.
• Deze verwarmer is bestemd voor gebruik bij 220-
240 V.
• Een zekeringsgroep van 10 A, 220-240 V is
noodzakelijk.
Aansluiting op een aparte groep heeft de voorkeur, maar is niet in alle gevallen
noodzakelijk. Een eigen schakeling is vereist wanneer na montage blijkt dat de
stroomonderbreker of zekering regelmatig doorslaat tijdens het gebruik van de
verwarmer. Extra apparaten op dezelfde groep kunnen de stroomsterkte van de
stroomonderbreker overschrijden.
WAARSCHUWING: De bedrading van elektrische stopcontacten moet voldoen
aan de plaatselijke bouwvoorschriften en andere toepasselijke voorschriften ter
voorkoming van het risico op brand, elektrische schokken of letsel aan personen.
NL

- 39 - www.dimplex-fires.eu- 38 -
Bediening Bediening
Deze haard kan worden bediend door middel van een afstandsbediening of een
aanraakscherm. Wanneer de haard correct aangesloten is op een geaard elektrisch
stopcontact, controleer dan of de handmatige aan/uitschakelaar aan de rechterkant van
de haard in de stand "AAN" staat.
Wanneer de haard aangezet wordt, dan zullen het digitale display en de
bedieningssymbolen op het glazen frontpaneel oplichten. Als er binnen 10 seconden
geen knop of symbool ingedrukt wordt, zullen de bedieningselementen uitgeschakeld
worden, doordat eerst het digitale display uitgaat en vervolgens de symbolen. Om
de bedieningselementen weer aan te zetten, kunt u op een willekeurige knop op de
afstandsbediening drukken of een symbool aanraken op het glazen frontpaneel.
7654 321
1. Stroom AAN/UIT
2. Vlamregeling
3. Warmte AAN/UIT
4. Timer
5. Gloeibed
6. Niveauselectie
7. Digitaal display
N.B.: De verwarmer op uw haard kan bij het eerste gebruik mogelijk een flauwe,
onschadelijke geur verspreiden. Deze geur treedt normaal op bij de eerste verhitting
van binnenste delen van de verwarmer; dit gebeurt alleen bij het eerste gebruik.
NOODONDERBREKER
N.B.: Binnenin de verwarmer bevindt zich een noodonderbreker in geval van
oververhitting. Als de verwarmer oververhit mocht raken, dan zorgt deze onderbreker
dat de stroom uitgeschakeld wordt.
Deze kan gereset worden door het apparaat los te koppelen en vijf minuten te wachten
alvorens het apparaat weer aan te zetten.
LET OP: Als u de verwarmer steeds opnieuw moet resetten, ontkoppel deze dan en bel
de technische dienst op nummer +31(0) 513 656500 of e-mail: info@dimplex-fires.eu.
STROOM AAN/UIT
De AAN/UIT-knop schakelt de haard AAN en UIT. Wanneer de haard UIT staat, wordt
door een druk op de AAN/UIT-knop op de afstandsbediening of het aanraken van het
symbool op het glazen frontpaneel de haard ingeschakeld. Als de AAN/UIT-knop binnen
10 seconden opnieuw ingedrukt wordt, wordt de haard uitgeschakeld. Wanneer de
bedieningselementen inactief zijn druk tweemaal om de haard UIT te zetten. Met de
eerste druk op de AAN/UIT-knop gaat het aanraakscherm met de symbolen aan. Met de
tweede druk wordt het bedieningselement actief.
De haard heeft een ingebouwde geheugenfunctie. Wanneer de haard weer aangezet
wordt, toont het display de laatst geselecteerde functie en begint het bij de laatst
gebruikte instellingen (behalve de timer). Wanneer de haard losgekoppeld wordt van de
netvoeding, start deze weer op met de standaardinstellingen.
VLAMREGELING
Door middel van deze knop worden de vlammen AAN gezet, wordt de vlamkleur
gewijzigd, en worden de vlammen weer UIT gezet. Druk herhaaldelijk op de vlamknop
om de 7 kleuropties te doorlopen (L8, L7, L6, L5, L4, L3, L2), de optie roterende kleuren
(L1) en de vlammen UIT te zetten.
Wanneer L8, L7…of L2 wordt weergegeven, drukt u op de knop Niveauselectie voor het
wijzigen van de helderheid van de vlammen, namelijk: 3- hoog, 2-middel en 1-laag.
Houd het vlamsymbool 5 seconden vast om het geluid van de vlammen AAN of UIT te
zetten.
WARMTE AAN/UIT
Met een druk op de knop Warmte wordt de verwarmer aan- of uitgezet.
Met Warmte AAN en met de weergegeven ingestelde temperatuur drukt u
herhaaldelijk op de knop Niveauselectie
om de 11 temperatuurinstellingen te doorlopen:
27°C, ON, 18°C, 19°C, 20°C, 21°C, 22°C, 23°C, 24°C, 25°C, 26°C.
"ON” betekent dat de verwarmer continu in werking is.
NL
Sayfa yükleniyor...
Sayfa yükleniyor...
Sayfa yükleniyor...
Sayfa yükleniyor...
Sayfa yükleniyor...
Sayfa yükleniyor...
Sayfa yükleniyor...
Sayfa yükleniyor...
Sayfa yükleniyor...
Sayfa yükleniyor...
Sayfa yükleniyor...
Sayfa yükleniyor...
Sayfa yükleniyor...
Sayfa yükleniyor...
Sayfa yükleniyor...
Sayfa yükleniyor...
Sayfa yükleniyor...
Sayfa yükleniyor...
Sayfa yükleniyor...
Sayfa yükleniyor...
Sayfa yükleniyor...
Sayfa yükleniyor...
Sayfa yükleniyor...
Sayfa yükleniyor...
Sayfa yükleniyor...
Sayfa yükleniyor...
Sayfa yükleniyor...
Sayfa yükleniyor...
Sayfa yükleniyor...
Sayfa yükleniyor...
Sayfa yükleniyor...
Sayfa yükleniyor...
Sayfa yükleniyor...
Sayfa yükleniyor...
Sayfa yükleniyor...
Sayfa yükleniyor...
Sayfa yükleniyor...
Sayfa yükleniyor...
Sayfa yükleniyor...
Sayfa yükleniyor...
Sayfa yükleniyor...
Sayfa yükleniyor...
Sayfa yükleniyor...
Sayfa yükleniyor...
Sayfa yükleniyor...
Sayfa yükleniyor...
Sayfa yükleniyor...
Sayfa yükleniyor...
Sayfa yükleniyor...
Sayfa yükleniyor...
Sayfa yükleniyor...
Sayfa yükleniyor...
Sayfa yükleniyor...
Sayfa yükleniyor...
Sayfa yükleniyor...
Sayfa yükleniyor...
Sayfa yükleniyor...
Sayfa yükleniyor...
Sayfa yükleniyor...
Sayfa yükleniyor...
Sayfa yükleniyor...
Sayfa yükleniyor...
Sayfa yükleniyor...
Sayfa yükleniyor...
Sayfa yükleniyor...
Sayfa yükleniyor...
Sayfa yükleniyor...
-
 1
1
-
 2
2
-
 3
3
-
 4
4
-
 5
5
-
 6
6
-
 7
7
-
 8
8
-
 9
9
-
 10
10
-
 11
11
-
 12
12
-
 13
13
-
 14
14
-
 15
15
-
 16
16
-
 17
17
-
 18
18
-
 19
19
-
 20
20
-
 21
21
-
 22
22
-
 23
23
-
 24
24
-
 25
25
-
 26
26
-
 27
27
-
 28
28
-
 29
29
-
 30
30
-
 31
31
-
 32
32
-
 33
33
-
 34
34
-
 35
35
-
 36
36
-
 37
37
-
 38
38
-
 39
39
-
 40
40
-
 41
41
-
 42
42
-
 43
43
-
 44
44
-
 45
45
-
 46
46
-
 47
47
-
 48
48
-
 49
49
-
 50
50
-
 51
51
-
 52
52
-
 53
53
-
 54
54
-
 55
55
-
 56
56
-
 57
57
-
 58
58
-
 59
59
-
 60
60
-
 61
61
-
 62
62
-
 63
63
-
 64
64
-
 65
65
-
 66
66
-
 67
67
-
 68
68
-
 69
69
-
 70
70
-
 71
71
-
 72
72
-
 73
73
-
 74
74
-
 75
75
-
 76
76
-
 77
77
-
 78
78
-
 79
79
-
 80
80
-
 81
81
-
 82
82
-
 83
83
-
 84
84
-
 85
85
-
 86
86
-
 87
87


diğer dillerde
- español: Dimplex DVF1200 El manual del propietario
- français: Dimplex DVF1200 Le manuel du propriétaire
- italiano: Dimplex DVF1200 Manuale del proprietario
- polski: Dimplex DVF1200 Instrukcja obsługi
- Deutsch: Dimplex DVF1200 Bedienungsanleitung
- Nederlands: Dimplex DVF1200 de handleiding
İlgili makaleler
Diğer belgeler
-
Morphy Richards 47110 Kullanma talimatları
-
-
 marphy richards COMFIGRIP Instructions Manual
-
Morphy Richards 48321 Yükleme Rehberi
-
Stovax Radiance Inset Edge User Instructions
-
-
LG OLED65C6V El kitabı
