Indesit PWC 71040 W (EU) Kullanici rehberi
- Kategori
- Çamaşır makineleri
- Tip
- Kullanici rehberi

GB
1
Contents
Installation, 2-3
Unpacking and levelling
Connecting the electricity and water supplies
The first wash cycle
Technical data
Description of the washing machine
and starting a wash cycle, 4-5
Control panel
Indicator lights
Starting a wash cycle
Wash cycles, 6
Table of wash cycles
Personalisation, 7
Setting the temperature
Setting the spin speed
Functions
Detergents and laundry, 8
Detergent dispenser drawer
Bleach cycle
Preparing the laundry
Garments requiring special care
Load balancing system
Precautions and tips, 9
General safety
Disposal
Care and maintenance, 10
Cutting off the water or electricity supply
Cleaning the washing machine
Cleaning the detergent dispenser drawer
Caring for the door and drum of your appliance
Cleaning the pump
Checking the water inlet hose
Troubleshooting, 11
Service, 12
PWC 71040 W
Instructions for use
WASHING MACHINE
English,1
GB
Türkçe,13
TR

2
GB
! This instruction manual should be kept in a safe place for
future reference. If the washing machine is sold, transferred
or moved, make sure that the instruction manual remains
with the machine so that the new owner is able to familiari-
se himself/herself with its operation and features.
! Read these instructions carefully: they contain vital infor-
mation relating to the safe installation and operation of the
appliance.
Unpacking and levelling
Unpacking
1. Remove the washing machine from its packaging.
2. Make sure that the washing machine has not been
damaged during the transportation process. If it has been
damaged, contact the retailer and do not proceed any
further with the installation process.
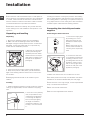
3. Remove the 4 protective
screws (used during tran-
sportation) and the rubber
washer with the correspon-
ding spacer, located on the
rear part of the appliance
(see figure).
4. Close off the holes using the plastic plugs provided.
5. Keep all the parts in a safe place: you will need them
again if the washing machine needs to be moved to ano-
ther location.
! Packaging materials should not be used as toys for
children.
Levelling
1. Install the washing machine on a flat sturdy floor, without
resting it up against walls, furniture cabinets or anything
else.
2. If the floor is not perfectly
level, compensate for any
unevenness by tightening
or loosening the adjusta-
ble front feet (see figure);
the angle of inclination,
measured in relation to the
worktop, must not exceed
2°.
Levelling the machine correctly will provide it with stability,
help to avoid vibrations and excessive noise and prevent it
from shifting while it is operating. If it is placed on carpet or
a rug, adjust the feet in such a way as to allow a sufficient
ventilation space underneath the washing machine.
Connecting the electricity and water
supplies
Connecting the water inlet hose
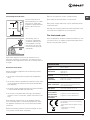
1. Connect the supply pipe
by screwing it to a cold
water tap using a ¾ gas
threaded connection (see
figure).
Before performing the con-
nection, allow the water to
run freely until it is perfectly
clear.
2. Connect the inlet hose
to the washing machine by
screwing it onto the corre-
sponding water inlet of the
appliance, which is situa-
ted on the top right-hand
side of the rear part of the
appliance (see figure).
3. Make sure that the hose is not folded over or bent.
! The water pressure at the tap must fall within the values
indicated in the Technical details table (see next page).
! If the inlet hose is not long enough, contact a specialised
shop or an authorised technician.
! Never use second-hand hoses.
! Use the ones supplied with the machine.
Installation

GB
3
Connecting the drain hose
Connect the drain hose,
without bending it, to a drai-
nage duct or a wall drain
located at a height between
65 and 100 cm from the
floor;
alternatively, rest it on
the side of a washbasin
or bathtub, fastening the
duct supplied to the tap
(see figure). The free end
of the hose should not be
underwater.
! We advise against the use of hose extensions; if it is
absolutely necessary, the extension must have the same
diameter as the original hose and must not exceed 150 cm
in length.
Electrical connections
Before plugging the appliance into the electricity socket,
make sure that:
• the socket is earthed and complies with all applicable
laws;
• the socket is able to withstand the maximum power load
of the appliance as indicated in the Technical data table
(see opposite);
• the power supply voltage falls within the values indicated
in the Technical data table (see opposite);
• the socket is compatible with the plug of the washing
machine. If this is not the case, replace the socket or the
plug.
! The washing machine must not be installed outdoors,
even in covered areas. It is extremely dangerous to leave
the appliance exposed to rain, storms and other weather
conditions.
! When the washing machine has been installed, the elec-
tricity socket must be within easy reach.
! Do not use extension cords or multiple sockets.
! The cable should not be bent or compressed.
! The power supply cable must only be replaced by autho-
rised technicians.
Warning! The company shall not be held responsible in the
event that these regulations are not respected.
The first wash cycle
Once the appliance has been installed, and before you use
it for the first time, run a wash cycle with detergent and no
laundry, using the wash cycle 3.
65 - 100 cm
Technical data
Model
PWC 71040 W
Dimensions
width 59.5 cm
height 85 cm
depth 55 cm
Capacity
from 1 to 7 kg
Electrical
connections
please refer to the technical data plate
fixed to the machine
Water connections
maximum pressure 1 MPa (10 bar)
minimum pressure 0.05 MPa (0.5 bar)
drum capacity 52 litres
Spin speed
up to 1000 rotations per minute
Test wash cycles
in accordance
with directives
1061/2010 and
1015/2010.
Programme 3: Cotton Standard 60°;
Programme 4: Cotton Standard 40°.
This appliance conforms to the following
EC Directives:
- 2004/108/EC (Electromagnetic Compa-
tibility)
- 2006/95/EC (Low Voltage)
- 2002/96/EC

4
GB
Detergent dispenser drawer: used to dispense
detergents and washing additives (see “Detergents and
laundry”).
ON/OFF button: switches the washing machine on and off.
WASH CYCLE knob: programmes the wash cycles. Du-
ring the wash cycle, the knob does not move.
FUNCTION buttons with indicator light: used to select the
available functions. The indicator light corresponding to the
selected function will remain lit.
TEMPERATURE button: sets the temperature or the cold
wash cycle (see “Personalisation”).
SPIN button: sets the spin speed or exclude the spin cycle
completely (see “Personalisation”).
DELAY TIMER button: delays the start of the wash cycle
by up to 9 hours.
Press the button repeatedly until the indicator light corre-
sponding to the desired delay time turns on.
When the button is pressed for the fourth time, the option
will be deactivated.
N.B.: once the START/PAUSE button has been pressed,
the delay time can only be modified by decreasing it until
the set programme is launched.
! This option is available on all programmes.
WASH CYCLE PROGRESS
indicator light
s: used to
monitor the progress of the wash cycle.
The illuminated indicator light shows which phase is in
progress.
DOOR LOCKED indicator light: indicates whether the
door may be opened or not (see next page).
START/PAUSE button with indicator light: starts or tem-
porarily interrupts the wash cycles.
N.B. To pause the wash cycle in progress, press this
button; the corresponding indicator light will flash orange,
while the indicator light for the current wash cycle phase
will remain lit in a fixed manner. If the DOOR LOCKED
indicator light is switched off, the door may be opened
(wait approximately 3 minutes).
To start the wash cycle from the point at which it was inter-
rupted, press this button again.
Standby mode
This washing machine, in compliance with new energy sa-
ving regulations, is fitted with an automatic standby system
which is enabled after about 30 minutes if no activity is
detected. Press the ON-OFF button briefly and wait for the
machine to start up again.
Consumption in off-mode: 0,5 W
Consumption in Left-on: 0,5 W
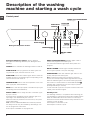
Description of the washing
machine and starting a wash cycle
Control panel
WASH CYCLE PROGRESS
indicator lights
DOOR LOCKED
indicator light
START/
PAUSE
button with
indicator light
Detergent dispenser drawer
ON/OFF
button
WASH CYCLE
knob
DELAY TIMER
button
INDICATOR
LIGHTS
TEMPERATURE
button
SPIN
button
FUNCTION
buttons with
indicator lights

GB
5
Indicator lights
The indicator lights provide important information.
This is what they can tell you:
Delayed start
If the DELAY TIMER function has been activated (see “Per-
sonalisation”), after the wash cycle has been started the
indicator light corresponding to the selected delay period
will begin to flash:
As time passes, the remaining delay will be displayed and
the corresponding indicator light will flash:
The set programme will start once the selected time delay
has expired.
Wash cycle phase indicator lights
Once the desired wash cycle has been selected and has be-
gun, the indicator lights switch on one by one to indicate which
phase of the cycle is currently in progress.
Function buttons and corresponding indicator lights
When a function is selected, the corresponding indicator
light will illuminate.
If the selected function is not compatible with the program-
med wash cycle, the corresponding indicator light will flash
and the function will not be activated.
If the selected function is not compatible with another
function which has been selected previously, the indicator
light corresponding to the first function selected will
flash and only the second function will be activated; the
indicator light corresponding to the enabled option will
remain lit.
Note: if the function is active, all other non-compatible
functions cannot be activated.
Door locked indicator light
When the indicator light is on, the porthole door is locked
to prevent it from being opened; make sure the indicator
light is off before opening the door (wait approximately 3
minutes).
To open the door during a running wash cycle, press the
START/PAUSE button; the door may be opened once the
DOOR LOCKED indicator light turns off.
! If the “functions” and START/PAUSE indicator lights flash
fast and the “current phase” and DOOR LOCKED indicator
lights turn on, there is an anomaly (see “Troubleshooting”).
Starting a wash cycle
1. Turn the washing machine on by pressing the ON/OFF button. All the indicator lights will turn on for a few seconds, then only
the indicator lights relative to the selected programme settings will remain lit and the START/PAUSE indicator light will flash.
2. Load the laundry and close the door.
3. Set the WASH CYCLE knob to the desired programme.
4. Set the washing temperature (see “Personalisation”).
5. Set the spin speed (see “Personalisation”).
6. Measure out the detergent and washing additives (see “Detergents and laundry”).
7. Select the desired functions.
8. Start the wash cycle by pressing the START/PAUSE button and the corresponding indicator light will remain lit in a fixed
manner in blu. To cancel the set wash cycle, pause the machine by pressing the START/PAUSE button and select a new
cycle.
9. At the end of the wash cycle the indicator light will switch on. The door can be opened once the DOOR LOCK indi-
cator light turns off (wait approximately 3 minutes). Take out your laundry and leave the appliance door ajar to make sure the
drum dries completely. Switch the washing machine off by pressing the ON/OFF button.
Wash
Rinse
Spin
Drain
End of wash cycle
WASH CYCLE PROGRESS
indicator lights
END

6
GB
Wash cycles
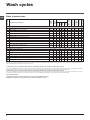
Table of wash cycles
The length of cycle shown on the display or in this booklet is an estimation only and is calculated assuming standard working conditions. The actual
duration can vary according to factors such as water temperature and pressure, the amount of detergent used, the amount and type of load inser-
ted, load balancing and any wash options selected.
Wash cycles
Description of the wash cycle
Max.
temp.
(°C)
Max.
speed
(rpm)
Detergents
Max. load (kg)
Residual
dampness %
Energy
consumption
kWh
Total water lt
Cycle duration
Prewash
Wash
Bleach
Fabric
softener
Daily Programs
1
Cottons with Pre-wash: extremely soiled whites. 90° 1000
-
7 62 2,21 78 170’
2
White Cottons: extremely soiled whites. 90° 1000 -
7 62 2,16 72 160’
3
Standard Cotton 60° (1): heavily soiled whites and resistant colours. 60° 1000 -
7 62 1,35 58 190’
4
Standard Cotton 40° (2): heavily soiled whites and delicate colours. 40° 1000 -
7 62 1,09 92 185’
5
Synthetics: heavily soiled resistant colours. 60° 800 -
3 44 0,93 47 110’
5
Synthetics (3): lightly soiled resistant colours. 40° 800 -
3 44 0,57 46 95’
6
Synthetics: lightly soiled resistant colours. 40° 800 -
3 - - - 70’
7 Jeans
40° 800 -
-
3,5 - - - 70’
8 Shirts
40° 600 -
2 - - - 70’
9
Mix-Cool 30’: to refresh lightly soiled garments quickly (not suitable for wool, silk and
clothes which require washing by hand).
Cold
water
800 -
-
3 71 0,04 34 30’
10 Standard Cotton 20°
20° 1000 -
7 - - - 170’
Special
11
Wool: for wool, cashmere, etc. 40° 800 -
-
1,5 - - - 70’
12
Silk/Curtains: for garments in silk and viscose, lingerie. 30° 0 -
-
1 - - - 55’
13 Sport Shoes
30° 600 -
-
Max.2
paires
- - - 60’
14 Outwear
30° 400 -
- - 2 - - - 60’
Partials
Rinse - 1000 - -
7 - - - 36’
Spin + Drain - 1000 - - - - 7 - - - 16’
1) Test wash cycle in compliance with directive 1061/2010: set wash cycle 3 with a temperature of 60°C.
This cycle is designed for cotton loads with a normal soil level and is the most efficient in terms of both electricity and water consumption; it should
be used for garments which can be washed at 60°C. The actual washing temperature may differ from the indicated value.
2) Test wash cycle in compliance with directive 1061/2010: set wash cycle 4 with a temperature of 40°C.
This cycle is designed for cotton loads with a normal soil level and is the most efficient in terms of both electricity and water consumption; it should
be used for garments which can be washed at 40°C. The actual washing temperature may differ from the indicated value.
For all Test Institutes:
2) Long wash cycle for cottons: set wash cycle
4 with a temperature of 40°C.
3) Synthetic program along: set wash cycle 5 with a temperature of 40°C.

GB
7
Setting the temperature
Press the TEMPERATURE button to set the wash temperature (see Table of wash cycles).
The temperature may be lowered, or even set to a cold wash .
The washing machine will automatically prevent you from selecting a temperature which is higher than the maximum value
set for each wash cycle.
Setting the spin speed
Press the SPIN SPEED button to set the spin speed for the selected wash cycle.
The maximum spin speeds available for each wash cycle are as follows:
Wash cycles Maximum spin speed
Cottons 1000 rpm
Synthetics 800 rpm
Wool 800 rpm
Silk drain only
The spin speed may be lowered, or the spin cycle can be excluded altogether by selecting the symbol .
The washing machine will automatically prevent you from selecting a spin speed which is higher than the maximum speed
set for each wash cycle.
Functions
The various wash functions available with this washing machine will help to achieve the desired results, every time.
To activate the functions:
1. Press the button corresponding to the desired function;
2. the function is enabled when the corresponding indicator light is illuminated.
Note: If the indicator light flashes rapidly, this signals that this particular function may not be selected in conjunction with the
selected wash cycle.
The “PRIME” technology optimises energy, water and time consumption according to the quantity of garments actually inserted in the
machine. Moreover, pressing the button allows for selecting the following options:
- Water: allows for reducing water consumption without having to renounce impeccable results (recommended for heavily
soiled garments).
- Energy: automatically selected by “PRIME”, this option reduces energy consumption (recommended for normally soiled
garments).
- Time: allows for reducing wash cycle duration (recommended for lightly soiled garments).
! This may only be used in conjunction with wash cycles 1, 2, 3, 4, 5, 6,10 (all three levels) and 7, 8, 9 (- Energy and - Time levels).
Extra Rinse
By selecting this option, the efficiency of the rinse is increased and optimal detergent removal is guaranteed. It is particularly
useful for sensitive skin.
! It cannot be used in conjunction with wash cycles 9, .
Easy iron
By selecting this function, the wash and spin cycles will be modified in order to reduce the formation of creases. At the end
of the cycle the washing machine will perform slow rotations of the drum, while the EASY IRON and START/PAUSE indica-
tor lights will flash (blue and orange respectively) and the led will remain lit in a fixed manner. To end the cycle, press the
START/PAUSE button or the EASY IRON button. For wash cycles number 12-14, the machine will end the cycle while the
laundry is soaking; the EASY IRON and START/PAUSE indicator lights will flash. To drain the water so that the laundry may
be removed, press the START/PAUSE button or the EASY IRON button.
! It cannot be used in conjunction with wash cycles 9, 11, 13, , .
Stain removal
Bleaching cycle designed to remove the toughest stains. Please remember to pour the bleach into extra compartment 4 (see
“Bleach cycle”).
! This function may not be used in conjunction with wash cycles 1, 7, 9, 11, 12, 13, 14, .
Personalisation

8
GB
Detergents and laundry
Detergent dispenser drawer
Good washing results also depend on the correct dose of
detergent: adding too much detergent will not necessa-
rily result in a more efficient wash, and may in fact cause
build up on the inside of your appliance and contribute to
environmental pollution.
! Do not use hand washing detergents because these
create too much foam.
! Use powder detergent for white cotton garments, for pre-
washing, and for washing at temperatures over 60°C.
! Follow the instructions given on the detergent packaging.
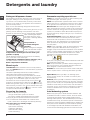
Open the detergent dispen-
ser drawer and pour in the
detergent or washing additive,
as follows.
Compartment 1:
Pre-wash detergent
(powder)
Before pouring in the detergent,
make sure that extra compart-
ment 4 has been removed.
Compartment 2: Detergent for the wash cycle
(powder or liquid)
Liquid detergent should only be poured in immediately
prior to the start of the wash cycle.
compartment 3: Additives (fabric softeners, etc.)
The fabric softener should not overflow the grid.
Extra compartment 4: Bleach
Bleach cycle
! Traditional bleach should be used on sturdy white fa-
brics, and delicate bleach for coloured fabrics, synthetics
and for wool.
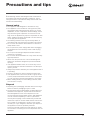
This option is particularly useful for the removal of stubborn
stains. Place extra compartment 4 (supplied) into
compartment 1. When pouring in the bleach, be careful
not to exceed the “max” level marked on the central pivot
(see figure). To run the bleach cycle on its own, pour
the bleach into extra compartment 4, set the “Rinse”
programme and activate the “Stain removal” option. To
bleach during a wash cycle, pour in the detergent and any
fabric softener you wish to use, set the desired wash cycle
and enable the “Stain removal” option. The use of extra
compartment 4 excludes the “Prewash”.
Preparing the laundry
• Divide the laundry according to:
- the type of fabric/the symbol on the label
- the colours: separate coloured garments from whites.
• Empty all garment pockets and check the buttons.
• Do not exceed the values listed in the “Table of wash
cycles”, which refer to the weight of the laundry when dry.
How much does your laundry weigh?
1 sheet 400-500 g
1 pillow case 150-200 g
1 tablecloth 400-500 g
1 bathrobe 900-1200 g
1 towel 150-250 g
Garments requiring special care
Jeans: turn the garments inside out before washing and
use liquid detergent. Use wash cycle 7.
Shirts: use special wash cycle 8 to wash shirts in various
fabrics and colours. It guarantees maximum care is taken
of the garments and minimises the formation of creases.
Mix-Cool 30’: this wash cycle was designed to wash
lightly soiled garments quickly: it lasts just 30 minutes and
therefore saves both energy and time. By selecting wash
cycle 9, it is possible to wash different fabrics (except for
wool and silk items) using a cold cycle, up to a maximum
load of 3 kg.
Cotton Standard 20° (wash cycle 10) ideal for heavily
soiled cotton loads. The effective performance levels
achieved at cold temperatures, which are comparable to
washing at 40°, are guaranteed by a mechanical action
which operates at varying speed, with repeated and
frequent peaks.
Lana: Il ciclo di lavaggio “Lana” di questa lavatrice è stato
testato e approvato dalla Woolmark Company per il
lavaggio di capi contenenti lana classificati come “lavabili a
mano”, purché il lavaggio venga eseguito nel rispetto delle
istruzioni riportate sull’etichetta dell’indumento e delle
indicazioni fornite dal produttore di questa lavatrice.
(M1126)
In UK, Eire, Hong Kong and India the Woolmark trade mark
is a Certification trade mark.
Silk: use special wash cycle 12 to wash all silk garments.
We recommend the use of special detergent which has
been designed to wash delicate clothes.
Curtains: we recommend you fold the curtains and place
them in a pillow case or mesh bag. Use wash cycle 12.
Sport Shoes (wash cycle 13): is for washing sports
shoes; for best results, do not wash more than 2 pairs
simultaneously
Outwear (wash cycle 14): is studied for washing water-re-
pellent fabrics and winter jackets (e.g. Gore-Tex, polyester,
nylon); for best results, use a liquid detergent and dosage
suitable for a half-load; pre-treat necks, cuffs and stains if
necessary; do not use softeners or detergents containing
softeners. Stuffed duvets cannot be washed with this
programme..
Load balancing system
Before every spin cycle, to avoid excessive vibrations and
to distribute the load in a uniform manner, the drum rotates
continuously at a speed which is slightly greater than the
washing rotation speed. If, after several attempts, the load is
not balanced correctly, the machine spins at a reduced spin
speed. If the load is excessively unbalanced, the washing ma-
chine performs the distribution process instead of spinning.
To encourage improved load distribution and balance, we
recommend small and large garments are mixed in the load.
4
2
3
1
4
2
1
3

GB
9
Precautions and tips
! This washing machine was designed and constructed in
accordance with international safety regulations. The fol-
lowing information is provided for safety reasons and must
therefore be read carefully.
General safety
• This appliance was designed for domestic use only.
• This appliance is not intended for use by persons (inclu-
ding children) with reduced physical, sensory or mental
capabilities, or lack of experience and knowledge, unless
they have been given supervision or instruction concer-
ning use of the appliance by a person responsible for their
safety. Children should be supervised to ensure that they
do not play with the appliance.
• The washing machine must only be used by adults, in
accordance with the instructions provided in this manual.
• Do not touch the machine when barefoot or with wet or
damp hands or feet.
• Do not pull on the power supply cable when unplugging
the appliance from the electricity socket. Hold the plug
and pull.
• Do not open the detergent dispenser drawer while the
machine is in operation.
• Do not touch the drained water as it may reach extremely
high temperatures.
• Never force the porthole door. This could damage the
safety lock mechanism designed to prevent accidental
opening.
• If the appliance breaks down, do not under any circum-
stances access the internal mechanisms in an attempt to
repair it yourself.
• Always keep children well away from the appliance while it
is operating.
• The door can become quite hot during the wash cycle.
• If the appliance has to be moved, work in a group of two
or three people and handle it with the utmost care. Never
try to do this alone, because the appliance is very heavy.
• Before loading laundry into the washing machine, make
sure the drum is empty.
Disposal
• Disposing of the packaging materials: observe local regu-
lations so that the packaging may be re-used.
• The European Directive 2002/96/EC on Waste Electrical
and Electronic Equipment, requires that old household
electrical appliances must not be disposed of in the
normal unsorted municipal waste stream. Old appliances
must be collected separately in order to optimise the
recovery and recycling of the materials they contain and
reduce the impact on human health and the environment.
The crossed out “wheeled bin” symbol on the product
reminds you of your obligation, that when you dispose of
the appliance it must be separately collected.
Consumers should contact their local authority or retailer
for information concerning the correct disposal of their old
appliance.

10
GB
Care and maintenance
2. Unscrew the lid by rota-
ting it anti-clockwise (see
figure): a little water may
trickle out. This is perfectly
normal.
3. Clean the inside thoroughly.
4. Screw the lid back on.
5. Reposition the panel, making sure the hooks are secu-
rely in place before you push it onto the appliance.
Checking the water inlet hose
Check the inlet hose at least once a year. If there are any
cracks, it should be replaced immediately: during the wash
cycles, water pressure is very strong and a cracked hose
could easily split open.
! Never use second-hand hoses.
Cutting off the water and electricity
supplies
• Turn off the water tap after every wash cycle. This will
limit wear on the hydraulic system inside the washing
machine and help to prevent leaks.
• Unplug the washing machine when cleaning it and du-
ring all maintenance work.
Cleaning the washing machine
The outer parts and rubber components of the appliance
can be cleaned using a soft cloth soaked in lukewarm
soapy water. Do not use solvents or abrasives.
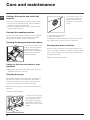
Cleaning the detergent dispenser drawer
To remove the drawer, press
lever (1) and pull the drawer
outwards (2) (see figure).
Wash it under running water;
this procedure should be
repeated frequently.
Caring for the door and drum of your
appliance
• Always leave the porthole door ajar in order to prevent
unpleasant odours from forming.
Cleaning the pump
The washing machine is fitted with a self-cleaning pump
which does not require any maintenance. Sometimes,
small items (such as coins or buttons) may fall into the
protective pre-chamber at the base of the pump.
! Make sure the wash cycle has finished and unplug the
appliance.
To access the pre-chamber:
1. Take off the cover panel
on the front of the machine
by first pressing it in the
centre and then pushing
downwards on both sides
until you can remove it (see
figures).
2
1
1
2
3

GB
11
Troubleshooting
Your washing machine could fail to work. Before contacting the Technical Assistance Centre (see “Assistance”), make sure
that the problem cannot be solved easily using the following list.
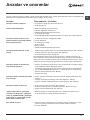
Problem:
The washing machine does not
switch on.
The wash cycle does not start.
The washing machine does not
take in water (the indicator light for
the first wash cycle stage flashes
rapidly).
The washing machine continuously
takes in and drains water.
The washing machine does not
drain or spin.
The washing machine vibrates a lot
during the spin cycle.
The washing machine leaks.
The “Functions” indicator lights and the
“start/pause” indicator light flash, while
one of the “phase in progress” indicator
lights and the “door locked” indicator
light will remain lit in a fixed manner.
There is too much foam.
Possible causes / Solutions:
• The appliance is not plugged into the socket fully, or is not making contact.
• There is no power in the house.
• The washing machine door is not closed properly.
• The ON/OFF button has not been pressed.
• The START/PAUSE button has not been pressed.
• The water tap has not been opened.
• A delayed start has been set (see “Personalisation”).
• The water inlet hose is not connected to the tap.
• The hose is bent.
• The water tap has not been opened.
• There is no water supply in the house.
• The pressure is too low.
• The START/PAUSE button has not been pressed.
• The drain hose is not fitted at a height between 65 and 100 cm from the floor
(see “Installation”).
• The free end of the hose is under water (see “Installation”).
• The wall drainage system is not fitted with a breather pipe.
If the problem persists even after these checks, turn off the water tap, switch
the appliance off and contact the Assistance Service. If the dwelling is on one of
the upper floors of a building, there may be problems relating to water drainage,
causing the washing machine to fill with water and drain continuously. Special
anti-draining valves are available in shops and help to avoid this inconvenience.
• The wash cycle does not include draining: some wash cycles require the drain
phase to be started manually.
• The “Easy iron” function is enabled: to complete the wash cycle, press the
START/PAUSE button (“Personalisation”).
• The drain hose is bent (see “Installation”).
• The drainage duct is clogged.
• The drum was not unlocked correctly during installation (see “Installation”).
• The washing machine is not level (see “Installation”).
• The washing machine is trapped between cabinets and walls (see “Installation”).
• The water inlet hose is not screwed on properly (see “Installation”).
• The detergent dispenser drawer is blocked (for cleaning instructions, see
“Care and maintenance”).
• The drain hose is not fixed properly (see “Installation”).
• Switch off the machine and unplug it, wait for approximately 1 minute and
then switch it back on again.
If the problem persists, contact the Technical Assistance Service.
• The detergent is not suitable for machine washing (it should display the text
“for washing machines” or “hand and machine wash”, or the like).
• Too much detergent was used.

12
GB
Service
Before calling for Assistance:
• Check whether you can solve the problem alone (see “Troubleshooting”);
• Restart the programme to check whether the problem has been solved;
• If this is not the case, contact an authorised Technical Assistance Centre using the telephone number provided on the
guarantee certificate.
! Always request the assistance of authorised technicians.
Have the following information to hand:
• the type of problem;
• the appliance model (Mod.);
• the serial number (S/N).
This information can be found on the data plate applied to the rear of the washing machine, and can also be found on the
front of the appliance by opening the door.

TR
13
Türkçe
Ýçindekiler
Montaj, 14-15
Ambalajýn çýkartýlmasý ve seviye ayarý getirilmesi
Su ve elektrik baðlantýlarý
Ýlk yýkama
Teknik veriler
Çamaþýr makinesinin tanýmý ve program-
larýn çalýþtýrýlmasý, 16-17
Kontrol paneli
Iþýklý göstergeler
Bir programýn baþlatýlmasý
Programlar, 18
Program tablosu
Kiþisel ayarlar, 19
Sýcaklýk ayarý
Sýkma hýzý ayarý
Fonksiyonlar
Deterjan ve çamaþýr, 20
Deterjan haznesi
Beyazlatma iþlevi
Çamaþýrýn hazýrlanmasý
Özel çamaþýrlar
Yük dengeleme sistemi
Önlemler ve öneriler, 21
Genel güvenlik uyarýlarý
Atýklarýn tasfiye edilmesi
Bakým ve özen, 22
Su ve elektrik kesilmesi
Çamaþýr makinesin temizlenmesi
Deterjan haznesinin temizlenmesi
Kapak ve hazne bakýmý
Pompanýn temizlenmesi
Su besleme hortumunun kontrol edilmesi
Arýzalar ve onarýmlar, 23
Teknik Servis, 24
TR
PWC 71040 W
Kullanma Kýlavuzu
ÇAMAÞIR MAKÝNESÝ

14
TR
Montaj
! Bu kitapçýðý gerektiði her an danýþabilmeniz için özenle
saklayýnýz. Çamaþýr makinesinin satýlmasý, devri veya
nakli durumlarýnda da, yeni sahibinin faydalanabilmesi
için bu kýlavuz makineyle beraber saklanmalýdýr.
! Talimatlarý dikkatlice okuyunuz; montaj, kullaným ve
güvenliðe iliþkin önemli bilgiler içermektedir.
Ambalajýn çýkartýlmasý ve ayný seviyeye
getirilmesi
Ambalajdan çýkartýlmasý
1. Çamaþýr makinesinin ambalajdan çýkartýlmasý.
2. Çamaþýr makinesinin taþýma esnasýnda hasar görme-
miþ olduðunu kontrol ediniz. Hasar görmüþ ise monte
etmeyiniz. Satýcýya baþvurunuz.
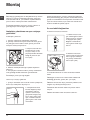
3. Taþýma sýrasýnda arka
tarafta bulunan 4 adet
koruyucu vidayý ve ara
parçasýyla birlikte buradaki
lastiði de çýkartýnýz (ba-
kýnýz þekil).
4. Delikleri ambalajda bulacaðýnýz plastik kapaklarla
kapayýnýz.
5. Tüm parçalarý muhafaza ediniz: çamaþýr makinesinin
nakli gerektiði takdirde takýlmalarý gerekmektedir.
! Ambalajlar çocuk oyuncaðý deðildir.
Cihazýn ayný seviyeye getirilmesi
1. çamaþýr makinesini düz ve sert bir zemine yerleþtiriniz,
duvar veya mobilyalara dayamayýnýz.
2. Yerleþtirilecek zemin
tam düz deðilse çamaþýr
makinesinin vidalý ön
ayaklarýný sýkarak veya
gevþeterek dengeyi sað-
layýnýz (bkz. þekil); eðim
açýsý, makinenin üst tez-
gahýna göre 2° den fazla
olmamalýdýr.
Saðlýklý bir dengeleme, çamaþýr makinesine saðlam bir
duruþ kazandýracaðý gibi, çalýþmasý esnasýndaki sarsýntý,
gürültü ve hareketlilikleri de önleyecektir. Zeminde moket
veya halý olmasý halinde, ayarý makinenin altýnda hava-
landýrma olabilecek þekilde yapýnýz .
Su ve elektrik baðlantýlarý
Su besleme hortumunun takýlmasý
1. Tedarik borusunu 3/4
gaz vidali baglanti kullana-
rak bir soguk su muslugu-
na baglayin (bkz. þekil).
Baðlantý öncesinde ber-
rak su gelene kadar suyu
akýtýnýz.
2. Besleme hortumunu
arka kýsýmda üst sað köþe-
deki su giriþine vidalaya-
rak çamaþýr makinesine
takýnýz (bkz. þekil).
3. Hortumda katlanma ve ezilme olmamasýna dikkat
ediniz.
! Musluðun su basýncýnýn Teknik Veriler tabelasýnda
belirtildiði gibi olmasý gerekir (bkz. yan sayfa).
! Besleme hortumunun boyu yetersizse yetkili bir satýcý
maðaza veya teknisyene baþvurunuz.
! Kesinlikle daha önceden kullanýlmýþ hortum kullan-
mayýnýz.
! Makine ile birlikte verilen hortumlarý kullanýnýz.

TR
15
65 - 100 cm
Tahliye hortumunun takýlmasý
Tahliye hortumunu, katlan-
masýný önleyerek, zemin-
deki veya yerden 65 ile
100 cm yükseklik arasýn-
daki bir duvar tahliyesine
takýnýz
veya mevcut olan kýla-
vuzu çeþmeye baðlaya-
rak lavabo ya da küvet
kenarýna yaslayýnýz (bkz.
þekil). Tahliye hortumu-
nun serbest ucunun suya
girmemesi gerekir.
! Tahliye hortumu için ilave uzatma kullanýlmamasý tav-
siye olunur; aksi mümkün deðilse, uzatma hortumunun
çapýnýn da ayný olmasý ve 150 cm. den uzun olmamasý
gerekir.
Elektrik baðlantýsý
Fiþi prize takmadan evvel aþaðýdaki hususlara dikkat
ediniz:
• prizin topraklamasýnýn yürürlükteki normlara uygun
olmasýna;
• prizin, makinenin Teknik Veriler tabelasýnda belirtilen,
azami gücünü taþýyabilecek olmasýna (bkz. yan taraf);
• þebeke geriliminin, Teknik Veriler tabelasýnda belirtilen
deðerlere uygun olmasýna (bkz. yan taraf);
• prizin çamaþýr makinesinin fiþiyle uyumlu olmasýna.
Aksi takdirde fiþi veya prizi deðiþtiriniz.
! Çamaþýr makinesi, muhafazalý olsa bile açýk alanda
monte edilemez, çünkü rüzgara ve yaðmura maruz kal-
masý çok tehlikelidir.
! Monte edilen çamaþýr makinesinin fiþinin kolaylýkla
eriþilebilir olmasý gerekir.
! Uzatma kablosu ile çoklu prizler kullanmayýnýz.
! Kablonun ezilmemesi ve katlanmamasý gerekir.
! Beslenme kablosunun yalnýzca yetkili teknisyenler
tarafýndan deðiþtirilmelidir.
Dikkat! Bu kurallara uyulmamasý halinde firma hiç bir
sorumluluk kabul etmemektedir.
Ýlk yýkama
Montajdan sonra, çamaþýr koymaksýzýn deterjanla 3.
programý ayarlayarak yýkama yapýnýz.
Teknik bilgiler
Model PWC 71040 W
Ölçüler
geniþlik 59,5 cm
yükseklik 85 cm
derinlik 55 cm
Kapasite 1 - 7 kg
Elektrik baðlantýlarý
makine üstünde takýlý olan teknik veriler
plakasýna bakýnýz.
Su baðlantýlarý
max. su basýncý 1 MPa (10 bar) min. su
basýncý 0,05 MPa (0,5 bar)
tambur kapasitesi 52 litre
Sýkma hýzý maksimum dakikada 1000 devire kadar
1061/2010 ve
1015/2010 sayýlý
direktiflere göre
kontrol programlarý
program 3; 60°C Standart Pamuk;
program 4; 40°C Standart Pamuk.
Bu makina aþaðýda belirtilen AB normlarýna
uygundur:
- 2004/108/CE (Elektromanyetik Uyum)
- 2002/96/CE
- 2006/95/CE (Alçak gerilim)

16
TR
Çamaþýr makinesinin tanýmý ve
programlarýn çalýþtýrýlmasý
Deterjan Bölmesi: ve diðer katkýlarý koyunuz (“Deterjan-
lar bölümüne” bakýnýz).
ON/OFF düðmesi: çamaþýr makinesini çalýþtýrmak ve
kapatmak için.
PROGRAMLAR uyarý lambalý tuþlarý: programlarý ayarla-
mak. Program esnasýnda düðme sabit kalýr.
FONKSÝYON düðmeleri: iþlev seçimi için. Seçilen iþlev
düðmesinde ýþýklý gösterge yanýk kalýr.
Düðmesi SÝKMA HÝZÝ AYARÝ düðmesi: sýkma çalýþtýrmak
veya durdurmak için (bkz. Kiþisel ayarlar bölümü).
Düðmesi SÝCAKLÝK AYARÝ düðmesi: istenen sýcaklýðý
veya soðuk suyla yýkamayý ayarlamak için (bkz. Kiþisel
ayarlar bölümü).
GECIKMELI BAÞLATMA düðmesi:
Çamaþýr makinesinin çalýþmasýný 9 saate kadar erteler.
Ýstenilen gecikme süresi ile ilgili gösterge lambasý yanana
kadar düðmeye arka arkaya basýn.
Düðmeye dört kez basýldýðýnda, seçenek devre dýþý
býrakýlacaktýr.
Not: START/PAUSE düðmesine basýlýr basýlmaz, gecik-
me süresi yalnýzca ayarlanan program baþlatýlana kadar
azaltýlarak deðiþtirilebilir.
! Bu seçenek tüm programlarda bulunmaktadýr.
PROGRAM TAKÝP uyarý lambasý: yýkama programýnýn
aþamalarýný görmek için.
Uyarý lambasý makinenin açýk olduðunu gösterir.
KAPAK KÝLÝTLÝ göstergesi: çamaþýr makinesinin ka-
paðýnýn açýlabilirliðini görmek için (bkz. yan sayfa).
START/PAUSE uyarý lambalý tuþ: programlarý baþlatmak
yada geçici olarak durdurmak için.
Not: devrede olan bir programýn beklemeye alýnmasý için
bu düðmeye basýnýz; turuncu renkli uyarý lambasý yanýp
sönecektir. MAKÝNE KAPAÐI KÝLÝTLÝ uyarý lambasý
kapalý ise, kapak açýlabilir.
Yýkama programýnýn kaldýðý yerden devam etmesi için bu
düðmeye tekrar basýnýz.
Bekleme modu
Yeni enerji tasarrufu düzenlemeleri ile uyumlu bu ça-
maþýr makinesine herhangi bir faaliyet algýlanmadýðýnda
30 dakika içinde devreye sokulan otomatik bekleme
sistemi yerleþtirilmiþtir ON/OFF düðmesine bir süre basýn
ve makinenin tekrar çalýþmasýný bekleyin.
Off-mode’da tüketim: 0,5 W
Left-on’da tüketim: 0,5 W
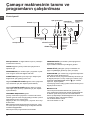
Kontrol paneli
Deterjan Bölmesi
ON/OFF düðmesi
PROGRAMLAR
düðmesi
SÝCAKLÝK AYARÝ
düðmesi
SÝKMA HÝZÝ AYARÝ
düðmesi
KAPAK
KÝLÝTLÝ
göstergesi
START/
PAUSE
uyarý
lambalý tuþ
Gecikmeli
başlatma
düğmesi
FONKSÝYON
uyarý lambalý tuþlarý
PROGRAM
TAKÝP Uyarý
lambasý
Iþýklý göstergeler

TR
17
Iþýklý göstergeler
Iþýklý göstergeler önemli bilgiler verir.
Ýþte verdikleri bilgiler:
Zaman Ayarý
GECIKMELI BAÞLATMAYÝ programlayarak sonradan
çalýþtýrma ayarý yapýldýysa (bkz. kiþisel ayarlar bölümü),
gösterge yanacak ve çalýþma baþlangýcý için kalan süreyi
gösterecektir:
Süre geçtikçe, bu ýþýklý gösterge kalan süreyi göstermeye
devam edecektir.
Ayarlanan program seçili gecikme süresi sona erdiðinde
baþlayacaktýr.
Program Takip uyarý lambasi
Ýstenilen yýkama devresini seçtikten sonra çalýþma
esnasýnda ýþýklý göstergeler sürekli yanarak yürütül-
mekte olan iþlemi gösterecektir.
FONKSÝYON tuþlarý ve ilgili uyarý lambalarý
Herhangi bir iþlem seçildiðinde ilgili gösterge yanacaktýr.
Seçilen iþlem yürütülen programla uyumlu olmadýðý
takdirde,ilgili gösterge yanýp sönecek ve iþlev baþlatýlma-
yacaktýr.
Seçilen fonksiyon ayarlanmýþ olan programla uyumlu
olmadýðý takdirde, ilk iþlevle ilgili uyarý lambasý yanýp
sönecek ve etkinleþtirilmiþ iþlev yanýp sönmesi sona
erecektir.
Not: seçeneði etkinse, diðer uyumlu tüm seçenekler
etkinleþtirilebilir.
KAPAK KÝLÝTLÝ göstergesi
Gösterge ýþýðý açýk olduðunda, yan kapak açýlmamasý
için kilitlenir; kapaðý açmadan önce gösterge ýþýðýnýn ka-
palý olduðundan emin olunuz (yaklaþýk 3 dakika bekleyi-
niz). Devam eden yýkama devri sýrasýnda kapaðý açmak
için, START/PAUSE düðmesine basýnýz; kapak KAPAK
KÝLÝTLÝ göstergesi ýþýðý söndüðünde açýlabilir.
! Seçenekler ve START/PAUSE gösterge lambalarý hýzlý
hýzlý yanýp sönüyor ve mevcut aþama veKAPAK KÝLÝTLÝ
gösterge lambalarý açýksa, bir anormallik sözkonusudur
(“Sorun Giderme ye bakýnýz”).
Bir programýn baþlatýlmasý
1. ON/OFF düðmesine basarak çamaþýr makinesini açýn. Gösterge lambalarýnýn hepsi birkaç saniyeliðine yanacaktýr
ve daha sonra sadece seçilen program ayarlarý ile ilgili gösterge lambalarý yanýk kalacaktýr, START/PAUSE gösterge
lambalarý yanýp sönecektir.
2. Çamaþýrý yerleþtirip kapaðý kapatýnýz.
3. PROGRAMLAR düðmesiyle istenen programý seçiniz.
4. Yýkama suyu sýcaklýðýný seçiniz (bkz. “Kiþisel ayarlar”).
5. Sýkma hýz ayarýný seçiniz (bkz. “Kiþisel ayarlar”).
6. Deterjan ve diðer katkýlarý koyunuz (Bkz. Deterjanlar ve çamaþýrlar bölümü).
7. Ýstenilen iþlevleri seçin.
8. START/PAUSE düðmesine basarak yýkama çevrimini baþlatýn, ilgili mavi gösterge lambasý yanýk kalacaktýr yanýp
sönmez.
9. Program bitiminde “END” göstergesi yanmaya baþlayacaktýr. Kapak, KAPAK KÝLÝTLÝ göstergesi ýþýðý söndüðünde
açýlabilir. Çamaþýrý çýkarýnýz ve içerisinin kurumasý için kapaðý hafif aralýk býrakýnýz. ON/OFF tuþuna basarak çamaþýr
makinasýný kapatýnýz.
Yýkama
Durulama
Sýkma
Su boþaltma
Yýkama sonu
END

18
TR
Programlar
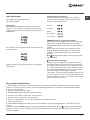
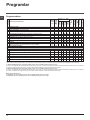
Program tablosu
1) 1061/2010 düzenlemesine uygun test yıkama çevrimi: 60°C sıcaklıkta yıkama çevrimi 3’yi seçin.
Bu devre, orta kirlilikteki pamuklu çamaşırları temizlemek için uygundur ve 60°C’de yıkanabilir çamaşırlar üzerinde kullanılacak, kombine enerji ve su tüketimi
açısından en etkili devredir. Geçerli olan yıkama sıcaklık derecesi, belirtilen sıcaklık derecesinden farklı olabilir.
2) 1061/2010 düzenlemesine uygun test yıkama çevrimi: 40°C sıcaklıkta yıkama çevrimi 4’yi seçin.
Bu devre, orta kirlilikteki pamuklu çamaşırları temizlemek için uygundur ve 40°C’de yıkanabilir çamaşırlar üzerinde kullanılacak, kombine enerji ve su tüketimi
açısından en etkili devredir. Geçerli olan yıkama sıcaklık derecesi, belirtilen sıcaklık derecesinden farklı olabilir.
Bütün Test merkezleri için:
2) Pamuklular için uzun yıkama çevrimi: 40°C sıcaklıkta yıkama çevrimi 4’ü seçin.
3) Sentetikler için uzun yıkama çevrimi: 40°C sıcaklıkta yıkama çevrimi 5’ü seçin.
Ekran veya kitapçık üzerinde gösterilen devre süresi, standart şartlara göre hesaplanmış tahmini bir süredir. Geçerli olan süre, girişteki sıcaklık derecesi ve suyun
basıncı, ortam sıcaklığı, deterjan miktarı, yük miktarı ve tipi, yükün dengesi, seçilen ilave seçenekler gibi sayısız faktörlere göre değişiklik gösterebilmektedir.
Yıkama
çevrimleri
Yıkama çevrimi açıklaması
Maks.
Sıcak
(°C)
Maks. Hız
(dev/dak.)
Deterjan ve katkı
maddeleri
Maks. yük
(kg)
Kalan nem %
Enerji tüketimi
kWh
Toplam su lt
Çevrim süresi
Ön
yıkama
Ana
Yıkama
Çamaşır
suyu
Yumu-
şatıcı
Günlük çevrimler
1
Ön yıkamalı pamuklular: aşırı kirli beyazlar.
90° 1000
-
7 62 2,21 78 170’
2
Beyaz pamuklular: aşırı kirli beyazlar.
90° 1000 -
7 62 2,16 72 160’
3
60°C Standart pamuklu (1): Çok kirli beyazlar ve dayanıklı renkliler.
60° 1000 -
7 62 1,35 58 190’
4
40°C Standart pamuklu (2): Az kirli beyazlar ve hassas renkliler.
40° 1000 -
7 62 1,09 92 185’
5
Sentetikler: Çok kirlenmiş dayanıklı renkliler.
60° 800 -
3 44 0,93 47 110’
5
Sentetikler (3): Az kirlenmiş dayanıklı renkliler.
40° 800 -
3 44 0,57 46 95’
6
Sentetikler
:
Az kirlenmiş dayanıklı renkliler.
40° 800 -
3 - - - 70’
7
Kot pantalon
40° 800 -
-
3,5 - - - 70’
8
Gömlek
40° 600 -
2 - - - 70’
9
Mix-Cool 30’: Az kirlenmiş giysileri hemen temizlemek için (elle
yıkamayı gerektiren yün, ipek ve elbiseler için uygun değildir).
Soğuk
su
800 -
-
3 71 0,04 34 30’
10
20°C Standart pamuklu
20° 1000 -
7 - - - 170’
Özel çevrimler
11
Yün: Yün, kaşmir vs.
40° 800 -
-
1,5 - - - 70’
12
İpek/Perde: ipek ve sentetik giysiler, iç çamaşırları için.
30° 0 -
-
1 - - - 55’
13
Spor Ayakkabıları
30° 600 -
-
En fazla
2 çift
- - - 60’
14
Eskitme
30° 400 -
- - 2 - - - 60’
Kısmi çevrimler
Durulama
- 1000 - -
7 - - - 36’
Sıkma
+
Su boþaltma
- 1000 - - - - 7 - - - 16’

TR
19
Sýcaklýk ayarý
Yýkama suyu ýsýsýný SÝCAKLÝK AYARI tuþuna basýnýz seçiniz (bkz. Program tablosu).
sýcaklýk ayarý soðuk suyla yýkanacak seviyeye kadar düþürülebilir ( ).
Makine, seçilen program için öngörülenin üzerinde bir yýkama ýsýsýný otomatik olarak uygulamayacaktýr.
Sýkma hýzý ayarý
Tuþuna basýnýz SIKMA HIZI ayarý bu düðmenin çevrilmesiyle yapýlýr.
Programlar için öngörülen azami süratler þöyledir:
Programlar Azami Sýkma hýzý
Pamuklular Dakikada 1000 devir
Sentetik kumaþlar Dakikada 800 devir
Yünlüler Dakikada 800 devir
Ýpekli sadece boþaltma
Sýkma sürati azaltýlabilir veya iþareti seçilerek devre dýþý býrakýlabilir.
Makine, her bir program için öngörülenin üzerinde bir sýkma hýzýný kabul etmez.
Fonksiyonlar
Çamaþýr makinesince öngörülen muhtelif iþlemler arzu edilen temizlik ve beyazlýktaki yýkamalara olanak saðlar.
Ýþlevleri çalýþtýrmak için:
1. istediðiniz iþlev düðmesine basýnýz;
2. ilgili göstergenin yanmasý iþlevin baþladýðýný belirtir.
Not: göstergenin hýzlý bir þekilde yanýp sönmesi seçilen iþlevin yürütülmekte olan programa uygun olmadýðýnýn iþaretidir.
“PRIME” teknolojisi, enerji, su ve zaman tüketimini makinenin içine konulan çamaşırlara uygun olarak en iyi şekilde kullanır. Ayrıca
tuşuna basınca, aşağıdaki opsiyonlar seçilebilir:
- Water (Su): mükemmel sonuçlardan vazgeçmeden su tüketimini azaltmamıza olanak tanır (çok kirli çamaşırlar için tavsiye edilir).
- Enegy (Enerji): “PRIME” tarafından otomatik olarak ayarlanan bu opsiyon, enerji tüketimini azaltır (normal kirlilikteki çamaşırlar
için tavsiye edilir).
- Time (Zaman): yıkama süresini kısaltmamıza olanak tanır(az kirli çamaşırlar için tavsiye edilir).
! Bu sadece 1, 2, 3, 4, 5, 6, 10 (üç seviyenin her biriyle) ve 7, 8, 9 (- Enegy ve - Time seviyeleri) ile birlikte kullanılabilir.
Ekstra Durulama
Bu opsiyon seçildiðinde durulamanýn verimliliði daha yüksek olur ve deterjandan tamamen temizlenmesi saðlanýr. Hassas
ciltler için uygundur.
! Sonraki programlarda uygulanamaz: 9, programlarý.
Kolay Ütü
Bu iþlev seçildiðinde kýrýþýklarý önleyecek þekilde yýkama ve sýkma devrinin özellikleri deðiþtirilecektir. Program bitiminde
çamaþýr makinesi iç sepetini yavaþça döndürecektir, KOLAY ÜTÜ ve START/PAUSE seçenekleri için gösterge ýþýklarý
yanýp söner (önce yeþil, sonra turuncu renkte) ve “END” göstergesi ýþýðý yanar. Programý bitirmek için START/PAUSE
veya KOLAY ÜTÜ düðmesine basýnýz.
12-14 programda makine çamaþýrlarý durulama suyu içinde durduracaktýr ve KOLAY ÜTÜ ve START/PAUSE uyarý
lambalarý turuncu renkte yanýp sönecek ve DURULAMA safhasýnýn lambasý yanýk kalacaktýr. Su boþaltmak için START/
PAUSE ya da KOLAY ÜTÜ düðmesine basmanýz gerekir. Simdi çamaþýrlarýnýzý alabilirsiniz.
! Bu programlarda uygulanamaz: 9, 11, 13, , .
Leke önleyici
Beyazlatma iþlemi en kalýcý kirleri bile çýkartmaya yarar. Ýlave haznesine çamaþýr suyu koymayý unutmayýnýz (bkz.
“Beyazlatma iþlemi”).
! Bu programlarda uygulanamaz: 1, 7, 9, 11, 12, 13, 14, .
Kiþisel ayarlar

20
TR
Deterjan çekmecesi
Başarılı yıkama sonuçları aynı zamanda doğru miktarda
deterjan kullanımına bağlıdır: çok fazla deterjan ilave edil-
mesi daha iyi bir yıkama ile sonuçlanmadığı gibi, cihazın
içerisinde birikir ve çevre kirliliğine katkıda bulunur.
! Elde yıkama deterjanları kullanmayınız, çünkü aşırı
köpük yaparlar.
! Beyaz pamuklu çamaşırlar, ön yıkama ve 60°C’den
yüksek sıcaklık derecesi ile yıkamalar için toz deterjan
kullanınız.
! Deterjan ambalajı üzerinde aktarılan bilgileri takip ediniz.
Deterjan çekmecesini açın
ve deterjan veya katkı mad-
delerini aşağıdaki şekilde
dökün.
Bölüm 1: Ön yıkama
deterjanı (toz)
Deterjanı dökmeden önce, ila-
ve bölme 4’ün çıkarıldığından
emin olun.
Bölüm 2: Yıkama deterjanı (toz veya sıvı)
Sıvı deterjan sadece yıkama çevrimine başlamadan hemen önce
dökülmelidir.
Bölüm 3: Katkı maddeleri (yumuşatıcı vs.)
Yumuşatıcı ızgaranın dışına taşmamalıdır.
ilave bölme 4: Çamaşır suyu
Beyazlatma iþlemi
! Normal çamaþýr suyu dayanýklý beyaz çamaþýrlar için, has-
sas olaný ise renkliler, sentetikler ve yünlüler için kullanýlýr.
4 numaralý ilave hazneyi 1 numaralý hazneye yerleþtiriniz.
Çamaþýr suyu miktarýný ayarlarken orta mildeki “max”
iþaretini geçmeyiniz (resime bkz.).
Yalnýzca beyazlatma iþlemi için, çamaþýr suyunu 4 numaralý
hazneye koyun ve “Durulama” ve “Leke önleyici”
opsiyonuna ayarlayýnýz.
Yýkama esnasýnda beyazlatmak için, deterjan ve katký
maddelerini koyunuz, arzu ettiðiniz programý seçiniz ve
“Leke önleyici” opsiyonuna ayarlayýnýz.
4 numaralý ilave haznenin kullanýmý ön yýkama iþlemini
devre dýþý býrakýr.
Çamaşırın hazırlanması
• Çamaşırı aşağıdakilere göre ayırın:
- etiketteki kumaş türü/sembole
- renge: renkli giysileri beyazlardan ayırın.
• Bütün cepleri boşaltın ve düğmeleri kontrol edin.
• Kurulama sýrasýnda çamaþýrýn aðýrlýðýný gösteren “Pro-
gramlar Tablosu”’’daki deðerleri aþmayýn.
Çamaşırınız ağırlığı ne kadardır ?
1 çarşaf 400-500 gr
1 yastık kılıfı 150-200 gr
1 masa örtüsü 400-500 gr
1 bornoz 900-1.200 gr
1 havlu 150-250 gr
Özel yıkama çevrimleri
Kot pantalon: yıkamadan önce giysilerin içini dışa doğru
çevirin ve sıvı deterjan kullanın. Yıkama çevrimi 7’i kullanın.
Gömlek:değişik kumaş ve renklerdeki gömlekler için
özel çamaşır çevrimi 8’u kullanın. Bu giysilere maksimum
özen gösterilmesini sağlar ve iz oluşumunu en aza indirir.
Mix-Cool 30’: bu yıkama çevrimi az kirlenmiş giysileri hızlı
bir şekilde yıkamak için tasarlanmıştır: 30 dakika içinde
sona erer ve böylece hem enerji hem de zaman tasarrufu
sağlar. Yıkama çevrimi 9’i seçerken, maksimum 3 kg.’lık
yüke kadar, soğuk bir çevrim yaparak farklı kumaşların
(yünlü ve ipekli eşyalar hariç) yıkanması mümkündür.
20°C Standart pamuklu (program 10): kirli pamuklu
çamaþýrlar için idealdir. 40°’de bir yýkama ile mukayese
edilebilen, soðuk suda da etkili olan performanslar,
yinelenen ve karþýlaþtýrýlan en yüksek hýz varyasyonu ile
çalýþan mekanik bir hareket ile saðlanýr.
Yün: Bu çamaşır makinesinin “Yünlüler” yıkama devresi,
yıkama işlemi giysilerin etiketi üzerinde aktarılan talimat-
lara ve elektrikli ev aletinin üretici rması tarafından
verilen talimatlara riayet ederek gerçekleştirildiği sürece,
“elde yıkanabilir” olarak sınıandırılan yünlü çamaşırların
yıkanması için Woolmark Company tarafından test
edilmiş ve onaylanmıştır. (M1126)
İpek: bütün ipek giysileri yıkamak için özel yıkama çevri-
mi 12’yi kullanın. Hassas elbiseleri yıkamak için tasarla-
nan özel deterjanın kullanılmasını tavsiye ederiz.
Perdeler: perdeleri katlamanızı ve bir yastık kılıfının veya
çamaşır lesinin içine yerleştirmenizi öneririz. Yıkama
çevrimi 12’i kullanın.
Spor Ayakkabıları: (program 13) spor ayakkabılarını
yıkamak için kullanılır; en iyi sonuçlar için, aynı anda 2
çiftten fazla yıkamayınız.
Eskitme: (program 14) su geçirmez kumaşlar ve kış
ceketleri için (örn. Gore-Tex, polyester, naylon) yıkama
için kullanılır; en iyi sonuçlar için, sıvı deterjan ve yarım
yük doz kullanınız; gömlek yakalarını, manşetlerini
ve lekeleri ön işlemden geçiriniz; yumuşatıcı veya
yumuşatıcı içeren deterjan kullanmayınız. Doldurulmuş
yorganlar bu programla yıkanamaz.
Yük dengeleme sistemi
Her dönüş çevriminden önce aşırı titreşimi önlemek ve
yükü tek bir yönde dağıtmak için, tambur yıkama dönüş
hızından biraz daha fazla olan bir hızda sürekli döner.
Birkaç denemeden sonra, yük doğru şekilde dengelen-
mezse, makine düşük bir dönüş hızında döner. Yük çok
dengesizse, çamaşır makinesi döndürme yerine dağıtma
işlemini uygular. Gelişmiş yük dağılımı ve dengeyi de-
steklemek için, küçük ve büyük giysilerin yük içerisinde
karıştırılmasını öneririz.
Deterjanlar ve çamaþýr
4
2
3
1
4
2
1
3
Sayfa yükleniyor...
Sayfa yükleniyor...
Sayfa yükleniyor...
Sayfa yükleniyor...
-
 1
1
-
 2
2
-
 3
3
-
 4
4
-
 5
5
-
 6
6
-
 7
7
-
 8
8
-
 9
9
-
 10
10
-
 11
11
-
 12
12
-
 13
13
-
 14
14
-
 15
15
-
 16
16
-
 17
17
-
 18
18
-
 19
19
-
 20
20
-
 21
21
-
 22
22
-
 23
23
-
 24
24


Indesit PWC 71040 W (EU) Kullanici rehberi
- Kategori
- Çamaşır makineleri
- Tip
- Kullanici rehberi
diğer dillerde
- English: Indesit PWC 71040 W (EU) User guide