
KULLANIM KILAVUZU
TR
USERS MANUAL
EN
GEBRAUCHSANWEİSUNG
DE
MANUAL DE USUARIO
ESP
MODE D’EMPLOI
FR
ИНСТРУКЦИЯ ПО ЭКСПЛУАТАЦИИ
РУ
BARDAK YIKAMA MAKİNASI
GLASS WASHING MACHINE
GLASWASCHMASCHINE
LAVADORA DE VIDRIO
VERRE MACHINE A LAVER
СТЕКЛО СТИРАЛЬНАЯ МАШИНА
MODEL : BYM042B
BYM042BT
Revizyon No : 03
Yürürlülük Tarihi : 04.07.2019

2
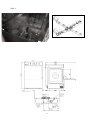
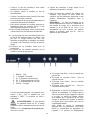
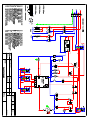
Şekil - 1

3
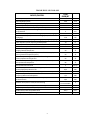
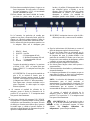
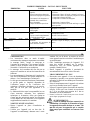
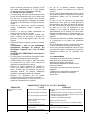
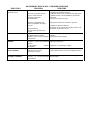
TEKNİK ÖZELLİK TABLOSU
MODEL/MODEL
BYM
042B/BT
Genislik/Width/Breite
460
mm
Derinlik/Depth/Tiefe
560
mm
Yükseklik/Height/Höhe
730
mm
Kaset Kapasitesi/Rack Capacity/Korbkapazität
40
Pcs/h
Bardak Kapasitesi/Glass Capacity/Glaserkapazität
600-800
Pcs/h
Program sayısı /Number Of Programs/Anzahl von
Programmen
3
Pcs
Kısa Yıkama Peryodu/Short Washing Cycle/Kurzer Spülgang*
80
sec
Orta Yıkama Peryodu/Medium Washing Cycle/Mittlerer
Spülgang*
110
sec
Uzun Yıkama Peryodu/Long Washing Cycle/Langer Spülgang*
140
sec
Tank Kapasitesi/Tank Capacity/Tankkapazität
13
Lt
Su Girisi/Water Inlet/Wasser Einlass
3/4"
Inch
Su Giris Basıncı/Pressure of Water Supply/Wasserdruck
2-4
bar
Su Giris Sıcaklığı/Temperature of Water
Supply/Wassertemperatur
50
ºC
Su Giris Sıcaklığı (maks.) /Temperature of Water Supply
(max.)/Wassertemperatur (max.)
55
ºC
Yıkama Suyu Sıcaklığı/Temperature of Washing
Water/Spülwassertemperatur
55
ºC
Durulama Suyu Sıcaklığı/Temperature of Rinse Water/
Klarspülwassertemperatur
85
ºC
Durulama Su Tüketimi/Rinse Water Consumption/
Klarspülwasserverbrauch
3
Lt/cyc
Yıkama Pompa Motor Gücü/Washing Pump Motor
Power/Spülpump Motorkrraft
0,25
kW
Tank Isı Kapasitesi/Tank Heat Capacity/Tankwärmekapazität
1,2
kW
Boyler Isı Kapasitesi/Boiler Heat
Capacity/Boilerwärmekapazität
2,6
kW
Max. Güç Tüketimi/Max. Pover Consumption/Max.
Kraftverbrauch
2,95
kW
Elektrik Girisi/Electric Inlet/Stromzuleitung
230V AC
1P+N+PE 50Hz
V
Boşaltma süresi/ Drainage time / Entladungszeit
120
Sn.
Boyler kapasitesi / Boiler capacty
2,7
Lt.
Kablo Kesiti/Cable Cut/Kabelschnitt
3x2,5
mm²
Net Ağırlık/Net Weight/Nettogewicht
39
Kg

4
TR
1. AÇIKLAMA
Bu kılavuzdaki talimatlar makinanın emniyetli
montajı, kullanımı, temizliği ve bakımı hakkında
önemli bilgiler içerir. Bu nedenle kılavuzu,
makinayı kullanacak kişi ve teknisyenin rahatlıkla
ulaşabileceği bir yerde saklayınız.
Makinanın montajı, bu konuda tecrübeli uzman
bir kişi tarafından üretici firmanın talimatlarına
uygun bir şekilde yapılmalıdır.
Makinanın elektrik ve su bağlantıları “Teknik
Özellikler” tablosunda verilen değerlere uygun
olarak yapılmalıdır.
Makinanızın doğru çalışması ve uzun ömürlü
olması, kesinlikle doğru kullanım, periyodik
bakım ve servis işlemlerinin yerine getirilmesi ile,
ona göstereceğiniz özene bağlıdır.
Üretici firma; kullanım kılavuzuna uymadan
yapılan herhangi bir işlemden, yetkili teknisyenler
tarafından yapılmayan bakım veya teknik
müdahalelerden, makinaya bağlanan ekstra
hazneler veya cihazlardan dolayı insanlara veya
eşyalara karşı meydana gelen nihai zararlardan
sorumluluk kabül etmez.
2. MONTAJ TALİMATI
Cihazı montaj mahaline taşıyınız ve ambalajından
çıkarınız.
Cihazın sağlam bir durumda olduğunu kontrol
edin. Eğer bir hasar sözkonosu ise derhal
satıcınıza bu durumu bildiriniz ve eğer bir
kuşkunuz varsa uzman birine kontrol ettirmeden
cihazı çalıştırmayınız.
Cihaz üzerindeki koruyucu naylonu sıyırarak
çıkarınız. Yüzey üzerinde yapışkan madde
artıkları kalırsa uygun bir çözücü ile temizleyiniz.
(Örneğin;Henkel-Helios)
Cihazı, mümkünse su bağlantısına ve pis su
giderine yakın bir yere yerleştiriniz.
3. SU BAĞLANTISI
Cihazınızı normal şebeke suyuna bağlayınız.
Ancak elektrik tasarrufu sağlamak için 45°C sıcak
su girişine de bağlayabilirsiniz.
Cihazla musluk arasındaki bağlantıyı verilen
fleksıbıl hortum ile yapınız.
Cihazın verimli çalışabilmesi için, giriş suyunun 7
Fr sertliğinde ve gelen basınç min 2bar, max
10bar basıncında olması gerekir. Su basıncı
bağlantıları yapıldıktan sonra musluğu sonuna
kadar açın ve su sızıntısı olup olmadığını kontrol
edin.
Yeni üründe eski ya da kullanılmış su giriş
hortumu kullanmayınız.
UYARI:
1. Base model cihazlarda gider borusunun,
su akışının sağlıklı yapılabilmesi için yerden
yüksekliği 50 mm, boşaltma pompalı
cihazlarda ise yerden yükseklik max. 700mm
geçmeyecek bir gidere bağlanması gerekir.
2. Bağlantılar tamamlandıktan sonra musluğu
sonuna kadar açın ve su sızıntısı olup
olmadığını kontrol edin.
3. Yıkama programı bittiğinde su giriş
musluğunu güvenliğiniz için mutlaka
kapatınız.
4. Cihazınızın daha uzun ömürlü ve verimli çalışabilmesi
için su girişine kireç sökücü filtre takınız. Aksi takdirde
boyler ve boru iç yüzeylerinde birikecek olan kireç
tortuları cihazın verimli çalışmasını
engelleyecektir.
4. ELEKTRİK BAĞLANTISI
Cihazın montajı ve elektrik bağlantısı standartlara
uygun olarak yetkili kişilerce yapılmalıdır.
Cihaz DIN VDE 0100 elektrik tesisat
standarlarına uygun bir şebekeye bağlanmalıdır.
Elektrik bağlantı hattı için H07 RN-F kalitesinde
3x2.5 mm2kesitinde kablo kullanılmalıdır.
Cihaz bir ana şaltere (temas mesafesi 3mm veya
daha fazla) ve sigortalı izolatöre bağlanmalıdır.
Voltaj tolaransı ± % 10'u geçmemelidir.

5
Cihazın besleme hattına max. 25A' lik sigorta
konulmalıdır.
Elektrik bağlantısında 30 mA'lik kaçak akım
rölesi kullanılmasını tavsiye ederiz.
Beslama kablosu 230V AC 1N 50Hz 3x2,5mm²
olmalıdır.
Cihaz mutlaka topraklanmalıdır. Bunun için DIN
VDE 0100 madde 540 gözönünde
bulundurulmalıdır. Topraklama vidası sol alt
kısımda " " etiketi ile belirtilmiştir.
UYARI
Uzatma kabloları yada çoklu prizlerle
bağlantı yapmayın. hasar görmüş bir
elektrik kablosu Yetkili servis tarafından
değiştirlmelidir.
Yerel yönetmeliklere uygun toprkalama
yapılmadan kullanılması halinde ortaya
çıkacak zararlardan firmamız sorumlu değildir.
5. KULLANICI TALİMATI
Makina; toplu yemek verilen orta ölçekli
işletmelerde ve kafeterya türü tüm tesislerde,
tepsi, tabak, bardak, fincan, çatals-kaşık vb.
bulaşıkları özel olarak tasarlanmış kasalar
içerisinde yıkamak için tasarlanmıştır..
Makina sürekli bu iş için tahsis edilmiş kalifiye
bir elemen tarafından kullanılmalıdır.
BYM042 için; Makina maksimum 290mm
yüksekliğindeki bardakları yıkama özelliğine
sahiptir.
İyi bir yıkama sonucu için su önemli bir faktördür.
Bu nedenle suyun sertliği 12 Fr' yi geçerse "su
yumuşatıcısı" kullanılmasını tavsiye ederiz.
İyi bir yıkama kalitesi için bulaşıkları makinaya
girmeden önce mutlaka ön yıkamadan geçiriniz.
Aksi taktir de bulaşıklar üzerinde kalan yemek
artıkları, limon kabukları, kürdan vb. malzemeler
gider borusunu tıkayabilir ve yıkama kalitesine
zarar verebilir.
Makinada iki tip kimyasal ürün kullanılmaktadır.
Bunlar yıkama için deterjan ve parlatma için
parlatıcıdır. Deterjan endüstriyel tip(toz veya sıvı)
ve köpüksüz olmalıdır. Kullanılacak miktar için
deterjan imalatçısı tarafından belirlenen değerleri
uygulayınız.(Suyun sertliğine göre deterjan
miktarında değişiklik olabilir.)
BYM042 için; Makinada standart aksesuar olarak
400x400 mm ölçülerinde 1 adet bardak kasası
bulunmaktadır.
Yıkanacak bulaşığa göre ilgili kasayı seçiniz ve
tabloda belirtilen kapasitelere uygun olarak
yükleme yapınız. Deterjan ve elektrik tasarrufu
sağlamak için kasayı tam olarak doldurmadan
makinayı çalıştırtmayınız.
Yıkayacağınız bulaşıkların Bulaşık Yıkama
Makinesi'ne dayanıklı olmasına dikkat ediniz.
Makina çalışır durumda iken asla yerini
değiştirmeyiniz.
Makinayı çalıştırmadan önce su giriş vanasının
açık olduğundan emin olunuz.
Makinanın iç parçalarının periyodik temizliğinin
yapılması tavsiye edilir.
Temizlenmiş bulaşıklarda sağlığa uygun iyi
sonuçlar elde edebilmek için aşağıdaki temel
kurallara uyulmalıdır:
Deterjan dozu için suyun sertliğine bağlı
olarak üreticinin belirttiklerini uygulayınız.
Yıkama suyu günde en az 3 kez veya kirli
partiküller nedeni ile suyun temizleme özelliği
kaybolduğunda yenilenmelidir. Kirli yıkama
suyu ile yapılan yıkama, deterjan, parlatıcı ve
elektrik israfı ile birlikte kötü yıkama
sonucuna neden olur.
Kirli havlu ile temizlenmiş bulaşıkları
kurulamayınız.
Gözenekli havluların veya diğer materyallerin
üzerine temiz bulaşıkları koymayınız.
Bir defa kullanılıp atılabilen materyalleri veya
tercihen sepet sistemi kullanınız.
Tüm bulaşıkları depoladığınız rafların daimi
temizliğini piyasadaki mevcut özel deterjanlar
ve dezenfektanlarla yapınız.
NOT: Deterjan seçimi, iyi yıkama sonucu
alabilme, makinenin korunması ve ömrü açısından
belirleyici bir faktördür. Bu nedenle aşındırıcı
veya kirletici ürünler kullanmamanızı ve önerilen
deterjan miktarını aşmamanızı tavsiye ederiz.

6. MAKİNANIN KULLANIMI
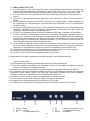
6.1- Çalışma
1. READY
2. ON/OFF
3. P1 : 1. kısa program 80 sec
4. P2 : 2. orta program 110 sec
5. P3 : 3. uzun program 140 sec
6. DRAIN
Makinanın elektrik fişi takıldıktan sonra, “2
ON/OFF düğmesine basılır ve “1 READY”
konumuna gelinceye kadar beklenir. Makine
çalışmaya hazır duruma gelmiştir.
UYARI: Bu pozisyon da P1 butonuna
basılırsa yıkama başlar ancak su soğuk
olduğu için deterjan köpürür.Yıkama işleminin en
iyi sonucu vermesi için “1 READY” lambasının
yanması beklenmelidir.
P1-Kısa Yıkama (80sn.) :Az kirli bulaşıklar
için
P2-Orta Yıkama (110sn.) :Kirli bulaşıklar için
P3-Uzun Yıkama (140-180sn.) :Yağlı-kirli
bulaşıklar için
"P1, P2, P3" progamlarından birini seçebilirsiniz.
Tavsiye edilen yıkama süresi 110sn. Suyun
sıcaklığı ise 55°C dir.
İlk açılışta sıcaklık 55°C ye ulaşınca "Yıkama
Sıcaklık hazır sinyal lambası" yanar. Lamba
yandıktan sonra uygun program seçilir. Yıkama
devam ettiği sürece Yıkama yapılıyor sinyal
lambası açık kalır.
BOŞALTMA:
Kapak açılır
Tıpa çıkartılır
2 numaralı “ON/OFF” butonu off konuma
getirilir.
6 numaralı “DRAIN” butonuna bir kere
basılır.
Cihazın tahliye işlemi başlar
Tahliye işlemi devam ederken DRAIN
butonunda ışık yanık haldedir, işlem
bitince ışık söner.
Su yüksekliği taşma seviyesini aşınca
tahliye pompası devreye girer ve otomatik
boşaltma belirli bir süre çalışır. Bu şekilde su
yüksekliği korunur.
6.2- Kullanıcı Bilgileri
Cihazda, yıkama işlemi için sıvı ve köpüksüz
detarjan kullanınız. Kullanıcak miktar detarjan
imalatçısı tarafından belirlenmelidir. Ayrıca
cihazda kullanılacak parlatıcı miktarı da imalatçı
firma tarafından belirlenmelidir. Detarjan ve
parlatıcı koyma üniteleri de imalatçı firmalar
tarafından yapılmaktadır.
Yıkanacak bulaşığın cinsine ve/veya kirliliğine
göre en uygun programı seçiniz.
Yıkanacak bulaşığa göre ilgili kasayı seçiniz ve
tabloda belirtilen kapasitelere uygun olarak
yükleme yapınız. Deterjan ve elektrik tasarrufu
sağlamak için kasayı tam olarak doldurmadan
cihazı çalıştırtmayınız.
Cihaz çalışır durumda iken asla yerini
değiştirmeyiniz.
Cihazı çalıştırmadan önce su giriş vanasının açık
olduğundan emin olunuz.
DİKKAT!!!
ASLA YIKAMA SUYU İÇERİSİNE
ÇIPLAK ELİNİZİ SOKMAYINIZ. EĞER
GEREKİRSE KORUYUCU ELDİVEN
KULLANINIZ. DETERJANLI SUYU GÖZÜNÜZE
SÜRMEYİNİZ.
7. KAPATMA
Makinanın “2 ON/OFF” düğmesine basınız.
Ön kapağı açarak yıkanmış ürünü dışarı alınız ve
kapağı tapatınız.
Su giriş vanasını kapatınız.
8. EMNİYET TEDBİRLERİ
Cihaz çalışırken kapak açılırsa ya da cihaza start
verildiğinde kapak tam olarak kapatılmamışsa
çalışma durur. Kapak kapatıldığında cihaz
çalışmaya devam eder.
UYARI: Cihazın enerji giriş kablosunda
herhangi bir hasar yâda cihazın tahliye ortumunda
su kaçağı varsa, cihaz mutlaka kapatılmalı ve
yetkili servise haber verilmelidir.
9. GÜNLÜK BAKIM
Yıkama suyu günde en az iki kez veya kirli
partiküller nedeni ile suyun temizleme özelliği
kaybolduğunda yenilenmelidir. Kirli yıkama suyu
ile yapılan yıkama, deterjan, parlatıcı ve elektrik
israfı ile birlikte kötü yıkama sonucuna neden
olur.
Bakım faaliyetlerine başlamadan önce cihazın
bağlı olduğu şalteri kapatınız.
Artıkların pis su giderini tıkamamasına dikkat
ediniz.

7
Yıkama ve durulama kollarının rahatça dönüp
dönemediğini kontrol ediniz. Fıskiyeleri kontrol
edip eğer tıkanmış ise ince bir çubukla delikleri
temizleyiniz.
Cihazın temizliğini yaptıktan sonra kapağını açık
bırakınız.
UYARI: Cihazı, elektrik aksamına zarar
vermemek için direkt yâda yüksek basınçlı su
ile temizlemeyiniz.
PERİYODİK BAKIM ( 2-3 günde bir)
Cihaz üzerinde elektrik varken kesinlikle bakım
yapmayınız.
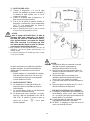
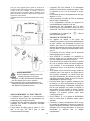
Yandaki şekilde gösterildiği üzere su
fıskiyelerinin nozullarını çıkarıp tıkanıklığa sebep
olabilecek maddelerden temizlenmelidir.
Cihazın dış yüzeylerini sabunlu suya batırılmış bir
bez ile temizleyiniz. Cihaz yüzeyi temizlenirken
aşındırıcı içeriği olan detarjanlar, tel fırçalar
vb.yüzeylerde çizik yapabilecek malzemeler
kullanmayınız.
Cihaz ısıtıcılarını haftada bir kireç çözücü ile
temizleyiniz.
Pompa ön filitresini belirli peryotlarla yerinden
çıkarıp temizleyiniz.
Eğer cihaz uzun müddet kullanılmayacaksa,
yüzeyler ince bir tabaka halinde vazelinle
kaplanmalıdır.
Cihazda tehlikeli bir durum görülmemesi halinde
yetkili servise haber veriniz. Ehliyetsiz kişilerin
cihaza müdahalesine izin vermeyiniz.
Sudaki kalsiyum ve magnezyum belli bir çalışma
süresinden sonra suyun sertliğine bağlı olarak
yıkama tankının iç yüzeylerinde, boylerde ve su
borularının iç kısmında cihazın performansını
etkileyen kazan taşı oluşumuna sebep olabilir. Bu
nedenle zamanla vasıflı bir teknisyen tarafından
kazan taşı temizleme işleminin yapılması
gereklidir.
Boylerin bakımı, boyler ve pompa içindeki suyun
boşaltılarak temizlenmesi peryodik olarak
ehliyetli kişilere yaptırılmalıdır.
Makinanın uzun bir süre çalışmadığı zamanlarda
donma tehlikesi varsa, yıkama pompası ve boyler
boşaltılmalıdır.
Makinada tehlikeli bir durum görülmesi halinde
yetkili servise haber veriniz. Ehliyetsiz kişilerin
makinaya müdahalesine izin vermeyiniz.
11. Çoçuk Güvenliği
Bu cihaz kullanıcı gözetim olmadan 8 yaş altı
çocuklar tarafından ve fiziksel, duyusal veya
zihinsel yetenekleri veya tecrübe ve bilgi eksikliği
kişiler tarafından (engelli) kullanması tehlikeli ve
yasaktır.
Çocukların cihaz ile oynaması tehlikelidir.
Temizlik ve bakımı kullanıcı gözetim olmadan
çocuklar tarafından yapılmamalıdır
OLASI PROBLEMLER - SEBEPLERİ - ÇÖZÜMLERİ
PROBLEM SEBEP ÇÖZÜM
1-Bulaşıklar temiz değil
-Yıkama kolları sıkışmıştır.
-Yıkama fıskiyeleri tıkanmıştır.
-Durulama fıskiyeleri tıkanmıştır.
-Deterjan konsantrasyonu çok
yüksek veya yetersizdir.
-Filtre tıkanmıştır.
-Yıkama zamanı yetersizdir.
-Bulaşıkların kolların dönüşünün engellemediğini
kontrol ediniz.
- Yıkama kolunu söküp fıskiyeleri temizleyiniz.
-Durulama kolunu söküp fıskiyeleri temizleyiniz.
Suyun sertliğini kontrol ediniz.
-Deterjan miktarını kontrol ediniz.
-Filtreyi söküp temizleyiniz.
-Daha uzun bir yıkama peryodunu seçin veya aynı
peryodu tekrarlayınız.
2-Bulaşıklar kırılıyor.
-Uygun kasa kullanılmamıştır.
-Aşırı yükleme yapılmıştır.
-Kasa seçimine dikkat ediniz.
-Kapasitesine riayet ediniz.
3-Cihaz su almıyor.
-Su giriş vanası kapalıdır.
-Kapak tam kapanmamıştır.
-Selenoid valf bozulmuştur.
-Kontrol ediniz/Açınız.
-Kontrol ediniz/kapatınız.
-Yetkili servise haber veriniz.
4-Cihaz sürekli su alıyor.
-Presostat arızalıdır.
-Prosestat hortumu hava yapmıştır
-Yetkili servise haber veriniz.
-Tank içindeki suyu boşaltınız ve cihazı tekrar
çalıştırınız.
5-Cihaz gövdesinde paslanma
oluyor.
-Uygun olmayan kimyasal temizle
yiciler kullanılmıştır.
-Cihazı kullanma talimatına uygun temizleyiniz.

8
EN
EXPLANATION
1. The instructions in this manual include
important information regarding the secure
installation, use, cleaning and maintenance of
the machine. Therefore, keep this manual in a
place where the user of the machine or the
technician can reach with ease.
2. The installation of the machine must be
performed according to the instructions of the
producing company by an expert who is
experienced in this topic.
3. The power and water connections of the
machine must be performed in accordance
with the given values in the "Technical
Specifications" chart.
4. Your machine's proper operation and long life
depends absolutely on correct usage, periodic
maintenance, fulfilling the service operations
and your attention.
5. Producer firm does not accept responsibility
of; any operation performed without
complying with the user’s manual,
maintenance or technical interventions
performed without authorized technicians,
eventual damages that harm people or
properties due to extra reservoir or devices.
2. INSTALLATION INSTRUCTIONS
1. Carry the device to the place of installation
and remove it from its package.
2. Check whether the device is in a solid state. If
there is damage, immediately notify this
situation to your dealer and if you have any
doubt do not operate the device without
having it checked by an expert.
3. Peel away the protective nylon on the device.
If there are material remains left on the
surface, clean them with a convenient
dissolver. (For Example;Henkel-Helios)
4. If possible, place the device near a water
connection and waste water drain.
3. WATER CONNECTION
1. Connect your device to the city water
normally. However, you can also connect it to
the hot water input in order to save electricity.
2. Perform the connection between the device
and the tap with the provided flexible hose.
3. In order for the device to work correctly, the
input water must be at 7 Fr hardness and min
2 bar, max 4 bar pressure.
4. Do not use old or used water inlet hose at the new
product.
WARNING:
Drain pipe required to be connected to a
drain at height 50 mm from ground for
base model devices and at max. 700 mm
from the ground for the devices with
pump to maintain a reliable water flow.
For longer life and efficiency of your device,
attach a lime remover at the water input.
Otherwise the lime scale that will accumulate at
the internal surfaces of the boiler and pump will
prevent the device from working efficiently.
For your safety, you must turn off the water inlet
tap at the end of the washing program.
4. POWER CONNECTION
1. The installation and power connection of the
device must be performed by authorized
personnel according to the standards.
2. The device needs to be connected to a
network which is consistent with the DIN
VDE 0100 power installment standards.
3. Usage of a H07 RN-F quality 3x2,5mm2
profile cable is necessary for the power
connector line.
4. The device needs to be connected to a master
switch (contact distance 3mm or more) and to
a fused isolator.

9
5. Voltage tolerance ± must not go over % 10.
6. A maximum of 25A fuse must be put to the
device feed line.
7. We recommend the usage of a 30 mA faulty
residual current device.
5. The device must absolutely be grounded. For
this, DIN VDE 0100 clause 540 must be taken
into consideration. Grounding screw is
indicated at the bottom left section with the "
" tag.
WARNING:
Don't make connections with extension
cords or multi sockets.
A damaged power cable must be changed by
the Authorized Service.
Our firm is not responsible for any damage
which may occur in case of its use with an
earthing which is incompatible with local
regulations.
USER INSTRUCTIONS
8. The machine is designed for washing; trays,
plates, glasses, cups, knives and forks etc.
dishes inside specially designed cases for
medium scale businesses and all cafeteria type
facilities where mass catering services are
provided.
9. For BYM042; The machine has the capability
washing feature which is used for glasses with
maximum 290mm length.
10. The machine must always be operated by
qualified personnel, assigned for this work.
11. Water is an important factor for getting a
good washing result. For this reason, if the
hardness of water passes 12 Fr, we
recommend using a "water softener".
12. For a good washing quality, soaking the
dishes before putting them inside the machine
is advised. Otherwise the food residue, lemon
peels, toothpick etc. materials can block the
materials drain pump and alter the washing
quality.
13. Two types of chemical products are used in
the machine. These are detergent for washing,
and polisher for polishing. The detergent must
be an industrial type (powder or liquid) and
foam free. Apply the determined values by the
detergent manufacturer for the used amount.
(Detergent amount can vary according to the
hardness of water.)
14. Select the relevant tray according to the dishes
to be washed and load them according to the
capacities stated on the chart. Do not start the
machine without entirely filling the tray in
order to save detergent and power.
15. Be mindful of the durableness of the dishes
that you will put inside the Dishwashing
Machine.
16. Never change the location of the machine
while it is operating.
17. Be sure that the water input valve is open
before operating the machine.
18. Cleaning of the internal parts of the machine
periodically is recommended.
19. For BYM042; There is one 400x400mm
basket for glasses in the machine as a standard
option.
20. In order to obtain healthy results in cleaned
dishes, the following ground rules must be
met.
Apply the manufacturer’s remarks on the
detergent dosage according to the water hardness.
The wash water must be renewed at least 3 times a
day or when the water loses its ability to clean due
to dirty particles. Washing performed with dirty
wash water causes bad washing results, along
with detergent, polisher and power wastage.
Do not dry cleaned dishes with a dirty towel.
Do not place clean dishes on spongy towels or
other materials.
Use disposable materials or preferably the basket
system.
Make the constant cleaning of the shelves that you
use for storing dishes with special detergents and
disinfectants available in the market.
NOTE: The choice of detergent can be a
determining factor in getting a good wash result,
protection and lifetime of the machine. Therefore
we recommend not using abrasive or
contaminating products and not exceeding the
suggested detergent amount.

10
USING THE MACHINE
6.1- Running
1. READY
2. ON/OFF
3. P1 : 1. short program 80 sec
4. P2 : 2. medium program 110 sec
5. P3 : 3. long program 140 sec
6. DRAIN
ATTENTION: In that position, when the dial is
turned to P1, that will start the washing, however
the detergent foams because the cold water. For
the best result of the washing process, the signal lamp
of "the washing temperature is ready" should be
waiting.
P1-Short Wash (80 sec) : For dishes with low
dirt
P2-Medium Wash (110 sec) : For dirty dishes
P3-Long wash (140-180 sec.) : For oily and
dirty dishes
You can select one of the programs "P1, P2 and
P3". Recommended washing duration is 110 sec.
and recommended water temperature is 55ºC.
At the start of operation, when the temperature
reaches 55ºC, "washing temperature reached
signal light" turns on. After the light turns on, an
appropriate program is selected. As long as the
washing continues, the "in wash" signal light stays
on.DRAINING:
Lid opens
Stopper is removed
ON “ON / OFF” button numbered 2 is
turned off.
Press the “DRAIN” button number 6
once.
Tah Evacuation of the device begins
light While draining is in progress, the
DRAIN button is on, the light goes out
when the process is finished.
When you are sure that the water drained
completely, turn off the machine.
The full model includes a top level
pressurestat.
When the water level reaches above the spill
level, the bilge pump runs and automatically
drains for a certain amount of time. This
running continues until the contacts of the
pressurestat relocates.
1. Select the relevant tray according to the dishes
to be washed and load them according to the
capacities stated on the chart. Do not start the
device without entirely filling the tray in order
to save detergent and power.
2. Never change the location of the device while
it is operating.
3. Be sure that the water input valve is open
before operating the device.
WARNING!!!
NEVER PUT YOUR BARE HANDS IN THE WASH
WATER. IF NECESSARY, USE PROTECTIVE
GLOVES. DO NOT RUB DETERGENT WATER ON
YOUR EYES.
9. TURNING OFF
1. Press the “2 ON / OFF” button of the
machine.
2. Bring the switch that supplies the device to
"0" position.
3. Take the washed product out by lifting the
upper cover and close the cover.
4. Close the water inlet valve.
10.SECURITY MEASURES
1. If the cover is opened while the device is
operating or if the cover is not completely
closed after it is started, the device will stop
operating. Device will start operating once the
cover is shut.
WARNING: If there are any damages on the
energy input cable or any water leakage on the
release pump, the device needs to be shut down
and an authorized service must be notified.
10.DAILY MAINTENANCE
1. The wash water must be renewed at least two
times a day or when the water loses its ability
to clean due to dirty particles. Washing
performed with dirty wash water causes bad

11
washing results, along with detergent, polisher
and power wastage.
2. Before starting maintenance activities, turn off
the power switch that the device is connected
to.
3. Be careful so that the dirty water outlet is not
blocked.
4. Check whether the washing and rinsing arms
can turn easily. Check the water sprays and if
they are blocked, clean the holes with a thin
stick.
5. Leave the cover open after cleaning the
device.
WARNING; In order not to damage the
electrical equipment, clean the device with
a direct or high pressured water.
10.PERIODIC MAINTENANCE( once every
2-3 days)
1. Never do maintenance while the device is
powered.
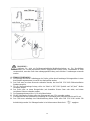
2. As shown in Figure 1, materials that can cause
blocking must be cleaned by taking out the
nozzles of the water sprays.
3. Clean the outer surfaces of the device with a
wet and soapy cloth. While cleaning the
surface of the device, do not use materials that
can leave marks on the surface such as
detergents, wire brushes etc. which have
abrasive content.
4. Clean the device warmers with an anti-lime
once a week.
5. Take out and clean the pump front filter in
certain periods.
6. If the device will not be used for a long time,
the surfaces need to be covered with Vaseline
in thin layers.
7. Contact the authorized service in case a
dangerous situation is noticed in the device.
Do not let unqualified people to interfere the
device.
8. After a certain operating duration, depending
on the hardness of water, the calcium and
magnesium in the water can cause the forming
of boiler scale on the interior surfaces of the
wash tank, boilers and interior sections of the
water pumps which can affect the devices
performance. For this reason, a boiler scale
cleaning process must be performed by a
qualified technician over time.
9. Maintenance of the boilers, emptying the
water inside the boiler and pump and cleaning
them must be performed by qualified people
periodically.
10.If there is a danger of freezing during the
times when the machine hasn't worked for a
long time, the wash pump and boiler must be
emptied.
11.Contact the authorized service in case a
dangerous situation is noticed in the machine.
Do not permit unqualified people to interfere
the device.
Child safety
This device is dangerous and forbidden
to use by children under 8 years of age
and by people who have a lack of
physical, sensory or mental abilities or
experience and knowledge (disabilities)
without supervision of user.
Playing with the device by children is
dangerous.
Cleaning and maintenance should not
carried out by children without the
supervision of user.
POTENTIAL PROBLEMS - CAUSES - SOLUTIONS
PROBLEM CAUSE SOLUTION
1-Dishes are not clean.
-Washing arms may be stuck.
-Washing water sprays may be
blocked.
-Rinsing water sprays may be
blocked.
-Detergent concentration may be
very high or insufficient.
-Filter may be blocked.
-Washing time may be insufficient.
-Check whether the dishes prevent arms from rotating.
-Clean the water sprays by removing the washing arm.
-Clean the water sprays by removing the rinsing arm.
-Check the hardness of water.
-Check the detergent amount.
-Remove and clean the filter.
-Select a longer wash period or repeat the same period.
2-Dishes are getting broken.
-Proper tray may not have been
used.
-Machine may have been
overloaded.
-Be careful when selecting the tray.
-Comply with its capacity.
3-The device does not take
water.
-Water inlet valve may be closed.
-Cover may not be closed
-Check/Open
-Check/Close

12
completely.
-Solenoid valve may be broken.
-Notify the authorized service.
4-The device continuously
takes water.
-Pressure stat may be defective.
-Pressure stat hose may have taken
in air.
-Notify the authorized service.
-Empty the water inside the tank and restart the
device.
5-There is rusting on the
device surface
-Improper chemical materials
may have been used.
-Clean the device according to the instructions for use
DE
1. ERKLÄRUNG
1. Die Anweisungen dieser Anleitung beinhalten wichtige İnformationen über die zuverlässige Montage,
Gebrauch, Reinigung und Pflege des Gerätes. Bewahren sie deshalb diese Gebrauchsanweisung an
einem durch den Verbraucher und Techniker leicht erreichbaren Ort auf.
2. Die Montage des Gerätes sollte durch einen, vom Hersteller der Maschiene beauftragten und erfahrenen
Fachexperten, den Anweisungen der Firma anpassend durchgeführt werden.
3. Die Wasser und Strom Verbindungen des Gerätes sollten den Werten der Tabelle der “Technischen
Eigenschaften” anpassend gemacht werden.
4. Das regelrechte Funktionieren und Langlebigkeit ihrer Spülmaschiene hängt zweifellos vom richtigen
Gebrauch, regelmäßige Pflege, Einhaltung der Servicearbeiten und Reinigung ab.
5. Der Hersteller übernimmt keine Verantwortung für jegliche Schäden, die durch das nicht Einhalten der
Gebrauchsanweisung, durch die Pflege und technischer Eingriff anderer Personen anstelle des befugten
Technikers oder durch das Anschließen von zusätzlichen Behälter und Geräten an der Spülmaschiene
entstanden sind.
2. MONTAGEANLEİTUNG
1. Tragen sie das Gerät an den montier Ort und entfernen sie die Verpackung.
2. Kontrollieren sie, ob das Gerät in einem unbeschädigten und festen Zustand ist. Falls ein Schaden
vorhanden ist, informieren sie unverzüglich den Verkäufer und falls sie durch irgendeinem Grund
Bedenken haben lassen sie das Gerät von einem Fachmann durchprüfen bevor sie es einschalten.
3. Entfernen sie vorsichtig die Schutzfolie des Gerätes und reinigen sie die überreste mit entsprechenden
Reinigungsmitteln (zbs. Henkel-Helios).
4. Falls möglich platzieren sie das Gerät an einem, den Wasser und Schmutzwasser Verbindungen
nahelegenden Ort.
3. WASSERVERBINDUNG
5. Schließen sie das Gerät an das normale Leitungswasser an. Aber wenn sie Energie sparen möchten
können sie das Gerät auch an die Warmwasserverbindung anschließen.
6. Machen sie die Gerät-Wasserhahn Verbindung mit dem mitgegebenen flexiblen Schlauch.
7. Damit das Gerät effizient funktiorien kann sollte das Einlasswasser in 7 Fr Härte und min 2bar, max 4bar
Druck sein.
8. Für Ihre Sicherheit drehen Sie den Hahn für die Wassereinfuhr unbedingt nach dem Waschprogramm
ab.
WARNUNG :
-Abzugsrohr muss zu einem Abzug bei 50mm höhe von Boden für Base Model und für
Pumpvorrichtung bei max. 700 mm höhe von boden um einen belastbare Wasserfluss zu erhalten
angeschlossen werden.
-Montieren sie der Langlebigkeit und Effizienz ihrer Spülmaschiene zuliebe an den Wassereingang einen Kalklöser.
Andernfalls werden die im Heizkessel und İnnenfläche der Röhre angesammelten Kalkreste das richtige Funktionieren
des Gerätes verhindern.
Benutzen Sie für das neue Produkt keine alte bzw. gebrauchte Wasserleitung.

13
WARNUNG :
Schlissen Sie nicht mit Verlängerungskabelnder Mehrfachsteckdosen an. Ein Beschädigtes
Elektrokabel soll von dem autorisierten Service ausgewechselt werden. Unser Unternehmen ist nicht
verantwortlich, wenn das Gerät ohne ordnungsgemäße Erdung nach örtlichen Verordnungen verwendet
werden.
4. STROM VERBİNDUNG
1. Die Montage und Strom Verbindungen des Gerätes sollten durch beauftragte Fachangestellten in einer
dem Standart angemessenen Art und Weise durchgeführt werden.
2. Das Gerät muss an einem Netzwerk verbunden werden, das dem DIN VDE 0100 Elektroinstallation
Standart entspricht.
3. Für die Stromverbindungs-Leitung sollte ein Kabel in H07 RN-F-Qualität und 3x2,5mm2-Maßen
verwendet werden.
4. Das Gerät sollte an einem Hauptschalter (mit kontaktier Distanz 3mm oder mehr) und einem
versicherten İsolator verbunden werden.
5. Die Spannungstoleranz sollte ± % 10 nicht überschreiten.
6. Für die Zuleitung des Gerätes sollte eine Sicherung mit max. 25A verwendet werden.
7. Wir empfehlen bei der elektrischen Verbindung die Verwendung eines Ableitstrom Relais mit 30 mA.
8. Das Gerät muss unbedingt eine Erdschlussleitung haben. Dafür sollte DIN VDE 0100 Artikel 540
berücksichtigt werden. Die Erdungsschraube ist im linken unteren Bereich mit " " angegben.

14
5. GEBRACUHSANLEITUNG
1. Die Spülmaschiene ist für den Gebrauch bei allen mittelständischen gastronomischen Betrieben oder
Cafeteria und Mensa ähnlichen Einrichtungen, in denen Tablet, Teller, Glas, Tasse, Gabel-Löffel und
andere in speziell konzipierten Kisten der Spülmaschiene gereinigt werden können, gastaltet worden.
2. Das Gerät sollte durch einen, dauerhaft für diese Arbeit beauftragten qualifiziertes Personal betrieben
werden.
3. BYM042; Die Spülmaschine besitzt die Eigenschaft Gläser mit einer max. Höhe von 290 mm spülen zu
können.
4. Für das gründliche Reinigen des Geschirrs ist das Wasser ein wichtiger Faktor. Deshalb empfehlen wir
die Verwendung von “Wasserenthärter” beim überschreiten der Wasserhärte von 12Fr. Wasserenthärter
verwendet werden.
5. Für eine gute Spülqualität sollten sie das Geschirr unbedingt reinigen bevor sie es in die Spülmaschiene
einräumen. Andernfalls könnten Essensreste, Zitronenschalen, Zahnstocher und andere Mittel das
Abflussrohr verstopfen und die Spülqualität reduzieren.
6. BYM042; Als Standardausstattung verfügt die Spülmaschine über einen Gläserkorb von 400x400mm.
7. Für den Gebrauch der Spülmaschiene werden zwei verschiedene Chemikalien verwendet. Diese sind
zum einen das Spülmittel für die Reinigung und zum anderen das Klarspülmittel für die Klarspülung.
Das Spülmittel sollte in Industrie Typ (Staub oder Flüssigkeit) und schaumfrei sein. Beachten sie für die
benötigte Menge die Empfehlung des Spülmittel-Herstellers. (je nach Härte des Wassers könnte eine
Abweichung der Menge des Spülmittels gemacht werden)
8. Je nach Art des zu spülenden Geschirrs wählen sie die geeignete Kiste und räumen sie das Geschirr nach
der in der Tabelle vorgegebenen Kapazität ein. Um den Strom und Spülmittel Verbrauch zu minimieren,
schalten sie die Spülmaschiene nicht ein bevor die Kisten volständig mit Geschirr befüllt sind.
9. Überprüfen sie ihr Geschirr, ob es für die Spülmaschiene geeignet ist bevor sie es damit reinigen.
10. Bewegen sie die Spülmaschiene keinesfalls während sie in Betrieb ist.
11. Stellen sie sicher, dass das Wassereingangsventil auf ist bevor sie das
aufbewahren mit den dafür vorgesehenen speziellen Reinigungs- und Desinfektionsmitteln.
Gerät in Betrieb nehmen.
12. Wir empfehlen die regelmäßige Reinigung der inneren Teile der Spülmaschiene.
13. Um der Gesundheit unschädliches, gut gereinigtes Geschirr und einwandfreie Ergebnisse zu erhalten
müssen sie die folgenden Grundregeln beachten:
Beachten sie je nach Härte des Wassers, die durch den Hersteller vorgegebene Menge des Spülmittels.
Das Spülwasser sollte täglich mindestens dreimal oder wenn es durch schmutzige Partikel seine reinigende
Eigenschaft verliert erneuert werden. Das Spülen mit schmutzigem Spülwasser führt neben Spülmittel,
Klarspüler und Strom Verschwendung auch zu schlechten Spülergebnissen.
Trocknen sie nicht das Geschirr, wenn es mit schmutzigem Tuch gereinigt wurde.
Tuen sie sauberes Geschirr nicht auf porigen Tüchern oder anderen Materielien.
Bevorzugen sie für einweg Materielien je nach Bedarf das Korb System.
Durchführen sie die kontinuierliche Reinigung der Regale und Schränke in denen sie ihr Geschirr
1. READY : Bereit
2. ON/OFF : Aus/Ein
3. P1 :1. Kurzprogramm 80 sek
4. P2 : 2. Mittleres Programm 110 sek
5. P3 : 3. Langprogramm 140 sek
6. DRAIN : Entleertaste

15
Nach dem Anschließen des Geräts wird die Taste
„2 EIN / AUS“ gedrückt und gewartet, bis 1
BEREIT erreicht ist. Die Maschine ist
betriebsbereit.
WARNUNG: Wenn diese Position ebenfalls auf
P1 gedreht wird, beginnt der Waschvorgang, das
Waschmittel schäumt jedoch, weil das Wasser kalt
ist.
Den Netzversorgungsstecker der Maschine in die
Netzversorgunsbuchse stecken und danach
Wählschalter von “0” nach “1” drehen. Die
Maschine ist nun Betriebsbereit
HINWEIS: Sollte von dieser Position aus auf die
Position P1 gedreht werden, beginnt der
Waschvorgang jedoch mit kaltem Wasser, was das
Waschmittel aufschäumen lässt. Für ein optimales
Ergebnis sollte gewartet werden bis die
"Warnleuchte Waschtemperatur erreicht"
aufleuchtet.
P1-Kurzprogramm (80sek) :Für leicht
beschmutztes Geschirr
P2-Mittleres Programm (110sek) : Für
beschmutztes Geschirr
P3-Langprogramm (140sek) : Für
fettbeschmutztes Geschirr
P3-Intensiv spülen (140-180 Sek.) : für fette
stark verschmutztes Geschirr
Wählen sie ein Programm "P1, P2, P3". Die
empfohlene Waschdauer ist 110 Sekunden. Die
empfohlene Waschtemperatur ist 55°C.
Beim Betriebsbeginn leuchtet nach Aufwärmung
bis 55°C die “Waschtemperatur Bereit
Signalleuchte”.
Nachdem die Leuchte leuchtet, geeigneten
Programm wählen. Solange der Waschbetrieb
aktiviert ist, leuchtet die Waschbetrieb-
Signalleuchte.
ENTLEEREN:
* Deckel öffnet sich
* Stopper wird entfernt
* Die ON / OFF-Taste 2 ist ausgeschaltet.
* Drücken Sie die Taste "DRAIN" Nummer 6
einmal.
* Die Evakuierung des Geräts beginnt
* Während des Entleerens leuchtet die
Taste DRAIN und die Anzeige erlischt, wenn
der Vorgang abgeschlossen ist.
1. andere Mittel das Abflussrohr verstopfen und
die Spülqualität reduzieren.
2. Durch die Montage von einer Trenneinheit,
Arbeitsplatteneinheit mit Spülbecken und
Ausgangsarbeitsplatte an das Gerät kann ein
integriertes Geschirr Spülsystem gewonnen
werden.
3. Das Spülmittel sollte flüssig und schaumfrei
sein. Beachten sie für die benötigte Menge die
Empfehlung des Spülmittel-Herstellers. (je
nach Härte des Wassers könnte eine
Abweichung der Menge des Spülmittels
gemacht werden) die Spül- und
Klarspülmittelbehälter werden auch durch
Spülmittelhersteller hergestellt.
4. Wählen sie je nach Art und
Schmutzigkeitsgrad des Geschirrs das
geeignete Spülprogramm
5. Je nach Art des zu spülenden Geschirrs
wählen sie die geeignete Kiste und räumen sie
das Geschirr nach der in der Tabelle
vorgegebenen Kapazität ein. Um den Strom
und Spülmittel Verbrauch zu minimieren,
schalten sie die Spülmaschiene nicht ein bevor
die Kisten volständig mit Geschirr befüllt
sind.
6. Überprüfen sie ihr Geschirr, ob es
für die Spülmaschiene geeignet ist
bevor sie es damit reinigen.
7. Bewegen sie die Spülmaschiene keinesfalls
während sie in Betrieb ist.
8. Stellen sie sicher, dass das
Wassereingangsventil auf ist bevor sie das
Gerät in Betrieb nehmen.
ACHTUNG!!!
BERÜHREN SİE NİEMALS DAS SPÜLWASSER
MİT BLOßER HAND. FALLS DİES NOTWENDİG
İST BENUTZEN SİE SCHUTZ HANDSCHUHE.
VERMEİDEN SİE AUGENKONTAKT MİT DEM
SPÜLWASSER.
7. AUSSCHALTEN
1. Durch zwei sekunden langem drücken der
ON/OF Taste wird das Gerät ausgeschaltet.
2. Stellen sie den Schalter auf "0" ein.
3. Öffnen sie den oberen Deckel und räumen sie
das gespülte subere Geschirr raus und
schließen sie den Deckel wieder zu.
4. Schließen sie anschließend das Wasser
Eingangsventil.

16
11.SICHERHEITSMAßNAHMEN
1. Falls während der Spülung der Deckel
geöffnet wird oder bereits offen war stoppt die
Spülung. Wenn sie den Deckel wieder
schließen fährt die Spülung erneut fort.
WARNUNG: Falls der Strom Eingangskabel
Schäden aufweist oder falls aus dem
Ablaufschlauch Wasser ausläuft, sollten sie das
Gerät unbedingt ausschalten und den autorisierten
Kundendienst informieren.
9. TÄGLICHE PFLEGE
1. Das Spülwasser sollte täglich mindestens
zweimal oder wenn das Spülwasser durch
schmutzige Partikel seine reinigende
Eigenschaft verliert, erneuert werden. Das
Spülen mit schmutzigem Spülwasser führt
neben unnötigem Spülmittel, Klarspüler und
Stromverlust auch zu schlechten
Spülergebnissen.
2. Schalten sie den Schalter aus, bevor sie die
tägliche Pflege durchführen.
3. Achten sie auf die Essensreste, die den
Abwasserschlauch verstopfen könnten.
4. Kontrollieren sie, ob die Spül und
AbSpülarmen sich leicht drehen. Überprüfen
sie die Wasserstrahlen, falls diese verstopft
sind reinigen sie mit einem Spitzen Gerät die
kleinen Löcher.
5. Lassen sie den Deckel nach jeder Reinigung
in offener Position.
WARNING: Reinigen sie das Gerät
mit direktem Wasser, welches hohen
Druck hat, um Schäden der elektrischen
Ausrüstung des Gerätes zu vermeiden.
10.PERIODISCHE PFLEGE (einmal in 2-3
Tagen)
1. Reinigen sie niemals das Gerät wenn es mit
Strom verbunden ist.
2. Wie in Abbildung 1 dargestellt, entfernen sie
die Spülarmaturen und reinigen sie dessen
Wasserstrahldüsen, die möglicherweise durch
Essensreste verstopft sind.
3. Reinigen sie die Außenfläche des Gerätes
mithilfe eines feuchten Tuches. Vermeiden sie
bei der Reinigung ätzende Spülmittel, harte
Bürsten und andere schädliche Mittel.
4. Reinigen sie die Wärmer des Gerätes einmal
in der Woche mithilfe von Entkalkmittel.
5. Entfernen sie die vorderen Filter der Pumpe
und reinigen sie diese regelmäßig.
6. Falls sie das Gerät für einen längeren
Zeitraum nicht benutzen werden, sollten sie
alle Oberflächen mit einer dünnen
Vaselineschicht bedecken.
7. İnformieren sie unverzüglich den
Kundendienst beim Erscheinen von
gefährlichem Befund am Gerät. Vermeiden
sie den Eingriff von nicht beauftragten
Personen am Gerät.
8. Das Kalzium und Magnesium im Wasser
könnte nach einer bestimmten Gebrauchszeit,
je nach härte des Wassers, an der İnnenfläche
des Tankes, am Heizkessel und İnnenfläche
der Rohre zu Steinbildung führen, welches die
Leistung der Spülmaschiene erheblich
verschlechtert. Aus diesem Grund sollte ein
qualifizierter Techniker die gebildeten Steine
entfernen.
9. Die Reinigung des Heizkessels sollte durch
Entleerung des Wassers im Heizkessel und in
der Pumpe von autorisierten Personen
durchgeführt werden.
10.Falls bei längerer Nichtbetätigung der
Spülmaschiene eine Frostgefahr vorhanden
ist, sollten sie das Wasser im Heizkessel und
Spülpumpe ausleeren.
11.İnformieren sie unverzüglich den
Kundendienst beim Erscheinen von
gefährlichem Befund am Gerät. Vermeiden
sie den Eingriff von nicht beauftragten
Personen am Gerät.
11. Kindersicherheit
Die Benutzung dieses Gerätes
von Kindern unter 8 Jahren oder von
Personen, deren physiche, sinnliche oder
geistliche Fähigkeiten oder Erfahrungen
mangelhaft sind über Unkenntnis verfügen
(Behinderte Personen) ohne Aufsicht des
Nutzers ist gefährlich und verboten.

MÖGLICHE PROBLEME - GRÜNDE – LÖSUNGEN
PROBLEM GRUND LÖSUNG
ESP
1. DESCRIPCIÓN
1. Las instrucciones en este manual contienen
información sobre la instalación, operación,
mantenimiento y limpieza de la máquina. Por
esta razón, mantenerlo en un lugar de facíl
acceso el técnico o el usuario.
2. La instalación de la máquina por una persona
con experiencia en este campo deber ser de
acuerdo con las instrucciones del fabricante.
3. Las conexiones de electricidad y agua deben
estar de acuerdo con los valores indicados en
las “especificaciones técnicas”.
4. La longevidad y el funcionamiento correcto
de la máquina depende del cuidado continuo,
funcionamiento absolutamente correcto,
mantenimiento periódico y procesos de
cumplimiento de servicios.
5. El fabricante no acepta ninguna
responsabilidad en cuanto a cualquier
transacción realizada sin antes cumplir con el
manual de instrucciones, el mantenimiento o
intervenciones técnicas que no se llevan a
cabo por técnicos cualificados, los hubs
adicionales o dispositivos conectados a la
máquina debido a los daños indirectos
causados a las personas o propiedades.
2. INSTRUCCIONES DE INSTALACIÓN
1. Maneje la ubicación de instalación del
dispositivo y desembalalo.
2. Compruebe que el dispositivo está en un
estado saludable. En el caso de un dañado
informe inmediatamente a su distribuidor; si
teine dudas no opere el dispositivo sin un
control especializado. Retire el dispositivo de
raspado nylon protector. Si detecte residuos
de adhesivo sobre la superficie, limpie con un
disolvente adecuado. (Por ejemplo; Henkel-
Helios)
3. Reubicar el dispositivo cerca de una conexión
de agua y salida de agua residual, si es
posible.
1-Geschirr ist nicht sauber
-Die Spülarme könnten verklemmt
sein.
-Die Spülwasserstrahlen könnten
verstopft sein.
-Die Abspülwasserstrahlen
könnten verstopft sein.
-Das Spülmittelkonzentrat könnte
unzureichend oder zu viel sein.
-Das Filter könnte verstopft sein.
-Die Spülzeit könnte unzureichend
sein.
-Überprüfen sie, ob das Geschirr das Kreisen der
Spülarme verhindert.
- Trennen sie die Spülarme und reinigen sie die
Wasserstrahllöcher.
-Trennen sie die Abspülarme und reinigen sie dessen
Wasserstrahllöcher.
- Überprüfen sie die Härte des Wassers.
- Überprüfen sie die Menge des Spülmittels.
- Trennen die den Filter und reinigen sie ihn.
- Wählen sie ein längeres Spülprogramm oder
wiederholen sie die Spülung.
2-Geschirr wird beschädigt.
-Die geignete Kiste wurde nicht
verwendet.
-Zu viel Geschirr wurde
möglicherweise eingeräumt.
- Achten sie auf ihre Kistenwahl.
- Halten sie sich an die Kapazität Vorgaben.
3-Gereat nimmt kein Wasser
ein.
-das Wassereingangsventil ist
möglicherweise zu.
-Der Deckel ist möglicherweise
nicht richtig zugemacht worden.
-Das Magnetventil ist
möglicherweise beschädigt.
-Kontrollieren sie es/Öffnen sie es.
-Kontrollieren sie es/Schließen sie es.
-İnformieren sie den Kundendienst.
4-Gerät nimmt dauernd
Wasser ein.
-Der Druckschalter könnte defekt
sein.
-Der Druckschalter-Schlauch
könnte Luft eingenommen haben.
- İnformieren sie den Kundendienst.
-Entleeren sie das Wasser im Tank und schalten sie
das Gerät erneut ein.
5-Gerät Körper verrostet.
-Ungeeignete Chemikalien wurden
verwendet.
-Reinigen sie das Gerät nach den Vorgaben der
Gebrauchsanweisung.

18
3. CONEXIÓNDE AGUA
1. Conecte el dispositivo a la red de agua
normal. Sin embargo es posible conectarlo a
la entrada de agua caliente con el fin de
conservar la energía.
2. Realice la conexión entre el dispositivo y el
grifo con una manguera flexible.
3. Con el fin de operar de manera eficiente el
dispositivo, la dureza de la agua entrada debe
ser 7 Fr, y la presión debe ser 2bares al
mínimo y 4 bares al máximo.
4. Para su seguridad, debe cerrar el grifo de entrada
de agua al final del programa de lavado.
AVISO:
5. Para el equipo del modelo base, el tubo de
descarga debe estar conectado a un drenaje
que tiene una altura de 50 mm desde el suelo, y
para appareccihature con bomba de desagüe
debe estar conectado a un drenaje que tiene
una altura máxima desde el suelo de 700 mm.
para asegurar un buen flujo de agua.
6. Para operación de más larga duración y eficiente del
dispositivo, conectar un aparato descalcificador a la
entrada de agua.
7. No utilice la manguera de entrada agua vieja o usada
con el nuevo producto.
AVISO:
No hacer conexiones con cables de extensión o
enchufes múltiples. Un cable de alimentación
dañado debe ser cambiado por el de servicio
autorizado.
Nuestra empresa es responsable de cualquier
daño que pueda ocurrir en el caso de su uso
con una puesta a tierra que es incompatible
con las normativas locales.
4. CONEXIÓN ELÉCTRICA
1. La instalación y la conexión eléctrica del
dispositivo debe ser realizado por técnicos
especializados.
2. El dispositivo debe ser conectado a una red
adecuado conforme a las bormas de
instalación eléctrica DIN VDE 0100.
3. Para la línea de conexión eléctrica, debe ser
utilizado el cable de calidad H07 RN-F y con
sección 3x2,5mm2.
4. El dispositivo debe ser conectado a un
interruptor principal (distancia de contacto
3mm o más) y un aislador con fusible.
5. La tolerancia de tensión no debe sobrepasar ±
10%.
6. Debe estar puesto un fusible max. 25 A en la
línea de suministro del dispositivo.
7. Le recomendamos utilizar un relé diferancial
30 mA en la conexión eléctrica.
8. El aparato debe estar conectado a la tierra.
Para esto, debe ser considerado el art. 540 de
DIN VDE. El tornillo de puesta a tierra se
indica con el rótulo " " en la parte
inferior izquierda.
INSTRUCCIONES PARA EL USUARIO
9. La máquina es diseñado especificamente para
lavar bandejas, platos, vasos, tazas, cubiertos
etc. en cajones, para todo tipo de empresas de
tamaño medio y las cafeterías.
10. La máquina debe ser usado por un personal
constantemente dedicado a esta labor.
11. BYM042; la máquina es capaz de lavar los
vasos a un altura de 290 mm.

19
12. Para obtener resultados óptimos, el agua es un
factor importante. Por esta razón, si la dureza
del agua sobrepasa a 12 Fr, se recomienda
utilizar “ablandador de agua”.
13. Para obtener una buena calidad de lavado,
pre-lavar los platos antes de poner en la
máquina.
De lo contrario, las partículas de comida que
quedan en sus platos, cáscaras de limón, palillo de
dientes, etc. limpieza pueden obstruir y dañar la
tubería de salida y causar mala calidad de lavado.
14. Se utilizan dos tipos de productos químicos en
la máquina. Estos son el detergente para
lavado y el pulidor. El detergente debe ser de
tipo industrial (polvo o líquido) y no de
espuma. Siga el fabricante para los valores
determinados en cuanto a la cantidad de
detergente a utilizar. (La cantidad de
detergente pueder variar debido a la dureza
del agua.)
15. BYM042; la máquina tiene un cajón de 400 x
400 mm para vasos, como accesorio estándar.
1. READY : Bereit
2. ON/OFF : Aus/Ein
3. P1 :1. Kurzprogramm 80 sek
4. P2 : 2. Mittleres Programm 110 sek
5. P3 : 3. Langprogramm 140 sek
6. DRAIN : Entleertaste
Después de enchufar la máquina, "se presiona
el botón 2 ON / OFF se espera hasta que
llegue 1 READY". La máquina está lista para
funcionar.
ADVERTENCIA: Si esta posición también se
gira a P1, se iniciará el lavado, pero el
detergente formará espuma porque el agua
está fría. Para obtener los mejores resultados,
la lámpara ama 1 READY ”debe encenderse.
Para lograr sanos y buenos resultados en los
platos limpiados, se debe seguir las reglas
básicas siguientes:
Al conectar el enchufe de eléctrico de la
máquina, poner el Botón de Marcación de la
posición "0" a la posición "1". Y la máquina estará
lista para el funcionamiento.
Seleccione el botón del programa DR 6 DRAIN
del programa. El tapón del tanque se retira cuando
el dispositivo está encendido y en espera. El botón
de drenaje se ilumina para indicar que el proceso
ha tenido lugar, y cuando el proceso finaliza, la
máquina se apaga después de asegurarse de que el
agua esté completamente drenada.
Siga las indicaciones del fabricante en cuanto al
dosis de detergente según la dureza del agua.
El agua de lavado deber ser reformado por lo
menos 3 veces al día o y cuando las propiedades
de limpieza del agua se pierden debido a las
partículas de suciedad. El lavado que se hace con
el agua sucio causa residuos de detergente, pulidor
y energía, asi como mal calidad de lavado.
No secar los platos limpios con toalla sucia.
No ubicar platos limpios sobre toalla porosa o
otras materiales.
Utilizar materiales desechables o preferentemente
sistema de bandejas.
La limpieza permanente de los estantes en que se
pone todos los platos, se hace con los detergentes
y desinfectantes presentes en el mercado.
NOTA: La elección del detergente es el factor
determinante para el buen resultado, el
mantenimiento y la longevidad de la máquina. Por
esto, no utilice productos abrasivos o corrosivos y
contaminantes que no superan la cantidad
recomendada de detergente recomendada.
Al conectar el enchufe de eléctrico de la
máquina, poner el Botón de Marcación de la
posición "0" a la posición "1". Y la máquina estará
lista para el funcionamiento.
ADVERTENCIA: Si la posición se gira a
P1, el lavado comienza pero debido a que el
agua es frío, el detergente espuma. Se debe
esperar “la lámpara indicadora de
temperatura” para el mejor resultado.

20
P1-Lavado Corto (80seg.) : Para la vajilla
ligeramente sucia
P2-Lavado Medio (110seg.) : Para la vajilla
sucia
P3-Lavado Largo (140seg.) : Para la vajilla
engrasada-sucia
P3- Lavado largo (140-180seg.): Para platos
grasos y sucios
Usted puede seleccionar uno de los programas
de "P1, P2, P3" . El tiempo de lavado
recomendado es de 110 seg. Y la temperatura
del agua es de 55°C.
Usted debe poner en la posición de descarga el
conmutador de programas del dispositivo.
Retire el tapón dentro del tanque cuando el
DRENAJE
* La tapa se abre
* Se quita el tapón
* El botón número 2 "ON / OFF" está
apagado.
* Presione el botón "DRENAJE" número 6
una vez.
* Comienza la evacuación del dispositivo.
* Mientras el drenaje está en
progreso, el botón DRAIN está
encendido, la luz se apaga cuando finaliza
el proceso.
Cuando la altura del agua excede el nivel de
desbordamiento
dispositivo está encendido y en la posición de
espera y se mantiene presionado el "Botón de
Descarga". Se enciende el botón de descarga e
indica que el proceso se lleva a cabo. Cuando
haya terminado el proceso se apaga la
máquina, asegúrandose de que el agua esté
totalmente descargado.
El modelo completo también lleva un
interruptor de nivel superior.
Cuando la altura de agua excede el nivel de
rebose, se activa la bomba de descarga y la
descarga automática se queda en
funcionamiento un cierto tiempo. Este período
continúa hasta que cambien de posición los
contactos del indicador de nivel superior.
6.2- Uso
1. Dispositivo 102S; Por medio de instalar las
unidades como la unidad de extracción, el
recolector de basura, el contador con lavadero
y el contador de salida se puede elaborar un
sistema de lavavajillas integrado.
2. El dispositivo es diseñado especialmente para
para lavar platos, vasos, tazas, cubiertos, etc.
en cajones, para todo tipo de empresas de
tamaño medio y las cafeterías.
3. El dispositivo debe utilizado por el personal
cualificado y asignado para este trabajo.
4. El dispositivo tiene 3 diferentes programas de
lavado.
1-Lavado rápido (90 seg.) :Para platos menos
sucios
2-Lavado medio (120 seg.) :Para platos sucios
3-Lavado largo (180 seg.) : Para platos
grasientos y muy sucios
USA Para,
1-Lavado rápido (120 seg.) :Para platos menos
sucios
2-Lavado medio (180 seg.) :Para platos sucios
3-Lavado largo (300seg.):Para platos
grasientos y muy sucios
5. Para obtener una buena calidad de lavado,
pre-lavar los platos antes de poner en la
máquina. De lo contrario, las partículas de
comida que quedan en sus platos, cáscaras de
limón, palillo de dientes, etc. limpieza pueden
obstruir y dañar la tubería de salida y causar
mala calidad de lavado.
6. Es posible integrar un sisrema de lavado con
la instalación de unidades como encimera con
lavabo de basura, unidad de sacudida, y
encimera de salida al dispositivo.
7. Se utilizan detergente de en polvo o de líquido
sin espuma para lavado. La cantidad se indica
por el fabricanre de detergente. Además la
cantidad de pulidor que sev a a ser usado en la
máquina se indica por el fabricante. Las
unidades de detergente y pulidor también son
producidos por los fabricantes.
8. Seleccionar el programa adecuado para el tipo
y/o suciedad de los platos.
9. Como acessorio estándar, se encuentra una
casilla de platos, una casilla de vasos y un
casilla de cubiertos de tamaños 500x500 mm.
10. Selecciona la casilla de vajilla y cargalo con
las capacidades indicadas en la tabla. No
funcionar la máquina antes de llenar
completamente, con el fin de ahorrar
detergente.
11. Nunca cambie la ubicación de la máquina
mientras está funcionando.
12. Asegúrese de que la válvula de entrada de
agua está abierta antes de arrancar la máquina.
Cuando el agua excede el límite de
desbordamiento.
Sayfa yükleniyor...
Sayfa yükleniyor...
Sayfa yükleniyor...
Sayfa yükleniyor...
Sayfa yükleniyor...
Sayfa yükleniyor...
Sayfa yükleniyor...
Sayfa yükleniyor...
Sayfa yükleniyor...
Sayfa yükleniyor...
Sayfa yükleniyor...
Sayfa yükleniyor...
Sayfa yükleniyor...
-
 1
1
-
 2
2
-
 3
3
-
 4
4
-
 5
5
-
 6
6
-
 7
7
-
 8
8
-
 9
9
-
 10
10
-
 11
11
-
 12
12
-
 13
13
-
 14
14
-
 15
15
-
 16
16
-
 17
17
-
 18
18
-
 19
19
-
 20
20
-
 21
21
-
 22
22
-
 23
23
-
 24
24
-
 25
25
-
 26
26
-
 27
27
-
 28
28
-
 29
29
-
 30
30
-
 31
31
-
 32
32
-
 33
33


diğer dillerde
- español: Inoksan BYM 42B El manual del propietario
- français: Inoksan BYM 42B Le manuel du propriétaire
- Deutsch: Inoksan BYM 42B Bedienungsanleitung