Hotpoint LFF 8M121 B EU Kullanici rehberi
- Kategori
- Bulaşık makineleri
- Tip
- Kullanici rehberi

EN
1
Operating instructions
Contents
Product Fiche, 2
Precautions, advice and Assistance, 3-4
General safety
Disposal
Saving energy and respecting the environment
Assistance
Installation, 5-6
Positioning and levelling
Connecting the water and electricity supplies
Advice regarding the first wash cycle
Technical data
Description of the appliance, 7
Overall view
Control panel
Loading the racks, 8-9
Lower rack
Cutlery basket
Upper rack
Start-up and use, 10
Starting the dishwasher
Measuring out the detergent
Wash cycles, 11
Table of wash cycles
Special wash cycles and Options, 12
Rinse aid and refined salt, 13
Measuring out the rinse aid
Measuring out the refined salt
Care and maintenance, 14
Shutting off the water and electricity supplies
Cleaning the dishwasher
Preventing unpleasant odours
Cleaning the sprayer arms
Cleaning the water inlet filter
Cleaning the filters
Leaving the machine unused for extended periods
Troubleshooting, 15
English, 1
EN
LFF 8M121
DISHWASHER
Türkçe, 16
TR

EN
2
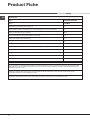
Product Fiche
Brand
HOTPOINT ARISTON
Model
LFF 8M121
Rated capacity in standard place settings (1)
14
Energy efciency class on a scale from A+++ (low consumption) to D (high consumption)
A++
Energy consumption per year in kWh (2)
265.0
Energy consumption of the standard cleaning cycle in kWh
0.93
Power consumption of the off-mode in W
0.5
Power consumption of the left-on mode in W
5.0
Water consumption per year in litres (3)
2520.0
Drying efcacy class on a scale from G (low efcacy) to A (high efcacy)
A
Programme time for standard cleaning cycle in minutes
190’
The duration of the left-on mode in minutes
10
Noise in dB(A) Re 1pW
41
Built-in model
No
NOTES
1) The information on the label and che relates to the standard cleaning cycle, this programme is suitable to clean normally soiled
tableware and it is the most efcient programme in terms of combined energy and water consumption. The standard cleaning cycle
corresponds to the Eco cycle.
2) Based on 280 standard cleaning cycles using cold water ll and the consumption of the low power modes. Actual energy
consumption depends on how the appliance is used.
3) Based on 280 standard cleaning cycles. Actual water consumption depends on how the appliance is used.
Product Fiche

EN
3
* Only available in selected models.
Precautions, advice and
Assistance
This appliance was designed and
manufactured in compliance with international
safety standards The following information has
been provided for safety reasons and should
therefore be read carefully.
Keep this instruction manual in a safe place for
future reference. If the appliance is sold, given
away or moved, please ensure the manual is kept
with the machine.
Please read these instructions carefully: they
contain important information on installation, use
and safety.
This appliance is designed for domestic use or
similar applications, for example:
- staff kitchen areas in shops, offices and other
work environments;
- farmhouses;
- use by guests in hotels, motels and other
residential settings;
- bed & breakfasts.
General safety
• The appliance should not be operated by
people (including children) with reduced
physical, sensory or mental capacities, or by
inexperienced people who are not familiar with
the product, unless supervision or instructions
on how to use it are provided by someone who
assumes responsibility for their safety.
• Anadultmustsupervisechildrenatalltimesto
prevent them from playing with the appliance.
• The appliance was designed for domestic
use inside the home and is not intended for
commercial or industrial use.
• Theappliancemustbeusedbyadultsonlyto
wash domestic crockery in accordance with
the instructions in this manual.
• Theappliancemustnotbeinstalledoutdoors,
even in covered areas. It is extremely dangerous
to leave the machine exposed to rain and
storms.
• Donottouchtheappliancewhenbarefoot.
• Whenunpluggingtheappliancealwayspullthe
plug from the mains socket. Do not pull on the
cable.
• Thewatersupplytapmustbeshutoffandthe
plug should be removed from the electrical
socket before cleaning or maintaining the
appliance.
• Iftheappliancebreaksdown,donotunderany
circumstances touch the internal parts in an
attempt to perform the repair work yourself.
• Donot lean or sit on the open door of the
appliance: this may cause the appliance to
overturn.
•Thedoorshouldnotbeleftopenasitmaycreate
a dangerous obstacle.
• Keepdetergentandrinseaidoutofreachof
children.
• Thepackagingmaterialshouldnotbeusedas
a toy for children.
Disposal
• Disposalofpackagingmaterial:observelocal
legislation so that the packaging may be
reused.
• The European Directive 2012/19/EU relating
toWasteElectricalandElectronicEquipment
(WEEE) states that household appliances
should not be disposed of using the normal
solidurbanwastecycle.Exhaustedappliances
should be collected separately in order to
optimise the re-using and recycling rate of the
materials inside the machine, while preventing
potential damage to the environment and public
health. The crossed-out dustbin symbol is
marked on all products to remind the owners
of their obligations regarding separated waste
collection.
For further information relating to the correct
disposal of household appliances, owners may
contact the relevant public authority or the local
appliance dealer.
Saving energy and respecting the
environment
Saving water and energy
• Onlybeginawashcyclewhenthedishwasher
isfull.Whilewaitingforthedishwashertobe
filled, prevent unpleasant odours using the Soak
cycle
(seeWashcycles)
.
• Selectawashcyclethatissuitedtothetype
of crockery and to the soil level of the crockery
using the Table of wash cycles:
-fordisheswithanormalsoillevelusetheEco
washcycle, which ensureslow energy/water
consumption levels.
- If the load is smaller than usual activate the
Half Load option*
(see Start-up and use).
• Ifyourelectricitysupplycontractgivesdetailsof
electricity-saving time bands, run wash cycles
when electricity prices are lower. The Delayed
Start button *
(see Start-up and use)
helps you
organise the wash cycles accordingly.

EN
4
Phosphate-free and chlorine-free detergents
containing enzymes
• Westronglyrecommendthatyouusedetergents
that do not contain phosphates or chlorine, as
these products are harmful to the environment.
• Enzymesprovideaparticularlyeffectiveaction
at temperatures around 50°C. As a result
detergentscontainingenzymescanbeusedin
conjunction with low-temperature wash cycles
in order to achieve the same results as a normal
65°Cwashcycle.
•Toavoidwasting detergent,use the product
in appropriate quantities based on the
manufacturer’s recommendations, the hardness
of the water, the soil level and the quantity
of crockery to be washed. Even if they are
biodegradable, detergents contain substances
which may alter the balance of nature.
Assistance
Before contacting Assistance:
• Checkwhethertheproblemcanberesolvedusingthe
Troubleshooting guide
(see Troubleshooting).
• Restarttheprogrammetocheckwhethertheproblem
has ceased to exist.
• If the problem persists, contact the Authorised
Technical Assistance Service.
Never use the services of unauthorised technicians.
Please have the following information to hand:
• Thetypeofmalfunction.
• Theappliancemodel(Mod.).
• Theserialnumber(S/N).
This information can be found on the appliance data plate
(see Description of the appliance)
.

EN
5
Installation
* Only available in selected models.
If the appliance must be moved at any time, keep it in an
upright position; if absolutely necessary, it may be tilted onto its
back.
Positioning and levelling
1.Remove theappliance fromall packaging and check that
it has not been damaged during transportation. If it has been
damaged, contact the retailer and do not proceed any further
with the installation process.
2.Arrangethedishwashersothatitssidesorbackpanelarein
contact with the adjacent cabinets or the wall. This appliance
can also be recessed under a single worktop
*
(see the Assembly
Instruction sheet.)
3. Position the dishwasher on a level sturdy floor. If the floor
is uneven, the front feet of the appliance should be adjusted
untilitreachesahorizontalposition.Iftheapplianceislevelled
correctly, it will be more stable and much less likely to move or
cause vibrations and noise while it is operating.
4
*. To adjust the height of the rear foot, turn the red hexagonal
bushing on the lower central part at the front of the dishwasher
using a hexagonal spanner with an opening of 8 mm. Turn the
spanner in a clockwise direction to increase the height and in an
anticlockwise direction to decrease it
(see Building-in Instruction
sheet attached to the documentation.)
Connecting the water and electricity supplies
Connection to the water and electricity supplies should only
beperformedbyaqualifiedtechnician.
The dishwasher should not stand on the water hoses or
electricity supply cable.
The appliance must be connected to the water supply
network using new hoses.
Do not use old piping.
The water inlet and outlet hoses and the electricity supply cable
may be positioned towards the right or the left in order to achieve
the best possible installation.
Connecting the water inlet hose
• Toasuitablecoldwaterconnectionpoint:beforeattaching
the hose, run the water until it is perfectly clear so that any
impurities that may be present in the water do not clog the
appliance; after performing this operation, screw the inlet
hose tightly onto a tap with a ¾ gas threaded connection.
• Toa suitablehotwaterconnectionpoint:your dishwasher
may be supplied with hot water from the mains supply (if you
have a central heating system with radiators) provided that it
doesnotexceedatemperatureof60°C.
Screw the hose to the tap as described for connection to a
cold water supply.
If the inlet hose is not long enough, contact a specialist store
or an authorised technician
(see Assistance.)
The water pressure must be within the values indicated in
the Technical Data table
(see adjacent information.)
The hose should not be bent or compressed.
Connecting the water outlet hose
Connect the outlet hose (without bending it) to a drain duct with
a minimum diameter of 4 cm.
Theoutlethosemustbeataheightrangingfrom40to80cm
fromthefloor/surfacewherethedishwasherrests(A).
Before connecting the water outlet hose to the sink drain, remove
the plastic plug (B).
Anti-flooding protection
To ensure floods do not occur, the dishwasher:
- is provided with a special system which blocks the water supply
in the event of anomalies or leaks from inside the appliance.
Somemodelsarealsoequippedwiththesupplementarysafety
device New Acqua Stop*, which guarantees anti-flooding
protection even in the event of a supply hose rupture.
WARNING: HAZARDOUS VOLTAGE!
Under no circumstances should the water inlet hose be cut, as
it contains live electrical parts.
Electrical connection
Before inserting the plug into the electrical socket, make sure
that:
• Thesocketisearthedandcomplieswithcurrentregulations.
• thesocketcanwithstandthemaximumloadoftheappliance,
which is indicated on the data plate located on the inside of
the door
(see Description of the appliance);
• Thepowersupplyvoltagefallswithinthevaluesindicatedon
the data plate on the inside of the door.
• Thesocketiscompatiblewiththeplugoftheappliance.If
this is not the case, ask an authorised technician to replace
the plug (
see Assistance
); do not use extension cables or
multiple sockets.
Once the appliance has been installed, the power supply
cable and the electrical socket should be easily accessible.
The cable should not be bent or compressed.
If the power supply cable is damaged, it must be replaced
by the manufacturer or its Technical Assistance Service in order
topreventallpotentialhazards
(see Assistance.)

EN
6
Technical data
Dimensions
width 60 cm
height 85 cm
depth 60 cm
Capacity 14 standard place-settings
Water supply
pressure
0,05 ÷ 1MPa (0.5 ÷ 10 bar)
7,25 – 145 psi
Power supply
voltage
See appliance data plate
Total absorbed
power
See appliance data plate
Fuse See appliance data plate
This dishwasher conforms to the
following European Community
Directives:
-2006/95/EC (Low Voltage)
-2004/108/EC (Electromagnetic
Compatibility)
-2009/125/EC (Comm. Reg.
1016/2010) (Ecodesign)
-97/17/EC (Labelling)
-2012/19/EU Waste Electrical
and Electronic Equipment
(WEEE)
The machine has a buzzer/set of tones
(depending on the
dishwasher model
) to inform the user that a command has
been implemented: power on, cycle end etc.
The symbols/indicator lights/LEDs on the control panel/
display may vary in colour and may have a flashing or fixed
light
(depending on the dishwasher model)
.
The display provides useful information concerning the type
of wash cycle, drying/wash-cycle phase, remaining time,
temperature etc etc.
* Only available in selected models.
Anti-condensation strip*
After installing the dishwasher, open the door and stick the
adhesive transparent strip under the wooden shelf in order
to protect it from any condensation which may form.
Advice regarding the first wash cycle
After the installation, remove the stoppers from the racks and
the retaining elastic elements from the upper rack, if any.
Immediately before the first washing, completely fill the salt
dispenser with water and add only then approximately 1
kgofsalt(seechapterentitledRinseaidandrefinedsalt).
The water may overflow: this is normal and is not a cause
for concern. Select the water hardness value (see chapter
entitledRinseaidandrefinedsalt).-Afterthesalthasbeen
poured into the machine, the LOW SALT indicator light*
switches off.
If the salt container is not filled, the water softener and
the heating element may be damaged as a result.

EN
7
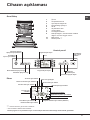
Overall view
Description of the
appliance
***Only in completely built-in models.
* Only available in selected models.
Control panel
The number and type of wash cycles and options may vary depending on the dishwasher model.
1. Upper rack
2. Upper sprayer arm
3. Tip-up compartments
4. Rackheightadjuster
5. Lower rack
6. Lower sprayer arm
7. Washingfilter
8. Salt dispenser
9. Detergent dispenser, rinse-aid dispenser and
Active Oxygen device*
10. Data plate
11. Control panel***
Start/Pause
button and
indicator lights
Button and
indicator light
On-Off/Reset
Extra Drying option button
Zone Wash option button
Delayed Start
buttons
Multi-functional Tablets
option button (Tabs)
Wash-Cycle Selection buttons
Short Time Option button
Wash-cycle indicator lights
Wash-cycle indicator lights
Zone Wash indicator lights
Low Rinse-Aid indicator light
Low Salt indicator light
Blocked Filter indicator light
Extra Drying indicator light
Multi-Functional Tablets indicator light (Tabs)
Washing and Drying indicator lights
Tap Shut-Off indicator light
Delayed Start indicator light
Short Time indicator light
Remaining Time indicator
Display

EN
8
Loading the racks
Tips
Before loading the racks, remove all food residues from the
crockeryandemptyliquids from glasses and containers.No
preventive rinsing is needed under running water.
Arrange the crockery so that it is held in place firmly and does
not tip over; and arrange the containers with the openings facing
downwards and the concave/convex parts placed obliquely,
thus allowing the water to reach every surface and flow freely.
Make sure that the lids, handles, trays and frying pans do not
prevent the sprayer arms from rotating. Place any small items
in the cutlery basket.
Since plastic dishes and non-stick frying pans usually retain more
water drops, their drying will be not so good as that of ceramic
or stainless-steel dishes.
Lightweight items such as plastic containers should be placed
in the upper rack and arranged so that they cannot move.
After loading the appliance, make sure that the sprayer arms
can rotate freely.
Lower rack
The lower rack can hold pans, lids, dishes, salad bowls, cutlery
etc. Large plates and lids should ideally be placed at the sides.
Very soiled dishes and pans should be placed in the lower rack
because in this sector the water sprays are stronger and allow
a higher washing performance.
Several dishwasher models are fitted with tip-up sectors
*.
They can be used in a vertical position when arranging dishes
orinahorizontalposition(lower)toloadpansandsaladbowls
easily.
Cutlery basket
The basket is equipped with top grilles for improved cutlery
arrangement. The cutlery basket should be positioned only at
the front of the lower rack
Knives and other utensils with sharp edges must be placed
in the cutlery basket with the points facing downwards or they
mustbepositionedhorizontallyinthetip-upcompartmentson
the upper rack
Upper rack
Load this rack with delicate and lightweight crockery such as
glasses, cups, saucers and shallow salad bowls.
Several dishwasher models are fitted with tip-up sectors
*.
They can be used in a vertical position when arranging tea/
dessert saucers or in a lower position to load bowls and food
containers.
*Only available in selected models with different numbers and
positions.

EN
9
Adjusting the height of the upper rack
In order to make it easier to arrange the crockery, the upper rack
may be moved to a higher or lower position.
The height of the upper rack should be adjusted WHEN THE
RACK IS EMPTY.
NEVER raise or lower the rack on one side only.
IftherackisequippedwithaLift-Up device*
(see figure)
, lift
it up by holding its sides. To restore the lower position, press
the levers (A) at the sides of the rack and follow the rack down.
Unsuitable crockery
• Woodencrockeryandcutlery.
• Delicatedecoratedglasses,artistichandicraftandantique
crockery. Their decorations are not resistant.
• Parts in synthetic material which do not withstand high
temperatures.
• Copperandtincrockery.
• Crockerysoiledwithash,wax,lubricatinggreaseorink.
Thecoloursofglassdecorationsandaluminium/silverpiecescan
change and fade during the washing process. Some types of
glass(e.g.crystalobjects)canbecomeopaqueafteranumber
of wash cycles too.
Damage to glass and crockery
Caused by:
• Typeofglassandglassproductionprocess.
• Chemicalcompositionofdetergent.
• Watertemperatureofrinsecycle.
Tips:
• Only use glasses and porcelain guaranteed by the
manufacturer as dishwasher safe.
• Useadelicatedetergentsuitableforcrockery.
• Collectglassesandcutleryfromthedishwasherassoonas
the wash cycle is over.
Theupperrackcanbeadjustedforheightbasedonrequirements:
high position to place bulky crockery in the lower rack and low
positiontomakethemostofthetip-upcompartments/sectors
by creating more space upwards.
Tip-up compartments with adjustable position
The side tip-up compartments can be positioned at three
differentheightstooptimizethearrangementofcrockeryinside
the rack.
Wineglassescanbeplacedsafelyinthetip-upcompartments
by inserting the stem of each glass into the corresponding slots.
Cutlery tray*
Some dishwasher models are fitted with a sliding tray which
can be used to hold serving utensils or small cups. For optimum
washing performance avoid positioning bulky crockery directly
below the tray. The cutlery tray can be removed
(see Figure).
Before loading the tray, make sure the supports are properly
coupled to the upper rack
(see Figure).

EN
10
Start-up and use
* Only available in selected models.
Measuring out the detergent
A good wash result also depends on the correct
amount of detergent being used. Exceeding the stated
amount does not result in a more effective wash and
increases environmental pollution.
Based on how soiled the items are, the amount can be
adjusted to individual cases using powder or liquid
detergent.
In the case of normally soiled items, use approximately
either 35 gr (powder detergent) or 35 ml (liquid detergent).
If tablets are used, one tablet will be enough.
If the crockery is only lightly soiled or if it has been rinsed
with water before being placed in the dishwasher, reduce
the amount of detergent used accordingly.
For good washing results also follow the instructions shown
on the detergent box.
For further questions please ask the detergent producers'
Advice Offices.
To open the detergent dispenser use the opening device “A”.
Introduce the detergent into the dry dispenser “B” only.
Place the amount of detergent for pre-washing directly
inside the tub.
1.
WhenmeasuringoutthedetergentrefertotheTableofwash
cyclestoaddtheproperquantity.CompartmentB comprises
a level showing the maximum quantity of liquid or powder
detergent that can be added to each cycle.
2.
Removedetergentresiduesfromtheedgesofthedispenser
and close the cover until it clicks.
3. Close the lid of the detergent dispenser by pulling it up until
the closing device is secured in place.
The detergent dispenser automatically opens up at the right time
according to the wash cycle.
If all-in-one detergents are used, we recommend using the TABS
option, because it adjusts the cycle so that the best washing
and drying results are always achieved.
Only use detergent which has been specifically designed
for dishwashers.
DO NOT USE washing-up liquid.
Using excessive detergent may result in foam residue
remaining in the machine after the cycle has ended.
The use of tablets is only recommended for models which
offer the MULTI-FUNCTIONAL TABLETS option.
To achieve the best results from each washing and drying
cycle, powder detergent, liquid rinse aid and salt should
be used.
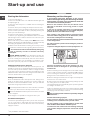
Starting the dishwasher
1.Turnthewatertapon.
2.PresstheON/OFF button:The ON/OFF indicator light and
the display light up.
3. Open the door and pour in a suitable amount of detergent
(see below).
4. Load the racks
(see Loading the racks)
and shut the door.
5. Select the wash cycle in accordance with the type of crockery
and its soil level
(see Table of wash cycles)
by pressing the
wash-cycle selection buttons.
6. Select the wash options
*
(see adjacent information).
7.StartthecyclebypressingtheStart/Pausebutton:Thewash
indicator light comes on and the time left to the end of the cycle
appears on the display.
8. At the end of the cycle, the display shows END. Switch off the
appliancebypressingtheON/OFFbutton,shutoffthewatertap
and unplug the appliance from the electricity socket.
9.Waitforafewminutesbeforeremovingthecrockeryinorder
to avoid burns. Unload the racks, beginning with the lower level.
- The machine will switch off automatically during long
periods of inactivity in order to minimise electricity
consumption.
AUTO WASH CYCLES*:some dishwasher models are
equippedwithaspecialsensorwhichcanbeusedtoassess
the level of soiling and automatically select the most efficient
and economical wash cycle accordingly. The duration of the
auto wash cycles may vary due to the operation of the sensor.
Changing a wash cycle in progress
If a mistake was made in the wash cycle selection process, it is
possible to change the cycle provided that it has only just begun:
once the wash cycle has started, in order to change the wash
cycleswitchoffthemachinebypressingandholdingtheON/
OFF/Resetbutton.Switchitbackonusingthesamebuttonand
select the desired wash cycle and options.
Adding extra crockery
PresstheStart/Pausebuttonandopenthedoor,takingcareto
avoid the escaping steam, and place the crockery inside the
dishwasher.PresstheStart/Pausebutton:Thecyclewillstart
again after a long beep has been emitted.
If the delayed start has been set, at the end of the countdown
the wash cycle will not start. It will stay in Pause mode.
PresstheStart/Pausebuttontopausethemachine;thewash
cycle is stopped.
At this stage it is not possible to change the wash cycle.
Accidental interruptions
If the door is opened during the wash cycle or there is a power
cut, the cycle stops. It starts again from the point at which it
was interrupted once the door has been shut or the electricity
supply is restored.

EN
11
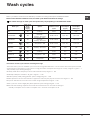
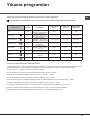
Wash cycles
Wash-cycledataismeasuredunderlaboratoryconditionsaccordingtoEuropeanStandardEN50242.
Based on the different conditions of use, the wash-cycle duration and data can change.
The number and type of wash cycles and options may vary depending on the dishwasher model.
Wash cycle
Wash cycle
which
include
drying
Options
Approximate
duration of wash
cycles
Water
consumption
(l/cycle)
Energy
consumption
(KWh/cycle)
Eco Yes
Delayed start – Tabs –
Extra Dry
03:10’ 9 0,93
Auto Intensive Yes
Delayed start – Tabs –
Zone wash –
Extra Dry - Short Time
02:00’ - 03:10’ 14,0 - 15,5 1,50 - 1,80
Auto Normal Yes
Delayed start – Tabs –
Zone wash –
Extra Dry - Short Time
01:30’ - 02:30’ 14,5 – 16,0 1,20 - 1,35
Auto Fast No
Delayed start – Tabs
00:40’ - 01:20’ 13,0 - 14,5 1,15- 1,25
Duo Wash Yes
Delayed start – Tabs –
Extra Dry - Short Time
02:00’ 18,0 1,30
Delicate Yes
Delayed start – Tabs –
Extra Dry
01:40’ 11,0 1,10
Express 30’ No
Delayed start – Tabs
00:30’ 9,0 0,50
Soak No
Delayed start
00:12’ 4,5 0,01
Instructions on wash-cycle selection and detergent dosage
1.
TheECOwashcycleisthestandardcycletowhichtheenergylabeldatarefers.Itcanbeusedtowashcrockerywithanormal
soillevelandisthemostefficientcycleintermsofenergyandwaterconsumptionforthistypeofcrockery.29gr/ml+6gr/ml**–1
Tab (**Quantity of pre-washing detergent)
2.
Heavilysoileddishesandpans(nottobeusedfordelicateitems).35gr/ml–1Tab
3.Normallysoiledpansanddishes.29gr/ml+6gr/ml**–1Tab
4.Limitedquantityofdailysoiling(idealfor4placesettings)25gr/ml–1Tab
5.Washspreadoverthetworacks:delicateonupperrackandheavy-dutyforpansonlowerrack.35gr/ml–1Tab
6.Cyclefordelicateitems,whicharemoresensitivetohightemperatures35gr/ml–1Tab
7.Fastcycletobeusedforslightlydirtydishes(idealfor2placesettings)25gr/ml–1Tab
8.Pre-washwhileawaitingcompletionoftheloadwiththedishesfromthenextmeal.Nodetergent.
Standbyconsumption:Left-onmodeconsumption:5W-Offmodeconsumption:0.5W.

EN
12
Extra drying
To improve the dryness level of the crockery, press
theEXTRADRYINGbuttonandthesymbolwilllightup.Ifit
is pressed again, the option will be deselected.
A higher temperature during the final rinsing and a longer
drying phase improve the dryness level.
The EXTRA DRYING option increases the duration of
the wash cycle.
Delayed start
It is possible to delay the start time of the cycle for a
period of time between 1 and 24 hours:
1. Select the desired wash cycle and any other options
required,presstheDELAYEDSTARTbutton.Therelevant
symbolstartsflashing.Usethebuttons+and-toselectwhen
thewashcyclewillstart(h01,h02etc.)
2.ConfirmwiththeSTART/PAUSEbutton.Thesymbolstops
flashing and the countdown begins.
3.Oncethistimehaselapsed,theDELAYEDSTARTsymbol
switches off and the wash cycle begins.
TodeselecttheDELAYEDSTARToption,presstheDELAYED
STARTbuttonuntilthetextOFF appears.
The Delayed Start function cannot be set once a wash
cycle has been started.
Wash options
The OPTIONS may only be set, changed or reset after
the wash cycle has been selected and before the Start/
Pause button has been pressed.
Only the options which are compatible with the type of wash
cycle set may be selected. If an option is not compatible
with the selected wash cycle
(see Table of wash cycles)
, the
corresponding symbol flashes rapidly 3 times.
If an option is selected which is not compatible with another
(previously selected) option, it will flash 3 times and switch
off, while the most recently selected option will remain active.
To deselect an option which has been set by mistake, press
the corresponding button again.
Multi-functional tablets (Tabs)
This option optimises washing and drying results.
When using multi-functional tablets, press the MULTI-
FUNCTIONALTABLETSbutton;thecorrespondingsymbol
will light up. If the button is pressed again, the option will
be deselected.
The “Multi-functional tablets” option results in a
longer wash cycle.
The use of tablets is only recommended for models
having this option and it is not recommended with wash
cycles which do not specify the use of multi-functional
tablets.
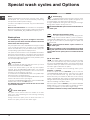
Special wash cycles and Options
Short Time option
This option can be used to reduce the duration of the main
wash cycles while maintaining the same washing and drying
performance levels.
Having selected the option, press the Short Time button. To
deselect the option, press the same button again.
Notes:
Optimum performance levels when using the “Fast wash”
and“Express30’”cyclescanbeachievedbyrespecting
the specified number of place settings.
To reduce consumption even further, only run the dishwasher
when it is full.
Note for Test Laboratories: for information on comparative
ENtestingconditions,pleasesendanemailtothefollowing
address:[email protected]
Zone Wash
This option makes it possible to carry out the wash
cycle in the selected rack only. Select the wash cycle and
thenpresstheZONEWASHbutton:theselectedracklights
up and the wash cycle starts in the selected rack only. Press
the button again to deselect the option.
The option is available with the following wash cycles:
Intensive and Normal.
Select the option and the Intensive cycle to start the
ULTRAINTENSIVEZONEwashing.Thiswashcycleisideal
for very soiled mixed loads, e.g. pans and saucepans,
dishes with heavy encrustation or difficult-to-clean crockery
(grater, vegetable mill, dirty cutlery). The spraying pressure is
stronger and the washing temperature higher, thus ensuring
optimum handling of stubborn stains.
Select the option and the Normal
cycletostarttheSAVING
ZONEwashing.Thisfunctionmakesitpossibletoreduce
energy consumption. Cycle duration might change
Remember to load the crockery in the selected rack only

EN
13
Rinse aid and refined salt
Only use products which have been specifically designed
for dishwashers.
Do not use table/industrial salt or washing-up liquid.
Follow the instructions given on the packaging.
If using a multi-functional product it is not necessary to add
any rinse aid. However, we recommend that you add salt,
especially if you live in an area where the water is hard or
very hard.
(Follow the instructions given on the packaging).
If you do not add salt or rinse aid, the LOW SALT* and
LOW RINSE AID
* indicator lights will stay lit.
Measuring out the rinse aid
Rinseaidmakesiteasierforthecrockerytodry,aswaterrunsoff
the surfaces more readily and therefore does not leave streaks
or marks. The rinse aid dispenser should be filled:
• WhentheLOWRINSEAIDindicatorlight* on the control panel
is illuminated, a reserve supply of rinse aid is still available
for1-2cycles;
1.Openthedispenser“D” by pressing and pulling up the tab
on the lid;
2. Carefully introduce the rinse aid as far as the maximum
reference notch of the filling space - avoid spilling it. If this
happens, clean the spill immediately with a dry cloth.
3. Press the lid down until you hear a click to close it.
NEVER pour the rinse aid directly into the appliance tub.
Rinse-aid dispenser setting
If you are not completely satisfied with the drying results, you
canadjustthequantityofrinseaid.Switch the dishwasher on
and off using the ON/OFF button.
Pressthe Start/Pause button 3 times; switch on the machine
using the ON/OFF button and access the adjustment menu - the
rinse-aid indicator light is lit
(set to factory level).
SelectthelevelofrinseaidsupplyusingtheECOcyclebutton
(0to4max.)
Press the ON/OFF button to save the setting.
IftherinseaidlevelissettoZERO,norinseaidwillbesupplied.
TheLOWRINSEAIDindicatorlightwillnotilluminateifyourun
out of rinse aid.
• Iftherearestreaksonthecrockery,settheadjustmentdevice
toalowernumber(1-2.)
• If there are drops of water or limescale marks, set the
adjustment device to a higher number (3-4.)
Setting the water hardness
Everydishwasherisequippedwithawatersoftenerwhich,by
using refined salt specially designed for this type of appliance,
supplies water without limescale which is then used to wash
the crockery.
This dishwasher offers a setting which helps to reduce pollution
and optimises washing performance in accordance with the
water hardness level in your area. This information can be
obtained from the organisation which supplies your household
with water.
- Switch the dishwasher on and off using the ON/OFF button.
Holddown theStart/Pausebuttonfor min.3seconds;switch
on the machine using the ON/OFF button and access the
adjustment menu - the salt indicator light is lit.
-Selectthedesiredlevel(1to5*max.basedonthedishwasher
model)usingtheECObutton.
(water softener set to medium level).
Press the ON/OFF button to save the setting.
Evenifusingmulti-functionaltablets,thesaltdispensershould
still be filled.
(°dH=hardnessmeasuredinGermandegrees-°f=hardness
measuredinFrenchdegrees–mmol/l=millimolesperlitre)
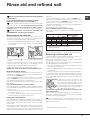
Measuring out the refined salt
In order to obtain the best possible results from a wash cycle,
make sure that the salt dispenser is never empty.
Refinedsaltremoveslimescalefromthewater,thusavoiding
the formation of deposits on crockery.
The salt dispenser is located in the lower part of the dishwasher
(see Description)
and should be filled:
• Whenthegreenfloat* cannot be seen by simply looking at
the cap of the salt dispenser;
• WhentheLOWRINSEAIDindicatorlightonthecontrolpanel
is illuminated *;
1.Removethelowerrackandunscrewthecap(anticlockwise).
2.Thefirsttimeyoudothis:fillthewatertankrightuptoitsedge.
3. Position the funnel*
(see figure)
and fill the salt dispenser up
totheedge(approximately1kg).Itisnormalforalittlewater
to leak out.
4. Remove the funnel* and wipe any salt
residues away from the opening; rinse the
cap under running water and then screw
it on, the head facing downwards so as to
let the water flow out of the four slots (star-
shaped arrangement) in the lower part of
the cap (cap with green float
*).
It is advisable to perform this procedure every time you add
salt to the dispenser.
Make sure the cap is screwed on tightly so that no detergent can
get into the container during the wash cycle (this could damage
the water softener beyond repair).
Whennecessary,measureoutthesaltbeforeawashcycle
so that any saline solution which has leaked out of the salt
dispenser is removed.
* Only available in selected models.
Water Hardness Table
Average salt dispenser
capacity duration
**
level °dH °fH mmol/l months
1 0 - 6 0 - 10 0 - 1 7 months
2 6 - 11 11 - 20 1,1 - 2 5 months
3 12 - 17 21 - 30 2,1 - 3 3 months
4 17 - 34 31 - 60 3,1 - 6 2 months
5
*
34 - 50 61 - 90 6,1 - 9 2/3 weeks
For values between 0°f and 10°f, we do not recommend the use of salt.
* a setting of 5 may increase cycle duration.
** 1 wash cycle per day.
M
A
X

EN
14
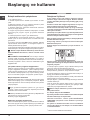
Care and maintenance
Shutting off the water and electricity
supplies
• Turn
off
the
water
tap
after
every
wash
cycle
to
avoid
leaks.
• Always
unplug
the
appliance
when
cleaning
it
and
when
performing maintenance work.
Cleaning the dishwasher
• The
external
surfaces
of
the
machine
and
the
control
panel
can be cleaned using a non-abrasive cloth which has been
dampened with water. Do not use solvents or abrasive
products.
• Any
marks
on
the
insideof
the
appliance
may
be
removed
using a cloth dampened with water and a little vinegar.
Preventing unpleasant odours
• Always
keep
the
door
of
the
appliance
ajar
in
order
to
avoid
moisture from forming and being trapped inside the machine.
• Clean
the
seals
around
the
door
and
detergent
dispensers
regularly using a damp sponge. This will avoid food becoming
trapped in the seals, which is the main cause behind the
formation of unpleasant odours.
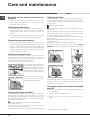
Cleaning the sprayer arms
Food residue may become encrusted onto the sprayer arms
and block the holes used to spray the water. It is therefore
recommended that you check the arms from time to time and
clean them with a small non-metallic brush.
The two sprayer arms may both be removed.
To remove the upper sprayer arm,
turn the plastic locking ring in an
anti-clockwise direction. The upper
sprayer arm should be replaced
so that the side with the greater
number of holes is facing upwards.
The lower sprayer arm can be
removed by pressing on the side
tabs and pulling it upwards.
Cleaning the water inlet filter*
If the water hoses are new or have not been used for an extended
period of time, let the water run to make sure it is clear and free
of impurities before performing the necessary connections. If this
precaution is not taken, the water inlet could become blocked
and damage the dishwasher.
Clean the water inlet filter at the tap outlet regularly.
- Turn off the water tap.
- Unscrew the end of the water inlet hose, remove the filter and
clean it carefully under running water.
-
Re-place
the
filter
and
screw
the
water
hose
back
into
position.
Cleaning the filters
The filter assembly consists of three filters which remove food
residues from the washing water and then recirculate the water.
They should be cleaned if you wish to achieve the best results
in every wash.
Clean the filters regularly.
The dishwasher should not be used without filters or if the
filter is loose.
•Afterseveralwashes,checkthefilterassemblyandifnecessary
clean it thoroughly under running water, using a non-metallic
brush and following the instructions below:
1. Turn the cylindrical filter C in an anti-clockwise direction and
pull it out
(fig.1).
2.RemovethecupfilterB by exerting a slight pressure on the
side flaps
(fig.2);
3. Slide out the stainless-steel plate filter A.
(fig. 3).
4. Inspect the trap and remove any food residues. NEVER
REMOVE the wash-cycle pump protection
(black detail) (fig.4).
After cleaning the filters, re-place the filter assembly and fix it in
position correctly; this is essential for maintaining the efficient
operation of the dishwasher.
Leaving the machine unused for extended
periods
• Disconnecttheappliancefromtheelectricitysupplyandshut
off the water tap.
• Leavethedooroftheapplianceajar.
• Whenyoureturn,runawashcyclewhenthedishwasheris
empty.
* Only available in selected models.

EN
15
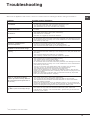
Troubleshooting
Whenevertheappliancefailstowork,checkforasolutionfromthefollowinglistbeforecallingforAssistance.
* Only available in selected models.
Problem: Possible causes / Solutions:
The dishwasher does not start or cannot
be controlled.
• Switch off the appliance by pressing the ON/OFF button, switch it back
on after approximately one minute and reset the cycle.
• The appliance has not been plugged in properly.
• The dishwasher door has not been shut properly.
The door won’t close.
• The lock was released. Strongly push the door until a “clacking” noise
is heard.
No water drains from the
dishwasher.
• The dishwasher cycle has not yet finished.
• The water inlet hose is bent (see Installation).
• The drain duct is blocked.
• The filter is clogged up with food residues.
The dishwasher makes excessive
noise.
• The dishes are rattling against each other or against the sprayer arms.
• An excessive amount of foam has been produced: the detergent has not
been measured out correctly or it is not suitable for use in dishwashers
(see Start-up and use).
The dishes and glasses are
covered in a white film or
limescale deposits.
• The level of refined salt is low or the dosage setting is not suited to the
hardness of the water (see Rinse aid and salt).
• The lid on the salt dispenser is not closed properly.
• The rinse aid has been used up or the dosage is too low.
The dishes and glasses are
streaked or have a bluish tinge.
• The rinse aid dosage is too high.
The crockery has not been dried
properly.
• A wash cycle without a drying cycle has been selected.
• The rinse aid has been used up or the dosage is too low (see Rinse aid
and salt).
• The rinse aid dispenser setting is not suitable.
• The crockery is made from non-stick material or plastic.
The dishes are not clean. • The racks are overloaded (see Loading the racks).
• The crockery has not been arranged properly.
• The sprayer arms cannot rotate freely.
• The wash cycle is too gentle (see Wash cycles).
• An excessive amount of foam has been produced: the detergent has not
been measured out correctly or it is not suitable for use in dishwashers
(see Start-Up and Use).
• The lid on the rinse aid compartment has not been shut correctly.
• The filter is dirty or blocked (see Care and maintenance).
• The refined salt level is low (see Rinse aid and salt).
• Switch off the appliance by pressing the ON/OFF button. Shut off the
water tap to eliminate the risk of flooding and remove the plug from the
electrical socket.
Make sure the water inlet filter has not become blocked by impurities
(see “Care and maintenance” chapter).
The dishwasher does not take any
water in - Tap shut-off alarm
(indicator light ON/OFF ashing; H2O and
tap symbol displayed; F 6 appears after a
few seconds).
• There is no water in the mains supply.
• The water inlet hose is bent (see Installation).
• Turn on the tap and the appliance will start after a few minutes.
• The appliance lock has been activated because no action was taken
when the beeps sounded.
Switch off the appliance using the ON/OFF button, turn on the tap and
switch the appliance back on after a few seconds by pressing the same
button. Re-program the appliance and restart the wash cycle.
Clogged lter alarm
The “lter” symbol on the display will light
up.
• Make sure the wash cycle has ended, open the dishwasher door
and clean the cup filter and stainless-steel filter (see “Care and
maintenance” chapter). The “blocked filter” symbol will go off when the
following cycle starts.

Kullanım talimatları
İçindekiler
Ürün bilgilerine, 17
Önlemler ve tavsiyeler, 18
Genel güvenlik
İmha Etme
Enerji tasarrufu ve Çevreye saygı
Kurulum ve destek, 19-20
Konumlandırma ve düzleştirme
Su ve elektrik bağlantılarının yapılması
İlk yıkama programı hakkında öneri
Teknik bilgiler
Yardım
Cihazın tanımı, 21
Genel Bakış
Kontrol Paneli
Raarın yüklenmesi, 22-23
Alt raf
Çatal-bıçak sepeti
Üst raf
Çalıştırma ve kullanım, 24
Bulaşık makinesinin çalıştırılması
Deterjanın ölçülmesi
Yıkama programları, 25
Yıkama programları tablosu
Özel yıkama programları ve Seçenekler, 26
Parlatıcı ve rane tuz, 27
Durulama maddesinin ölçülmesi
İşlenmiş tuzun ölçülmesi
Temizlik ve bakım, 28
Su ve elektrik bağlantısının kapatılması
Bulaşık makinesinin temizlenmesi
İstenmeyen kokuların önlenmesi
Püskürtücü kollarının temizlenmesi
Su Giriş Filtresinin Temizlenmesi
Filtrelerin temizlenmesi
Makinenin uzun süre kullanılmaması
Sorun giderme, 29
Yardım, 30
TR
LFF 8M121
BULAŞIK MAKİNESİ
Türkçe, 16

TR
17
ürün bilgilerine
Marka
HOTPOINT ARISTON
Model
LFF 8M121
Standart yer yerleşimlerinde nominal kapasite (1)
14
A+++ (düşük tüketim)’’dan D (yüksek tüketim)’’e Enerji verimlilik sınıfı
A++
kWh cinsinden yıllık enerji tüketimi (2)
265.0
kWh cinsinden standart temizleme programının enerji tüketimi
0.93
W’’de off-modun güç tüketimi
0.5
W’’de left-on modun güç tüketimi
5.0
Litre olarak yıllık su tüketimi (3)
2520.0
A (yüksek verim)’’dan G (düşük verim)’’e kurutma verimlilik sınıfı
A
Dakika cinsinden standart temizleme programı için program süresi
190’
Left-on modun dakika cinsinden süresi
10
Yıkamada dB(A) re 1 pW cinsinden gürültü
41
Ankastre Model
Hayır
Notlar
1) Etiket ve ş üzerinde yer alan bilgi, standart yıkama programı ile ilişkilidir, bu programın normal olarak kirlenmiş sofra takımlarını
yıkamak için uygundur ve kombine enerji ve su tüketimi açısından en etkili programlardır. Standart yıkama programı, Eco program’’dır.
2) Soğuk su kullanılan 280 adet standart yıkama programına ve ve düşük güç modlarının tüketimine dayanmaktadır. Gerçek enerji
tüketimi cihazın nasıl kullanıldığına göre değişecektir.
3) 280 adet standart yıkama programına dayanmaktadır. Gerçel su tüketimi, cihazın nasıl kullanıldığına bağlıdır.
Ürün bilgilerine

TR
18
* Yalnızca belirli modellerde bulunmaktadır.
Önlemler ve öneriler
Bu cihaz, uluslararası güvenlik standartlarına
uygun olarak tasarlanıp üretilmiştir. Aşağıdaki bilgiler
güvenlik amacıyla verilmiştir ve bu nedenle dikkatle
okunmalıdır.
Bu kullanım kılavuzunu, gelecekte referans olarak
kullanmak üzere saklayın. Cihazı satarsanız, birine
hediye ederseniz veya başka bir yere taşırsanız, kullanım
kılavuzunu da vermeyi/götürmeyi ihmal etmeyin.
Lütfen bu talimatları dikkatle okuyun: talimatlar,
kurulum, kullanım ve güvenlik hakkında önemli
bilgiler içermektedir.
Bu cihaz, evde kullanmanın yanı sıra benzeri
uygulamalarda da kullanılmak üzere tasarlanmıştır;
örneğin:
- mağazalar, osler ve diğer çalışma ortamlarındaki
personel mutfağı alanları;
- çiftlik evleri;
- oteller, moteller ve diğer yerleşim türü ortamlarında
müşteriler tarafından;
- oda-kahvaltı sistemiyle hizmet veren turistik tesisler.
Genel güvenlik
• Bu cihaz, güvenliklerinden sorumlu bir kişi tarafından
cihazın kullanımıyla ilgili talimatlar kendilerine
öğretilmeden veya bu kişinin gözetimi altında olmadan
ziksel, ruhsal veya akli durumları yeterli olmayan
kişiler (çocuklar dahil) ya da gerekli bilgi ve tecrübeye
sahip olmayan kişiler tarafından kullanılmamalıdır.
• Yetişkinler, cihazla oynamadıklarından emin olmak
için çocukları her zaman gözetim altında tutmalıdır.
• Cihaz ev içi kullanım için tasarlanmıştır ve ticari
veya endüstriyel kullanım amaçlanmamıştır.
• Ev bulaşıklarının bu kullanım kılavuzunda belirtilen
şekilde yıkanması için makine sadece yetişkinler
tarafından kullanılmalıdır.
• Aygıt, üzeri kapatılarak olsa bile açık alanlara
kurulmamalıdır. Makinenin yağmur ve fırtınaya
maruz bırakılması son derece tehlikelidir.
• Ayaklarınız çıplakken cihaza dokunmayın.
• Cihazı fişten çekerken, daima fişi duvardaki
elektrik prizinden çekin, kablodan çekmeyin.
Kablosunu çekmeyin.
• Cihaz temizlenmeden veya bakım yapılmadan
önce su besleme musluğu kapatılmalı ve cihazın
şi mutlaka prizden çıkarılmalıdır.
• Makine arızalanırsa, hiçbir koşulda makineyi
kendiniz tamir etmeye çalışmayın ve makinenin
iç kısımlarına dokunmayın.
• Cihaza yaslanmayın, üzerine oturmayın: cihaz
devrilebilir.
• Kapak, tehlikeli bir engel yaratabileceği için açık
bırakılmamalıdır.
• Deterjan ve parlatıcıyı çocukların erişemeyeceği
bir yerde muhafaza edin.
• Ambalaj malzemeleri çocuklar tarafından oyuncak
gibi kullanılmamalıdır:
Elden Çıkarma
• Ambalaj malzemesinin elden çıkarılması:
paketlerin/ambalaj malzemelerinin yeniden
kullanılabilir olup olmadığına dair yerel yasaları
inceleyin.
• Atık Elektrikli ve Elektronik Ekipmanların (WEEE)
elden çıkarılması hakkında Avrupa birliği Direkti
2012/19/EU, elektrikli ev aletlerinin normal
evsel atıklar gibi elden çıkarılmaması gerektiğini
belirtmektedir. Hizmet ömrünü tamamlayan
cihazlar, makinenin içindeki malzemelerin yeniden
kullanılma ve geri dönüştürülme maliyetlerinin
optimize edilmesini sağlamak ve doğaya ya da halk
sağlığına zararlı etkileri önlemek amacıyla ayrı bir
şekilde toplanmalıdır. Üzeri çarpı işaretli çöp kovası
simgesi, bu atıkların ayrı bir şekilde toplanması
gerektiği konusunda o ürünün kullanıcılarını
uyarmak amacıyla tüm ürünlere konmaktadır.
Konutlarda kullanılan elektrikli cihazların doğru bir
şekilde elden çıkarılması konusunda ayrıntılı bilgi
edinmek için ilgili kamu kuruluşuna ya da yerel
bayinize başvurabilirsiniz.
Enerji tasarrufu ve Çevreye saygı
Su ve enerji tasarrufu
• Sadece bulaşık makinesi dolu olduğu zaman
yıkama devrini başlatın. Bulaşık makinesinin
dolmasını beklerken, sudan geçirme devrini
kullanarak istenmeyen kokuların oluşmasını
önleyin (
Yıkama Devirleri’ne
bakın).
• Yıkama devirleri tablosunu kullanarak bulaşıkların
kirlilik seviyesine ve bulaşık tipine uygun olan
yıkama devrini seçin:
- normal bulaşık seviyesindeki tabaklar için, düşük
enerji ve su tüketimi seviyelerini temin eden
Ekonomik yıkama devrini kullanın.
- Bulaşıklar normalden daha azsa, Yarım Bulaşık
seçeneğini etkinleştirin*
(bkz. Çalıştırma ve Kullanım).
• Elektrik tedarikçiniz indirimli elektrik tarifeleri
hakkında bilgi vermişse, yıkama devirlerini
elektrik fiyatlarının düşük olduğu zamanlarda
gerçekleştirin. Gecikmeli Çalıştırma düğmesi *
(bkz. Çalıştırma ve Kullanım)
yıkama devirlerinizi
buna göre düzenlemenize yardımcı olur.
Enzim içeren fosfatsız ve klorsuz deterjanlar
• Bu ürünler çevreye zararlı olduğu için fosfat veya
klor içeren deterjanları kullanmamanızı kesinlikle
tavsiye ederiz.
• Enzimler 50°C civarındaki sıcaklıklarda özel bir
etki sağlar ve bunun sonucunda enzim içeren
deterjanlar normal 65°C'lik yıkama devriyle aynı
sonucu elde etmek için düşük sıcaklıktaki yıkama
devirlerinde kullanılabilirler.
• Deterjanın boşa kullanılmasını önlemek için,
ürünü üretici önerilerine dayanan miktar, su
sertliği, bulaşık seviyesi ve çanak çömlek
miktarında kullanın. Toprakta çözünebilir olsalar
bile, deterjanlar doğanın dengesinde değişiklik
yapabilecek maddeler içerir.

TR
19
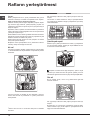
Kurulum
Bu kullanım kılavuzunu, gelecekte referans olarak
kullanmak üzere saklayın. Cihaz satılır, başka bir yere verilir
veya taşınırsa, lütfen yeni sahibinin içerisinde bulunan
açıklamalardan faydalanabilmesi için kılavuzun makineyle
birlikte verildiğinden emin olun.
Lütfen bu kullanım kılavuzunu dikkatle okuyun: Cihazın
güvenli bir şekilde montajı, kullanımı ve bakımı ile ilgili önemli
bilgiler içermektedir.
Cihazın taşınması gerekirse, dik konumda tutun, bu
kesinlikle zorunludur, yapılmazsa arkaya devrilebilir.
Bu aygıt, evde ve aşağıdaki gibi uygulamalarda kullanmak
için tasarlanmıştır:
- mağazalar, osler ve diğer çalışma ortamlarındaki personel
mutfağı alanları;
- çiftlik evleri;
- oteller, moteller ve diğer yerleşim türü ortamlarında
müşteriler tarafından ;
- oda ve kahvaltı türü ortamlarda.
Konumlandırma ve düzleştirme
1. Cihazdan tüm ambalaj malzemelerini sökün ve nakliye
sırasında hasar görüp görmediğini kontrol edin.
Hasar görmüşse, satıcıyla temasa geçin ve montaj işlemine
başlamayın.
2. Bulaşık makinesini yerine yerleştirerek her iki yanının
veya arka panelin bitişiğindeki dolaplar yada duvarla temas
edip etmediğini kontrol edin. Bu cihaz dolapsız bir mutfak
tezgahının altına da yerleştirilebilir
.*
(bkz. Montaj talimatı
sayfası)
.
3. Bulaşık makinesini, düz ve dayanıklı bir yüzey üzerine
yerleştirin. Yüzey düz değil ise cihazın ön ayağı, makine
yatay bir pozisyona gelene kadar ayarlanabilir. Cihaz düzgün
şekilde dengelenirse, daha sabit olacak ve çalışırken büyük
bir ihtimalle daha az hareket veya titreşim ve gürültüye neden
olacaktır.
4. Bulaşık makinesinin alt orta kısmında cihazın ön tarafından
* arka ayak yüksekliğini 8 mm'lik altıgen anahtarla ayarlayın.
Yüksekliği artırmak için saat yönünde, yüksekliği azaltmak
için saat yönü tersine çevirin.
Su ve elektrik bağlantılarının yapılması
Su ve elektrik tesisatına bağlantı sadece yetkili bir
teknisyen tarafından yapılmalıdır.
Bulaşık makinesi su hortumlarının veya elektrik
kablosunun üzerinde durmamalıdır.
Cihaz, su tesisatına yeni hortumlar kullanılarak
bağlanmalıdır.
Eski hortumları kullanmayın.
Su giriş ve çıkış hortumları ile elektrik kablosu, mümkün
olan en iyi montaj konumunu elde etmek için sağa veya sola
yerleştirilebilir.
Su giriş hortumunun bağlanması
• Uygun bir soğuk su bağlantı noktasına: hortumu
bağlamadan önce, suda bulunabilecek kirli maddelerin
cihazı tıkamaması için suyun iyice temizlenene kadar
akmasına izin verin, bu işlemi yaptıktan sonra, giriş
hortumunu ¾’lük vida dişi açılmış bir musluğa sıkı olacak
bir şekilde bağlayın.
• Uygun bir sıcak su bağlantı noktasına: bulaşık makineniz,
sıcaklığı 60°C’yi geçmeyecek şekilde elektrik kaynağından
gelen sıcak su ile beslenebilir (radyatörlü bir merkezi ısıtma
sisteminiz varsa).
Soğuk su şebekesine bağlantı için hortumu musluğa
tanımlandığı gibi bağlayın.
Giriş hortumu yeterince uzun değilse, uzman bir mağaza
veya yetkili bir teknisyenle temasa geçin
(Servis’e bakınız)
.
Su basıncı, Teknik Bilgiler Tablosu’nda gösterilen değer
aralığında olmalıdır
(yandaki bilgilere bakınız)
.
Hortum bükülmemeli veya sıkıştırılmamalıdır.
Su çıkış hortumunun bağlanması
Çıkış hortumunu (bükmeden) en az 4 cm çapa sahip bir pis
su borusuna bağlayın.
Çıkış hortumu, bulaşık makinesinin (A) bulunduğu zeminden/
yüzeyden yaklaşık 40-80 cm yüksekte olmalıdır.
Su çıkış hortumunu lavabo giderine bağlamadan önce plastik
tapayı sökün (B).
Su basmasına karşı koruma
Su baskınlarının meydana gelmesini engellemek için, bulaşık
makinesi:
- arıza veya cihaz içerisinden sızıntı olması durumunda su
teminini engelleyen özel bir sistemle donatılmıştır.
Bazı modellerde, New Acqua Stop
* (Yeni Su Durdurma)
olarak bilinen ve besleme hortumunun yırtılması durumunda
bile su basmalarına karşı koruma sağlayan destek güvenlik
cihazları da bulunmaktadır
.
* Yalnızca belirli modellerde bulunmaktadır.

TR
20
UYARI: TEHLİKELİ VOLTAJ!
Hiçbir suretle su giriş hortumu üzerinde elektrik bulunan
elektrikli parçaları taşıdığı için kesilmemelidir.
Elektrik bağlantısı
Fişi elektrik prizine takmadan önce şunları kontrol edin:
• Priz topraklanmış olup uygulanan tüm yönetmeliklere
uygundur.
• Priz, kapağın iç kısmında bulunan bilgi plakası üzerinde
belirtilen cihazın maksimum yüküne dayanacak güçtedir.
(Aygıtın tanıtılması başlıklı bölümü inceleyin)
• Güç kaynağı voltajı, kapağın iç kısmında bulunan bilgi
plakasının üzerinde belirtilen değerler içerisinde değişir.
• Priz, cihazın şi ile uyumludur. Uyumlu değilse, yetkili
teknisyenden şi değiştirmesini isteyin
(Yardım bölümüne
bakın)
; uzatma kablosu yada çoklu priz kullanmayın.
Cihazın kurulumu tamamlandıktan sonra güç kaynağı
kablosu ve elektrik prizi kolaylıkla ulaşılabilir bir yerde
olmalıdır.
Kablo bükülmemeli veya sıkıştırılmamalıdır.
Güç kaynağı kablosu zarar görmüş ise tüm potansiyel
tehlikelerin önlenmesi için kablo, imalatçı ya da Teknik Destek
Servisi tarafından değiştirilmelidir. (Servis’e bakınız)
Şirket, bu kurallara uyulmaması nedeniyle meydana gelen
hiçbir kazadan sorumlu tutulamaz.
Yoğunlaşma önleyici şerit*
Bulaşık makinesini kurduktan sonra kapağı açın ve bulaşık
makinenizi yoğuşma nedeniyle oluşan muhtemel sorunlardan
korumak için yapışkanlı bandı ahşap rafın altına yapıştırın.
İlk yıkama programı hakkında öneri
Kurulumdan sonra stoperleri raardan çıkarın ve varsa üst
raftaki elastik sabitleme elemanlarını da sökün.
Cihazın kurulumu tamamlandıktan sonra ve ilk yıkama
programını başlatmadan hemen önce tuz dağıtıcısını
tamamıyla su ile doldurun ve ancak bundan sonra yaklaşık
1 kg kadar tuz ekleyin
(Durulama maddesi ve işlenmiş
tuz başlıklı bölümü inceleyin)
. Su taşabilir: bu normal
bir durumdur, endişe etmeyin. Su sertliği değerini seçin
(Durulama maddesi ve işlenmiş tuz bağlıklı bölümü inceleyin)
.
- Tuz, makinenin içine döküldükten sonra, YETERSİZ TUZ
(LOW SALT) göstergesi*
sönecektir.
Tuz kabı dolu değilse, su yumuşatıcı ve ısıtma elemanı
bunun sonucunda hasar görebilir.
Makine, kumandanın gerçekleştiğini bildiren sesli/tonlu
sinyaller
(bulaşık makinesinin modeline göre
) ile donatılmıştır:
açma, devre sonu, vb.
Kumanda paneli/ekran üzerinde mevcut olan ışıklı semboller/
uyarı lambaları/ledler, renk, basış ya da sabit ışıklı olma
değişikliği gösterebilir.
(bulaşık makinesinin modeline göre)
.
Ekran, ayarlanan devre tipine, yıkama/kurutma fazına, kalan
süreye, sıcaklık derecesine vb... vb... ilişkin faydalı bilgiler
görüntülemektedir.
* Yalnızca belirli modellerde bulunmaktadır.
Teknik bilgiler
Boyutlar
genişlik 60 cm
yükseklik 85 cm
derinlik 60 cm
Kapasite 14 standart yer ayarı
Su şebeke
basıncı
0.05 ÷ 1MPa (0.5 ÷ 10 bar)
7,25 – 145 psi
Güç kaynağı
voltajı
Bilgi levhasına bakınız
Toplam
absorbe edilen
güç
Bilgi levhasına bakınız
Sigorta Bilgi levhasına bakınız
Bu bulaşık makinesi aşağıdaki
Avrupa Birliği Yönergelerine
uygundur:
-2006/95/EC (düşük voltaj)
-2004/108/EC (elektromanyetik
uyumluluk)
-2009/125/EC (AB Direkti
1016/2010) (Ecodesign)
-97/17/EC (Etiketleme)
-2012/19/AB
Atık Elektrikli
ve Elektronik Donanım (WEEE)
Sayfa yükleniyor...
Sayfa yükleniyor...
Sayfa yükleniyor...
Sayfa yükleniyor...
Sayfa yükleniyor...
Sayfa yükleniyor...
Sayfa yükleniyor...
Sayfa yükleniyor...
Sayfa yükleniyor...
Sayfa yükleniyor...
Sayfa yükleniyor...
Sayfa yükleniyor...
-
 1
1
-
 2
2
-
 3
3
-
 4
4
-
 5
5
-
 6
6
-
 7
7
-
 8
8
-
 9
9
-
 10
10
-
 11
11
-
 12
12
-
 13
13
-
 14
14
-
 15
15
-
 16
16
-
 17
17
-
 18
18
-
 19
19
-
 20
20
-
 21
21
-
 22
22
-
 23
23
-
 24
24
-
 25
25
-
 26
26
-
 27
27
-
 28
28
-
 29
29
-
 30
30
-
 31
31
-
 32
32


Hotpoint LFF 8M121 B EU Kullanici rehberi
- Kategori
- Bulaşık makineleri
- Tip
- Kullanici rehberi
diğer dillerde
- English: Hotpoint LFF 8M121 B EU User guide