
Model No: K 010 CooKing
Düdüklü Tencere
Kullanma Kılavuzu / Instruction Manual
K 010 - K 011
CooKing
DÜDÜKLÜ TENCERE
PRESSURE COOKER

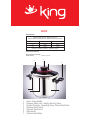
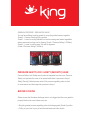
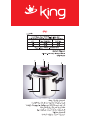
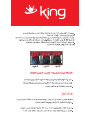
PARÇALARI
1. Açma/Kapama kolu
2. Emniyet ventili
3. Kademeli Basınç Ayar Ventili (Buhar Boşaltma Kanalı)
4. Paslanmaz çelik kelepçe
5. Paslanmaz çelik kapak
6. Yan sap
7. Paslanmaz çelik gövde
1
2
3
6
5
4
7
22 cm.
7 lt.
Max Çalıştırma Basıncı : 0,80 bar
Azami Güvenlik Basıncı : 1,10 bar
5 lt.
Kapasite Gövde içi
Paslanmaz Çelik 18 /10 Cr-NI gövde ve kapak
Paslanmaz çelik ve alüminyumdan mamul kapsül taban
Gövde Tabanı
18 cm.
Direktif Standart: 97/23 AT - TS 445 EN 12778
18 cm.22 cm.
ÜRÜN ÖZELLİKLERİ

BAKIM, ONARIM VE KULLANIMDA UYULMASI GEREKEN
KURALLAR
■
Düdüklü tencerenizi amacı dışında kullanmayınız.
■
Pişirme sonrası buharı tamamen boşalmamış basınç altındaki düdüklü
tencerenizi sadece yan saplarından tutarak dikkatli taşıyınız.
■
Düdüklü tencerenizi hiçbir zaman zorlayarak açmayınız, iç basıncının düşmüş
olduğundan emin olduktan sonra açınız.
■
Düdüklü tencerenizi içinde sıvı olmadan asla kullanmayınız. Bu durum ciddi
yaralanmalara ve hasarlara neden olabilir.
■
Düdüklü tencerenizi 2/3 den fazla doldurmayınız.
Pirinç, kompostolar ve suyu alınmış sebzeler gibi pişirme esnasında genleşen
besinler için düdüklü tencerenizi yarıya kadar doldurun, kesinlikle daha fazla
doldurmayınız.
■
Uygun ısı kaynakları kullanınız.
■
Bezelye gibi besinlerin kapak açılınca dışarı sıçramaması için düdüklü
tencerenizi hafifçe salladıktan sonra kapağını açınız.
■
Düdüklü tencerenizi basınç altında yağ ile patates kızartmak gibi amaçlar için
kullanmayınız.
■
Her kullanım öncesi ventillerin tıkalı olmadığından emin olunuz.
■
Temizlik ve bakım talimatları dışında, düdüklü tencerenin güvenlik tertibatlarına
müdahale etmeyiniz.
■
Düdüklü tencerenizi açmadan önce basıncın tamamen çıkarılmış olduğundan
emin olun.
■
Düdüklü tencerenizi asitli ve tuzlu yiyecekleri saklamak için kullanmayınız.
*ilk kullanımdan önce düdüklü tencerenizin kapağını, contasını ve gövdesini
bulaşık deterjanı ile bol sıcak suda yıkayınız.

Kapak açma/kapama
■
Kapak Açma:
Düdüklü tencerenizin devrilmeyecek şekilde düz bir yüzey üzerine oturmasına
dikkat ederek,kapak üzerindeki açma/kapama kolunu yine kol üzerinde gösterilen
açma yönünde döndürerek açınız. Tencerenizin kapağını açmak için asla kuvvet
uygulamayınız.
■
Kapak Kapatma:
Düdüklü tencerenizin devrilmeyecek şekilde düz bir yüzey üzerine oturmasına
dikkat ederek, kapak üzerindeki açma/kapama topuzu yine kapak üzerinde
gösterilen kapatma yönünde döndürerek kapatınız.
Düdüklü Tencerenin Doldurulması
Düdüklü tencerenizi kesinlikle susuz çalıştırmayınız. Çalıştırma esnasında
minumum 2 baıdak (25 d) maximum gövde yüksekliğinin 2/3 üne kadar su ile
doldurularak çalıştırılmalıdır.
DİKKAT: Pirinç, suyu alınmış sebzeler veya kompostolar gibi pişirme sırasında
genleşen besinler için, düdüklü tencerenizi yarı yüksekliğin yukarısında
doldurmayınız.
Kademeli basınç sıyan ventili
Kademeli basınç ayarını kullanarak farklı pişirme hızları elde edilebilir.
Kademe 0: Basınç Tahliye kademesi (Basınç yok)

Basınç emniyet kilidi / Emniyet ventili
Basınç Emniyet Kilidi/Emniyet güvenlik ventili kapak üzerine entegre olarak
yerleştirilmiştir.Basınç Emniyet kilidi tencere içerisinde basınç varken kapağın
açılmasına engel olur.
Emniyet Ventili ise herhangi bir nedenle kademeli basınç ayar ventilinin
tıkanması halinde devreye girerek tencere içerisinde oluşan basıncı tahliye
eder.
Pişirme öncesi;
Her kullanım öncesi kapak üzerindeki buhar boşaltma kanalının tıkalı
olmadığından, kapak contasının kapağa düzgünce takılı olduğundan emin
olunuz.
• Kademeli basınç ayar ventilini basınç tahliye kademesi (Kademe 0 Konumu)
getiriniz.
• Tencerenize önce pişireceğiniz yiyecekleri koyunuz daha sonra üzerine
su ve diğer sıvıları ilave ediniz.
Kademe 1: Nazik gıdalar, örneğin bazı yeşil yapraklı
sebzeler, vitamin koruyucu amaçlı pişirmeler ve buz çözme maksatlı pişirmelerde
kullanılır.
(1 .Kademe Basınç Ayarı 0,65 Bar)
Kademe 2: Et, balık, kuru bakliyat gibi yiyecekleri pişirmede kullanılır.
(2.Kademe Basınç Ayarı 0,80 Bar)
Kademe 0 Kademe 1 Kademe 2

Pişirme esnasında;
Düdüklü tencerenizin içindeki basınç yeterli seviyeye ulaştığında basınç
göstergesi yukarı kalkar. Basınç göstergesininin yukarı kalktığını göz ile
görebilirsiniz. Kademeli basınç ayar ventilinden düzenli olarak buhar sesi çıkmaya
başladığında ısı kaynağının şiddetini azaltın Yemeğinizin pişmesi için yemek
kitaplarında belirtilen pişirme süresi kadar bekleyiniz.
• Pişirme sırasında kademeli basınç ayar ventilinden düzenli olarak
ıslık sesi çıkmasına dikkat edin. Yeterli buhar yoksa ısı kaynağını biraz
şiddetlendirin ve düzenli ıslık sesi çıkmasını sağlayın.
KADEMELİ BASINÇ AYAR VENTİLİNDE TAHLİYE EDİLEN
BUHAR AŞIRI SICAKTIR!
1. Yavaşça Basınç Tahliye Etme: Kademeli basınç ayar ventilini basınç
tahliye kademesine alarak basınç göstergesi tamamen inene kadar beklenir.
Basınç tamamen düşünce tencerenin kapağını açabilirsiniz.
2. Hızlıca Basınç Tahliye Etme: Düdüklü tencerenizi akan soğuk musluk suyu
altında tutarak basınç göstergesinin hızlı bir şekilde aşağı düşmesini
sağlayınız. Basınç göstergesi aşağıya düştüğünde düdüklü tencereniz artık
basınç altında değildir.
• Düdüklü tencerenizin kapağını contanın düzgün takılı olduğundan emin
olarak hafifçe bastırarak tencere üzerine yerleştiriniz.
• Kapak üzerindeki açma/kapama koluyla kapağı kapatınız. Bu işlem sırasında
kelepçelerin tamamen kapandığından emin olunuz.
• Düdüklü tencerenizi en yüksek ayara getirilmiş bir ısı kaynağı üzerine
koyarak pişireceğiniz malzemenin özelliğine göre kademeli basınç ayar
ventilini Kademel veya Kademe2 konumuna alınız.

TEMİZLİK VE BAKIM
Düdüklü tencerenizden en iyi verimi alabilmek ve güvenli çalışmasını sağlamak
için her temizlik sonrası bakım kurallarını uygulayınız.
Gövdenin Temizlenmesi:
• Düdüklü tencerenizi bulaşık makinasında yıkayabilirsin
• Eğer elde yıkamak isterseniz gövdenin dışını yumuşak bir süngerle yıkayınız.
Sert cisimler ve ovma tozları kullanmayınız. Aksi durumda parlak yüzeylerde
çizilmeler oluşur.
• Düdüklü tencerenizin iç kısmını normal bulaşık süngeri ile yıkayabilirsiniz.
• Yıkama sonrası dış yüzey ve iç yüzey kuru bir bezle silinerek kurulanmalıdır.
Kapağın Temizlenmesi:
Düdüklü tencerenizin kapağını bulaşık makinasında yıkayabilirsiniz. Yıkama
öncesi ve sonrası kapak üzerinde bulunan kademeli basınç ayar ventil kapağını
yerinden çıkararak buhar boşaltma kanalının deliklerinin içerisine girmesi
muhtemel yemek artıklarını iğne veya kürdan kullanarak temizleyiniz. Yine
kademeli basınç ayar ventil kapağımda temizleyiniz. Kademeli basınç ayar ventil
düğmesini yerinden çıkarmak için düğmeyi önce basınç tahliye kademesine alınız.
Daha sonra hafifçe yukarı çekerek saat yönünün tersi istikametinde çevirerek
döndürünüz. Döndürme işlemi sırasında çekerek çıkarınız. Parçayı ve iç
yüzeylerini akar su altında temizleyerek ventil düğmesini tekrar yerine takınız.
Yine düdüklü tencere kapağının iç yüzeyinde bulunan Basınç Emniyet Kilidi /
Emniyet (Güvenlik) Ventili her kullanım sonrası iyice temizlenmelidir. Temizlik
işlemi için bu parçalar kesinlikle sökülmemelidir. Bu aksam akan su altında el ile
temizlenmeli, temizlik işlemi esnasında parçanın çalışıp çalışmadığı el ile kontrol
edilmelidir.
Kademeli basınç ayar ventilini basınç tahliye kademesine alarak düdüklü
tencerenizin kapağını açabilirsiniz. Fakat bu işlemde dikkatli olmak gerekir.
Çünkü sıcak tencereyi suyun altına koyarken saate su kaçırabilir veya sıcak
buhardan dolayı bir yerinizi yakabilir ya da ürünü sıcak olduğu için iyi tutamayıp
düşürebilirsiniz.

KAPAK İÇİNDEKİ VİDALARI ASLA SÖKMEYİNİZ.
Kapak Contasının Temizlenmesi:
• Her pişirme sonrası contayı ve conta yuvasını temizleyiniz. Contayı tekrar
yerine takınız. Contayı yerine takarken kapaktaki tırnaklara düzgün
yerleştiğinden emin olunuz.
• Düdüklü kapak contasını her yıl düzenli olarak orijinali ile değiştiriniz.
DÜDÜKLÜ TENCERENİZİN SAKLANMASI VE KORUNMASI
Kullanmadığınız zaman tencere kapağını tencere üzerine kuru vaziyette ve ters
olarak yerleştiriniz. Bu sayede kapak contasının ömrünü uzatmış olursunuz.
KULLANIM TAVSİYELERİ
• Basınç göstergesi yükseldikten sonra düdüklünüzün kapağını açamazsınız.
Asla açmak için zorlamayınız.
• Emniyet ventili seviyesinde hafif bir buhar sızması normaldir
• Basınç çıkarma sırasında buhar püskürtmesine karşı dikkatli olunuz.
• Düdüklü tencereyi taşımak için, gövdenin iki sapını beraber kullanın.
• Sıcak olabilecek yüzeylere el sürmeyiniz. Pişirme esnasında tencerenin
dış yüzeyine kesinlikle el sürmeyiniz.
• Düdüklü tencerenizi besinleri uzun süre muhafaza etmek için kullanmayınız.
• Temizlik için çamaşır suyu veya klor ihtiva eden temizlik malzemeleri
kullanmayınız. Bunlar paslanmaz çeliğin kalitesini bozabilir.
• Güvenlik subabını ve contayı temizlemek için kesici veya delici aletler
kullanmayınız.
• Düdüklü tencere kapak contasını her yıl düzenli olarak değiştiriniz.
• Düdüklü tencerenizin temizliğini mutlaka soğuk ve boş iken yapınız.
• Kapakların içindeki vidaları asla sökmeyiniz gevşetmeyiniz.
• Her zaman düdüklü tencerenizin modeline uygun conta kullanınız.

PARTS
1. Open / Close Handle
2. Pressure Safety Lock / Safety (Security) Valve
3. Gradual Pressure - Regulating Valve / Steam Relief Drain
4. Stainless Steel Clamp
5. Stainless Steel Cover
6. Side Handle
7. Stainless Steel Body
1
2
3
6
5
4
7
22 cm.
7 lt.
0.80 bars 1.10 bars
STANDART INFORMATION
Max. Operating Pressure Max.
Safety Pressure
5 lt.
Capacity Inner body (diameter)
(Stainless Steel 18/10 Cr.-Ni Body and cover)
(Capsule bottom manufactured from stainless steel and aluminum)
Body bottom
18 cm.
Directive - Standard : 97/23 AT - TS 445 EN 12778
18 cm.22 cm.
SPECIFICATION

MAINTENANCE, REPAIR AND USAGE RULES
■
Keep your pressure cooker out of reach of children and use carefully while
children are around.
■
Do not use your pressure cooker for the wrong purposes.
■
Handle your pressure cooker carefully only by holding the side handles after
cooking.
■
Do not use any force to open your pressure cooker. Open the cover after
ensuring that the inner pressure is decreased.
■
Do not use your pressure cooker without any liquid in it. This may cause serious
injuries and damages.
■
Do not fill your pressure cooker more than 2/3. Please fill your pressure cooker
in half for food that expands during cooking process such as rice, compotes and
dehydrated vegetables and ensure that your pressure cooker is not filled more
than half.
■
Use appropriate heating resources.
■
In order to prevent the spreading of several food such as peas, slightly shake
your pressure cooker before opening the cover.
■
Do not use your pressure cooker to fry potatoes under pressure.
■
Please ensure that the valves are not clogged before each use.
■
Do not intervene with the safety appliances of the pressure cooker other than
cleaning and maintenance instructions.
■
Please ensure that the pressure is completely discharged before you open the
cover of your pressure cooker.
■
Do not use your pressure cooker to store your salty and acidic food.

OPENING / CLOSING THE COVER OF PRESSURE COOKER
■
Opening the Cover:
Please ensure that your pressure cooker is on a flat surface to prevent any tilting
and open the cover by turning the open/close handle to the opening direction
which is shown on the same handle. Never use any force to open your pressure
cooker.
■
Closing the Cover:
Please ensure that your pressure cooker is on a flat surface to prevent any
tilting and close the cover by turning the open/close knob to the closing
direction which is shown on the same handle.
FILLING THE PRESSURE COOKER
Do not operate your pressure cooker without water. During operation a
minimum of 2 cups (25 cl) of the maximum body height of 2/3 filled with water
to be run.
ATTENTION: Do not fill your pressure cooker more than the half of its body
height for food that expands during cooking process such as rice, dehydrated
vegetables and compotes.
GETTING STARTED
* Soak your pressure cooker’s cover, gasket and body with dishwashing liquid
in warm water before your first use.

PRESSURE SAFETY LOCK / SAFETY (SECURITY) VALVE
Pressure Safety Lock/ Safety security valve is integrated over the cover. Pressure
Safety Lock prevents the cover to be opened while there is pressure is the pot.
Safety (Security) Valve becomes active if the pressure regulating valve is stuck
for some reason and discharges the pressure in the pot.
BEFORE COOKING
Please ensure that the steam discharge drain is not clogged and the cover gasket is
properly fixed on the cover before every use.
• Bring the gradual pressure regulating valve to discharge grade (Grade 0) position.
• Firstly, put your food in your pot and then add water and other liquids.
GRADUAL PRESSURE - REGULATING VALVE
You can have different cooking speeds by using the gradual pressure regulator.
Grade 0 : Pressure Discharge (No pressure)
Grade 1 : Is used in cooking delicate food such as some green leaved vegetables,
vitamin preserved cooking and for thawing. (Grade 1 Pressure Setting 0, 65 Bars)
Grade 2 : is used in cooking meat, fish and dry legumes .
(Grade 2 Pressure Setting 0, 80 Bars)
Grade 0 Grade 1 Grade 2

DURING COOKING;
• When the pressure in your pressure cooker reaches a sufficient level, the
pressure indicator will stand on. You can see the indicator standing with your
eyes.
• When the gradual pressure regulating valve starts making a PSSST sound,
lower the intensity of heat source.
• Please wait as long as it is stated on a cook book in order your food to be
cooked.
• Please ensure that the gradual pressure regulating valve is regularly whistling
during cooking process. If there is not enough steam, then increase the
intensity of the heat source and ensure that there is a regular whistling.
AFTER COOKING
• Turn the heat off when cooking process is over.
• There are two options to release the steam after turning the heat off
1 - Releasing pressure out slowly: Bring the gradual pressure regulating valve
to pressure discharge grade and wait until the pressure indicator is completely
dropped. When the pressure is dropped completely, you can open the pressure
cooker’s cover.
2 - Releasing pressure out quickly: Put your pressure cooker under cold
running tap water and ensure the pressure indicator to be dropped down quickly.
• Place you pressure cooker’s cover over the pot by slightly pressing it
ensuring the cover gasket is properly fixed.
• Close the cover by using the open/close handle on the cover. Please
ensure that the clamps are completely closed during this process.
• Put your pressure cooker over a heat source that is set to the highest
temperature and set the gradual pressure regulating valve to Grade 1 or
Grade 2 depending the ingredients you cook.

CLEANING AND MAINTENANCE
In order to get the best efficiency and ensure safe operation, please apply the
maintenance rules after each cleaning.
Cleaning the body :
• You can wash your pressure cooker in the dishwasher.
• If you want to hand wash, use a soft sponge on the outer side of the body. Do
not use hard equipment and scouring powder. Otherwise there will be
scratches on the shiny surface.
• You can use a regular washing sponge while washing the inner side of your
pressure cooker.
• Both outer and inner surfaces should be wiped off to dry with a dry dishcloth.
Cleaning the cover:
You can wash your pressure cooker’s cover in the dishwasher.
Take the gradual pressure regulating valve cover off before washing and clean the
possible food resi¬dues that may stuck within the steam discharge holes by using
a needle or toothpick. Also clean the gradual pressure regulating valve cover. In
order to take the gradual pressure regulating valve pin off, bring the pin to steam
discharge grade. Then turn it on the counterclockwise while pulling slightly up in
the same time and take it off while turning. Clean the part and its inner sides under
running water and assemble the valve pin back in its place after washing.
The pressure safety lock/Safety (Security) Valve that is inside the pressure
cooker’s cover should be properly cleaned after each use. These parts should
never be disassembled for cleaning. These equipment should be hand cleaned
under running water and the equipment should be checked by hand for whether it
works or not
YOU NEVER REMOVE COVER SCREWS IN.
When the indicator is dropped then your pressure cooker will no longer be under
pressure. You can open the cover of your pressure cooker by bringing the gradual
pressure regulating valve to pressure discharge grade.

Cleaning the Cover Gasket :
• Clean the gasket and the gasket hole after each cooking. Place the gasket
back in its place. Pay attention to fit the gasket properly in the cams that are
on the cover.
• Change the whistle cover gasket with a new original one regularly each
year.
KEEPING AND PRESERVING YOUR PRESSURE COOKER
Keep the cooker’s cover dry and upside down on top of the pot while not using.
Thus you will extend the cover gasket’s lifetime.
ADVISES TO USE
• The pressure cooker should be used carefully and under strict monitoring
while children are around.
• You cannot open the cover of your pressure cooker after the pressure
indicator is risen. Do not apply force to open.
• A slight steam leakage on the Safety (Security) Valve level is normal.
• Watch out for steam burst during pressure release process.
• Use both handles of the body while carrying your pressure cooker.
• Do not touch the possible hot surfaces. Do not touch the outer surface of
the pot during cooking process.
• Do not use your pressure cooker to preserve your food for long periods.
• Do not use bleach or chlorine based cleaning products for cleaning. Such
products may corrupt the quality of stainless steel.
• Do not use sharp objects while cleaning the safety valve and the gasket.
• Change the pressure cooker cover gasket regularly each year.
• Always clean your pressure cooker with cold water and when it is empty.
• Do not disassemble or loosen the screws inside the covers.
• Read user’s guide carefully before using your pressure cooker. Do not let
anyone to use this pot unless they read the user’s guide or have any
cooking with pressure cooker experience.
• Do not use the pressure cooker for wrong purposes.
• Always use the appropriate gasket for your pressure cooker’s model.
• If there are any cuts or deformation in the gasket change it immediately with
a new original one.
• If there are white spots on the bottom of your pot after first cooking, this
may be caused by the lime amount in the water you used. You can clean
this spots by using vinegar or a descaling agent.


Sayfa yükleniyor...
Sayfa yükleniyor...
Sayfa yükleniyor...
-
 1
1
-
 2
2
-
 3
3
-
 4
4
-
 5
5
-
 6
6
-
 7
7
-
 8
8
-
 9
9
-
 10
10
-
 11
11
-
 12
12
-
 13
13
-
 14
14
-
 15
15
-
 16
16
-
 17
17
-
 18
18
-
 19
19
-
 20
20
-
 21
21
-
 22
22
-
 23
23


King CooKing K 011 Kullanım kılavuzu
- Tip
- Kullanım kılavuzu
- Bu kılavuz aynı zamanda aşağıdakiler için de uygundur:
diğer dillerde
- English: King CooKing K 011 User manual