Bahco BBA1224-3200 Kullanım kılavuzu
- Kategori
- Pil şarj cihazları
- Tip
- Kullanım kılavuzu

English ................................. Page 02
Français ............................... Page 18
Español ...........................Página 34
Português ............. Página 50
Italian o ..............................Pagina 66
Deutsch ...............................Seite 82
Neder lands ............Pagina 98
Polski ................................. Strona 114
Svensk a ......................... Sidan 130
Dansk ................................... Side 146
Norsk ..................................... Side 162
Suomi ...................................... Sivu 178
Русский
...............
Страница
194
Türkçe ................................ Sayfa 210
Český
................................. Strana 226
Slovenský
.................Strana 242
Ελληνικά
.....................
Σελίδα
258
Magyar ..............................Oldal 274
BBA1224-3200
BBA1224-3200-CHG

• 2 •
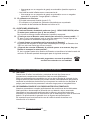
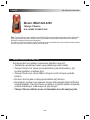
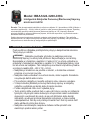
ENGLISH Instructions for use
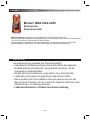
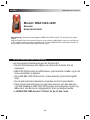
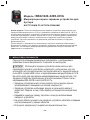
Model: BBA1224-3200
Booster
OWNER’S MANUAL
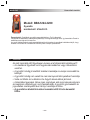
Summary: Congratulations with the purchase of your Booster. You made the right choice !
Chosen by the professionals all over the world for its power and reliability, it will bring you an
incomparable pleasure of use.
To prolong the lifetime of your new Booster and use it safely, we invite you to read and follow
the recommendations of this user’s manual.
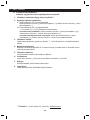
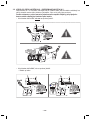
1. CAUTION
Read attentively the user manual before rst use !!!
• Failure to comply with the instructions can lead to damages or an explosion.
• Always use the Booster in well ventilated areas, and wear eye protection
and gloves.
• Always use the Booster in a non conductive and non polluting atmosphere.
• Never charge or jump-start a vehicle with a frozen battery.
• This equipment may not be used by children or by those who can not read
and understand the manual. Store, use and charge the Booster out of the
reach of children and unauthorized persons.
• Recharge your Booster after receipt 24 hours before using.

• 3 •
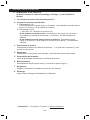
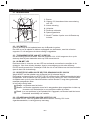
2. GENERAL INFORMATION
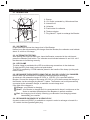
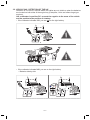
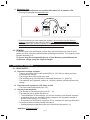
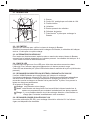
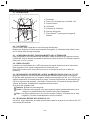
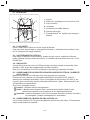
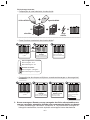
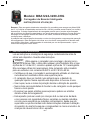
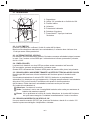
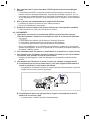
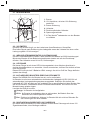
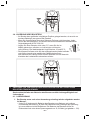
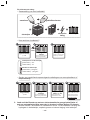
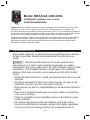
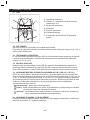
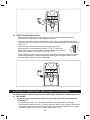
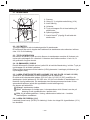
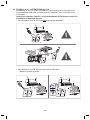
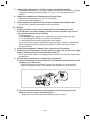
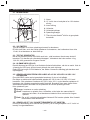
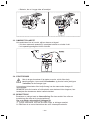
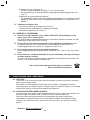
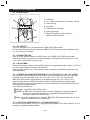
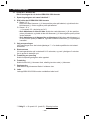
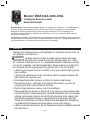
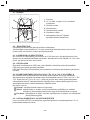
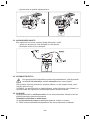
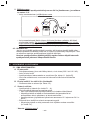
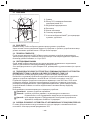
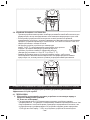
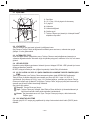
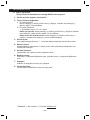
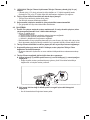
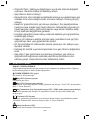
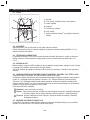
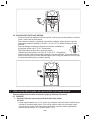
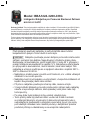
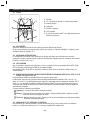
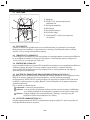
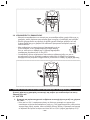
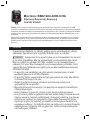
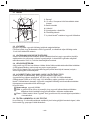
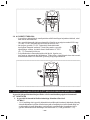
2.1. DESCRIPTION
1. Buzzer
2. 12V Outlet, protected by 16A external fuse
3. Internal fuse
4. Voltmeter
5. Push button for voltmeter
6. Tension selector
7. Plug Neutrik
®
4 pole to recharge the Booster
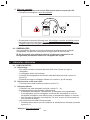
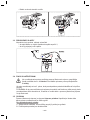
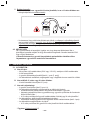
2.2. VOLTMETER
Press the button to show the charge level of the Booster.
Half an hour after disconnecting the charger from the Booster, the voltmeter must indicate
about 13 volt for a full charge.
2.3. ALTERNATOR TESTING
After starting the engine at 2000 rpm, leave the Booster connected to the vehicle and
press the voltmeter push button. The voltmeter must indicate between 14 and 14,4 volt if
the alternator is functioning correctly.
2.4. LED CLAMP
The blue clamp is provided with a LED to avoid wrong connections in the darkness.
To light the LED, push simply on the red push-button.
This LED is supplied by 3 LR44 batteries placed in the handle of the clamp (on the push-
button’s size).
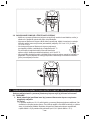
2.5. RECHARGE THE BOOSTER USING THE AC 230V OR 110V/DC 12V CHARGER
NEVER wait until the Booster is completely discharged before recharging.
An electronic full automatic charger AC 230V or 110V/DC 12V is provided with the
Booster. Connect the charger to the sector AC 230V or 110V, then connect the charger to
the Booster via the recharge plug Neutrik
®
4 poles. The Booster can be left permanently
connected to the automatic charger, to maintain correct charge level.
If the light of the charger is:
Orange: your Booster is charging.
Green: your Booster is charged but it is recommended to leave it continuous on the
sector to maintain the batteries of the Boosters in perfect condition.
Red: the charging circuit is faulty. Warning: your Booster is not charging,contact
immediately your reseller.
2.6. RECHARGE ON BOARD OF A VEHICLE 12V
A male to male cord (DC/DC) is available on request in order to recharge on board of a
12V vehicle via the cigarette-lighter plug.

• 4 •
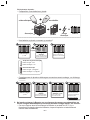
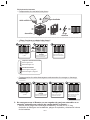
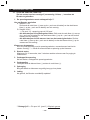
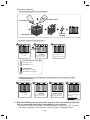
3. INSTRUCTION MANUAL
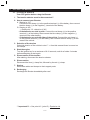
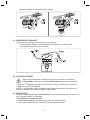
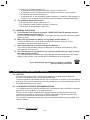
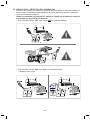
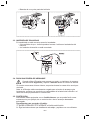
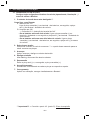
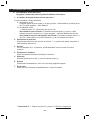
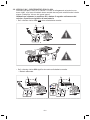
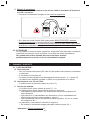
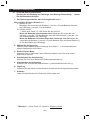
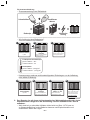
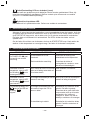
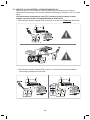
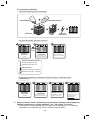
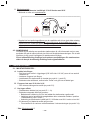
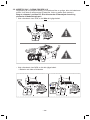
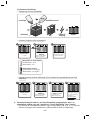
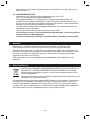
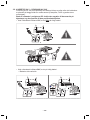
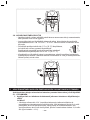
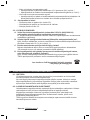
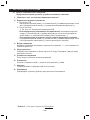
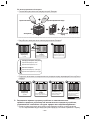
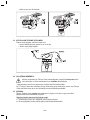
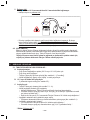
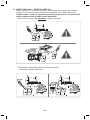
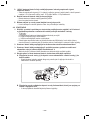
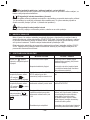
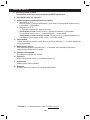
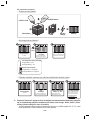
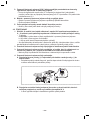
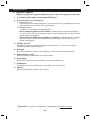
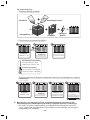
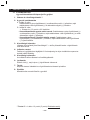
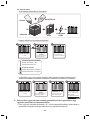
3.1. TO START A VEHICLE
Turn OFF ignition before using the Booster.
1. The tension selector must be disconnected !**
2. How to connect your Booster
A. Starting in 12V
Connect the red clamp (+) to the positive terminal (+) of the battery, then connect
the blue clamp (-) to the negative (-) terminal of the battery.
B. Starting in 24V
-> Read point 3.2.: detection of 24V
• If the batteries are side by side: Connect the red clamp (+) to the positive
terminal (+) of the battery, then connect the blue clamp (-) to the negative (-)
terminal of the other battery.
• If the batteries are on both sides of the vehicle: Connect the red clamp (+)
to the positive terminal (+) of the battery, then connect the blue clamp (-) to the
mass of the vehicle.
3. Selection of the tension
Select the tension of the vehicle to start ** -> from this moment there is current on
the clamps.
4. Start the engine
Turn the ignition key for a maximum of 8-10 seconds, wait for a further 3 minutes
before attempting to start again.
5. Disconnection of the tension
After starting, disconnect the tension selector.
6. Disconnection
Disconnect the blue (-) clamp rst, followed by the red (+) clamp.
7. Storing
Return the cables and clamps to their support posts.
8. Recharging
Recharge the Booster immediately after use !
** Importantt !!! -> See point 4.2. (point 5.): Explosion risk

• 5 •
2B 2B
3
4
5
6
7
8
2A1

• 6 •
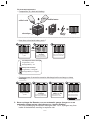
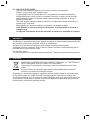
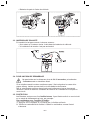
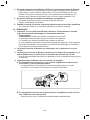
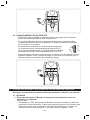
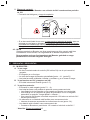
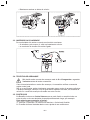
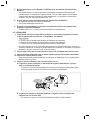
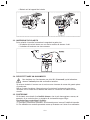
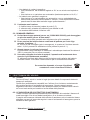
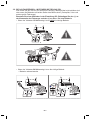
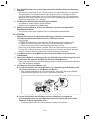
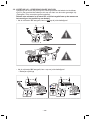
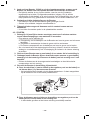
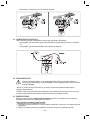
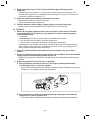
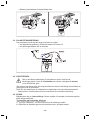
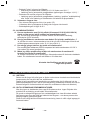
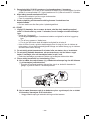
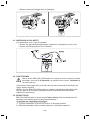
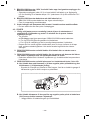
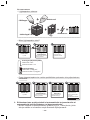
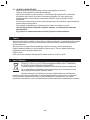
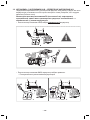
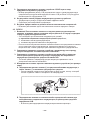
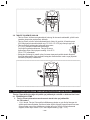
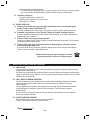
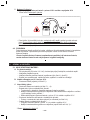
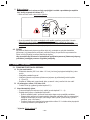
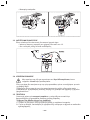
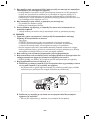
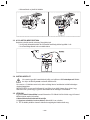
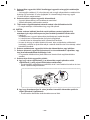
3.2. VEHICLE 24V - DETECTION OF THE 24V
Detection of 24 volt on a vehicle where the cables are not visible or when the batteries
are located on both sides of the engine bay (Caterpillar, Volvo and others large type
engines).
Use a voltmeter in position DC: connect the negative to the mass of the vehicle
and the positive to the positive of a battery.
• If the voltmeter indicates 12V, you are not on the right battery.
• If the voltmeter indicates 24V, you are on the right battery.
– Batteries side by side
24V1 2V
Fuse
Fuse

• 7 •
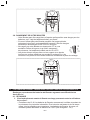
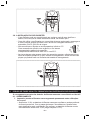
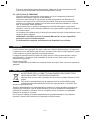
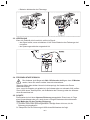
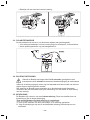
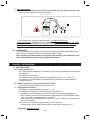
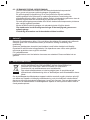
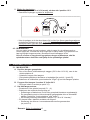
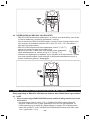
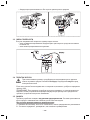
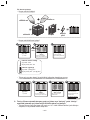
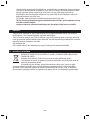
– Batteries located on both sides of the vehicle
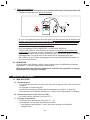
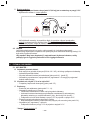
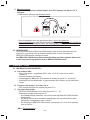
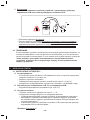
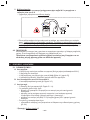
3.3. INVERSION OF POLARITY
If the polarity is not right, the buzzer will give a signal:
– if the remaining voltage, in the batteries of the vehicle, is at least 4 volt.
– if the tension selector is not connected.
3.4. STARTING ATTEMPT
When using the Booster to start an engine, do not crank for more than
8-10 seconds, and wait for a further 3 minutes before a second attempt.
If after the 3
rd
attempt the engine does not start, it may be necessary to identify a
further cause for the breakdown.
NOTE: If your Booster is fully charged but the starter turns slowly, the vehicle’s or
Booster’s battery may need checking for short circuit.
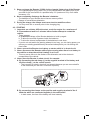
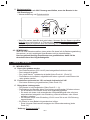
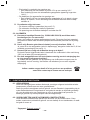
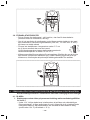
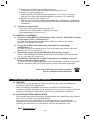
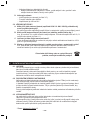
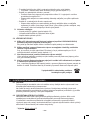
3.5. PROTECTION
Boosters are equipped with an internal fuse. It can melt following a short circuit or a
too long start attempt, for example.
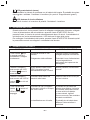
Two methods to control the fuse:
1. Push on the voltmeter, if it does not deviate, the fuse is melted.
2. This can be determined by checking it like the example below.

• 8 •
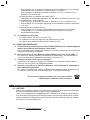
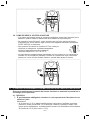
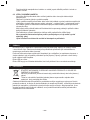
3.6. STORAGE OF YOUR BOOSTER
– The Booster can be stored in any position, without any danger for the batteries,
because those are dry batteries, pure lead.
– When not using the Booster for long periods of time, recharge the unit with the
original automatic electric 230V or 110V AC /12V DC charger every three months
for 48 hours.
– Do not store your Booster below 0°C (32° Fahrenheit) if you want
to use it urgently. Too cold, the Booster will miss performance.
The ideal operating temperature is between 10 to 25°C
(50 to 77° Fahrenheit).
– Clamps must be stored on their support posts, ensuring they do not come to
contact with any metallic surface. During charge there is current on the clamps and
you will melt the contacts (poles) in the charging plug.
4. PREVENTING PREMATURE FAILURE OF YOUR BOOSTER’S BATTERIES
Correctly recharging the Booster batteries, increases its efciency and its lifetime !
4.1. RECHARGING
1. The Booster must be imperatively put on permanent charge between use.
è Why ?
– Below 12,4V, the Booster batteries will start to sulphate and irreversible lose
performance. The lower the voltage, and the longer the time spent in a discharged
state, the deeper the sulphation. When not in use, the Booster batteries must
never drop below 12,4V (well-charged = 13V).

• 9 •
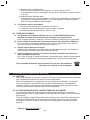
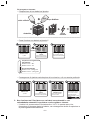
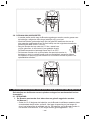
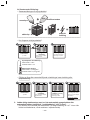
è Illustrated explanation:
– Composition of a lead-acid battery:
1/4
3/4
lead
baeryelectric
charge
sulfuric acid
electrolyte
dislled water
– How does a lead-acid battery work ?
recharge
=
Return of the acid into the water
Eliminaon of the lead sulfate
charged baery
+/- 13V
Lead
sulfate
The acid is aracted by the
lead: forming of lead sulfate
start
=
discharge
1
2 3
Density of the electrolyte
charged baery : 1.28 kg/dm³
discharged baery : 1.15 kg/dm³
Frost temperature of the electrolyte
charged baery : -40°C
discharged baery : -6°C
– Consequences of several successive discharge before recharge or deep
discharge:
charged baery
+/- 13V
The acid is aracted by the
lead: forming of lead sulfate
start
=
discharge
1
2
Acid erodes the lead
Accumulaon of sulfate
deeply discharged
baery +/- 11V
3
Return of the acid into the
water Traces of acid and
sulfate on the lead plates
recharged baery
irreversible damage
= loss of power
4
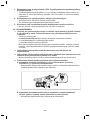
2. Never recharge the Booster on a non-automatic garage charger or on an
automatic charger set on « fast charge » or « boost » position.
– You risk overcharging the Booster and higher than 14,7V, hydrogen may form
inside of the batteries, resulting in explosion risk.

• 10 •
3. Never recharge the Booster 12/24V via the cigarette lighter plug of the Booster.
– The cigarette lighter plug (outlet 12V) is only connected to one battery and is just
provided for the connection of a portable lamp 12V (maximum 16A) or all others
accessory 12V.
4. Never completely discharge the Booster’s batteries.
– The batteries of your Booster do not have a memory effect.
– Danger of irreversible sulphatation.
5. During the charge, the clamps must never touch a metallic surface.
– You may melt one or several poles in the charging plug.
4.2. STARTING
1. Important: on vehicles difcult to start, crank the engine for a maximum of
8-10 seconds and wait for 3 minutes before further attempt to restart the
vehicle.
– Three reasons:
a. To allow the voltage of the Booster batteries to build up again.
b. To allow the renewal of gasses inside the batteries.
c. To allow the internal components of the batteries to cool down.
– If you do not wait and/or the starting attempt is too long, you risk losing power, you
reduce your starting possibilities by the second attempt and you risk melting the
fuse inside.
2. Never connect the Booster to a battery or starter which is in short-circuit.
3. Never disconnect the Booster while engine running when there is no battery in
the vehicle or when the vehicle’s battery is at 0 volt.
– This may cause failure to the diodes of the alternator and to the electronic
components of the vehicle.
4. Never place the Booster in short-circuit, for example:
A. By connecting the red clamp (+) to the negative terminal of the battery and
the blue clamp (-) to the vehicle’s earth.
– The inversion of polarity signal will not operate because you are connected 2x
to the mass and you are not in inversion of polarity.
B. By connecting the clamps on the positive and negative terminal of the 2
batteries which are connected together in the vehicle 24V.
– In both cases, the fuse of the battery will blow instantly.

• 11 •
5. Explosion risk:
Never connect the Booster on a vehicle 24V when it is in position 12V.
– Forming of hydrogen and explosion risk.
– If you notice that you have made this mistake, do not disconnect the tension
selector, because this may cause a spark. It is recommended to disconnect one
of the clamps of the vehicle’s battery, to move away from the Booster and to wait
some minutes while the hydrogen escapes from the Booster. Contact you reseller
immediately.
4.3. REMARK
If someone else uses the Booster, ensure they are well informed on how to use it
safely, and have read and understood the operating instructions. The longevity of the
Booster depends on it.
To ensure long life and optimize the use of your Booster, put the Booster on
continuous charge using the original charger.
5. QUESTIONS - ANSWERS
5.1. MY BOOSTER…
A. Does not recharge anymore:
– There is no current on the wall socket (230V or 110V AC) on which you have
connected the charger.
– The charger does not function any more.
– The recharge plug of the Booster is damaged [see point 4.1. (point 5)].
– The batteries are sulphated, swollen or « cooked » and do not take anymore the
charge.
B. Does not work anymore in 12V, either in 24V:
– The fuse inside melted (see point 3.5.).
C. Has no power anymore:
– The Booster is not charged (see point 5.1. - A).
– The batteries lost its power because of:
• The sulphatation of the batteries: you did not recharge your Booster regularly.
• A recharge with a non automatic garage charger or an automatic charger in
position « fast charge » or « boost ».
*
• A connection of the Booster in position 12V to a vehicle 24V during a short time.
*
– An element inside a battery melted because of:
• Starting attempts superseding the user instructions (see point 3.4.).
* Attention: Explosion risk !!!

• 12 •
* Attention: Explosion risk !!!
– A battery is « cooked » because of:
• A connection of the Booster in position 12V to a vehicle 24V.
*
• A recharge on a non automatic garage charger (more than 14,4V tension).
*
– The batteries are swollen because of:
• A recharge with a non automatic garage charger or in position « fast charge » or
« boost », or a recharge of the Booster when the battery is deeply discharged.
*
D. The voltmeter does not function:
– The internal fuse is blown (see point 3.5.).
– The voltmeter or push button is broken or defective.
– The tension of the batteries is below 9V.
5.2. GENERAL QUESTIONS
A. Can a Booster too powerful (example 12/24V-2400/1200CA) damage a small
engine (example a motor bike) ?
No, as long the voltage is respected. The engine will only take the necessary power
(amps) to start.
B. May I use my Booster as battery for my fridge, mobile phone,… ?
Yes this is possible but not at all recommended. Because under 12,4V the
sulphatation process starts (see point 4.1.).
C. How many times do I need to recharge the Booster ?
The power of the provided charger is designed to recharge the Booster at 100%
overnight (for a normal use).
D. Once the Booster is connected to the vehicle to jump start, do I have to make
the start attempt quickly ?
Yes, otherwise a part of the tension of the Booster will be transferred to the empty
battery of the vehicle. Your booster will be discharged for the next start.
If you have others questions or in case of a problem;
please contact your seller.
6. ELECTRONIC COMPONENTS OF VEHICLES
6.1. HISTORY
For more than twenty years, vehicles and engines of all kind are provided with
electronic components more and more sophisticated.
Those are perfectly compatible with the use of a Booster in contrary to the old starting
practices, still too much used and extremely dangerous for vehicle electronics and for
the health and safety of the users.
6.2. CAR MANUFACTURERS’ RECOMMENDATIONS
Our boosters perfectly match manufacturers’ requirements. None prohibits or advises
against the use of a battery or a release booster.
Faced with the multiple requests from garage owners, some manufacturers have
worked out a process of intervention to follow if the battery fails that excludes any
other form of intervention under pain of loss of warranty.
It is, therefore, important to read the vehicle user manual before doing anything on a
vehicle’s battery.
(

• 13 •
6.3. HIGH VOLTAGE SURGE
How can one damage or destroy one or more electronic components?
Answer: by provoking high voltage surges.
A high voltage surge is a small spark or a very powerful stray ash provoked by
voltage differences, short circuits or reversals of polarity, or again, and quite often,
making electrical welds on vehicles without disconnecting the battery or using a
special Anti-Zap lter.
The small surges damage or destroy electronic components of board computers or
ordinary logic controllers.
Stray ashes and electrical welding, contrariwise, do greater damage.
If the Booster is used according to instructions, it is impossible to provoke a
voltage surge.
A complete information about the electronic of vehicles is available on request.
7. WARRANTY
The Booster is guaranteed two years against all defects in material and workmanship. With
the exception of any signs of abuse, misuse or modication.
Boosters must be returned complete (with charger) freight paid and suitably
packaged preventing damage whilst in transit. Repairs carried out under warranty will be
returned free of return delivery costs.
For the LED-clamp:
The LED functions with 3 standard supplied batteries. Those are excluded of the warranty.
8. DISPOSAL
IMPORTANT INFORMATION FOR CORRECT DISPOSAL OF THE PRODUCT
IN ACCORDANCE WITH EC DIRECTIVE 2002/96/EC.
At the end of its working life, the product must not be disposed of as urban
waste.
If must be taken to a special local authority differentiated waste collection
centre or to a dealer providing this service.
Disposing of a household appliance separately avoids possible negative consequences
for the environment and health deriving from inappropriate disposal and enables the
constituent materials to be recovered to obtain signicant savings in energy and resources.
As a reminder of the need to dispose of household appliances separately, the product is
marked with a crossed-out wheeled dustbin.

• 14 •
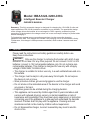
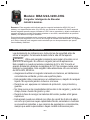
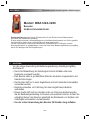
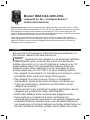
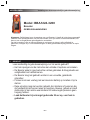
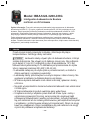
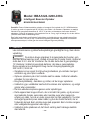
Model: BBA1224-3200-CHG
Intelligent Booster Charger
OWNER’S MANUAL
Summary: This fully automatic charger is designed for charging the 12V AGM (6 cells and
rated capacities of 28-180 Ah) batteries contained in your booster. The specialized design
of the charger allows the booster to be recharged to 100% capacity, enables long time
connection of the booster to the charger when not in use and keeps it always in perfect state
without damaging it.
Full protections against wrong connections and short circuits ensure the charging
operation to be safe. This charger will indicate if the charging circuit of the booster is faulty.
Furthermore, this charger is Microprocessor-controlled, which makes it smarter and more
reliable.
1. CAUTION
Please read the instructions and safety guidelines carefully before use.
Keep these instructions.
WARNING
Only use the charger to recharge the booster with which it was
delivered. Do not use it for any other purpose. Do not connect it to 6V or 24V
batteries; connect to 12V rechargeable batteries only. Do not recharge non-
rechargeable batteries. This charger is designed for use only with a supply
voltage of 220V-240V, 50-60Hz circuit.
• The charger is suitable for indoor use only, in a well ventilated area and on a
at surface.
• The charger must be kept in a dry area away from liquids. Do not expose
the device to rain or snow.
• Wear protective clothes, gloves and goggles to use the charger.
• Do not smoke in the immediate area of the booster or the charger and avoid
any spark or hot spot.
• Explosive gases can be emitted during the charging duration.
• This appliance can be used by children aged from 8 years and above and
persons with reduced physical, sensory or mental capabilities or lack of
experience and knowledge if they have been given supervision or instruction
concerning use of the appliance in a safe way and understand the hazards
involved. Children shall not play with the appliance. Cleaning and user
maintenance shall not be made by children without supervision.
• Do not disassemble charger, incorrect reassembly may result in electric
shock or re.

• 15 •
• Do not replace/modify the original AC plug/cord. Call a qualied electrician if
needed.
• Do not cover the charger.
• If your booster has been stocked or used at negative temperatures, do let
it heat-up to room temperature before charging it. Do not recharge frozen
battery.
• Do not attempt to charge a damaged booster’s battery. If the supply cord
is damaged or if you notice any damage on the unit, it must be replaced by
the manufacturer, its service agent or similarly qualied persons in order to
avoid a hazard.
• Never recharge the booster if the clamps are not stored on their support on
the booster’s case.
• Connect and disconnect charging plug to/from the booster only after
removing AC cord from electric outlet.
• Never pull on the AC cord to remove the AC plug from the mains. This may
damage the cord or the plug.
• Disconnect the charger before any cleaning or maintenance.
• If the charger has not gone to maintenance charging within 3 days, the
charger and the booster must be disconnected and veried by a qualied
person. It may be that the booster’s batteries are sulfated.
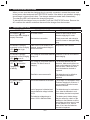
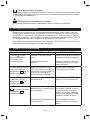
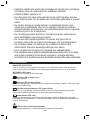
2. CONTROL PANEL
START/STOP BUTTON
Press to immediately start charging your properly connected booster. If the button is not
pressed, charging should begin in ten minute’s time.
POWER LED (green)
The charger is connected to an AC outlet.
Charging LED (orange) lit
The booster is charging.
Charging LED (orange) ashing
The booster is not charging because the charger has detected a problem. The “defect” LED
will also light up (refer to point 4 “Troubleshooting”).
Charged/Maintaining LED – GREEN pulsing
The booster is fully charged. The charger gets in oat charging mode to maintain the battery
capacity.
Battery Defect LED (red)
The charger has detected a problem with the booster batteries. Those might be damaged or
sulfated. In the above case, please contact your retailer (refer to point 4 “Troubleshooting”).
Faulty Charging Circuit LED
The charging circuit is in reverse polarity, please contact your retailer.

• 16 •
3. OPERATION INSTRUCTIONS
When you are sure that the charging plug is correctly connected, connect the power cord
to the power outlet and push the START/STOP button. If the latter is not pressed, charging
should begin in then minute’s time. The charger starts and resets itself automatically.
The charging LED’s will indicate the charging progress.
To disconnect the charger from your booster, push the START/STOP button. Remove the
AC cord from the electric outlet and disconnect the charger from the booster.
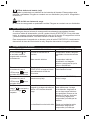
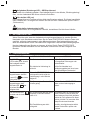
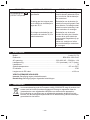
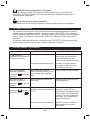
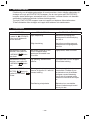
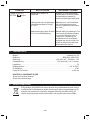
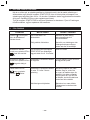
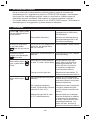
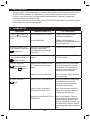
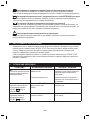
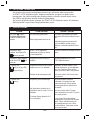
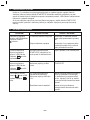
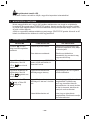
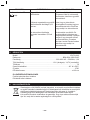
4. TROUBLESHOOTING
PROBLEM POSSIBLE CAUSE REASON/SOLUTION
The POWER
LED
doesn’t light when charger is
properly connected.
AC outlet is dead.
Bad electrical connection.
Check for open fuse or circuit
breaker supplying AC outlet.
Check power cord and extension
cord for a loose or damaged tting
plug.
The booster is correctly
connected, but the Charging
LED
didn’t light
immediately.
If the START/STOP button is not
pressed, charging should begin in
ten minute’s time.
No problem, this is normal.
The booster is properly
connected, but the Charging
LED
never lit.
The voltage of the booster batteries
is very low.
Press the START/STOP button to
start charging.
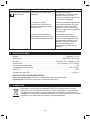
The Battery Defect
LED
is lit and the
Charging LED
is ashing.
The voltage of the booster batteries
is below 10V after 2 hours of
charging.
Desulfation was unsuccessful.
The booster batteries may be
defective. Make sure there are no
loads on the batteries. If there are,
remove them. If there are none,
have the batteries checked or
replaced.
The batteries may be defective.
Have batteries checked or
replaced.
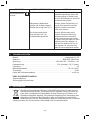
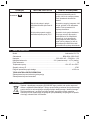
The Battery Defect
LED
is lit.
The booster batteries are sulfated.
Lack of progress is detected and
booster batteries voltage is below
14.2V.
The batteries voltage drops to
below 12.2V in Maintain Mode.
The charger is in desulfation mode.
Continue charging for 24 hours. If
not successful, have the booster
batteries checked.
The batteries may be overheated.
If so, allow the batteries to cool.
Have battery checked or replaced.
The battery won’t hold a charge.
May be caused by a drain on the
batteries or the batteries could be
bad. Make sure there are no loads
on the batteries. If so, remove
them. If not, have the batteries
checked or replaced.

• 17 •
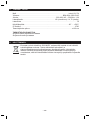
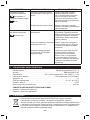
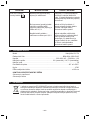
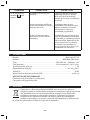
5. SPECIFICATIONS
Model ..................................................................................................................................................... Charger 12V-7A
Reference ................................................................................................................................BBA1224-3200-CHG
Voltage .................................................................................................................. 220-240V AC ~ 50/60Hz, 1.3A
Charging voltage ...............................................................................................12V (nominal) / 14.7V (max.)
Charging current ........................................................................................................................................................... 7A
Operating temperature .................................................................................................................... -20° to +50°C
IP indication .................................................................................................................................................................IP20
Length of the DC cord ................................................................................................................................. ± 160 cm
CHECK / SAFETY MODE
Reverse Polarity Protection
Protection against short-circuits
6. DISPOSAL
In accordance with the European directive 2002/96/CE, this product must not be
disposed of with your other household waste. Dispose of your waste equipment
by handing it over to a designated collection point for the recycling of waste
electrical and electronic equipment. The separate collection and recycling of
your waste equipment at the time of disposal will help to conserve natural
resources and ensure that it is recycled in a manner that protects human health
and the environment.

• 18 •
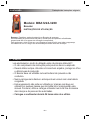
FRANÇAIS Traduction de la notice originale
Modèle
: BBA1224-3200
Booster
MANUEL D’UTILISATION
Sommaire
: Félicitations pour l’achat de votre Booster. Vous avez fait le bon choix !
Choisi par les professionnels du monde entier pour sa puissance et sa abilité, il vous
procurera un plaisir d’utilisation incomparable.
Pour prolonger la durée de vie de votre nouveau Booster et l’utiliser en toute sécurité nous
vous invitons à lire et suivre les recommandations de ce mode d’emploi.
1. PRÉCAUTIONS D’UTILISATION
Lire attentivement le mode d’emploi avant la première utilisation !!!
• Un non respect des instructions peut entraîner des dommages ou explosion.
• Il faut toujours utiliser le Booster dans des endroits bien aérés, se protéger
les yeux et porter des gants.
• Le Booster doit être utilisé dans une atmosphère non polluante et non
conductrice.
• Ne jamais essayer de recharger ou de démarrer un véhicule avec une
batterie gelée.
• Cet équipement ne peut pas être utilisé par des enfants ou des personnes
qui ne savent pas lire et comprendre le manuel. Veillez à conserver,
utiliser et charger le Booster hors de portée des enfants et personnes non
autorisées.
• Rechargez votre Booster dès réception pendant 24 heures, avant de
l’utiliser.

• 19 •
2. INFORMATIONS GÉNÉRALES
2.1. DESCRIPTION
1. Buzzer
2. Sortie 12V, protégée par un fusible de 16A
3. Fusible interne
4. Voltmètre
5. Bouton-poussoir du voltmètre
6. Sélecteur de tension
7. Prise Neutrik
®
4 pôles pour recharger le
Booster
2.2. VOLTMÈTRE
Appuyez sur le bouton pour vérier le niveau de charge du Booster.
Une demi-heure après avoir déconnecté le chargeur du Booster, le voltmètre doit indiquer
environ 13 volts pour une pleine charge.
2.3. ALTERNATEUR DU VÉHICULE
Pour tester son fonctionnement, après la mise en marche du moteur, laissez le Booster
connecté sur la batterie et appuyez sur le bouton-poussoir. Le voltmètre doit indiquer 14 à
14,4V moteur tournant à 2000 tours/minute.
2.4. PINCE À LED
La pince bleue est pourvue d’une LED pour éviter des mauvaises connexions dans
l’obscurité. Pour l’allumer, appuyez simplement sur le bouton-poussoir rouge.
Cette LED est alimentée par 3 piles LR44 situées dans le manche de la pince (côté bouton
poussoir).
2.5. RECHARGE DU BOOSTER VIA SECTEUR; COURANT AC/DC 230/12V
Il ne faut JAMAIS attendre que votre Booster soit vide pour le recharger.
Un chargeur/maintien de charge AC/DC 230/12V électronique entièrement automatique
est fourni avec le Booster. Connectez simplement le chargeur au secteur AC 230V,
raccordez ensuite le chargeur au Booster via la prise Neutrik
®
4 pôles. Vous pouvez le
laisser en charge en permanence.
Si la lampe du chargeur est :
Orange : votre Booster est en charge.
Verte : votre Booster est chargé mais il est conseillé de le laisser branché sur le
secteur en permanence pour maintenir les batteries à leur pleine capacité.
Rouge : il y a un problème dans le circuit de recharge. Attention, votre Booster ne
charge pas. Contactez immédiatement votre revendeur.
2.6. RECHARGE À BORD D’UN VÉHICULE 12V
Un cordon mâle-mâle (DC-DC), pour recharge à bord d’un véhicule 12V via l’allume-
cigare, est disponible sur demande.

• 20 •
3. INSTRUCTIONS D’UTILISATION
3.1. DÉMARRAGE D’UN VÉHICULE
Coupez le contact du véhicule (chauffage, éclairage…) avant d’utiliser le
Booster.
1. Le sélecteur de tension doit être déconnecté !
**
2. Comment connecter votre Booster
A. Démarrage en 12V
Connectez d’abord la pince rouge (+) à la borne + de la batterie, ensuite la pince
bleue (-) à la borne – de la batterie du véhicule.
B. Démarrage en 24V
-> Voir point 3.2. : détection de la borne 24V
• Si les batteries sont côte à côte : Connectez la pince rouge (+) à la borne +
de la batterie et ensuite la pince bleue (-) à la borne - de l’autre batterie du
véhicule.
• Si les batteries sont de part et d’autre du véhicule : Connectez la pince
rouge (+) à la borne + de la batterie et ensuite la pince bleue (-) à la masse du
véhicule.
3. Sélectionnez la tension
Sélectionnez la tension du véhicule à démarrer ** -> à partir de ce moment il y a du
courant sur les pinces.
4. Démarrage
Maximum 8 à 10 secondes, puis attendez 3 minutes avant un deuxième essai.
5. Déconnexion de la tension
Après le démarrage, déconnectez le sélecteur de tension.
6. Débranchement
Déconnectez d’abord la pince bleue (-) et ensuite la pince rouge (+).
7. Rangement
Rangez correctement les câbles et pinces sur leur support.
8. Recharge
Après usage, rechargez immédiatement le Booster !
** Important
!!! -> Voir point 4.2. (point 5.)
: Risque d’explosion
Sayfa yükleniyor...
Sayfa yükleniyor...
Sayfa yükleniyor...
Sayfa yükleniyor...
Sayfa yükleniyor...
Sayfa yükleniyor...
Sayfa yükleniyor...
Sayfa yükleniyor...
Sayfa yükleniyor...
Sayfa yükleniyor...
Sayfa yükleniyor...
Sayfa yükleniyor...
Sayfa yükleniyor...
Sayfa yükleniyor...
Sayfa yükleniyor...
Sayfa yükleniyor...
Sayfa yükleniyor...
Sayfa yükleniyor...
Sayfa yükleniyor...
Sayfa yükleniyor...
Sayfa yükleniyor...
Sayfa yükleniyor...
Sayfa yükleniyor...
Sayfa yükleniyor...
Sayfa yükleniyor...
Sayfa yükleniyor...
Sayfa yükleniyor...
Sayfa yükleniyor...
Sayfa yükleniyor...
Sayfa yükleniyor...
Sayfa yükleniyor...
Sayfa yükleniyor...
Sayfa yükleniyor...
Sayfa yükleniyor...
Sayfa yükleniyor...
Sayfa yükleniyor...
Sayfa yükleniyor...
Sayfa yükleniyor...
Sayfa yükleniyor...
Sayfa yükleniyor...
Sayfa yükleniyor...
Sayfa yükleniyor...
Sayfa yükleniyor...
Sayfa yükleniyor...
Sayfa yükleniyor...
Sayfa yükleniyor...
Sayfa yükleniyor...
Sayfa yükleniyor...
Sayfa yükleniyor...
Sayfa yükleniyor...
Sayfa yükleniyor...
Sayfa yükleniyor...
Sayfa yükleniyor...
Sayfa yükleniyor...
Sayfa yükleniyor...
Sayfa yükleniyor...
Sayfa yükleniyor...
Sayfa yükleniyor...
Sayfa yükleniyor...
Sayfa yükleniyor...
Sayfa yükleniyor...
Sayfa yükleniyor...
Sayfa yükleniyor...
Sayfa yükleniyor...
Sayfa yükleniyor...
Sayfa yükleniyor...
Sayfa yükleniyor...
Sayfa yükleniyor...
Sayfa yükleniyor...
Sayfa yükleniyor...
Sayfa yükleniyor...
Sayfa yükleniyor...
Sayfa yükleniyor...
Sayfa yükleniyor...
Sayfa yükleniyor...
Sayfa yükleniyor...
Sayfa yükleniyor...
Sayfa yükleniyor...
Sayfa yükleniyor...
Sayfa yükleniyor...
Sayfa yükleniyor...
Sayfa yükleniyor...
Sayfa yükleniyor...
Sayfa yükleniyor...
Sayfa yükleniyor...
Sayfa yükleniyor...
Sayfa yükleniyor...
Sayfa yükleniyor...
Sayfa yükleniyor...
Sayfa yükleniyor...
Sayfa yükleniyor...
Sayfa yükleniyor...
Sayfa yükleniyor...
Sayfa yükleniyor...
Sayfa yükleniyor...
Sayfa yükleniyor...
Sayfa yükleniyor...
Sayfa yükleniyor...
Sayfa yükleniyor...
Sayfa yükleniyor...
Sayfa yükleniyor...
Sayfa yükleniyor...
Sayfa yükleniyor...
Sayfa yükleniyor...
Sayfa yükleniyor...
Sayfa yükleniyor...
Sayfa yükleniyor...
Sayfa yükleniyor...
Sayfa yükleniyor...
Sayfa yükleniyor...
Sayfa yükleniyor...
Sayfa yükleniyor...
Sayfa yükleniyor...
Sayfa yükleniyor...
Sayfa yükleniyor...
Sayfa yükleniyor...
Sayfa yükleniyor...
Sayfa yükleniyor...
Sayfa yükleniyor...
Sayfa yükleniyor...
Sayfa yükleniyor...
Sayfa yükleniyor...
Sayfa yükleniyor...
Sayfa yükleniyor...
Sayfa yükleniyor...
Sayfa yükleniyor...
Sayfa yükleniyor...
Sayfa yükleniyor...
Sayfa yükleniyor...
Sayfa yükleniyor...
Sayfa yükleniyor...
Sayfa yükleniyor...
Sayfa yükleniyor...
Sayfa yükleniyor...
Sayfa yükleniyor...
Sayfa yükleniyor...
Sayfa yükleniyor...
Sayfa yükleniyor...
Sayfa yükleniyor...
Sayfa yükleniyor...
Sayfa yükleniyor...
Sayfa yükleniyor...
Sayfa yükleniyor...
Sayfa yükleniyor...
Sayfa yükleniyor...
Sayfa yükleniyor...
Sayfa yükleniyor...
Sayfa yükleniyor...
Sayfa yükleniyor...
Sayfa yükleniyor...
Sayfa yükleniyor...
Sayfa yükleniyor...
Sayfa yükleniyor...
Sayfa yükleniyor...
Sayfa yükleniyor...
Sayfa yükleniyor...
Sayfa yükleniyor...
Sayfa yükleniyor...
Sayfa yükleniyor...
Sayfa yükleniyor...
Sayfa yükleniyor...
Sayfa yükleniyor...
Sayfa yükleniyor...
Sayfa yükleniyor...
Sayfa yükleniyor...
Sayfa yükleniyor...
Sayfa yükleniyor...
Sayfa yükleniyor...
Sayfa yükleniyor...
Sayfa yükleniyor...
Sayfa yükleniyor...
Sayfa yükleniyor...
Sayfa yükleniyor...
Sayfa yükleniyor...
Sayfa yükleniyor...
Sayfa yükleniyor...
Sayfa yükleniyor...
Sayfa yükleniyor...
Sayfa yükleniyor...
Sayfa yükleniyor...
Sayfa yükleniyor...
Sayfa yükleniyor...
Sayfa yükleniyor...
Sayfa yükleniyor...
Sayfa yükleniyor...
Sayfa yükleniyor...
Sayfa yükleniyor...
Sayfa yükleniyor...
Sayfa yükleniyor...
Sayfa yükleniyor...
Sayfa yükleniyor...
Sayfa yükleniyor...
Sayfa yükleniyor...
Sayfa yükleniyor...
Sayfa yükleniyor...
Sayfa yükleniyor...
Sayfa yükleniyor...
Sayfa yükleniyor...
Sayfa yükleniyor...
Sayfa yükleniyor...
Sayfa yükleniyor...
Sayfa yükleniyor...
Sayfa yükleniyor...
Sayfa yükleniyor...
Sayfa yükleniyor...
Sayfa yükleniyor...
Sayfa yükleniyor...
Sayfa yükleniyor...
Sayfa yükleniyor...
Sayfa yükleniyor...
Sayfa yükleniyor...
Sayfa yükleniyor...
Sayfa yükleniyor...
Sayfa yükleniyor...
Sayfa yükleniyor...
Sayfa yükleniyor...
Sayfa yükleniyor...
Sayfa yükleniyor...
Sayfa yükleniyor...
Sayfa yükleniyor...
Sayfa yükleniyor...
Sayfa yükleniyor...
Sayfa yükleniyor...
Sayfa yükleniyor...
Sayfa yükleniyor...
Sayfa yükleniyor...
Sayfa yükleniyor...
Sayfa yükleniyor...
Sayfa yükleniyor...
Sayfa yükleniyor...
Sayfa yükleniyor...
Sayfa yükleniyor...
Sayfa yükleniyor...
Sayfa yükleniyor...
Sayfa yükleniyor...
Sayfa yükleniyor...
Sayfa yükleniyor...
Sayfa yükleniyor...
Sayfa yükleniyor...
Sayfa yükleniyor...
Sayfa yükleniyor...
Sayfa yükleniyor...
Sayfa yükleniyor...
Sayfa yükleniyor...
Sayfa yükleniyor...
Sayfa yükleniyor...
Sayfa yükleniyor...
Sayfa yükleniyor...
Sayfa yükleniyor...
Sayfa yükleniyor...
Sayfa yükleniyor...
Sayfa yükleniyor...
Sayfa yükleniyor...
Sayfa yükleniyor...
Sayfa yükleniyor...
Sayfa yükleniyor...
Sayfa yükleniyor...
Sayfa yükleniyor...
Sayfa yükleniyor...
Sayfa yükleniyor...
Sayfa yükleniyor...
Sayfa yükleniyor...
Sayfa yükleniyor...
Sayfa yükleniyor...
Sayfa yükleniyor...
Sayfa yükleniyor...
Sayfa yükleniyor...
Sayfa yükleniyor...
Sayfa yükleniyor...
Sayfa yükleniyor...
-
 1
1
-
 2
2
-
 3
3
-
 4
4
-
 5
5
-
 6
6
-
 7
7
-
 8
8
-
 9
9
-
 10
10
-
 11
11
-
 12
12
-
 13
13
-
 14
14
-
 15
15
-
 16
16
-
 17
17
-
 18
18
-
 19
19
-
 20
20
-
 21
21
-
 22
22
-
 23
23
-
 24
24
-
 25
25
-
 26
26
-
 27
27
-
 28
28
-
 29
29
-
 30
30
-
 31
31
-
 32
32
-
 33
33
-
 34
34
-
 35
35
-
 36
36
-
 37
37
-
 38
38
-
 39
39
-
 40
40
-
 41
41
-
 42
42
-
 43
43
-
 44
44
-
 45
45
-
 46
46
-
 47
47
-
 48
48
-
 49
49
-
 50
50
-
 51
51
-
 52
52
-
 53
53
-
 54
54
-
 55
55
-
 56
56
-
 57
57
-
 58
58
-
 59
59
-
 60
60
-
 61
61
-
 62
62
-
 63
63
-
 64
64
-
 65
65
-
 66
66
-
 67
67
-
 68
68
-
 69
69
-
 70
70
-
 71
71
-
 72
72
-
 73
73
-
 74
74
-
 75
75
-
 76
76
-
 77
77
-
 78
78
-
 79
79
-
 80
80
-
 81
81
-
 82
82
-
 83
83
-
 84
84
-
 85
85
-
 86
86
-
 87
87
-
 88
88
-
 89
89
-
 90
90
-
 91
91
-
 92
92
-
 93
93
-
 94
94
-
 95
95
-
 96
96
-
 97
97
-
 98
98
-
 99
99
-
 100
100
-
 101
101
-
 102
102
-
 103
103
-
 104
104
-
 105
105
-
 106
106
-
 107
107
-
 108
108
-
 109
109
-
 110
110
-
 111
111
-
 112
112
-
 113
113
-
 114
114
-
 115
115
-
 116
116
-
 117
117
-
 118
118
-
 119
119
-
 120
120
-
 121
121
-
 122
122
-
 123
123
-
 124
124
-
 125
125
-
 126
126
-
 127
127
-
 128
128
-
 129
129
-
 130
130
-
 131
131
-
 132
132
-
 133
133
-
 134
134
-
 135
135
-
 136
136
-
 137
137
-
 138
138
-
 139
139
-
 140
140
-
 141
141
-
 142
142
-
 143
143
-
 144
144
-
 145
145
-
 146
146
-
 147
147
-
 148
148
-
 149
149
-
 150
150
-
 151
151
-
 152
152
-
 153
153
-
 154
154
-
 155
155
-
 156
156
-
 157
157
-
 158
158
-
 159
159
-
 160
160
-
 161
161
-
 162
162
-
 163
163
-
 164
164
-
 165
165
-
 166
166
-
 167
167
-
 168
168
-
 169
169
-
 170
170
-
 171
171
-
 172
172
-
 173
173
-
 174
174
-
 175
175
-
 176
176
-
 177
177
-
 178
178
-
 179
179
-
 180
180
-
 181
181
-
 182
182
-
 183
183
-
 184
184
-
 185
185
-
 186
186
-
 187
187
-
 188
188
-
 189
189
-
 190
190
-
 191
191
-
 192
192
-
 193
193
-
 194
194
-
 195
195
-
 196
196
-
 197
197
-
 198
198
-
 199
199
-
 200
200
-
 201
201
-
 202
202
-
 203
203
-
 204
204
-
 205
205
-
 206
206
-
 207
207
-
 208
208
-
 209
209
-
 210
210
-
 211
211
-
 212
212
-
 213
213
-
 214
214
-
 215
215
-
 216
216
-
 217
217
-
 218
218
-
 219
219
-
 220
220
-
 221
221
-
 222
222
-
 223
223
-
 224
224
-
 225
225
-
 226
226
-
 227
227
-
 228
228
-
 229
229
-
 230
230
-
 231
231
-
 232
232
-
 233
233
-
 234
234
-
 235
235
-
 236
236
-
 237
237
-
 238
238
-
 239
239
-
 240
240
-
 241
241
-
 242
242
-
 243
243
-
 244
244
-
 245
245
-
 246
246
-
 247
247
-
 248
248
-
 249
249
-
 250
250
-
 251
251
-
 252
252
-
 253
253
-
 254
254
-
 255
255
-
 256
256
-
 257
257
-
 258
258
-
 259
259
-
 260
260
-
 261
261
-
 262
262
-
 263
263
-
 264
264
-
 265
265
-
 266
266
-
 267
267
-
 268
268
-
 269
269
-
 270
270
-
 271
271
-
 272
272
-
 273
273
-
 274
274
-
 275
275
-
 276
276
-
 277
277
-
 278
278
-
 279
279
-
 280
280
-
 281
281
-
 282
282
-
 283
283
-
 284
284
-
 285
285
-
 286
286
-
 287
287
-
 288
288
-
 289
289
-
 290
290


Bahco BBA1224-3200 Kullanım kılavuzu
- Kategori
- Pil şarj cihazları
- Tip
- Kullanım kılavuzu
diğer dillerde
- slovenčina: Bahco BBA1224-3200 Používateľská príručka
- español: Bahco BBA1224-3200 Manual de usuario
- français: Bahco BBA1224-3200 Manuel utilisateur
- italiano: Bahco BBA1224-3200 Manuale utente
- svenska: Bahco BBA1224-3200 Användarmanual
- čeština: Bahco BBA1224-3200 Uživatelský manuál
- polski: Bahco BBA1224-3200 Instrukcja obsługi
- Deutsch: Bahco BBA1224-3200 Benutzerhandbuch
- português: Bahco BBA1224-3200 Manual do usuário
- English: Bahco BBA1224-3200 User manual
- dansk: Bahco BBA1224-3200 Brugermanual
- русский: Bahco BBA1224-3200 Руководство пользователя
- suomi: Bahco BBA1224-3200 Ohjekirja
- Nederlands: Bahco BBA1224-3200 Handleiding
İlgili makaleler
Diğer belgeler
-
Stanley SXAE00125 Kullanım kılavuzu
-
-
Schumacher Bahco BBCE12-15S Automatic Battery Charger with Supply Mode El kitabı
-
Defort DBC-10 El kitabı
-
Defort DBC-15 El kitabı
-
Facom B12.2 El kitabı
-
Draper Expert 12V/24V 20A Battery Charger Kullanma talimatları
-
Hama 00136686 Kullanım kılavuzu
-
Black & Decker BXAE00021 Kullanım kılavuzu
-