Yamaha YT-2100 Kullanım kılavuzu
- Kategori
- Gitar aksesuarları
- Tip
- Kullanım kılavuzu

GUITAR/BASS AUTO TUNER
OWNER’S MANUAL / MODE D’EMPLOI
BEDIENUNGSANLEITUNG /
YT-2100
Printed in Hong Kong
u
t y
i
o
!0
q
e
wr
i
o
u
i u
q
e
y
r
t W
Q
W Q
q
e
w
w
r
t W Q
q
e
y
y e
y
e
q
q
r
!0
W Q
q

Thank you for purchasing the YAMAHA YT-2100 Guitar/
Bass Auto Tuner.
Please read this manual thoroughly and keep it in a
safe place for future reference.
FCC INFORMATION (U.S.A.)
1. IMPORTANT NOTICE: DO NOT MODIFY THIS UNIT!
This product, when installed as indicated in the instructions contained in this manual, meets FCC
requirements. Modifications not expressly approved by Yamaha may void your authority, granted by
the FCC, to use the product.
2. IMPORTANT:
When connecting this product to accessories and/or another product use only high quality
shielded cables. Cable/s supplied with this product MUST be used. Follow all installation instructions.
Failure to follow instructions could void your FCC authorization to use this product in the USA.
3. NOTE:
This product has been tested and found to comply with the requirements listed in FCC Regula-
tions, Part 15 for Class ”B” digital devices. Compliance with these requirements provides a reasonable
level of assurance that your use of this product in a residential environment will not result in harmful
interference with other electronic devices. This equipment generates/uses radio frequencies and, if not
installed and used according to the instructions found in the users manual, may cause interference
harmful to the operation of other electronic devices. Compliance with FCC regulations does not guar-
antee that interference will not occur in all installations. If this product is found to be the source of
interference, which can be determined by turning the unit ”OFF” and ”ON”, please try to eliminate the
problem by using one of the following measures:
Relocate either this product or the device that is being affected by the interference.
Utilize power outlets that are on different branch (circuit breaker or fuse) circuits or install AC line filter/s.
In the case of radio or TV interference, relocate/reorient the antenna. If the antenna lead-in is 300 ohm
ribbon lead, change the lead-in to co-axial type cable.
If these corrective measures do not produce satisfactory results, please contact the local retailer
authorized to distribute this type of product. If you can not locate the appropriate, please contact
Yamaha Corporation of America, Electronic Service Division, 6600 Orangethorpe Ave, Buena Park, CA
90620
The above statements apply ONLY to those products distributed by Yamaha Corporations of America or
its subsidiaries.
THIS DIGITAL APPARATUS DOES NOT EXCEED THE “CLASS B” LIMITS FOR RADIO NOISE EMISSIONS FROM
DIGITAL APPARATUS SET OUT IN THE RADIO INTERFERENCE REGULATION OF THE CANADIAN DEPARTMENT
OF COMMUNICATIONS.
Bij dit produkt zijn batterijen geleverd. Wanneer
deze leeg zijn, moet u ze niet weggooien maar
inleveren als KCA.
■ TUNING PROCEDURES
● Auto Tuning (AUTO)
In AUTO mode, the tuner will automatically select the note closest to
the tone input for tuning. This is convenient for tuning during musical
performances.
1. For electric guitars and basses, connect the guitar cord to the INPUT
jack
i. (At this time, the OUTPUT jack o can be connected to an
amplifier in preparation for tuning during a performance.) For acoustic
guitars, place the guitar sound hole near the built-in microphone u.
* The built-in microphone u cannot be used when there is a plug in the
INPUT jack
i.
2. Turn the power switch q to the “AUTO” position.
3. If desired, press the pitch switch e to select the standard A4 pitch.
(Refer to the Pitch Selection section for details.)
4. Pluck the string to be tuned. The appropriate indicator
y will light
up for the tuning note. (Do not pluck two or more strings at the time.)
5. If the wrong indicator light is on, adjust the guitar tuning peg until the
correct light comes on.
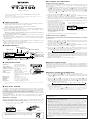
6. Continue to adjust the tuning
peg until the VU meter
r
needle rests in the middle (“0
cent”). If the note is flat, the
left tuning guide (W) will light.
If the note is raised, the right
tuning guide (Q ) will light.
Adjust accordingly until both
tuning guides (W ,Q ) are lit.
At this point, the string is
correctly tuned.
7. Repeat steps 4 through 6 to tune the other strings.
● Manual Tuning (MANL)
In MANL mode, each note must be individually selected as needed.
This mode is most commonly used to tune instruments before musical
performances.
1. Similar to AUTO mode, connect the electric guitar or bass cord to
the INPUT jack i. For acoustic guitars, place the guitar sound hole
near the built-in microphone u.
2. Turn the power switch q to the “MANL” position.
3. If desired, press the pitch switch e to select the standard A4 pitch.
(Refer to the Pitch Selection section for details.)
4. Press the note switch w to select the desired tuning note. The
indicators y for the tuning notes will light in sequence (as shown in
the pattern below) each time the note switch is pressed.
6E → 5A → 4D → 3G → 2B → 1E
5. Adjust the tuning peg until the VU meter r needle rests in the
middle (“0 cent”). If the note is flat, the left tuning guide (W ) will
light. If the note is raised, the right tuning guide (Q) will light. Adjust
accordingly until both tuning guides (W ,Q) are lit. At this point, the
string is correctly tuned.
6. Repeat steps 4 and 5 to tune the other strings.
GUITAR/BASS AUTO TUNER
YT-2100
OWNER’S MANUAL
■ PRECAUTIONS
◆ To prevent damage, do not use the tuner in the following locations:
• places where the unit will be in direct sunlight;
• places subject to temperature and humidity extremes;
• places that are sandy or dusty.
◆ To power the tuner, use only a 6F22 or 006P 9V dry cell battery or
an optional YAMAHA AC-05UC or AC-320UC AC Adaptor. Other
power sources may damage the device.
* Before connecting the AC adaptor, make sure that the polarities of
the plug and the jack match ( –
+ ).
◆ For maximum battery life, always be sure the tuner is turned OFF
when not in use.
◆ To prevent possible damage due to leakage of battery fluid, remove
the battery from the tuner if it is not to be used for an extended
period of time.
◆ Do not subject the tuner to strong physical shock or vibration. Do not
use excessive force on any of the parts.
◆ Never use solvents such as benzine or thinner to clean the tuner.
Wipe clean with a soft, dry cloth.
u MICROPHONE
t TUNING GUIDES y INDICATORS
i INPUT JACK
o OUTPUT JACK
!0 DC 9V JACK
q POWER SWITCH
e PITCH SWITCH
w NOTE SWITCH
r VU METER
■ COMPONENTS
■ SPECIFICATIONS
Indicators : VU Meter, Indicator
LEDs,Tuning Guides
Tuning Notes : 6E, 5A, 4D, 3G, 2B, 1E
VU Meter Precision : ± 1 cent
Standard Pitch Range
: A4 = 438 Hz — 445 Hz
(1 Hz steps)
Added Function : Battery Check
Jacks : INPUT, OUTPUT, DC 9V
Power Source : 9V dry cell battery
(006P or 6F22) or YAMAHA
AC adaptor (AC-05UC or AC-
320UC)
Battery Life : Approx. 9 hours
Dimensions : 155 x 48.5 x 32.5 mm
(WxHxD) (6-1/8" x 1-15/16" x 1-1/4")
Weight : 159 g (5.6 oz) with battery
Accessory : 9V dry cell battery (6F22) x 1
* Specifications and external appearance are subject to change without
notice.
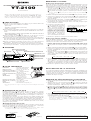
■ BATTERY CHECK
For about 2 seconds after switching the power from “OFF” to “AUTO”
or “MANL”, the VU meter needle will indicate the charge remaining in
the battery. If the needle rests to the left of the battery check bar (refer
to Figure 1 below), the battery needs to be replaced.
As an additional check, if the battery runs low while the tuner is in use,
both tuning guide indicators (W,Q ) will flash indicating that the battery
must be replaced.
For convenience, the tuner has a DC 9V jack; please use an optional
YAMAHA AC adaptor (AC-05UC or AC-320UC) wherever possible.
● Battery Change
The battery compartment is in the rear of the tuner. Remove the old
battery and replace it with a new one of the same type. Be careful to
connect the battery in the correct polarity.
* Always turn the power switch q to “OFF” before changing the battery
or connecting an AC adaptor.
(Figuare 2)(Figuare 1)
OKLOW
■ PITCH SELECTION
Recently, it has become common to slightly raise the standard pitch
when tuning musical instruments. The standard pitch also depends on
the region and the era. To conform to the current standard and to
harmonize with other instruments, the standard pitch must be changed
from time to time.
■ PITCH SELECTION METHOD
1. Turn the power switch q to the “MANL” or “AUTO” position.
2. Press the pitch switch e once to enter pitch selection mode. An
indicator y will flash at one of the standard pitch settings (A4: 438
— 445 Hz).
3. While the indicator
y is flashing, press the pitch switch e. The
indicators y will flash in sequence (as shown in the pattern below)
each time the pitch switch is pressed. Each indicator y step represents
a 1 Hz change in standard pitch.
438 → 439 → 440 → 441 → 442 → 443 → 444 → 445
4. Select the desired standard pitch. When the pitch switch
e has not
been pressed for about 2 seconds, the tuner will automatically
return to tuning mode.
* Turning OFF the power switch
q cancels the selected standard pitch.
When the power switch
q is turned back on to the “AUTO” or “MANL”
position, the standard pitch automatically resets to A4: 440 Hz.
Adjust the tuning peg until the VU meter
needle rests in the middle (“0 cent”).
The appropriate indicator for the
plucked tuning note should lights up.

Nous vous remercions d’avoir porté votre choix sur l’ac-
cordeur automatique de guitare/basse YAMAHA YT-2100.
Nous vous prions de lire attentivement ce mode d’emploi
et de le conserver en lieu sûr pour toute référence future.
■ MARCHE A SUIVRE
● Accord automatique (AUTO)
En mode AUTO, l’accordeur sélectionne automatiquement la note la
plus proche de la tonalité d’entrée pour réaliser l’accord. Ceci est
particulièrement commode pour accorder pendant une représentation.
1. Brancher le cordon de la guitare ou de la basse à la prise INPUT
i
(la prise OUTPUT o peut alors être connectée à un amplificateur
afin de pouvoir accorder en cours de représentation). Dans le cas
d’une guitare acoutisque, placer l’ouverture près du micro intégré
u.
* Le micro intégré u ne peut pas être utilisé lorsque la prise INPUT i
est utilisée.
2. Mettre l’interrupteur d’alimentation POWER q sur la position “AUTO”.
3. Si besoin est, appuyer sur la touche PITCH e pour sélectionner la
hauteur standard A4 (se reporter à “Sélection de la hauteur” pour
plus de détails).
4. Pincer la corde à accorder. L’indicateur y approprié s’allume pour
la note d’accord (ne pas pincer plus d’une corde à la fois).
5. Si l’indicateur qui s’allume n’est pas le bon, accorder jusqu’à ce que
le bon indicateur s’allume.
6. Continuer à accorder jusqu’à
ce que l’aiguille du VU-mètre
r s’immobilise au milieu (“0
cent”). Si la note est plate, le
témoin d’accord gauche (W )
s’allume. Si la note est haute,
le témoin droit (Q ) s’allume.
Accorder en conséquence
jusqu’à ce que les deux
témoins (W ,Q ) s’allument en
même temps. La corde est
alors correctement accordée.
7. Refaire les opérations 4 à 6 pour les autres cordes.
● Accord manuel (MANL)
En mode MANL, chaque note doit être sélectionnée individuellement
chaque fois que nécessaire. Cette méthode est la plus couramment
utilisée pour accorder un instrument avant une représentation.
1. Comme dans le cas du mode AUTO, brancher le cordon de la
guitare ou de la basse électrique à la prise INPUT i. Dans le cas
d’une guitare acoutisque, placer l’ouverture près du micro intégré
u.
2. Mettre l’interrupteur d’alimentation POWER q sur la position “MANL”.
3. Si besoin est, appuyer sur la touche PITCH e pour sélectionner la
hauteur standard A4 (se reporter à “Sélection de la hauteur” pour
plus de détails).
4. Appuyer sur la touche NOTE w pour sélectionner la note d’accord
souhaitée. Les indicateurs y de note d’accord s’allument l’un
après l’autre (dans l’ordre indiqué ci-après) à chaque pression de la
touche NOTE.
6E → 5A → 4D → 3G → 2B → 1E
5. Accorder jusqu’à ce que l’aiguille du VU-mètre r s’immobilise au
milieu (“0 cent”). Si la note est plate, le témpoin d’accord gauche
(W ) s’allume. Si la note est haute, le témoin droit (Q ) s’allume.
Accorder en conséquence jusqu’à ce que les deux témoins (W ,Q )
s’allument en même temps. La corde est alors correctement accordée.
6. Refaire les opérations 4 et 5 pour les autres cordes.
ACCORDEUR AUTOMATIQUE DE GUITARE/BASSE
YT-2100
MODE D’EMPLOI
■ PRECAUTIONS
◆ Afin de ne pas endommager l’accordeur ne pas l’utiliser dans des
endroits soumis aux conditions suivantes:
• plein soleil;
• humidité ou températures excessives;
• sable ou poussière.
◆ Pour alimenter l’accordeur, utiliser une pile sèche 6F22 ou 006P de
9 volts ou un adaptateur secteur en option YAMAHA AC-05G ou AC-
320G.
* Avant de brancher, vérifier que la polarité de la fiche et celle de la
prise correspondent ( –
+ ).
◆ Pour prolonger au maximum la durée de vie de la pile, toujours
mettre l’accordeur hors tension lorsqu’il n’est pas utilisé.
◆ Pour prévenir tout endommagement éventuel de l’accordeur dû à
une fuite du liquide de la pile, enlever la pile lorsque l’accordeur ne
doit pas être utilisé pendant une période prolongée.
◆ Ne pas soumettre l’accordeur à des chocs ou à des vibrations
importantes. Ne jamais le manipuler avec une force excessive.
◆ Ne jamais utiliser de solvants, tels que de la benzine ou un diluant,
pour nettoyer l’accordeur. L’essuyer avec un chiffon propre et sec.
■ FICHE TECHNIQUE
Indicateurs : VU-mètre, indicateurs à
LED, témoin d’accord
Notes d’accord : 6E, 5A, 4D, 3G, 2B, 1E
Précision du VU-mètre : ± 1 centième
Plage de hauteur standard
: A4 — 438 Hz à 445 Hz
(pas de 1 Hz)
Fonction supplémentaire
: Contrôle de la pile
Prises : INPUT, OUTPUT, DC 9V
Alimentation : Pile sèche de 9V
(006P ou 6F22) ou
adaptateur secteur
YAMAHA (AC-05G ou AC-320G)
Durée de vie de la pile : Env. 9 heures
Dimensions (L x H x P) : 155 x 48.5 x 32.5 mm
Poids : 159 g avec pile
Accessoires : Pile sèche de 9 V (6F22) x 1
* Les spécifications et l’aspect externe peuvent être modifiés sans aucun
avis.
Accorder jusqu’à ce que l’aiguille du VU-
mètre s’immobilise au milieu (“0 cent”).
L’indicateur correspondant à la note
d’accord pincée doit s’allumer.
LE PRESENT APPAREIL NUMERIQUE N'EMET PAS DE BRUITS RADIOELECTRIQUES DEPASSANT LES LIMITES
APPLICABLES AUX APPAREILS NUMERIQUES DE LA "CLASSE B" PRESCRITES DANS LE REGLEMENT SUR LE
BROUILLAGE RADIOELECTRIQUE EDICTE PAR LE MINISTERE DES COMMUNICATIONS DU CANADA.
■ ORGANES
u MICROPHONE
t TEMOINS D’ACCORD
i PRISE D’ENTREE
o PRISE DE SORTIE
!0 PRISE DE 9 V CC
e TOUCHE DE HAUTEUR
y INDICATEURS
q INTERRUPTEUR D’ALIMENTATION
r VU-METRE
w TOUCHE DE NOTE
■ CONTROLE DE LA PILE
Pendant environ 2 secondes après la mise sous tension, lorsque
l’interrupteur POWER q est mis sur “AUTO” ou “MANL”, l’aiguille du
VU-mètre indique la charge de la pile. Si l’aiguille vient se placer à
gauche de la barre de contrôle de la pile (voir la Figure 1 ci-dessous),
la pile doit être changée.
Par mesure de sécurité, si la pile devient trop faible pendant que
l’accordeur est en cours d’utilisation, les deux témoins d’accord (W,Q )
se mettent à clignoter pour indiquer que la pile doit être remplacée.
Pour des raisons de commodité, l’accordeur est pourvu d’une prise 9 V
CC; utiliser un adaptateur secteur YAMAHA (AC-05G ou AC-320G)
chaque fois que possible.
● Remplacement de la pile
Le logement de la pile est situé au dos de l’accordeur. Retirer la pile
usée et la remplacer par une pile neuve du même type. Faire très
attention de placer la pile en respectant les polarités.
* Toujours mettre
q’interrupteur POWER 1 sur la position “OFF” avant
de remplacer la pile ou de connecter un adaptateur secteur.
(Figure 2)(Figure 1)
CORRECTBAS
■ SELECTION DE LA HAUTEUR
Il est devenu habituel d’élever légèrement la hauteur standard pour
accorder un instrument musical. La hauteur standard varie également
selon les pays et les époques. Pour être conforme au goût du jour et
s’harmoniser avec d’autres instruments, la hauteur standard doit être
modifiée de temps en temps.
■ MODE DE SÉLECTION DE LA HAUTEUR
1. Mettre l’interrupteur d’alimentation POWER q sur la position “AUTO”
ou “MANL”.
2. Appuyer une fois sur la touche PITCH e pour activer le mode de
sélection de hauteur. Un des indicateurs y correspondant à une
hauteur standard (A4: 438 à 445 Hz) clignote.
3. Pendant que l’indicateur y clignote, appuyer sur la touche PITCH
e. Les indicateurs y clignotent l’un après l’autre (dans l’ordre
indiqué ci-après) à chaque pression de la touche PITCH. Chaque
indicateur y représente une modification de la hauteur standard de
1 Hz.
438 → 439 → 440 → 441 → 442 → 443 → 444 → 445
4. Sélectionner la hauteur standard souhaitée. Si la touche PITCH e
n’est pas sollicitée dans les 2 secondes environ, l’accordeur revient
automatiquement au mode d’accord.
* Le fait mettre l’interrupteur POWER
q sur la position “OFF” annule
la hauteur standard sélectionnée. Lorsque l’interrupteur POWER q
est remis sur “AUTO” ou “MANL”, la hauteur standard A4: 440 Hz est
automatiquement rétablie

Vielen Dank für den Kauf des elektronischen Gitarren/
Baß-Stimmgeräts YT-2100 von Yamaha.
Bitte lesen Sie sich diese Anleitung vor Gebrauch durch
und bewahren Sie sie dann zur späteren Bezugnahme
an einem sicheren Ort auf.
■ STIMMVORGANG
● Automatisches Stimmen
In der AUTO-Betriebsart wählt das Stimmgerät automatisch die dem
Eingabeton am nächsten liegende Note. Dies ist besonders praktisch
während Live-Konzerten.
1. Die E-Gitarre oder den Baß an die INPUT-Buchse
i anschließen.
(Die OUTPUT-Buchse o kann zur Vorbereitung bereits mit einem
Verstärker verbunden sein.) Bei akustischen Gitarren das Schalloch
möglichst nahe an das Mikrofon u bringen.
* Bei beschalteter INPUT-Buchse i funktioniert das Mikrofon u nicht.
2. Den Betriebsschalter q in die Stellung AUTO schieben.
3. Falls gewünscht, mit der PITCH-Taste
e die Bezugstonhöhe für
den Ton A4 wählen. (Einzelheiten, siehe unter Wahl der Bezugstonhöhe).
4. Die zu stimmende Saite anschlagen. Die entsprechende Notenanzeige
y leuchtet dadurch auf. (Keinesfalls mehr als eine Saite anschlagen).
5. Falls die falsche Notenanzeige aufleuchtet, am Stimmwirbel der
Gitarre drehen, bis die korrekte Note angezeigt wird.
6. Den Stimmwirbel weiterdrehen,
bis der Zeiger des VU-Meters
r in der Mitte (0 Cent) steht.
Falls der Eingabeton zu niedrig
ist, blinkt der linke Stimmzeiger
(W ) auf. Bei zu hohem
Eingabeton spricht der rechte
Stimmzeiger (Q) an. Die Saite
stimmen, bis beide
Stimmzeiger (W,Q) gleichzeitig
leuchten. Damit hat die Saite
die korrekte Stimmung.
7. Die Schritte 4 bis 6 zum Stimmen der restlichen Saiten wiederholen.
● Manuelles Stimmen (MANL)
In der MANL-Betriebsart müssen die Noten zum Stimmen einzeln
gewählt werden. Diese Stimmbetriebsart empfiehlt sich besonders vor
Konzerten.
1. Wie beim AUTO-Stimmvorgang die E-Gitarre oder den Baß an die
INPUT-Buchse i anschließen. Bei akustischen Gitarren das Schalloch
möglichst nahe an das Mikrofon u bringen.
2. Den Betriebsschalter q in die Stellung MANL schieben.
3. Falls gewünscht, mit der PITCH-Taste e die Bezugstonhöhe für
den Ton A4 wählen. (Einzelheiten, siehe unter Wahl der Bezugstonhöhe).
4. Mit der NOTE-Taste w die zu stimmende Note wählen. Die Taste so
oft antippen, bis die Notenanzeige y für die zu stimmende Noten
aufleuchtet.
6E → 5A → 4D → 3G → 2B → 1E
5. Den Stimmwirbel weiterdrehen, bis der Zeiger des VU-Meters r in
der Mitte (0 Cent) steht. Falls der Eingabeton zu niedrig ist, blinkt
der linke Stimmzeiger (W) auf. Bei zu hohem Eingabeton spricht der
rechte Stimmzeiger (Q) an. Die Saite stimmen, bis beide Stimmzeiger
(W,Q) gleichzeitig leuchten. Damit hat die Saite die korrekte Stimmung.
6. Die Schritte 4 bis 5 zum Stimmen der restlichen Saiten wiederholen.
ELEKTRONISCHES GITARREN/BASS-STIMMGERÄT
YT-2100
BEDIENUNGSANLEITUNG
■ VORSICHTSMASSNAHMEN
◆ Das Gerät vor den nachfolgenden Einflüssen schützen, um Schäden
zu verhindern:
• Direkte Sonneneinstrahlung
• Extreme Temperaturen oder Feuchtigkeit
• Übermäßiger Staub.
◆ Zum Betrieb des YT-2100 nur eine 9 V Batterie der Kennung 6F22
oder 006P bzw. den getrennt erhältlichen Yamaha Netzadapter AC-
05G oder AC-320G verwenden. Andere Stromquellen können zu
Schäden führen.
* Vor dem Anschluß des Netzadapters sicherstellen, daß die Polarität
des Steckers mit der der Buchse übereinstimmt ( –
+ ).
◆ Das Gerät nach Gebrauch stets ausschalten, um die Batterie zu
schonen.
◆ Vor längerem Nichtgebrauch die Batterie entfernen, um Schäden
durch womöglich lecke Batterien zu verhindern.
◆ Vor Stoß und Schlag schützen. Keinesfalls mit Gewalt handhaben.
◆ Zum Reinigen keinesfalls Benzin oder Verdünner verwenden. Mit
einem trockenen, sauberen Tuch abwischen.
Bescheinigung des Importeurs
Hiermit wird bescheinigt, daß der / die / das
GUITAR/BASS AUTO TUNER Typ : YT-2100
(Gerät, Typ, Bezeichnung)
in Übereinstimmung mit den Bestimmungen der
VERFÜGUNG 1046/84
(Amtsblattverfügung)
funkentstört ist.
Der Deutschen Bundespost wurde das Inverkehrbringen dieses Gerätes angezeigt und die
Berechtigung zur Überprüfung der Serie auf Einhaltung der Bestimmungen eingeräumt.
YAMAHA Europa GmbH
Name des Importeurs
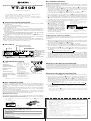
■ BATTERIEPRÜFUNG
Ungefähr 2 Sekunden nach Einschalten (AUTO oder MANL) zeigt der
VU-Meter die Batterieladung an. Falls der Zeiger links am BATTERY-
Balken steht (siehe Abb. 1 unten), sollte die Batterie ausgetauscht
werden.
Außerdem blinken beide Stimmzeiger (W ,Q ) bei schwach werdender
Batterie gleichzeitig, um beim Stimmen auf einen notwendigen
Batterieaustausch hinzuweisen.
Das YT-2100 verfügt außerdem über eine DC 9V Buchse, damit ein
getrennt erhältlicher Yamaha Netzadapter (AC-05G oder AC-320G)
zum Betreiben des Geräts verwendet werden kann.
● Batteriewechsel
Das Batteriefach befindet sich auf der Rückseite. Die alte Batterie
durch eine neue des gleichen Typs austauschen. Beim Anschließen
der Batterie auf korrekte Polung achten.
* Vor dem Wechseln der Batterie den Betriebsschalter q unbedingt auf
OFF stellen.
(Abb. 2)
(Abb. 1)
OKNiedrig
■ BAUTEILE
t Stimmzeiger y Notenanzeigen
!0 Gleichspannungs-
buchse (DC 9V)
u Mikrofon (MIC.)
q Betriebsschalter
(AUTO/MANL/OFF)
w Notenschalter (NOTE)
e Tonhöhenschalter (PITCH)
r VU-Meter
■ TECHNISCHE DATEN
Anzeigen : VU-Meter, LED-
Anzeigen, Stimmzeiger
Stimmnoten : 6E, 5A, 4D, 3G, 2B, 1E
VU-Meterpräzision : ± 1 Cent
Bezugstonhöhenbereich: A4= 438 Hz — 445 Hz
(1 Hz Schritte)
Zusatzfunktion : Batterieprüfung
Buchsen : INPUT, OUTPUT,
DC 9V
Stromversorgung : 9V Trockenzelle
(006P oder 6F22) oder
YAMAHA Netzadapter (AC-05G oder AC-320G)
Batterie-Lebensdauer : ca. 9 Stunden
Abmessungen (WxHxD) : 155 x 48.5 x 32.5 mm
Gewicht : 159 g mit Batterie
Zubehör : 9V Batterie (6F22) x 1
* Änderungen an Daten und Design vorbehalten.
■ WAHL DER BEZUGSTONHÖHE
In der letzten Zeit wird die Bezugstonhöhe und damit die Tonlage von
Instrumenten oft geringfügig angehoben. Die Bezugstonhöhe unterscheidet
sich von Region zu Region und Ära zu Ära. Um ein Harmonisieren mit
anderen Instrumenten zu erlauben, kann die Bezugstonhöhe und die
Tonlage des YT-2100 modifiziert werden.
■ WAHL DER BEZUGSTONHÖHE
1. Den Betriebsschalter q in die Stellung MANL oder AUTO schieben.
2. Durch Drücken von PITCH
e auf Tonlagenwahl schalten. Eine
Anzeige der Bezugstonhöhe (A4: 438 — 445 Hz) blinkt dadurch.
3. Während Blinkens der Anzeige y, PITCH e so oft antippen, bis die
gewüschte Tonlagenanzeige für Ton A aufleuchtet (die Reihenfolge
ist unten gezeigt). Jede Anzeige repräsentiert hierbei eine Änderung
der Bezugstonhöhe um 1 Hz.
438 → 439 → 440 → 441 → 442 → 443 → 444 → 445
4. Die gewünschte Tonlage wählen. WIrd die PITCH-Taste e ca. 2
Sekunden lang nicht betätigt, schaltet das YT-2100 automatische
auf Stimmbetrieb.
* Durch Ausschalten q wird die gewählte Tonlage rückgestellt. Beim
Einschalten (AUTO oder MANL) wird automatisch die Standardtonhöhe
von A4=440 Hz vorgewählt.
o Ausgangsbuchse
(OUTPUT)
i Eingangsbuchse
(INPUT)
Den Stimmwirbel weiterdrehen, bis
der Zeiger des VU-Meters in der
Mitte (0 Cent) steht.
Die Notenanzeige der
angeschlagenen Saite muß
leuchten.
-
 1
1
-
 2
2
-
 3
3
-
 4
4


Yamaha YT-2100 Kullanım kılavuzu
- Kategori
- Gitar aksesuarları
- Tip
- Kullanım kılavuzu
Diğer dillerde
- español: Yamaha YT-2100 Manual de usuario
- français: Yamaha YT-2100 Manuel utilisateur
- italiano: Yamaha YT-2100 Manuale utente
- svenska: Yamaha YT-2100 Användarmanual
- 日本語: Yamaha YT-2100 ユーザーマニュアル
- čeština: Yamaha YT-2100 Uživatelský manuál
- polski: Yamaha YT-2100 Instrukcja obsługi
- Deutsch: Yamaha YT-2100 Benutzerhandbuch
- português: Yamaha YT-2100 Manual do usuário
- English: Yamaha YT-2100 User manual
- dansk: Yamaha YT-2100 Brugermanual
- русский: Yamaha YT-2100 Руководство пользователя
- suomi: Yamaha YT-2100 Ohjekirja
- Nederlands: Yamaha YT-2100 Handleiding
- română: Yamaha YT-2100 Manual de utilizare