
CHIMES
YCH585
Thank you for selecting the YAMAHA chimes.
Please read this owner’s manual carefully, and truly enjoy this instru-
ment for years to come.
OWNER’S MANUAL
Make sure to read the PRECAUTIONS before assembling.
07.1.19, 2:11 PMPage 1

Caution
Injury or handicaps to persons caused by the disregard of warnings with this mark
or, misuse of the instrument, may result in the loss of personal property.
If the instrument is often moved, bolts, parts, etc., may be-
come loose. After moving the instrument, check and make
sure all bolts, parts, etc., are firmly fastened. Firmly tighten
all loose items.
Do not use the hammer for anything other than playing the
instrument. It may be the cause of injury or accidents. Do
not let children strike other, etc., with the hammer. Do not
allow such dangerous behavior to take place.
Before you use the chime, carefully read the instructions listed below and the owner’s manual.
Cautions when setting the instrument.
Never place the instrument on an sloping, unstable, etc., platform. The instrument may fall or overturn and result in injury.
Cautions for treatment of the instrument.
Never lean on or climb onto the instrument. The instrument may fall and result in injury.
Do not play or roughhouse around the instrument. Bumping into the instrument may result in injury.
It may also cause the instrument to fall over. Keep children away from the instrument.
If an earthquake occurs, strong shocks caused by the earthquake may overturn the instrument or cause it to move about.
Stay away from the instrument during earthquakes.
Cautions when moving the instrument.
Warning
Disregard of the warnings with this mark or misuse may
result in death or personal injury.
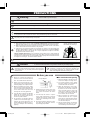
Hold the stand by its side
columns and move slowly in
the direction you want to go.
1. When moving with the casters, move on smooth surfaces only. Do not move on sloping,
rough or gravel surfaces. The chime may overturn, roll away recklessly causing injury.
2. Move the instrument only after making sure that the caster locks are off. If the instru-
ment is moved with the casters locked, it may overturn.
3. Two persons are required to move the instrument. As shown in the illustration, both
persons should hold the stand by its side columns and move the instrument slowly in
the direction you want to go. Do not run. It may be impossible to stop the instrument,
bump into the wall and cause injury.
Weight, YCH585 about 84 kg. If the instrument must be lifted, use as many people as
possible and lift it being careful not to cause any injury. Make sure that the hanger (the part
from which the sound columns are suspended) is always upright. Never allow the base to
be higher that the hanger. The sound columns will fall.
With the instrument fully assembled, do not transport up or down a staircase. Parts may fall off, balance may be lost causing.
1 Never use a metal type hammer or
mallets to strike the sound column
with. The sound column will break.
2 Always use the instrument on a flat,
level surface. The instrument will not
function properly on a sloped surface.
3 When assembling the stand, make
sure each part is firmly attached, and
there is no twisting or disfigurement
in the frame. Also, make sure that
all wing nuts are firmly tightened.
4 Use your toes to operate the damper
pedal. Do not stand on or put your
weight on the pedal. Doing so may
cause the pedal to break.
5 Do not touch the damper adjuster
(shown in the illustration right). The
adjuster has been adjusted at the
factory. Moving the adjuster may re-
sult in the damper not functioning
properly.
■
Be careful when transporting
1
When transporting or moving the instru-
ment, do not subject it to strong shocks.
2 The sound column’s pitch and/or
tone may change if the columns are
scratched or bent. Be careful.
3
When the instrument is to be trans-
ported over long distances, especially
by vehicle, do so with the sound col-
umns removed from the stand. The
shape of the stand may change and
the column’s wire/strings may be cut
if the columns are not removed.
4 When attaching or removing the
sound columns, do so in a place
where there is sufficient room so that
the columns do not come into con-
tact with other objects.
5
After the sound columns are removed,
wrap them in a soft cloth, etc., to pre-
vent scratching, and then transport.
Before you use
6 When playing the chime, make sure
the caster brakes are firmly set and
the chime stand does not move
about.
7 Do not keep the chime in a place
where high temperatures and high
humidity are present. Doing so will
result in the shortening of the instru-
ments life.
8 For regular cleaning, wipe with a soft,
dry cloth. Never wipe with thinner,
or polishing preparations.
PRECAUTIONS
Damper Adjuster
07.1.19, 2:11 PMPage 2

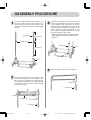
Slide the hanger onto the side columns.
Side Column
Hanger
Insert the side columns into the base. At
this time, make sure that the damper rest,
attached at the center of the column, and
the short section of the column is positioned
upright.
ASSEMBLY PROCEDURE
Fit the damper onto the side columns and
lower the damper onto the damper rest.
Next, secure the damper in its position with
the damper wing bolts. At this time, tighten
the wing bolts that secure the side column
to the base as well.
Remove the damper stay, attached to the
bottom of the damper, loosen the wing bolt
on the damper stay, and attach the stay to
the pedal hook. The pedal’s position can be
controlled by adjusting the length of the
pedal stay with its two wing bolts. At this
time, tighten the upper wing bolt first, then
go on to tighten the lower bolt.
Adjust the pedal position so that the pedal
stops slightly above the floor when fully de-
pressed.
Damper Stay
Base
Pedal Hook
Damper
Damper Stay
Damper Rest
Side Column
Side Column
Damper Rest
Short Section
Long Section
Base
1
2
3
4
07.1.19, 2:11 PMPage 3

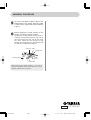
Before hanging the sound columns on the
hanger, activate the damper stopper.
Position the sound column with its pitch in-
scription facing forward, place one side of
the wire/strings into the slot of the fixing
pin. Next, hook the wire/strings on the
hanger pin, finally place the wire/strings into
the slot of the remaining fixing pin.
To activate the damper stopper, depress the
pedal and press the stopper. When the pedal
is released, the stopper will hold the damper
in place.
When hanging the sound columns, it is easier to
hang the accidental tones (C#52-F#71) first, then
hang the natural tones (C52-G71).
Sound Column
Hanger Pin
Wire
Fixing Pin
Fixing Pin
Teflon Tube
ASSEMBLY PROCEDURE
5
6
WK54160 0701 R0 Printed in Japan
07.1.19, 2:11 PMPage 4
-
 1
1
-
 2
2
-
 3
3
-
 4
4


Diğer dillerde
- español: Yamaha YCH-585 El manual del propietario
- français: Yamaha YCH-585 Le manuel du propriétaire
- italiano: Yamaha YCH-585 Manuale del proprietario
- svenska: Yamaha YCH-585 Bruksanvisning
- čeština: Yamaha YCH-585 Návod k obsluze
- polski: Yamaha YCH-585 Instrukcja obsługi
- Deutsch: Yamaha YCH-585 Bedienungsanleitung
- português: Yamaha YCH-585 Manual do proprietário
- English: Yamaha YCH-585 Owner's manual
- dansk: Yamaha YCH-585 Brugervejledning
- русский: Yamaha YCH-585 Инструкция по применению
- suomi: Yamaha YCH-585 Omistajan opas
- Nederlands: Yamaha YCH-585 de handleiding
- română: Yamaha YCH-585 Manualul proprietarului