
1 DTX502 Reference Manual
DTX502
This manual describes the functions made available by connecting your DTX502 Drum Trigger Module to a computer, iPad, or iPhone.
When connected to a computer, for example, your DTX502 can send and receive song, audio, and kit data; in addition, it can also output
the MIDI performance data produced by playing the pads. Meanwhile, when connected to an iPad or iPhone, you can use your DTX502
in many fun ways together with smart-device apps from the Yamaha web site (http://www.yamaha.com/).
If viewing this document using Adobe® Reader®, you can enter keywords into the Find text box in the toolbar to quickly and conve-
niently search for them within the text.
• The illustrations and screens shown in this manual are for instructional purposes only and may differ somewhat for your particular
setup.
• The company names and product names used in this manual are the trademarks or registered trademarks of their respective companies.
NOTE
•Refer to Connecting to a Computer from the Owner’s Manual for details on how to connect your DTX502 to a computer.
• You cannot simultaneously connect your DTX502 to a computer and to an iPad or iPhone.
NOTE
You can download the latest version of Adobe® Reader® from the following web page.
http://www.adobe.com/products/reader/
How to Use this Manual
Keyword Searching
Illustrations & Trademarks
EN
Reference Manual
Drum Trigger Module

2 DTX502 Reference Manual
Transferring Song, Audio & Kit Data
Using the free Yamaha application Musicsoft Downloader, you can easily exchange the following
types of data between a DTX502 and a computer connected via a USB cable.
• Song data (SMF)
Move drum performances recorded on your DTX502 to a computer or transfer song data (SMF) created using other
devices to the drum trigger module.
• Audio data (WAV or AIFF)
Transfer percussion instrument samples, effect sounds, or other types of audio data to your DTX502 so that you
can play them using the pads.
• Kit data
Move the User kits that you have made on your DTX502 to a computer for safekeeping.
1. Make sure your computer is connected to the Internet and then download the Musicsoft Downloader
installer from the following web site.
Yamaha Download Site: http://download.yamaha.com/
Enter “DTX502” into the model name field and select Musicsoft Downloader. System requirements for Musicsoft Downloader will
be displayed on the download page.
2. Double-click the downloaded installer to launch it.
Follow the instructions displayed and install Musicsoft Downloader. When installed, Musicsoft Downloader will be added to your
Programs menu and a shortcut to the application will be created on your desktop.
Details on how to use Musicsoft Downloader can also be found in the application’s Help section.
NOTE
• You can transfer up to 40 items of song data, 20 items of audio data, and 50 items of kit data to your DTX502.
• The combined total volume of song data, audio data, and kit data that can be transferred to your DTX502 is 1 MB.
MusicSoft Manager
MusicSoft Manager is a free app that operates in a similar way to Musicsoft Downloader. Using this app, you can conveniently
transfer data between your DTX502 and iPad or iPhone. For details, please refer to Connecting to Smart Devices on page 10.
Installing Musicsoft Downloader

Transferring Song, Audio & Kit Data
3 DTX502 Reference Manual
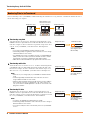
Before transferring a file to your DTX502, a number indicating the destination User song, audio file, or kit must be added at the start of
the file name using your computer.
Transferring song data
Song data files have an extension of .mid. Before transferring them to your
DTX502, add a three digit number between 061 and 100 at the start of the file
name. For example, in order to transfer the song data file sample.mid to User
song No. 85 on your DTX502, you should rename it “085sample.mid”.
Transferring audio data
Audio data files have an extension of .wav or .aif. Before transferring them to
your DTX502, add a two digit number between 01 and 20 at the start of the
file name. For example, in order to transfer the audio data file sample.wav to
Wave Voice No. 9 on your DTX502, you should rename it “09sample.wav”.
Transferring kit data
Kit data files have an extension of .bin. Before transferring them to your
DTX502, add a three digit number between 051 and 100 at the start of the file
name. For example, in order to transfer the kit data file UserKit.bin to User kit
No. 72 on your DTX502, you should rename it “072UserKit.bin”.
NOTE
• User songs on the DTX502 are numbered from 61 to 100.
• If transferring multiple song data files at the same time, be sure to assign
a different number to each of them.
• Your DTX502 only accepts song data in the form of a standard MIDI file
(SMF) of format 0 or 1. When you transfer an SMF of format 1, it will be
automatically converted to format 0 by the drum trigger module.
• SMFs with less than 96 subdivisions per quarter note cannot be used.
NOTE
• Wave Voices (voice category W) on your DTX502 are numbered from 1
to 20.
• If transferring multiple audio data files at the same time, be sure to
assign a different number to each of them.
• Audio files with a bit depth other than 16-bit cannot be used. In addition,
these audio files must have a sampling rate of 44.1 kHz, and if neces-
sary, you should use a DAW application or the like to convert to this sam-
pling rate in advance.
NOTE
• User kits on the DTX502 are numbered from 51 to 100.
• If transferring multiple kit data files at the same time, be sure to assign a
different number to each of them.
• If you wish to modify the name of the kit itself, please use your DTX502
to do so.
Numbering Files to be Transferred
sample.mid 085sample.mid 085sample.mid
Original file name
Add a number to the
start of the file name
on your computer
Modified file name
sample.mid 085sample.mid
Modified file name
User song number
(three digits; between
061 and 100)
Original file name
sample.wav 09sample.wav
Modified file name
Wave Voice number
(two digits; between
01 and 20)
Original file name
UserKit.bin 072UserKit.bin
Modified file name
User kit number
(three digits; between
051 and 100)
Original file name

Transferring Song, Audio & Kit Data
4 DTX502 Reference Manual
1. Connect your DTX502 and computer using a USB cable, and then set up your DTX502 as follows.
• Access either the Kit area or Song area.
• Ensure that playback of a song or the metronome is stopped.
2. Double-click the Musicsoft Downloader shortcut on your desktop.
• If there is no Musicsoft Downloader shortcut on your desktop, open the Start menu, navigate to All Programs YAMAHA
Musicsoft Downloader 5, and click Musicsoft Downloader.
• If you are using Windows 8 and the Musicsoft Downloader icon is not displayed on the Start screen, right-click on a blank portion
and then click the All apps icon that is displayed. All installed applications will now be shown, and from here, you can click the
Musicsoft Downloader icon to launch it.
Musicsoft Downloader will launch and the main window will be displayed.
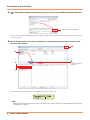
3. Click the Connection Check button at the bottom right of the main window to confirm the current
connection status.
An error message will be displayed if your DTX502 and computer are not connected or are unable to communicate properly. In such
a case, check your connections and/or MIDI driver in line with the message content.
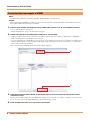
4. Click the Add File button at the top of the main window.
NOTE
The menu items and windows shown below may differ slightly depending on your OS version.
NOTICE
Before connecting your DTX502 to a computer, be sure to save any data that is currently being edited. Unsaved edits are restored to
their original condition upon connection to a computer.
Transferring files from computer to DTX502
4
3

Transferring Song, Audio & Kit Data
5 DTX502 Reference Manual
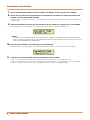
5. In the file selection window, select the files you wish to copy to your DTX502 and click the Open but-
ton.
Copies of the selected files will be temporarily stored in Musicsoft Downloader and listed in the corresponding area in the top half
of the main window.
6. Select the destination device for the copied files by clicking Electronic Musical Instruments at the
left of the main window.
The following message will be displayed on the drum trigger module’s LCD screen.
NOTE
Operations via the DTX502 control panel, input from the pads, and the Auto Power-Off function will be disabled while data is being
exchanged with a computer.
Select files and then click Open.
6
8
7
8
10
Select files and then
click Move.

Transferring Song, Audio & Kit Data
6 DTX502 Reference Manual
7. Select the destination memory area by clicking Flash Memory at the left of the main window.
8. Select the files to be transferred from the list of temporarily stored files in the top half of the main
window, and then click the Move button.
You will be asked to confirm if you wish to proceed. Clicking the Cancel button in this window will end the process without trans-
ferring any files.
9. Click the OK button to transfer the selected files from the temporary storage area to your DTX502.
The following message will be displayed on the drum trigger module’s LCD screen while transferring files.
10. Close the main window to shut down Musicsoft Downloader.
The following message will be displayed on the drum trigger module’s LCD screen as it disconnects from the computer.
11. Confirm that the data has been correctly transferred to your DTX502.
• In the case of song data, this can be done by accessing Song mode and selecting the corresponding User song.
• In the case of audio data, this can be done by accessing Kit mode and assigning the corresponding Wave Voice to an instrument.
• In the case of kit data, this can be done by accessing Kit mode and selecting the corresponding User kit.
NOTICE
Do not disconnect the USB cable while files are being transferred. In addition, the DTX502 should not be operated at this time.
Failure to avoid these precautions can not only prevent transferred data from being saved correctly, but in certain cases, can also
lead to the entire DTX502 memory being deleted.

Transferring Song, Audio & Kit Data
7 DTX502 Reference Manual
1. Connect your DTX502 and computer using a USB cable, and set up your DTX502 as follows.
• Access either the Kit area or Song area.
• Ensure that playback of a song or the metronome is stopped.
2. Double-click the Musicsoft Downloader shortcut on your desktop.
• If there is no Musicsoft Downloader shortcut on your desktop, open the Start menu, navigate to All Programs YAMAHA
Musicsoft Downloader 5, and click Musicsoft Downloader.
• If you are using Windows 8 and the Musicsoft Downloader icon is not displayed on the Start screen, right-click on a blank portion
and then click the All apps icon that is displayed. All installed applications will now be shown, and from here, you can click the
Musicsoft Downloader icon to launch it.
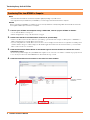
3. Click the Connection Check button at the bottom right of the main window to confirm the current
connection status.
An error message will be displayed if your DTX502 and computer are not connected or are unable to communicate properly. In such
a case, check your connections and/or MIDI driver in line with the message content.
4. Click Electronic Musical Instruments at the left of the main window.
NOTE
• The menu items and windows shown below may differ slightly depending on your OS version.
• The songs that come pre-installed on your DTX502 (i.e., Preset songs) cannot be transferred to a computer.
NOTICE
Before connecting your DTX502 to a computer, be sure to save any data that is currently being edited. Unsaved edits are restored to
their original condition upon connection to a computer.
Transferring Files from DTX502 to Computer
6
4
5
3
Select files and then
click Move.

Transferring Song, Audio & Kit Data
8 DTX502 Reference Manual
The following message will be displayed on the drum trigger module’s LCD screen.
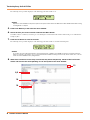
5. Click Flash Memory at the left of the main window.
6. Select the files you wish to transfer and click the Move button.
You will be asked to confirm if you wish to proceed. Clicking the Cancel button in this window will end the process without trans-
ferring any files.
7. Click the OK button to start file transfer.
The following message will be displayed on the drum trigger module’s LCD screen while transferring files.
8. When files have been successfully transferred, they will be temporarily stored in Musicsoft Down-
loader and listed in the corresponding area in the top half of the main window.
NOTICE
Operations via the DTX502 control panel, input from the pads, and the Auto Power-Off function will be disabled while data is being
exchanged with a computer.
NOTICE
Do not disconnect the USB cable while files are being transferred. In addition, the DTX502 should not be operated at this time.
Failure to avoid these precautions can not only prevent transferred data from being saved correctly, but in certain cases, can also
lead to the entire DTX502 memory being deleted.
10
10
8,9
13

Transferring Song, Audio & Kit Data
9 DTX502 Reference Manual
9. From the list of temporarily stored files, select the files that you wish to transfer to your computer.
10. Click My Computer in the list at the left of the main window, choose a destination for the files, and
click the Move button.
You will be asked to confirm if you wish to proceed. Clicking the Cancel button in this window will end the process without trans-
ferring any files.
11. Click the OK button to transfer the selected files from the temporary storage area to your computer.
12. Confirm that the data has been correctly transferred to your computer.
13. Close the main window to shut down Musicsoft Downloader.
The following message will be displayed on the drum trigger module’s LCD screen as it disconnects from the computer.

10 DTX502 Reference Manual
Connecting to Smart Devices
Using the procedure described below, you can connect your DTX502 to an iPad, iPhone, or iPod
touch and use it with a range of specially developed apps.
1. Open the following web page and select the app you wish to use.
http://www.yamaha.com/
2. Read the app’s system requirements to confirm that it supports both the DTX502 and the smart
device you wish to use.
Supported musical instruments, compatibility with different smart device models, and other system requirements vary from app to
app. Details are provided on the above web page and should be checked carefully before proceeding.
3. Confirm the required mode of connection and make the necessary preparations.
The mode of connection and other requirements vary from app to app. Details are provided on the above web page and should be
checked carefully before proceeding.
Downloading the app
Click or tap the App Store icon for the selected app. The corresponding App Store page will open, and from there, you can download
the app.
NOTE
Certain apps can be used without having to connect a musical instrument to the smart device.

11 DTX502 Reference Manual
MIDI Reference Material
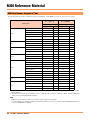
The following table shows the note numbers used by your DTX502 to output MIDI notes when the various pads are struck.
*1: These MIDI notes are output only when using a PCY100 as your hi-hat. For details, read the Cup shots section of the DTX502
Owner’s Manual.
*2: This MIDI note is output only when DblBass is set to “on” and the hi-hat controller is operated. For details, read the Double Bass
Switch section of the DTX502 Owner’s Manual.
Input source
Preset kits
No. 1 to No. 49
Preset kits
No. 50 (GM Kit)
Note assignment Note assignment
Number (decimal) Note Number (decimal) Note
Snare
snare Head 38 D1 38 D1
snare OpenRim 40 E 1 40 E 1
snare ClosedRim 37 C# 137C# 1
snare(off) Head 31 G 0 31 G 0
snare(off) OpenRim 34 A# 034A# 0
snare(off) ClosedRim 27 D# 027D# 0
Tom
tom1 Head 48 C2 48 C2
tom2 Head 47 B 1 47 B 1
tom3 Head 43 G 1 43 G 1
Ride
ride Bow 51 D# 251D# 2
ride Edge 52 E 2 57 A 2
ride Cup 53F253F2
Crash
crash Bow 59 B 2 59 B 2
crash Edge 49 C# 249C# 2
crash Cup 55 G 2 55 G 2
HiHat
hihat Open 46 A# 146A# 1
hihat EdgeOpen 78 F# 446A# 1
hihat CupOpen (*1) 85C# 546A# 1
hihat Close 42 F# 142F# 1
hihat EdgeClose 79 G 4 42 F# 1
hihat CupClose (*1) 86D542F# 1
hihat FootClose 44 G# 144G# 1
hihat FootSplash 83B446A# 1
Kick
kick 1 36C136C1
kick 2 (*2) 35 B 0 35 B 0
Pad
pad 8 57 A 2 52 E 2
pad 10 15 D# -1 54 F# 2
pad 11 16 E -1 56 G# 2
pad 1
2 56 G# 265F3
NOTE
• MIDI notes are not output for input sources to which a pad song has been assigned.
• You can modify the note number assignments shown above. Details on how to do so can be found in the MIDI Note Number sec-
tion of the DTX502 Owner’s Manual.
MIDI Note Numbers Assigned to Pads

MIDI Reference Material
12 DTX502 Reference Manual
1. G e n e r a l
1. 1 S c o p e
The specifications described herein apply to transmission and recep-
tion of MIDI data by a DTX502 drum trigger module.
1.2 Compliance
The specifications described herein comply with the MIDI 1.0 stan-
dard.
1.3 Legend
The following symbol has a special meaning herein.
• $: Placed in front of hexadecimal numbers.
2. Channel Messages
2.1 Key On & Key Off
Key On and Key Off messages are transmitted and received.
Range of notes received: 0 (C-2) to 127 (G8)
Velocity range: 1 to 127 (i.e., Note On only)
2.2 Control Change
2.2.1 Bank Select MSB (0), LSB (32)
Bank Select MSB and LSB messages are received. These mes-
sages can also be sent by turning on the output of MIDI Program
Change messages in the KitCommon area.
MSB = 0, LSB = any value: General MIDI instrument voices
MSB = 127, LSB = any value: General MIDI drum voices (see Note 1)
MSB = 125, LSB = 1: Drum kits (see Note 2)
* Note 1
When received, GM drum voices are selected for song parts.
Playback parts do not change.
* Note 2
The drum kit having the same number as the received program
number is selected. If received on MIDI channel 10, the same
drum kit will also be selected for playback parts.
2.2.2 Modulation (1)
Modulation messages are received but not transmitted.
2.2.3 Foot Controller (4)
Foot Controller messages are transmitted and received.
2.2.4 Portamento Time (5)
Portamento Time messages are received but not transmitted.
2.2.5 Data Entry (MSB = 6, LSB = 38)
Data Entry messages are received but not transmitted. These
messages are used to specify RPN data.
2.2.6 Main Volume (7)
Main Volume messages are received. These messages can also
be sent by turning on the output of MIDI Control Change mes-
sages in the KitCommon area.
2.2.7 Pan (10)
Pan messages are received. These messages can also be sent
by turning on the output of MIDI Control Change messages in the
KitCommon area.
A value of 0 corresponds to the far left of the stereo image; a
value of 127, to the far right.
2.2.8 Expression (11)
Expression messages are received but not transmitted.
2.2.9 Hold 1 (64)
Hold 1 messages are received but not transmitted.
2.2.10 Portamento Switch (65)
Portamento Switch messages are received but not transmitted.
2.2.11 Sostenuto (66)
Sostenuto messages are received but not transmitted.
2.2.12 Harmonic Content (71)
Harmonic Content messages are received but not transmitted.
2.2.13 EG Release Time (72)
EG Release Time messages are received but not transmitted.
2.2.14 EG Attack Time (73)
EG Attack Time messages are received but not transmitted.
2.2.15 Brightness (74)
Brightness messages are received but not transmitted.
2.2.16 Effect 1 Depth (91)
Effect 1 Depth messages are received but not transmitted. The
message value corresponds to the Reverb Send level.
2.2.17 Data Increment (96), Decrement (97)
Data Increment and Decrement messages are received but not
transmitted.
2.2.18 RPN
$00/$00 Pitch bend sensitivity: Received but not transmitted.
$00/$01 Fine tuning: Received but not transmitted.
$00/$02 Coarse tuning: Received but not transmitted.
$7F/$7F NULL: Received but not transmitted.
2.3 Channel Mode
All types of Channel Mode message are received, but none are trans-
mitted.
2.3.1 All Sound Off (120)
Upon receipt of an All Sound Off message, the DTX502 mutes all
voices currently playing on the corresponding channel.
2.3.2 Reset All Controllers (121)
Upon receipt of a Reset All Controllers message, the DTX502
resets the following controllers to their initial values:
Pitch Bend, Modulation, Expression, Hold 1, Portamento, Soste-
nuto, RPN, Harmonic Content, Release Time, Attack Time, and
Brightness
2.3.3 All Note Off (123)
Upon receipt of an All Note Off message, the DTX502 mutes all
notes currently playing on the corresponding channel. If Hold 1 or
Sostenuto is turned on, however, muting will not take place until
said controller is turned off.
2.3.4 Omni Off (124)
Upon receipt of an Omni Off message, the DTX502 acts in the
same way as if an All Notes Off message had been received.
2.3.5 Omni On (125)
Upon receipt of an Omni On message, the DTX502 acts in the
same way as if an All Notes Off message had been received.
2.3.6 Mono (126)
Upon receipt of a Mono message, the DTX502 acts in the same
way as if an All Sound Off message had been received.
2.3.7 Poly (127)
Upon receipt of a Poly message, the DTX502 acts in the same
way as if an All Sound Off message had been received.
MIDI Data Format

MIDI Reference Material
13 DTX502 Reference Manual
2.4 Program Change
Program Change messages are received. These messages can also
be sent by turning on the output of MIDI Program Change messages
in the KitCommon area.
2.5 Pitch Bend
Pitch Bend messages are received but not transmitted.
2.6 Channel Aftertouch
Channel Aftertouch messages are neither transmitted nor received.
2.7 Polyphonic Aftertouch
Polyphonic Aftertouch messages are transmitted but not received.
3. System Exclusive Messages
3.1 Universal Non-Real Time
3.1.1 General MIDI System On
$F0 $7E $7F $09 $01 $F7
General MIDI System On messages are received but not trans-
mitted. Receipt thereof does not cause the kit number or reverb
type of the playback part to change.
3.1.2 Identity Request
$F0 $7E $7F $06 $01 $F7
Upon receipt of the above message, the DTX502 transmits an
Identity Reply message. These messages are received but not
transmitted.
3.1.3 Identity Reply
$F0 $7E $7F $06 $02 $43 $00 $41 $4B $06 $00 $00 $00 $7F
$F7
Identity Reply messages are transmitted but not received.
3.2 Universal Real Time
3.2.1 MIDI Master Volume
$F0 $7F $7F $04 $01 $XX $mm $F7
$XX is ignored. $mm represents the volume data. MIDI Master
Volume messages are received but not transmitted.
3.3 Parameter Change
3.3.1 XG System On
$F0 $43 $10 $4C $00 $00 $7E $00 $F7
Upon receipt of an XG System On message, the DTX502 acts in
the same way as if a General MIDI System On message had
been received. XG System On messages are received but not
transmitted.
4. System Common Messages
System Common messages are neither transmitted nor received.
5. System Real Time Messages
5.1 Timing Clock
Timing Clock messages are transmitted but not received.
5.2 Start & Stop
Start and Stop messages are transmitted but not received.
5.3 Active Sensing
Reception: If, following receipt of an Active Sensing message, no sub-
sequent MIDI data is received for approximately 300 milliseconds, the
DTX502 will mute all voices currently playing.
Transmission: The DTX502 constantly transmits Active Sensing mes-
sages at intervals within approximately 300 milliseconds.

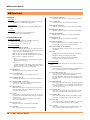
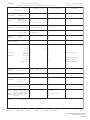
MIDI Implemantation Chart
U.R.G., Digital Musical Instruments Division
© 2013 Yamaha Corporation
302PO-A0
YAMAHA [ Drum Trigger Module ] Date :10-Dec-2012
Model DTX502 MIDI Implementation Chart Version : 1.0
Transmitted Recognized Remarks
Function...
Basic Default 1 - 16 1 - 16
Channel Changed x x
Default x 3
Mode Messages x x
Altered ************** x
Note 0 - 127 0 - 127
Number : True voice ************** 0 - 127
Velocity Note ON o 9nH,v=1-127 o 9nH,v=1-127
Note OFF x 9nH,v=0 x
After Key's o x
Touch Ch's x x
Pitch Bend x o
0,32 o *1 o Bank Select
4 o o
7,10 o *1 o
1,5,11 x o
Control 6,38 x o Data Entry
64-66 x o
Change 71-74 x o
96,97 x o RPN Inc/Dec
91 x o Effect Depth
100,101 x o RPN LSB,MSB
Prog o 0 - 127 *1 o 0 - 127
Change : True # **************
System Exclusive x o
: Song Pos. x x
Common : Song Sel. x x
: Tune x x
System : Clock o x
Notes: *1 transmit if switch is on.
Real Time: Commands o x
:All Sound Off x o(120,126,127)
Aux :Reset All Cntrls x o(121)
:Local ON/OFF x x
Mes- :All Notes OFF x o(123-125)
sages:Active Sense o o
:Reset x x
Mode 1 : OMNI ON , POLY Mode 2 : OMNI ON ,MONO o : Yes
Mode 3 : OMNI OFF, POLY Mode 4 : OMNI OFF,MONO x : No
-
 1
1
-
 2
2
-
 3
3
-
 4
4
-
 5
5
-
 6
6
-
 7
7
-
 8
8
-
 9
9
-
 10
10
-
 11
11
-
 12
12
-
 13
13
-
 14
14


Yamaha DTX Drums DTX502 Kullanım kılavuzu
- Tip
- Kullanım kılavuzu
- Bu kılavuz aynı zamanda aşağıdakiler için de uygundur:
diğer dillerde
- español: Yamaha DTX Drums DTX502 Manual de usuario
- français: Yamaha DTX Drums DTX502 Manuel utilisateur
- italiano: Yamaha DTX Drums DTX502 Manuale utente
- svenska: Yamaha DTX Drums DTX502 Användarmanual
- 日本語: Yamaha DTX Drums DTX502 ユーザーマニュアル
- čeština: Yamaha DTX Drums DTX502 Uživatelský manuál
- polski: Yamaha DTX Drums DTX502 Instrukcja obsługi
- Deutsch: Yamaha DTX Drums DTX502 Benutzerhandbuch
- português: Yamaha DTX Drums DTX502 Manual do usuário
- English: Yamaha DTX Drums DTX502 User manual
- dansk: Yamaha DTX Drums DTX502 Brugermanual
- русский: Yamaha DTX Drums DTX502 Руководство пользователя
- suomi: Yamaha DTX Drums DTX502 Ohjekirja
- Nederlands: Yamaha DTX Drums DTX502 Handleiding
- română: Yamaha DTX Drums DTX502 Manual de utilizare
İlgili makaleler
-
Yamaha DTX502 Kullanım kılavuzu
-
-
-
-
-
-
-
Yamaha DGX-530 El kitabı
-
Yamaha DGX-220 Kullanım kılavuzu
-
Yamaha YPG-525 El kitabı