
HG 2520 E
Information
000000000 05/2015 Technische Änderungen vorbehalten.
RUS CN BG LV LT EST HR SLO RO PL SK CZ HTR GR NFIN DK S P E I NL FGB D
STL-5557-15_BDAL_HG_2520_E_A5.indd 1 09.06.15 09:14
STEINEL Vertrieb GmbH
Dieselstraße 80-84
33442 Herzebrock-Clarholz
Tel: +49/5245/448-188
www.steinel.de
Contact
www.steinel.de/contact
DEGBFRNLITESPTSEDKFINOGRTRHUCZSKPLROSIHREELTLVRUBGCN

- 2 - - 3 -
- 3 -
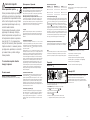
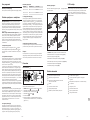
HG 2520 E
14
11
1
2
15
7
6
9 8
3 4 5 6
8
9
10
13
7
12
HG 2520 E
29
- 2 -
HG 2220 E
HG2220E_HG2420E_DE_HG2120E_HG2320E 13.06.14 11:06 Seite 2
21 2216
15
17 18 19
6
20
7 8
28
23 2524
- 2 -
HG 2220 E
HG2220E_HG2420E_DE_HG2120E_HG2320E 13.06.14 11:06 Seite 2
- 2 -
HG 2220 E
HG2220E_HG2420E_DE_HG2120E_HG2320E 13.06.14 11:06 Seite 2
31 5
- 2 -
HG 2220 E
HG2220E_HG2420E_DE_HG2120E_HG2320E 13.06.14 11:06 Seite 2
14
- 2 -
HG 2220 E
HG2220E_HG2420E_DE_HG2120E_HG2320E 13.06.14 11:06 Seite 2
4
- 2 -
HG 2220 E
HG2220E_HG2420E_DE_HG2120E_HG2320E 13.06.14 11:06 Seite 2
2
9 10 1211
- 2 -
HG 2220 E
HG2220E_HG2420E_DE_HG2120E_HG2320E 13.06.14 11:06 Seite 2
13
2726

- 4 - - 5 -
Bitte machen Sie sich vor Gebrauch mit dieser Bedienungs-
anleitung vertraut. Denn nur eine sachgerechte Handhabung
Betrieb.
Original-Bedienungsanleitung
Zu diesem Dokument
Lesen und beachten Sie diese
Hinweise, bevor Sie das Gerät
benutzen. Bei Nichtbeachtung
der Be die nungsanleitung kann
das Gerät zu einer Gefahren quelle
werden.
-
-
-
betreiben.
Erstinbetriebnahme
Rauch austreten. Der Rauch entsteht
Berücksichtigen Sie
-
-
-
vorbehalten.
DE
Sicherheitshinweise
Schützen Sie sich vor
elektrischem Schlag.
es in Betrieb ist.
Bewahren Sie Ihre
Werkzeuge sicher auf.
-
-
Personen mit verringerten physi-
-
-
lich des sicheren Gebrauchs des
verstehen.
spielen.
-
Überlasten Sie Ihre
Werkzeuge nicht.
Sie arbeiten besser und sicherer im
angegebenen Leistungsbereich.
Stellen Sie immer sicher, dass
das Ausblasrohr und auch in
Kombination mit montierter Düse
nie vollständig verdeckt oder ver-
schlossen ist. Ein Schaden an der
Heizung oder Motor kann sonst
die Folge sein.
Achten Sie auf giftige Gase
und Entzündungsgefahr.
-
-
-
die in der Bedienungsanleitung ange-
Der Gebrauch anderer als der in der
Bedienungsanleitung oder im Kata-
Sicherheitshinweise
DE

- 6 - - 7 -
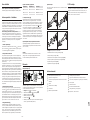
Voreingestellte Programme
5. Speicherfunktion [S]
-
9
im LCD blinkt um
-
-
Temperaturerfassung am Werkstück
(Art.Nr.: 007690).
Heizung
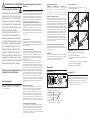
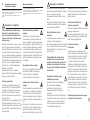
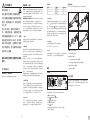
Kabelwechsel
1. Wichtig!
2. Schraube
d
a
3. Zugentlastung
b
c
5. Kabel
e
Reparaturen nur vom
Elektrofachmann
stimmungen.
Betreiber entstehen.
Resthitzeanzeige 5
-
bei direktem Hautkontakt mit dem
Ab einem Betrieb von 90 Sekunden
am Ausblasrohr bei Raumtemperatur
Bewahren Sie diese Sicherheits-
hinweise beim Gerät gut auf.
Sicherheitshinweise
Das Gerät ist mit einem Thermoschutz ausgestattet:
komplett ab.
Für Ihre Sicherheit
Gerätebeschreibung - Inbetriebnahme
Bitte beachten Sie:
richtet sich nach Material und beabsichtigter Bearbei-
Vorsicht beim Wechseln heißer Düsen! Wenn Sie das
-
-
1. Inbetriebnahme
12
10
2. Einstellung der Temperatur
Die Temperatur kann in einem Bereich von 50 -
Joystick 10
+/–-
-
-
-
peratur erreicht ist.
3. Luftmenge einstellen
8
-
4. Programmbetrieb [P]
gram men 2 - -
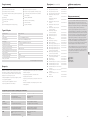
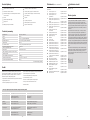
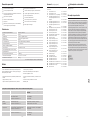
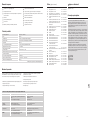
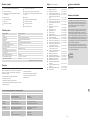
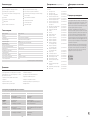
Programm Temperatur °C Luft l/min
1 250 ca. 350
2 350 ca. 400
3 450 ca. 500
4 550 ca. 400
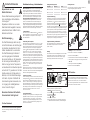
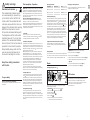
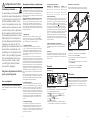
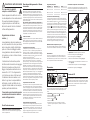
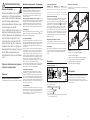
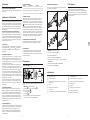
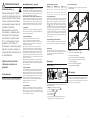
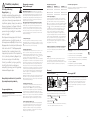
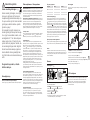
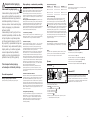
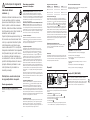
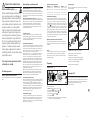
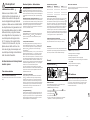
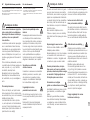
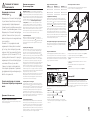
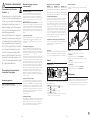
Heizungswechsel
1. Wichtig!
Abb. 1).
Abb. 1).
4.Abb. 2).
(Abb. 2/3).
(Abb. 3).
Abb. 4).
13
1.
3.
2.
4.
-
unseren Service unter 05245-448-188.
LOC-Funktion
Reparatur
DE

- 8 - - 9 -
220 -
2300 W
50 -
150 -
4000 Pa
10.000 h
ja
Ja
2 2
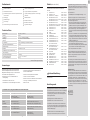
Leistung
Temperatur
Ø Ausblasrohr
Thermosicherung
Emissionsschalldruckpegel
Technische Änderungen vorbehalten
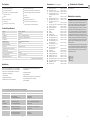
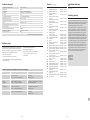
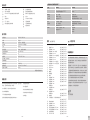
Anwendungen
Zubehör (siehe Abb. Seite 2)
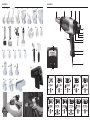
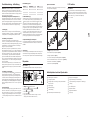
Geräteelemente
Edelstahl-Ausblasrohr
Belastbares Gummikabel
1
12
13
14
15
2
3
4
6
7
8
10
11
5
9
Technische Daten
Sie bereit.
1
2
3
4
5
6
7
8
9 Art.-Nr. 093211
10
11 Planenschere Art.-Nr. 010423
12
13
14
15
16
17
18
19
20
21
22
23
24
25
26
27
28
29
Herstellergarantie
-
-
stehenden Bedingungen:
Wir leisten Garantie durch kostenlose Behebung der
Konformitätserklärung
(siehe Seite 160)
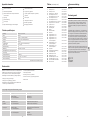
Werkstoff
PVC hart
PE hart
(HDPE)
PP
Polypropylen
ABS
Anwendungsarten
Erkennungsmerkmale
scheppernder Klang
scheppernder Klang
scheppernder Klang
Auswahlhilfe für den richtigen Schweißdraht beim Kunststoffschweißen
DE
-
-
die Garantie ausgeschlossen:
-
-
brauch des Produkts oder Missachtung der Bedienungs-
-
-
-
-
-
sches Recht unter Ausschluss des Übereinkommens der
Geltendmachung
-
-
HERSTELLER
1
3
JAHR
DEU
GARANTIE
5
HERSTELLER
GARANTIE
HERSTELLER
GARANTIE

- 10 - - 11 -
properly.
Translation of the original
operating instructions About this document
Read and observe this information
before using the tool. Failure to
observe the operating instructions
may result in the tool becoming a
source of danger.
precautions to avoid electric shock
unattended.
Children should be supervised to
the tool.
First time of use
Take the ambient conditions
into account.
-
direct the tool at one and the same
atmosphere. Escaping heat may be
Protect yourself from
electric shock.
Do not leave the tool unattended
Safety warnings
Always ensure that the blow-out
tube (including in combination
with mounted nozzle) is never
completely covered or sealed.
Damage to the heating element or
motor may otherwise result.
Beware of toxic gases and
-
similar materials.
-
cessories and attachments that are
Using attachments or accessories
other than those recommended in
the operating instructions or cata-
logue may result in personal injury.
Repairs must only be
electrician.
Store your tools in a
safe place.
-
children's reach.
This tool may be used by children
aged 8 or above and by persons
-
are supervised or have been given
involved.
the tool.
Do not overload your tools.
-
cord. Do not unplug the tool by pul-
edges.
Safety warnings
GB
GB

- 12 - - 13 -
Residual heat indicator
The residual heat indicator serves
-
-
-
-
perature. The residual heat indicator
user as care must be taken at all
Keep these safety precautions
with the tool.
Safety warnings
5
The tool is protected from overheating:
overloaded.
For your safety
Tool description - Operation
Please note
-
Take care when changing hot nozzles! When using
no disturbances are expected.
1. Operation
12
10
2. Setting the temperature
-
indicated on the display. The joystick 10 is used as an input
+/–
-
selected temperature is reached.
3. Setting airow rate
mode 8
-
4. Programming mode [P]
operation.
Preset programmes
5. Memory function [S]
-
9
on the
has been changed. To record this setting in the user pro-
approx. 2 s. The settings entered have been saved once the
memory symbol stays on all the time. To return to normal
Temperature measurement on the workpiece
Heating element
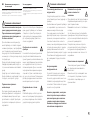
Changing the power cord 13
1. Important!
d
a.
3. Release cable grip
b.
4. Undo mains terminals
c.
5. Pull out cable
e.
Programme Temperature °C Air l/min
1 250 approx. 350
2 350 approx. 400
3 450 approx. 500
4 550 approx. 400
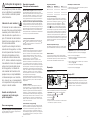
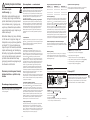
Changing the heating element
The plug-in heating element in the HG 2520 E can be
1. Important!
(Fig. 1).
3. Remove guard sleeve (Fig. 1).
(Fig. 2).
(Fig. 2/3).
(Fig. 3).
(Fig. 4).
Repair
a
1.
3.
2.
4.
please contact our Service Department on
+44/1733/366-700.
LOC function
GB

- 14 - - 15 -
2300 W max.
4000 Pa
Yes
Yes
2 / K = 0.08 m/s2
0.84 kg
Temperature
Air pressure
Residual heat indicator
Protection class
Thermal cut-out
Emission sound pressure level
Total vibration value
Applications
- Working rigid thermoplastic materials in plastics and
tank construction.
- Shaping thermoplastics.
- Activating and removing glues and hot-melt adhesives.
- Smoothing leather.
Tool features
1
12
13
14
2
3
4
6
7
8
10
11
5
9
Technical Specications
Accessories
Manufacturer's warranty
-
-
shall be excluded.
the appropriate Service Centre or handed in to the dealer
Declaration of Conformity
Removable guard sleeve
temperature scanner
Hanger
Residual heat indicator
LCD display
Programme selector button and memory button
Air inlet
Material
Rigid PVC
Rigid PE
(HDPE)
Polyethylene
PP
Polypropylene
ABS
Applications
technical mouldings
Characteristic signs
crashing sound
crashing sound
crashing sound
crashing sound
Guide for selecting the right type of welding rod for welding plastics
1
2
3
4
straight Prod. No. 013240
5
6
7
8
9
10
11 Tarpaulin shears Prod. No. 010423
12
13 Weld slide Prod. No. 093013
14
15
16
17
18
19
20
21 Jointing plane Prod. No. 093112
22
23
24
25
26
27
28
29
GB
MANUFACTURER'S
1
3
5
YEAR
GB
WARRANTY
MANUFACTURER'S
YEAR
WARRANTY
MANUFACTURER'S
YEAR
WARRANTY

- 16 - - 17 -
Avant d'utiliser l'
mode d'-
Nous souhaitons que votre nouveau pistolet à air chaud vous
Traduction des instructions
d'utilisation originales
À propos de ce document
Veuillez lire ces consignes avant
d'utiliser l'appareil. L'appareil peut
devenir une source de danger si le
mode d'emploi n'est pas respecté.
Lors de l'utilisation d'-
-
-
sure et d'incendie. Un incendie peut
survenir et des personnes peuvent être
'
Avant d'utiliser l'
-
lance.
jouent pas avec l'appareil.
Première mise en service
à cause de la chaleur.
-
vail lors de la première utilisation de
Tenez compte des conditions
ambiantes.
-
-
pas longtemps vers le même endroit.
N
d'une atmosphère explosive. La cha-
Protection contre les
accidents électriques.
-
Stockez l'appareil dans un
endroit sûr.
-
dir avant de le remballer.
Lorsqu'il n
-
-
pareil et s'ils comprennent les risques
l'appareil.
-
Ne soumettez pas votre
appareil à une surcharge
électrique.
l'huile et des arêtes coupantes.
Veillez toujours à ce que le tube
de propulsion d'air, même combi-
né avec le terminal numérique de
commande monté, ne soit jamais
complètement dissimulé ou obturé.
Sinon, le chauffage ou le moteur
risque de subir des dommages.
Attention aux émanations de
gaz toxiques et au danger
-
-
duire sous l'action de la chaleur.
et d
uniquement les accessoires ou les
dans le mode d'emploi et recomman-
accessoires autres que ceux recom-
risques de blessures.
Les réparations ne doivent
être effectuées que par un
spécialiste en électricité.
-
-
a risque d'accident pour l'utilisateur.
'-
Consignes de sécurité
Consignes de sécurité
FR
FR

- 18 - - 19 -
chaleur résiduelle 5
-
direct avec le tube de propulsion d'air
-
ment après avoir
-
-
-
ture au niveau du tube de propulsion
-
lors de la manipulation des pistolets à
air chaud.
Conservez bien ces consignes de
sécurité à proximité de l'appareil.
Consignes de sécurité
L'appareil est équipé d'une protection thermique :
de surcharge.
Pour votre sécurité
Description de l'appareil -
Mise en service
Note
la taille du jet d'air chaud.
Soyez prudent en changeant les buses lorsqu'elles
sont chaudes !
1. Mise en service
MARCHE/ARRÊT 12 -
nette 10
la vitesse du ventilateur.
2. Réglage de la température
-
La manette
10
En appuyant brièvement sur la manette « +/–
-
3. Réglage du débit d'air
8 -
-
entre min. 150 l/min et max. 500 l/min.
4. Fonctionnement programmé [P]
-
normal.
Programmes préréglés
5. Fonction mémoire [S]
9
-
Saisie de la température sur la pièce à usiner
à usiner.
Corps de chauffe
-
Changement du câble secteur 13
1. Important !
2.
d
a.
3.
b.
4.
c.
e.
etc.).
Programme Température °C Air l/min
1 250 350 env.
2 350 400 env.
3 450 500 env.
4 550 400 env.
Changement du chauffage
HG 2520 E
1. Important !
(ill. 1).
(ill. 1).
4.
(ill. 2).
(ill. 2/3).
(ill. 3).
(ill. 4).
Réparation
Fonction LOC
(Lockable Override Control)
1.
3.
2.
4.
FR

- 20 - - 21 -
2300 W
4000 Pa
10 000 heures
Raccordement au secteur
Puissance
Ø du tube de propulsion d'air
Classe de protection (sans raccordement à la terre)
Utilisations
-
rapidement d'autres exemples d'utilisations.
-
- Traitement de tous les thermoplastiques durs dans la
construction de cuves et avec des matières plastiques.
- Activation et retrait des colles classiques et des colles
- Lissage du cuir.
Accessoires (voir ill. page 2)
Eléments de l'appareil
Tube de propulsion d'air en inox
Manchon de protection amovible
Capuchon amovible pour poser le scanner de
Suspension
Ecran ACL
Caractéristiques techniques
-
soires à votre disposition.
1
2
3
4
5
6
7
8
9
10
11
12
13
14
15
16
17
18 Patin de soudure rapide de 3 mm
19 Patin de soudure rapide de 4 mm
20 Patin de soudure rapide de 5 mm
21
22
23
24
25
26
27
28
29
Garantie du fabricant
-
-
-
-
objets sont exclus de la garantie.
d'un ticket de caisse portant la date d'achat et le cachet
du vendeur ou s'il est remis au vendeur dans les 6 pre-
miers mois de la garantie.
Déclaration de conformité
(voir page 160)
1
12
13
14
15
2
3
4
6
7
8
10
11
5
9
Matériau
PVC rigide
PE rigide
(HDPE)
PP
Polypropylène
ABS
Utilisations
Comment reconnaître les différents types
de matière plastique ?
Guide de sélection de la bonne baguette à souder pour le soudage du plastique
FR
1
3
5
FR
DE GARANTIE
AN
FABRICANT
DE GARANTIE
ANS
FABRICANT DE GARANTIE
ANS
FABRICANT

- 22 - - 23 -
Vertaling van de originele
handleiding
Over dit document
Deze voorschriften voor gebruik
van het apparaat lezen en in acht
nemen. Wanneer de gebruiksaan-
veroorzaken.
-
paraten moeten ter voorkoming van
letsel en brandgevaar de volgende
-
kunnen raken.
Controleer het apparaat voor de
ingebruikneming op eventuele be-
-
beschadiging niet in gebruik.
ingeschakeld laten.
apparaat spelen.
Eerste ingebruikneming
rook ontsnappen. De rook ontstaat
-
-
-
-
Houd ook rekening met
omgevingsinvloeden.
Stel elektrisch gereedschap nooit bloot
aan regen. Gebruik elektrisch gereed-
schap niet in vochtige toestand en niet
-
raat in de buurt van brandbare materi-
-
paraat niet gebruiken in een explosieve
Bescherm uzelf tegen
elektrische schokken.
-
voorbehouden.
Veiligheidsvoorschriften
-
Berg uw gereedschap
veilig op.
Zet het apparaat na gebruik op het
het opruimt.
op een voor kinderen onbereikbare
Dit apparaat mag door kinderen
-
lige gebruik van het apparaat en de
risico‘s die door het gebruik ontstaan.
Laat kinderen niet met het apparaat
spelen.
-
heden (door de gebruiker) mogen al-
Voorkom overbelasting
van uw gereedschap.
aangegeven vermogen.
Draag het apparaat niet aan de kabel
en gebruik de kabel niet om de stek-
ker uit het stopcontact te trekken.
Zorg er steeds voor dat de uitlaat-
buis ook in combinatie met een
gemonteerd mondstuk nooit ge-
heel afgedekt of afgesloten is. An-
ders kan hierdoor schade aan de
verwarming of de motor ontstaan.
Let op giftige gassen en
ontbrandingsgevaar.
-
en ontbrandingsgevaar.
-
sluitend toebehoren en aanvullende
-
-
cent van het apparaat aanbevolen
Het gebruik van andere dan in de
toebehoren kan leiden tot persoon-
Laat reparaties alleen door
een elektro-vakman
uitvoeren.
Dit elektrische gereedschap voldoet
-
anders kunnen ongelukken ontstaan
voor de gebruiker.
Veiligheidsvoorschriften
NL
NL

- 24 - - 25 -
Aanduiding restwarmte 5
het hete uitblaasmondstuk te voor-
komen. De aanduiding voor de rest-
-
-
gedaald. Als het apparaat korter dan
-
Berg deze veiligheidsvoorschriften
Veiligheidsvoorschriften
Dit apparaat is voorzien van een thermobeveiliging:
helemaal uit.
Voor uw veiligheid
Apparaatbeschrving - ingebruikname
Let op: de optimale
pagina Accessoires op de omslag) kan de hete lucht precies
Wees voorzichtig b het verwisselen van hete mond-
stukken!
erop letten dat het apparaat goed en stevig op een schone
ondergrond staat.
-
1. Ingebruikname
12 aan
de achterkant van de greep in- en uitgeschakeld. Met de
joystick 10
resp. het toerental van de ventilator geregeld.
2. Temperatuurinstelling
De temperatuur kan met de joystick in een bereik van
display getoond. De joystick 10 dient als invoertoets met
Door kort te drukken op de '+/–' van de joystick kan de
-
bereikt.
-
3. Luchtstroom instellen
knop voor de luchthoeveelheidmodus 8
ventilatorsymbool knippert. Daarna voert u de instelling uit
met de joystick. Als de luchthoeveelheid 5 seconden niet
de luchtstroom. Wanneer na het instellen van de luchtstroom
De luchthoeveelheid varieert van min. 150 l/min tot max.
500 l/min.
4. Programmawerking [P]
-
Vooraf ingestelde programma's
5. Geheugenfunctie [S]
-
-
grammatoets 'P' 9
-
stroom in. Het geheugensymbool op het display knippert
-
programmatoets drukken tot het programmasymbool op het
Temperatuurregistratie op het werkstuk
007690).
Verwarming
Na gebruik kan de heteluchtbrander HG 2520 E direct uitge-
Fnstoflter
Vervanging van de kabel
1. Belangrk! De stekker uit het stopcontact trekken.
d
a .
3. Trekontlasting
b losmaken.
c losmaken.
5. Kabel
e eruit trekken.
Programma Temperatuur °C Lucht l/min.
1 250 ca. 350
2 350 ca. 400
3 450 ca. 500
4 550 ca. 400
Verwisselen van de verwarming
HG 2520 E is ingestoken
1. Belangrk! De stekker uit het stopcontact trekken.
2. Schroeven van de beschermhuls losdraaien (afb. 1).
(afb. 1).
4. De 4 schroeven aan het einde van het uitblaasmondstuk
losdraaien (afb. 2).
-
(afb. 2/3).
(afb. 3).
7. Beschermhuls vastschroeven (afb. 4).
Reparatie
13
HG 2520 E
ingesteld.
LOC-functie
1.
3.
2.
4.
NL

- 26 - - 27 -
2300 W
4000 Pa
ca. 10.000 uur
ja
ja
2 2
Netaansluiting
Temperatuur
Luchthoeveelheid
Luchtdruk
Ø uitblaasmondstuk
Levensduur motor
Netsnoer
(geen geaarde aansluiting)
Thermobeveiliging
Emissie-geluidsdrukniveau
Toepassingsmogelkheden
-
- Drogen van vochtige oppervlakken.
- Gladmaken van leer.
Accessoires
Apparaatelementen
Technische gegevens
kopen.
1 Rond mondstuk 5 mm art.nr. 092214
2 Rond mondstuk 10 mm art. nr. 092313
3
4
5
6
7
8
voor bitumen art. nr. 009090
9 Aandrukrol 50 mm art. nr. 093211
10 Aandrukrol 35 mm art. nr. 006785
11 Zeilschaar art. nr. 010423
12 Steekmes art. nr. 011833
13 Lasnaadslede art. nr. 093013
14 Lasschoen art. nr. 075316
15 Snellasschoen 3 mm art. nr. 010263
16 Snellasschoen 4 mm art. nr. 010270
17 Snellasschoen 5 mm art. nr. 010287
18
19
20
21 Guts art. nr. 093112
22 Sikkelmes art. nr. 092917
23
24
25
26
27
28
29
Fabrieksgarantie
-
-
beoordelen.
-
is uitgesloten van garantie.
-
-
-
Conformiteitsverklaring
160)
Roestvrijstalen uitblaasmondstuk
LCD-scherm
Toets voor modus luchthoeveelheid
Joystick (instelling temperatuur en luchthoeveelheid)
Luchtinlaat
Belastbare rubberen kabel
1
12
13
14
15
2
3
4
6
7
8
10
11
5
9
Materiaal
PVC hard
PE hard
(HDPE)
polyethyleen
PP
polypropyleen
ABS
Toepassingen
technisch gevormde delen
Herkenningskenmerken
rammelend geluid
rammelend geluid
rammelend geluid
Hulp b het kiezen van de juiste lasdraad b het kunststof lassen
NL
1
3
5
NL
FABRIEKS
JAAR
GARANTIE
FABRIEKS
JAAR
GARANTIE FABRIEKS
JAAR
GARANTIE

- 28 - - 29 -
IT
-
bile e privo di disturbi.
ad aria calda.
Traduzione delle istruzioni
per l'uso originali
Riguardo a questo documento
Leggete attentamente le presenti
avvertenze sulla sicurezza prima
di usare l'apparecchio. In caso di
mancato rispetto delle istruzioni per
l'uso, l'apparecchio può divenire una
fonte di pericolo.
-
cessario osservare le seguenti norme
-
menti e d'incendio.
Se non usate l'apparecchio con pre-
o di lesione a persone. Prima della
-
parecchio non presenti eventuali danni
-
-
l'apparecchio.
Non lasciate l'apparecchio incustodito.
-
bini e badate che essi non giochino con
l'apparecchio.
Prima messa in esercizio
-
isolante del riscaldatore.
-
-
poggio. Al primo impiego l'ambiente di
lavoro dovrebbe essere ben ventilato.
ambientali.
Non esponete le apparecchiature
apparecchiature elettriche umide e non
impiegatele in ambienti umidi o bagnati.
-
parecchio a lungo verso uno stesso
-
sono però nascosti.
ProteggeteVi dalla scossa
elettrica.
Evitate il contatto del corpo con parti
-
-
-
Conservate i Vostri utensili
in un posto sicuro.
Dopo l'uso appoggiate l'apparecchio
ritirarlo.
devono venir messi da parte in un po-
bambini non abbiano accesso.
-
sensoriali o mentali ridotte o con espe-
-
recchio e i possibili pericoli che da esso
risultano.
Non lasciate giocare i bambini con l'ap-
parecchio.
siano sorvegliati.
Gli utensili non si devono mai
sottoporre a sovraccarichi.
Si lavora meglio e con maggiore sicu-
-
Non trasportate l'apparecchio tenendo-
lo per il cavo e non tirate quest'ultimo
-
gete il cavo dal calore e da contatti con
olio e spigoli taglienti.
Assicurarsi sempre che il tubo di
scarico, anche in combinazione con
l'ugello montato, non sia mai com-
-
so contrario, si potrebbe danneggia-
re il riscaldamento o il motore.
Fate attenzione ai gas velenosi
e al pericolo di accensione.
vernici e simili si possono generare gas
velenosi.
esclusivamente accessori e apparec-
chiature supplementari indicati nelle
-
cati dal costruttore dell'apparecchio.
Se si impiegano degli accessori o ap-
parecchi di complemento diversi da
lesioni.
Avvertenze sulla sicurezza
Avvertenze sulla sicurezza
IT

- 30 - - 31 -
Programmi preimpostati
5. Funzione di memorizzazione [S]
9-
-
di memoria sul display lampeggia per segnalare che il
2 secondi. Se il simbolo di memoria rimane acceso perma-
-
il simbolo di programma sul display non scompare.
Misurazione della temperatura sul pezzo
Riscaldamento
Dopo l'uso il convogliatore ad aria calda HG 2520 E può
non compromette la durata utile del riscaldatore.
Sostituzione del cavo
-
cassa.
1. Importante! Sconnettete l'apparecchio dalla rete.
2. Svitate la vite
d
a.
b.
4. Svitate i morsetti di rete
c.
e.
rete etc.).
IT
Per riparazioni rivolgeteVi
sempre a un elettrotecnico.
-
-
altrimenti sussiste il rischio di incidenti
nell'uso dell'apparecchio.
Segnalazione del calore
residuo 5
-
ve come avvertimento visivo per evitare
lesioni dovute al contatto diretto della
-
-
-
-
vogliatori ad aria calda occorre sempre
Conservate scrupolosamente queste
avvertenze sulla sicurezza nelle vici-
nanze dell'apparecchio.
L'apparecchio è dotato di una protezione termica:
-
recchio completamente.
Per la Vostra sicurezza
Descrizione dell'apparecchio - Messa
in esercizio
-
possibile dirigere il getto di aria calda con elevata precisione
Fate attenzione quando cambiate gli ugelli bollenti! Se
Le accensioni gene-
-
voli della rete è possibile che altri apparecchi vengano com-
1. Messa in funzione
L'apparecchio viene acceso e spento mediante l'interruttore
12 10
ossia del numero di giri del ventilatore.
2. Regolazione della temperatura
La temperatura può essere impostata in un campo com-
quadro di comando con display a cristalli liquidi. La tempe-
10 serve come tasto di
Premendo brevemente il joystick "+/–" si aumenta / dimi-
-
gere il valore impostato. La temperatura nominale impostata
compare per 3 secondi sul display. Dopo di ciò viene visua-
a quando non viene raggiunta la temperatura nominale.
muoviate nuovamente il joystick per aumentare o diminuire il
valore. Dopo lo spegnimento del convogliatore ad aria calda
viene mantenuto il valore impostato per ultimo.
3. Impostazione del volume d'aria
per la modalità volume d'aria 8
-
ne tramite il joystick. Se per 5 secondi il valore del volume
volume d'aria viene automaticamente abbandonata. Se dopo
min. 150 l/min a max. 500 l/min.
4. Funzionamento di programma [P]
programma giungerete ai programmi da 2 a 4. Premendo
Avvertenze sulla sicurezza Programma Temperatura °C Aria l/min
1 250 ca. 350
2 350 ca. 400
3 450 ca. 500
4 550 ca. 400
Sostituzione del dispositivo di riscaldamento
HG 2520 E è semplicemente inserito nell'apparecchio e può
1. Importante! Sconnettete l'apparecchio dalla rete.
2. Svitate le viti dalla guaina protettiva (Fig. 1).
3. Rimuovete la guaina protettiva (Fig. 1).
4. Svitate l(Fig. 2).
nuovo (Fig. 2/3).
6. Riavvitate bene il dispositivo di riscaldamento (Fig. 3).
7. Avvitate bene la guaina protettiva (Fig. 4).
Riparazione
13
-
HG 2520 E
clienti +39/02/96457231.
Funzione LOC
1.
3.
2.
4.

- 32 - - 33 -
2300 W
4000 Pa
Ca. 10.000 ore
Sì
Sì
2 2
Allacciamento alla rete
Temperatura
Pressione dell'aria
Durata utile del motore
Cavo di allacciamento alla rete
Livello di pressione acustica delle emissioni
Applicazioni
-
verranno in mente ulteriori esempi.
-
- Saldatura di teloni e pellicole.
-
- Modellatura di materiali termoplastici.
- Processi di asciugatura e di riscaldamento di ogni tipo.
- Lisciatura di pelle.
Componenti dell'apparecchio
Dati tecnici
Accessori
-
sortimento di accessori.
1 Ugello tondo 5 mm art. n. 092214
2 Ugello tondo 10 mm art. n. 092313
3
4 Ugello angolare piatto 20 x 2 mm art. n. 092115
diritto art. n. 013240
5 Ugello angolare piatto 40 x 2 mm art. n. 092016
6 Ugello angolare piatto 30 x 2 mm art. n. 011925
7
8
9 Rullo pressore 50 mm art. n. 093211
10 Rullo pressore 35 mm art. n. 006785
11
12 Spatola art. n. 011833
13 Carrello per cordone di saldatura art. n. 093013
14 Zoccolo di saldatura art. n. 075316
15 Zoccolo di saldatura 3 mm art. n. 010263
16 Zoccolo di saldatura 4 mm art. n. 010270
17 Zoccolo di saldatura 5 mm art. n. 010287
18
19
20
21
22
23
24
25
26
27
28
29
Garanzia del produttore
-
-
-
-
Non sussiste nessun diritto
-
parecchio propriamente imballato ed accompagnato dallo
Dichiarazione di conformità
(vedi pagina 160)
Materiale
PVC duro
PE duro
(HDPE)
Polietilene
PP
Polipropilene
ABS
Tipi di applicazione
Caratteristiche distintive
suono tintinnante
suono tintinnante
suono tintinnante
Suggerimenti per la scelta del giusto lo di apporto nella saldatura di plastica
IT
Cappuccio rimovibile per l'accessorio dello scanner
Sospensione
Display a cristalli liquidi
Rivestimento morbido antiscivolo
Tasto per la modalità volume d'aria
volume d'aria)
Apertura per l'ingresso dell'aria
Cavo di allacciamento alla rete sostituibile
Comoda impugnatura morbida
1
12
13
14
15
2
3
4
6
7
8
10
11
5
9
DI GARANZIA
3
5
ANNO
IT
DEL PRODUTTORE
DI GARANZIA
ANNI
DEL PRODUTTORE
DI GARANZIA
ANNI
DEL PRODUTTORE

- 34 - - 35 -
Le deseamos que pueda sacar buen provecho de su pistola
de aire caliente.
Traducción de las instrucciones
de uso originales
Acerca de este documento
Lea y observe estas indicaciones
antes de utilizar el aparato. La no
observancia de estas instruccio-
nes de uso puede hacer del apa-
rato una fuente de peligro.
requiere que se tengan en cuenta
las siguientes medidas de seguridad
-
siones e incendios. El manejo negli-
gente del aparato puede provocar un
incendio o daños personales.
Compruebe el aparato previa puesta
-
gilancia.
Los niños deben de estar controla-
dos para asegurarse de que no jue-
guen con el aparato.
Primera puesta en funcionamiento
es posible que salga algo de humo.
El humo se produce por los aglu-
tinantes que se desprenden de la
-
rante el primer uso debido al calor.
bien ventilada durante el primer uso.
Tenga en cuenta las
condiciones ambientales.
-
tricas a la lluvia. No utilice las herra-
Tenga cuidado cuando utilice los
-
mables. No los dirija al mismo punto
durante un tiempo prolongado. No
explosiva. El calor puede transmitirse
-
llan ocultos.
Protéjase contra las
descargas eléctricas.
Evite el contacto corporal con ele-
-
miento.
Indicaciones de seguridad
Guarde sus herramientas en
un sitio seguro.
-
antes de volver a guardarlo.
han de guardar en un sitio seco y
niños.
niños a partir de los 8 años y por
sensoriales o mentales reducidas o
-
acerca de un uso seguro del aparato
y comprenden los riesgos que puede
implicar.
Los niños no deben jugar con el
aparato.
a cabo por niños sin la debida
vigilancia.
No someta sus herramientas
a esfuerzos excesivos.
-
dad en la gama de potencia indicada.
No lleve la herramienta al cable y no
toma de corriente. Proteja el cable
-
dos.
Asegúrese siempre de que el tubo
de descarga y también en com-
binación con la boquilla montada
nunca esté completamente cu-
bierto o cerrado. De lo contrario,
pueden producirse daños en el
calentador o en el motor.
Preste atención a los gases
tóxicos y al peligro de
-
Tenga presente el peligro de incen-
-
camente los accesorios y el equipo
adicional indicados en estas instruc-
herramienta.
El uso de herramientas de trabajo o
accesorios no recomendados en las
-
-
Las reparaciones las deberá
efectuar un técnico
electricista.
normas de seguridad pertinentes.
-
Indicaciones de seguridad
ES
ES

- 36 - - 37 -
Indicaciones de seguridad
Indicador de calor restante
-
evitar lesiones por contacto directo
de aire caliente. ¡El indicador de ca-
parpadea hasta que la temperatura
-
-
-
tante no se activa. El usuario es res-
ponsable en cualquier caso ya que
el manejo de pistolas de aire caliente
requiere siempre mucho cuidado.
Guarde bien estas indicaciones de
seguridad cerca del aparato.
El aparato está equipado con una termoprotección:
caso de recalentamiento.
Para su seguridad
Descripción del aparato - Puesta en
servicio
Por favor, tenga en cuenta: La distancia que debe man-
tenerse con respecto al objeto que se trabaja depende del
-
las toberas acoplables adquiribles como accesorio (vea la
¡Tenga cuidado al cambiar toberas calientes! Cuando
-
-
-
1. Puesta en servicio
El aparato se conecta y desconecta con el interruptor de
12 en la trasera de la empuñadura. El joys-
tick 10
2. Regulación de temperatura
La temperatura puede regularse sin etapas dentro de un
El joystick 10 sirve de pulsador de entrada con
+/–-
la pistola necesita algunos segundos para llegar al valor ajus-
-
-
ajustado.
3. Regular el caudal de aire
8
-
-
4. Funcionamiento de programas [P]
-
-
-
Programas precongurados
5. Función de memorización [S]
9
en el LCD
parpadea para indicar que el programa de usuario seleccio-
-
-
Registro de temperatura en la pieza de trabajo
(nº de art.: 007690).
Resistencia
Tras el uso puede desconectarse directamente el soplador
Cambio del cable
-
mente sin necesidad de abrir la carcasa.
1. ¡Importante! Desconecte el aparato de la red.
2. Soltar el tornillo
dy retirar la tapa
a.
b.
4. Soltar los bornes de la red
c.
5. Sacar el cable
e.
6. Aplicar nuevo cable y sujetarlo en orden inverso
Programa Temperatura °C Aire l/min
1 250 aprox. 350
2 350 aprox. 400
3 450 aprox. 500
4 550 aprox. 400
Cambio de la resistencia
La resistencia del HG 2520 E es de quita y pon y puede
cambiarse en unos segundos.
1. ¡Importante! Desconecte el aparato de la red.
.
.
4.
aire .
5. Extraer la resistencia y sustituirla por una nueva .
.
.
Reparación
5
13
Función LOC
ES
1.
3.
2.
4.

- 38 - - 39 -
ES
2300 W
4000 Pa
aprox. 10.000 h
22
Potencia
Temperatura
Caudal de aire
Cable de red
Clase de aislamiento (sin toma de tierra)
Aplicaciones
- -
-
- Activar y despegar pegamentos y termoencolados.
- Procesos de secado y calentado de todo tipo.
- Alisar cuero.
Accesorios
Elementos del aparato
Datos técnicos
de accesorios.
1
2
3
4 Tobera plana angular 20 x 2 mm nº art. 092115
5 Tobera plana angular 40 x 2 mm nº art. 092016
6
7 Tobera plana angular 40 x 2 mm
8 Tobera plana 60 x 2 mm
9 Rodillo presionador 50 mm nº art. 093211
10 Rodillo presionador 35 mm nº art. 006785
11
12
13
14 Tobera soldadora nº art. 075316
15
16
17
18
19
20
21 Cepillo acanalador nº art. 093112
22
23
24
25
26
27
28
29
Garantía de fabricante
-
La presta-
un uso o mantenimiento inadecuados y los causados por
-
rios en objetos ajenos.
-
pondiente centro de servicio o se entrega al vendedor en
Declaración de conformidad
Pulsador para la modalidad caudal de aire
Entrada de aire
Cable de red intercambiable
Cable de goma resistente
Empuñadura blanda agradable al tacto
1
12
13
14
15
2
3
4
6
7
8
10
11
5
9
Material
PVC duro
PE duro
(HDPE)
Polietileno
PP
Polipropileno
ABS
Tipos de aplicación
-
-
Características distintivas
ruido tintineante
ruido tintineante
ruido tintineante
ruido tintineante
Ayuda para elegir la barrita de soldadura adecuada al soldar plástico
DE GARANTÍA
1
3
5
AÑO
ES
DE FABRICANTE
DE GARANTÍA
AÑOS
DE FABRICANTE
DE GARANTÍA
AÑOS
DE FABRICANTE
Sayfa yükleniyor...
Sayfa yükleniyor...
Sayfa yükleniyor...
Sayfa yükleniyor...
Sayfa yükleniyor...
Sayfa yükleniyor...
Sayfa yükleniyor...
Sayfa yükleniyor...
Sayfa yükleniyor...
Sayfa yükleniyor...
Sayfa yükleniyor...
Sayfa yükleniyor...
Sayfa yükleniyor...
Sayfa yükleniyor...
Sayfa yükleniyor...
Sayfa yükleniyor...
Sayfa yükleniyor...
Sayfa yükleniyor...
Sayfa yükleniyor...
Sayfa yükleniyor...
Sayfa yükleniyor...
Sayfa yükleniyor...
Sayfa yükleniyor...
Sayfa yükleniyor...
Sayfa yükleniyor...
Sayfa yükleniyor...
Sayfa yükleniyor...
Sayfa yükleniyor...
Sayfa yükleniyor...
Sayfa yükleniyor...
Sayfa yükleniyor...
Sayfa yükleniyor...
Sayfa yükleniyor...
Sayfa yükleniyor...
Sayfa yükleniyor...
Sayfa yükleniyor...
Sayfa yükleniyor...
Sayfa yükleniyor...
Sayfa yükleniyor...
Sayfa yükleniyor...
Sayfa yükleniyor...
Sayfa yükleniyor...
Sayfa yükleniyor...
Sayfa yükleniyor...
Sayfa yükleniyor...
Sayfa yükleniyor...
Sayfa yükleniyor...
Sayfa yükleniyor...
Sayfa yükleniyor...
Sayfa yükleniyor...
Sayfa yükleniyor...
Sayfa yükleniyor...
Sayfa yükleniyor...
Sayfa yükleniyor...
Sayfa yükleniyor...
Sayfa yükleniyor...
Sayfa yükleniyor...
Sayfa yükleniyor...
Sayfa yükleniyor...
Sayfa yükleniyor...
Sayfa yükleniyor...
-
 1
1
-
 2
2
-
 3
3
-
 4
4
-
 5
5
-
 6
6
-
 7
7
-
 8
8
-
 9
9
-
 10
10
-
 11
11
-
 12
12
-
 13
13
-
 14
14
-
 15
15
-
 16
16
-
 17
17
-
 18
18
-
 19
19
-
 20
20
-
 21
21
-
 22
22
-
 23
23
-
 24
24
-
 25
25
-
 26
26
-
 27
27
-
 28
28
-
 29
29
-
 30
30
-
 31
31
-
 32
32
-
 33
33
-
 34
34
-
 35
35
-
 36
36
-
 37
37
-
 38
38
-
 39
39
-
 40
40
-
 41
41
-
 42
42
-
 43
43
-
 44
44
-
 45
45
-
 46
46
-
 47
47
-
 48
48
-
 49
49
-
 50
50
-
 51
51
-
 52
52
-
 53
53
-
 54
54
-
 55
55
-
 56
56
-
 57
57
-
 58
58
-
 59
59
-
 60
60
-
 61
61
-
 62
62
-
 63
63
-
 64
64
-
 65
65
-
 66
66
-
 67
67
-
 68
68
-
 69
69
-
 70
70
-
 71
71
-
 72
72
-
 73
73
-
 74
74
-
 75
75
-
 76
76
-
 77
77
-
 78
78
-
 79
79
-
 80
80
-
 81
81


diğer dillerde
- slovenčina: STEINEL HG 2520 E Používateľská príručka
- română: STEINEL HG 2520 E Manual de utilizare
İlgili makaleler
-
STEINEL HG 2320 E Original Operating Instructions
-
STEINEL HG 2220 E Kullanım kılavuzu
-
-
-
-
-
-
STEINEL RS 200 SC Kullanım kılavuzu
-
-