Daikin EABH16DF6V Kullanım kılavuzu

Kategori
Uzay ısıtıcıları
Tip
Kullanım kılavuzu
Operation manual
Daikin Altherma 3 H F+W English
Betriebsanleitung
Daikin Altherma 3 H F+W Deutsch
Manuel d'utilisation
Daikin Altherma 3 H F+W Français
Bedieningshandleiding
Daikin Altherma 3 H F+W Nederlands
Manual de instrucciones
Daikin Altherma 3 H F+W Español
Manuale d'uso
Daikin Altherma 3 H F+W Italiano
Manual do funcionamento
Daikin Altherma 3 H F+W Portugues
Kullanım kılavuzu
Daikin Altherma 3 H F+W Türkçe
Bruksanvisning
Daikin Altherma 3 H F+W Svenska
Driftshåndbok
Daikin Altherma 3 H F+W Norsk
Návod kobsluze
Daikin Altherma 3 H F+W čeština
Operation manual
Daikin Altherma 3 H F+W
EABH16DF6V
EABH16DF9W
EABX16DF6V
EABX16DF9W
EAVH16S18DA6V(G)
EAVH16SU18DA6V
EAVH16S23DA6V(G)
EAVH16SU23DA6V
EAVH16S18DA9W(G)
EAVH16S23DA9W(G)
EAVX16S18DA6V(G)
EAVX16S23DA6V(G)
EAVX16S18DA9W(G)
EAVX16S23DA9W(G)
Table of contents
Operation manual
2
EABH/X16DF6V+9W + EAVH/X16S(U)18+23DA6V+9W
Daikin Altherma 3 H F+W
4P644480-1 – 2020.12
Table of contents
1 About this document 2
2 About the system 3
2.1 Components in a typical system layout ..................................... 3
3 Operation 3
3.1 User interface: Overview ........................................................... 3
3.2 Possible screens: Overview ...................................................... 4
3.2.1 Home screen............................................................... 4
3.2.2 Main menu screen ...................................................... 5
3.2.3 Setpoint screen........................................................... 5
3.2.4 Detailed screen with values ........................................ 5
3.3 Turning operation ON or OFF ................................................... 6
3.3.1 Visual indication.......................................................... 6
3.3.2 To turn ON or OFF...................................................... 6
3.4 Space heating/cooling control ................................................... 7
3.4.1 Setting the space operation mode .............................. 7
3.4.2 To change the desired room temperature................... 7
3.4.3 To change the desired leaving water temperature...... 7
3.5 Domestic hot water control........................................................ 8
3.5.1 Reheat mode .............................................................. 8
3.5.2 Scheduled mode......................................................... 8
3.5.3 Scheduled + reheat mode........................................... 8
3.5.4 Using DHW powerful operation................................... 8
3.6 Advanced usage........................................................................ 9
3.7 Schedule screen: Example........................................................ 9
3.8 Menu structure: Overview user settings .................................... 12
3.9 Installer settings: Tables to be filled in by installer .................... 13
3.9.1 Configuration wizard ................................................... 13
3.9.2 Settings menu............................................................. 13
4 Energy saving tips 13
5 Maintenance and service 13
5.1 Overview: Maintenance and service ......................................... 13
5.2 To find the contact/helpdesk number ........................................ 14
6 Troubleshooting 14
6.1 To display the help text in case of a malfunction....................... 14
6.2 Symptom: You are feeling too cold (hot) in your living room..... 14
6.3 Symptom: The water at the tap is too cold ................................ 14
6.4 Symptom: Heat pump failure..................................................... 14
6.5 Symptom: The system is making gurgling noises after
commissioning........................................................................... 15
7 Disposal 15
8 Glossary 15
1 About this document
Thank you for purchasing this product. Please:
Read the documentation carefully before operating the user
interface to ensure the best possible performance.
Request the installer to inform you about the settings that he used
to configure your system. Check if he has filled in the installer
settings tables. If not, request him to do so.
Keep the documentation for future reference.
Target audience
Endusers
Documentation set
This document is part of a documentation set. The complete set
consists of:
General safety precautions:
Safety instructions that you must read before operating your
system
Format: Paper (in the box of the indoor unit)
Operation manual:
Quick guide for basic usage
Format: Paper (in the box of the indoor unit)
User reference guide:
Detailed step-by-step instructions and background information
for basic and advanced usage
Format: Digital files on http://www.daikineurope.com/support-
and-manuals/product-information/
Latest revisions of the supplied documentation may be available on
the regional Daikin website or via your installer.
The original documentation is written in English. All other languages
are translations.
Breadcrumbs
Breadcrumbs (example: [4.3]) help you to locate where you are in
the menu structure of the user interface.
1To enable the breadcrumbs: In the home screen or
main menu screen, press the help button. The
breadcrumbs appear in the top left corner of the
screen.
2To disable the breadcrumbs: Press the help button
again.
This document also mentions these breadcrumbs. Example:
1Go to [4.3]: Space heating/cooling > Operation
range.
This means:
1Starting from the home screen, turn the left dial and
go to Space heating/cooling.
4
Space heating/cooling
2Press the left dial to enter the submenu.
3Turn the left dial and go to Operation range.
Operation range
4.3
4Press the left dial to enter the submenu.
2 About the system
Operation manual
3
EABH/X16DF6V+9W + EAVH/X16S(U)18+23DA6V+9W
Daikin Altherma 3 H F+W
4P644480-1 – 2020.12
2 About the system
Depending on the system layout, the system can:
Heat up a space
Cool down a space (if a heating/cooling heat pump model is
installed)
Produce domestic hot water (if a DHWtank is installed)
2.1 Components in a typical system
layout
d
ab
ce
f
gBC A
AMain zone. Example: Living room.
BAdditional zone. Example: Bedroom.
CTechnical room. Example: Garage.
aOutdoor unit heatpump
bIndoor unit heatpump
cDomestic hot water (DHW) tank
dUser interface of the indoor unit
eUser interface used as room thermostat
fUnderfloor heating
gRadiators, heatpump convectors, or fancoil units
INFORMATION
The indoor unit and the domestic hot water tank (if
installed) can be separated or integrated depending on the
indoor unit type.
3 Operation
3.1 User interface: Overview
The user interface has the following components:
b
c
a
aStatus indicator
bLCD screen
cDials and buttons
a
b
c
aStatus indicator
bLCD screen
cDials and buttons
Status indicator
The LEDs of the status indicator light up or blink to show the
operating mode of the unit.
LED Mode Description
Blinking blue Standby The unit is not in operation.
Continuous blue Operation The unit is in operation.
Blinking red Malfunction A malfunction occurred.
See "6.1To display the help text
in case of a malfunction"[414]
for more information.
LCD screen
The LCD screen has a sleeping function. After 15 min of non-
interaction with the user interface, the screen darkens. Pressing any
button or rotating any dial awakens the display.
Dials and buttons
You use the dials and buttons:
To navigate through the screens, menus and settings of the LCD
screen
To set values
a b c d e
Item Description
aLeft dial The LCD shows an arc on the left side of the
display when you can use the left dial.
: Turn, then press the left dial. Navigate
through the menu structure.
: Turn the left dial. Choose a menu item.
: Press the left dial. Confirm your choice
or go to a submenu.
bBack button : Press to go back 1 step in the menu structure.
cHome
button
: Press to go back to the home screen.
dHelp button : Press to show a help text related to the current
page (if available).
eRight dial The LCD shows an arc on the right side of the
display when you can use the right dial.
: Turn, then press the right dial. Change
a value or setting, shown at the right side of the
screen.
: Turn the right dial. Navigate through
the possible values and settings.
: Press the right dial. Confirm your
choice and go to the next menu item.
3 Operation
Operation manual
4
EABH/X16DF6V+9W + EAVH/X16S(U)18+23DA6V+9W
Daikin Altherma 3 H F+W
4P644480-1 – 2020.12
3.2 Possible screens: Overview
The most common screens are as follows:
+
a
OR
b
c
c2
c4
c1
c3
aHome screen
bMain menu screen
cLower level screens:
c1: Setpoint screen
c2: Detailed screen with values
c3: Screen with weather-dependent curve
c4: Screen with schedule
3.2.1 Home screen
Press the button to go back to the home screen. You see an
overview of the unit configuration and the room and setpoint
temperatures. Only symbols applicable for your configuration are
visible on the home screen.
Possible actions on this screen
Go through the list of the main menu.
Go to the main menu screen.
Enable/disable breadcrumbs.
Item Description
21
21
The temperatures are shown in circles. If the circle
is grey, the corresponding operation (example:
space heating) is currently not active.
Outdoor
unit
a2 a3
a1
a1 : Outdoor unit
a2 : Quiet mode active
a3 Measured ambient temperature
Item Description
Indoor unit /
domestic
hot water
tank
b1
b2
b1 Indoor unit:
: Floor-standing indoor unit with integrated
tank
: Wall-mounted indoor unit with separated
tank
: Wall-mounted indoor unit
b2 Water pressure
Space
operation
mode
c : Cooling
: Heating
Disinfection
/ Powerful
d : Disinfection mode active
: Powerful operation active
Date / time eCurrent date and time
Holiday f: Holiday mode active
Main zone
g3
g1
g4
g2
g1 Heat emitter type:
: Underfloor heating
: Fancoil unit
: Radiator
g2 Leaving water temperature setpoint
g3 Room thermostat type:
: Daikin user interface used as room
thermostat
: External control
Hidden: Leaving water temperature control
g4 Measured room temperature
Additional
zone
h3
h1 h2
h1 Heat emitter type:
: Underfloor heating
: Fancoil unit
: Radiator
h2 Leaving water temperature setpoint
h3 Room thermostat type:
: External control
Hidden: Leaving water temperature control
Domestic
hot water
i1 i2
i1
: Domestic hot water
i2 Measured tank temperature
Malfunction j or : A malfunction occurred
See "6.1To display the help text in case of a
malfunction"[414] for more information.
3 Operation
Operation manual
5
EABH/X16DF6V+9W + EAVH/X16S(U)18+23DA6V+9W
Daikin Altherma 3 H F+W
4P644480-1 – 2020.12
3.2.2 Main menu screen
Starting from the home screen, press ( ) or turn ( ) the
left dial to open the main menu screen. From the main menu, you
can access the different setpoint screens and submenus.
a
2
Main zone
Additional zone
Room
Malfunctioning
Space heating/cooling
aSelected submenu
Possible actions on this screen
Go through the list.
Enter the submenu.
Enable/disable breadcrumbs.
Submenu Description
[0] or
Malfunctioning
Restriction: Only displayed if a
malfunction occurs.
See "6.1To display the help text in
case of a malfunction"[414] for more
information.
[1] Room Restriction: Only displayed if a room
thermostat is connected to the indoor
unit.
Set the room temperature.
[2] Main zone Shows the applicable symbol for your
main zone emitter type.
Set the leaving water temperature for
the main zone.
[3] Additional zone Restriction: Only displayed if there
are two leaving water temperature
zones. Shows the applicable symbol
for your additional zone emitter type.
Set the leaving water temperature for
the additional zone (if present).
[4] Space heating/
cooling
Shows the applicable symbol for your
unit.
Put the unit in heating mode or cooling
mode. You cannot change the mode
on heating only models.
[5] Tank Restriction: Only displayed if a
domestic hot water tank is present.
Set the domestic hot water tank
temperature.
[7] User settings Gives access to user settings such as
holiday mode and quiet mode.
[8] Information Displays data and information about
the indoor unit.
[9] Installer
settings
Restriction: Only for the installer.
Gives access to advanced settings.
[A] Commissioning Restriction: Only for the installer.
Perform tests and maintenance.
[B] User profile Change the active user profile.
[C] Operation Turn heating/cooling functionality and
domestic hot water preparation on or
off.
3.2.3 Setpoint screen
The setpoint screen is displayed for screens describing system
components that need a setpoint value.
Examples
[1] Room temperature screen
+
21°C
1
Room
[2] Main zone screen
+
35°C
2
Main zone
[3] Additional zone screen
+
45°C
3
Additional zone
[5] Tank temperature screen
+
50°C
5
Tank
Explanation
a1
d
+
d
ed
e
c
a2
b1
b2
Possible actions on this screen
Go through the list of the submenu.
Go to the submenu.
Adjust and automatically apply the desired
temperature.
Item Description
Minimum temperature limit a1 Fixed by the unit
a2 Restricted by the installer
Maximum temperature limit b1 Fixed by the unit
b2 Restricted by the installer
Current temperature cMeasured by the unit
Desired temperature dTurn the right dial to
increase/decrease.
Submenu eTurn or press the left dial to
go to the submenu.
3.2.4 Detailed screen with values
Example:
a bc
a bc
7.2.1
Time/date
Hours 11
30
Minutes
a Settings
b Values
c Selected setting and value
3 Operation
Operation manual
6
EABH/X16DF6V+9W + EAVH/X16S(U)18+23DA6V+9W
Daikin Altherma 3 H F+W
4P644480-1 – 2020.12
Possible actions on this screen
Go through the list of settings.
Change the value.
Go to the next setting.
Confirm changes and proceed.
3.3 Turning operation ON or OFF
3.3.1 Visual indication
Certain functionalities of the unit can be enabled or disabled
separately. If a functionality is disabled, the corresponding
temperature icon in the home screen will be greyed out.
Room temperature control
1.6
bar
55
21
35
45
a
1.6
bar
55
21
35
45
b
aRoom temperature control ON
bRoom temperature control OFF
Space heating/cooling operation
1.6
bar
55
21
35
45
c
1.6
bar
55
21
35
45
d
cSpace heating/cooling operation ON
dSpace heating/cooling operation OFF
Tank heating operation
1.6
bar
55
21
35
45
e
1.6
bar
55
21
35
45
f
eTank heating operation ON
fTank heating operation OFF
3.3.2 To turn ON or OFF
Room temperature control
1Go to [C.1]: Operation > Room.
Operation
Room
Space heating/cooling On
On
C.1
2Set operation to On or Off.
Space heating/cooling operation
NOTICE
Room frost protection. Even if you turn OFF space
heating/cooling operation ([C.2]: Operation > Space
heating/cooling), room frost protection operation –if
enabled– can still activate. However, for leaving water
temperature control and external room thermostat control,
the protection is NOT guaranteed.
NOTICE
Water pipe freeze prevention. Even if you turn OFF
space heating/cooling operation ([C.2]: Operation >
Space heating/cooling), water pipe freeze prevention
if enabled– will remain active.
1Go to [C.2]: Operation > Space heating/cooling.
Operation
Space heating/cooling
Tank Off
On
On
Room
C.2
2Set operation to On or Off.
Tank heating operation
NOTICE
Disinfection mode. Even if you turn OFF tank heating
operation ([C.3]: Operation > Tank), disinfection mode will
remain active. However, if you turn it OFF while
disinfection is running, an AH error occurs.
1Go to [C.3]: Operation > Tank.
Operation
Tank Off
On
Space heating/cooling
C.3
2Set operation to On or Off.
3 Operation
Operation manual
7
EABH/X16DF6V+9W + EAVH/X16S(U)18+23DA6V+9W
Daikin Altherma 3 H F+W
4P644480-1 – 2020.12
3.4 Space heating/cooling control
3.4.1 Setting the space operation mode
About space operation modes
Your unit can be a heating or a heating/cooling model:
If your unit is a heating model, it can heat up a space.
If your unit is a heating/cooling model, it can both heat up and cool
down a space. You have to tell the system which operation mode
to use.
To tell the system which space operation to use, you can:
You can… Location
Check which space operation mode is
currently used.
Home screen
Set the space operation mode permanently. Main menu
Restrict automatic changeover according to
a monthly schedule.
To set the space operation mode
1Go to [4.1]: Space heating/cooling > Operation
mode
2Select one of the following options:
Heating: Only heating mode
Cooling: Only cooling mode
Automatic: The operation mode changes
automatically between heating and cooling based
on the outdoor temperature. Restricted per month
according to the Operation mode schedule
[4.2].
To restrict automatic changeover according to a schedule
Conditions: You set the space operation mode to Automatic.
1Go to [4.2]: Space heating/cooling > Operation
mode schedule.
2Select a month.
3For each month, select an option:
Reversible: Not restricted
Heating only: Restricted
Cooling only: Restricted
4Confirm the changes.
3.4.2 To change the desired room temperature
During room temperature control, you can use the room temperature
setpoint screen to read out and adjust the desired room temperature.
1Go to [1]: Room.
Room
1
2Adjust the desired room temperature.
+
21°C
1
a b
Room
a Actual room temperature
b Desired room temperature
If scheduling is on after changing the desired room temperature
The temperature will stay the same as long as there is no
scheduled action.
The desired room temperature will return to its scheduled value
whenever a scheduled action occurs.
You can avoid scheduled behaviour by (temporarily) turning off
scheduling.
To turn off room temperature scheduling
1Go to [1.1]: Room > Schedule.
2Select No.
3.4.3 To change the desired leaving water
temperature
INFORMATION
The leaving water is the water that is sent to the heat
emitters. The desired leaving water temperature is set by
your installer in accordance with the heat emitter type.
Only adjust the leaving water temperature settings in case
of problems.
You can use the leaving water temperature setpoint screen to read
out and adjust the desired leaving water temperature.
1Go to [2]: Main zone or [3]: Additional zone.
Main zone
2
Additional zone
3
3 Operation
Operation manual
8
EABH/X16DF6V+9W + EAVH/X16S(U)18+23DA6V+9W
Daikin Altherma 3 H F+W
4P644480-1 – 2020.12
2Adjust the desired leaving water temperature.
+
35°C
2
a b
Main zone
+
45°C
3
a b
Additional zone
a Actual leaving water temperature
b Desired leaving water temperature
3.5 Domestic hot water control
3.5.1 Reheat mode
In reheat mode the DHW tank continuously heats up to the
temperature shown on the home screen (example: 50°C) when the
temperature drops below a certain value.
t
60°C
00:00 07:00
50°C
15°C
40°C
14:00 21:00
1
2
3
4
Tt
TtDHWtank temperature
tTime
INFORMATION
Risk of space heating capacity shortage for domestic hot
water tank without internal booster heater: In case of
frequent domestic hot water operation, frequent and long
space heating/cooling interruption will happen when
selecting the following:
Tank > Heat up mode > Reheat only.
INFORMATION
When the DHW tank mode is reheat, the risk for capacity
shortage and comfort problem is significant. In case of
frequent reheat operation, space heating/cooling function
is regularly interrupted.
3.5.2 Scheduled mode
In scheduled mode the DHWtank produces hot water corresponding
to a schedule. The best time to allow the tank to produce hot water is
at night, because the space heating demand is lower.
Example:
t
60°C
00:00 07:00
50°C
15°C
40°C
14:00 21:00
1
2
34
5
Tt
TtDHWtank temperature
tTime
Initially, the DHW tank temperature is the same as the
temperature of the domestic water entering the DHW tank
(example: 15°C).
At 00:00 the DHWtank is programmed to heat up the water to a
preset value (example: Comfort = 60°C).
During the morning, you consume hot water and the DHW tank
temperature decreases.
At 14:00 the DHWtank is programmed to heat up the water to a
preset value (example: Eco = 50°C). Hot water is available again.
During the afternoon and evening, you consume hot water again
and the DHWtank temperature decreases again.
At 00:00 the next day, the cycle repeats.
3.5.3 Scheduled + reheat mode
In scheduled + reheat mode, the domestic hot water control is the
same as in scheduled mode. However, when the DHW tank
temperature drops below a preset value (=reheat tank temperature
hysteresis value; example: 35°C), the DHW tank heats up until it
reaches the reheat set point (example: 45°C). This ensures that a
minimum amount of hot water is available at all times.
Example:
t
Tt
60°C
00:00 07:00
50°C
45°C
15°C
14:00 21:00
35°C
1
24
5
3
TtDomestic hot water tank temperature
tTime
3.5.4 Using DHW powerful operation
About powerful operation
Powerful operation allows the domestic hot water to be heated by
the backup heater or booster heater. Use this mode on days when
there is more hot water usage than usual.
To check if powerful operation is active
If is displayed on the home screen, powerful operation is active.
Activate or deactivate Powerful operation as follows:
1Go to [5.1]: Tank > Powerful operation
2Turn powerful operation Off or On.
3 Operation
Operation manual
9
EABH/X16DF6V+9W + EAVH/X16S(U)18+23DA6V+9W
Daikin Altherma 3 H F+W
4P644480-1 – 2020.12
Usage example: You immediately need more hot water
You are in the following situation:
You already consumed most of your domestic hot water.
You cannot wait for the next scheduled action to heat up the
domestic hot water tank.
Then you can activate powerful operation. The domestic hot water
tank will start heating up the water to the Comfort temperature.
INFORMATION
When powerful operation is active, the risk of space
heating/cooling and capacity shortage comfort problems is
significant. In case of frequent domestic hot water
operation, frequent and long space heating/cooling
interruptions will happen.
3.6 Advanced usage
The amount of information you can read out and edit in the menu
structure depends on your user permission level:
User: Standard mode
Advanced user: You can read out and edit more information
To change the user permission level
You can change the user permission level as follows:
1Go to [B]: User profile.
User profile
B
2Enter the applicable pin code for the user permission
level.
Browse through the list of digits and change the
selected digit.
Move the cursor from left to right.
Confirm the pin code and proceed.
User pin code
The User pin code is 0000.
0000
User
Advanced user pin code
The Advanced user pin code is 1234. Additional menu items for the
user are now visible.
1234
Advanced user
3.7 Schedule screen: Example
This example shows how to set a room temperature schedule in
heating mode for the main zone.
INFORMATION
The procedures to program other schedules are similar.
To program the schedule: overview
Example: You want to program the following schedule:
Mon
Sat
Wed
Fri
Thu
Tue
Sun
User defined 1
Prerequisite: The room temperature schedule is only available if
room thermostat control is active. If leaving water temperature
control is active, you can program the main zone schedule instead.
1Go to the schedule.
2(optional) Clear the content of the whole week schedule or the
content of a selected day schedule.
3Program the schedule for Monday.
4Copy the schedule to the other weekdays.
5Program the schedule for Saturday and copy it to Sunday.
6Give the schedule a name.
To go to the schedule
1Go to [1.1]: Room > Schedule.
2Set scheduling to Yes.
3Go to [1.2]: Room > Heating schedule.
To clear the content of the week schedule
1Select the name of the current schedule.
Mon
Sat
Wed
Fri
Thu
Tue
Sun
User defined 1
2Select Delete.
Delete
Rename
Select
3Select OK to confirm.
To clear the content of a day schedule
1Select the day of which you want to clear the
content. For example Friday
Mon
Sat
Wed
Fri
Thu
Tue
Sun
User defined 1 C
3 Operation
Operation manual
10
EABH/X16DF6V+9W + EAVH/X16S(U)18+23DA6V+9W
Daikin Altherma 3 H F+W
4P644480-1 – 2020.12
2Select Delete.
Delete
Edit
Copy
3Select OK to confirm.
To program the schedule for Monday
1Select Monday.
Mon
Sat
Wed
Fri
Thu
Tue
Sun
User defined 1
2Select Edit.
Delete
Edit
Copy
3Use the left dial to select an entry and edit the entry
with the right dial. You can program up to 6 actions
each day. On the bar, a high temperature has a
darker colour than a low temperature.
0
6:00
8:30
17:30
20°C
18°C
22:00
--:--
18°C
--
21°C
12 24
Mon
Note: To clear an action, set its time as the time of
the previous action.
4Confirm the changes.
Result: The schedule for Monday is defined. The
value of the last action is valid until the next
programmed action. In this example, Monday is the
first day you programmed. Thus, the last
programmed action is valid up to the first action of
next Monday.
To copy the schedule to the other weekdays
1Select Monday.
Mon
Sat
Wed
Fri
Thu
Tue
Sun
User defined 1
2Select Copy.
Delete
Edit
Copy
Result: Next to the copied day, "C" is displayed.
3Select Tuesday.
Mon
Sat
Wed
Fri
Thu
Tue
Sun
User defined 1
C
4Select Paste.
Delete
Edit
Copy
Paste
Result:
Mon
Sat
Wed
Fri
Thu
Tue
Sun
User defined 1
C
5Repeat this action for all other weekdays.
Mon
Sat
Wed
Fri
Thu
Tue
Sun
User defined 1 C
To program the schedule for Saturday and copy it to Sunday
1Select Saturday.
2Select Edit.
3Use the left dial to select an entry and edit the entry
with the right dial.
0
8:00
23:00
--:--
21°C
18°C
--
12 24
Sat
4Confirm the changes.
5Select Saturday.
6Select Copy.
7Select Sunday.
8Select Paste.
Result:
Mon
Sat
Wed
Fri
Thu
Tue
Sun
User defined 1
C
3 Operation
Operation manual
11
EABH/X16DF6V+9W + EAVH/X16S(U)18+23DA6V+9W
Daikin Altherma 3 H F+W
4P644480-1 – 2020.12
To rename the schedule
1Select the name of the current schedule.
Mon
Sat
Wed
Fri
Thu
Tue
Sun
User defined 1
2Select Rename.
Delete
Rename
Select
3(optional) To delete the current schedule name,
browse through the character list until is
displayed, then press to remove the previous
character. Repeat for each character of the schedule
name.
4To name the current schedule, browse through the
character list and confirm the selected character.
The schedule name can contain up to 15characters.
5Confirm the new name.
INFORMATION
Not all schedules can be renamed.
3 Operation
Operation manual
12
EABH/X16DF6V+9W + EAVH/X16S(U)18+23DA6V+9W
Daikin Altherma 3 H F+W
4P644480-1 – 2020.12
3.8 Menu structure: Overview user settings
[1] Room
Room sensor offset
Setpoint range
Antifrost
Cooling schedule
Heating schedule
Schedule
[2] Main zone
Schedule
Heating schedule
Setpoint mode
Cooling schedule
Heating WD curve
Cooling WD curve
[3] Additional zone
Schedule
Heating schedule
Setpoint mode
Cooling schedule
Heating WD curve
Cooling WD curve
[4] Space heating/cooling
Operation mode
Operation mode schedule
[5] Tank
Powerful operation
Comfort setpoint
Eco setpoint
Reheat setpoint
Schedule
[7] User settings
Language
Time/date
Holiday
Quiet
Electricity price
Gas price
[8] Information
Energy data
Malfunction history
Dealer information
Sensors
Actuators
Operation modes
About
Connection status
[B]User profile
[C]Operation
Room
Space heating/cooling
Tank
[1.4] Antifrost
Activation
Room setpoint
[1.5] Setpoint range
Heating minimum
Heating maximum
Cooling minimum
Cooling maximum
[7.2] Time/date
Hours
Minutes
Year
Month
Day
Daylight savings time
Format
[7.3] Holiday
Activation
From
Till
[7.4] Quiet
Activation
Schedule
[7.5] Electricity price
High
Medium
Low
Schedule
[8.1] Energy data
Electricity input
Produced heat
(*)
(*)
(*)
(*)
(*)
(*)
(*)
(*)
Setpoint screen
(*) Only applicable for reversible models, or heating only models + conversion kit
INFORMATION
Depending on the selected installer settings and unit type,
settings will be visible/invisible.
4 Energy saving tips
Operation manual
13
EABH/X16DF6V+9W + EAVH/X16S(U)18+23DA6V+9W
Daikin Altherma 3 H F+W
4P644480-1 – 2020.12
3.9 Installer settings: Tables to be
filled in by installer
3.9.1 Configuration wizard
Setting Fill in…
System
Indoor unit type (read only)
Backup heater type [9.3.1]
Domestic hot water [9.2.1]
Emergency [9.5]
Number of zones [4.4]
Backup heater
Voltage [9.3.2]
Configuration [9.3.3]
Capacity step 1 [9.3.4]
Additional capacity step 2
[9.3.5] (if applicable)
Main zone
Emitter type [2.7]
Control [2.9]
Setpoint mode [2.4]
Schedule [2.1]
Additional zone (only if [4.4] = 1)
Emitter type [3.7]
Control (read only) [3.9]
Setpoint mode [3.4]
Schedule [3.1]
Tank
Heat up mode [5.6]
Comfort setpoint [5.2]
Eco setpoint [5.3]
Reheat setpoint [5.4]
3.9.2 Settings menu
Setting Fill in…
Main zone
Thermostat type [2.A]
Additional zone (if applicable)
Thermostat type [3.A]
Information
Dealer information [8.3]
4 Energy saving tips
Tips about room temperature
Make sure the desired room temperature is NEVER too high (in
heating mode) or too low (in cooling mode), but ALWAYS
according to your actual needs. Each saved degree can save up
to 6% of heating/cooling costs.
Do NOT increase/decrease the desired room temperature to
speed up space heating/cooling. The space will NOT heat up/cool
down faster.
When your system layout contains slow heat emitters (example:
underfloor heating), avoid large fluctuation of the desired room
temperature and do NOT let the room temperature drop too low/
rise too high. It will take more time and energy to heat up/cool
down the room again.
Use a weekly schedule for your normal space heating or cooling
needs. If necessary, you can easily deviate from the schedule:
For shorter periods: You can overrule the scheduled room
temperature until the next scheduled action. Example: When
you have a party, or when you are leaving for a couple of hours.
For longer periods: You can use the holiday mode.
Tips about DHWtank temperature
Use a weekly schedule for your normal domestic hot water needs
(only in scheduled mode).
Program to heat up the DHWtank to a preset value (Comfort =
higher DHW tank temperature) during the night, because then
space heating demand is lower.
If heating up the DHW tank once at night is not sufficient,
program to additionally heat up the DHWtank to a preset value
(Eco = lower DHWtank temperature) during the day.
Make sure the desired DHW tank temperature is NOT too high.
Example: After installation, lower the DHWtank temperature daily
by 1°C and check if you still have enough hot water.
Program to turn ON the domestic hot water pump only during
periods of the day when instant hot water is necessary. Example:
In the morning and evening.
5 Maintenance and service
5.1 Overview: Maintenance and
service
The installer has to perform a yearly maintenance. You can find the
contact/helpdesk number via the user interface.
As enduser, you have to:
Keep the area around the unit clean.
Keep the user interface clean with a soft damp cloth. Do NOT use
any detergents.
Regularly check if the water pressure is above 1bar.
Refrigerant
This product contains fluorinated greenhouse gases. Do NOT vent
gases into the atmosphere.
Refrigerant type: R32
Global warming potential (GWP) value: 675
NOTICE
Applicable legislation on fluorinated greenhouse gases
requires that the refrigerant charge of the unit is indicated
both in weight and CO2 equivalent.
Formula to calculate the quantity in CO2 equivalent
tonnes: GWP value of the refrigerant × total refrigerant
charge [in kg] / 1000
Please contact your installer for more information.
WARNING: FLAMMABLE MATERIAL
The refrigerant inside this unit is mildly flammable.
6 Troubleshooting
Operation manual
14
EABH/X16DF6V+9W + EAVH/X16S(U)18+23DA6V+9W
Daikin Altherma 3 H F+W
4P644480-1 – 2020.12
WARNING
The appliance shall be stored in a room without
continuously operating ignition sources (example: open
flames, an operating gas appliance or an operating electric
heater).
WARNING
Do NOT pierce or burn refrigerant cycle parts.
Do NOT use cleaning materials or means to accelerate
the defrosting process other than those recommended
by the manufacturer.
Be aware that the refrigerant inside the system is
odourless.
WARNING
The refrigerant inside the unit is mildly flammable, but
normally does NOT leak. If the refrigerant leaks in the
room and comes in contact with fire from a burner, a
heater, or a cooker, this may result in fire, or the formation
of a harmful gas.
Turn off any combustible heating devices, ventilate the
room, and contact the dealer where you purchased the
unit.
Do NOT use the unit until a service person confirms that
the part from which the refrigerant leaked has been
repaired.
5.2 To find the contact/helpdesk
number
1Go to [8.3]: Information > Dealer information.
6 Troubleshooting
Contact
For the symptoms listed below, you can try to solve the problem
yourself. For any other problem, contact your installer. You can find
the contact/helpdesk number via the user interface.
6.1 To display the help text in case of a
malfunction
In case of a malfunction, the following will appear on the home
screen depending on the severity:
: Error
: Malfunction
You can get a short and a long description of the malfunction as
follows:
1Press the left dial to open the main menu and go to
Malfunctioning.
Result: A short description of the error and the error
code is displayed on the screen.
2Press in the error screen.
Result: A long description of the error is displayed
on the screen.
6.2 Symptom: You are feeling too cold
(hot) in your living room
Possible cause Corrective action
The desired room temperature is
too low (high).
Increase (decrease) the desired
room temperature. See "To
change the desired room
temperature"[47].
If the problem recurs daily, do
one of the following:
Increase (decrease) the room
temperature preset value. See
the user reference guide.
Adjust the room temperature
schedule. See "3.7 Schedule
screen: Example"[49].
The desired room temperature
cannot be reached.
Increase the desired leaving
water temperature in accordance
with the heat emitter type. See
"To change the desired leaving
water temperature"[47].
The weather-dependent curve is
set incorrectly.
Adjust the weather-dependent
curve. See the user reference
guide.
6.3 Symptom: The water at the tap is
too cold
Possible cause Corrective action
You ran out of domestic hot
water because of unusual high
consumption.
If you immediately need domestic
hot water, activate the DHW tank
Powerful operation. However,
this consumes extra energy. See
"Using DHW powerful
operation"[48].
If the problems recurs daily, do
one of the following:
Increase the DHW tank
temperature preset value. See
the user reference guide.
Adjust the DHW tank
temperature schedule.
Example: Program to
additionally heat up the
DHW tank to a preset value
(Eco setpoint = lower tank
temperature) during the day.
See "3.7 Schedule screen:
Example"[49].
The desired DHWtank
temperature is too low.
6.4 Symptom: Heat pump failure
When the heat pump fails to operate, the backup heater and/or
booster heater can serve as an emergency heater and either
automatically or non-automatically take over the heat load.
When auto emergency is set to Automatic and a heat pump
failure occurs:
For EHVH/X: The backup heater will automatically take over the
heat load and domestic hot water production
For EHBH/X: The backup heater will automatically take over the
heat load, and the booster heater in the optional tank will
automatically take over the domestic hot water production.
7 Disposal
Operation manual
15
EABH/X16DF6V+9W + EAVH/X16S(U)18+23DA6V+9W
Daikin Altherma 3 H F+W
4P644480-1 – 2020.12
When auto emergency is set to Manual and a heat pump failure
occurs, the domestic hot water and space heating operation will
stop and need to be recovered manually via the user interface. To
recover operation manually, go to the Malfunctioning main
menu screen, where the user interface will then ask you to confirm
whether the backup heater and/or booster heater can take over
the heat load or not.
When the heat pump fails, or will appear on the user
interface.
Possible cause Corrective action
Heat pump is damaged. See "6.1To display the help text
in case of a malfunction"[414].
INFORMATION
When the backup heater or booster heater takes over the
heat load, electricity consumption will be considerably
higher.
6.5 Symptom: The system is making
gurgling noises after
commissioning
Possible cause Corrective action
There is air in the system. Purge air from the system.(a)
Various malfunctions. Check if or is displayed
on the home screen of the user
interface. See "6.1To display the
help text in case of a
malfunction"[414] for more
information about the
malfunction.
(a) We recommend to purge air with the air purge function of the unit
(to be performed by the installer). If you purge air from the heat
emitters or collectors, mind the following:
WARNING
Air purging heat emitters or collectors. Before you
purge air from heat emitters or collectors, check if or
is displayed on the home screen of the user interface.
If not, you can purge air immediately.
If yes, make sure that the room where you want to
purge air is sufficiently ventilated. Reason: Refrigerant
might leak into the water circuit, and subsequently into
the room when you purge air from the heat emitters or
collectors.
7 Disposal
NOTICE
Do NOT try to dismantle the system yourself: dismantling
of the system, treatment of the refrigerant, oil and other
parts MUST comply with applicable legislation. Units
MUST be treated at a specialised treatment facility for
reuse, recycling and recovery.
8 Glossary
DHW = Domestic hot water
Hot water used, in any type of building, for domestic
purposes.
LWT = Leaving water temperature
Water temperature at the water outlet of the unit.
Inhaltsverzeichnis
Betriebsanleitung
16
EABH/X16DF6V+9W + EAVH/X16S(U)18+23DA6V+9W
Daikin Altherma 3 H F+W
4P644480-1 – 2020.12
Inhaltsverzeichnis
1 Informationen zu diesem Dokument 16
2 Über das System 17
2.1 Komponenten in einem typischen Systemlayout....................... 17
3 Betrieb 17
3.1 Bedieneinheit: Überblick............................................................ 17
3.2 Mögliche Bildschirme: Überblick ............................................... 18
3.2.1 Startbildschirm ............................................................ 18
3.2.2 Hauptmenübildschirm ................................................. 19
3.2.3 Sollwert-Bildschirm ..................................................... 19
3.2.4 Detaillierter Bildschirm mit Werten.............................. 20
3.3 Ein-/Ausschalten des Betriebs .................................................. 20
3.3.1 Visuelle Anzeige ......................................................... 20
3.3.2 So schalten Sie es EIN oder AUS............................... 20
3.4 Regelung der Raumheizung/-kühlung....................................... 21
3.4.1 Einstellung des Betriebsmodus................................... 21
3.4.2 So ändern Sie die Soll-Raumtemperatur .................... 21
3.4.3 So ändern Sie die Soll-Vorlauftemperatur .................. 21
3.5 Brauchwasserregelung.............................................................. 22
3.5.1 Warmhaltebetrieb........................................................ 22
3.5.2 Programmbetrieb ........................................................ 22
3.5.3 Programmbetrieb + Warmhaltebetrieb........................ 22
3.5.4 Verwendung des Brauchwasser-
Hochleistungsbetriebs................................................. 23
3.6 Erweiterte Nutzung.................................................................... 23
3.7 Programmbildschirm: Beispiel................................................... 23
3.8 Menüstruktur: Übersicht über die Benutzereinstellungen.......... 26
3.9 Monteureinstellungen: Vom Monteur auszufüllende Tabellen .. 27
3.9.1 Konfigurationsassistent............................................... 27
3.9.2 Menü "Einstellungen".................................................. 27
4 Tipps zum Energiesparen 27
5 Instandhaltung und Wartung 27
5.1 Übersicht: Instandhaltung und Wartung .................................... 27
5.2 So ermitteln Sie die Kontakt/Helpdesk-Nr. ................................ 28
6 Fehlerdiagnose und -beseitigung 28
6.1 Zum Anzeigen von Hilfeinformationen im Falle einer
Fehlfunktion............................................................................... 28
6.2 Symptom: Ihnen ist in Ihrem Wohnzimmer zu kalt (warm)........ 28
6.3 Symptom: Das Wasser am Wasserhahn ist zu kalt .................. 29
6.4 Symptom: Wärmepumpenausfall .............................................. 29
6.5 Symptom: Das Gerät macht nach der Inbetriebnahme
gurgelnde Geräusche................................................................ 29
7 Entsorgung 29
8 Glossar 29
1 Informationen zu diesem
Dokument
Vielen Dank, dass Sie sich für den Kauf dieses Produkts
entschieden haben. Zu beachten:
Lesen Sie die Dokumentation aufmerksam durch, bevor Sie die
Benutzerschnittstelle verwenden, um die bestmögliche Leistung
zu gewährleisten.
Bitten Sie den Monteur, Sie über die Einstellungen zu informieren,
die er für die Konfiguration Ihres Systems verwendet hat.
Überprüfen Sie, ob er die Tabellen mit den Monteureinstellungen
ausgefüllt hat. Falls nicht, bitten Sie ihn, diese Tabellen
auszufüllen.
Bewahren Sie die Dokumentation zu Referenzzwecken sorgfältig
auf.
Zielgruppe
Endbenutzer
Dokumentationssatz
Dieses Dokument ist Teil eines Dokumentationssatzes. Der
vollständige Satz besteht aus:
Allgemeine Sicherheitsvorkehrungen:
Sicherheitsanweisungen, die Sie vor der Inbetriebnahme Ihres
Systems lesen müssen
Format: Papier (im Lieferumfang des Innengeräts enthalten)
Bedienungsanleitung:
Kurzanleitung mit Hinweisen zur grundlegenden Nutzung
Format: Papier (im Lieferumfang des Innengeräts enthalten)
Referenzhandbuch für den Benutzer:
Detaillierte schrittweise Anleitungen und
Hintergrundinformationen für die grundlegende und erweiterte
Nutzung
Format: Digitale Dateien unter http://www.daikineurope.com/
support-and-manuals/product-information/
Neueste Ausgaben der mitgelieferten Dokumentation gibt es
gegebenenfalls auf der regionalen Daikin-Webseite oder bei Ihrem
Installateur.
Die Original-Dokumentation ist auf Englisch verfasst. Bei der
Dokumentation in anderen Sprachen handelt es sich um
Übersetzungen des Originals.
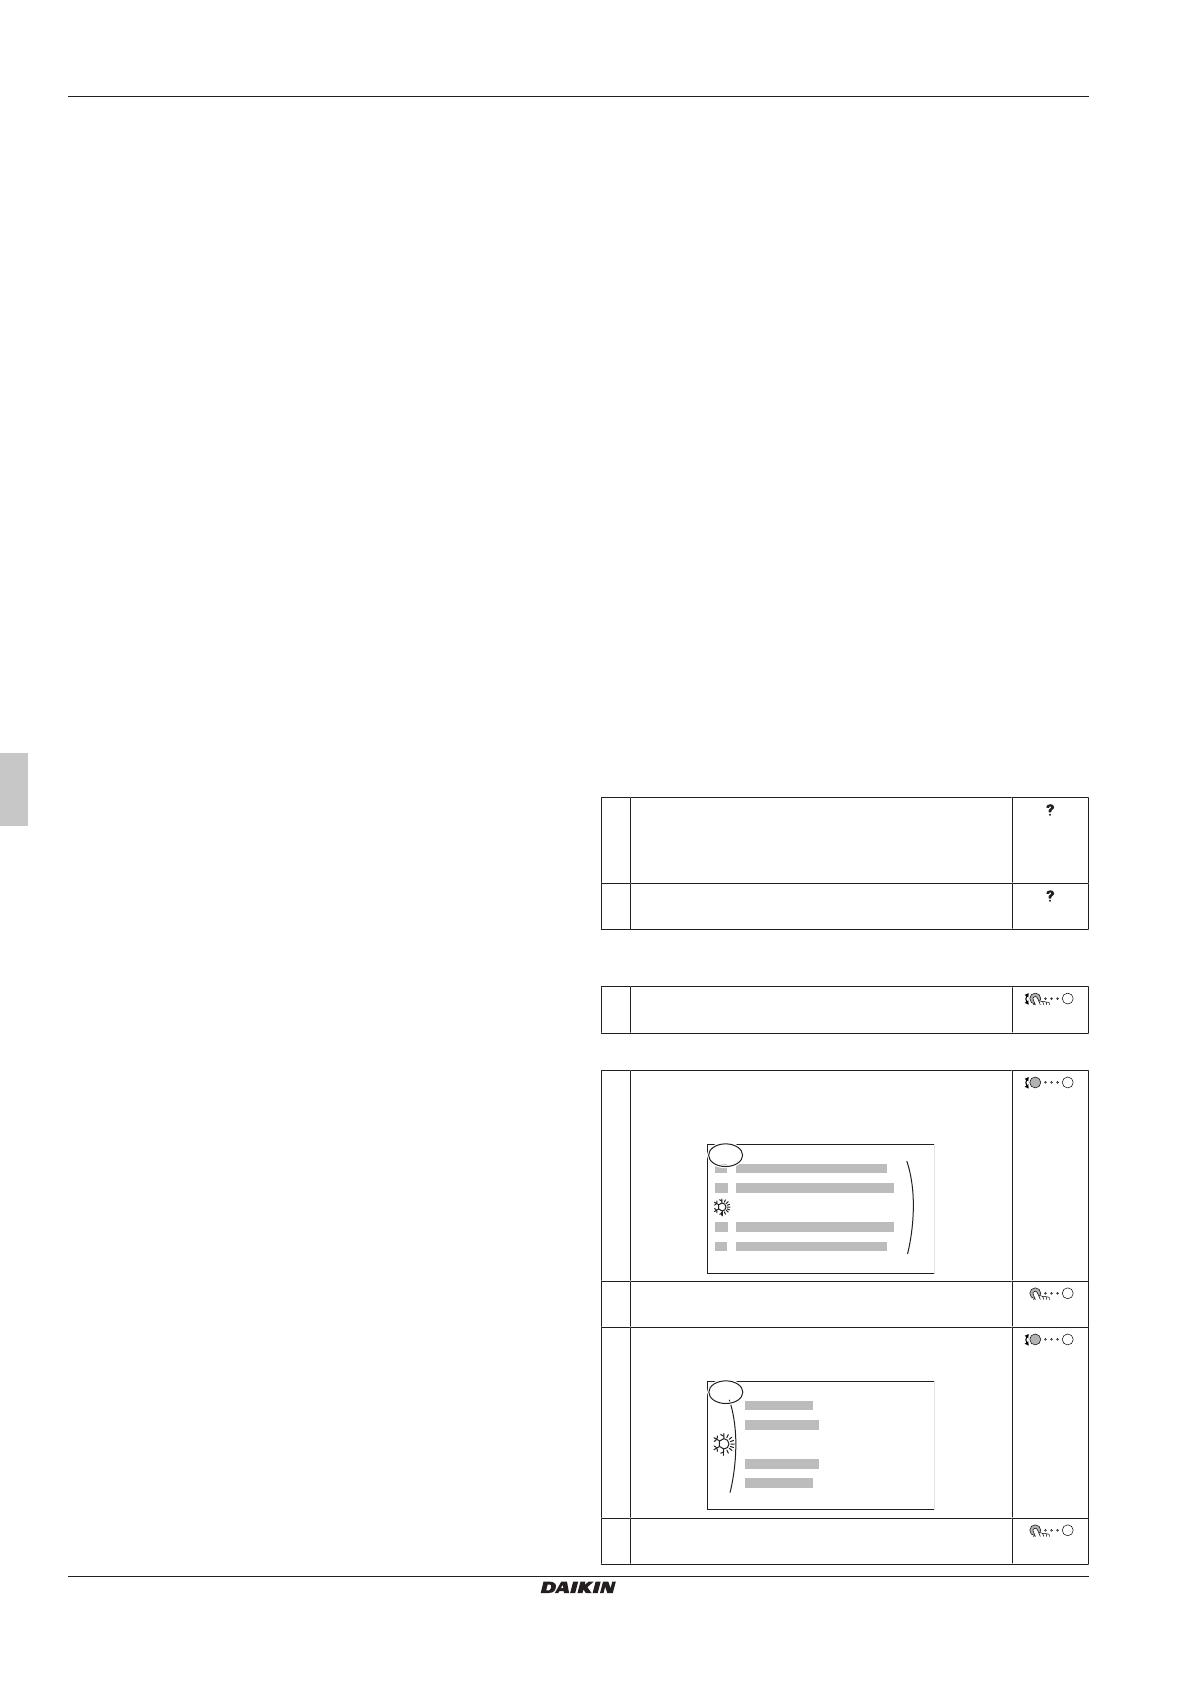
Brotkrumen
Brotkrumen (Beispiel: [4.3]) helfen Ihnen dabei zu ermitteln, wo Sie
sich gerade in der Menüstruktur der Bedieneinheit befinden.
1So aktivieren Sie die Brotkrumen: Drücken Sie im
Startbildschirm oder Hauptmenübildschirm die Hilfe-
Taste. Die Brotkrumen werden oben links im
Bildschirm angezeigt.
2So deaktivieren Sie die Brotkrumen: Drücken Sie
erneut die Hilfe-Taste.
In diesem Dokument sind diese Brotkrumen ebenfalls erwähnt.
Beispiel:
1Gehen Sie zu [4.3]: Raumheizung/-kühlung >
Betriebsbereich.
Das bedeutet:
1Drehen Sie ausgehend vom Startbildschirm den
linken Regler und rufen Sie Raumheizung/-kühlung
auf.
4
Raumheizung/-kühlung
2Drücken Sie den linken Regler, um das Untermenü
aufzurufen.
3Drehen Sie den linken Regler, um
Betriebsbereich aufzurufen.
Betriebsbereich
4.3
4Drücken Sie den linken Regler, um das Untermenü
aufzurufen.
2 Über das System
Betriebsanleitung
17
EABH/X16DF6V+9W + EAVH/X16S(U)18+23DA6V+9W
Daikin Altherma 3 H F+W
4P644480-1 – 2020.12
2 Über das System
Abhängig vom Systemlayout kann das System:
einen Raum erwärmen
einen Raum abkühlen (wenn eine Wärmepumpe zum Heizen/
Kühlen installiert ist)
Brauchwasser erzeugen (wenn ein Brauchwasserspeicher
installiert ist)
2.1 Komponenten in einem typischen
Systemlayout
d
ab
ce
f
gBC A
AHauptzone. Beispiel: Wohnzimmer.
BZusätzliche Zone. Beispiel: Schlafzimmer.
CNutzfläche. Beispiel: Garage.
aWärmepumpe des Außengeräts
bWärmepumpe des Innengeräts
cBrauchwasserspeicher (BW-Speicher)
dBedieneinheit am Innengerät
eBedieneinheit verwendet als Raumthermostat
fUnterbodenheizung
gRadiatoren, Wärmepumpen-KonvektorenoderVentilator-
Konvektoren
INFORMATION
Innengerät und Brauchwasserspeicher (falls installiert)
können abhängig vom Innengerätetyp getrennt oder
integriert werden.
3 Betrieb
3.1 Bedieneinheit: Überblick
Die Bedieneinheit hat die folgenden Komponenten:
b
c
a
aStatusanzeige
bLCD-Bildschirm
cRegler und Tasten
a
b
c
aStatusanzeige
bLCD-Bildschirm
cRegler und Tasten
Statusanzeige
Die LEDs der Statusanzeige leuchten oder blinken und zeigen so
den Betriebsmodus des Geräts.
LED Modus Beschreibung
Blinkt blau Standby Das Gerät ist nicht in Betrieb.
Leuchtet blau Betrieb Das Gerät ist in Betrieb.
Blinkt rot Fehler Es ist ein Fehler aufgetreten.
Weitere Einzelheiten dazu siehe
"6.1Zum Anzeigen von
Hilfeinformationen im Falle einer
Fehlfunktion"[428].
LCD-Bildschirm
Der LCD-Bildschirm verfügt über eine Ruhemodusfunktion. Nach
15Minuten ohne Interaktion mit dem Raumbedienmodul verdunkelt
sich der Bildschirm. Durch das Betätigen einer Taste oder das
Drehen eines Reglers wird der Bildschirm reaktiviert.
Regler und Tasten
Sie verwenden die Regler und Tasten:
Zur Navigation durch die Bildschirme, Menüs und Einstellungen
des LCD-Bildschirms
Zum Festlegen von Werten
a b c d e
Posten Beschreibung
aLinker
Regler
Das LCD zeigt einen Bogen auf der linken Seite
des Displays, wenn Sie den linken Regler
verwenden können.
: Drehen und dann den linken Regler
drücken. Durch die Menüstruktur navigieren.
: Linken Regler drehen. Menüelement
auswählen.
: Linken Regler drücken. Auswahl
bestätigen oder ein Untermenü aufrufen.
bZurück-
Taste
: Drücken, um 1 Schritt in der Menüstruktur
zurückzugehen.
cStartbildsch
irm-Taste
: Drücken, um zum Startbildschirm
zurückzukehren.
dHilfe-Taste : Drücken, um einen Hilfetext in Bezug auf die
aktuelle Seite anzuzeigen (wenn verfügbar).
3 Betrieb
Betriebsanleitung
18
EABH/X16DF6V+9W + EAVH/X16S(U)18+23DA6V+9W
Daikin Altherma 3 H F+W
4P644480-1 – 2020.12
Posten Beschreibung
eRechter
Regler
Das LCD zeigt einen Bogen auf der rechten Seite
des Displays, wenn Sie den rechten Regler
verwenden können.
: Drehen und dann den rechten Regler
drücken. Einen Wert oder eine Einstellung
ändern, die auf der rechten Seite des
Bildschirms angezeigt werden.
: Rechten Regler drehen. Durch die
möglichen Werte und Einstellungen navigieren.
: Rechten Regler drücken. Auswahl
bestätigen und zum nächsten Menüelement
wechseln.
3.2 Mögliche Bildschirme: Überblick
Dies sind die gängigsten Bildschirme:
+
a
OR
b
c
c2
c4
c1
c3
aStartbildschirm
bHauptmenübildschirm
cBildschirme der unteren Ebene:
c1: Sollwert-Bildschirm
c2: Detaillierter Bildschirm mit Werten
c3: Detaillierter Bildschirm mit der witterungsgeführten
Kurve
c4: Bildschirm mit Programm
3.2.1 Startbildschirm
Drücken Sie die Taste , um zum Startbildschirm zurückzukehren.
Sie sehen einen Überblick der Gerätekonfiguration, den Raum und
die Sollwert-Temperaturen. Nur Symbole, die für Ihre Konfiguration
gelten, sind auf dem Startbildschirm sichtbar.
Mögliche Aktionen in diesem Bildschirm
Durchlaufen Sie die Liste des Hauptmenüs.
Gehen Sie zum Hauptmenübildschirm.
Aktivieren/deaktivieren Sie Brotkrumen.
Posten Beschreibung
21
21
Die Temperaturen werden in Kreisen angezeigt.
Wenn der Kreis grau ist, ist der entsprechende
Betrieb (Beispiel: Raumheizung) derzeit nicht
aktiv.
Außengerät
a2 a3
a1
a1 : Außengerät
a2 : Geräuscharm aktiv
a3 Gemessene Umgebungstemperatur
Innengerät/
Brauchwas
ser-
Speicher
b1
b2
b1 Innengerät:
: Innengerät für Aufstellung auf dem
Boden mit integriertem Speicher
: Wandmontiertes Innengerät mit
separatem Speicher
: Wandmontiertes Innengerät
b2 Wasserdruck
Betriebsmo
dus
c : Kühlen
: Heizen
Desinfektio
n/
Leistungsst
ark
d : Desinfektionsmodus aktiv
: Hochleistungsbetrieb aktiv
Datum /
Uhrzeit
eAktuelles Datum und Uhrzeit
Ruhetag f: Urlaubsmodus aktiv
Haupt-Zone
g3
g1
g4
g2
g1 Heizverteilsystem-Typ:
: Fußbodenheizung
: Ventilator-Konvektor
: Heizkörper
g2 Vorlauftemperatur-Sollwert
g3 Raumthermostattyp:
: Daikin-Bedieneinheit verwendet als
Raumthermostat
: Externe Steuerung
Verborgen: Vorlauftemperaturregelung
g4 Gemessene Raumtemperatur
Zusatzzone
h3
h1 h2
h1 Heizverteilsystem-Typ:
: Fußbodenheizung
: Ventilator-Konvektor
: Heizkörper
h2 Vorlauftemperatur-Sollwert
h3 Raumthermostattyp:
: Externe Steuerung
Verborgen: Vorlauftemperaturregelung
3 Betrieb
Betriebsanleitung
19
EABH/X16DF6V+9W + EAVH/X16S(U)18+23DA6V+9W
Daikin Altherma 3 H F+W
4P644480-1 – 2020.12
Posten Beschreibung
Brauchwas
ser
i1 i2
i1
: Brauchwasser
i2 Gemessene Speichertemperatur
Fehler j oder : Es ist ein Fehler aufgetreten.
Weitere Einzelheiten dazu siehe "6.1Zum
Anzeigen von Hilfeinformationen im Falle einer
Fehlfunktion"[428].
3.2.2 Hauptmenübildschirm
Beginnen Sie auf dem Startbildschirm und drücken ( ) oder
drehen Sie ( ) den linken Regler, um den
Hauptmenübildschirm zu öffnen. Über das Hauptmenü können Sie
auf die verschiedenen Sollwertbildschirme und Untermenüs
zugreifen.
a
2
Hauptzone
Zusatzzone
Raum
Fehler
Raumheizung/-kühlung
aAusgewähltes Untermenü
Mögliche Aktionen in diesem Bildschirm
Durchlaufen Sie die Liste.
Rufen Sie das Untermenü auf.
Aktivieren/deaktivieren Sie Brotkrumen.
Untermenü Beschreibung
[0] oder Fehler Beschränkung: Wird nur angezeigt,
wenn es zu einem Fehler kommt.
Weitere Einzelheiten dazu siehe
"6.1Zum Anzeigen von
Hilfeinformationen im Falle einer
Fehlfunktion"[428].
[1] Raum Beschränkung: Wird nur angezeigt,
wenn ein Raumthermostat mit dem
Innengerät verbunden ist.
Legen Sie die Raumtemperatur fest.
[2] Hauptzone Zeigt das zutreffende Symbol für Ihren
Hauptzonenverteilertyp an.
Legen Sie die Vorlauftemperatur für
die Hauptzone fest.
[3] Zusatzzone Beschränkung: Wird nur angezeigt,
wenn es zwei Vorlauftemperaturzonen
gibt. Zeigt das zutreffende Symbol für
Ihren Zusatzzonenverteilertyp an.
Legen Sie die Vorlauftemperatur für
die Zusatzzone fest (falls vorhanden).
[4] Raumheizung/-
kühlung
Zeigt das zutreffende Symbol für Ihr
Gerät an.
Versetzen Sie das Gerät in den
Heizen-Modus oder den Kühlen-
Modus. Sie können den Modus bei
Nur-Heizen-Modellen nicht ändern.
[5] Speicher Beschränkung: Wird nur angezeigt,
wenn ein Brauchwasser-Speicher
vorhanden ist.
Legen Sie die Brauchwasser-
Speichertemperatur fest.
Untermenü Beschreibung
[7]
Benutzereinstellun
gen
Bietet Zugriff auf die
Benutzereinstellungen, wie den
Urlaubsmodus und den Geräuscharm-
Modus.
[8] Information Zeigt Daten und Informationen zum
Innengerät an.
[9]
Monteureinstellung
en
Beschränkung: Nur für den Monteur.
Bietet Zugriff auf die erweiterten
Einstellungen.
[A] Inbetriebnahme Beschränkung: Nur für den Monteur.
Führt Tests und die Wartung durch.
[B] Benutzerprofil Ändern Sie das aktive Benutzerprofil.
[C] Betrieb Schalten Sie die Heizen-/Kühlen-
Funktionalität und die
Brauchwasserproduktion ein oder aus.
3.2.3 Sollwert-Bildschirm
Der Sollwert-Bildschirm wird für Bildschirme angezeigt, die
Systemkomponenten beschreiben, die einen Sollwert benötigen.
Beispiele
[1] Raumtemperatur-Bildschirm
+
21°C
1
Raum
[2] Hauptzone-Bildschirm
+
35°C
2
Hauptzone
[3] Zusatzzone-Bildschirm
+
45°C
3
Zusatzzone
[5] Speichertemperatur-
Bildschirm
+
50°C
5
Speicher
Erläuterung
a1
d
+
d
ed
e
c
a2
b1
b2
Mögliche Aktionen in diesem Bildschirm
Durchlaufen Sie die Liste des Untermenüs.
Gehen Sie zum Untermenü.
Passen Sie die Soll-Temperatur an und übernehmen
Sie sie automatisch.
Posten Beschreibung
Minimale Temperaturgrenze a1 Durch das Gerät festgelegt
a2 Durch den Monteur
beschränkt
Maximale Temperaturgrenze b1 Durch das Gerät festgelegt
b2 Durch den Monteur
beschränkt
Aktuelle Temperatur cDurch das Gerät gemessen
3 Betrieb
Betriebsanleitung
20
EABH/X16DF6V+9W + EAVH/X16S(U)18+23DA6V+9W
Daikin Altherma 3 H F+W
4P644480-1 – 2020.12
Posten Beschreibung
Soll-Temperatur dDrehen Sie zum Erhöhen/
Verringern den rechten
Regler.
Untermenü eDrehen oder drücken Sie
den linken Regler, um das
Untermenü aufzurufen.
3.2.4 Detaillierter Bildschirm mit Werten
Beispiel:
a bc
a bc
7.2.1
Zeit/Datum
Stunden 11
30
Minuten
a Einstellungen
b Werte
c Ausgewählte Einstellung und
Wert
Mögliche Aktionen in diesem Bildschirm
Durchlaufen Sie die Liste des Einstellungen.
Ändern Sie den Wert.
Gehen Sie zur nächsten Einstellung.
Bestätigen Sie die Änderungen und fahren Sie fort.
3.3 Ein-/Ausschalten des Betriebs
3.3.1 Visuelle Anzeige
Bestimmte Funktionen des Geräts können separat aktiviert oder
deaktiviert werden. Wenn eine Funktion deaktiviert ist, ist das
entsprechende Temperatursymbol auf dem Startbildschirm
ausgegraut.
Raumtemperaturregelung
1.6
bar
55
21
35
45
a
1.6
bar
55
21
35
45
b
aRaumtemperaturregelung EIN
bRaumtemperaturregelung AUS
Raumheizungs-/-kühlungsbetrieb
1.6
bar
55
21
35
45
c
1.6
bar
55
21
35
45
d
cRaumheizungs-/-kühlbetrieb EIN
dRaumheizungs-/-kühlbetrieb AUS
Speicherheizbetrieb
1.6
bar
55
21
35
45
e
1.6
bar
55
21
35
45
f
eSpeicherheizbetrieb EIN
fSpeicherheizbetrieb AUS
3.3.2 So schalten Sie es EIN oder AUS
Raumtemperaturregelung
1Gehen Sie zu [C.1]: Betrieb > Raum.
Betrieb
Raum
Raumheizung/-kühlung Ein
Ein
C.1
2Setzen Sie den Betrieb auf Ein oder Aus.
Raumheizungs-/-kühlungsbetrieb
HINWEIS
Frostschutz Raum. Auch wenn Sie den Raumheiz-/-
kühlbetrieb ausschalten ([C.2]: Betrieb > Raumheizung/-
kühlung), kann der Frostschutzbetrieb Raum aktiv werden
(wenn er aktiviert wurde). Für die Vorlauftemperatur-
Steuerung und die externe Raumthermostat-Steuerung
wird der Schutz NICHT garantiert.
HINWEIS
Wasserrohr-Frostschutz. Auch wenn Sie den
Raumheiz-/-kühlbetrieb ausschalten ([C.2]: Betrieb >
Raumheizung/-kühlung), bleibt der Wasserrohr-
Frostschutz aktiv, wenn er aktiviert wurde.
1Gehen Sie zu [C.2]: Betrieb > Raumheizung/-
kühlung.
Betrieb
Raumheizung/-kühlung
Speicher Aus
Ein
Ein
Raum
C.2
2Setzen Sie den Betrieb auf Ein oder Aus.
Speicherheizbetrieb
HINWEIS
Desinfektionsmodus. Auch wenn Sie den Heizbetrieb
ausschalten ([C.3]: Betrieb > Speicher), bleibt der
Desinfektionsmodus. aktiv. Wenn Sie aber die Desinfektion
während der Ausführung ausschalten, kommt es zu einem
AH-Fehler.
  • Page 1 1
  • Page 2 2
  • Page 3 3
  • Page 4 4
  • Page 5 5
  • Page 6 6
  • Page 7 7
  • Page 8 8
  • Page 9 9
  • Page 10 10
  • Page 11 11
  • Page 12 12
  • Page 13 13
  • Page 14 14
  • Page 15 15
  • Page 16 16
  • Page 17 17
  • Page 18 18
  • Page 19 19
  • Page 20 20
  • Page 21 21
  • Page 22 22
  • Page 23 23
  • Page 24 24
  • Page 25 25
  • Page 26 26
  • Page 27 27
  • Page 28 28
  • Page 29 29
  • Page 30 30
  • Page 31 31
  • Page 32 32
  • Page 33 33
  • Page 34 34
  • Page 35 35
  • Page 36 36
  • Page 37 37
  • Page 38 38
  • Page 39 39
  • Page 40 40
  • Page 41 41
  • Page 42 42
  • Page 43 43
  • Page 44 44
  • Page 45 45
  • Page 46 46
  • Page 47 47
  • Page 48 48
  • Page 49 49
  • Page 50 50
  • Page 51 51
  • Page 52 52
  • Page 53 53
  • Page 54 54
  • Page 55 55
  • Page 56 56
  • Page 57 57
  • Page 58 58
  • Page 59 59
  • Page 60 60
  • Page 61 61
  • Page 62 62
  • Page 63 63
  • Page 64 64
  • Page 65 65
  • Page 66 66
  • Page 67 67
  • Page 68 68
  • Page 69 69
  • Page 70 70
  • Page 71 71
  • Page 72 72
  • Page 73 73
  • Page 74 74
  • Page 75 75
  • Page 76 76
  • Page 77 77
  • Page 78 78
  • Page 79 79
  • Page 80 80
  • Page 81 81
  • Page 82 82
  • Page 83 83
  • Page 84 84
  • Page 85 85
  • Page 86 86
  • Page 87 87
  • Page 88 88
  • Page 89 89
  • Page 90 90
  • Page 91 91
  • Page 92 92
  • Page 93 93
  • Page 94 94
  • Page 95 95
  • Page 96 96
  • Page 97 97
  • Page 98 98
  • Page 99 99
  • Page 100 100
  • Page 101 101
  • Page 102 102
  • Page 103 103
  • Page 104 104
  • Page 105 105
  • Page 106 106
  • Page 107 107
  • Page 108 108
  • Page 109 109
  • Page 110 110
  • Page 111 111
  • Page 112 112
  • Page 113 113
  • Page 114 114
  • Page 115 115
  • Page 116 116
  • Page 117 117
  • Page 118 118
  • Page 119 119
  • Page 120 120
  • Page 121 121
  • Page 122 122
  • Page 123 123
  • Page 124 124
  • Page 125 125
  • Page 126 126
  • Page 127 127
  • Page 128 128
  • Page 129 129
  • Page 130 130
  • Page 131 131
  • Page 132 132
  • Page 133 133
  • Page 134 134
  • Page 135 135
  • Page 136 136
  • Page 137 137
  • Page 138 138
  • Page 139 139
  • Page 140 140
  • Page 141 141
  • Page 142 142
  • Page 143 143
  • Page 144 144
  • Page 145 145
  • Page 146 146
  • Page 147 147
  • Page 148 148
  • Page 149 149
  • Page 150 150
  • Page 151 151
  • Page 152 152
  • Page 153 153
  • Page 154 154
  • Page 155 155
  • Page 156 156

Daikin EABH16DF6V Kullanım kılavuzu

Kategori
Uzay ısıtıcıları
Tip
Kullanım kılavuzu