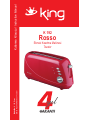
King Rosso K 192 Kullanım kılavuzu
- Kategori
- Tost makineleri
- Tip
- Kullanım kılavuzu

Model No: K 192 Rosso
Ekmek Kızartma Makinesi / Toaster
Kullanma Kılavuzu / Instruction Manual
K 192
Rosso
Ekmek Kızartma Makinesi
Toaster

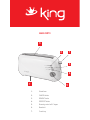
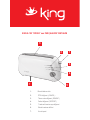
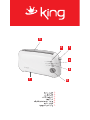
MAIN PARTS
1.
Bread lever
2.
CANCEL button
3.
REHEAT button
4.
DEFROST button
5.
Browning control with 7 stages
6.
Bread slot
7.
Crumb tray
6
2 1
3
4
5
7

IMPORTANT SAFETY INSTRUCTIONS
Please read these instructions carefully before using the appliance.
■Check that your mains voltage corresponds to that stated on the appliance.
■Never leave the appliance unsupervised when in use. Keep out of reach of children or
incompetent persons.
■From time to time check the cord for damages. Never use the appliance if cord or
appliance shows any signs of damage.
■Only use the appliance for domestic purposes and in the way indicated in these
instructions.
■Never immerse the appliance in water or any other liquid for any reason whatsoever.
■Never place it into the dishwasher.
■Never use the appliance near hot surfaces.
■Should the cord be damaged, it must be replaced by a competent qualified electrician (*).
■Before cleaning, always unplug the appliance from the power supply.
■All repairs should be made by a competent qualified electrician
■Never use the appliance outside and always place it in a dry environment.
■Never use accessories which are not recommended by the producer. They could
constitute a danger to the user and risk to damage the appliance.
■Never move the appliance by pulling the cord. Make sure the cord cannot get caught in
any way. Do not wind the cord around the appliance and do not bend it. Tand the appliance
on a table or flat surface.
■Make sure the appliance has cooled down before cleaning and storing it.
■Make sure the cord never comes into contact with the hot parts of the appliance.
■Never touch the hot parts of the appliance.
■Make sure the appliance never comes into contact with inflammable materials, such as
curtains, cloth, etc... when it is in use, as a fire might occur. Keep a distance of at least 1
metre between the appliance and the curtains.
■Do not use the appliance for defrosting food and only insert unbuttered slices of bread of
which the thickness does not risk to prevent the bread from coming up. Be extremely
strictabout this as toasters are the cause of many fires when these elementary safety
precautions are not observed.
■Empty the appliance frequently of breadcrumbs. Make sure the appliance is always
unplugged before emptying it. Check the « Cleaning » section
■When cleaning the appliance, do not use metallic scourers in order to avoid any future risk
of electric short-circuit.
■Competent qualified service: after sales department of the producer or importer or any
person who is qualified, approved and competent to perform this kind of repairs in order to
avoid all danger. In any case you should return the appliance to this service.

OPERATION
■Before using your appliance for the first time, check if it is clean (see “Maintenance and
cleaning”) as it comes into direct contact with bread. Check if any object has fallen into the slot.
■In the first time, connect the appliance only to a mains earthed wall socket. A grommet on
the bottom of the appliance enables to maintain the cord by positioning it to the backside
of the appliance.
■Place the bread slices in the slot (for the French bread, cut a loaf shorter than the
slot,then cut it in two pieces along its length.). Your appliance is provided to receive French
bread, but also pieces of toast or other bread slices if their thickness and their length are
shorter than the one of the slot.
■Press down the bread carriage handle until it stops (in the same time, the grid inside the
slot will tighten around the bread in order to keep it away from the heating wires).
■Then release the pressure and the handle will stay in the lower position, which means
that the heating process has begun. If the handle comes up immediately, check if the
appliance is plugged in as it blocks when the unit is plugged in.
■You can adjust the browning intensity to obtain a more or less toasted bread by
positioning the browning control selector to one of the degrees marked from 1 to7.
■Therefore you only have to turn clockwise to increase the intensity, and anticlockwise to
decrease it. The higher the number is, the more toasted the bread will be.
■During the functioning, if you think that the bread is toasted enough or for another
reason,you can break the heating process, simply by pressing the “STOP” button.
■The "REHEAT" button allows you to reheat already toasted bread or to toast bread which
is not toasted enough during a short time without modifying the browning degree.
■The “DEFROST” button allows you to toast the bread that has been frozen
before hand.
■Always unplug the appliance after use and let it cool down before handling or storing it.
■A cord winder is foreseen on the bottom of the appliance: two feet like two
semicircles.When you store your appliance, wind the cord around the feet.
MAINTENANCE AND CLEANING
■Before attempting any cleaning operation, make sure the toaster is unplugged from the
supply socket and fully cooled down.
■To remove bread crumbs slide the crumb tray situated on the side of the appliance.
■Never use sharp objects to clean. Doing so could damage the appliance.
■To clean the exterior surfaces, simply wipe over with a soft damp cloth. On no account
must the toaster be immersed in water.
■All other maintenance and repair should be performed by a qualified technician.

KING K-192 “ROSSO’ nun PARÇALARINI TANIYALIM
1.
Ekmek kaldırma kolu
2.
İPTAL düğmesi ( CANCEL )
3.
Tekrar ısıtma düğmesi ( REHEAT )
4.
Defrost düğmesi ( DEFROST )
5.
7 kademeli kızartma ayar düğmesi
6.
Ekmek kızartma delikleri
7.
Kırıntı tepsisi
6
2 1
3
4
5
7

ÖNEMLİ EMNİYET TALİMATLARI
Lütfen bu talimatları dikkatlice okuyunuz!
Kullanmadan önce:
■Ekmek kızartma makinenizi ambalajından dikkatlice çıkarınız.İleride kullanmak üzere
ambalajını saklayabilirsiniz.
■Ana kabloyu ve fişini sıcak cisimlerden ve yüzeylerden uzak tutunuz.
■Çocuklar etraftayken, ekmek kızartma makinenizi kullanırken kontrolü elden
bırakmayınız.
■Ekmek kızartma makinenizi kullandıktan sonra yerine kaldırmadan önce tamamen
soğuduğundan emin olunuz.
■Eğer ekmek kızartma deliklerinin arasına sıkıştıysa cihazın fişini prizden çekmeden
çıkartmaya çalışmayınız.
■Ekmekleri çıkartmadan önce tamamen soğumasını bekleyiniz.
■Ekmeği çıkartırken iç mekanizmayı bozmamaya dikkat ediniz.
■İç parçalar kolaylıkla zarar görebilirler.Ekmek kızartma makinenizin iç parçalarına
herhangi bir aletle müdahale etmeyiniz.
ÖNEMLİ NOT
■Ekmek Kızartma Makinesi ilk defa çalıştırıldığı zaman, ısı elementleri ısınmaya başladığı
için hafif bir yanık kokusu olabilir.Bu kullanıcıya tehlike arz etmez ve cihazda bir hasar
olduğunu göstermez. İlk defa kullanırken bu yanık kokusu gidene kadar ekmek kızartma
makinesinin ısınmasını bekleyiniz.
ÇALIŞTIRMA
■Ekmek kızartma makinesini ilk defa çalıştıracağınız zaman ekmekleri koymadan
çalıştırmanız tavsiye edilir.
■Ekmek kızartma makinesinin fişini prize takınız ve makineyi çalıştırınız.
■Kızartma ayar düğmesini en düşük ayarına getiriniz. ( 1 )
■Ekmek kaldırma kolunu aşağı doğru bastırınız ve ısı elementlerinin ısınmasına izin
veriniz.
■Yanık kokusu gidene kadar elementlerin ısınmasına izin veriniz.
■Ekmek kaldırma kolunun serbest kalması için İPTAL düğmesine basınız.

EKMEK KIZARTMA MAKİNENİZİN KULLANIMI
■Ekmek kızartma makinenizin fişinin prize takılı olduğuna ve açtığınıza emin olunuz.
■Kızartma deliklerine 1 veya 2 dilim ekmek yerleştiriniz ve ekmek kaldırma kolunu
kilitlenene kadar aşağı doğru bastırınız.
■Ekmek kızartma makinesi otomatik olarak ısınacak ve ekmekleri kızartmaya
başlayacaktır.
■Kızartma ayar düğmesini istediğiniz 7 kademeli ekmek kızartma ayarından birine getiriniz.
■Kızartmayı durdurmak için istediğiniz anda İPTAL düğmesine basabilirsiniz.
TEMİZLİK
■Temizlemeden önce, cihazı kapatınız, fişini prizden çekiniz ve tamamen soğumasını
bekleyiniz.
■Cihazın kızartma deliklerinin içinde kalan kırıntıları cihazı çok sarsmadan çıkartınız.
■Kırıntı tepsisini çekerek çıkartınız ve boşaltınız.Kırıntı tepsisini kaydırarak tekrar yerine
koyunuz.
■Cihazın dış yüzeyini nemli bir bezle siliniz.

1 . Bread Hebel
2 . CANCEL
3 . Aufwärmtaste
4 . DEFROST Taste
5 . Browning Steuerung mit 7 Etappen
6 . Bread Schlitz
7 . Krümelschublade
6
2 1
3
4
5
7

WICHTIGE SICHERHEITSHINWEISE
Bitte lesen Sie diese Anleitung sorgfältig durch, bevor Sie das Gerät .
■ Überprüfen Sie , ob Ihre Netzspannung mit der auf dem Gerät angegebenen
übereinstimmt.
■ Lassen Sie das Gerät nicht unbeaufsichtigt , wenn im Einsatz . Darf nicht in die Hände
von Kindern oder unfähigen Personen .
■ Von Zeit zu Zeit überprüfen, das Kabel auf Beschädigungen. Verwenden Sie das Gerät,
wenn Netzkabel oder Gerät zeigt keine Anzeichen von Schäden .
■ Das Gerät darf nur für den Hausgebrauch und in der angegebenen Weise in diese
Anweisungen.
■ Tauchen Sie das Gerät nicht in Wasser oder eine andere Flüssigkeit aus irgendeinem
Grund .
■ Platzieren Sie es nicht in die Spülmaschine .
■ Verwenden Sie das Gerät in der Nähe von heißen Oberflächen .
■ Sollte das Stromkabel beschädigt sein, muss es von einem qualifizierten Elektriker (* )
ersetzt werden.
■ Vor dem Reinigen stets den Netzstecker aus der Steckdose .
■ Alle Reparaturen müssen von einem qualifizierten Elektriker vorgenommen werden
■ Verwenden Sie das Gerät außen und stellen Sie es immer in einer trockenen
Umgebung.
■ Verwenden Sie niemals Zubehör, das nicht vom Hersteller empfohlen. Sie konnten
eine Gefahr für den Benutzer und das Risiko , das Gerät beschädigen.
■ Sie das Gerät niemals durch Ziehen am Kabel. Achten Sie darauf, das Kabel nicht in
irgendeiner Weise verfangen. Wickeln Sie nicht das Kabel um das Gerät herum und
biegen Sie es nicht . Tand das Gerät auf einem Tisch oder flache Oberfläche .
■ Achten Sie darauf, das Gerät hat sich vor der Reinigung und es wegräumen .
■ Achten Sie darauf, das Kabel kommt nie in Berührung mit den heißen Teilen des Geräts.
■ Berühren Sie nicht die heißen Teile des Gerätes.
■ Achten Sie darauf, das Gerät niemals in Kontakt mit brennbaren Materialien , wie
Gardinen , Stoffe, etc. .. wenn es in Gebrauch ist, als ein Feuer auftreten. Halten Sie einen
Abstand von mindestens 1 Meter zwischen dem Gerät und den Vorhängen.
■ Nehmen Sie das Gerät nicht zum Auftauen Lebensmittel und nur einfügen unbuttered
Brotscheiben , deren Dicke nicht riskieren muss , um das Brot aus der Tür zu verhindern.
Seien Sie äußerst strictabout dies als Toaster die Ursache für viele Brände sind , wenn
diese elementaren Sicherheitsvorkehrungen nicht beachtet werden.
■ Leeren Sie das Gerät häufig aus Paniermehl . Achten Sie darauf, das Gerät ist immer
unplugged vor der Entleerung es . Überprüfen Sie die «Reinigung » Abschnitt
■ Wenn Sie das Gerät reinigen , verwenden Sie nicht metallische Schwämme , um jede
zukünftige Risiko eines elektrischen Kurzschluss zu vermeiden .

■ Kompetente qualifizierten Service : After-Sales- Abteilung des Herstellers oder
Importeurs oder jede Person, die qualifizierte , anerkannte und kompetente , diese Art von
Reparaturen durchzuführen, um jede Gefahr zu vermeiden. In jedem Fall sollten Sie das
Gerät für diesen Dienst zurückzukehren.
OPERATION
■ Bevor Sie Ihr Gerät zum ersten Mal erfahren, ob es sauber ist (siehe " Wartung und
Reinigung " ), wie es in direkten Kontakt mit Brot kommt . Prüfen Sie, ob jedes Objekt in
den Schlitz gefallen ist.
■ In der ersten Zeit , schließen Sie das Gerät nur an einem Netz geerdete Steckdose .
Tülle an der Unterseite des Gerätes ermöglicht , das Seil , indem man sie an der Rückseite
des Gerätes zu erhalten.
■ Legen Sie die Brotscheiben in den Steckplatz (für die Französisch Brot, einen Laib
geschnitten kürzer als der Schlitz , dann schneiden Sie es in zwei Teile entlang seiner
Länge. ) . Ihr Gerät ist vorgesehen, Französisch Brot zu erhalten, sondern auch Teile von
Toast oder anderen Brotscheiben , wenn ihre Dicke und deren Länge kürzer ist als die des
Schlitzes sind .
■ Drücken Sie die Brothalterschlittens Griff, bis es ( in der gleichen Zeit , das Netz in dem
Schlitz wird rund um die Brot ziehen , um sie zu halten weg von der Heizdrähte ) stoppt .
■ Lassen Sie dann den Druck und der Griff in der unteren Position bleiben , was bedeutet,
dass die Heiz- Prozess hat begonnen . Wenn der Griff kommt sofort auf, überprüfen Sie,
ob das Gerät an die Stromversorgung angeschlossen ist , wie es , wenn das Gerät
eingesteckt ist blockiert
■ Sie können die Bräunung Intensität , um eine mehr oder weniger von geröstetem Brot
erhalten Positionierung des Röstgradkontrolle Wahlschalter auf eine der Grad von 1 bis7
markiert.
■ Daher müssen Sie nur im Uhrzeigersinn drehen , um die Intensität zu erhöhen, und
gegen den Uhrzeigersinn , um sie zu verringern. Je höher die Zahl ist , desto mehr wird
das Brot getoastet werden .
■ Während des Betriebs , wenn Sie denken, dass das Brot genug oder aus einem anderen
Grund wird geröstet, können Sie brechen die Erwärmung , durch einfaches Drücken der
Taste "STOP" .
■ Die " REHEAT " -Taste können Sie bereits geröstetes Brot aufwärmen oder Brot toasten,
die nicht genug während einer kurzen Zeit ohne Veränderung der Bräunungsgrad
getoastet.
■ Die "Defrost " -Taste können Sie das Brot , das eingefroren war Toast vor der Hand .
■ Stecken Sie das Gerät nach Gebrauch und lassen Sie es abkühlen, bevor Handhabung
oder Lagerung.

■ Eine Kabelaufwicklung ist auf der Unterseite des Gerätes vorgesehen: zwei Füße wie
zwei semicircles.When Sie speichern Ihr Gerät , wickeln Sie das Kabel um die Füße .
PFLEGE UND REINIGUNG
■ Vor der Ausführung jeglicher Reinigungsvorgang , stellen Sie sicher, der Toaster aus der
Steckdose gezogen ist und vollständig abgekühlt ist.
■ So entfernen Sie Semmelbrösel schieben Sie die Krümelschublade an der Seite des
Gerätes befindet .
■ Verwenden Sie niemals scharfe Gegenstände zu reinigen. Dies könnte das Gerät
beschädigen.
■ Um die Außenflächen reinigen , wischen Sie einfach mit einem weichen feuchten Tuch.
Auf keinen Fall darf der Toaster in Wasser getaucht werden.
■ Alle anderen Wartungs-und Reparaturarbeiten sollten von einem qualifizierten Techniker
durchgeführt werden.

1 . Levier de pain
2 . Bouton ANNULER
3 . Bouton REHEAT
4 . Touche DEFROST
5 . Contrôle Browning avec 7 étapes
6 . Fente à pain
7 . Ramasse-miettes
6
2 1
3
4
5
7

CONSIGNES DE SÉCURITÉ IMPORTANTES
S'il vous plaît lire attentivement ces instructions avant d'utiliser l'appareil.
■ Vérifiez que la tension du réseau correspond à celle indiquée sur l'appareil.
■ Ne jamais laisser l'appareil sans surveillance lorsqu'il est utilisé. Tenir hors de portée des
enfants ou des personnes incompétentes .
■ De temps en temps vérifier le cordon n'est pas endommagé . Ne jamais utiliser l'appareil
si le cordon ou appareil montre des signes de dommages.
■ Utilisez l'appareil uniquement à des fins domestiques et de la manière indiquée dans
ces instructions .
■ Ne jamais plonger l'appareil dans l'eau ou tout autre liquide , pour quelque raison que
ce soit.
■ Ne jamais placer dans le lave-vaisselle.
■ Ne jamais utiliser l' appareil à proximité de surfaces chaudes.
■ Si le cordon est endommagé, il doit être remplacé par un électricien qualifié et
compétent (*).
■ Avant le nettoyage, débranchez toujours l'appareil de l'alimentation électrique .
■ Toutes les réparations doivent être effectuées par un électricien qualifié et compétent
■ Ne jamais utiliser l'appareil à l'extérieur et placez-le toujours dans un environnement
sec.
■ Ne jamais utiliser d' accessoires qui ne sont pas recommandés par le fabricant. ils
pourraient constituer un danger pour l'utilisateur et risque d'endommager l'appareil.
■ Ne déplacez jamais l'appareil en tirant le cordon. Assurez-vous que le cordon ne peut
pas se faire prendre en aucune façon. Ne pas enrouler le cordon autour de l'appareil et ne
pas le plier. Tand l'appareil sur une table ou une surface plane .
■ Assurez-vous que l' appareil ait refroidi avant de le nettoyer et de le ranger.
■ Assurez-vous que le cordon n'entre jamais en contact avec les parties chaudes de
l'appareil.
■ Ne pas toucher les parties chaudes de l'appareil .
■ Assurez-vous que l'appareil n'entre jamais en contact avec des matières inflammables ,
comme des rideaux , des tissus, etc .. quand il est en utilisation, comme un incendie
pourrait se produire. Gardez une distance d'au moins 1 mètre entre l'appareil et les
rideaux.
■ Ne pas utiliser l'appareil pour décongeler les aliments et seulement insérer les tranches
de pain beurré dont l'épaisseur ne risque pas d' empêcher le pain de monter . Soyez
extrêmement strictabout ce que les grille-pain sont la cause de nombreux incendies
lorsque ces précautions élémentaires de sécurité ne sont pas respectées .
■ Vider l'appareil fréquemment de chapelure. Assurez-vous que l'appareil est toujours
débranché avant de le vider . Consultez la section «Nettoyage »

■ Lors du nettoyage , ne pas utiliser des éponges métalliques afin d'éviter tout risque futur
de court-circuit électrique.
■ Qualifié compétente: service après- vente du producteur ou de l'importateur ou de toute
personne qui est qualifié, agréé et compétent pour exercer ce genre de réparations afin
d'éviter tout danger. Dans tous les cas, vous devez retourner l'appareil à ce service.
FONCTIONNEMENT
■ Avant d'utiliser votre appareil pour la première fois, vérifiez si elle est propre (voir «
Entretien et nettoyage ») car il est en contact direct avec du pain . Vérifiez si un objet est
tombé dans la fente.
■ Dans le premier temps, raccorder l'appareil uniquement à un réseau mis à la terre prise
murale. Un passe-fil sur le fond de l'appareil permet de maintenir le cordon en le
positionnant à l'arrière de l' appareil .
■ Placez les tranches de pain dans la fente ( pour le pain français , couper un pain plus
courte que la fente, puis le couper en deux morceaux le long de sa longueur. ) . Votre
appareil est prévu pour recevoir du pain français, mais aussi des morceaux de pain ou
d'autres tranches de pain si leur épaisseur et leur longueur est plus courte que celle de la
fente.
■ Appuyez sur la poignée du chariot à pain jusqu'à ce qu'il s'arrête (en même temps , la
grille à l'intérieur de la fente se serrer autour du pain afin de le tenir éloigné des fils de
chauffage ) .
■ Puis relâcher la pression et la poignée reste en position basse , ce qui signifie que le
processus de chauffage a commencé. Si la poignée revient immédiatement , vérifier si
l'appareil est branché car il bloque lorsque l'appareil est branché
■ Vous pouvez régler l'intensité brunissement pour obtenir un pain plus ou moins grillé par
positionnant le sélecteur de brunissage à l'un des degrés marqués de 1 à 7 .
■ Par conséquent, vous n'avez qu'à tourner vers la droite pour augmenter l'intensité et le
sens antihoraire pour le diminuer. Plus le nombre est élevé, plus le pain grillé sera.
■ Pendant le fonctionnement , si vous pensez que le pain est assez ou pour une autre
raison grillé, vous pouvez rompre le processus de chauffage , en appuyant simplement sur
le bouton " STOP".
■ Le bouton " REHEAT " vous permet de réchauffer le pain grillé ou déjà à griller du pain
qui n'est pas assez grillé pendant un court laps de temps sans modifier le degré de
brunissement .
■ Le bouton «dégivrage» vous permet de griller le pain qui a été congelé avant la main.
■ Toujours débrancher l'appareil après utilisation et laissez-le refroidir avant de le
manipuler ou de le ranger.
■ Un enrouleur de cordon est prévu sur le fond de l'appareil : deux pieds comme deux
semicircles.When vous stockez votre appareil, enrouler le cordon autour des pieds .

ENTRETIEN ET NETTOYAGE
■ Avant toute opération de nettoyage, assurez-vous que le grille-pain est débranché de la
prise d'alimentation et complètement refroidi.
■ Pour enlever les miettes de pain glisser le tiroir ramasse-miettes situé sur le côté de
l'appareil.
■ Ne jamais utiliser d' objets tranchants pour nettoyer . Cela pourrait endommager
l'appareil.
■ Pour nettoyer les surfaces extérieures , il suffit d'essuyer avec un chiffon doux et
humide. En aucun cas, le grille-pain doit être immergé dans l'eau .
■ Tout autre entretien et les réparations doivent être effectuées par un technicien qualifié.

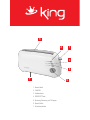
1 . Leva di pane
2 . Pulsante ANNULLA
3 . Pulsante REHEAT
4 . Pulsante di sbrinamento
5 . Controllo Browning con 7 tappe
6 . Slot di pane
7 . Vassoio di Crumb
6
2 1
3
4
5
7

IMPORTANTI ISTRUZIONI DI SICUREZZA
Si prega di leggere attentamente queste istruzioni prima di utilizzare l'apparecchio .
■ Verificare che la tensione di rete corrisponda a quella indicata sull'apparecchio .
■ Non lasciare mai l' apparecchio incustodito quando è in uso . Tenere fuori dalla portata
dei bambini o di persone incapaci.
■ Di tanto in tanto controllare il cavo di risarcimento danni. Non utilizzare l'apparecchio se
il cavo o apparecchio mostra segni di danneggiamento .
■ Utilizzare l'apparecchio solo per scopi domestici e nel modo indicato in questi
istruzioni .
■ Non immergere mai l' apparecchio in acqua o altri liquidi per qualunque motivo .
■ Non collocare mai in lavastoviglie.
■ Non utilizzare l'apparecchio in prossimità di superfici calde .
■ Se il cavo è danneggiato, deve essere sostituito da un elettricista qualificato competente
( * ) .
■ Prima della pulizia, staccare sempre la spina dalla presa di corrente .
■ Tutte le riparazioni devono essere effettuate da un tecnico qualificato competente
■ Non utilizzare l'apparecchio esterno e posizionare sempre in un ambiente asciutto .
■ Non utilizzare accessori non consigliati dal produttore . potevano
costituire un pericolo per l'utente e il rischio di danneggiare l'apparecchio.
■ Non spostare mai l'apparecchio tirando il cavo . Assicurarsi che il cavo non possa
impigliarsi in alcun modo. Non avvolgere il cavo intorno all'apparecchio e non piegarlo.
Tand l'apparecchio su un tavolo o una superficie piana .
■ Accertarsi che l'apparecchio si sia raffreddato prima di pulirlo e riporlo.
■ Assicurarsi che il cavo non entra mai in contatto con le parti calde dell'apparecchio .
■ Non toccare le parti calde dell'apparecchio .
■ Assicurarsi che l'apparecchio non entra mai in contatto con materiali infiammabili , come
tende , tessuti , ecc .. quando è in uso , come potrebbe verificarsi un incendio. Mantenere
una distanza di almeno 1 metro tra l'apparecchio e le tende .
■ Non utilizzare l'apparecchio per scongelare cibi e inserire solo le fette unbuttered di
pane il cui spessore non rischia di impedire il pane da venire . Essere estremamente
strictabout questo come tostapane sono la causa di molti incendi quando non vengono
rispettate le precauzioni elementari .
■ Svuotare l'apparecchio spesso di pangrattato . Assicurarsi che l'apparecchio sia sempre
scollegato prima di svuotamento. Controlla la sezione « Pulizia »
■ Durante la pulizia , non usare pagliette metalliche , al fine di evitare qualsiasi rischio
futuro di corto circuito elettrico .
■ Servizio competente qualificato : dopo il reparto vendite del produttore o importatore o
qualsiasi persona che sia qualificata , approvato e competente per svolgere questo tipo di

riparazione, al fine di evitare ogni pericolo. In ogni caso è necessario restituire
l'apparecchio a questo servizio.
OPERAZIONE
■ Prima di utilizzare l'apparecchio per la prima volta , controllare se è pulito ( vedere "
Manutenzione e pulizia "), come si entra in contatto diretto con il pane. Controllare se un
oggetto è caduto nella fessura .
■ Nel primo tempo , collegare l'apparecchio solo ad una presa con messa a terra presa a
muro . Un anello di tenuta sul fondo dell'apparecchio consente di mantenere il cordone
posizionandola al retro dell'apparecchio .
■ Mettere le fette di pane nella fessura ( per il pane francese , tagliare una pagnotta più
corta della fessura , poi tagliarlo in due pezzi lungo la sua lunghezza . ) . L'apparecchio è
fornito per ricevere pane francese , ma anche pezzi di toast o altre fette di pane se il loro
spessore e la loro lunghezza è più corto di quello della fessura .
■ Premere l' impugnatura del carrello pane fino all'arresto ( nello stesso tempo , la griglia
all'interno della scanalatura stringerà attorno al pane per tenerlo lontano dai fili di
riscaldamento) .
■ Quindi rilasciare la pressione e la maniglia rimane nella posizione più bassa , il che
significa che il processo di riscaldamento è iniziato. Se la maniglia viene fuori immediata-
mente , controllare se l' apparecchio è collegato in quanto blocca quando l'apparecchio è
collegato poll
■ È possibile regolare l' intensità della doratura per ottenere un pane più o meno tostato
da posizionando il selettore di controllo doratura a uno dei gradi segnato da 1 a7 .
■ Quindi devi solo girare in senso orario per aumentare l'intensità , e in senso antiorario
per diminuirla. Più alto è il numero , maggiore tostato il pane sarà.
■ Durante il funzionamento , se si pensa che il pane è tostato abbastanza o per un altro
motivo , è possibile interrompere il processo di riscaldamento , semplicemente premendo
il tasto "STOP".
■ Il pulsante " RISCALDAMENTO " permette di riscaldare il pane già tostato o di pane
tostato , che non è tostato abbastanza durante un breve periodo di tempo senza
modificare il grado di doratura .
■ Il pulsante " SCONGELAMENTO " permette di tostare il pane che è stato congelato
prima mano.
■ Scollegare sempre l'apparecchio dopo l'uso e lasciarlo raffreddare prima di maneggiare
o riporlo.
■ Un cavo di argano è prevista sul fondo dell'apparecchio : due piedi come due
semicircles.When di memorizzare il vostro apparecchio , avvolgere il cavo intorno ai piedi.

MANUTENZIONE E PULIZIA
■ Prima di effettuare qualsiasi operazione di pulizia , assicurarsi che il tostapane sia
scollegato dalla presa di alimentazione e completamente raffreddato .
■ Per rimuovere pangrattato scorrere il vassoio situato sul lato dell'apparecchio .
■ Non utilizzare mai oggetti appuntiti per pulire . Ciò potrebbe danneggiare l'apparecchio.
■ Per la pulizia delle superfici esterne , semplicemente pulire con un panno morbido e
umido. In nessun caso deve il tostapane essere immerso in acqua .
■ Tutti gli altri manutenzione e riparazione devono essere eseguite da un tecnico
qualificato .

6
2 1
3
4
5
7
1 .
2 .
3 .
4 .
5 .
7
6 .
7 .
Sayfa yükleniyor...
Sayfa yükleniyor...
Sayfa yükleniyor...
-
 1
1
-
 2
2
-
 3
3
-
 4
4
-
 5
5
-
 6
6
-
 7
7
-
 8
8
-
 9
9
-
 10
10
-
 11
11
-
 12
12
-
 13
13
-
 14
14
-
 15
15
-
 16
16
-
 17
17
-
 18
18
-
 19
19
-
 20
20
-
 21
21
-
 22
22
-
 23
23


King Rosso K 192 Kullanım kılavuzu
- Kategori
- Tost makineleri
- Tip
- Kullanım kılavuzu
diğer dillerde
- français: King Rosso K 192 Manuel utilisateur
- italiano: King Rosso K 192 Manuale utente
- Deutsch: King Rosso K 192 Benutzerhandbuch
- English: King Rosso K 192 User manual
İlgili makaleler
Diğer belgeler
-
Philips Essence HD2580 Kullanım kılavuzu
-
-
Philips HD2618/00 Kullanım kılavuzu
-
Philips HD2650 Kullanım kılavuzu
-
Philips HD2637/00 Kullanım kılavuzu
-
Elta T127 Kullanım kılavuzu
-
OK. OTO 402-B Kullanım kılavuzu
-