Yamaha PM5D Yükleme Rehberi
- Kategori
- Ses mikserleri
- Tip
- Yükleme Rehberi
Bu kılavuz aynı zamanda aşağıdakiler için de uygundur:

Studio Manager V2 Installation Guide
Studio Manager V2 Installationshandbuch
Studio Manager V2 Manuel d’installation
Studio Manager V2 Guía de Instalación
Studio Manager V2 Installation Guide (for PM5D)
1
DEUTSCHFRANÇAISESPAÑOL ENGLISH
Special Notices
• The software and this manual are the exclusive copyrights of
Yamaha Corporation.
• Use of the software and this manual is governed by the
Software Licensing Agreement which the purchaser fully
agrees to upon breaking the seal of the software packaging.
(Carefully read the agreement at the end of this manual before
installing the software.)
• Copying of the software or reproduction of this manual in
whole or in part by any means is expressly forbidden without
the written consent of the manufacturer.
• Yamaha makes no representations or warranties with regard
to the use of the software and documentation and cannot be
held responsible for the results of the use of this manual and
the software.
• This disc is a CD-ROM. Do not attempt to play the disc on an
audio CD player. Doing so may result in irreparable damage
to your audio CD player.
• Copying of the commercially available music sequence data
and/or digital audio files is strictly prohibited except for your
personal use.
• The screen displays as illustrated in this manual are for
instructional purposes, and may appear somewhat different
from the screens which appear on your computer.
• Future upgrades of application and system software and any
changes in specifications and functions will be announced
separately.
• Specifications and descriptions in this installation guide are
for information purposes only. Yamaha Corp. reserves the
right to change or modify specifications at any time without
prior notice. Since specifications may not be the same in every
locale, please check with your Yamaha dealer.
• The company names and product names in this installation
guide are the trademarks or registered trademarks of their
respective companies.
Yamaha Professional Audio web site:
http://www.yamahaproaudio.com/
Contents
Getting Started............................................. 2
Introduction..................................................... 2
CD-ROM Contents........................................... 2
Windows System Requirements........................ 3
Macintosh System Requirements...................... 3
System Hookup................................................ 4
Configuring Your Yamaha Mixing Console....... 4
Caution when using a USB connection............. 4
Windows Installation.................................... 4
Adobe Reader .................................................. 4
USB MIDI Driver............................................... 4
Installing Studio Manager ................................ 5
Macintosh Installation .................................. 6
USB MIDI Driver............................................... 6
Installing Studio Manager ................................ 7
Getting Started............................................. 8
Overview of Studio Manager............................ 8
Starting and setting up Studio Manager........... 9
Troubleshooting .......................................... 10
SOFTWARE LICENSING AGREEMENT.......... 11

Studio Manager V2 Installation Guide (for PM5D)
2
Introduction
Yamaha Studio Manager enables you to control your Yamaha mixing console from a Windows or Macintosh computer.
This Installation Guide explains how to install Studio Manager and the necessary driver software for Windows and Macintosh computers.
For information on how to use Studio Manager and the various editors, refer to the PDF format Studio Manager manual and the manuals
for the various editors which are installed on your computer when Studio Manager is installed. Refer to the owner’s manuals for your
devices for information on operating the devices.
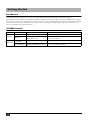
CD-ROM Contents
Getting Started
Folder Software Description
Windows
SM_\PM5D_ Studio Manager for PM5D
1
1. For information on using this software, refer to the PDF manual after installation.
Yamaha Studio Manager for PM5D (for Windows 2000/XP).
USBdrv2k_
Yamaha USB MIDI Driver
(Windows 2000, XP)
Yamaha USB driver. Necessary if you are connecting to a USB
port on your computer.
Macintosh
Mac OS X
\SM_\PM5D_
Studio Manager for PM5D
1
Yamaha Studio Manager for PM5D (for Mac OS X).
Mac OS X\USBdrv_ YAMAHA USB MIDI Driver for OS X
Yamaha USB driver. Necessary if you are connecting to a USB
port on your Macintosh computer.

Studio Manager V2 Installation Guide (for PM5D)
3
ENGLISH
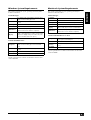
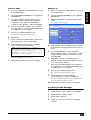
Windows System Requirements
The system requirements of your operating system may differ
from those listed here.
Studio Manager
Yamaha USB MIDI Driver
System requirements for software not listed here can be found
on the CD-ROM.
Macintosh System Requirements
The system requirements of your operating system may be
different to those listed here.
Studio Manager
Yamaha USB MIDI Driver for OS X
System requirements for software not listed here can be found
on the CD-ROM.
Computer
A computer with a 800 MHz or faster Intel Pen-
tium or Celeron family processor
OS
Windows 2000, XP Home Edition, XP Profes-
sional
Memory
256 MB or more
Hard Disk
30 MB or more of free space
MIDI Driver
USB or MIDI (depending on the connection
between the console and the computer)
Display
1024 x 768 pixels, 256 colors or higher
1280 x 1024, High Color 16-bit recommended
(If you use display settings of 1024 x 768, turn
on the Task Bar’s Auto-hide option.)
Computer
A computer with a 166 MHz or faster Intel Pen-
tium or Celeron family processor and a USB
port
OS
Windows 2000, XP Home Edition, XP Profes-
sional
Memory
32 MB or more
Hard Disk
2 MB or more of free space
Computer
A Macintosh G4 or better and a USB port
OS
Mac OS X 10.2.8 or later
Memory
512 MB or more of free memory
Hard Disk
30 MB or more of free space
Display
1024 x 768 pixels, 256 colors or higher
1280 x 1024, 32,000 colors recommended
MIDI Driver
USB or MIDI (depending on the connection
between the console and the computer)
Computer
A Macintosh computer with a PowerPC proces-
sor or higher and a USB port
OS
Mac OS X 10.2 or later
Memory
64 MB or more (recommended: 128 MB or
more)
Hard Disk
2 MB or more

Studio Manager V2 Installation Guide (for PM5D)
4
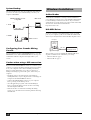
System Hookup
The following illustration shows the available hookup methods
you can use to connect your Yamaha mixing console to your
computer: USB, MIDI.
Configuring Your Yamaha Mixing
Console
Press the DISPLAY ACCESS [MIDI/REMOTE] key to open the
MIDI SETUP screen. In the PM5D EDITOR area, select a port to
communicate with the computer and assign an ID to your
console.
Caution when using a USB connection
If you’ve used the USB TO HOST connector to connect to your
computer, you must perform the following actions. If you fail to
do so, your computer or the connected mixing console may
hang up, causing data damage or loss. If your computer or
mixing console hangs up, turn off the power, and restart your
computer.
• Disable the energy conservation mode (suspend/sleep/
standby/hibernate) on your computer before connecting your
computer via the USB TO HOST connector.
• Connect the USB TO HOST connector to your computer
before powering-on the mixing console.
• Close all application programs (such as StudioManager)
before powering the mixing console on/off or connecting/
disconnecting the USB cable.
• Wait at least three seconds between turning the mixing
console on or off, and between connecting and disconnecting
the USB cable.
Adobe Reader
Adobe Reader (available free of charge) must be installed on
your computer in order for you to view the PDF format manuals
for Studio Manager and the various editors. If you don’t have
Adobe Reader, access the Adobe Corporation website at the URL
shown below, and download Adobe Reader.
http://www.adobe.com
USB MIDI Driver
If you are connecting your Yamaha mixing console to a USB
port on your computer, you’ll need to install the Yamaha USB
driver. If you already have this driver installed, skip this section.
The procedure you use for installing the Yamaha USB driver
depends on which version of Windows you’re using:
• Windows 2000: See page 5
• Windows XP: See page 5
USB cable
USB port
Yamaha mixing console
rear panel
Mac or PC
MIDI interface
MIDI cables
2. MIDI
1. USB
TO HOST
USB
INOUT
Windows Installation
Studio
Manager
Yamaha
mixing console
Computer
USB cable
Driver

Studio Manager V2 Installation Guide (for PM5D)
5
ENGLISH
Windows 2000
1
Start your computer to launch Windows, then log
in as Administrator.
2
Insert the included CD-ROM into your computer’s
CD-ROM drive.
3
Go to My Computer–>Control Panel–>System–
>Hardware–>Driver Signing–>File Signature
Verification, select “Ignore—Install all files,
regardless of file signature,” and then click [OK].
4
Turn off your Yamaha mixing console, and then
use a USB cable to connect its USB TO HOST port
to a USB port on your computer.
5
Turn on your Yamaha mixing console.
The “Found New Hardware Wizard” appears.
6
Click [Next].
7
Select “Search for a suitable driver for my device
(Recommended),” and then click [Next].
8
In the subsequent window, select “CD-ROM
drives” only, and then click [Next].
The driver is installed, and the message “Completing the
Found New Hardware Wizard” appears.
9
Click [Finish], and then restart your computer.
Windows XP
1
Start your computer to launch Windows, then log
in as Administrator.
2
Insert the included CD-ROM into your computer’s
CD-ROM drive.
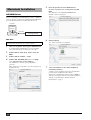
3
Click the [Start] button, and then click [Control
Panel].
The following window appears.
4
Click [Switch to Classic display] in the left column
in the window to display all items in the Control
Panel.
5
Go to System Hardware–>Driver signatures–
>Driver signature options, select “Ignore—Install
software without asking for confirmation,” and
then click [OK].
6
Click [OK] to close the “System Properties”
window, and then click the Close button to close
the “Control Panel” window.
7
Turn off your Yamaha mixing console, and then
use a USB cable to connect its USB TO HOST port
to a USB port on your computer.
8
Turn on your Yamaha mixing console.
The “Found New Hardware Wizard” appears.
9
Select “Install software automatically
(recommended) (I),” and then click [Next].
The driver is installed, and the message “Completing the
Found New Hardware Wizard” appears.
10
Click [Finish], and then restart your computer.
Installing Studio Manager
1
Double-click the “SM_” folder on the CD-ROM.
2
Double-click the “PM5D_” folder.
3
Double-click “Setup.exe.”
4
Follow the on-screen instructions to install the
software.
NOTE:
You may be prompted to insert your Windows
CD-ROM. Do not insert it! Click [OK], and in the “Copy files
from” section of the subsequent dialog box, enter
“D:\USBdrv2k_” (replacing “D” with the drive letter of your
CD-ROM drive), and then click [OK].

Studio Manager V2 Installation Guide (for PM5D)
6
USB MIDI Driver
If you’re connecting your Yamaha mixing console to a USB port
on your computer, you’ll need to install the Yamaha USB driver.
If you already have this driver installed, skip this section.
Mac OS X
1
Start your computer, then log in as Administrator.
To confirm that the Administrator account is available,
select [System Preferences], then [Users (Account)].
2
Double-click the “Mac OS X” folder on the CD-
ROM.
3
Double-click the “USBdrv_” folder.
4
Double-click “USB-MIDI Driver v1. *****.mpkg”
(***** represents the version number).
An “Authenticate” window opens, prompting the
password.
If the window does not prompt you to enter the password,
click the lock icon.
5
Enter the password for the Administrator’s
account. If you have not set the password, click
[OK].
The “Welcome to the YAMAHA USBMIDI Driver
Installer” window is displayed.
6
Click [Continue].
The “Select a Destination” is displayed.
7
Select a destination for the driver installation,
then click [Continue].
A window opens, displaying the message “Click install to
perform a basic installation of this software.”
The message “Installing this software requires 100MB of
disk space” may appear. However, the actual required free
disk space is specified in the “Macintosh System
Requirements” on page 6.
Macintosh Installation
NOTE:
Before installing the driver, disconnect any USB devices
(other than the keyboard and mouse) from the computer.
Computer
USB cable
Studio
Manager
Yamaha
mixing console
Driver

Studio Manager V2 Installation Guide (for PM5D)
7
ENGLISH
8
Click [Install].
If the driver has already been installed, the [Upgrade]
button is displayed instead of the [Install] button.
The driver is installed, and message “The software was
successfully installed” is displayed.
9
Click the [Close] button.
The driver installation is complete.
You can check the following locations to confirm that the
driver has been installed:
• Library -> Audio -> MIDI Drivers -> YAMAHA-
USBMIDIDriver.plugin
• Library -> PreferencePanes -> YAMAHA-
USBMIDIPatch.prefPane
Installing Studio Manager
1
Double-click the “Mac OS X” folder on the CD-
ROM.
2
Double-click the “SM_” folder.
3
Double-click the “PM5D_” folder.
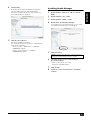
4
Double-click “Install Studio Manager.”
As you follow the on-screen instructions to proceed with
the installation, the following screen will appear.
5
Click [Customize].
6
Select the model of your console and your
preferred language.
• Editor for the console you’re using
• Language for the PDF manual
7
Click [Install].
8 Follow the on-screen instructions to install the
software.
NOTE: If you don’t select [Customize], only the editors and
the English-language PDF manual will be installed.

Studio Manager V2 Installation Guide (for PM5D)
8
Getting Started
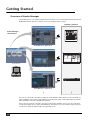
Overview of Studio Manager
Studio Manager is a cross-platform application that enables you to start multiple Editors that control
YAMAHA hardware products remotely, and to save multiple Editor settings.
You can save and recall each Editor’s settings in Studio Manager. This enables you to recall all the set-
tings of multiple devices from Studio Manager and control the entire system using simple operations.
This capability is called the “Total Recall” function.
Also, if you are saving the setup files or trying to synchronize multiple devices, you can recall all the
settings for multiple devices using Studio Manager. Alternatively, you can recall the settings only for a
certain device using the Editor of the corresponding device.
PM5D
Studio Manager
SPX2000
DM2000
PM5D Editor application
DM2000 Editor application
Synchro-
nize
Synchro-
nize
Synchro-
nize
SPX2000 Editor application
Hardware products
Studio Manager
starts Editors.

Studio Manager V2 Installation Guide (for PM5D)
9
ENGLISH
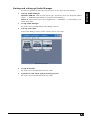
Starting and setting up Studio Manager
Yo u’ll need to perform the following setup in order to use the editors in Studio Manager.
1 Start up Studio Manager.
Windows 2000/XP: Click the [Start] button, place your mouse cursor over [Programs (All Pro-
grams)] -> [YAMAHA Studio Manager], then click [Studio Manager].
MacOS X: Open folders in the order of “Applications” -> “YAMAHA” -> “Studio Manager,” and
double-click “SM2.”
2 Set up Studio Manager.
For details, refer to the PDF format Studio Manager manual.
3 Start up each editor.
In the Studio Manager window, double-click the icon for each editor.
4 Set up each editor.
For details, refer to the PDF manual for each editor.
5 Synchronize each editor with your mixing console.
For details, refer to the PDF manual for each editor.
Studio Manager window

Studio Manager V2 Installation Guide (for PM5D)
10
Q: Cannot install Studio Manager?
A: Check the system requirements for Studio Manager (page 3).
If the computer’s operating system does not satisfy the
system requirements, you cannot install the software.
Q: The console is unable to communicate with
Studio Manager via USB.
A: Have you installed the Yamaha USB MIDI driver (Windows
page 4, Mac page 6)?
A: Is the USB cable connected correctly (page 4)?
A: Is your Yamaha mixing console configured correctly
(page 4)?
A: Is each editor set to the correct ID (page 4, the manual for
each editor)?
A: If a USB hub is connected between the console and the
computer, remove it and connect the console directly to the
computer.
Q: Cannot install the Yamaha USB MIDI Driver?
A: Is the USB cable connected correctly (page 4)?
A: Try disconnecting the USB cable, and then reconnecting it.
A: Windows: Is USB enabled? When your Yamaha mixing
console is connected to your computer for the first time, if
the “Add New Hardware Wizard” doesn’t appear, it may be
because your computer’s USB controller is disabled. To
check this, open the System control panel, click the Device
Manager tab, and check for any crosses (x) or exclamation
points (!) next to the “Universal Serial Bus controllers” and
“USB Root Hub” items. If these items do have these marks
next to them, your USB controller is disabled. For
information on enabling your USB controller, refer to your
computer’s documentation.
A: Windows: If for some reason installation of the Yamaha USB
Driver fails, your Yamaha mixing console may be registered
as an unknown device and you may not be able to reinstall
the driver until the unknown device is deleted. In this case,
open the System control panel, click the Device Manager tab,
and select the “View devices by connection” option. If an
item called “Other devices” appears in the list, click it. If
there’s an item called “Unknown device,” select it and then
click the Remove button. Disconnect the USB cable,
reconnect it, and then try reinstalling the driver again.
Q: How to remove & reinstall the Yamaha USB
MIDI Driver
A: Mac OS X: When you delete the following files, the driver
will be removed. After removing the driver, restart the
computer and re-install the driver.
— -> Library -> Preferences ->
jp.co.yamaha.USBMIDIDriver.plist (This file is created after
the driver is loaded.)
Library -> Audio -> MIDI Drivers ->
YAMAHAUSBMIDIDriver.plugin
Library -> PreferencePanes ->
YAMAHAUSBMIDIPatch.prefPane
Q: The system fails to function correctly.
A: If your computer seems unresponsive, make sure it satisfies
the system requirements (page 3).
A: Quit any other applications that you are not using.
Q: After I installed a new editor, a different
editor will no longer start up.
A: For some combinations of versions of Studio Manager and
the various editors, an editor may not start up. Please
download the latest versions from the website, and reinstall
the latest versions of all editors.
http://www.yamahaproaudio.com/
Q: Cannot suspend or resume your computer?
A: Windows: Suspend will not work if there are any MIDI
applications open.
A: Windows 2000: Depending on your system’s USB controller,
suspend and resume may not work properly. If your Yamaha
mixing console does stop responding, try disconnecting and
reconnecting the USB cable.
Troubleshooting
Note: “—” represents folders for users in the Users folder on the
hard disk.
Note: Only root users can delete the driver. Most users are not
authorized to delete the driver.

Studio Manager V2 Installation Guide (for PM5D)
11
ENGLISH
SOFTWARE LICENSING AGREEMENT
The following is a legal agreement between you, the end user, and Yamaha Corporation (“Yamaha”). The enclosed Yamaha software
program is licensed by Yamaha to the original purchaser for use only on the terms set forth herein. Please read this licensing
agreement with care. Opening this package indicates that you accept all terms outlined herein. If you do not agree to the terms, return
this package unopened to Yamaha for a full refund. In the event that you obtained the enclosed Yamaha software program(s) as a part of
a software package or software bundled with a hardware product, you may not return the enclosed Yamaha software program(s) to
Yamaha.
1. GRANT OF LICENSE AND COPYRIGHT
Yamaha grants you, the original purchaser, the right to use one copy of the enclosed software program and data (“SOFTWARE”) on a
single-user computer system. You may not use it on more than one computer or computer terminal. The SOFTWARE is owned by
Yamaha and is protected by Japanese copyright laws and all applicable international treaty provisions. You are entitled to claim
ownership of the media in which the SOFTWARE is included. Therefore, you must treat the SOFTWARE like any other copyrighted
materials.
2. RESTRICTIONS
The SOFTWARE program is copyrighted. You may not engage in reverse engineer-ing or reproduction of the SOFTWARE by other
conceivable methods. You may not reproduce, modify, change, rent, lease, resell, or distribute the SOFTWARE in whole or in part, or
create derivative works from the SOFTWARE. You may not transmit or network the SOFTWARE with other computers. You may
transfer ownership of the SOFTWARE and the accompanying written materials on a permanent basis provided that you retain no
copies and the recipient agrees to the terms of the licensing agreement.
3. TERMINATION
The licensing condition of the software program becomes effective on the day that you receive the SOFTWARE. If any one of the
copyright laws or clauses of the licensing conditions is violated, the licensing agreement shall be terminated automatically without
notice from Yamaha. In this case, you must destroy the licensed SOFTWARE and its copies immediately.
4. PRODUCT WARRANTY
Yamaha warrants to the original purchaser that if the SOFTWARE, when used in normal conditions, will not perform the functions
described in the manual provided by Yamaha, the sole remedy will be that Yamaha will replace any media which proves defective in
materials or workmanship on an exchange basis without charge. Except as expressly set forth above, the SOFTWARE is provided “as
is,” and no other war-ranties, either expressed or implied, are made with respect to this
software, including, without limitation the implied warranties of merchantability and fitness for a particular purpose.
5. LIMITED LIABILITY
Your sole remedies and Yamaha’s entire liability are as set forth above. In no event will Yamaha be liable to you or any other person
for any damages, including without limitation any incidental or consequential damages, expenses, lost profits, lost savings or other
damages arising out of the use or inability to use such SOFTWARE even if Yamaha or an authorized dealer has been advised of the
possibility of such damages, or for any claim by any other party.
6. GENERAL
This license agreement shall be interpreted according to and governed by Japanese laws.
-
 1
1
-
 2
2
-
 3
3
-
 4
4
-
 5
5
-
 6
6
-
 7
7
-
 8
8
-
 9
9
-
 10
10
-
 11
11


Yamaha PM5D Yükleme Rehberi
- Kategori
- Ses mikserleri
- Tip
- Yükleme Rehberi
- Bu kılavuz aynı zamanda aşağıdakiler için de uygundur:
diğer dillerde
- español: Yamaha PM5D Guía de instalación
- français: Yamaha PM5D Guide d'installation
- italiano: Yamaha PM5D Guida d'installazione
- svenska: Yamaha PM5D Installationsguide
- čeština: Yamaha PM5D instalační příručka
- polski: Yamaha PM5D Instrukcja instalacji
- Deutsch: Yamaha PM5D Installationsanleitung
- português: Yamaha PM5D Guia de instalação
- English: Yamaha PM5D Installation guide
- dansk: Yamaha PM5D Installationsvejledning
- русский: Yamaha PM5D Инструкция по установке
- suomi: Yamaha PM5D Asennusohje
- Nederlands: Yamaha PM5D Installatie gids
- română: Yamaha PM5D Ghid de instalare