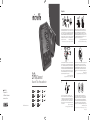
Microlife BP B6 Connect Kullanım kılavuzu
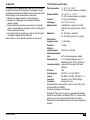
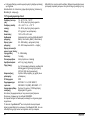
- Kategori
- Kan basıncı birimleri
- Tip
- Kullanım kılavuzu
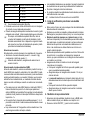
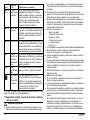
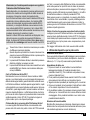
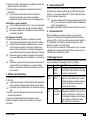
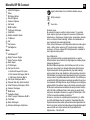
Aşağıda, BP B6 Connect için kısa bilgileri bulacaksınız. Bu cihaz, hipertansiyonu, hipotansiyonu, diyabeti, hamileliği, preeklampsiyi, aterosklerozu, son dönem böbrek hastalığını, obeziteyi ve yaşlıları olan hastalarda klinik olarak doğrulanmıştır. Cihaz, Atriyal Fibrilasyon (AF) düşündüren düzensiz bir nabzı tespit edebilir. Microlife AFIBsens, atriyal fibrilasyon (AF) ve arteriyel hipertansiyonun tespiti için dünyanın önde gelen dijital kan basıncı ölçüm teknolojisidir. AFIB algoritması, atriyal fibrilasyonun olabileceğini belirtir. Bu nedenle, cihaz kan basıncı ölçümünüz sırasında bir AFIB sinyali verdiğinde doktorunuza başvurmanız önerilir. Cihaz, MAM modunda çalışan, üç ölçümde kan basıncının otomatik olarak ölçülmesini sağlar ve elde edilen sonuçlar tek ölçüme göre daha güvenilirdir. Bu cihaz aynı zamanda, nabzı da ölçer ve kalp atış hızının düzensiz olduğunu gösterir.
Aşağıda, BP B6 Connect için kısa bilgileri bulacaksınız. Bu cihaz, hipertansiyonu, hipotansiyonu, diyabeti, hamileliği, preeklampsiyi, aterosklerozu, son dönem böbrek hastalığını, obeziteyi ve yaşlıları olan hastalarda klinik olarak doğrulanmıştır. Cihaz, Atriyal Fibrilasyon (AF) düşündüren düzensiz bir nabzı tespit edebilir. Microlife AFIBsens, atriyal fibrilasyon (AF) ve arteriyel hipertansiyonun tespiti için dünyanın önde gelen dijital kan basıncı ölçüm teknolojisidir. AFIB algoritması, atriyal fibrilasyonun olabileceğini belirtir. Bu nedenle, cihaz kan basıncı ölçümünüz sırasında bir AFIB sinyali verdiğinde doktorunuza başvurmanız önerilir. Cihaz, MAM modunda çalışan, üç ölçümde kan basıncının otomatik olarak ölçülmesini sağlar ve elde edilen sonuçlar tek ölçüme göre daha güvenilirdir. Bu cihaz aynı zamanda, nabzı da ölçer ve kalp atış hızının düzensiz olduğunu gösterir.


-
 1
1
-
 2
2
-
 3
3
-
 4
4
-
 5
5
-
 6
6
-
 7
7
-
 8
8
-
 9
9
-
 10
10
-
 11
11
-
 12
12
-
 13
13
-
 14
14
-
 15
15
-
 16
16
-
 17
17
-
 18
18
-
 19
19
-
 20
20
-
 21
21
-
 22
22
-
 23
23
-
 24
24
-
 25
25
-
 26
26
-
 27
27
-
 28
28
-
 29
29
-
 30
30
-
 31
31
-
 32
32
-
 33
33
-
 34
34
-
 35
35
-
 36
36
-
 37
37
-
 38
38
-
 39
39
-
 40
40
-
 41
41
-
 42
42
-
 43
43
-
 44
44
-
 45
45
-
 46
46
-
 47
47
-
 48
48
-
 49
49
-
 50
50
-
 51
51
-
 52
52
-
 53
53
-
 54
54
-
 55
55
-
 56
56
-
 57
57
-
 58
58
-
 59
59
-
 60
60
-
 61
61
-
 62
62
-
 63
63
-
 64
64
-
 65
65
-
 66
66
-
 67
67
-
 68
68
-
 69
69
-
 70
70
-
 71
71
-
 72
72
-
 73
73
-
 74
74
-
 75
75
-
 76
76
-
 77
77
-
 78
78
-
 79
79
-
 80
80
-
 81
81
-
 82
82
-
 83
83
-
 84
84
-
 85
85
-
 86
86
-
 87
87
-
 88
88
-
 89
89
-
 90
90
-
 91
91
-
 92
92
-
 93
93
-
 94
94
-
 95
95
-
 96
96
-
 97
97
-
 98
98
-
 99
99
-
 100
100
-
 101
101
-
 102
102
-
 103
103
-
 104
104
-
 105
105
-
 106
106
-
 107
107


Microlife BP B6 Connect Kullanım kılavuzu
- Kategori
- Kan basıncı birimleri
- Tip
- Kullanım kılavuzu
Aşağıda, BP B6 Connect için kısa bilgileri bulacaksınız. Bu cihaz, hipertansiyonu, hipotansiyonu, diyabeti, hamileliği, preeklampsiyi, aterosklerozu, son dönem böbrek hastalığını, obeziteyi ve yaşlıları olan hastalarda klinik olarak doğrulanmıştır. Cihaz, Atriyal Fibrilasyon (AF) düşündüren düzensiz bir nabzı tespit edebilir. Microlife AFIBsens, atriyal fibrilasyon (AF) ve arteriyel hipertansiyonun tespiti için dünyanın önde gelen dijital kan basıncı ölçüm teknolojisidir. AFIB algoritması, atriyal fibrilasyonun olabileceğini belirtir. Bu nedenle, cihaz kan basıncı ölçümünüz sırasında bir AFIB sinyali verdiğinde doktorunuza başvurmanız önerilir. Cihaz, MAM modunda çalışan, üç ölçümde kan basıncının otomatik olarak ölçülmesini sağlar ve elde edilen sonuçlar tek ölçüme göre daha güvenilirdir. Bu cihaz aynı zamanda, nabzı da ölçer ve kalp atış hızının düzensiz olduğunu gösterir.
diğer dillerde
- español: Microlife BP B6 Connect Manual de usuario
- français: Microlife BP B6 Connect Manuel utilisateur
- italiano: Microlife BP B6 Connect Manuale utente
- português: Microlife BP B6 Connect Manual do usuário
İlgili makaleler
-
Microlife Bluetooth® blood pressure monitor Kullanım kılavuzu
-
Microlife BP B3 AFIB Kullanım kılavuzu
-
-
Microlife BP A6 BT Kullanım kılavuzu
-
Microlife BP B2 Basic Blood Pressure Monitor Kullanım kılavuzu
-
Microlife BP B6 Connect El kitabı
-
Microlife BP B3 Comfort PC Kullanım kılavuzu
-
-
-