Philips HP4647 Kullanım kılavuzu
- Kategori
- Saç düzleştiriciler
- Tip
- Kullanım kılavuzu
Bu kılavuz aynı zamanda aşağıdakiler için de uygundur:

Influence
HP4647

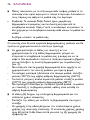
2

3
2 3 4 5
1

4


Introduction
This new Philips Influence! straightener provides ultra-fast and super-
smooth straightening results.The adjustable temperature enables you to
personalise the straightener to obtain optimal results for your hair.The
ceramic-coated plates ensure ultra-smooth gliding through the hair.
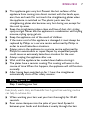
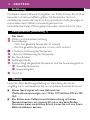
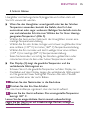
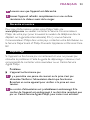
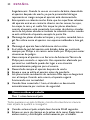
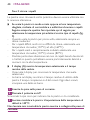
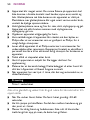
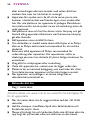
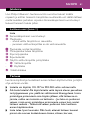
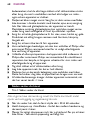
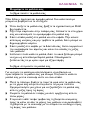
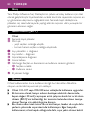
General description (fig. 1)
Appliance
A Ceramic-coated plates
B Pilot light
- green: selected temperature has been reached
- red: selected temperature has not yet been reached
C + button to increase the temperature
D - button to decrease the temperature
E On/off button
F Hanging loop
G Display: shows the selected temperature and the usage time
- H Selected temperature
- I Usage time
J Cool tip area
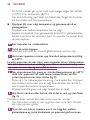
Important
Read these instructions for use carefully before using the appliance and
save them for future reference.
◗ This appliance can be used at 110-127 volts AC or 220-240 volts AC.
◗ For additional protection, we advise you to install a residual
current device (RCD) with a rated residual operating current not
exceeding 30mA in the electrical circuit supplying the bathroom.
Ask your installer for advice.
◗ Keep this appliance away from water! Do not use this product
near or over water contained in baths, washbasins, sinks etc.
When used in a bathroom, unplug the appliance after use since
the proximity of water presents a risk, even when the appliance is
switched off.
ENGLISH6

◗ This appliance gets very hot. Prevent the hot surfaces of the
appliance from coming into direct contact with the hands, eyes,
ears, face and neck. Do not touch the straightening plates when
the appliance is switched on.The plastic parts near the
straightening plates also become very hot during use, except for
the cool tip areas.
◗ Keep the straightening plates clean and free of dust, dirt, styling
spray and gel. Never use the appliance in combination with styling
mousse, styling spray, gel etc.
◗ Keep the appliance out of the reach of children.
◗ If the mains cord of this appliance is damaged, it must always be
replaced by Philips or a service centre authorised by Philips in
order to avoid hazardous situations.
◗ Always return the appliance to a service centre authorised by
Philips for examination or repair. Repair by unqualified people
could cause an extremely hazardous situation for the user.
◗ Always unplug the appliance after use.
◗ Wait until the appliance has cooled down before storing it.
◗ The plates have a ceramic coating.This coating will wear in the
course of time.When this happens, the appliance will still function
normally.
◗ After having been switched on for 1 hour, the straightener
automatically shuts off for safety reasons.
Styling your hair
Step 1: washing your hair
Everybody wants shiny and beautiful hair.A good hair-washing routine
can help to achieve this.
◗ When washing your hair, wet your hair thoroughly for 30-60
seconds.
◗ Pour some shampoo into the palm of your hand. Spread it
between your hands and distribute it evenly through the hair.
ENGLISH 7

◗ Gently massage your hair and scalp. Do not rough up the hair or
pull long hair up onto the scalp, as this may cause tangles.
◗ Massage your scalp with your fingertips.This stimulates blood
circulation and is gentler to the hair cuticles.
◗ Rinse your hair thoroughly, as poor rinsing can result in dull hair.
Finish with a cold rinse for extra shine.
Step 2: drying your hair
To get super-smooth results, it is essential to prepare your hair for
straightening. Dry you hair properly with a hairdryer to ensure a
professional, smooth finish.
◗ After washing, squeeze excess water out of the hair with your
hands and then towel-dry the hair. Use a comb to disentangle hair
gently from the roots to the tips.
◗ Divide the hair into sections by means of clips, starting at the
back.
◗ Dry each section by pulling a straightening brush down the hair
length while following the brush with the hairdryer, with its
nozzle pointing towards the hair ends.
◗ When you have finished drying each section, set the hairdryer to
the cold setting for a final cold shot.This closes the cuticles and
leaves your hair glossier.
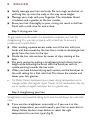
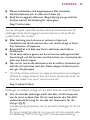
B
Tip: Philips Protect hairdryers have a lower drying temperature and a
stronger airflow than regular dryers.Thanks to this combination, they dry
just as quickly as regular hairdryers but in a gentler way.
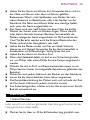
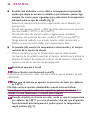
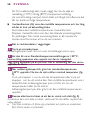
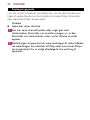
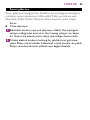
Step 3: straightening your hair
Straighteners are powerful styling tools and should always be used with
care.
◗ If you use the straightener incorrectly or if you use it at the
wrong temperature, you could overdry your hair or even burn it.
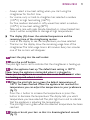
Always follow the four steps below to select the right
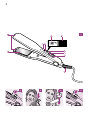
temperature for you hair type! (fig. 2).
ENGLISH8

- Always select a low heat setting when you start using the
straightener for the first time.
- For coarse, curly or hard-to-straighten hair, selected a medium
(120cC) to high heat setting (160cC).
- For fine, medium-textured or softy waved hair, select a medium
(120cC) to low heat setting (80cC)
- Take extra care with pale, blonde, bleached or colour-treated hair,
since it will be susceptible to damage at high temperatures.
◗ The display (G) shows the selected temperature and the
remaining time of the straightening session.
- Look at the display to see the temperature you have selected.
- The bars on the display show the remaining usage time of the
straightener.The total usage time is 60 minutes. Every ten minutes
one of the six bars will disappear.
1 Insert the plug into the wall socket.
2 Press the on/off button.
The pilot light burns red to indicate that the straightener is heating up.
3 Let the appliance heat up.The default heat setting is 140cC.
Never leave the appliance unattended when it is plugged in.
Never put the appliance on a surface that is not heat-resistant when
it is heating up and when it is hot.
4 When the pilot light turns green the default temperature of
140cC has been reached.When the appliance has reached this
temperature, you can adjust the temperature to your preference
(fig. 2).
- Press the + button to increase the temperature or press the -
button to decrease the temperature.The display tells you which
temperature you have selected.The pilot light turns red to indicate
that the appliance is adjusting the temperature.
- The pilot light turns green when the selected temperature has been
reached.
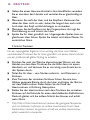
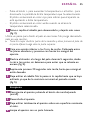
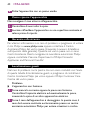
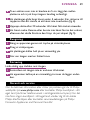
5 Comb or brush your hair so that it is disentangled and smooth
(fig. 3).
ENGLISH 9

Use a comb to divide the hair into sections. Do not put too much hair
in one section.
B
Tip: it is better to section off the crown area and to straighten the hair
underneath first.Then straighten the top area.
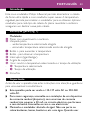
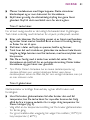
6 Take a section that is not wider than 5 cm. Place it between the
straightening plates and press the handles of the appliance firmly
together.
7 Slide the straightener down the length of the hair for 5 seconds,
from root to hair end, without stopping to prevent overheating
(fig. 4).
8 Repeat this process after 20 seconds until you have achieved the
desired look.
9 Allow your hair to cool down. Do not comb or brush it before it
has cooled down, as this would ruin the hairstyle you have just
created (fig. 5).
Cleaning
1 Switch the appliance off by pressing the on/off button.
2 Unplug the appliance.
3 Let the appliance cool down completely on a heat-resistant
surface.
4 Clean the appliance with a damp cloth.
Storage
Never wind the mains cord round the appliance.
1 Make sure the appliance is unplugged.
2 Let the appliance cool down on a heat-resistant surface before
storing it.
ENGLISH10

Guarantee & service
If you need information or if you have a problem, please visit the Philips
Web site at www.philips.com or contact the Philips Customer Care
Centre in your country (you will find its phone number in the
worldwide guarantee leaflet). If there is no Customer Care Centre in
your country, turn to your local Philips dealer or contact the Service
Department of Philips Domestic Appliances and Personal Care BV.
Troubleshooting
If problems should arise with your straightener and you are unable to
solve them by means of the troubleshooting guide below, please
contact the nearest Philips service centre or the Philips Customer Care
Centre in your country.
Problem
◗ The appliance does not work at all.
1 Perhaps there is a power failure or the socket is not live. Check if
the power supply is working. If it is, check whether the socket is
live by plugging in another appliance.
2 Perhaps the mains cord of the appliance is damaged. If the mains
cord of this appliance is damaged, it must always be replaced by
Philips or a service centre authorised by Philips in order to avoid
hazardous situations.
ENGLISH 11

Einführung
Mit diesem neuen Influence! Haarglätter von Philips können Sie Ihr Haar
besonders schnell und effektiv glätten. Die Temperatur lässt sich
einstellen; Sie passen das Gerät an Ihre persönlichen Anforderungen an
und erzielen beim Glätten optimale Ergebnisse. Die
keramikbeschichteten Platten gleiten besonders leicht durch Ihr Haar.
Komponenten (Abbildung 1)
Das Gerät
A Platten mit Keramikbeschichtung
B Kontrolllampe
- Grün: Die gewählte Temperatur ist erreicht
- Rot: Die gewählte Temperatur ist noch nicht erreicht
C + Taste zur Erhöhung der Temperatur
D - Taste zur Reduzierung der Temperatur
E Ein-/Aus-Schalter
F Aufhängeschlaufe
G Display: Zeigt die gewählte Temperatur und die Anwendungszeit an
- H Gewählte Temperatur
- I Anwendungszeit
J Cool-Tip
Wichtig
Lesen Sie diese Bedienungsanleitung vor Benutzung des Geräts
sorgfältig durch und bewahren Sie sie zur späteren Einsichtnahme auf.
◗ Dieses Gerät eignet sich zum Gebrauch bei
Wechselstromspannungen von 110 bis 127 Volt bzw. 220 bis 240
Volt.
◗ Der Einbau einer Fehlerstromschutzeinrichtung mit einem
Nennauslösestrom von maximal 30 mA in den betreffenden
Stromkreis bietet zusätzlichen Schutz. Lassen Sie sich von Ihrem
Elektroinstallateur beraten.
DEUTSCH12

◗ Halten Sie das Gerät von Wasser fern.Verwenden Sie es nicht in
der Nähe von Wasser oder über mit Wasser gefüllten
Badewannen,Wasch- oder Spülbecken usw. Ziehen Sie nach
jedem Gebrauch im Badezimmer sofort den Stecker aus der
Steckdose. Die Nähe zum Wasser bildet eine ständige Gefahr,
auch wenn das Gerät ausgeschaltet ist.
◗ Das Gerät wird sehr heiß.Achten Sie darauf, dass die heißen
Flächen des Geräts nicht mit Händen,Augen, Ohren, Gesicht
oder Hals in Kontakt kommen. Berühren Sie keinesfalls die
Platten, solange das Gerät eingeschaltet ist. Mit Ausnahme des
Cool-Tip-Bereichs werden auch die Kunststoffteile nahe den
Platten während des Haarglättens sehr heiß.
◗ Halten Sie die Platten sauber und frei von Staub, Schmutz,
Haarspray und Haargel.Verwenden Sie das Gerät keinesfalls in
Kombination mit Schaumfestiger, Styling-Spray, Gel usw.
◗ Halten Sie das Gerät von Kindern fern!
◗ Wenn das Netzkabel defekt ist, darf es aus Sicherheitsgründen
nur von Philips oder einem Philips Service-Center ausgetauscht
werden.
◗ Wenden Sie sich zu Prüf- und Reparaturzwecken immer an ein
Philips Service-Center. Unsachgemäße Reparaturen gefährden den
Benutzer.
◗ Ziehen Sie nach jedem Gebrauch den Stecker aus der Steckdose.
◗ Lassen Sie das Gerät abkühlen, bevor Sie es wegräumen.
◗ Die Keramikbeschichtung der Platten nutzt sich im Laufe der Zeit
ab. Das Gerät funktioniert jedoch weiterhin normal.
◗ Aus Sicherheitsgründen schaltet sich das Gerät nach einer Stunde
Betrieb automatisch aus.
Haar-Styling
1. Schritt:Waschen
Jeder wünscht sich schönes, glänzendes Haar. Eine gute Routine bei der
Haarwäsche kann dabei helfen.
◗ Machen Sie Ihr Haar ca. 30 bis 60 Sekunden lang gründlich nass.
DEUTSCH 13

◗ Geben Sie etwas Haarwaschmittel in Ihre Handfläche, verreiben
Sie es zwischen den Händen und verteilen Sie es gleichmäßig im
Haar.
◗ Massieren Sie sanft das Haar und die Kopfhaut. Zerzausen Sie
dabei das Haar nicht zu sehr; ziehen Sie langes Haar auch nicht
hoch über den Kopf, um Verklettungen zu vermeiden.
◗ Massieren Sie die Kopfhaut mit den Fingerspitzen; das regt die
Durchblutung an und schont das Haar.
◗ Spülen Sie Ihr Haar gründlich aus. Ungenügendes Spülen kann zu
glanzlosem Haar führen. Spülen Sie zuletzt mit kaltem Wasser für
zusätzlichen Glanz.
2. Schritt:Trocknen
Für ein super-glattes Ergebnis ist es wichtig, das Haar zum Glätten
vorzubereiten.Trocknen Sie Ihr Haar gründlich mit einem Haartrockner,
um ein professionell glattes Styling zu erzielen.
◗ Drücken Sie nach der Wäsche überschüssiges Wasser mit den
Händen aus dem Haar.Trocknen Sie das Haar dann mit einem
Handtuch vor und kämmen Sie es vorsichtig vom Ansatz bis zu
den Spitzen durch.
◗ Teilen Sie Ihr Haar - vom Nacken aufwärts - mit Klammern in
Strähnen.
◗ Zum Trocknen der einzelnen Strähnen führen Sie eine zum
Glätten geeignete Bürste durch das Haar und folgen der Bürste
mit dem Haartrockner. Dabei halten Sie die Düse des
Haartrockners in Richtung Haarspitzen.
◗ Stellen Sie den Haartrockner nach dem Trocknen der einzelnen
Strähnen auf die Kaltstufe für einen abschließenden Kaltluftstrom.
Dadurch glättet sich die äußere Schicht des Haares und erhält
mehr Glanz.
B
Tipp: Philips Protect-Haartrockner trocknen bei geringerer Temperatur
und mit stärkerem Luftstrom als andere Haartrockner. Durch diese
Kombination trocknen sie genauso schnell wie andere Haartrockner,
jedoch wesentlich schonender.
DEUTSCH14

3. Schritt: Glätten
Haarglätter sind leistungsstarke Stylinggeräte und sollten stets mit
Vorsicht verwendet werden.
◗ Wenn Sie den Haarglätter unsachgemäß oder bei der falschen
Temperatur anwenden, besteht die Gefahr, dass Ihr Haar
austrocknet oder sogar verbrennt. Befolgen Sie deshalb stets die
vier nachstehenden Schritte zum Wählen der für Ihren Haartyp
geeigneten Temperatur! (Abb. 2).
- Wählen Sie beim ersten Gebrauch des Haarglätters immer eine
niedrige Temperatureinstellung.
- Wählen Sie für sehr dickes, lockiges und schwer zu glättendes Haar
eine mittlere (120c C) bis hohe (160c C) Temperatureinstellung.
- Wählen Sie für normales und leicht welliges Haar eine mittlere
(120c C) bis niedrige (80c C) Temperatureinstellung.
- Seien Sie besonders vorsichtig bei blondem, gebleichtem oder
coloriertem Haar, da dies unter hohen Temperaturen leidet.
◗ Das Display (G) zeigt die gewählte Temperatur und die
verbleibende Glättungszeit an.
- Schauen Sie sich die gewählte Temperatur auf dem Display an.
- Die Balken auf dem Display zeigen die verbleibende Glättungszeit
an. Die gesamte Dauer beträgt 60 Minuten. Alle zehn Minuten
verschwindet einer der sechs Balken.
1 Stecken Sie den Netzstecker in die Steckdose.
2 Drücken Sie den Ein-/Aus-Schalter.
Die rote Kontrolllampe signalisiert, dass das Gerät aufheizt.
3 Lassen Sie das Gerät aufheizen. Die voreingestellte Temperatur
beträgt 140c C.
Lassen Sie das eingeschaltete Gerät niemals unbeaufsichtigt.
Legen Sie das Gerät nur auf hitzebständige Flächen, solange es
aufheizt oder heiß ist.
DEUTSCH 15

4 Wenn die Kontrolllampe grün leuchtet, ist die voreingestellte
Temperatur von 140c C erreicht. Jetzt können Sie die Temperatur
nach Ihrer Wahl neu einstellen (Abb. 2).
- Drücken Sie die + Taste zur Erhöhung bzw. die - Taste zur
Reduzierung der Temperatur. Die von Ihnen gewählte Temperatur
erscheint auf dem Display. Die Kontrolllampe leuchtet rot und
signalisiert, dass sich das Gerät auf die gewählte Temperatur
einstellt.
- Sobald die gewählte Temperatur erreicht ist, leuchtet die
Kontrolllampe grün.
5 Kämmen oder bürsten Sie Ihr Haar, damit es glatt und locker fällt
(Abb. 3).
Teilen Sie Ihr Haar mit einem Kamm in Strähnen. Erfassen Sie dabei
nicht zu viel Haar in einer Strähne.
B
Tipp: Am besten teilen Sie zuerst das Haar oben auf dem Kopf ab und
glätten das Haar darunter. Gätten Sie anschließend die oberen
Haarpartien.
6 Erfassen Sie eine höchstens 5 cm breite Haarsträhne, legen Sie sie
zwischen die Platten und drücken Sie die Griffe fest zusammen.
7 Führen Sie das Gerät 5 Sekunden lang ohne Unterbrechung vom
Ansatz bis zu den Spitzen, um das Haar vor Überhitzung zu
schützen (Abb. 4).
8 Wiederholen Sie diesen Vorgang nach 20 Sekunden, bis Sie das
gewünschte Ergebnis erzielt haben.
9 Lassen Sie Ihr Haar abkühlen, bevor Sie es kämmen oder bürsten.
Andernfalls ruinieren Sie die soeben geschaffene Frisur (Abb. 5).
Reinigung
1 Schalten Sie das Gerät aus, indem Sie den Ein-/Aus-Schalter
drücken.
2 Ziehen Sie den Netzstecker aus der Steckdose.
3 Lassen Sie das Gerät auf einer hitzebeständigen Unterlage
vollständig abkühlen.
DEUTSCH16

4 Reinigen Sie das Gerät mit einem feuchten Tuch.
Aufbewahrung
Wickeln Sie das Netzkabel nicht um das Gerät.
1 Achten Sie darauf, dass der Netzstecker nicht in der Steckdose
steckt.
2 Lassen Sie das Gerät auf einer hitzebeständigen Unterlage
abkühlen, bevor Sie es wegräumen.
Garantie und Kundendienst
Benötigen Sie weitere Informationen oder treten Probleme auf, wenden
Sie sich bitte an Ihren Philips-Händler oder setzen Sie sich mit einem
Philips Service-Center in Ihrem Land in (Tel. Nr. 0180/5356767).
Besuchen Sie auch die Philips Website www.philips.com
Fehlerbehebung
Sollten Sie mit Ihrem Haarglätter Probleme haben, die sich mithilfe der
nachstehenden Lösungsvorschläge nicht beheben lassen, wenden Sie
sich bitte an das Philips Service-Center in Ihrem Land.
Problem
◗ Das Gerät funktioniert nicht.
1 Möglicherweise liegt ein Stromausfall vor oder die Steckdose ist
defekt. Ist grundsätzlich Strom verfügbar, schließen Sie ein anderes
Gerät an die Steckdose an, um zu ermitteln, ob diese Strom führt.
2 Möglicherweise ist das Netzkabel defekt.Wenn das Netzkabel
defekt oder beschädigt ist, muss es aus Sicherheitsgründen von
Philips oder einem Philips Service-Center ausgetauscht werden.
DEUTSCH 17

Introduction
Le nouveau lisseur Influence de Philips offre des résultats ultra-rapides.
La température réglable vous permet de personnaliser le lisseur selon
le type de cheveux pour obtenir les meilleurs résultats. Les plaques
céramiques assurent un lissage ultra-doux.
Description générale (fig. 1)
Appareil
A Plaques céramiques
B Témoin lumineux
- vert: la température sélectionnée est atteinte
- rouge: la température sélectionnée n'est pas encore atteinte
C Bouton + pour augmenter la température
D Bouton - pour diminuer la température
E Bouton marche/arrêt
F Anneau de suspension
G Affichage: indique la température sélectionnée et le temps
d'utilisation
- H Température sélectionnée
- I Temps d'utilisation
J Zone froide
Important
Lisez les instructions du mode d'emploi avant d'utiliser l'appareil et
conservez-le pour un usage ultérieur.
◗ L'appareil peut être utilisé sur une tension de 110-127 volts AC
ou 220-240 volts AC.
◗ Pour plus de protection, il est conseillé de brancher l'appareil sur
une prise de courant protégée par un disjoncteur différentiel de
30mA maxi si vous utilisez l'appareil dans la salle de bains.
Demandez conseil à votre électricien.
◗ Evitez tout contact de l'appareil avec de l'eau! Ne l'utilisez pas
près d'une baignoire, d'un lavabo ou d'un évier.
FRANÇAIS18

Si vous utiliserl'appareil dans la salle de bain, débranchez-le après
usage car la proximité de l'eau peut présenter un risque pour
l'utilisateur même si l'appareil est arrêté.
◗ L'appareil chauffe fortement. Evitez le contact des surfaces très
chaudes de l'appareil avec vos mains, yeux, oreilles, visage ou cou.
Ne touchez pas les plaques de lissage lorsque l'appareil est en
marche. Les parties en plastiques à proximité des plaques
deviennent très chaudes.
◗ Les plaques de lissage doivent être toujours propres, sans traces
de poussières, mousse coiffante, gel etc.Avant d'utiliser l'appareil,
n'appliquez pas de mousse ou spray coiffant, gel, etc.
◗ Tenez l'appareil hors de portée des enfants.
◗ Si le cordon d'alimentation de l'appareil est endommagé, il ne doit
être remplacé que par un Centre Service Agréé Philips, pour
éviter tout accident.
◗ Pour des contrôles ou réparations, adressez-vous toujours à
votre revendeur ou à un Centre Service Agréé Philips. En effet,
une réparation par une personne non qualifiée pourrait présenter
un grave danger pour l'utilisateur.
◗ Débranchez toujours l'appareil après utilisation.
◗ Attendez que l'appareil refroidisse avant de le ranger.
◗ Les plaques ont un revêtement en céramique. Ce revêtement
peut s'user au cours du temps, mais l'appareil continuera à
fonctionner correctement.
◗ Pour plus de sécurité, le lisseur s'arrête automatiquement après 1
heure environ.
Mise en forme
1er étape: laver vos cheveux
Tout le monde souhaite avoir des cheveux sains et beaux. Pour cela
vous devez vous laver les cheveux régulièrement.
◗ Lors du lavage des cheveux, mouillez-les bien pendant 30-60
secondes.
FRANÇAIS 19

◗ Versez une petite quantité de shampoing dans la paume de la
main. Frottez les mains l'une contre l'autre afin de le
distribueruniformément.
◗ Massez délicatement les cheveux et le cuir chevelu. Ne
frictionnez pas fortement pour éviter d'emmêler les cheveux.
◗ Massez le cuir chevelu du bout des doigts afin de stimuler la
circulation sanguine.
◗ Rincez abondamment les cheveux, pour ne pas les rendre ternes.
Pour plus de brillance, finissez par un jet d'eau froide.
2è étape: sécher vos cheveux
Pour obtenir des cheveux ultra-lisses, il est essentiel de préparer vos
cheveux au lissage. Séchez vos cheveux bien à l'aide d'un sèche-
cheveux pour des résultats professionnels.
◗ Après avoir lavé les cheveux, séchez-les avec une serviette.
Démêlez doucement vos cheveux avec un peigne, à partir de la
racine.
◗ Divisez vos cheveux en mèches à l'aide des pinces et commencez
par la partie arrière de la tête.
◗ Séchez chaque mèche à l'aide d'une brosse de brushing en tirant
doucement vers le bas et suivant la brosse avec le sèche-cheveux.
◗ A la fin, réglez le sèche-cheveux sur le jet d'air froid pour le
finissage de la coiffure et pour donner plus de brillance à vos
cheveux.
B
Suggestion: Les sèche-cheveux Protect de Philips ont une température
de séchage plus basse et un jet d'air plus puissant que les sèche-
cheveux traditionnels. Grâce à cette combinaison, ils sèchent aussi
rapidement que les autres appareils mais plus délicatement.
3è étape: lisser vos cheveux
Les lisseurs sont des appareils puissants, donc utilisez-les avec
précaution.
FRANÇAIS20
Sayfa yükleniyor...
Sayfa yükleniyor...
Sayfa yükleniyor...
Sayfa yükleniyor...
Sayfa yükleniyor...
Sayfa yükleniyor...
Sayfa yükleniyor...
Sayfa yükleniyor...
Sayfa yükleniyor...
Sayfa yükleniyor...
Sayfa yükleniyor...
Sayfa yükleniyor...
Sayfa yükleniyor...
Sayfa yükleniyor...
Sayfa yükleniyor...
Sayfa yükleniyor...
Sayfa yükleniyor...
Sayfa yükleniyor...
Sayfa yükleniyor...
Sayfa yükleniyor...
Sayfa yükleniyor...
Sayfa yükleniyor...
Sayfa yükleniyor...
Sayfa yükleniyor...
Sayfa yükleniyor...
Sayfa yükleniyor...
Sayfa yükleniyor...
Sayfa yükleniyor...
Sayfa yükleniyor...
Sayfa yükleniyor...
Sayfa yükleniyor...
Sayfa yükleniyor...
Sayfa yükleniyor...
Sayfa yükleniyor...
Sayfa yükleniyor...
Sayfa yükleniyor...
Sayfa yükleniyor...
Sayfa yükleniyor...
Sayfa yükleniyor...
Sayfa yükleniyor...
Sayfa yükleniyor...
Sayfa yükleniyor...
Sayfa yükleniyor...
Sayfa yükleniyor...
Sayfa yükleniyor...
Sayfa yükleniyor...
Sayfa yükleniyor...
Sayfa yükleniyor...
Sayfa yükleniyor...
Sayfa yükleniyor...
Sayfa yükleniyor...
Sayfa yükleniyor...
Sayfa yükleniyor...
Sayfa yükleniyor...
Sayfa yükleniyor...
Sayfa yükleniyor...
Sayfa yükleniyor...
Sayfa yükleniyor...
Sayfa yükleniyor...
Sayfa yükleniyor...
Sayfa yükleniyor...
Sayfa yükleniyor...
Sayfa yükleniyor...
Sayfa yükleniyor...
Sayfa yükleniyor...
Sayfa yükleniyor...
-
 1
1
-
 2
2
-
 3
3
-
 4
4
-
 5
5
-
 6
6
-
 7
7
-
 8
8
-
 9
9
-
 10
10
-
 11
11
-
 12
12
-
 13
13
-
 14
14
-
 15
15
-
 16
16
-
 17
17
-
 18
18
-
 19
19
-
 20
20
-
 21
21
-
 22
22
-
 23
23
-
 24
24
-
 25
25
-
 26
26
-
 27
27
-
 28
28
-
 29
29
-
 30
30
-
 31
31
-
 32
32
-
 33
33
-
 34
34
-
 35
35
-
 36
36
-
 37
37
-
 38
38
-
 39
39
-
 40
40
-
 41
41
-
 42
42
-
 43
43
-
 44
44
-
 45
45
-
 46
46
-
 47
47
-
 48
48
-
 49
49
-
 50
50
-
 51
51
-
 52
52
-
 53
53
-
 54
54
-
 55
55
-
 56
56
-
 57
57
-
 58
58
-
 59
59
-
 60
60
-
 61
61
-
 62
62
-
 63
63
-
 64
64
-
 65
65
-
 66
66
-
 67
67
-
 68
68
-
 69
69
-
 70
70
-
 71
71
-
 72
72
-
 73
73
-
 74
74
-
 75
75
-
 76
76
-
 77
77
-
 78
78
-
 79
79
-
 80
80
-
 81
81
-
 82
82
-
 83
83
-
 84
84
-
 85
85
-
 86
86


Philips HP4647 Kullanım kılavuzu
- Kategori
- Saç düzleştiriciler
- Tip
- Kullanım kılavuzu
- Bu kılavuz aynı zamanda aşağıdakiler için de uygundur:
diğer dillerde
- español: Philips HP4647 Manual de usuario
- français: Philips HP4647 Manuel utilisateur
- italiano: Philips HP4647 Manuale utente
- svenska: Philips HP4647 Användarmanual
- Deutsch: Philips HP4647 Benutzerhandbuch
- português: Philips HP4647 Manual do usuário
- dansk: Philips HP4647 Brugermanual
- Nederlands: Philips HP4647 Handleiding
İlgili makaleler
-
Philips HP4642 Kullanım kılavuzu
-
Philips HP4665/29 Kullanım kılavuzu
-
Philips HP4667/08 Kullanım kılavuzu
-
-
Philips HP4669/08 Kullanım kılavuzu
-
Philips HP4668/07 Kullanım kılavuzu
-
-
-
-