Bticino 368121 Kullanma talimatları
- Kategori
- Saklama sandıkları
- Tip
- Kullanma talimatları
Sayfa yükleniyor...
Sayfa yükleniyor...
Sayfa yükleniyor...
Sayfa yükleniyor...
Sayfa yükleniyor...
Sayfa yükleniyor...
Sayfa yükleniyor...

8
Audio-Kit
I
NL
F
GR
GB
P
E
D
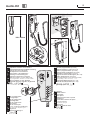
Attenzione: il citofono deve rispettare le seguenti regole
installative:
- deve essere installato solo in ambienti interni
-
non deve essere esposto a stillicidio o a spruzzi d’acqua
- non ostruire le aperture di ventilazione
- deve essere usato unicamente su sistemi 2 fili SCS
BTicino.
Ogni uso improprio dell’articolo puó comprometterne le
caratteristiche di sicurezza.
Atenção: o intercomunicador deve respeitar as seguintes regras
para ser instalado:
- deve ser instalado somente internamente
- não deve ser exposto a estilicídio ou borrifos de água
- não deve obstruir as aberturas de ventilação
- deve ser usado somente em sistemas de 2 fios da
SCS BTicino.
Qualquer uso impróprio do artigo pode comprometer as
suas características de segurança.
Achtung: die Hausstation muss unter Beachtung folgender Regeln
installiert werden:
- es darf nur im Inneren installiert werden
- es darf nicht Wassertropfen oder -spritzer ausgesetzt
werden
- Belüftungsschlitze nicht verstopfen
- Es darf nur mit “2--Draht-Bus-System” der SCS BTicino
verwendet werden.
Jeder ungeeigneter Gebrauch des Geräts kann seine
Sicherheitseigenschaften beeinträchtigen.
Prosoxç: h syskeyç endoepikoinvnìaz me bìnteo
prépei na threì
toyz akòloyuoyz kanònez egkatàstashz:
- prépei na egkatastaueì mòno se kleistò xèro
-
den prépei na ektìuetai se stàjimo ç pitsiliéz neroù
- mhn boylènete ta anoìgmata ejaerismoù
-
prépei na xrhsimopoihueì apokleistikà se systçmata 2
kalvdìvn SCS BTicino.
Kàue akatàllhlh xrçsh toy eìdoyz mporeì na uései se
kìndyno ta xarakthristikà asfaleìaz toy.
Attention: le phone doit respecter les règles d’installation
suivantes:
- il doit être monté seulement à l’intérieur
- il ne doit pas être exposé à des suintements ou à des
éclaboussures
- ne pas boucher les ouvertures d’aération
- il doit être utilisé uniquement sur des systèmes 2 fils
SCS BTicino.
Tout usage impropre de la référence peut compromettre
les caractéristiques de sécurité.
Caution: the internal unit must respect the following
installation rules:
- it must only be installed indoors
- it must not be exposed to water drops or splashes
- do not block the ventilation openings
- it must be used only on SCS BTicino 2-wire systems
An improper use of the item can compromise its safety
features
Atención: el interfono debe respetar las siguientes normas
de instalación:
- se debe instalar sólo al cubierto
- no debe estar expuesto a goteo o salpicones de agua
- no tape las aberturas de ventilación
- se debe utilizar exclusivamente en sistemas 2 hilos
SCS BTicino.
Cualquier uso impropio del artículo puede comprometer
sus características de seguridad.
Let op: Bij de installatie van de telefoon moet men de
volgende voorschriften in acht nemen:
- binnenshuis installeren
- niet aan waterdruppels en -stralen blootstellen
- de ventilatieopeningen niet versperren
- uitsluitend in 2-dradige SCS BTicino systemen instal
-
leren
Ieder oneigenlijk gebruik kan de veiligheid van het product
schaden.
RU
TR
PL
DYBVFYBT5 Ghb ecnfyjdrt ljvjajyf cj,k.lfnm cktle.
obt ghfdbkf5
- ecnfyfdkbdfnm njkmrj dj dyenhtyyb[ chtlf[
- ljk;ty ,snm pfoboty jn gjgflfybz rfgtkm bkb ,hspu djls
- yt pfrhsdfnm dtynbkzwbjyyst jndthcnbz
- ghbvtyznm njkmrj lkz lde[ghjdjlys[ cbcntv SCS BTi
-
cino.
Bcgjkmpjdfybt ghb,jhjd yt gj yfpyfxtyb. vj;tn ytufnb-
dyj jnhfpbnmcz yf b[ [fhfrnthbcnbrf[ ,tpjgfcyjcnb7
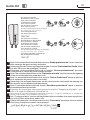
Dikkat: dahili ünite afla¤ıdaki kurma kurallarına
uymalıdır:
- sadece kapalı ortamlara kurulmalıdır
- damlamaya veya su püskürtmelerine maruz
bırakılmamalıdır
- havalandırma deliklerini kapatmayın
- sadece 2 kablolu SCS BTicino sistemlerinde
kullanılmalıdır.
Ürünün her farklı kullanımı emniyet özelliklerini tehlikeye
atabilir.
Uwaga: domofon powinien być instalowany zgodnie z
następującymi zasadami:
- instalacja wyłącznie w budynku
- nie może być narażony na wilgoć i zalewanie wodą
- nie zasłaniać otworów wentylacyjnych
- może byś stosowany wyłącznie w systemie 2-przewo
-
dowym BTicino.
Nieprawidłowe stosowanie i użycie może ograniczyć
bezpieczeństwo produktu.
Sayfa yükleniyor...

10
Audio-Kit
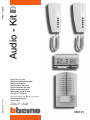
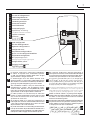
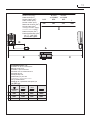
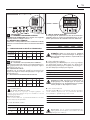
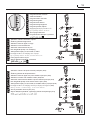
Installare e collegare gli apparecchi come indicato nello schema.
Assicurarsi che durante le operazioni di montaggio degli apparecchi
l’alimentatore non sia collegato alla rete pubblica.
L’alimentatore non deve essere esposto a stillicidio o spruzzi
d’acqua.
Non ostruire le aperture di ventilazione dell’alimentatore.
Prima di alimentare l’impianto verificare l’esattezza del cablaggio
ed accertarsi che la tensione di rete sia compatibile con quella
dell’alimentatore.
Posare i cavi seguendo lo schema riportato nelle pagine precedenti
in cui è indicato il numero dei cavi da predisporre e la dislocazione
fisica degli apparecchi che compongono l’impianto.
La tabella seguente indica la sezione minima dei cavi in funzione della
distanza tra posto esterno e posto interno.
Die Gerate laut Plan montieren und anschlieBen.
Bei der Montage der Gerate darf das Netzgerat nicht am Niederspan
-
nungsnetz angeschlossen sein.
Das Speisegerat darf nicht Tropfwasser oder Wasserspritzer au
-
sgesetzt werden.
Beluftungsschlitze des Speisegerats nicht verstopfen.
Bevor die Anlage mit Strom versorgt wird, sollte kontrolliert werden,
ob die Verkabeluna richtig vorgenommen wurde. Frufen Sie bitte
die Anschlusswerte
des Netzgerates mit der Netzspannung.
Bitte beachten Sie die Nummerierung der Drahte auf beigefugtem
Schaltplan.
Nachstehende Tabelle gibt den Mindestwert des Leiterquerschnitts in
Funktion “der Enffernung zwischen Tür- und Hausstation” an.
Poser les câbles d’après le schéma qui se trouve dans les pages
précédentes, sur lequel est indiqué le nombre de cables à placer et la
localisation physique des appareils qui forment l’installation.
L’alimentation ne doit etre exposée ni à stillation ou à pulvérisations
d’eau.
Ne pas boucher les ouvertures d’aération de l’alimentation.
Le tableau suivant indique la section minimale des cables en fonction
de la distance entre le poste externe et le poste interne.
Monter et brancher les appareils comme indiqué sur le schéma.
S’assurer que pendant les opérations d’installation des appareils
l’alimentation n’est pas raccordée au réseau public.
Avant d’alimenter l’installation, vérifier que le cablage est correct
et s’assurer que la tension du réseau est compatible avec celle de
l’alimentation.
Install and connect the devices as indicated in the diagram.
Make sure that when the devices are mounted the power supply is
not connected to the public electric power line.
The power supply must not be exposed to dripping water or
splashes.
Do not block the power supply ventilation openings.
Before energizing the installation chech that cabling is correct and
make sure that line voltage is compatible with power supply voltage
Lay cables according to diagram shown in the previous pages, which
indicates the number of cables to be arranged and the layout of devices
that make up the installation.
The table below shows the minimum conductor cross-section accor
-
ding to the distance between inside and outside station.
Instalar y conectar los aparatos como se indica en el esquema. Ase
-
gurarse de que durante las operaciones de montaje de los aparatos,
el alimentador no está conectado a la red pública.
El alimentador no debe estar expuesto a goteo o salpicones de
agua.
No tape las aberturas de ventilación del alimentador.
Antes de alimentar la instalación, comprobar que el cableado es
correcto y asegurarse de que la tensión de red es compatible con
la del alimentador.
Colocar los cables siguiendo el esquema que se da en las páginas
anteriores en las que se ha indicado el número de los cables que
hay que predisponer y la colocación fisica de los aparatos que
componen la instalación.
O La tabla siguiente indica la sección minima de los cables en función
de la distancia entre la unidad exterior y la unidad interior.
Leg de kabels aan volgens het schema op de volgende bladzijden
waarin het nummer van de kabels en de plaatsing van de apparaten
is aangegeven.
De voeding mag niet worden blootgesteld aan waterdruppels of
-stralen.
Niet de ventilatieopeningen van de voeding versperren.
In de volgende tabel zijn de minimumdoorsneden van de kabels bij
verschillende afstanden tussen de binnenplaats en de buitenplaats
vermeld.
Installeer en verbind de apparatuur zoals aangegeven in het schema.
Vergewis u ervan dat de voeding niet op het lichtnet is aangesloten
tijdens de installatie.
Controleer voordat u de installatie aansluit op het lichtnet of de
bekabeling goed is aangelegd en of de netspanning geschikt is
voor de voeding.
Instalar e ligar os aparelhos conforme indicado no esquema.
Assegurar-se de que durante as opera,cóes de montagem dos
aparelhos, o alimentador nao está ligado à rede pública.
O alimentador nao deve ser exposto a estililicídio ou a borrifos
de água.
Não obstrua as aberturas de ventila,cáo do alimentador.
Antes de ligar a corrente na instalaçao verificar se os cabos sao
correctos e certificar-se de que a tensao de rede é compativel
com a do alimentador.
Colocar os cabos se~quindo o esquema das páginas anteriores
onde se indica o número dos cabos a preparar e a disposicao
fisica dos aparelhos que formam o sistema.
A tabela abaixo indica a secçao minima dos cabos em funçáo da
distància entre a unidade exterior e a unidade interior.
Topouetçste kai syndéste tiz syskeyéz òpvz ypodeiknùetai
sto sxçma. Bebaivueìte pvz sth diàrkeia tvn xeirismèn to
-
pouéthshz tvn syskeyèn to trofodotikò den eìnai syndeméno
sto dìktyo toy reùmatoz. To trofodotikò den prépei na
ektìuetai se stàjimo ç pitsiliéz neroù.
Mhn boylènete ta anoìgmata ejaerismoù toy trofodotikoù.
Prin thn paroxç reùmatoz sthn egkatàstash elégjte thn
oruòthta thz kalvdìvshz kai bebaivueìte pvz h tàsh reùma
-
toz toy diktùoy eìnai symbatç me aytç toy trofodotikoù.
Topouetçste ta kalèdia akoloyuèntaz to sxçma poy ana
-
gràfetai stiz prohgoùmenez selìdez stiz opoìez ypodeiknùe
-
tai o ariumòz tvn kalvdìvn poy prépei na prodiateuoùn kai h
fysikç diàtajh tvn syskeyèn poy apoteloùn thn egkatàstash.
O epòmenoz pìnakaz ypodeiknùei thn elàxisth diatomç tvn
kalvdìvn bàsei thz apòstashz anàmesa sto ejvterikò kai
sto esvterikò shmeìo.
Ecnfyjdbnm b gjlcjtlbybnm fggfhfnehe cjukfcyj c[tvs7
Cktlbnm pf ntv6 xnj,s dj dhtvz c,jhrb fggfhfnehs ,kjr gbn
-
fybz yt ,sk gjlrk.xty r cbcntvs
ktrnhbxtcrjuj cyf,;tybz7
Yt jcnfdkznm ,kjr gbnfybz ytpfobotyysv jn ghjcfxbdfybz
dkfub bkb gjgflfybz djls.
Yt pfrhsdfnm dtynbkzwbjyyst jndthcnbz ,kjrf gbnfybz7
Gthtl ntv6 rfr gjlrk.xbnm fggfhfnehe r ctnb gbnfybz6
ghjdthbnm ghfdkmyjcnm dsgjkytybz ghjdjlrb b cjjndtncndbt
yfghz;tybz ctnb
ktrnhbxtcrjuj cyf,;tybz njrjdsv [fhfrn-
thbcnbrfv ghb,jhf7
ktrnhjghjdjlre cktletn dsgjkyznm d
cjjndtncndbb c erfpfyyjq yf ghtleleob[ cnhfybwf[ c[tvjq6
d rjnjhs[ erfpfyj rjkbxtcndj ytj,[jlbvs[ ghjdjlybrjd6
f nfr;t abpbxtcrjt hfpvtotybt rjvgktrne.ob[ ghb,jhjd
cbcntvs7 D yb;tghbdtltyyjq nf,kbwt erfpfyj vbybvfkmyjt
ctxtybt ghjdjlybrjd d pfdbcbvjcnb jn hfccnjzybz vt;le
dyenhtyytq b dytiytq njxrfvb7
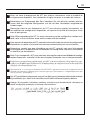
Cihazları flemada gösterildi¤i gibi kurunuz ve ba¤layınız. Cihazların
montaj ifllemlerinin gerçeklefltirilmesi esnasında, besleyicinin genel
flebekeye ba¤lı olmadı¤ını kontrol ederek emin olunuz.
Besleyici su damlamaları veya püskürmelerine maruz
kalmamalıdır.
Besleyicinin havalandırma açıklıklarını tıkamayınız.
Tesise elektrik vermeden önce kablo ba¤lantılarının do¤rulu¤unu
kontrol ediniz ve flebeke geriliminin besleyici gerilimine uygun
oldu¤undan emin olunuz. Kabloları, hazır edilmesi gereken
kablo sayısının ve tesisi oluflturan cihazların fiziki yerleflimlerinin
gösterildi¤i, önceki sayfalarda bulunan flemaya uygun olarak
döfleyiniz. Afla¤ıdaki tablo, dıflardaki ve içerdeki nokta arasındaki
mesafeye göre kabloların minimum kesitini göstermektedir.
Zainstalować i podłączyć elementy instalacji według
wskazówek podanych na schemacie. Upewnić się, że
podczas instalacji zasilacz nie jest podłączony do sieci.
Zasilacz nie może być narażony na wilgoć lub zalewanie
wodą. Nie zasłaniać otworów wentylacyjnych zasilacza.
Przed podłączeniem zasilania do instalacji, upewnij się, że
podłączenia są wykonane prawidłowo, a napięcie podane
z sieci jest zgodne z napięciem pracy zasilacza. Kable
powinny być ułożone zgodnie ze schematem podanym w
instrukcji, obejmującym liczbę przewodów oraz fizyczne
rozmieszczenie i połączenie elementów wchodzących w
skład instalacji. Tabela na następnej stronie zawiera dane
dotyczące minimalnego przekroju przewodów, jakie należy
zastosować, w zależności od odległości między panelem
zewnętrznym a aparatem wewnętrznym.
I
NL
F
GR
GB
P
E
D
RU
TR
PL
Sayfa yükleniyor...

12
Audio-Kit
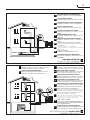
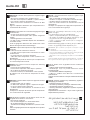
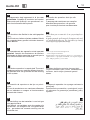
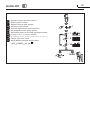
Il collegamento degli apparecchi è di tipo non
polarizzato. L’impiego di conduttori con sezioni
diverse da quelli prescritti, non garantisce il cor-
retto funzionamento dell’impianto.
A conexão dos aparelhos é do tipo não
polarizado.
O emprego de condutores com secções
diferentes das prescritas, não garante
que a instalação funcione correctamente.
Der Anschluss der Geräte ist des nicht gepolten
Typs.
Der Einsatz von Leitern mit einem anderen Schnitt
als vorgeschrieben, gewährt nicht den einwand
-
freien Betrieb.
Le raccordement des appareils est de type
non
polarisé. L’emploi de conducteurs de sections
différentes de celles prescrites ne garantit pas le
bon fonctionnement de l’installation.
The device connection is unpolarised. The use of
conductors with cross-sections different from tho
-
se specified does not guarantee correct working
of the system.
La conexión de aparatos es de tipo no polari-
zado.
El uso de conductores con secciones diferentes
de las indicadas no asegura el funcionamiento
correcto del sistema.
De aansluiting van de toestellen is van het type
niet gepolariseerd.
Het gebruik van geleiders met doorsneden die
verschillen van diegene die voorgeschreven
zijn, garandeert de correcte werking van de
installatie niet.
H sùndesh tvn syskeyèn eìnai mh polvménoy
tùpoy.
H xrçsh agvgèn me diatoméz diaforetikéz apò
tiz prodiagrafòmenez, den eggyàtai th svstç
leitoyrgìa thz egkatàstashz.
Nbg gjlrk.xtybz fggfhfnjd
- ytgjkzhbpjdfyysq7
Ghbvtytybt ghjdjlybrjd lheujuj ctxtybz6 gj
chfdytyb. c ghtlgbcfyysvb 6yt ufhfynbhetn
yflkt;foe. hf,jne cbcntvs7
Cihazların ba¤lantısı polarize olmayan tiptir.
Öngörülenlerden farklı kesitli kondüktörlerin
kullanımı, tesisin do¤ru ifllemesini garanti
etmez.
Podłączenie aparatów nie wymaga zachowania
polaryzacji.
Zastosowanie przewodów o przekrojach innych
niż zalecane nie gwarantuje prawidłowej pracy
systemu.
I
F
D
NL
GB
E
GR
RU
TR
PL
P
Sayfa yükleniyor...
Sayfa yükleniyor...
Sayfa yükleniyor...

16
Audio-Kit
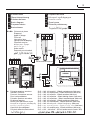
0 2 31
1200Hz 1200Hz1200Hz1200Hz
0Hz 2400Hz600Hz
0= bez
konfiguratora
1 2 3 4 5 6 7
1
sek.
2
sek.
3
sek.
jak
przycisk
6
sek.
8
sek.
10
sek.4 sek.
numer konfiguratora
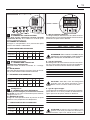
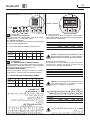
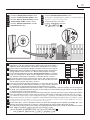
S = rodzaj sygnału wywołania
Konfiguracja S określa dźwięk sygnału wywołania
na domofonie. Dźwięki wywołania z różnych paneli
zewnętrznych mogą być zróżnicowane.
Dwutonowy
Konfigurator 0 2 3
Dwutonowy JednotonowyRodzaj dêwi´ku
1
Dwutonowy
1200Hz 1200Hz1200Hz1200Hz
0Hz 2400Hz600Hz
UWAGA: Przy każdej zmianie konfiguracji system
musi zostać wyłączony, a po upływie 1 minuty
ponownie podłączony do zasilania.
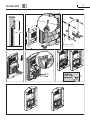
Konfigurator:
P = NUMER PANELU ZEWNĘTRZNEGO
Panel zewnętrzny nie wymaga konfiguracji (z wyjątkiem
ewentualnego rozbudowania zestawu – w tym przypadku
drugi panel należy konfigurować jako P=1)
N = NUMER WYWOŁANIA
Określa powiązanie między przyciskiem na panelu
zewnętrznym, a domofonami lub wideodomofonami.
T = CZAS DZIAŁANIA PRZEKAŹNIKA ZAMKA
0= konfi-
güratör yok
1 2 3 4 5 6 7
1
san.
2
san.
3
san.
tu s
gibi
6
san.
8
san.
10
san.4 san.
Konfigüratör numarası
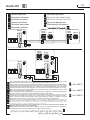
S - arama sinyali tipi
S konfigürasyonu, dahili ünitelerden arama tonunu
belirler. Bu flekilde farklı dıfl ünitelerden gelen aramaların
farklılafltırılması mümkündür.
Çift tonlu
Konfigüratör 0 2 3
Çift tonlu Tek tonluÇift tonluAlarm tipi
1
1200Hz 1200Hz1200Hz1200Hz
0Hz 2400Hz600Hz
D‹KKAT: Kon
fi
gürasyonun de
¤
ifltirildi
¤
i her defa,
tesisin beslemesini kesmek ve sonra yaklaflık 1
dakika bekleyerek yeniden beslemek gereklidir.
Konfigüratör:
P = DIfi MEVK‹ NUMARASI
Dıfl mevki kon
figüre edilmemelidir. ‹kinci bir dıfl mevki
kullanılıyorsa P = 1 ile konfigüre ediniz.
N = ARAMA NUMARASI
Dıfl mevki tuflu ile dahili telefon sistemi veya dahili video
sistemi arasında ba¤lantı kurar.
T = K‹L‹TLEME RÖLES‹ ZAMAN AYARLAYICISI
TR
PL
Sayfa yükleniyor...

18
Audio-Kit
Selezione suoneria
La suoneria di chiamata del citofono è selezionabile tra
16 differenti tipi di melodie. Si possono differenziare le
seguenti tipologie di chiamata:
• Chiamata al piano
• Chiamata da posto esterno principale
• Chiamata intercom
Selecção toques
Os toques de chamada do intercomunicador podem ser
seleccionados em 16 tipos de melodias diferentes. Po
-
dem ser diferenciados os seguintes tipos de chamada:
• Chamada ao piso
• Chamada da unidade externa principal
• Chamada Intercom
Läutwerk wählen
Für das Läutwerk der Rufe des haustelefons stehen 16
verschiedene Melodien zur Verfügung. Die Rufe können
folgendermaßen differenziert werden:
• Etagenruf
• Ruf von der Haupttürstation
• Intercom Anruf
Sélection sonnerie
La sonnerie d’appel du phone peut être sélectionnée par
-
mi 16 différents types de mélodies. On peut différencier
les typologies d’appel suivantes:
• Appel à l’étage
• Appel de poste extérieur principal
• Appel intercom
Bell selection
The door entry unit call bells can be selected from 16
different types of tune. The following types of call can
be differentiated:
• Call to the floor
• Call from main entrance panel
• Intercom Call
Selección del timbre
El timbre del llamada del interno fono se puede seleccio
-
nar entre 16 melodías diferentes. Es posible diferenciar
las siguientes tipologías de llamadas:
• Llamada a la planta
• Llamada desde puesta exterior principal
• Llamada interna
Beltoon kiezen
De oproepbeltoon van de telefoon biedt de keus uit 16
melodiën. Het is mogelijk om de volgende types oproe
-
pen te kenmerken:
• Oproep aan de verdieping
• Oproep vanuit het hoofddeurstation
• Intercom oproep
Epilogç hxhtikçz syskeyçz
To koydoùnisma klçshz thz syskeyçz endoepikoin
-
vnìaz me sçma bìnteo epilégetai metajù 16 diafore
-
tikèn tùpvn melvdìaz. Mporoùn na diaforopoihuoùn
oi akòloyuez typologìez klçshz:
• Klçsh ston òrofo
• Klçsh apò kùrio ejvterikò shmeìo
• Klçsh Intercom
Ds,jh pdjyrf
Djpvj;yjcnm ds,jhf jlyjq bp 16 hfpys[ vtkjlbq
lkz dspsdyjuj pdjyrf c dbltjljvjajyf7 Gj nbgfv
dspjds vjuen ,snm hfpltktys yf cktle.obt5
• Dspjd yf nf;
• Dspjd c ukfdyjq yfhe;yjq njxrb
• Dspjd gj bynthrjve
Alarm seçimi
Sistemi arama alarmı 16 farklı melodi tipi arasından seçi
-
lebilir. Afla¤’dbıdaki arama tipleri farklılafltırılabilirler:
• Katta arama
• Ana dıfl üniteden arama
• ‹nterkom arama
Wybór dźwięku sygnału wywołania
Dźwięk sygnału wywołania może być wybrany spośród
16 dostępnych dźwięków. Możliwe jest przypisanie
różnych dźwięków do różnych źródeł wywołania, np.:
• Wywołanie z dzwonka przy drzwiach
• Wywołanie z głównego panelu zewnętrznego
• Wywołanie interkomowe
I
F
D
NL
GB
E
GR
RU
TR
PL
P
Sayfa yükleniyor...
Sayfa yükleniyor...
Sayfa yükleniyor...
Sayfa yükleniyor...

23
Nota: nel caso di espansione del KIT, per ulteriori informazioni circa le modalità di
configurazione disponibili, fare riferimento al foglio istruzioni a corredo del citofono.
Bemerkung: zur Erweiterung des Sets, beziehen Sie sich bitte für weitere Informa
-
tionen über die mögliche Konfiguration, auf die mit dem Haustelefon mitgelieferten
Anweisungen.
Remarque: dans le cas d’expansion du KIT, pour de plus amples informations sur
les modalités de configuration disponibles, se reporter au feuillet d’instructions fourni
avec le parlophone.
Note: When expanding the KIT, for more information on the configuration modes avai
-
lable, refer to the instruction sheet which comes with the handset.
Nota: en caso de expansión del KIT, para más información sobre los modos de configuración
disponibles, se remite a la hoja de instrucciones suministrada junto con el interfono.
Opmerking: ingeval van een uitbreiding van de KIT, verwijst men voor bijkomende
inlichtingen m.b.t. de beschikbare modaliteiten van configuratie, naar het instructieblad
in dotatie bij de huistelefoon.
Nota: Caso se expandir o KIT, para ulteriores informações sobre a modalidade de configu-
rações disponíveis, consulte a folha de instruções fornecidas com o intercomunicador.
Shmeìvsh: se perìptvsh epéktashz toy KIT, gia perissòterez plhroforìez sxe-
tikà me tiz diauésimez diadikasìez diamòrfvshz, anaféreste sto stàntar fùllo
odhgièn toy uyrothlefènoy.
Ghbvtxfybt5 d ckexft hfcibhtybz RJVGKTRNF ljgjkybntkmyfz byajhvfwbz gj
ghtljcnfdkztvsv ghjwtlehfv rjyabuehfwbb ghbdtltyf d cjghjdjlbntkmyjq
bycnherwbb r ljvjajye7
Not: KIT geniflletilmesi durumunda, mevcut konfigürasyon yöntemleri hakkında daha detaylı
bilgi edinilmesi için, dahili ünite ile birlikte teslim edilen kullanım bilgilerine bakınız.
Uwaga: W przypadku rozbudowy zestawu, odnieść się do dodatkowych informacji na
temat konfiguracji podanych w instrukcji dla domofonu.
I
NL
F
GB
E
D
GR
P
RU
TR
PL
Sayfa yükleniyor...
Sayfa yükleniyor...

26
Audio-Kit
1 2 PL S+ S-
J
M
P
J
M
P
TP
230Va.c.
346000
346230
BUS 12
BUS
3
2
1
P
N
MOD
2
2
clack
1
T
J1
P
J2
J
M
P
clack
J
M
P
M
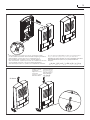
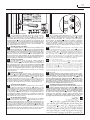
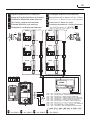
S+S- = 18V - 4A impulsivi - 250mA mantenimento
S+S- = 18V - 4A impulsstrom - 250mA Haltestrom
S+S- = 18V - 4A impulsifs - 250mA entretien
S+S- = 18V - 4A impulsive - 250mA holding current
S+S- = 18V - 4A impulsivos - 250mA mantenimiento
S+S- = 18V - 4A impulsief - 250mA onderhoud
1
Art. 3501/1
Comando luci scale con tasto
Treppenlichtbetätigung mit Taste
Commande éclairage escaliers avec touche
Staircase lights command with key
Mando luces escaleras con tecla
Bediening trappenhalverlichting met toets
I
NL
F
GB
E
D
GR
P
RU
TR
PL
Comando das luzes das escadas com tecla
Entolç gia fèta skàlaz me plçktro
Eghfdktybt cdtnjv yf ktcnybwf[ ryjgrjq
tuflu ile merdiven ıflıkları kumandası
Sterowanie światłem na schodach za pomocą przycisku
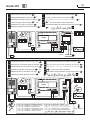
Comando serratura secondaria con tasto
Steuerung des zusätzlichen Schlosses mit Taste
Commande serrure secondaire avec touche
Secondary door lock command with key
Mando cerradura secundaria con tecla
Bediening tweede deurslot met toets
I
NL
F
GB
E
D
GR
P
RU
TR
PL
Comando da fechadura secundária com tecla
Entolç gia deytereùoysa kleidarià me plçktro
Eghfdktybt ljgjkybntkmysv pfvrjv ryjgrjq
tuflu ile ikinci kilit kumandası
Sterowanie drugim zamkiem za pomocą przycisku
3
2
3
3
3
3
3
3
3
3
3
3
3
2
2
2
2
2
2
2
2
2
2
2
230Va.c.
346000
346200
2
1
4
3
6
5
8
7
NC
NO
C
230Va.c.
BUS 12
BUS
3
2
1
P
N
MOD
3
M
N/P
MOD
T
S+S- = 18V - 4A instantâneos - 250mA continuos
S+S- = 18V - 4A palmikà - 250mA diatçrhshz
S+S- = !*D - $F bvgekmcyst - @%)vF gjllth;fybt
S+S- = 18V - 4A empülsiyonlu - 250mA muhafaza
S+S- = 18V – 4A impuls – 250 mA podtrzymanie
Sayfa yükleniyor...
Sayfa yükleniyor...
-
 1
1
-
 2
2
-
 3
3
-
 4
4
-
 5
5
-
 6
6
-
 7
7
-
 8
8
-
 9
9
-
 10
10
-
 11
11
-
 12
12
-
 13
13
-
 14
14
-
 15
15
-
 16
16
-
 17
17
-
 18
18
-
 19
19
-
 20
20
-
 21
21
-
 22
22
-
 23
23
-
 24
24
-
 25
25
-
 26
26
-
 27
27
-
 28
28


Bticino 368121 Kullanma talimatları
- Kategori
- Saklama sandıkları
- Tip
- Kullanma talimatları
diğer dillerde
- español: Bticino 368121 Instrucciones de operación
- français: Bticino 368121 Mode d'emploi
- italiano: Bticino 368121 Istruzioni per l'uso
- polski: Bticino 368121 Instrukcja obsługi
- Deutsch: Bticino 368121 Bedienungsanleitung
- português: Bticino 368121 Instruções de operação
- English: Bticino 368121 Operating instructions
- Nederlands: Bticino 368121 Handleiding
İlgili makaleler
-
Bticino 367121 Kullanma talimatları
-
-
-
-
-
-
-
-
-