
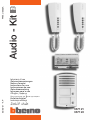
Audio - Kit
02/05-01 - AP
PART. U0053A
367121
367122
Istruzioni d’uso
Gebrauchanweisungen
Notice d’emploi
Instructions for use
Instrucciones de uso
Gebruiksaanwijzing
Istruçoes para o uso
Odhgìez Xrçshz
Bycnherwbb gj rcgkefnfwbb
Kullanım bilgileri
Instrukcja obs∏ugi

2
Audio-Kit

3
346000
230V~
3
2
1
3
2
1
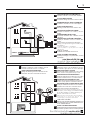
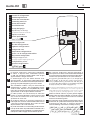
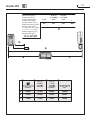
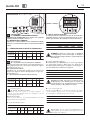
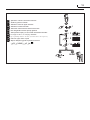
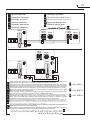
NUOVO IMPIANTO CITOFONICO
Impianto realizzato senza modifiche ai 2 fili
esistenti: chiamata, citofono e serratura.
I
NL
F
GR
GB
P
E
D
RU
TR
PL
NEUE HAUSTELEFONANLAGE
Anlage ohne Änderungen an den vorhandenen 2 Leiter:
Ruffunktion, haustelefon und elektrischer Schloss.
NOUVELLE INSTALLATION PHONIQUE
Installation réalisée sans modifications sur les 2
fils existants: appel, phone, et serrure électrique.
NEW DOOR ENTRY SYSTEM
System made without modifications to the 2 existing
wires; call, door entry and electric door lock.
NUEVA INSTALACIÓN INTERFÓNICA
Instalación realizada sin las modificaciones a los 2 hilos
existentes: llamada, interfono y cerradura eléctrica.
NIEUWE DEURTELEFOONINSTALLATIE
Installatie aangelegd zonder wijzigingen aan de 2 bestaan-
de aders: oproep, deurtelefoon en elektrisch deurslot.
NOVA INSTALAÇÃO DO INTERCOMUNICADOR
Instalação realizada sem modificar os 2 fios existentes:
chamada, intercomunicador e fechadura eléctrica.
NEA EGKATASTASH UYROTHLEFVNOY
Egkatàstash pragmatopoihménh xvrìz tro-
popoiçseiz sta 2 ypàrxonta kalèdia: klçsh,
bìnteo-uyrothléfvno ki hlektrikç kleidarià.
YJDFZ LJVJAJYYFZ CBCNTVF
Dsgjkytyf ,tp bpvtytybz ceotcnde.otq
ghjdjlrb bp @ ghjdjljd5 dspjdá dbl
-
tjljvjajy b ‘ktrnhbxtcrbq pfvjr7
YEN‹ DAH‹L‹ S‹STEM‹
Mevcut 2 tel üzerinde de¤ifliklik yapılmaksızın
gerçeklefltirilen tesis: arama, dahili video siste
-
mi ve elektrikli kilitleme.
NOWY SYSTEM DOMOFONOWY
Instalacja za∏o˝ona bez modyfikacji dwóch istniejàcych
przewodów: wywo∏anie, domofon i zamkni´cie drzwi
230Va.c. 12V
I
NL
F
GR
GB
P
E
D
RU
TR
PL
VECCHIO IMPIANTO A CAMPANELLO
Impianto esistente con 3 fili e due chiamate.
ALTE KLINGELANLAGE
Vorhandene Anlage mit 3 Leitern und zwei Rufen
ANCIENNE INSTALLATION A SONNETTE
Installation existante à 3 fils et deux appels
OLD SYSTEM WITH BELL
Existing system with 3 wires and two calls
VIEJA INSTALACIÓN CON TIMBRE
Instalación existente con 3 hilos y dos lla
-
madas
OUDE DEURBELINSTALLATIE
Bestaande installatie met 3 draden en twee
oproepen
ANTIGA INSTALAÇÃO EM CAMPAÍNHA
Instalação existente com 3 fios e duas cha
-
madas
PALIA EGKATASTASH KOYDOYNIOY
Ypàrxoysa egkatàstash me 3 kalèdia kai
dùo klçseiz
CNFHFZ CBCNTVF CJ PDJYRJV
Ceotcnde.ofz #-ghjdjlyfz cbcntvf yf
ldf dspjdf
ESK‹ Z‹L S‹STEM‹
3 kablolu ve iki aramalı mevcut tesis
STARY SYSTEM Z DZWONKIEM
Instalacja istniejàca o 3 przewodach, na dwa
wywo∏ania

4
Audio-Kit
1
2
CLACK
2
1
1
2
31
176
98
max ø 5mm
cm
160 ÷ 165
1
2
3
BUS

5
1
2
160÷165cm
3
2
1
215
45
90
65
3
2
1
3
2
1
ø 5 mm
3
2
1
1
2
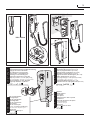
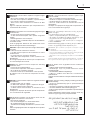
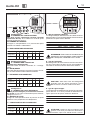
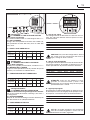
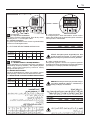
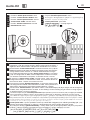
regolazione suoneria ed esclusione
Ruflautstärkeregrlung und Rufabschaltung
réglage sonnerie et exclusion
bell adjustment and exclusion
ajuste timbre y deshabilitación
afstelling en uitschakeling bel
regulação campainha e exclusão
rùumish koydoynioù kai ejaìreshz
htuekbhjdfybt pdjyrf b jnrk.xtybt
alarm ayarlama ve hariç bırakma
regulacja dzwonka i wytàczen
3
2
1
pulsanti programmabili (O-1-2-3)
Programmierbare
Tasten (O-1-2-3)
touches programmables (O-1-2-3)
programmable pushbuttons (O-1-2-3)
pulsadores programables O-1-2-3)
programmeerbare drukknoppen (O-1-2-3)
Botões programáveis (O-1-2-3)
programmatiwòmena koympià (O-1-2-3
)
ghjuhfvvbhetvst ryjgrb |)-!-@-#\
programlanabilir butonlar (O-1-2-3)
przyciski mo˝liwe do zaprogramowania (O-1-2-3)
apriporta
Türöffnertaster
ouvre-porte
door opener
dispositivo para abrir la puerta
deuropener
comando de abertura da porta
Anoigma pòrtaz
jnrhsnbt ldthb
kapı açma
przycisk otwarcia drzwi
led di segnalazione
Anzeigelampe
led de signalisation
signalling LED
led de señalización
lndicatieled
led de sinalização
Fvteinç éndeijh katàdeijhz
cbuyfkmyst bylbrfnjhs
sinyal ledi
dioda sygnalizacyjna
I
D
F
GB
E
NL
GR
P
RU
TR
PL
I
D
F
GB
E
NL
GR
P
RU
TR
PL
I
D
F
GB
E
NL
GR
P
RU
TR
PL
I
D
F
GB
E
NL
GR
P
RU
TR
PL

6
Audio-Kit
15 BUS
M
O
D
N P
OFF ON
ET
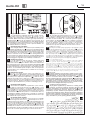
sede configuratori
Sitz der Konfiguratoren
logement configurateurs
configurator seat
alojamiento configuradores
plaats van de configuratiemodules
Alojamento configurador
uésh prosarmostèn
Ruytplj lkz rjyabuehfnjhjd
konfigüratörler yuvası
gniazdo konfiguratorów
morsetti di collegamento
Ve
rbindungsklemmen
bornes de raccordement
connecting terminals
bornes de conexión
aansluitklemmen
bornes de ligação
akrodéktez sùndeshz
cjtlbybntkmyst rktvvs
ba¤lantı terminalleri
zaciski potàczeniowe
I
D
F
GB
E
NL
GR
P
RU
TR
PL
I
D
F
GB
E
NL
GR
P
RU
TR
PL
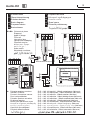
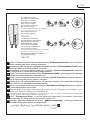
In impianti audio non è necessario selezionare
lo switch. In impianti misti audio/video spostare
su ON solo nell’ultimo citofono della tratta di ogni
appartamento e di ogni montante.
In Audioanlagen muss der Switch-Schalter nicht
gewählt werden. In gemischten Audio/Videoanlagen
den Schalter nur am letzten Haustelefon jeder Wohnun
-
gsanlage und jeder Steigleitung auf ON zu stellen.
Sur installations audio il n’est pas nécessaire de
sélectionner le “switch”. Sur installations mixtes
audio et vidéo, déplacer sur ON (MARCHE) seule
-
ment dans le dernier phone du parcours de chaque
appartement ou de chaque colonne montante.
In audio systems it is not necessary to select the
switch. In mixed audio/video systems move to ON
only in the last internal unit of the stretch of each
apartment or each riser.
En sistemas audio no es necesario seleccionar el
interruptor. En sistemas mixtos Audio/Vídeo mueva
a ON sólo el último interfono de la trama de cada
departamento o de cada montante.
Bij audio-installaties is het niet nodig om de schake-
laar op ON te zetten. Bij audio/video-installaties zet u
slechts bij de laatste huistelefoon van iedere apparte
-
mentlijn en iedere stijglijn de schakelaar op ON.
Em sistemas áudio não é preciso seleccionar o
interruptor. Em sistemas misto áudio/vídeo desloque
para ON somente no último intercomunicador do tre
-
cho de cada apartamento ou de cada montante.
Se hxhtikéz egkatastàseiz den eìnai aparaìthto
na epilexueì to switch. Se miktéz hxhtikéz/op
-
tikéz egkatastàseiz metatopìste sto ON mòno
sto teleytaìo uyrothléfvno thz diadromçz kàue
diamerìsmatoz kai kàue sthrìgmatoz.
D felbjcbcntvf[ ds,bhfnm gthtrk.xfntkm yt nht,etncz
D cvtifyys[ felbj.dbltj cbcntvf[ gthtdtcnb
vbrhjdsrk.xfntkm yf ON |DRK\ njkmrj yf gjcktlytv
ljvjajyt wtgb rf;ljq rdfhnbhs b rf;ljq cnjqrb7
Audio tesislerde switch’i seçmek gerekli de¤ildir.
Audio/video’nun birlikte oldukları tesislerde sadece
her daire ve her taflıma kolonu hattının son dahili
ünitesini ON üzerine getirin.
W systemach audio wybranie przetàcznika nie jest
konieczne. W systemach mieszanych audio /wideo
przesunàç na ON tylko w ostatnim domofonie
odcinka ka˝dego mieszkania i ka˝dej kolumny.
I
NL
F
GR
GB
P
E
D
RU
TR
PL

7
I
NL
F
GR
GB
P
E
D
Attenzione: il citofono deve rispettare le seguenti regole
installative:
- deve essere installato solo in ambienti interni
-
non deve essere esposto a stillicidio o a spruzzi d’acqua
- non ostruire le aperture di ventilazione
- deve essere usato unicamente su sistemi 2 fili SCS
BTicino.
Ogni uso improprio dell’articolo puó comprometterne le
caratteristiche di sicurezza.
Atenção: o intercomunicador deve respeitar as seguintes regras
para ser instalado:
- deve ser instalado somente internamente
- não deve ser exposto a estilicídio ou borrifos de água
- não deve obstruir as aberturas de ventilação
- deve ser usado somente em sistemas de 2 fios da
SCS BTicino.
Qualquer uso impróprio do artigo pode comprometer as
suas características de segurança.
Achtung: die Hausstation muss unter Beachtung folgender Regeln
installiert werden:
- es darf nur im Inneren installiert werden
- es darf nicht Wassertropfen oder -spritzer ausgesetzt
werden
- Belüftungsschlitze nicht verstopfen
- Es darf nur mit “2--Draht-Bus-System” der SCS BTicino
verwendet werden.
Jeder ungeeigneter Gebrauch des Geräts kann seine
Sicherheitseigenschaften beeinträchtigen.
Prosoxç: h syskeyç endoepikoinvnìaz me bìnteo
prépei na threì
toyz akòloyuoyz kanònez egkatàstashz:
- prépei na egkatastaueì mòno se kleistò xèro
-
den prépei na ektìuetai se stàjimo ç pitsiliéz neroù
- mhn boylènete ta anoìgmata ejaerismoù
-
prépei na xrhsimopoihueì apokleistikà se systçmata 2
kalvdìvn SCS BTicino.
Kàue akatàllhlh xrçsh toy eìdoyz mporeì na uései se
kìndyno ta xarakthristikà asfaleìaz toy.
Attention: le phone doit respecter les règles d’installation
suivantes:
- il doit être monté seulement à l’intérieur
- il ne doit pas être exposé à des suintements ou à des
éclaboussures
- ne pas boucher les ouvertures d’aération
- il doit être utilisé uniquement sur des systèmes 2 fils
SCS BTicino.
Tout usage impropre de la référence peut compromettre
les caractéristiques de sécurité.
Caution: the internal unit must respect the following
installation rules:
- it must only be installed indoors
- it must not be exposed to water drops or splashes
- do not block the ventilation openings
- it must be used only on SCS BTicino 2-wire systems
An improper use of the item can compromise its safety
features
Atención: el interfono debe respetar las siguientes normas
de instalación:
- se debe instalar sólo al cubierto
- no debe estar expuesto a goteo o salpicones de agua
- no tape las aberturas de ventilación
- se debe utilizar exclusivamente en sistemas 2 hilos
SCS BTicino.
Cualquier uso impropio del artículo puede comprometer
sus características de seguridad.
Let op: Bij de installatie van de telefoon moet men de
volgende voorschriften in acht nemen:
- binnenshuis installeren
- niet aan waterdruppels en -stralen blootstellen
- de ventilatieopeningen niet versperren
- uitsluitend in 2-dradige SCS BTicino systemen instal
-
leren
Ieder oneigenlijk gebruik kan de veiligheid van het product
schaden.
RU
TR
PL
DYBVFYBT5 Ghb ecnfyjdrt ljvjajyf cj,k.lfnm cktle.
obt ghfdbkf5
- ecnfyfdkbdfnm njkmrj dj dyenhtyyb[ chtlf[
- ljk;ty ,snm pfoboty jn gjgflfybz rfgtkm bkb ,hspu djls
- yt pfrhsdfnm dtynbkzwbjyyst jndthcnbz
- ghbvtyznm njkmrj lkz lde[ghjdjlys[ cbcntv SCS BTi
-
cino.
Bcgjkmpjdfybt ghb,jhjd yt gj yfpyfxtyb. vj;tn ytufnb-
dyj jnhfpbnmcz yf b[ [fhfrnthbcnbrf[ ,tpjgfcyjcnb7
Dikkat: dahili ünite afla¤ıdaki kurma kurallarına
uymalıdır:
- sadece kapalı ortamlara kurulmalıdır
- damlamaya veya su püskürtmelerine maruz
bırakılmamalıdır
- havalandırma deliklerini kapatmayın
- sadece 2 kablolu SCS BTicino sistemlerinde
kullanılmalıdır.
Ürünün her farklı kullanımı emniyet özelliklerini tehlikeye
atabilir.
Uwaga: domofon nale˝y podtàczyç wedtug poni˝szych
zasad instalacji:
- mo˝e byç zainstalowany tylko w pomieszczeniach
wewn´trznych
- nie mo˝e byç nara˝ony na bryzgi lub krople wody
- nie mo˝e zastaniaç otworów wentylacyjnych
- musi byç u˝yty wytàcznie w systemach 2-przewodowych
SCS Bticino.
Ka˝de niewtaÊciwe zastosowanie produktu mo˝e wy
-
stawiç na ryzyko jego cechy bezpieczeƒstwa.

8
Audio-Kit
N
P T
S
12BUS
BUS
ET
1
5
BUS
PL
S+
S-
A
346000
230Va.c.
B1
3
2
1
BUS
ET
1
5
B2
3
2
1
N
P
MOD
N
P
MOD
1
2 1
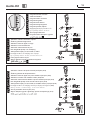
A= Pulsante apertura serratura
Schalter Türöffner
Poussoir d’ouverture serrure
Door lock pushbutton
Pulsador apertura cerradura
Drukknop opening
Botão para abertura do trinco
Koympì anoìgmatoz kleidariàz
Ryjgrf jnrhsnbz pfvrf
Kapı kilidi açma dü¤mesi
Przycisk otwarcia zamka
Schema base
Übersichtszeichnung
Schéma de base
Basic diagram
Esquema básico
Basisschema
I
NL
F
GB
E
D
GR
P
RU
TR
PL
Esquema de base
Hlektrikò sxediàgramma
<fpjdfz c[tvf
Temel flema
Schemat podstawowy
B1+B2= Chiamata al piano
Etagenruf
Appel à l’étage
Floor call
Llamada al piso
Oproep aan verdieping
Chamada ao piso
Klçsh ston òrofo
Dspjd yf nf;
Katta arama
Wywo∏anie na pi´trze
S+S- = 18V - 4A impulsivi - 250mA mantenimento (30Ω max)
S+S- = 18V - 4A impulsstrom - 250mA Haltestrom (30Ω max)
S+S- = 18V - 4A impulsifs - 250mA entretien (30Ω max)
S+S- = 18V - 4A impulsive - 250mA holding current (30Ω max)
S+S- = 18V - 4A impulsivos - 250mA mantenimiento (30Ω max)
S+S- = 18V - 4A impulsief - 250mA onderhoud (30Ω max)
S+S- = 18V - 4A instantâneos - 250mA continuos (30Ω max)
S+S- = 18V - 4A palmikà - 250mA diatçrhshz (30Ω max)
S+S- = !*D - $F bvgekmcyst - @%)vF gjllth;fybt (30Ω max)
S+S- = 18V - 4A empülsiyonlu - 250mA muhafaza (30Ω max)
S+S- = 18V - 4A impulsowe - 250mA utrzymanie (30Ω max)

9
Installare e collegare gli apparecchi come indicato nello schema.
Assicurarsi che durante le operazioni di montaggio degli apparecchi
l’alimentatore non sia collegato alla rete pubblica.
L’alimentatore non deve essere esposto a stillicidio o spruzzi
d’acqua.
Non ostruire le aperture di ventilazione dell’alimentatore.
Prima di alimentare l’impianto verificare l’esattezza del cablaggio
ed accertarsi che la tensione di rete sia compatibile con quella
dell’alimentatore.
Posare i cavi seguendo lo schema riportato nelle pagine precedenti
in cui è indicato il numero dei cavi da predisporre e la dislocazione
fisica degli apparecchi che compongono l’impianto.
La tabella seguente indica la sezione minima dei cavi in funzione della
distanza tra posto esterno e posto interno.
Die Gerate laut Plan montieren und anschlieBen.
Bei der Montage der Gerate darf das Netzgerat nicht am Niederspan
-
nungsnetz angeschlossen sein.
Das Speisegerat darf nicht Tropfwasser oder Wasserspritzer au
-
sgesetzt werden.
Beluftungsschlitze des Speisegerats nicht verstopfen.
Bevor die Anlage mit Strom versorgt wird, sollte kontrolliert werden,
ob die Verkabeluna richtig vorgenommen wurde. Frufen Sie bitte
die Anschlusswerte
des Netzgerates mit der Netzspannung.
Bitte beachten Sie die Nummerierung der Drahte auf beigefugtem
Schaltplan.
Nachstehende Tabelle gibt den Mindestwert des Leiterquerschnitts in
Funktion “der Enffernung zwischen Tür- und Hausstation” an.
Poser les câbles d’après le schéma qui se trouve dans les pages
précédentes, sur lequel est indiqué le nombre de cables à placer et la
localisation physique des appareils qui forment l’installation.
L’alimentation ne doit etre exposée ni à stillation ou à pulvérisations
d’eau.
Ne pas boucher les ouvertures d’aération de l’alimentation.
Le tableau suivant indique la section minimale des cables en fonction
de la distance entre le poste externe et le poste interne.
Monter et brancher les appareils comme indiqué sur le schéma.
S’assurer que pendant les opérations d’installation des appareils
l’alimentation n’est pas raccordée au réseau public.
Avant d’alimenter l’installation, vérifier que le cablage est correct
et s’assurer que la tension du réseau est compatible avec celle de
l’alimentation.
Install and connect the devices as indicated in the diagram.
Make sure that when the devices are mounted the power supply is
not connected to the public electric power line.
The power supply must not be exposed to dripping water or
splashes.
Do not block the power supply ventilation openings.
Before energizing the installation chech that cabling is correct and
make sure that line voltage is compatible with power supply voltage
Lay cables according to diagram shown in the previous pages, which
indicates the number of cables to be arranged and the layout of devices
that make up the installation.
The table below shows the minimum conductor cross-section accor
-
ding to the distance between inside and outside station.
Instalar y conectar los aparatos como se indica en el esquema. Ase-
gurarse de que durante las operaciones de montaje de los aparatos,
el alimentador no está conectado a la red pública.
El alimentador no debe estar expuesto a goteo o salpicones de
agua.
No tape las aberturas de ventilación del alimentador.
Antes de alimentar la instalación, comprobar que el cableado es
correcto y asegurarse de que la tensión de red es compatible con
la del alimentador.
Colocar los cables siguiendo el esquema que se da en las páginas
anteriores en las que se ha indicado el número de los cables que
hay que predisponer y la colocación fisica de los aparatos que
componen la instalación.
O La tabla siguiente indica la sección minima de los cables en función
de la distancia entre la unidad exterior y la unidad interior.
Leg de kabels aan volgens het schema op de volgende bladzijden
waarin het nummer van de kabels en de plaatsing van de apparaten
is aangegeven.
De voeding mag niet worden blootgesteld aan waterdruppels of
-stralen.
Niet de ventilatieopeningen van de voeding versperren.
In de volgende tabel zijn de minimumdoorsneden van de kabels bij
verschillende afstanden tussen de binnenplaats en de buitenplaats
vermeld.
Installeer en verbind de apparatuur zoals aangegeven in het schema.
Vergewis u ervan dat de voeding niet op het lichtnet is aangesloten
tijdens de installatie.
Controleer voordat u de installatie aansluit op het lichtnet of de
bekabeling goed is aangelegd en of de netspanning geschikt is
voor de voeding.
Instalar e ligar os aparelhos conforme indicado no esquema.
Assegurar-se de que durante as opera,cóes de montagem dos
aparelhos, o alimentador nao está ligado à rede pública.
O alimentador nao deve ser exposto a estililicídio ou a borrifos
de água.
Não obstrua as aberturas de ventila,cáo do alimentador.
Antes de ligar a corrente na instalaçao verificar se os cabos sao
correctos e certificar-se de que a tensao de rede é compativel
com a do alimentador.
Colocar os cabos se~quindo o esquema das páginas anteriores
onde se indica o número dos cabos a preparar e a disposicao
fisica dos aparelhos que formam o sistema.
A tabela abaixo indica a secçao minima dos cabos em funçáo da
distància entre a unidade exterior e a unidade interior.
Topouetçste kai syndéste tiz syskeyéz òpvz ypodeiknùetai
sto sxçma. Bebaivueìte pvz sth diàrkeia tvn xeirismèn to
-
pouéthshz tvn syskeyèn to trofodotikò den eìnai syndeméno
sto dìktyo toy reùmatoz. To trofodotikò den prépei na
ektìuetai se stàjimo ç pitsiliéz neroù.
Mhn boylènete ta anoìgmata ejaerismoù toy trofodotikoù.
Prin thn paroxç reùmatoz sthn egkatàstash elégjte thn
oruòthta thz kalvdìvshz kai bebaivueìte pvz h tàsh reùma
-
toz toy diktùoy eìnai symbatç me aytç toy trofodotikoù.
Topouetçste ta kalèdia akoloyuèntaz to sxçma poy ana
-
gràfetai stiz prohgoùmenez selìdez stiz opoìez ypodeiknùe
-
tai o ariumòz tvn kalvdìvn poy prépei na prodiateuoùn kai h
fysikç diàtajh tvn syskeyèn poy apoteloùn thn egkatàstash.
O epòmenoz pìnakaz ypodeiknùei thn elàxisth diatomç tvn
kalvdìvn bàsei thz apòstashz anàmesa sto ejvterikò kai
sto esvterikò shmeìo.
Ecnfyjdbnm b gjlcjtlbybnm fggfhfnehe cjukfcyj c[tvs7
Cktlbnm pf ntv6 xnj,s dj dhtvz c,jhrb fggfhfnehs ,kjr gbn
-
fybz yt ,sk gjlrk.xty r cbcntvs
ktrnhbxtcrjuj cyf,;tybz7
Yt jcnfdkznm ,kjr gbnfybz ytpfobotyysv jn ghjcfxbdfybz
dkfub bkb gjgflfybz djls.
Yt pfrhsdfnm dtynbkzwbjyyst jndthcnbz ,kjrf gbnfybz7
Gthtl ntv6 rfr gjlrk.xbnm fggfhfnehe r ctnb gbnfybz6
ghjdthbnm ghfdkmyjcnm dsgjkytybz ghjdjlrb b cjjndtncndbt
yfghz;tybz ctnb
ktrnhbxtcrjuj cyf,;tybz njrjdsv [fhfrn-
thbcnbrfv ghb,jhf7
ktrnhjghjdjlre cktletn dsgjkyznm d
cjjndtncndbb c erfpfyyjq yf ghtleleob[ cnhfybwf[ c[tvjq6
d rjnjhs[ erfpfyj rjkbxtcndj ytj,[jlbvs[ ghjdjlybrjd6
f nfr;t abpbxtcrjt hfpvtotybt rjvgktrne.ob[ ghb,jhjd
cbcntvs7 D yb;tghbdtltyyjq nf,kbwt erfpfyj vbybvfkmyjt
ctxtybt ghjdjlybrjd d pfdbcbvjcnb jn hfccnjzybz vt;le
dyenhtyytq b dytiytq njxrfvb7
Cihazları flemada gösterildi¤i gibi kurunuz ve ba¤layınız. Cihazların
montaj ifllemlerinin gerçeklefltirilmesi esnasında, besleyicinin genel
flebekeye ba¤lı olmadı¤ını kontrol ederek emin olunuz.
Besleyici su damlamaları veya püskürmelerine maruz
kalmamalıdır.
Besleyicinin havalandırma açıklıklarını tıkamayınız.
Tesise elektrik vermeden önce kablo ba¤lantılarının do¤rulu¤unu
kontrol ediniz ve flebeke geriliminin besleyici gerilimine uygun
oldu¤undan emin olunuz. Kabloları, hazır edilmesi gereken
kablo sayısının ve tesisi oluflturan cihazların fiziki yerleflimlerinin
gösterildi¤i, önceki sayfalarda bulunan flemaya uygun olarak
döfleyiniz. Afla¤ıdaki tablo, dıflardaki ve içerdeki nokta arasındaki
mesafeye göre kabloların minimum kesitini göstermektedir.
Zainstalowaç i po∏àczyç aparaty wed∏ug wskazówek podanych
na schemacie. Dopilnowaç, by podczas czynnoÊci zwiàzanych z
monta˝em aparatów zasilacz nie by∏ pod∏àczony do sieci u˝ytku
publicznego. Zasilacz nie powinien byç nara˝ony na bryzgi ani
krople wody. Nie zas∏aniaç otworów wentylacyjnych zasilacza.
Przed pod∏àczeniem zasilania do instalacji sprawdziç czy oka
-
blowanie jest prawid∏owe i upewniç si´ co do kompatybilnoÊci
napi´cia sieci z napi´ciem zasilacza. K∏aÊç kable ÊciÊ∏e wed∏ug
podanego na poprzednich stronach schematu, na którym jest
wskazana liczba wymaganych kabli oraz rozmieszczenie korpu
-
sów poszczególnych aparatów wchodzàcych w sk∏ad systemu.
Poni˝sza tabela zawiera dane dotyczàce minimalnego przekroju
kabli w zale˝noÊci od odleg∏oÊci dzielàcej punkt zewn´trzny od
wewn´trznego.
I
NL
F
GR
GB
P
E
D
RU
TR
PL

10
Audio-Kit
A
CB
3
2
1
A
B
C
610m
290m
320m
BTicino
336904
0,28mm
2
380m
200m
180m
400m
210m
190m
BTicino
L4669
0,35mm
2
1000m
580m
560m
1mm
2
0,28
BTicin
o
art.336904
1
100m
30m
50m
30m
D
Sezione cavi (mm
2
)
Kabelschnitt (mm
2
)
Section câbles (mm
2
)
Cable section (m
m
2
)
Sección cables (m
m
2
)
Doorsnede sleutels (m
m
2
)
Secção cabos (m
m
2
)
Diatomç kalvdìvn
(mm
2
)
Ctxtybt rf,tkz
(mm
2
)
Kablo seksiyonu (mm
2
)
Przekrój kabl
i (mm
2
)
BTicino
art.L4669
0,50 0,35
D

11
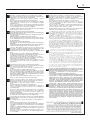
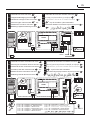
Il collegamento degli apparecchi è di tipo non
polarizzato. L’impiego di conduttori con sezioni
diverse da quelli prescritti, non garantisce il cor-
retto funzionamento dell’impianto.
A conexão dos aparelhos é do tipo não
polarizado.
O emprego de condutores com secções
diferentes das prescritas, não garante
que a instalação funcione correctamente.
Der Anschluss der Geräte ist des nicht gepolten
Typs.
Der Einsatz von Leitern mit einem anderen Schnitt
als vorgeschrieben, gewährt nicht den einwand
-
freien Betrieb.
Le raccordement des appareils est de type
non
polarisé. L’emploi de conducteurs de sections
différentes de celles prescrites ne garantit pas le
bon fonctionnement de l’installation.
The device connection is unpolarised. The use of
conductors with cross-sections different from tho
-
se specified does not guarantee correct working
of the system.
La conexión de aparatos es de tipo no polari-
zado.
El uso de conductores con secciones diferentes
de las indicadas no asegura el funcionamiento
correcto del sistema.
De aansluiting van de toestellen is van het type
niet gepolariseerd.
Het gebruik van geleiders met doorsneden die
verschillen van diegene die voorgeschreven
zijn, garandeert de correcte werking van de
installatie niet.
H sùndesh tvn syskeyèn eìnai mh polvménoy
tùpoy.
H xrçsh agvgèn me diatoméz diaforetikéz apò
tiz prodiagrafòmenez, den eggyàtai th svstç
leitoyrgìa thz egkatàstashz.
Nbg gjlrk.xtybz fggfhfnjd
- ytgjkzhbpjdfyysq7
Ghbvtytybt ghjdjlybrjd lheujuj ctxtybz6 gj
chfdytyb. c ghtlgbcfyysvb 6yt ufhfynbhetn
yflkt;foe. hf,jne cbcntvs7
Cihazların ba¤lantısı polarize olmayan tiptir.
Öngörülenlerden farklı kesitli kondüktörlerin
kullanımı, tesisin do¤ru ifllemesini garanti
etmez.
Potàczenie aparatów jest typu nie
spolaryzowanego.
Zastosowanie przewodów o innym przekroju
ni˝ zalecany nie gwarantuje prawidtowego
funkcjonowania instalacji.
I
F
D
NL
GB
E
GR
RU
TR
PL
P

12
Audio-Kit
0= aucun
configurateur
1 2 3 4 5 6 7
1 sec. 2 sec. 3 sec.
comme
poussoir
6 sec. 8 sec. 10 sec.
4 sec.
numéro du configurateur
S - type de signal d’appel
La configuration de S détermine la tonalité de l’appel des
postes internes. Il est ainsi possible de différencier les
appels provenant de postes extérieurs différents.
Configurateur 0 2 3
Deux tons Un tonDeux tonsType de sonnerie
1
Deux tons
1200Hz 1200Hz1200Hz1200Hz
0Hz 2400Hz600Hz
ATTENTION: Chaque fois que l’on modifie la confi-
guration, il faut retirer, puis redonner l’alimentation à
l’installation, après avoir attendu environ 1 minute.
Configurateur:
P = NUMERO DU POSTE EXTERIEUR
Ne doit pas être configuré (sauf extensions éventuel
-
les du kit). Si l’on utilise un deuxième poste extérieur,
configurer avec P = 1.
N = NUMERO D’APPEL
Assigne la correspondance entre le poussoir du poste
extérieur et les parlophones ou vidéophones.
T = TEMPORISATEUR RELAIS SERRURE
0= kein
Konfigurator
1 2 3 4 5 6 7
1 Sek. 2 Sek. 3 Sek.
Wie
Taste
6 Sek. 8 Sek. 10 Sek.
4 Sek.
Konfiguratornummer
S - Typ des Rufsignals
Die Konfiguration von S kennzeichnet den Ton eines Rufes
von einer Hausstation. Die Rufe, die von unterschiedlichen
Türstationen eintreffen, können differenziert werden.
Konfigurator 0 2 3
Zweiton EintonZweitonTonart
1
Zweiton
1200Hz 1200Hz1200Hz1200Hz
0Hz 2400Hz600Hz
ACHTUNG: Jedes Mal, wenn die Konfiguration
geändert wird, den Strom abschalten, etwa 1
Minute warten und dann wieder einschalten.
Konfigurationsgerät:
P = NUMMER DER TÜRSTATION
Benötigt keine Konfiguration.
Wird eine zweite Türstation verwendet, P = 1 konfigu
-
rieren.
N = RUFNUMMER
Dient der Übereinstimmung zwischen Taste der Türsta
-
tion und Haustelefone oder Videohaustelefone.
T = ZEITGEBER SCHLOSSRELAIS
0= nessun
configuratore
1 2 3 4 5 6 7
1 sec. 2 sec. 3 sec.
come
pulsante
6 sec. 8 sec. 10 sec.
4 sec.
numero del configuratore
S - tipo di segnale di chiamata
La configurazione di S determina il tono della chiamata
dei posti interni. É così possibile differenziare le chiamate
provenienti da posti esterni differenti.
Configuratore 0 2 3
Bitonale MonotonaleBitonaleTipo di suoneria
1
Bitonale
1200Hz 1200Hz1200Hz1200Hz
0Hz 2400Hz600Hz
ATTENZIONE: Tutte le volte che si modifica la con-
figurazione è necessario togliere e ridare l’alimenta
-
zione all’impianto, attendendo circa 1 minuto.
Configuratore:
P= NUMERO DEL POSTO ESTERNO
Non deve essere configurato (eccetto eventuali
espansioni del kit). Se si utilizza un secondo posto
esterno configurare con P=1.
N= NUMERO DI CHIAMATA
Assegna la corrispondenza tra il pulsante del posto
esterno ed i citofoni o videocitofoni.
T= TEMPORIZZATORE SERRATURA
I
F
D

13
0= geen
configurator
1 2 3 4 5 6 7
1 sec. 2 sec. 3 sec.
als de
drukknop
6 sec. 8 sec. 10 sec.
4 sec.
Configurator nummer
S - tiype oproepsignaal
De configuratie van S bepaalt de beltoon van oproepen vanuit
de binnenposten. Het is dus mogelijk om de oproepen van de
binnenposten te kenmerken door verschillende beltonen.
Configurator 0 2 3
Tweetonig EentonigTweetonigType belgeluid
1
Tweetonig
1200Hz 1200Hz1200Hz1200Hz
0Hz 2400Hz600Hz
LET OP: Na iedere wijziging in de configuratie
moet de installatie ongeveer 1 minuut van het
elektriciteitsnet worden afgesloten.
Configuratiemodule:
P = NUMMER VAN HET DEURSTATION
Het deurstation hoeft niet geconfigureerd te worden.
Als er een tweede deurstation aanwezig is, dit met P =
1 configureren.
N = OPROEPNUMMER
Bepaalt de overeenstemming tussen de drukknop van
het deurstation en de (video)huistelefoon.
T = TIMER DEURSLOTRELAIS
0= ningun
configurador
1 2 3 4 5 6 7
1 seg. 2 seg. 3 seg.
come
pulsador
6 seg. 8 seg. 10 seg.
4 seg.
Numero del configurador
S - tipo de señal de llamada
La configuración de S determina el tono de la llamada de
los puestos interiores. Es posible así diferenciar las lla
-
madas procedentes de puestos exteriores diferentes.
Configurador 0 2 3
Bitonal MonotonalBitonalTipo de timbre
1
Bitonal
1200Hz 1200Hz1200Hz1200Hz
0Hz 2400Hz600Hz
ATENCIÓN: Cada vez que modifica la confi-
guración, es necesario cortar y volver a dar
alimentación a la instalación, después de esperar
aproximadamente 1 minuto.
Configurador:
P = NÚMERO DEL PUESTO EXTERIOR
No se debe configurar.
Si utiliza un segundo puesto exterior, establezca P = 1.
N = NÚMERO DE LLAMADA
Asigna la correspondencia entre el pulsador del puesto
exterior y los interfonos o vídeointerfonos.
T = TEMPORIZADOR RELÉ CERRADURA
0= no
configurator
1 2 3 4 5 6 7
1 Sec. 2 Sec. 3 Sec.
As
pushbutton
6 Sec. 8 Sec. 10 Sec.
4 Sec.
Number of the configurator
S - type of call signal
The configuration of S determines the internal unit call
tone. The calls from different entrance panels can thus
be differentiated.
Configurator 0 2 3
Two-tone One-toneTwo-toneType of bell
1
Two-tone
1200Hz 1200Hz1200Hz1200Hz
0Hz 2400Hz600Hz
CAUTION: Every time the configuration is altered
the system must be switched off and back on
again, waiting for about 1 minute.
Configurator:
P = NUMBER OF THE OUTDOOR STATION
Must not be configured.
If a second outdoor station is used configure with P = 1.
N = CALL NUMBER
Assigns the correspondence between the outdoor sta
-
tion pushbutton and the door entry units or video door
entry units.
T = DOOR LOCK TIMER RELAY
NL
GB
E

14
Audio-Kit
0= ,tp
rjyabuehfnjhf
1 2 3 4 5 6 7
1 c7
2
c7
3
c7
Rfr
ryjgrf
6
c7
8
c7
10
c74 c7
yjvth rjyabuehfnjhf
S - nbg cbuyfkf dspjdf
Rjyabuehfwbz
S pflftn njy dspjdf lkz dyenhtyyb[
njxtr7 Nfrbv j,hfpjv vj;yj hfpkbxfnm dspjds6
gjcnegf.obt c hfpys[ yfhe;ys[ njxtr7
Lde[njyfkmysq
Rjyabuehfnjh 0 2 3
Lde[njyfkmysq JlyjnjyfkmysqLde[njyfkmysqNbg pdjyrf
1
1200Hz 1200Hz1200Hz1200Hz
0Hz 2400Hz600Hz
DYBVFYBT5 gjckt k.,jq vjlbabrfwbb rj-
yabuehfwbb ytj,[jlbvj j,tcnjxbnm cbcntve
ghbvthyj yf ! vbyene7
Rjyabuehfnjh5
P‚ YJVTH DYTIYTUJ <KJRF
Dytiybq ,kjr yt nht,etn rjyabuehfwbb 7 D
ckexft bcgjkmpjdfybz dnjhjuj dytiytuj ,kjrf
crjyabuehbhjdfnm H‚!7
N
‚ YJVTH DSPJDF
Pflftn cjjndtncndbt vt;le ryjgrjq dytiytuj ,kjrf b
felbj3dbltjljvjajyfvb7
T
‚ HTKT DHTVTYB PFVRF
0= kanénaz
diamorfvtçz
1 2 3 4 5 6 7
1
deyt
. 2
deyt
. 3
deyt
.
S t à m p a
plçktroy
6
deyt
. 8
deyt
. 10
deyt
.
4 deyt.
Ariumòz thz diamòrfvshz
S - tùpoz sçmatoz klçshz
H diamòrfvsh toy
S kauorìwei ton tòno thz klçshz
tvn esvterikèn shmeìvn. Kat’ aytòn ton tròpo eìnai
dynatç h diaforopoìhsh tvn klçsevn poy proérxon
-
tai apò diaforetikà ejvterikà shmeìa.
Diploù tònoy
Diamòrfvsh
0 2 3
Diploù tònoy Monoù tònoyDiploù tònoyTùpoz hxhtikoù sçmatoz
1
1200Hz 1200Hz1200Hz1200Hz
0Hz 2400Hz600Hz
PROSOXH: Kàue forà poy tropopoieìtai h
diamòrfvsh eìnai aparaìthto na kòcete kai
na epanaférete thn trofodòthsh sthn egkatà
-
stash, anaménontaz perìpoy 1 leptò.
Diamorfvtçz:
P = ARIUMOS TOY EJVTERIKOY SHMEIOY
To ejvterikò shmeìo den prépei na eìnai diamorfvméno.
Eàn xrhsimopoieìtai éna deùtero ejvterikò shmeìo
diamorfènete me R = 1.
N
= ARIUMOS KLHSHS
Apodìdei thn antistoixìa metajù toy koympioù toy
ejvterikoù shmeìoy kai tvn uyrothléfvnvn ç bìnteo-
uyrothléfvnvn
T
= XRONODIAKOPTHS RELE KLEIDARIAS
0= nenhum
configurador
1 2 3 4 5 6 7
1 seg. 2 seg. 3 seg.
como
botão
6 seg. 8 seg. 10 seg.
4 seg.
Numero do configurador
S - tipo de sinal de chamada
A configuração de S determina o tom da chamada das
unidades internas. É possível então diferenciar as cha
-
madas provenientes de unidades externas diferentes.
Bitonal
Configurador 0 2 3
Bitonal UnitonalBitonalTipo de toque
1
1200Hz 1200Hz1200Hz1200Hz
0Hz 2400Hz600Hz
ATENÇÃO: Todas as vezes que se modificar
a configuração é necessário ligar e desligar a
instalação da energia eléctrica, esperando cerca
de 1 minuto.
Configurador:
P = NÚMERO DA UNIDADE EXTERNA
Não deve ser configurada. Se se utilizar uma segunda
unidade externa configure com P = 1.
N = NÚMERO DE CHAMADA
Determina a correspondência entre o botão da unidade
externa e os intercomunicadores ou intercomunicadores
vídeo.
T = TEMPORIZADOR DO RELÉ DA FECHADURA
GR
P
RU

15
0 2 31
1200Hz 1200Hz1200Hz1200Hz
0Hz 2400Hz600Hz
0= bez
konfiguratora
1 2 3 4 5 6 7
1
sek.
2
sek.
3
sek.
jak
przycisk
6
sek.
8
sek.
10
sek.4 sek.
numer konfiguratora
S - rodzaj sygna∏u wywo∏ania
Konfiguracja sygna∏u S okreÊla ton wywo∏ania punktów
wewn
´trznych. W ten sposób mo˝na rozró˝niç wywo∏ywania
pochodzàce z rozmaitych punktów zewn´trznych.
Dwutonowy
Konfigurator 0 2 3
Dwutonowy JednotonowyRodzaj dêwi´ku
1
Dwutonowy
1200Hz 1200Hz1200Hz1200Hz
0Hz 2400Hz600Hz
UWAGA: Za ka˝dym razem przy zmianie konfigu-
racji nale˝y instalacj´ od∏àczyç i odczekawszy 1
minut´ pod∏àczyç do zasilania.
Konfigurator:
P = NUMER PUNKTU ZEWN¢TRZNEGO
Punkt zewn´trzny nie wymaga konfiguracji (z wyjàtkiem
ewentualnej ekspansji zestawu). JeÊli u˝ywany b´dzie
tak˝e i drugi punkt zewn´trzny wówczas nale˝y
konfigurazowaç jako P=1.
N = NUMER WYWO¸ANIA
Oznacza wpó∏zale˝noÊç mi´dzy przyciskiem punktu
zewn´trznego i domofonami lub wideodomofonami.
T = REGULATOR CZASOWY PRZEKAZNIKA ZAMKA
0= konfi-
güratör yok
1 2 3 4 5 6 7
1
san.
2
san.
3
san.
tus
gibi
6
san.
8
san.
10
san.4 san.
Konfigüratör numarası
S - arama sinyali tipi
S konfigürasyonu, dahili ünitelerden arama tonunu
belirler. Bu flekilde farklı dıfl ünitelerden gelen aramaların
farklılafltırılması mümkündür.
Çift tonlu
Konfigüratör 0 2 3
Çift tonlu Tek tonluÇift tonluAlarm tipi
1
1200Hz 1200Hz1200Hz1200Hz
0Hz 2400Hz600Hz
D‹KKAT: Kon
fi
gürasyonun de
¤
ifltirildi
¤
i her defa,
tesisin beslemesini kesmek ve sonra yaklaflık 1
dakika bekleyerek yeniden beslemek gereklidir.
Konfigüratör:
P = DIfi MEVK‹ NUMARASI
Dıfl mevki kon
figüre edilmemelidir. ‹kinci bir dıfl mevki
kullanılıyorsa P = 1 ile kon
figüre ediniz.
N = ARAMA NUMARASI
Dıfl mevki tuflu ile dahili telefon sistemi veya dahili video
sistemi arasında ba¤lantı kurar.
T = K‹L‹TLEME RÖLES‹ ZAMAN AYARLAYICISI
TR
PL

16
Audio-Kit
Regolazione del volume:
Se si manifestasse il disturbo del fischio, (effetto Larsen),
ridurre prima la potenza del microfono , agendo con un
cacciavite sul potenziometro corrispondente, fino ad un livello
accettabile. Qualora il fenomeno persista, agire sul potenziometro
dell’altoparlante
in modo da eliminare l’inconveniente. Se il
volume è troppo basso, aumentare prima il volume dell’altoparlante
ed eventualmente anche quello del microfono, tenendo presente
che è preferibile una trasmissione chiara e priva di disturbi, che
una al limite dell’innesco (Larsen).
Regulação do volume:
Se se manifestar uma interferência no som (efeito de Lar-
sen), começar por diminuir a potência do microfone , rodando
o potenciómetro correspondente com uma chave de parafusos,
até obter um nível aceitável. Se o fenómeno persistir, regular o
potenciómetro do altifalante
de modo a eliminar o problema.
Se o volume estiver demasiado baixo, começar por aumentar o
volume do altifalante e depois, se necessário, o do microfone,
tendo presente que é melhor ter uma transmissão clara e sem
interferências, que uma no limiar de início de efeitos Larsen.
Einstellung der Lautstärke:
Beim etwaigen Auftreten eines Pfeiftones (Larsen-Effekt), zuerst
die Lautstärke des Mikrophones bis auf einen annehmbaren Wert
herabsetzen, indem man das entsprechende Potentiometer mit einem
Schraubendreher einstellt. Sollte die Störung weiterhin bestehen, dann
das Potentiometer des Lautsprechers
bis zur Beseitigung des
Pfeiftones einstellen. Ist die Lautstärke nun zu niedrig, dann zuerst
die des Lautsprechers und erst danach evtl. auch die des Mikrophones
erhohen, wobei ein deutlicher und störungsfreier Empfang einem an
der Störungsgrenze liegendem (Larsen-Effekt) vorzuziehen ist.
Réglage du volume:
Lors de sifflement (effet de Larsen), reduire d’abord la
puissance du micro , sur le potentiomètre correspondant, à
l’aide d’un tournevis, jusqu’à l’obtention d’un niveau satisfaisant.
Si le sifflement persiste, régler le potentiomètre du hautparleur
jusqu’à l’élimination de celui-ci. Si le volume est trop bas, augmen-
ter d’abord la puissance du haut-parleur et éventuellement celle
du micro, en considérant qu’une réception claire et sans parasite
est préférable à une communication à la limite de l’accrochage
(effet de Larsen).
Adjustment volume:
In case of a whistle (Larsen effect), first reduce the mi-
crophones power, adjusting the corresponding potentiometers
with a screw driver, until an acceptable level is reached. Should
the whistle persist, adjust the loudspeakers
volume in order to
eliminate the trouble. If the volume is too low level then, increase
first the potentiometer of the loudspeaker and secondly the one
for the microphone, bearing in mind that a clear and noise free
reception is preferable than one just before whistling (Larsen).
Regulación del volumen:
Si se manifesta el silbido de acoplamiento, (efecto Larsen),
reducir primero la potencia del micrófono , girando con un
destornillador el potenciómetro correspondiente, hasta obtener un
nivel aceptable. Si el fenómeno persistiera, regular el potenció-
metro del altavoz
hasta eliminar la interferencia. Si el volumen
es demasiado bajo, aumentar primero el volumen del altavoz y
eventualmente también el del micrófono, teniendo en cuenta que
es preferible una transmissión clara y limpia de interferencias, que
una al limite del acoplo (Larsen).
De geluidssterkte regelen:
Als er een fluittoon hoorbaar is (effect van Larsen): verminder
eerst het vermogen van de microfoon met behulp van een schroe-
vendraaier zijn stroomregelaar zo te regelen dat de geluidssterkte van
het gefluit aanvaardbaar is. Als het verschijnsel niet verdwijnt, dan
moet u ook de stroomregelaar van de luidspreker
bijstellen.
Als
de geluidssterkte nu te klein is, verhoog dan eerst de geluidssterkte van
de luidspreker en daarna eventueel ook die van de microfoon, en denk
er bij het bijstellen aan dat een duidelijk hoorbaar en ongestoord geluid
beter is dan een harder geluid op de grens van het Larsen effect.
Rùumish toy çxoy:
Eàn paroysiasteì h parenòxlhsh toy sfyrìgmatoz, (efé
Larsen), meièste prèta thn isxù toy mikrofènoy
, drèntaz
me éna katsabìdi sto antìstoixo potensiòmetro, méxri éna
apodektò epìpedo. Eàn to pròblhma paraménei, dràte sto po-
tensiòmetro toy hxeìoy
étsi èste na ejaleifteì h dysxéreia.
Eàn h éntash eìnai polù xamhlç, ayjçste prèta thn éntash
toy hxeìoy ki endexoménvz kai toy mikrofènoy, lambànontaz
ypòch òti eìnai protimòterh mia kauarç kai xvrìz paràsita
metàdosh, apò mìa sta òria toy kacìmatoz (Larsen).
Htuekbhjdfybt pderf5
D ckexft gjzdktybz cdbcnf |
aatrn Kfhctyf\ cyfxfkf
cybpbnm ehjdtym pderf vbrhjajyf , jnhtuekbhjdfd jn-
dthnrjq cjjndtncnde.obq gjntywbjvtnh lj ye;yjuj ehjdyz7
Tckb ltatrn yt bcxtpytn6 njulf jnhtuekbheqnt gjntywbjvtnh
pderjdjq rjkjyrb
lj gjkyjuj bcxtpyjdtybz cdbcnf7 Lkz
edtkbxtybz ehjdyz pderf cyfxfkf gjdscbnm ehjdtym pderf
pderjdjq rjkjyrb6 f gjnjv6 tckb gjnht,etncz6 nj b vbrhjajy6
exbnsdfz ghb njv6 xnj xbcnfz gthtlfxf ,tp gjvt[ ghtlgjxnbn-
tkmytt rfxtcnde pderf yf ghtltkmyjv ehjdyt |Kfhcty\7
Ses ayarı:
Çınlama paraziti ile karflılaflılması halinde (Larsen etkisi),
iliflkin potansiyometre üzerinde bir tornavida ile hareket ederek,
kabul edilebilir bir seviyeye kadar önce mikrofonun gücünü
azaltınız. Parazitin devam etmesi halinde, istenmeyen bu
durumu ortadan kaldıracak flekilde hoparlörün
potansiyome-
tresi üzerinde müdahalede bulununuz. Ses çok alçak ise, önce
hoparlörün sesini ve gerekirse mikrofonun sesini de yükseltiniz.
Bunu yaparken temiz ve parazitsiz bir yayının çınlama sınırında
bir yayına tercih edildi¤ini unutmayınız (Larsen).
Regulacja nat´˝enia dêwi´ku:
W przypadku pojawienia si´ zak∏óceƒ w rodzaju gwizdu
(efekt Larsena), zmniejszyç pierwszà potencj´ mikrofonu
dzia∏ajàc Êrubokr´tem na odpowiedni potencjometr , a˝ do
osiàgni´cia wymaganego poziomu. Gdyby nie zapewni∏o to
po˝àdanego wyniku, dzia∏aç na potencjometr gloÊnika, a˝ do
usuni´cia niepo˝àdanego efektu. W razie zbyt niskiego nat´˝enia
dêwi´ku nale˝y najpierw podnieÊç poziom g∏oÊnika, ewentualnie
tak˝e i poziom mikrofonu, uwzgl´dniajàc, i˝ lepszy jest przekaz
jasny i niezak∏ócony ni˝ na granicy gwizdka (Larsen).
I
F
D
NL
GB
E
GR
RU
TR
PL
P

17
Selezione suoneria
La suoneria di chiamata del citofono è selezionabile tra
16 differenti tipi di melodie. Si possono differenziare le
seguenti tipologie di chiamata:
• Chiamata al piano
• Chiamata da posto esterno principale
• Chiamata intercom
Selecção toques
Os toques de chamada do intercomunicador podem ser
seleccionados em 16 tipos de melodias diferentes. Po
-
dem ser diferenciados os seguintes tipos de chamada:
• Chamada ao piso
• Chamada da unidade externa principal
• Chamada Intercom
Läutwerk wählen
Für das Läutwerk der Rufe des haustelefons stehen 16
verschiedene Melodien zur Verfügung. Die Rufe können
folgendermaßen differenziert werden:
• Etagenruf
• Ruf von der Haupttürstation
• Intercom Anruf
Sélection sonnerie
La sonnerie d’appel du phone peut être sélectionnée par
-
mi 16 différents types de mélodies. On peut différencier
les typologies d’appel suivantes:
• Appel à l’étage
• Appel de poste extérieur principal
• Appel intercom
Bell selection
The door entry unit call bells can be selected from 16
different types of tune. The following types of call can
be differentiated:
• Call to the floor
• Call from main entrance panel
• Intercom Call
Selección del timbre
El timbre del llamada del interno fono se puede seleccio
-
nar entre 16 melodías diferentes. Es posible diferenciar
las siguientes tipologías de llamadas:
• Llamada a la planta
• Llamada desde puesta exterior principal
• Llamada interna
Beltoon kiezen
De oproepbeltoon van de telefoon biedt de keus uit 16
melodiën. Het is mogelijk om de volgende types oproe
-
pen te kenmerken:
• Oproep aan de verdieping
• Oproep vanuit het hoofddeurstation
• Intercom oproep
Epilogç hxhtikçz syskeyçz
To koydoùnisma klçshz thz syskeyçz endoepikoin
-
vnìaz me sçma bìnteo epilégetai metajù 16 diafore
-
tikèn tùpvn melvdìaz. Mporoùn na diaforopoihuoùn
oi akòloyuez typologìez klçshz:
• Klçsh ston òrofo
• Klçsh apò kùrio ejvterikò shmeìo
• Klçsh Intercom
Ds,jh pdjyrf
Djpvj;yjcnm ds,jhf jlyjq bp 16 hfpys[ vtkjlbq
lkz dspsdyjuj pdjyrf c dbltjljvjajyf7 Gj nbgfv
dspjds vjuen ,snm hfpltktys yf cktle.obt5
• Dspjd yf nf;
• Dspjd c ukfdyjq yfhe;yjq njxrb
• Dspjd gj bynthrjve
Alarm seçimi
Sistemi arama alarmı 16 farklı melodi tipi arasından seçi
-
lebilir. Afla¤’dbıdaki arama tipleri farklılafltırılabilirler:
• Katta arama
• Ana dıfl üniteden arama
• ‹nterkom arama
Selekcja dêwi´ku sygna∏u
Dêwi´k sygna∏u wywo∏ania domofonu mo˝na wybraç
spoÊród 16 ró˝nych rodzajów melodii. Mo˝liwe jest
zró˝nicowanie nast´pujàcych typów wywo∏ania:
• Wywo∏anie na pi´trze
• Wywo∏anie z g∏ównego punktu zewn´trznego
• Wywo∏anie Intercom
I
F
D
NL
GB
E
GR
RU
TR
PL
P

18
Audio-Kit
1
16
2
OK
RESET
3
2
1
1
1
1
1
3
4
3
2
1
1
2
O
3
2
1
1
16
2
OK
RESET
1
1
1
1
3
4
2
3
2
1
1
3
2
1
I
NL
F
GB
E
D
GR
P
RU
TR
PL
Selezione suoneria chiamata al piano
Änderung Rufton Etagentaster
Sélection sonnerie appel à l’étage
Selection call to the floor bell
Selección timbre llamada al piso
Kies belgeluid oproep aan verdieping
Selecção do toque para chamada ao andar
Epilogç koydoynioù klçshz ston òrofo
Ghjuhfvvbhjdfybt pdjyrf lkz dspjdf yf ‘nf;
Kata ça¤ırma alarm seçimi
Wybór dêwi´ku sygna∏u wywo∏ania na pi´trze
I
NL
F
GB
E
D
GR
P
RU
TR
PL
I
NL
F
GB
E
D
GR
P
RU
TR
PL
Selezione suoneria da posto esterno principale (S=0)
Änderung Rufton der Haupttürstation
Sélection sonnerie appel d’un poste extérieur principal (S=0)
Selection call from main outdoor station (S=0) bell
Selección timbre llamada desde el puesto exterior principal (S=0)
Kies belgeluid oproep vanuit eerste externe post (S=0)
Selecção do toque para chamada da unidade externa principal (S=0)
Epilogç koydoynioù klçshz apò kùrio ejvterikò shmeìo (S=0)
Ds,jh pdjyrf c ukfdyjq yfhe;yjq njxrb (S=0)
Ana dıfl üniteden alarm seçimi (S=0)
Wybór dêwi´ku sygna∏u z g∏ównego punktu zewn´trznego (S=0)
Programmazione suonerie
wählbare Ruftöne
Programmation sonneries
Programming bells
Programación timbres
Programmering belgeluid
Programação dos toques
Programmatismòz koydoynièn
Ghjuhfvvbhjdfybt pdjyrjd
Alarm programlanması
Programowanie dêwi´ków sygna∏u

19
1
16
2
RESET
1
1
1
2
1
3
4
2
OK
3
2
1
3
2
1
1
I
NL
F
GB
E
D
GR
P
RU
TR
PL
Selezione suoneria chiamata intercom
Änderung interner Rufton
Sélection sonnerie appel intercom
Selection call intercom bell
Selección timbre llamada intercomunicante
Kies belgeluid intercom oproep gebouw
Selecção do toque para chamada intercomomunicador
Epilogç koydoynioù klçshz intercom
Ghjuhfvvbhjdfybt pdjyrf lkz dspjdf gj bynthrjve
Intercom ça¤rı alarm seçimi
Wybór dêwi´ku sygna∏u wywo∏ania intercom

20
Audio-Kit
3
2
1
3
2
1
2
1
3
CLAK
I
NL
F
GB
E
D
Funzione “Studio professionale” attiva
Funktion “Professionelles Studio” aktiv
Fonction “Bureau professionnel” activée
“Professional studio” function active
Función “Oficina Profesional” activada
Kantoorfunctie actief
00
01
03
05
10
11
13
15
+20
20
21
23
25
30
31
33
35
P
N MOD
P
N MOD
GR
P
RU
TR
PL
Função “Escritório profissional” activa
Leitoyrgìa ”Epaggelmatikò trafeìo” energopoihménh
Aeyrwbz 4Cnelbz4 frnbdbhjdfyf
“Profesyonel büro” ifllevi etkin
”Gabinet zawodowy” – funkcja aktywna
Per rendere operativa la funzione “studio professionale”, è necessario
aggiungere (+20) alla configurazione in MOD, come indicato in tabella, e
togliere e ridare alimentazione al dispositivo attendendo circa 1 minuto.
Um die Funktion “Professionelles Studio” verwenden zu können, muss (+20) der
MOD Konfiguration laut Angaben der Tabelle hinzugefügt werden, dann die Vorri
-
chtung stromlos machen und nach ca. 1 Minute wieder mit Strom versorgen.
Pour rendre opérationnelle la fonction “bureau professionnel”, il faut ajouter
(+20) à la configuration en MOD, comme indiqué dans le tableau et couper,
puis remettre l’alimentation au dispositif, en attendant environ 1 minute.
To make the “professional studio” function active, add (+20) to the
configuration in MOD, as indicated in the table, and switch the device off,
then wait for about 1 minute and switch it back on.
Para activar la función “Estudio Profesional”, es necesario agregar (+20)
a la configuración en MOD, como indicado en la tabla, cortar y restaurar la
alimentación al dispositivo esperando aproximadamente 1 minuto.
I
NL
F
GB
E
D
GR
P
RU
TR
PL
Om de functie “kantoorfunctie” operatief te maken, is het noodzakelijk (+20) bij te voegen aan de configuratie
in MOD, zoals aangeduid wordt in de tabel, en de voeding naar de inrichting weg te nemen en terug te geven
en hierbij ongeveer 1 minuut te wachten.
Para fazer com que a função “Escritório profissional” fique operativa, é preciso acrescentar (+20) à configuração em MOD,
como está indicado na tabela, e retirar e dar novamente a alimentação ao dispositivo esperando cerca de 1 minuto.
Gia na uésete se enérgeia th leitoyrgìa “epaggelmatikò trafeìo”, xreiàwetai na prosuésete (+20) sth diamòrfvsh se MOD,
òpvz ypodeiknùetai ston pìnaka kai na kòcete kai na janadèsete trofodòthsh sth diàtajh anaménontaz perìpoy 1 leptò.
Xnj,s frnbdbhjdfnm aeyrwb. 4Cnelbz4 ytj,[jlbvj lj,fdbnm (+20) d rjyabuehfwb. MOD, rfr gjrfpfyj
d nf,kbwt6 b j,tcnjxbnm ecnhjqcndj ghbvthyj yf vbyene7
“Profesyonel büro” ifllevini iflletilebilir kılmak için, MOD’daki konfigürasyona tabloda gösterildi¤i gibi (+20)
eklemek, beslemeyi kapatmak ve yaklaflık 1 dakika bekleyerek cihazı yeniden beslemek gerekir.
Aby uaktywniç funkcj´ ”gabinet zawodowy”, nale˝y dodaç (+20) do konfiguracji MOD, tak jak to jest podane
w tabeli, i od∏àczyç zasilanie od urzàdzenia a po odczekaniu 1 minuty, pod∏àczyç na nowo.
Sayfa yükleniyor...
Sayfa yükleniyor...
Sayfa yükleniyor...
Sayfa yükleniyor...
Sayfa yükleniyor...
Sayfa yükleniyor...
Sayfa yükleniyor...
Sayfa yükleniyor...
-
 1
1
-
 2
2
-
 3
3
-
 4
4
-
 5
5
-
 6
6
-
 7
7
-
 8
8
-
 9
9
-
 10
10
-
 11
11
-
 12
12
-
 13
13
-
 14
14
-
 15
15
-
 16
16
-
 17
17
-
 18
18
-
 19
19
-
 20
20
-
 21
21
-
 22
22
-
 23
23
-
 24
24
-
 25
25
-
 26
26
-
 27
27
-
 28
28


diğer dillerde
- español: Bticino 367121 Instrucciones de operación
- français: Bticino 367121 Mode d'emploi
- italiano: Bticino 367121 Istruzioni per l'uso
- Deutsch: Bticino 367121 Bedienungsanleitung
- português: Bticino 367121 Instruções de operação
- English: Bticino 367121 Operating instructions
- Nederlands: Bticino 367121 Handleiding
İlgili makaleler
-
Bticino 368111 Kullanma talimatları
-
Bticino 368121 Kullanma talimatları
-
Bticino 367221 Kullanma talimatları
-
-
-
-
-
-
-