

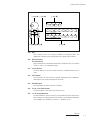
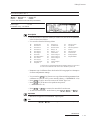
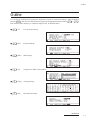
Bescheinigung des Importeurs
Hiermit wird bescheinigt, daß der/die/das
Gerät: Synthesizer Typ: VP1
- - - - - - - - - - - - - - - - - - - - - - - - - - - - - - - - - - - - - - - - - - - - - - - - - - - - - - -
(Gerät, typ, Bezeichnung)
in Übereinstimmung mit den Bestimmungen der
VERFÜGUNG 1046/84
- - - - - - - - - - - - - - - - - - - - - - - - - - - - - - - - - - - - - - - - - - - - - - -
(Amtsblattverfügung)
funkentstört ist.
Der Deutschen Bundespost wurde das
Inverkehrbringen dieses Gerätes angezeigt und die
Berechtigung zur Überprüfung der Serie auf
Einhaltung der Bestimmungen eingeräumt.
Yamaha Europa GmbH
- - - - - - - - - - - - - - - - - - - - - - - - - - - - - - - - - - - - - - - - - - - - -
Name des lmporteurs.
*
Dies bezieht sich nur auf die von der YAMAHA EUROPA
GmbH vertriebenen Produkte.
IMPORTANT NOTICE FOR THE UNITED KINGDOM
Connecting the Plug and Cord
IMPORTANT: The wires in this mains lead are coloured in
accordance with the following code:
GREEN-AND-YELLOW : EARTH
BLUE : NEUTRAL
BROWN : LIVE
As the colours of the wires in the mains lead of this apparatus
may not correspond with the coloured markings identifying the
terminals in your plug, proceed as follows:
The wire which is coloured GREEN and YELLOW must be con-
nected to the terminal in the plug which is marked by the letter E
or by the safety earth symbol or coloured GREEN and YEL-
LOW.
The wire which is coloured BLUE must be connected to the ter-
minal which is marked with the letter N or coloured BLACK.
The wire which is coloured BROWN must be connected to the
terminal which is marked with the letter L or coloured RED.
Dette apparat overholder det gaeldende EF-direktiv
vedrørende radiostøj.
Cet appareil est conforme aux prescriptions de la
directive communautaire 87/308/CEE.
Diese Geräte entsprechen der EG-Richtlinie 82/499/
EWG und/oder 87/308/EWG.
This product complies with the radio frequency in-
terference requirements of the Council Directive 82/
499/EEC and/or 87/308/EEC.
Questo apparecchio è conforme al D.M.13 aprile
1989 (Direttiva CEE/87/308) sulla soppressione dei
radiodisturbi.
Este producto está de acuerdo con los requisitos
sobre interferencias de radio frequencia fijados por
el Consejo Directivo 87/308/CEE.
YAMAHA CORPORATION
ADVARSEL!
Lithiumbatteri—Eksplosionsfare ved fejlagtig håndtering.
Udskiftning må kun ske med batteri af samme fabrikat og type.
Levér det brugte batteri tilbage til leverandoren.
VARNING
Explosionsfara vid felaktigt batteribyte. Använd samma
batterityp eller en ekvivalent typ som rekommenderas av
apparattillverkaren. Kassera använt batteri enligt fabrikantens
instruktion.
VAROITUS
Paristo voi räjähtää, jos se on virheellisesti asennettu. Vaihda
paristo ainoastaan laitevalmistajan suosittelemaan tyyppiin.
Hävitä käytetty paristo valmistajan ohjeiden mukaisesti.

i
VP1 OWNER’S MANUAL
Owner’ s Manual
Thank you for your purchase of the Yamaha VP1 Virtual Acoustic
Synthesizer. The VP1’s revolutionary VA sound system offers a range
of sounds and performance features not available from ordinary
synthesizers.
Please read through this manual to familiarize yourself with the VP1’s
operation and its many superlative functions. Retain the manual in a
safe place for future reference.

ii
VP1 OWNER’S MANUAL
Features
Revolutionary Virtual-Acoustic Sound System
The VP1’s VA (virtual acoustic) sound production is entirely different from
techniques used on conventional synthesizers. The system generates a computerized
model of the target instrument’s acoustic characteristics, creating a virtual instrument
that sounds and feels like the real thing.
Conventional synthesizers create sound by mixing monotone oscillations or by processing
a memorized set of waveform samples. Results are often uninteresting, or too far from what
you are aiming at. You can try to improve the sound by manipulating a host of seemingly
arbitrary settings, but the process frequently becomes tedious and discouraging.
Yamaha’s VA system changes this picture entirely. Operation is intuitively
reasonable, and the resulting sound is far more realistic.
The VP1 utilizes an F/VA (free-oscillating VA) sound system — one of the two
variants of the VA approach. The system creates a computerized model consisting of
two modules: a “driver” component and a “string” component. The driver component
simulates the action of the striking system (analogous to the action of a pick or finger
against a guitar string), while the string component simulates the action of the
vibrating system (analogous to the combination of the guitar’s string, fret, and bridge).
The VP1 fine-tunes the properties of each of these modules to produce a virtual
instrument with an extremely realistic sound.
You can use the VP1 to reproduce the sound of existing acoustic instruments, or to
design fanciful virtual instruments that could never exist in the real world. Regardless
of the type of instrument you choose, the resulting sound will have an authentic, real-
world quality not available from conventional synthesizers.
Powerful Controllers
The VP1’s powerful controllers allow you to achieve an expressive range previously
available only to skilled performers of acoustic instruments.
Consider a guitar player. The guitarist’s sound is determined not just by the finger on
the fret and the pick against the string. Many different actions are involved — the force
and direction of the pick, the left hand’s muting, vibrato, glissando, and trill effects,
the right hand’s muting and harmonic effects, the motion of the right arm, and so on.
It would be impossible to simulate all of these different actions using only the
keyboard. This is why the VP1 supports a full assortment of controllers — a pitch
wheel, two modulation wheels, a two-directional modulation ball, a breath controller,
two foot controllers, two foot switches, and two continuous sliders. By mastering the
use of these controllers, you can achieve a high level of expressiveness on any voice
you happen to be playing.

iii
VP1 OWNER’S MANUAL
Generally speaking, each controller governs a single parameter. But each time you
change the voice, the VP1 changes the parameter assignments accordingly — ensuring
that you always have significant control over the most important features of the voice
you are playing. You are also free to rearrange the parameters among the different
controllers so as to achieve the configuration best suited to your own playing style.
The VP1’s controller features allow you break through the barriers of electronic
instrumentation to achieve a level of control previously limited to acoustic instruments.
Kaleidoscopic “Scene” Control
The VP1 can store all controller settings into a single “scene”. You can register up to
three of these scenes, and recall any one of them at the press of a button. Or you can
use the Scene Controller to fade seamlessly from one scene into another, stopping at
any intermediate value along the way. This unique “scene” concept allows you to
produce unprecedented multidimensional sound changes.
High-Quality Effects
The VP1 offers five times as many as effects the SPX1000 — reverb, flanger, delay,
chorus, and many more. You can set these effects separately for each voice.
Professional Features
■ Professional Parallel Output
The VP1 processes effects internally to produce high-quality stereo output. You are
also free to select monaural output.
The VP1 also produces separate stereo outputs for each of the four elements
comprising the voice. You can connect all of these outputs to a mixer and add external
effects.
■ First VA System with 16-Note Polyphony
The VP1 is the world’s only VA system capable of producing 16-note polyphony. The
four-element voice structure affords ample capability for setting up complex
multilayered and split voices.
■ Superlative Design
The VP1’s FS76 keyboard already enjoys a high reputation among professional
musicians. All VP1 controllers are equipped with multicolor LEDs, allowing you to
ascertain controller conditions at a glance. And the instrument’s top and rear panels
are finished with high-quality real wood trim. Each panel has its own unique grain
pattern, so that no two synthesizers look exactly alike.
■ Complexity
The VP1 simulates an acoustic instrument not only in sound but also in sophistication
and complexity. Like an acoustic instrument, the VP1 requires — and amply rewards
— practice. As you master the instrument’s controllers and functions, you will
gradually attain your own unique, personalized performance style.

iv
VP1 OWNER’S MANUAL
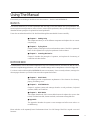
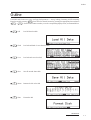
Using The Manual
The manual you are holding is divided into two main sections — BASICS and REFERENCE.
BASICS
This section introduces you to basic information that will help you become familiar with your synthesizer. The
section explains various precautions, tells you how to connect up the synthesizer, takes you through a trial run, and
describes the basic principles of operation and sound production.
Users who are unfamiliar with the VP1 should read through the entire BASICS section carefully.
■ Chapter 1 Setting It Up
This chapter introduces you to the different components and explains how to connect
everything up.
■ Chapter 2 Trying it Out
Chapter 2 takes you through a trial run and introduces some of the VP1’s operational
basics. It also explains how to play the synthesizer’s built-in demos.
■ Chapter 3 Learning the Basics
Chapter 3 describes the principles of operation, and explains the functioning of
controllers and other features.
REFERENCE
The REFERENCE section offers detailed explanations of the VP1’s different functions. It describes in detail the various
methods for implementing performance, voice, and controller settings, and for writing data to or from the floppy disk.
You do not need to read through the REFERENCE section in its entirety. Use it as a ready reference, turning to the
relevant pages whenever you need to learn more about a particular function.
■ Chapter 1 PLAY Mode
This chapter provides comprehensive explanations of the functions for selecting,
playing, and editing voices.
■ Chapter 2 SYSTEM Mode
Chapter 2 explains system-wide settings related to sound production, keyboard
operation, MIDI, and controllers.
■ Chapter 3 DISK Mode
This chapter describes the VP1’s various disk functions. It explains how to save data
to disk, load data from disk, format new disks, and rename existing disk files.
■ Appendix
The Appendix describes the system’s error messages and offers some advice on
troubleshooting.
Please refer also to the separately bound “Performance Notes” for a full listing of the VP1’s original voices and
functions.

v
VP1 OWNER’S MANUAL
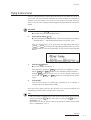
Notations
The following notational conventions are used throughout the manual to enhance clarity and readability.
PLAY
Denotes the PLAY button. All buttons are indicated by a rounded rectangular border
enclosing the button (function) name. Note that the function name also appears on the
synthesizer panel directly above or below the corresponding button. Some buttons
have two functions, with the name of the secondary function written in purple lettering
on the panel. When referring to the purple-lettered function, we use the following type
of notation: “
F1
:E1”, where “
F1
” denotes the button’s usual function and
“E1” denotes the function indicated in purple.
When referring to a function button (
F1
~
F8
), we write the symbol for the
button followed by the name of the operation that the button selects. For example:
F1
:Info.
Important
An important note or precaution intended to help you avoid loss of data or other major
inconvenience. Always read these notices carefully.
FYI (For your information)
Reference information indirectly related to the content of the main text. May contain
practical advice or general supplementary information.
Procedure
Step-by-step instructions for carrying out a particular function or operation.
Description
General description of one of the VP1’s functions.
(➝ BASICS: - ) (➝ REFERENCE: - )
Directs you to another page for related information.
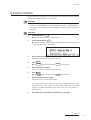
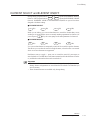
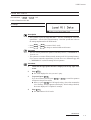
Within the REFERENCE section, all function descriptions begin with a fixed-format heading
summarizing important information about the function. An example is shown below.
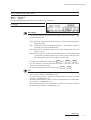
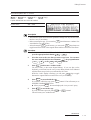
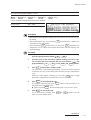
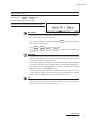
CONTROLLER ASSIGN TABLE: Control Range
PLAY
→
F4
(CTbl) →
F1
([Rng])
Determines the degree by which a parameter value changes in response to controller movement.
Max 0 ~ 127
Center 0 ~ 127
Min 0 ~ 127
Settable items (Listed
in the order that they
appear on the screen).
Allowable values
Display
Name of function
Procedure for entering the function
Brief description

vi
VP1 OWNER’S MANUAL
Contents
All page numbers begin with a letter indicating the section: “B” for BASICS, or “R” for REFERENCE.
BASICS
Chapter 1 Setting It Up
Controls and Connectors • • • • • • • • • • • • • • • • • • • • • • • • • • • • • • • • • • • • • • • • • • • • • • • • • • • • • • • • • • • • • • • • • • • • • • • • • • • • • • • • • • • • • • • • • • • • B: 1 - 2
Top Panel • • • • • • • • • • • • • • • • • • • • • • • • • • • • • • • • • • • • • • • • • • • • • • • • • • • • • • • • • • • • • • • • • • • • • • • • • • • B: 1 - 2
Rear Panel • • • • • • • • • • • • • • • • • • • • • • • • • • • • • • • • • • • • • • • • • • • • • • • • • • • • • • • • • • • • • • • • • • • • • • • • • • • B: 1 - 6
Front Side • • • • • • • • • • • • • • • • • • • • • • • • • • • • • • • • • • • • • • • • • • • • • • • • • • • • • • • • • • • • • • • • • • • • • • • • • • • B: 1 - 8
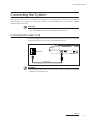
Connecting the System • • • • • • • • • • • • • • • • • • • • • • • • • • • • • • • • • • • • • • • • • • • • • • • • • • • • • • • • • • • • • • • • • • • • • • • • • • • • • • • • • • • • • • • • • • • • • • B: 1 - 9
Connecting the Power Cord • • • • • • • • • • • • • • • • • • • • • • • • • • • • • • • • • • • • • • • • • • • • • • • • • • • • • • • • • • B: 1 - 9
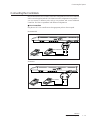
Connecting the Controllers • • • • • • • • • • • • • • • • • • • • • • • • • • • • • • • • • • • • • • • • • • • • • • • • • • • • • • • • • B: 1 - 10
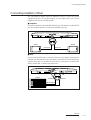
Connecting Amplifiers or Mixer • • • • • • • • • • • • • • • • • • • • • • • • • • • • • • • • • • • • • • • • • • • • • • • • • • • • B: 1 - 12
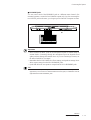
MIDI Connection • • • • • • • • • • • • • • • • • • • • • • • • • • • • • • • • • • • • • • • • • • • • • • • • • • • • • • • • • • • • • • • • • • B: 1 - 14
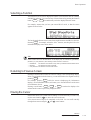
The Floppy Disk • • • • • • • • • • • • • • • • • • • • • • • • • • • • • • • • • • • • • • • • • • • • • • • • • • • • • • • • • • • • • • • • • • • • • • • • • • • • • • • • • • • • • • • • • • • • • • • • • • • B: 1 - 16
MIDI • • • • • • • • • • • • • • • • • • • • • • • • • • • • • • • • • • • • • • • • • • • • • • • • • • • • • • • • • • • • • • • • • • • • • • • • • • • • • • • • • • • • • • • • • • • • • • • • • • • • • • • • • • • • • • B: 1 - 17
Chapter 2 Trying It Out
First Try • • • • • • • • • • • • • • • • • • • • • • • • • • • • • • • • • • • • • • • • • • • • • • • • • • • • • • • • • • • • • • • • • • • • • • • • • • • • • • • • • • • • • • • • • • • • • • • • • • • • • • • • • • • • B: 2 - 2
Checking the Sound Output • • • • • • • • • • • • • • • • • • • • • • • • • • • • • • • • • • • • • • • • • • • • • • • • • • • • • • • • • • B: 2 - 2
Trying Some Voices • • • • • • • • • • • • • • • • • • • • • • • • • • • • • • • • • • • • • • • • • • • • • • • • • • • • • • • • • • • • • • • • • B: 2 - 3
Using the Controllers • • • • • • • • • • • • • • • • • • • • • • • • • • • • • • • • • • • • • • • • • • • • • • • • • • • • • • • • • • • • • • • • B: 2 - 4
Using Quick Edit • • • • • • • • • • • • • • • • • • • • • • • • • • • • • • • • • • • • • • • • • • • • • • • • • • • • • • • • • • • • • • • • • • • • B: 2 - 6
Playing the Demos • • • • • • • • • • • • • • • • • • • • • • • • • • • • • • • • • • • • • • • • • • • • • • • • • • • • • • • • • • • • • • • • • • • • • • • • • • • • • • • • • • • • • • • • • • • • • • • • • • B: 2 - 8
Chapter 3 Learning the Basics
Sound Production • • • • • • • • • • • • • • • • • • • • • • • • • • • • • • • • • • • • • • • • • • • • • • • • • • • • • • • • • • • • • • • • • • • • • • • • • • • • • • • • • • • • • • • • • • • • • • • • • • • B: 3 - 2
F/VA Sound Synthesis • • • • • • • • • • • • • • • • • • • • • • • • • • • • • • • • • • • • • • • • • • • • • • • • • • • • • • • • • • • • • • B: 3 - 2
Physical Characteristics of Struck-String Instruments • • • • • • • • • • • • • • • • • • • • • • • • • • • • • • • • B: 3 - 2
Driver • • • • • • • • • • • • • • • • • • • • • • • • • • • • • • • • • • • • • • • • • • • • • • • • • • • • • • • • • • • • • • • • • • • • • • • • • • • • • • • B: 3 - 3
String • • • • • • • • • • • • • • • • • • • • • • • • • • • • • • • • • • • • • • • • • • • • • • • • • • • • • • • • • • • • • • • • • • • • • • • • • • • • • • • B: 3 - 3
Editing Limitations • • • • • • • • • • • • • • • • • • • • • • • • • • • • • • • • • • • • • • • • • • • • • • • • • • • • • • • • • • • • • • • • • • B: 3 - 3
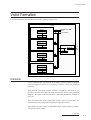
Voice Formation • • • • • • • • • • • • • • • • • • • • • • • • • • • • • • • • • • • • • • • • • • • • • • • • • • • • • • • • • • • • • • • • • • • • • • • • • • • • • • • • • • • • • • • • • • • • • • • • • • • • B: 3 - 4
Elements • • • • • • • • • • • • • • • • • • • • • • • • • • • • • • • • • • • • • • • • • • • • • • • • • • • • • • • • • • • • • • • • • • • • • • • • • • • • B: 3 - 4
Mixer • • • • • • • • • • • • • • • • • • • • • • • • • • • • • • • • • • • • • • • • • • • • • • • • • • • • • • • • • • • • • • • • • • • • • • • • • • • • • • • B: 3 - 5
Voices • • • • • • • • • • • • • • • • • • • • • • • • • • • • • • • • • • • • • • • • • • • • • • • • • • • • • • • • • • • • • • • • • • • • • • • • • • • • • • B: 3 - 5

vii
VP1 OWNER’S MANUAL
Contents
Memory Configuration • • • • • • • • • • • • • • • • • • • • • • • • • • • • • • • • • • • • • • • • • • • • • • • • • • • • • • • • • • • • • • • • • • • • • • • • • • • • • • • • • • • • • • • • • • • • • • B: 3 - 6
System Data • • • • • • • • • • • • • • • • • • • • • • • • • • • • • • • • • • • • • • • • • • • • • • • • • • • • • • • • • • • • • • • • • • • • • • • • • B: 3 - 6
Voice Data • • • • • • • • • • • • • • • • • • • • • • • • • • • • • • • • • • • • • • • • • • • • • • • • • • • • • • • • • • • • • • • • • • • • • • • • • • B: 3 - 6
Floppy Disks • • • • • • • • • • • • • • • • • • • • • • • • • • • • • • • • • • • • • • • • • • • • • • • • • • • • • • • • • • • • • • • • • • • • • • • • B: 3 - 7
Controllers • • • • • • • • • • • • • • • • • • • • • • • • • • • • • • • • • • • • • • • • • • • • • • • • • • • • • • • • • • • • • • • • • • • • • • • • • • • • • • • • • • • • • • • • • • • • • • • • • • • • • • • • • • B: 3 - 8
Principle of Operation • • • • • • • • • • • • • • • • • • • • • • • • • • • • • • • • • • • • • • • • • • • • • • • • • • • • • • • • • • • • • • • B: 3 - 8
Innovative Controller Types • • • • • • • • • • • • • • • • • • • • • • • • • • • • • • • • • • • • • • • • • • • • • • • • • • • • • • • • • B: 3 - 9
Scenes • • • • • • • • • • • • • • • • • • • • • • • • • • • • • • • • • • • • • • • • • • • • • • • • • • • • • • • • • • • • • • • • • • • • • • • • • • • • • • • • • • • • • • • • • • • • • • • • • • • • • • • • • • • • • B: 3 - 11
What is a Scene? • • • • • • • • • • • • • • • • • • • • • • • • • • • • • • • • • • • • • • • • • • • • • • • • • • • • • • • • • • • • • • • • • • • B: 3 - 11
Scene Controller • • • • • • • • • • • • • • • • • • • • • • • • • • • • • • • • • • • • • • • • • • • • • • • • • • • • • • • • • • • • • • • • • • • B: 3 - 12
Scene LEDs • • • • • • • • • • • • • • • • • • • • • • • • • • • • • • • • • • • • • • • • • • • • • • • • • • • • • • • • • • • • • • • • • • • • • • • B: 3 - 13
Controller Hook Function • • • • • • • • • • • • • • • • • • • • • • • • • • • • • • • • • • • • • • • • • • • • • • • • • • • • • • • • • • B: 3 - 14
Controller LEDs • • • • • • • • • • • • • • • • • • • • • • • • • • • • • • • • • • • • • • • • • • • • • • • • • • • • • • • • • • • • • • • • • • • B: 3 - 15
Controller Initialization Function • • • • • • • • • • • • • • • • • • • • • • • • • • • • • • • • • • • • • • • • • • • • • • • • • • • B: 3 - 15
Quick Edit • • • • • • • • • • • • • • • • • • • • • • • • • • • • • • • • • • • • • • • • • • • • • • • • • • • • • • • • • • • • • • • • • • • • • • • • • • • • • • • • • • • • • • • • • • • • • • • • • • • • • • • • • B: 3 - 16
General Description • • • • • • • • • • • • • • • • • • • • • • • • • • • • • • • • • • • • • • • • • • • • • • • • • • • • • • • • • • • • • • • • B: 3 - 16
Using Quick Edit • • • • • • • • • • • • • • • • • • • • • • • • • • • • • • • • • • • • • • • • • • • • • • • • • • • • • • • • • • • • • • • • • • • B: 3 - 17
Storing Results • • • • • • • • • • • • • • • • • • • • • • • • • • • • • • • • • • • • • • • • • • • • • • • • • • • • • • • • • • • • • • • • • • • • • B: 3 - 17
Quick-Edit Parameters • • • • • • • • • • • • • • • • • • • • • • • • • • • • • • • • • • • • • • • • • • • • • • • • • • • • • • • • • • • • • B: 3 - 18
MIDI Quick Edit Control • • • • • • • • • • • • • • • • • • • • • • • • • • • • • • • • • • • • • • • • • • • • • • • • • • • • • • • • • • • B: 3 - 20
Voice Categories • • • • • • • • • • • • • • • • • • • • • • • • • • • • • • • • • • • • • • • • • • • • • • • • • • • • • • • • • • • • • • • • • • • • • • • • • • • • • • • • • • • • • • • • • • • • • • • • • • B: 3 - 21
Category Listing • • • • • • • • • • • • • • • • • • • • • • • • • • • • • • • • • • • • • • • • • • • • • • • • • • • • • • • • • • • • • • • • • • • B: 3 - 21
Modes • • • • • • • • • • • • • • • • • • • • • • • • • • • • • • • • • • • • • • • • • • • • • • • • • • • • • • • • • • • • • • • • • • • • • • • • • • • • • • • • • • • • • • • • • • • • • • • • • • • • • • • • • • • • • B: 3 - 22
PLAY Mode • • • • • • • • • • • • • • • • • • • • • • • • • • • • • • • • • • • • • • • • • • • • • • • • • • • • • • • • • • • • • • • • • • • • • • • B: 3 - 22
SYSTEM Mode • • • • • • • • • • • • • • • • • • • • • • • • • • • • • • • • • • • • • • • • • • • • • • • • • • • • • • • • • • • • • • • • • • • • B: 3 - 22
DISK Mode • • • • • • • • • • • • • • • • • • • • • • • • • • • • • • • • • • • • • • • • • • • • • • • • • • • • • • • • • • • • • • • • • • • • • • • • B: 3 - 22
Basic Operations • • • • • • • • • • • • • • • • • • • • • • • • • • • • • • • • • • • • • • • • • • • • • • • • • • • • • • • • • • • • • • • • • • • • • • • • • • • • • • • • • • • • • • • • • • • • • • • • • • • B: 3 - 23
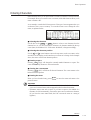
Switching the Mode • • • • • • • • • • • • • • • • • • • • • • • • • • • • • • • • • • • • • • • • • • • • • • • • • • • • • • • • • • • • • • • • B: 3 - 23
Selecting a Voice • • • • • • • • • • • • • • • • • • • • • • • • • • • • • • • • • • • • • • • • • • • • • • • • • • • • • • • • • • • • • • • • • • • B: 3 - 23
Selecting a Function • • • • • • • • • • • • • • • • • • • • • • • • • • • • • • • • • • • • • • • • • • • • • • • • • • • • • • • • • • • • • • • • B: 3 - 24
Returning to Previous Screen • • • • • • • • • • • • • • • • • • • • • • • • • • • • • • • • • • • • • • • • • • • • • • • • • • • • • • • B: 3 - 24
Moving the Cursor • • • • • • • • • • • • • • • • • • • • • • • • • • • • • • • • • • • • • • • • • • • • • • • • • • • • • • • • • • • • • • • • • B: 3 - 24
Changing Numerical Settings • • • • • • • • • • • • • • • • • • • • • • • • • • • • • • • • • • • • • • • • • • • • • • • • • • • • • • • B: 3 - 25
Changing Multiple-Choice Settings • • • • • • • • • • • • • • • • • • • • • • • • • • • • • • • • • • • • • • • • • • • • • • • • • B: 3 - 25
Entering Characters • • • • • • • • • • • • • • • • • • • • • • • • • • • • • • • • • • • • • • • • • • • • • • • • • • • • • • • • • • • • • • • • B: 3 - 26
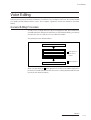
Voice Editing • • • • • • • • • • • • • • • • • • • • • • • • • • • • • • • • • • • • • • • • • • • • • • • • • • • • • • • • • • • • • • • • • • • • • • • • • • • • • • • • • • • • • • • • • • • • • • • • • • • • • • B: 3 - 27
General Editing Procedure • • • • • • • • • • • • • • • • • • • • • • • • • • • • • • • • • • • • • • • • • • • • • • • • • • • • • • • • • • B: 3 - 27
Storing • • • • • • • • • • • • • • • • • • • • • • • • • • • • • • • • • • • • • • • • • • • • • • • • • • • • • • • • • • • • • • • • • • • • • • • • • • • • • B: 3 - 28
Comparing • • • • • • • • • • • • • • • • • • • • • • • • • • • • • • • • • • • • • • • • • • • • • • • • • • • • • • • • • • • • • • • • • • • • • • • • • B: 3 - 30
Copying • • • • • • • • • • • • • • • • • • • • • • • • • • • • • • • • • • • • • • • • • • • • • • • • • • • • • • • • • • • • • • • • • • • • • • • • • • • • B: 3 - 30
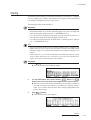
ELEMENT SELECT and ELEMENT ON/OFF • • • • • • • • • • • • • • • • • • • • • • • • • • • • • • • • • • • • • B: 3 - 31

viii
VP1 OWNER’S MANUAL
Contents
REFERENCE
Chapter 1 PLAY Mode
Outline • • • • • • • • • • • • • • • • • • • • • • • • • • • • • • • • • • • • • • • • • • • • • • • • • • • • • • • • • • • • • • • • • • • • • • • • • • • • • • • • • • • • • • • • • • • • • • • • • • • • • • • • • • • • • R: 1 - 2
Performance and Status • • • • • • • • • • • • • • • • • • • • • • • • • • • • • • • • • • • • • • • • • • • • • • • • • • • • • • • • • • • • • • • • • • • • • • • • • • • • • • • • • • • • • • • • • • • • • R: 1 - 3
Functions • • • • • • • • • • • • • • • • • • • • • • • • • • • • • • • • • • • • • • • • • • • • • • • • • • • • • • • • • • • • • • • • • • • • • • • • • • • • R: 1 - 3
PLAY • • • • • • • • • • • • • • • • • • • • • • • • • • • • • • • • • • • • • • • • • • • • • • • • • • • • • • • • • • • • • • • • • • • • • • • • • • • • • • • R: 1 - 4
INFORMATION DISPLAY • • • • • • • • • • • • • • • • • • • • • • • • • • • • • • • • • • • • • • • • • • • • • • • • • • • • • • • • • R: 1 - 5
CONTROLLER VALUE VIEW • • • • • • • • • • • • • • • • • • • • • • • • • • • • • • • • • • • • • • • • • • • • • • • • • • • • • R: 1 - 6
KEYBOARD TRANSMIT CHANNEL • • • • • • • • • • • • • • • • • • • • • • • • • • • • • • • • • • • • • • • • • • • • • • R: 1 - 7
VOICE DIRECTORY • • • • • • • • • • • • • • • • • • • • • • • • • • • • • • • • • • • • • • • • • • • • • • • • • • • • • • • • • • • • • • • R: 1 - 8
Editing Functions • • • • • • • • • • • • • • • • • • • • • • • • • • • • • • • • • • • • • • • • • • • • • • • • • • • • • • • • • • • • • • • • • • • • • • • • • • • • • • • • • • • • • • • • • • • • • • • • • • • R: 1 - 9
CONTROLLER ASSIGN TABLE • • • • • • • • • • • • • • • • • • • • • • • • • • • • • • • • • • • • • • • • • • • • • • • • • R: 1 - 10
CONTROLLER ASSIGN TABLE: Control Range • • • • • • • • • • • • • • • • • • • • • • • • • • • • • • • • • R: 1 - 12
SCENE • • • • • • • • • • • • • • • • • • • • • • • • • • • • • • • • • • • • • • • • • • • • • • • • • • • • • • • • • • • • • • • • • • • • • • • • • • • • R: 1 - 14
VOICE SETUP • • • • • • • • • • • • • • • • • • • • • • • • • • • • • • • • • • • • • • • • • • • • • • • • • • • • • • • • • • • • • • • • • • • • R: 1 - 16
VOICE SETUP: Element Switch • • • • • • • • • • • • • • • • • • • • • • • • • • • • • • • • • • • • • • • • • • • • • • • • • • • R: 1 - 17
VOICE SETUP: Max Notes • • • • • • • • • • • • • • • • • • • • • • • • • • • • • • • • • • • • • • • • • • • • • • • • • • • • • • • • R: 1 - 18
VOICE SETUP: Receive Channel • • • • • • • • • • • • • • • • • • • • • • • • • • • • • • • • • • • • • • • • • • • • • • • • • • R: 1 - 19
VOICE SETUP: Key Assign Mode • • • • • • • • • • • • • • • • • • • • • • • • • • • • • • • • • • • • • • • • • • • • • • • • • R: 1 - 20
VOICE SETUP: Volume • • • • • • • • • • • • • • • • • • • • • • • • • • • • • • • • • • • • • • • • • • • • • • • • • • • • • • • • • • • R: 1 - 22
VOICE SETUP: Detune • • • • • • • • • • • • • • • • • • • • • • • • • • • • • • • • • • • • • • • • • • • • • • • • • • • • • • • • • • • • R: 1 - 23
VOICE SETUP: Note Shift • • • • • • • • • • • • • • • • • • • • • • • • • • • • • • • • • • • • • • • • • • • • • • • • • • • • • • • • • R: 1 - 24
VOICE SETUP: Pan Range • • • • • • • • • • • • • • • • • • • • • • • • • • • • • • • • • • • • • • • • • • • • • • • • • • • • • • • • R: 1 - 25
VOICE SETUP: Note Limit • • • • • • • • • • • • • • • • • • • • • • • • • • • • • • • • • • • • • • • • • • • • • • • • • • • • • • • • R: 1 - 27
VOICE SETUP: Microtuning • • • • • • • • • • • • • • • • • • • • • • • • • • • • • • • • • • • • • • • • • • • • • • • • • • • • • • R: 1 - 28
VOICE SETUP: Portamento Mode • • • • • • • • • • • • • • • • • • • • • • • • • • • • • • • • • • • • • • • • • • • • • • • • • R: 1 - 30
VOICE SETUP: Portamento Resolution • • • • • • • • • • • • • • • • • • • • • • • • • • • • • • • • • • • • • • • • • • • • R: 1 - 31
VOICE SETUP: PB Range • • • • • • • • • • • • • • • • • • • • • • • • • • • • • • • • • • • • • • • • • • • • • • • • • • • • • • • • • R: 1 - 32
VOICE SETUP: PB Curve • • • • • • • • • • • • • • • • • • • • • • • • • • • • • • • • • • • • • • • • • • • • • • • • • • • • • • • • • R: 1 - 33
VOICE SETUP: Zoned Aftertouch Mode • • • • • • • • • • • • • • • • • • • • • • • • • • • • • • • • • • • • • • • • • • • R: 1 - 35
VOICE SETUP: Zoned Aftertouch Split • • • • • • • • • • • • • • • • • • • • • • • • • • • • • • • • • • • • • • • • • • • • R: 1 - 36
VOICE SETUP: Sustain • • • • • • • • • • • • • • • • • • • • • • • • • • • • • • • • • • • • • • • • • • • • • • • • • • • • • • • • • • • • R: 1 - 37
VOICE SETUP: Element Copy • • • • • • • • • • • • • • • • • • • • • • • • • • • • • • • • • • • • • • • • • • • • • • • • • • • • • R: 1 - 38
OUTPUT: MIXER • • • • • • • • • • • • • • • • • • • • • • • • • • • • • • • • • • • • • • • • • • • • • • • • • • • • • • • • • • • • • • • • • R: 1 - 41
OUTPUT: EFFECTS • • • • • • • • • • • • • • • • • • • • • • • • • • • • • • • • • • • • • • • • • • • • • • • • • • • • • • • • • • • • • • • R: 1 - 43
Effect Types • • • • • • • • • • • • • • • • • • • • • • • • • • • • • • • • • • • • • • • • • • • • • • • • • • • • • • • • • • • • • • • • • • • • • • • R: 1 - 44
Effects Parameters • • • • • • • • • • • • • • • • • • • • • • • • • • • • • • • • • • • • • • • • • • • • • • • • • • • • • • • • • • • • • • • • • R: 1 - 45
OUTPUT: Effect Copy • • • • • • • • • • • • • • • • • • • • • • • • • • • • • • • • • • • • • • • • • • • • • • • • • • • • • • • • • • • • • R: 1 - 50
OUTPUT: Equalizer • • • • • • • • • • • • • • • • • • • • • • • • • • • • • • • • • • • • • • • • • • • • • • • • • • • • • • • • • • • • • • • R: 1 - 51
OUTPUT: Equalizer Copy • • • • • • • • • • • • • • • • • • • • • • • • • • • • • • • • • • • • • • • • • • • • • • • • • • • • • • • • • R: 1 - 53
STORE • • • • • • • • • • • • • • • • • • • • • • • • • • • • • • • • • • • • • • • • • • • • • • • • • • • • • • • • • • • • • • • • • • • • • • • • • • • • R: 1 - 54
COMPARE • • • • • • • • • • • • • • • • • • • • • • • • • • • • • • • • • • • • • • • • • • • • • • • • • • • • • • • • • • • • • • • • • • • • • • • • R: 1 - 56

ix
VP1 OWNER’S MANUAL
Contents
Chapter 2 SYSTEM Mode
Outline • • • • • • • • • • • • • • • • • • • • • • • • • • • • • • • • • • • • • • • • • • • • • • • • • • • • • • • • • • • • • • • • • • • • • • • • • • • • • • • • • • • • • • • • • • • • • • • • • • • • • • • • • • • • • R: 2 - 2
SYSTEM Functions • • • • • • • • • • • • • • • • • • • • • • • • • • • • • • • • • • • • • • • • • • • • • • • • • • • • • • • • • • • • • • • • • • • • • • • • • • • • • • • • • • • • • • • • • • • • • • • • • R: 2 - 3
TONE GENERATOR SETTINGS • • • • • • • • • • • • • • • • • • • • • • • • • • • • • • • • • • • • • • • • • • • • • • • • • • • R: 2 - 4
KEYBOARD SETTINGS • • • • • • • • • • • • • • • • • • • • • • • • • • • • • • • • • • • • • • • • • • • • • • • • • • • • • • • • • • • R: 2 - 6
MIDI SETTINGS • • • • • • • • • • • • • • • • • • • • • • • • • • • • • • • • • • • • • • • • • • • • • • • • • • • • • • • • • • • • • • • • • • • R: 2 - 8
ASSIGNABLE CONTROLLERS • • • • • • • • • • • • • • • • • • • • • • • • • • • • • • • • • • • • • • • • • • • • • • • • • • R: 2 - 10
GREETING MESSAGE • • • • • • • • • • • • • • • • • • • • • • • • • • • • • • • • • • • • • • • • • • • • • • • • • • • • • • • • • • • R: 2 - 12
MISCELLANEOUS SETTINGS • • • • • • • • • • • • • • • • • • • • • • • • • • • • • • • • • • • • • • • • • • • • • • • • • • • R: 2 - 13
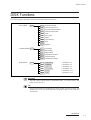
Chapter 3 DISK Mode
Outline • • • • • • • • • • • • • • • • • • • • • • • • • • • • • • • • • • • • • • • • • • • • • • • • • • • • • • • • • • • • • • • • • • • • • • • • • • • • • • • • • • • • • • • • • • • • • • • • • • • • • • • • • • • • • R: 3 - 2
DISK Functions • • • • • • • • • • • • • • • • • • • • • • • • • • • • • • • • • • • • • • • • • • • • • • • • • • • • • • • • • • • • • • • • • • • • • • • • • • • • • • • • • • • • • • • • • • • • • • • • • • • • • R: 3 - 3
LOAD ALL DATA • • • • • • • • • • • • • • • • • • • • • • • • • • • • • • • • • • • • • • • • • • • • • • • • • • • • • • • • • • • • • • • • • R: 3 - 4
LOAD 1 BANK • • • • • • • • • • • • • • • • • • • • • • • • • • • • • • • • • • • • • • • • • • • • • • • • • • • • • • • • • • • • • • • • • • • • • R: 3 - 5
LOAD 1 VOICE • • • • • • • • • • • • • • • • • • • • • • • • • • • • • • • • • • • • • • • • • • • • • • • • • • • • • • • • • • • • • • • • • • • • R: 3 - 7
SAVE ALL DATA • • • • • • • • • • • • • • • • • • • • • • • • • • • • • • • • • • • • • • • • • • • • • • • • • • • • • • • • • • • • • • • • • • R: 3 - 9
RENAME • • • • • • • • • • • • • • • • • • • • • • • • • • • • • • • • • • • • • • • • • • • • • • • • • • • • • • • • • • • • • • • • • • • • • • • • • • R: 3 - 11
FORMAT • • • • • • • • • • • • • • • • • • • • • • • • • • • • • • • • • • • • • • • • • • • • • • • • • • • • • • • • • • • • • • • • • • • • • • • • • • R: 3 - 12
Appendix
Function List • • • • • • • • • • • • • • • • • • • • • • • • • • • • • • • • • • • • • • • • • • • • • • • • • • • • • • • • • • • • • • • • • • • • • • • • • • • • • • • • • • • • • • • • • • • • • • • R: Appendix - 2
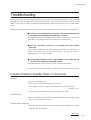
Troubleshooting • • • • • • • • • • • • • • • • • • • • • • • • • • • • • • • • • • • • • • • • • • • • • • • • • • • • • • • • • • • • • • • • • • • • • • • • • • • • • • • • • • • • • • • • • • • • R: Appendix - 5
Error Messages • • • • • • • • • • • • • • • • • • • • • • • • • • • • • • • • • • • • • • • • • • • • • • • • • • • • • • • • • • • • • • • • • • • • • • • • • • • • • • • • • • • • • • • • • • • • • R: Appendix - 9
Specifications • • • • • • • • • • • • • • • • • • • • • • • • • • • • • • • • • • • • • • • • • • • • • • • • • • • • • • • • • • • • • • • • • • • • • • • • • • • • • • • • • • • • • • • • • • • • • R: Appendix - 11
MIDI Data Format • • • • • • • • • • • • • • • • • • • • • • • • • • • • • • • • • • • • • • • • • • • • • • • • • • • • • • • • • • • • • • • • • • • • • • • • • • • • • • • • • • • • • • • • R: Appendix - 14
MIDI Implementation Chart • • • • • • • • • • • • • • • • • • • • • • • • • • • • • • • • • • • • • • • • • • • • • • • • • • • • • • • • • • • • • • • • • • • • • • • • • • • • • • • R: Appendix - 20
Index
Index • • • • • • • • • • • • • • • • • • • • • • • • • • • • • • • • • • • • • • • • • • • • • • • • • • • • • • • • • • • • • • • • • • • • • • • • • • • • • • • • • • • • • • • • • • • • • • • • • • • • • • • • • • • • • • Index - 2


BASICS
Chapter 1 Setting It Up
1 - 1
Chapter 1
Setting It Up
This chapter introduces the VP1’s various controls and connectors, and
explains how to connect everything up. Users unfamiliar with the VP1
should read this chapter carefully.

BASICS
Chapter 1 Setting It Up
1 - 2
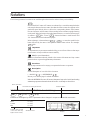
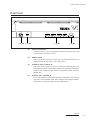
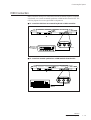
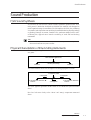
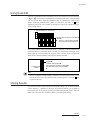
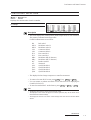
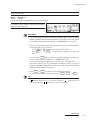
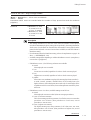
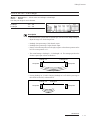
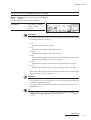
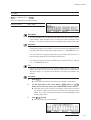
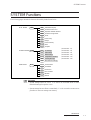
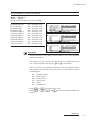
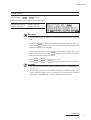
Controls and Connectors
Controls and Connectors
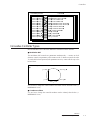
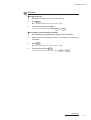
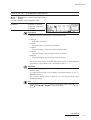
Top Panel
(1) MODULATION BALL
Use this ball to simultaneously control two different parameter values during
performance. Rotation in the X direction controls one parameter, while
rotation in the Y direction controls the other. Control effects differ for each
voice. (➝ BASICS: 3-9)
(2) PITCH wheel
Provides continuous variation of pitch. Depending on voice settings, wheel
operation may also affect other sound qualities.
(3) MODULATION 1 wheel
Controls one voice parameter during performance. The actual effect differs
for each voice.
(4) MODULATION 2 wheel
Controls one voice parameter during performance, where the actual effect
depends on the voice. Unlike the MODULATION 1 wheel, this wheel
includes a center click-stop.
(5) Controller LEDs
Each LED indicates the status of the corresponding controller. GREEN
means that the controller is currently effective, SOLID RED means that the
controller is outside of its effective range, and FLASHING RED means that
the controller is currently effective on some elements only. OFF means that
the controller is currently unassigned. (➝ BASICS: 3-15)
MODULATION BALL
Y
X
PITCH MODULATION 1 MODULATION 2
FOOT
CONTROLLER 1
FOOT
CONTROLLER 2
TOUCH EG
AFTER TOUCH
BREATH
BREATH
CONTROLLERPHONESFDD
CS 1VOLUME

BASICS
Chapter 1 Setting It Up
1 - 3
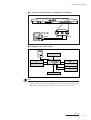
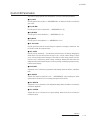
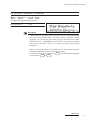
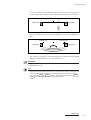
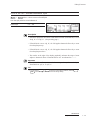
Controls and Connectors
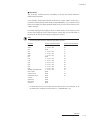
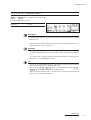
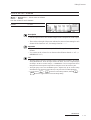
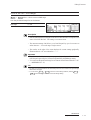
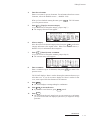
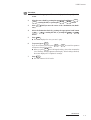
(6) PLAY button
SYSTEM button
DISK button
Each button selects the corresponding mode. The PLAY button always
switches the display to the initial PLAY screen. (➝ BASICS: 3-22)
(7) STORE button
Stores an edited voice to internal memory, or copies an existing voice to
another location (a different “voice number”). (➝ BASICS: 3-28)
(8) COMPARE button
Use this button to compare the sound of the voice you are editing with the
sound of the same voice before editing began. (➝ BASICS: 3-38)
(9) VOLUME slider
Adjusts the output volume. Note that this slider has no effect on the output
levels at the ELEMENT jacks.
(10) CS1 and CS2 (Continuous sliders)
These sliders provide real-time control of voice parameters during
performance. Actual effects differ for each voice.
(11) SCENE 1, SCENE 2, and SCENE 3 buttons
The VP1 memorizes up to three complete sets of controller settings, or
“scenes”. Pressing one of the SCENE buttons reestablishes the
corresponding set of controller settings.
(12) SCENE CONTROLLER
Use this controller to slide continuously from one scene into another. The
center click-stop position selects Scene 2. (➝ BASICS: 3-12)
PLAY SYSTEM DISK STORE COMPARE
CS 2CS 1VOLUME
SCENE 1 SCENE 2 SCENE 3
SCENE CONTROLLER

BASICS
Chapter 1 Setting It Up
1 - 4
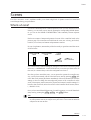
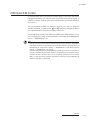
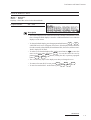
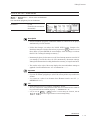
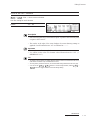
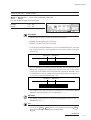
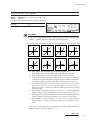
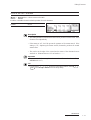
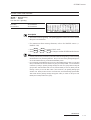
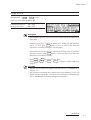
(13) QUICK EDIT selectors ( and )
Use these to select the functions to be controlled by the QUICK EDIT
sliders. (➝ BASICS: 3-16)
(14) QS1, QS2, QS3, and QS4 (Quick-edit sliders)
Use these sliders for quick editing. The LEDs along the right side of each
slider indicate the slider’s position. If the slider is at center position, the two
middle LEDs will be on. (➝ BASICS: 3-17)
(15) C3 key mark
Marks the position of note C3 on the keyboard. The marking is not
meaningful if the keyboard has been transposed.
(16) Display
The LCD displays the name of the currently selected voice, together with
various status information. Characters may be displayed black-on-white or
white-on-black. (➝ REFERENCE: 2-13) The screen’s contrast level may
change slightly over the course of a long session; adjust as necessary using
the CONT knob. (➝ REFERENCE: 2-13)
(17) F1 to F8 (Function buttons)
Use these buttons to select various functions while playing or editing. The
bottom line of the LCD indicates the currently available functions.
(18) CONT knob
Adjusts the LCD’s contrast.
Controls and Connectors
EQ LOW
AT FOLLOW
LFO DEPTH
EG ATTACK
EQ LO-MID
VEL SENS
LFO SPEED
EG DECAY
EQ HI-MID
POR TIME
LFO DELAY
EG SUSTN
EQ HIGH
EF DEPTH
LFO HOLD
EG RELSE
QS4QS3QS2QS1
QUICK EDIT
F1 F2 F3 F4 F5 F6 F7 F8 CONT
C3

BASICS
Chapter 1 Setting It Up
1 - 5
Controls and Connectors
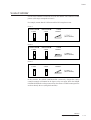
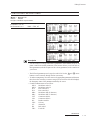
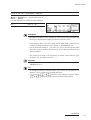
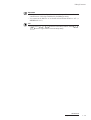
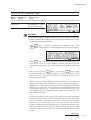
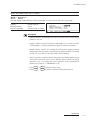
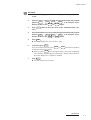
(19) Dial
Use to switch voices or to change a numerical or character value. The
magnitude of change varies in proportion to the speed of dial rotation.
(20) DEC/NO button
INC/YES button
Press to increment or decrement a numerical or character value, or to answer
“YES” or “NO” to a confirmation query.
(21) Cursor buttons
Use these buttons to move the screen’s cursor to a different menu item or
value.
(22) EXIT button
Use this button to exit from the currently displayed screen (submode),
returning the LCD to the next higher-level screen.
(23) ENTER button
Press this button to select or execute a function.
(24) A to D: Voice bank buttons
Use these buttons to select the voice bank (A to D).
(25) 1 to 16: Program buttons
Use these buttons to select a voice (by voice number) from the current voice
bank. During voice editing, buttons 1 to 4 select voice elements, and buttons
9 to 12 toggle voice elements on and off. (➝ BASICS: 3-31)
DEC/NO INC/YES
EXIT ENTER
9
E1
10
E2
11
E3
12
E4
13 14 15 16
2
E2
3
E3
4
E4
1
E1
5678
BCDA
ELEMENT SELECT
ELEMENT ON/OFF

BASICS
Chapter 1 Setting It Up
1 - 6
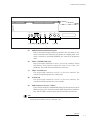
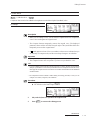
Rear Panel
(1) Power-cord connector
Connects to the AC power cord supplied with the VP1. (Please do not use
any other power cord with the VP1.)
(2) POWER switch
Press to switch the power ON or OFF. Power is ON when the switch is in
depressed position; OFF when it is in raised position.
(3) ELEMENT jacks: L/MONO, R
Each set of jacks outputs one of the four elements comprising the voice.
Each element is output in stereo: the L/MONO jack outputs the left channel,
and the R jack outputs the right channel. For monaural output, use the L/
MONO jack.
(4) OUTPUT jacks: L/MONO, R
These jacks output the full sound produced by combination of all elements
plus effects. The L/MONO and R jacks output the left and right channels,
respectively. For monaural output, use the L/MONO jack.
Controls and Connectors
YAMAHA MODEL VP1
AC INLET
POWER
ON/ OFF
ELEMENT 4
R L/MONO
ELEMENT 3
R L/MONO
ELEMENT 2
R L/MONO
ELEMENT 1
R L/MONO
OUTPUT
R L/MONO

BASICS
Chapter 1 Setting It Up
1 - 7
(5) PORTAMENTO and SUSTAIN jacks
Each of these jacks accepts connection to an FC4 or FC5 foot switch. A foot
switch connected to the SUSTAIN jack operates as a damper pedal; a foot
switch connected to the PORTAMENTO jack controls the portamento
effect.
(6) FOOT CONTROLLER jacks
Each jack accepts connection to an FC7 or FC9 foot controller. During
performance, each controller controls the value of one of the voice
parameters. The actual effects are different for each voice.
(7) FOOT VOLUME jack
This jack accepts connection to an FC7 or FC9 foot controller. The
connected controller operates as a volume pedal.
(8) SCENE jack
This jack accepts connection to an FC7 or FC9 foot controller. The
connected controller operates as a scene controller.
(9) MIDI connectors (IN, OUT, THRU)
These connectors attach to standard MIDI cables. The IN connector receives
MIDI input, the OUT connector transmits MIDI data produced within the
VP1, and the THRU connector relays data received at the IN connector.
FYI
• For hints about how to connect up the controllers supplied with your VP1, refer to
“Connecting the Controllers,” below. (➝ BASICS: 1-10)
Controls and Connectors
FOOT CONTROLLER
2 1
PORTAMENTO SUSTAIN FOOT VOLUME SCENE
MIDI
THRU OUT IN

BASICS
Chapter 1 Setting It Up
1 - 8
Controls and Connectors
Front Side
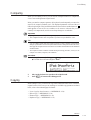
(1) Floppy-Disk Drive
The slot accepts insertion of a 3.5-inch 2HD (MF2HD) floppy disk.
(2) In-Use LED
This LED lights up while the VP1 is reading from or writing to the floppy
disk.
(3) EJECT button
Pressing this button ejects the floppy disk from the slot. Never press this
button while the In-Use LED is lit. Always proceed slowly and carefully
when inserting or removing a disk.
(4) Headphone jack
Connects to standard stereo headphones. Headphone impedance should be
between 8 and 150 ohms. Yamaha recommends the use of model HPE-170
headphones.
(5) Breath-controller jack
This jack connects to a BC2 or BC1 breath controller (sold separately). Like
other controllers, the breath controller provides dynamic control over one of
the assignable sound parameters.
FYI
• A “write-protect tab” is located on the rear side of the floppy disk casing. Setting the tab to
the lower position — so that the window is open — makes it impossible to write to or delete
from the disk. If your disk contains important data, you may want to set the tab downward to
protect against accidental data loss.
Sayfa yükleniyor ...
Sayfa yükleniyor ...
Sayfa yükleniyor ...
Sayfa yükleniyor ...
Sayfa yükleniyor ...
Sayfa yükleniyor ...
Sayfa yükleniyor ...
Sayfa yükleniyor ...
Sayfa yükleniyor ...
Sayfa yükleniyor ...
Sayfa yükleniyor ...
Sayfa yükleniyor ...
Sayfa yükleniyor ...
Sayfa yükleniyor ...
Sayfa yükleniyor ...
Sayfa yükleniyor ...
Sayfa yükleniyor ...
Sayfa yükleniyor ...
Sayfa yükleniyor ...
Sayfa yükleniyor ...
Sayfa yükleniyor ...
Sayfa yükleniyor ...
Sayfa yükleniyor ...
Sayfa yükleniyor ...
Sayfa yükleniyor ...
Sayfa yükleniyor ...
Sayfa yükleniyor ...
Sayfa yükleniyor ...
Sayfa yükleniyor ...
Sayfa yükleniyor ...
Sayfa yükleniyor ...
Sayfa yükleniyor ...
Sayfa yükleniyor ...
Sayfa yükleniyor ...
Sayfa yükleniyor ...
Sayfa yükleniyor ...
Sayfa yükleniyor ...
Sayfa yükleniyor ...
Sayfa yükleniyor ...
Sayfa yükleniyor ...
Sayfa yükleniyor ...
Sayfa yükleniyor ...
Sayfa yükleniyor ...
Sayfa yükleniyor ...
Sayfa yükleniyor ...
Sayfa yükleniyor ...
Sayfa yükleniyor ...
Sayfa yükleniyor ...
Sayfa yükleniyor ...
Sayfa yükleniyor ...
Sayfa yükleniyor ...
Sayfa yükleniyor ...
Sayfa yükleniyor ...
Sayfa yükleniyor ...
Sayfa yükleniyor ...
Sayfa yükleniyor ...
Sayfa yükleniyor ...
Sayfa yükleniyor ...
Sayfa yükleniyor ...
Sayfa yükleniyor ...
Sayfa yükleniyor ...
Sayfa yükleniyor ...
Sayfa yükleniyor ...
Sayfa yükleniyor ...
Sayfa yükleniyor ...
Sayfa yükleniyor ...
Sayfa yükleniyor ...
Sayfa yükleniyor ...
Sayfa yükleniyor ...
Sayfa yükleniyor ...
Sayfa yükleniyor ...
Sayfa yükleniyor ...
Sayfa yükleniyor ...
Sayfa yükleniyor ...
Sayfa yükleniyor ...
Sayfa yükleniyor ...
Sayfa yükleniyor ...
Sayfa yükleniyor ...
Sayfa yükleniyor ...
Sayfa yükleniyor ...
Sayfa yükleniyor ...
Sayfa yükleniyor ...
Sayfa yükleniyor ...
Sayfa yükleniyor ...
Sayfa yükleniyor ...
Sayfa yükleniyor ...
Sayfa yükleniyor ...
Sayfa yükleniyor ...
Sayfa yükleniyor ...
Sayfa yükleniyor ...
Sayfa yükleniyor ...
Sayfa yükleniyor ...
Sayfa yükleniyor ...
Sayfa yükleniyor ...
Sayfa yükleniyor ...
Sayfa yükleniyor ...
Sayfa yükleniyor ...
Sayfa yükleniyor ...
Sayfa yükleniyor ...
Sayfa yükleniyor ...
Sayfa yükleniyor ...
Sayfa yükleniyor ...
Sayfa yükleniyor ...
Sayfa yükleniyor ...
Sayfa yükleniyor ...
Sayfa yükleniyor ...
Sayfa yükleniyor ...
Sayfa yükleniyor ...
Sayfa yükleniyor ...
Sayfa yükleniyor ...
Sayfa yükleniyor ...
Sayfa yükleniyor ...
Sayfa yükleniyor ...
Sayfa yükleniyor ...
Sayfa yükleniyor ...
Sayfa yükleniyor ...
Sayfa yükleniyor ...
Sayfa yükleniyor ...
Sayfa yükleniyor ...
Sayfa yükleniyor ...
Sayfa yükleniyor ...
Sayfa yükleniyor ...
Sayfa yükleniyor ...
Sayfa yükleniyor ...
Sayfa yükleniyor ...
Sayfa yükleniyor ...
Sayfa yükleniyor ...
Sayfa yükleniyor ...
Sayfa yükleniyor ...
Sayfa yükleniyor ...
Sayfa yükleniyor ...
Sayfa yükleniyor ...
Sayfa yükleniyor ...
Sayfa yükleniyor ...
Sayfa yükleniyor ...
Sayfa yükleniyor ...
Sayfa yükleniyor ...
Sayfa yükleniyor ...
Sayfa yükleniyor ...
Sayfa yükleniyor ...
Sayfa yükleniyor ...
Sayfa yükleniyor ...
Sayfa yükleniyor ...
Sayfa yükleniyor ...
Sayfa yükleniyor ...
Sayfa yükleniyor ...
Sayfa yükleniyor ...
Sayfa yükleniyor ...
Sayfa yükleniyor ...
Sayfa yükleniyor ...
Sayfa yükleniyor ...
Sayfa yükleniyor ...
Sayfa yükleniyor ...
Sayfa yükleniyor ...
-
 1
1
-
 2
2
-
 3
3
-
 4
4
-
 5
5
-
 6
6
-
 7
7
-
 8
8
-
 9
9
-
 10
10
-
 11
11
-
 12
12
-
 13
13
-
 14
14
-
 15
15
-
 16
16
-
 17
17
-
 18
18
-
 19
19
-
 20
20
-
 21
21
-
 22
22
-
 23
23
-
 24
24
-
 25
25
-
 26
26
-
 27
27
-
 28
28
-
 29
29
-
 30
30
-
 31
31
-
 32
32
-
 33
33
-
 34
34
-
 35
35
-
 36
36
-
 37
37
-
 38
38
-
 39
39
-
 40
40
-
 41
41
-
 42
42
-
 43
43
-
 44
44
-
 45
45
-
 46
46
-
 47
47
-
 48
48
-
 49
49
-
 50
50
-
 51
51
-
 52
52
-
 53
53
-
 54
54
-
 55
55
-
 56
56
-
 57
57
-
 58
58
-
 59
59
-
 60
60
-
 61
61
-
 62
62
-
 63
63
-
 64
64
-
 65
65
-
 66
66
-
 67
67
-
 68
68
-
 69
69
-
 70
70
-
 71
71
-
 72
72
-
 73
73
-
 74
74
-
 75
75
-
 76
76
-
 77
77
-
 78
78
-
 79
79
-
 80
80
-
 81
81
-
 82
82
-
 83
83
-
 84
84
-
 85
85
-
 86
86
-
 87
87
-
 88
88
-
 89
89
-
 90
90
-
 91
91
-
 92
92
-
 93
93
-
 94
94
-
 95
95
-
 96
96
-
 97
97
-
 98
98
-
 99
99
-
 100
100
-
 101
101
-
 102
102
-
 103
103
-
 104
104
-
 105
105
-
 106
106
-
 107
107
-
 108
108
-
 109
109
-
 110
110
-
 111
111
-
 112
112
-
 113
113
-
 114
114
-
 115
115
-
 116
116
-
 117
117
-
 118
118
-
 119
119
-
 120
120
-
 121
121
-
 122
122
-
 123
123
-
 124
124
-
 125
125
-
 126
126
-
 127
127
-
 128
128
-
 129
129
-
 130
130
-
 131
131
-
 132
132
-
 133
133
-
 134
134
-
 135
135
-
 136
136
-
 137
137
-
 138
138
-
 139
139
-
 140
140
-
 141
141
-
 142
142
-
 143
143
-
 144
144
-
 145
145
-
 146
146
-
 147
147
-
 148
148
-
 149
149
-
 150
150
-
 151
151
-
 152
152
-
 153
153
-
 154
154
-
 155
155
-
 156
156
-
 157
157
-
 158
158
-
 159
159
-
 160
160
-
 161
161
-
 162
162
-
 163
163
-
 164
164
-
 165
165
-
 166
166
-
 167
167
-
 168
168
-
 169
169
-
 170
170
-
 171
171
-
 172
172
-
 173
173
-
 174
174


Diğer dillerde
- español: Yamaha VP1 El manual del propietario
- français: Yamaha VP1 Le manuel du propriétaire
- italiano: Yamaha VP1 Manuale del proprietario
- svenska: Yamaha VP1 Bruksanvisning
- čeština: Yamaha VP1 Návod k obsluze
- polski: Yamaha VP1 Instrukcja obsługi
- Deutsch: Yamaha VP1 Bedienungsanleitung
- português: Yamaha VP1 Manual do proprietário
- English: Yamaha VP1 Owner's manual
- dansk: Yamaha VP1 Brugervejledning
- русский: Yamaha VP1 Инструкция по применению
- suomi: Yamaha VP1 Omistajan opas
- Nederlands: Yamaha VP1 de handleiding
- română: Yamaha VP1 Manualul proprietarului
