Yamaha DVD-S796 Kullanım kılavuzu
- Kategori
- Dvd oynatıcılar
- Tip
- Kullanım kılavuzu

DVD-S796
Operating Instructions
DVD/Video CD/CD Player
Before connecting, operating or adjusting this product,
please read these instructions completely.
Please keep this manual for future reference.
VQT8677-1
U

Getting Started
2
Table of contents
Getting Started
Accessories . . . . . . . . . . . . . . . . . . . . . . . . . . . . . . . . . . . . . . . . . 02
SAFETY INFORMATION . . . . . . . . . . . . . . . . . . . . . . . . . . . . . . . 03
Remote control preparations . . . . . . . . . . . . . . . . . . . . . . . . . . . 05
Disc information . . . . . . . . . . . . . . . . . . . . . . . . . . . . . . . . . . . . . 06
Control reference guide . . . . . . . . . . . . . . . . . . . . . . . . . . . . . . . 07
Home theater . . . . . . . . . . . . . . . . . . . . . . . . . . . . . . . . . . . . . . . . 08
Connecting an AV amplifier with a built-in decoder . . . . . . . . . . 09
Connecting audio equipment with 2-channel analog audio
input terminals . . . . . . . . . . . . . . . . . . . . . . . . . . . . . . . . . . . . 10
Connecting audio equipment with digital audio input
terminals . . . . . . . . . . . . . . . . . . . . . . . . . . . . . . . . . . . . . . . . 11
Connection to a television . . . . . . . . . . . . . . . . . . . . . . . . . . . . 012
Basic Operations
Basic play . . . . . . . . . . . . . . . . . . . . . . . . . . . . . . . . . . . . . . . . . . 14
Stopping play . . . . . . . . . . . . . . . . . . . . . . . . . . . . . . . . . . . . . . . 15
Other methods of play . . . . . . . . . . . . . . . . . . . . . . . . . . . . . . . . 16
Still picture (Pause) . . . . . . . . . . . . . . . . . . . . . . . . . . . . . . . . . . 16
Skipping chapters or tracks . . . . . . . . . . . . . . . . . . . . . . . . . . . . 16
Frame advance (Frame reverse) . . . . . . . . . . . . . . . . . . . . . . . 16
Slow-motion play . . . . . . . . . . . . . . . . . . . . . . . . . . . . . . . . . . . . 17
Rapid advance (Rapid reverse) . . . . . . . . . . . . . . . . . . . . . . . . 17
Canceling playback control . . . . . . . . . . . . . . . . . . . . . . . . . . . . 18
Using menus to play . . . . . . . . . . . . . . . . . . . . . . . . . . . . . . . . . 18
Advanced Operations
Advanced operations . . . . . . . . . . . . . . . . . . . . . . . . . . . . . . . . . 19
Changing soundtrack . . . . . . . . . . . . . . . . . . . . . . . . . . . . . . . . 19
Changing subtitle language . . . . . . . . . . . . . . . . . . . . . . . . . . . . 20
Viewing from another angle. . . . . . . . . . . . . . . . . . . . . . . . . . . . 20
Reproducing an Advanced Virtual Surround
Sound (V.S.S.) effect . . . . . . . . . . . . . . . . . . . . . . . . . . . . . . . 21
Repeat play . . . . . . . . . . . . . . . . . . . . . . . . . . . . . . . . . . . . . . . . 22
Repeating sections between two specific points
(A-B repeat) . . . . . . . . . . . . . . . . . . . . . . . . . . . . . . . . . . . . . . 22
Program play . . . . . . . . . . . . . . . . . . . . . . . . . . . . . . . . . . . . . . . 23
Random play . . . . . . . . . . . . . . . . . . . . . . . . . . . . . . . . . . . . . . . 24
Using On-Screen Menu Icons . . . . . . . . . . . . . . . . . . . . . . . . . . 25
Common procedures . . . . . . . . . . . . . . . . . . . . . . . . . . . . . . . . . 25
Detailed descriptions of each icon . . . . . . . . . . . . . . . . . . . . . . 26
Changing initial settings . . . . . . . . . . . . . . . . . . . . . . . . . . . . . . 28
Common procedures . . . . . . . . . . . . . . . . . . . . . . . . . . . . . . . . . 28
1 Disc Languages . . . . . . . . . . . . . . . . . . . . . . . . . . . . . . . . . . 29
2 Ratings . . . . . . . . . . . . . . . . . . . . . . . . . . . . . . . . . . . . . . . . . 30
3 Menu Language . . . . . . . . . . . . . . . . . . . . . . . . . . . . . . . . . . 31
4 On-Screen Messages . . . . . . . . . . . . . . . . . . . . . . . . . . . . . 31
5 FL Display . . . . . . . . . . . . . . . . . . . . . . . . . . . . . . . . . . . . . . 31
6 TV Aspect . . . . . . . . . . . . . . . . . . . . . . . . . . . . . . . . . . . . . . 31
7 Digital Audio Output . . . . . . . . . . . . . . . . . . . . . . . . . . . . . . . 32
9 Other Settings . . . . . . . . . . . . . . . . . . . . . . . . . . . . . . . . . . . 34
How different kinds of software appear on your
television . . . . . . . . . . . . . . . . . . . . . . . . . . . . . . . . . . . . . . . . . 35
For Your Reference
Troubleshooting Guide . . . . . . . . . . . . . . . . . . . . . . . . . . . . . . . 36
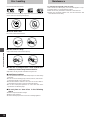
Disc handling . . . . . . . . . . . . . . . . . . . . . . . . . . . . . . . . . . . . . . . 38
Maintenance . . . . . . . . . . . . . . . . . . . . . . . . . . . . . . . . . . . . . . . . 38
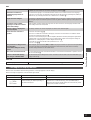
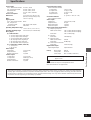
Specifications . . . . . . . . . . . . . . . . . . . . . . . . . . . . . . . . . . . . . . . 39
Dear Customer
Thank you for purchasing this product.
For optimum performance and safety, please read these instructions
carefully.
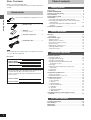
Accessories
Please check and identify the supplied accessories.
¸ Remote control . . . . . . . . . . . . . . 1
¸ Batteries . . . . . . . . . . . . . . . . . . . . 2
for remote control
¸ AC power supply cord . . . . . . . . 1
¸ Audio/video cable . . . . . . . . . . . . 1
Note
³The included AC power supply cord is for use with this unit only. Do
not use it with other equipment.
User memo:
The model number and serial number of this product can be
found on either the back or the bottom of the unit.
Please note them in the space provided below and keep for
future reference.
MODEL NUMBER!
SERIAL NUMBER
DATE OF PURCHASE
DEALER NAME
DEALER ADDRESS
TELEPHONE NUMBER

3
Getting Started
WARNING:
TO REDUCE THE RISK OF FIRE OR ELECTRIC
SHOCK, DO NOT EXPOSE THIS PLAYER TO RAIN
OR MOISTURE.
TO REDUCE THE RISK OF FIRE OR ELECTRIC SHOCK,
AND ANNOYING INTERFERENCE, USE THE RECOM-
MENDED ACCESSORIES ONLY.
This player is not disconnected from the AC power source as
long as it is connected to the wall outlet, even if this player
itself is turned off. This state is called the standby mode.
In this state, this player is designed to consume a very small
quantity of power.
FOR CANADIAN CUSTOMERS
To prevent electric shock, match wide blade of plug to wide
slot and fully insert.
This Class B digital apparatus complies with Canadian
ICES-003.
The lightning flash with arrowhead symbol, within
an equilateral triangle, is intended to alert the user
to the presence of uninsulated “dangerous volt-
age” within the product’s enclosure that may be of
sufficient magnitude to constitute a risk of electric
shock to persons.
The exclamation point within an equilateral trian-
gle is intended to alert the user to the presence of
important operating and maintenance (servicing)
instructions in the literature accompanying the ap-
pliance.
CAUTION: TO REDUCE THE RISK OF ELECTRIC
SHOCK, DO NOT REMOVE COVER (OR
BACK). NO USER-SERVICEABLE PARTS
INSIDE. REFER SERVICING TO QUALI-
FIED SERVICE PERSONNEL.
Note
Use this player only in areas with the same power supply.
Units for the U.S.A. and Canada: AC 120 V, 60 Hz.
SAFETY INFORMATION
CAUTION:
DVD/VIDEO CD/CD PLAYER IS A CLASS 1 LASER
PRODUCT. HOWEVER THIS DVD/VIDEO CD/CD
PLAYER USES A VISIBLE LASER BEAM WHICH
COULD CAUSE HAZARDOUS RADIATION EXPO-
SURE IF DIRECTED. BE SURE TO OPERATE THE
DVD/VIDEO CD/CD PLAYER CORRECTLY AS IN-
STRUCTED.
WHEN THIS DVD/VIDEO CD/CD PLAYER IS
PLUGGED TO THE WALL OUTLET, DO NOT
PLACE YOUR EYES CLOSE TO THE OPENING OF
THE DISC TRAY AND OTHER OPENINGS TO LOOK
INTO THE INSIDE OF THIS PLAYER.
USE OF CONTROLS OR ADJUSTMENTS OR PER-
FORMANCE OF PROCEDURES OTHER THAN
THOSE SPECIFIED HEREIN MAY RESULT IN HAZ-
ARDOUS RADIATION EXPOSURE.
DO NOT OPEN COVERS AND DO NOT REPAIR
YOURSELF. REFER SERVICING TO QUALIFIED
PERSONNEL.
CAUTION -LASER RADIATION WHEN OPEN.
DO NOT STARE INTO BEAM.
ATTENTION-RAYONNEMENT LASER EN CAS D'OUVERTURE.
NE PAS REGARDER DANS LE FAISCEAU.
VORSICHT -LASERSTRAHLUNG, WENN ABDECKUNG GEÖFFNET.
NICHT IN DEN STRAHL BLICKEN.
ADVARSEL -LASERSTRÅLING VED ÅBNING.
SE IKKE IND I STRÅLEN.
ADVARSEL -LASERSTRÅLING NÅR DEKSEL ÅPNES.
STIRR IKKE INN I STRÅLEN.
VARNING -LASERSTRÅLNING NÄR DENNA DEL ÄR ÖPPNAD.
STIRRA EJ IN I STRÅLEN.
VARO! -AVATTAESSA OLET ALTTIINA LASERSÄTEILYLLE.
ÄLÄ TUIJOTA SÄTEESEEN.
(Inside of player)
RISK OF ELECTRIC SHOCK
DO NOT OPEN
CAUTION

Getting Started
4
SAFETY INFORMATION
FCC INFORMATION (for US customers only)
1. IMPORTANT NOTICE: DO NOT MODIFY THIS UNIT! This
product, when installed as indicated in the instructions contained
in this manual, meets FCC requirements. Modifications not ex-
pressly approved by Yamaha may void your authority, granted by
the FCC, to use the product.
2. IMPORTANT: When connecting this product to accessories and/
or another product use only high quality shielded cables. Cable/s
supplied with this product MUST be used. Follow all installation
instructions. Failure to follow instructions could void your FCC
authorization to use this product in the USA.
3. NOTE: This product has been tested and found to comply with
the requirements listed in FCC Regulations, Part 15 for Class “B”
digital devices. Compliance with these requirements provides a
reasonable level of assurance that your use of this product in a
residential environment will not result in harmful interference with
other electronic devices.
This equipment generates/uses radio frequencies and, if not in-
stalled and used according to the instructions found in the users
manual, may cause interference harmful to the operation of other
electronic devices.
Compliance with FCC regulations does not guarantee that inter-
ference will not occur in all installations. If this product is found to
be the source of interference, which can be determined by turning
the unit “OFF” and “ON”, please try to eliminate the problem by
using one of the following measures:
Relocate either this product or the device that is being affected by
the interference.
Utilize power outlets that are on different branch (circuit breaker
or fuse) circuits or install AC line filter/s.
In the case of radio or TV interference, relocate/reorient the an-
tenna. If the antenna lead-in is 300 ohm ribbon lead, change the
lead-in to coaxial type cable.
If these corrective measures do not produce satisfactory results,
please contact the local retailer authorized to distribute this type
of product. If you can not locate the appropriate retailer, please
contact Yamaha Electronics Corp., U.S.A. 6660 Orangethorpe
Ave, Buena Park, CA 90620
The above statements apply ONLY to those products distributed
by Yamaha Corporation of America or its subsidiaries.
We Want You Listening For A Lifetime
YAMAHA and the Electronic Industries Association’s
Consumer Electronics Group want you to get the most out of
your equipment by playing it at a safe level. One that lets the
sound come through loud and clear without annoying blaring
or distortion—and, most importantly, without affecting your
sensitive hearing. Since hearing damage from
loud sounds is often undetectable until it is too
late, YAMAHA and the Electronic Industries
Association’s Consumer Electronics Group
recommend you to avoid prolonged exposure
from excessive volume levels.

5
Getting Started
B
A
30°30°
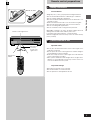
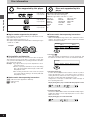
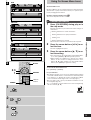
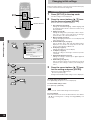
Remote control preparations
»
A
Battery installation
Use of batteries
³Align the poles (i and j) properly when inserting the batteries.
³Do not mix old and new batteries or different types of batteries.
³Do not recharge ordinary dry cell batteries.
³Do not heat or disassemble the batteries. Do not allow them to con-
tact flame or water.
³Remove the batteries if the unit is not to be used for a long time.
³Do not keep together with metallic objects such as necklaces.
³Do not use rechargeable type batteries.
³Do not use batteries if the covering has been peeled off.
Mishandling of batteries can cause electrolyte leakage which can
damage items the fluid contacts and may cause a fire.
If electrolyte leaks from the batteries, consult your dealer.
Wash thoroughly with water if electrolyte comes in contact with any
part of your body.
»
B
Correct method of use
Operation notes
³Do not place obstacles between the remote control signal sensor
and remote control unit.
³Do not expose the remote control signal sensor to direct sunlight or
to the bright light of a fluorescent light.
³Take care to keep the remote control signal sensor and end of the
remote control unit free from dust.
³If this system is installed in a rack with glass doors, the glass doors’
thickness or color might make it necessary to use the remote con-
trol a shorter distance from the system.
To prevent damage
³Never place heavy items on top of the unit.
³Do not disassemble or reconstruct the unit.
³Do not spill water or other liquids into the unit.
R6/LR6, AA, UM-3
Remote control signal sensor
Transmission
window
About 23 feet
(7 meters)
in front of the
signal sensor

Getting Started
6
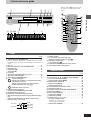
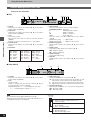
Disc information
º Region number supported by this player
Region numbers are allocated to DVD players and software accord-
ing to where they are sold.
³The region number of this player is “1”.
³The player will play DVDs marked with labels containing the region
number “1” or “ALL”.
Example:
º Playing DVDs and Video CDs
The producer of the material can control how these discs are played.
This means that you may not be able to control play of a disc with
some operations described in these operating instructions. Read the
disc’s instructions carefully.
Example: ³“/” appears when you press the skip buttons to move
to the next section.
³Resume, repeat play, and markers may not work during
play of interactive DVDs and menu play of Video CDs
with playback control.
³After showing the Karaoke menu, tracks are played
successively without returning to the menu (Video CD
with playback control).
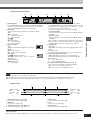
º Marks used in these operating instructions
[DVD]
: indicates features applicable to DVD only.
[VCD]: Video CD only.
[CD] : CD only.
For the purpose of these operating instructions, “DVD” stands for DVD-Video and “CD” stands for Audio CD.
º Terms used in these operating instructions
³Title/Chapter [DVD]
DVDs are divided up into large sections, titles, and smaller sections,
chapters. The numbers allocated to these sections are called title
numbers and chapter numbers.
³Track [VCD] [CD]
Video CDs and CDs are divided up into sections called tracks, and
the numbers allocated to these sections are called track numbers.
³Playback control [VCD]
If a Video CD has “playback control” written on its disc or jacket, it
means that particular scenes or information can be selected for
viewing interactively with the TV monitor using the menu screen.
This player can play Video CDs with playback control.
Using menus to control play of a Video CD is called “menu play” in
these operating instructions.
Display during menu play of a Video CD with playback control
³Interactive DVD [DVD]
An interactive DVD is DVD software which includes multiple angles,
multiple plot endings, etc. The elapsed play time of some of these
DVDs is not shown.
Display during play of an interactive DVD
Discs not supported by this
player
³Do not try to play Photo CD or CD-R.
(Data on the disc may be damaged.)
³DVD with region number other than “1” or “ALL”
³PAL discs ³CD-G ³Divx Video Disc
³DVD-ROM ³CD-RW ³DVD-Audio
³DVD-R ³DVD-RAM ³DVDiRW
³DVD-RW ³CD-ROM ³CVD
³SVCD ³SACD ³VSD
³CDV
etc.
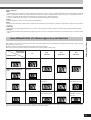
Discs supported by this player
3q (8 cm) disc/
5q (12 cm) disc
3q (8 cm) disc/
5q (12 cm) disc
3q (8 cm) disc/
5q (12 cm) disc
DVD-Video
Video CD
Audio CD
Track 1 Track 2 Track 3 Track 4 Track 5
Example:
etc.
1 ALL
3
4
1
Chapter 1 Chapter 2 Chapter 3 Chapter 1 Chapter 2
Title 1 Title 2
Example:
DVD

7
Getting Started
POWER
STOP
PAUSE
PLAY
OPEN/CLOSE
SKIP
TOP MENU
MENU
PLAY MODE
SUBTITLE
AUDIO ANGLE
ENTER
RETURNON SCREEN
123
A-B
V.S.S.
456
789
SET UP
CANCEL
0
S
10
6:9 5
∫
;
1
SLOW/
SEARCH
H/I
REPEAT
DVD
PROG.
ANGLE
96kHz 24bit
STANDBY/ON
f OPEN/CLOSE
DVD / VIDEO CD / CD
NATURAL SOUND DVD PLAYER
C
SEARCH
D
V.S.S.
D I G I T A L
:
SKIP
;
1 32 654
1
9 :
3
4
P
Q
R
T
U
V
S
6
9
G
I
K
L
M
N
O
H
5
J
;<= ?@
AB
78
CEFD
>
Page
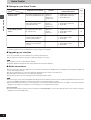
1 Standby/On button (STANDBY/ON) . . . . . . . . . . . . . . . . . . 14
Press to switch the unit from on to standby mode or vice versa.
In standby mode, the unit is still consuming a small amount of
power.
2 Disc tray . . . . . . . . . . . . . . . . . . . . . . . . . . . . . . . . . . . . . . . . . 14
3 Disc tray open/close button (<OPEN/CLOSE) . . . . . . . . . 14
4 Play button (1) . . . . . . . . . . . . . . . . . . . . . . . . . . . . . . . . . . . 14
5 Pause button (;) . . . . . . . . . . . . . . . . . . . . . . . . . . . . . . . . . . 16
6 Stop button (º) . . . . . . . . . . . . . . . . . . . . . . . . . . . . . . . . . . . 15
7 FL display
8 Virtual Surround Sound indicator (V.S.S.) . . . . . . . . . . . . . 21
9 Skip button (: SKIP 9) . . . . . . . . . . . . . . . . . . . . . . . . 16
: Search button (6 SEARCH 5) . . . . . . . . . . . . . . . . . . . 17
; Rotates during play.
Rotates fast clockwise or counterclockwise during
rapid advance (reverse).
Rotates slowly clockwise or counterclockwise
during slow-motion play. [DVD] [VCD]
Illuminates in the stop mode.
< Illuminates during playback.
Flashes when the RESUME function is ON.
= Illuminates during repeat play.
> Illuminates in the still picture (pause) mode.
? Elapsed playing time from the start of the title/track during
play
@ Audio channel information recorded in the disc being
played back (e.g. 2ch or 5.1ch)
A A DVD is loaded.
B It is possible to change the angle. [DVD]
C Illuminates during program play. [VCD] [CD]
D Title/chapter number [DVD]
Track number [VCD] [CD]
E Linear PCM of 96 kHz sampling is being played.
F Linear PCM of 24 bit is being played.
Remote control
Page
G Top menu button (TOP MENU) . . . . . . . . . . . . . . . . . . . . . . 14
H Cursor buttons (3, 4, 2, 1)/Enter button (ENTER) . . . . 14
I On screen button (ON SCREEN) . . . . . . . . . . . . . . . . . . . . . 25
J Play mode button (PLAY MODE) . . . . . . . . . . . . . . . . . . . . . 23
K Subtitle button (SUBTITLE) . . . . . . . . . . . . . . . . . . . . . . . . . 20
L Repeat button (REPEAT) . . . . . . . . . . . . . . . . . . . . . . . . . . . 22
M A-B repeat button (A-B) . . . . . . . . . . . . . . . . . . . . . . . . . . . . 22
N Virtual Surround Sound button (V.S.S.) . . . . . . . . . . . . . . . 21
O Setup button (SET UP) . . . . . . . . . . . . . . . . . . . . . . . . . . . . . 28
P Slow/Search buttons (6, 5 SLOW/SEARCH) . . . . . . . 17
Q Menu button (MENU) . . . . . . . . . . . . . . . . . . . . . . . . . . . . . . . 14
R Return button (RETURN) . . . . . . . . . . . . . . . . . . . . . . . . . . . 14
S Angle button (ANGLE) . . . . . . . . . . . . . . . . . . . . . . . . . . . . . 20
T Audio button (AUDIO) . . . . . . . . . . . . . . . . . . . . . . . . . . . . . . 19
U Numeric buttons (1–9, 0, S10) . . . . . . . . . . . . . . . . . . . . . . . 14
³To select a 2-digit number
Example: To select track 23
Press [S10], then [2] and [3].
V Cancel button (CANCEL) . . . . . . . . . . . . . . . . . . . . . . . . . . . 23
Rear (left)
Main (left)
Center
Rear (right)
Subwoofer
Main (right)
Control reference guide
Player
Buttons such as function in exactly
the same way as the buttons on the
player.

Getting Started
8
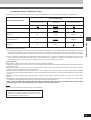
Home theater
º Settings for your Home Theater
¤1 If you have connected an AV amplifier with built-in Dolby Pro Logic decoder, you may need to connect center and rear speakers.
¤2 Connect speakers if necessary and make the speaker settings on the amplifier.
º Upgrading your television
³You can connect CRT projectors, LCD projectors, and projection televisions.
³See “Connection to a television” (á pages 12 and 13) for details on connection.
Note
³The equipment connections described are examples.
³Peripheral equipment and optional cables sold separately unless otherwise indicated.
º Before connections
³Ensure that this player and other equipment to be connected are switched to the standby mode or off and disconnect the AC power supply cord
before commencing connection.
³Do not block ventilation holes of any of the equipment and arrange them so that air can circulate freely.
³Read through the instructions before connecting other equipment.
³Ensure that you observe the color coding when connecting audio and video cables.
Note
³TV volume may be lower when playing DVDs than during television broadcasts. Turn the volume up while playing DVDs and reduce it to the
previous level before switching the source back to television to avoid sudden changes in volume.
³When you have finished connection, select the appropriate screen type at the initial setting “6 TV Aspect” according to your television (4:3/16:9)
(á page 31). No changes are needed if you connect the player to a conventional television (4:3).
Conserving power
³The unit consumes approx. 2.0 W even when it is turned off with [STANDBY/ON]. To save power when the unit is not to be used for a long time,
unplug it from the household AC outlet.
Set up
System
To enjoy 5.1 channel
surround sound
To enjoy Dolby surround
sound
¤1
To enjoy linear PCM sound
Equipment to be connected
AV amplifier with digital input and
built-in Dolby Digital/DTS decoder
AV amplifier with digital input and
built-in Dolby Digital decoder
(without DTS decoder)
AV amplifier with built-in Dolby
Pro Logic decoder
Stereo amplifier with digital input
and built-in high sampling DA
converter rated at 96 kHz
Stereo amplifier with digital input
and built-in conventional DA
converter
Speakers
³Main L/R
³Center
¤2
³Rear L/R¤2
³Subwoofer¤2
³Main L/R
³Center
¤2
³Rear L/R¤2
³Subwoofer¤2
³Main L/R
³Center
³Rear L/R
Main L/R
Main L/R
Settings in
“7 Digital Audio Output”
1. PCM down Conversion⇒“Yes”
2. Dolby Digital⇒“Bitstream”
3. DTS⇒“Bitstream”
1. PCM down Conversion⇒“Yes”
2. Dolby Digital⇒“Bitstream”
3. DTS⇒“Off”
1. PCM down Conversion⇒“Yes”
2. Dolby Digital⇒“PCM”
3. DTS⇒“Off”
1. PCM down Conversion⇒“No”
2. Dolby Digital⇒“PCM”
3. DTS⇒“Off”
1. PCM down Conversion⇒“Yes”
2. Dolby Digital⇒“PCM”
3. DTS⇒“Off”
Page
9
9
10
11
11

9
Getting Started
L
AUDIO OUT
VIDEO OUT
VIDEO
S VIDEO
R
COMPONENT VIDEO
P
R
P
B
Y
OPTICAL
PCM/Î DIGITAL
DTS
SUBWOOFER
AC IN
OPTICAL
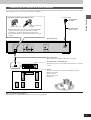
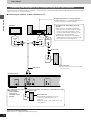
Connecting an AV amplifier with a built-in decoder
You can enjoy the 5.1-channel surround sound found on DVD recorded with Dolby Digital or DTS Digital Surround by connecting an AV amplifier
with a built-in decoder or a separate decoder-amplifier combination.
When you have finished connection
Adjust each item of “7 Digital Audio Output” to suit your decoder (á page 33).
Back of the player
Speaker
You can connect from 3 to 5 speakers including the main two.
³Main speaker (L/R)
³Center speaker
³Rear speaker (L/R)
³Subwoofer
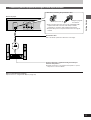
Note when connecting the optical fiber cable
³Remove the dust protection cap from the optical digital audio
output terminal and connect the cable firmly so that the
configurations of both the cable and the terminal match.
³Keep the dust protection cap and reattach when not using the
terminal.
Dust protection cap
Align the plug with the
terminal
Optical fiber cable
³Do not bend the optical fiber cable when connecting it.
AV amplifier with a built-in decoder
³Read the instructions for the amplifier and speakers for connection
details.
AC 120 V, 60 Hz
To household
AC outlet
AC power supply
cord (included)

10
Getting Started
L
AUDIO OUT
VIDEO OUT
VIDEO
S VIDEO
R
COMPONENT VIDEO
P
R
P
B
Y
OPTICAL
PCM/Î DIGITAL
DTS
SUBWOOFER
R
L
AUDIO
IN
INPUT
R
L
AUX IN
SUB
WOOFER
INPUT
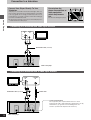
Home theater
Connecting audio equipment with 2-channel analog audio input terminals
You can enjoy stereo sound if you connect an amplifier, system component or TV that has 2-channel analog audio input terminals. By connecting a
subwoofer, you can also enjoy powerful bass.
º Connecting the amplifier, system component or TV
When you have finished connection
Adjust each item of “7 Digital Audio Output” (á page 33).
AV amplifier with built-in Dolby Pro Logic
decoder
³If you connect an AV amplifier with built-in
Dolby Pro Logic decoder, you will also need to
connect center and rear speakers to enjoy
surround sound. Read the instructions for the
equipment for connection details.
³Turn off V.S.S. (á page 21) and subwoofer
output (á item C on page 27). Dolby Pro Logic
will not function correctly if they are on.
º If connecting
audio equipment
which has no
subwoofer output
terminal
Amplifier and speakers or system component
³Read the instructions for the amplifier and speakers or
system component for connection details.
Audio cable
Audio cable
Active subwoofer
³Use the On-Screen Menu Icons to turn
subwoofer output on (á item C on
page 27).
³Adjust the volume of the subwoofer to suit
your preference.
Back of the player
Television
or
Active subwoofer
³Place the subwoofer as close as possible
to the front center.
Audio cable

11
Getting Started
L
AUDIO OUT
VIDEO OUT
VIDEO
S VIDEO
R
OPTICAL
PCM/Î DIGITAL
DTS
SUBWOOFER
OPTICAL
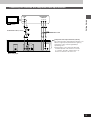
Connecting audio equipment with digital audio input terminals
When you have finished connection
Adjust each item of “7 Digital Audio Output” (á page 33).
Back of the player
Note when connecting the optical fiber cable
Dust protection cap
Align the plug with
the terminal
³Remove the dust protection cap from the optical digital audio
output terminal and connect the cable firmly so that the
configurations of both the cable and the terminal match.
³Keep the dust protection cap and reattach when not using the
terminal.
Optical fiber cable
³Do not bend the optical fiber cable when connecting it.
System component or amplifier with digital audio input
terminals and speakers
³Read the instructions for the amplifier and speakers or system
component for connection details.

12
Getting Started
L
AUDIO OUT
VIDEO OUT
VIDEO
S VIDEO
R
OPTICAL
PCM/Î DIGITAL
DTS
SUBWOOFER
AUDIO
IN
L
R
S VIDEO
IN
S video output terminal
The S (separate) video output terminal achieves a clearer
picture than the video output terminal by separating the color (C)
and luminance (Y) signals before transmitting them to the
television. (Actual results depend on the television.)
Television
Audio/video cable (included)
S video cable
Back of the player
Connect Your Player Directly To Your
Television.
If the player is connected to the television through a video cas-
sette recorder, the picture may not be played back correctly due
to the copy guard. So we strongly recommend you do not con-
nect the player to your video cassette recorder when setting up
your home entertainment system.
³Connect to the television section if you connect the player to a
combined television-video player.
Do not place the
player on amplifiers or
other equipment
which may become
hot.
The heat can damage the player.
Connecting to a television with video input terminal
Connection to a television
L
AUDIO OUT
VIDEO OUT
VIDEO
S VIDEO
R
OPTICAL
PCM/Î DIGITAL
DTS
SUBWOOFER
AUDIO
IN
L
R
VIDEO
IN
Back of the player
Audio/video cable (included)
Television
Connecting to a television with S video input terminal

13
Getting Started
L
AUDIO OUT
VIDEO OUT
VIDEO
S VIDEO
R
COMPONENT VIDEO
PR
PB Y
OPTICAL
PCM/Î DIGITAL
DTS
SUBWOOFER
AUDIO
IN
L
R
COMPONENT
VIDEO IN
YP
B PR
Component video output terminals (Y/PB/PR)
The component video output terminals output the color
difference signals (P
B/PR) and luminance signal (Y)
separately in order to achieve high fidelity in
reproducing colors.
³The description of the component video input
terminals depends on the television or monitor
(e.g. Y/P
B/PR, Y/B-Y/R-Y, Y/CB/CR and so on).
Connect to terminals of the same color.
Television
Audio/video cable (included)
Video cable
Back of the player
Connecting to a television with component video input terminals

Basic Operations
14
1
2
3
4
ENTER
POWER
STOP
PAUSE
PLAY
OPEN/CLOSE
SKIP
TOP MENU
MENU
PLAY MODE
SUBTITLE
AUDIO ANGLE
ENTER
RETURNON SCREEN
123
A-B
V.S.S.
456
789
SET UP
CANCEL
0
S
10
6:9 5
∫
;
1
SLOW/
SEARCH
H/I
REPEAT
1
2
4
TOP MENU
ENTER
MENU
RETURN
:, 9
Open
Reading
Close
A
SKIP
123
456
789
0
S
10
STANDBY/ON
f OPEN/CLOSE
DVD / VIDEO CD / CD
NATURAL SOUND DVD PLAYER
C
SEARCH
D
V.S.S.
D I G I T A L
:
SKIP
;
2 431
:
SKIP
;
STANDBY/ON
f OPEN/CLOSE
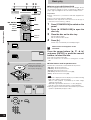
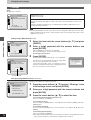
Basic play
º Before enjoying DVD/Video CD/CD
The menu language for this player has been set to English, but you
can change the language to French or Spanish (á “3 Menu Lan-
guage”, page 31). English has been used in the examples shown.
Preparations
³Ensure connections to your television and audio equipment are
correct.
³Turn on your television and other equipment.
³Switch the video input mode on the television to suit the type of
connection you have made (e.g., VCR 2).
1 Press [STANDBY/ON] to switch on the
power.
2 Press [< OPEN/CLOSE] to open the
disc tray.
3 Place the disc on the disc tray.
³Insert inside the guides.
³Do not load more than one disc.
4 Press [1].
The disc tray is automatically closed and play begins.
When a menu screen appears on the
»
A
TV monitor
Press the cursor buttons [3, 4, 2, 1]
and press [ENTER], or press the numeric
buttons, to select the item.
Play of the selected item now begins.
³The cursor buttons are not effective for selecting items for Video
CDs.
º Other buttons used to operate menus
Read the disc’s instructions for further details about operation.
[9 SKIP]: Shows the next menu.
[: SKIP]: Shows the previous menu.
[RETURN]: Shows the menu screen.
[TOP MENU]: Shows the first menu screen. [DVD]
[MENU]: Shows the menu screen. [DVD]
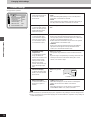
Note
³“NO PLAY” is displayed on the FL display if you load the following
kinds of discs and they cannot be played:
³
DVD for which playback is prohibited by the initial settings
“2 Ratings” (á page 30).
³
DVD with a region number other than “1” or “ALL” (á page 6).
³
If the disc is put in upside down (and it is a single sided disc).
³When “” appears on the TV monitor when a button is pressed, the
operation is prohibited by the player or disc.
Cursor
buttons/
5q (12 cm) disc
3q (8 cm) disc
Label must face upward.
(With double-sided discs, load
so the label for the side you
want to play is facing up.)
Numeric
buttons

15
Basic Operations
A
B
2
1
C
Press PLAY to Chapter Preview
POWER
STOP
PAUSE
PLAY
OPEN/CLOSE
SKIP
TOP MENU
MENU
6:9 5
∫
;
1
SLOW/
SEARCH
H/I
POWER
STOP
PAUSE
PLAY
OPEN/CLOSE
SKIP
TOP MENU
MENU
6:9 5
∫
;
1
SLOW/
SEARCH
H/I
∫
STOP PLAY
1
1·2
POWERH/I
STANDBY/ON
f OPEN/CLOSE
DVD / VIDEO CD / CD
NATURAL SOUND DVD PLAYER
C
SEARCH
D
V.S.S.
D I G I T A L
:
SKIP
;
STANDBY/ON
f OPEN/CLOSE
DVD / VIDEO CD / CD
NATURAL SOUND DVD PLAYER
C
SEARCH
D
V.S.S.
D I G I T A L
:
SKIP
;
1∫
STANDBY/ON
1·2
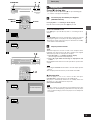
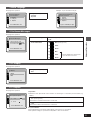
Basic play
»
A
Stopping play
Press [º] during play.
³The player records the point where [º] was pressed during play.
(“!” flashes on the player’s FL display.)
To resume play from where you stopped it
»
B
(RESUME function)
Press [1] while “!” is flashing on the FL display.
Play will resume from the point where [º] was pressed.
To clear the RESUME function
Press [º] again or open the disc tray while “!” is flashing on the FL
display.
Note
³The RESUME function works only with titles for which the elapsed
playing time appears on the player’s FL display during playback.
³This feature remains active if the player is switched to the standby
mode and then turned back ON.
»
C
Chapter preview function
[DVD ]
This function plays the first few seconds of each chapter from the
beginning of the title up to the point where operation was stopped.
This makes it possible to review previous chapters.
1. Press [1] while “!” is flashing on the FL display.
(The message illustrated is briefly displayed.)
2. Press [1] again while the message is displayed on the
screen.
Normal playback will commence from the point where operation was
stopped.
Note
³Canceling the RESUME function will also clear the chapter preview
function.
³The chapter preview function may not work with some DVDs.
º After operation
When the player is not in use, remove the disc and press
[STANDBY/ON] to switch the player to the standby mode.
The player is automatically switched to the standby mode after
30 minutes or so have elapsed in the stop mode.
(Auto power-off function)
Note
³The disc continues to rotate while the menu is displayed even after
the player has finished playing a particular item. Stop the player
when you finish viewing to preserve the player’s motor and prevent
screen burn.

Basic Operations
16
[
:
][
9
]
POWER
STOP
PAUSE
PLAY
OPEN/CLOSE
SKIP
TOP MENU
MENU
PLAY MODE
SUBTITLE
AUDIO ANGLE
ENTER
RETURNON SCREEN
123
A-B
V.S.S.
456
789
SET UP
CANCEL
0
S
10
6:9 5
∫
;
1
SLOW/
SEARCH
H/I
REPEAT
A
B
C
PLAY
1
PAUSE
SKIP
:9
;
:, 9
SKIP
STANDBY/ON
f OPEN/CLOSE
DVD / VIDEO CD / CD
NATURAL SOUND DVD PLAYER
C
SEARCH
D
V.S.S.
D I G I T A L
:
SKIP
;
:
SKIP
;
1
PAUSE
;
;
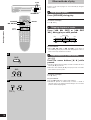
Other methods of play
Features on the next few pages are accessed mainly by using the
remote control.
»
A
Still picture (Pause)
Press [; PAUSE] during play.
To return to normal play
Press [1 PLAY].
»
B
Skipping chapters or tracks
Press [:, 9 SKIP] or [: SKIP
9], during play or while paused.
For your reference
³When [:, 9 SKIP] or [: SKIP 9] on the player is
pressed during menu play of Video CDs with playback control, a
menu screen may sometimes be recalled.
»
C
Frame advance (Frame reverse)
[DVD ] [VCD]
Press the cursor buttons [2, 1] while
paused.
³The disc is advanced (reversed) by one frame each time the cursor
buttons [2, 1] are pressed.
³When the cursor buttons [2, 1] are kept pressed, consecutive
frame advance (reverse) works.
To return to normal play
Press [1 PLAY].
For your reference
³Pressing [; PAUSE] also activates frame advance.
³Whether the pictures are advanced by a “Frame” or “Field” is
automatic, but you can change the initial settings to choose how the
picture is advanced (á page 34).
Reverse Forward
Cursor
buttons
Reverse
(DVD only)
Forward
Play position
twice once twiceonce
Chapter/track Chapter/track Chapter/track

17
Basic Operations
A
B
POWER
STOP
PAUSE
PLAY
OPEN/CLOSE
SKIP
TOP MENU
MENU
PLAY MODE
SUBTITLE
AUDIO ANGLE
ENTER
RETURNON SCREEN
123
A-B
V.S.S.
456
789
SET UP
CANCEL
0
S
10
6:9 5
∫
;
1
SLOW/
SEARCH
H/I
REPEAT
6, 5
SLOW/SEARCH
PLAY1
STANDBY/ON
f OPEN/CLOSE
DVD / VIDEO CD / CD
NATURAL SOUND DVD PLAYER
C
SEARCH
D
C
SEARCH
D
V.S.S.
D I G I T A L
:
SKIP
;
1
65
SLOW/
SEARCH
65
SLOW/
SEARCH
Other methods of play
»
A
Slow-motion play
[DVD] [VCD]
Press [6, 5 SLOW/SEARCH] or
[6 SEARCH 5] while paused
(á page 16).
³Each press increases the speed of slow-motion.
³There are five speeds of slow-motion.
To return to normal play
Press [1 PLAY].
For your reference
³When [6, 5 SLOW/SEARCH] or [6 SEARCH 5] on the
player is pressed during menu play of Video CDs with playback
control, a menu screen may sometimes be recalled.
»
B
Rapid advance (Rapid reverse)
Press [6, 5 SLOW/SEARCH] or
[6 SEARCH 5] during play.
³Each press increases the speed of the search.
³There are five speeds of advance (reverse).
To return to normal play
Press [1 PLAY].
For your reference
³When [6, 5 SLOW/SEARCH] or [6 SEARCH 5] on the
player is pressed during menu play of Video CDs with playback
control, a menu screen may sometimes be recalled.
³For DVDs and Video CDs, audio will be heard during searching (for-
ward direction only) at the initial search speed. (To turn audio off,
á “2 Audio during Search”, on page 34.)
ForwardReverse
(DVD only)
ForwardReverse

18
Basic Operations
POWER
STOP
PAUSE
PLAY
OPEN/CLOSE
SKIP
TOP MENU
MENU
PLAY MODE
SUBTITLE
AUDIO ANGLE
ENTER
RETURNON SCREEN
123
A-B
V.S.S.
456
789
SET UP
CANCEL
0
S
10
6:9 5
∫
;
1
SLOW/
SEARCH
H/I
REPEAT
A
B
C
2
2
1
1
ENTER
1
1
2
1
2
TOP MENU
MENU
TOP MENU
MENU
123
456
789
0
S
10
The disc’s top
menu
Title 1
Example: if you press the buttons while you are playing title 2
Menu
Title 2 Title 3
Menu Menu
STOP
∫
Other methods of play
»
A
Canceling playback control
[VCD]
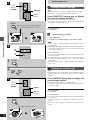
1 Press [º STOP] after the menu screen
appears (after step 4 on page 14).
“PBC” will be cleared from the player’s FL display.
2 Press the numeric buttons to select a
track
(á item 7 on page 7 for number entry).
Play begins.
³Refer to the jacket etc. of the disc concerned for the track
numbers.
³Press [1] to start play from the beginning of the disc.
To return to menu play
Press [º STOP] to stop play, press [MENU], and press the numeric
buttons to select an item.
“PBC” lights on the player’s FL display.
»
B
Using menus to play
[DVD]
By calling up menus during play, you can start play from a specific
title or chapter, or change the soundtrack and subtitle languages.
Press [TOP MENU] or [MENU] during
play to display the menu.
³Press again to return to what you were watching.
Press the cursor buttons [3, 4, 2,
1] to select an item and press
[ENTER].
The selected item is confirmed.
³Repeat if other menus are shown.
DVDs can have several menus. The menu displayed when you press
[TOP MENU] may be different to the menu displayed when you press
[MENU]. [C]
For your reference
³Menu content depends on the disc. These operating instructions
describe the basic steps.
³Both buttons take you to the same menu if the disc has only one
menu.

19
Advanced Operations
A
2
1
TOP MENU
MENU
PLAY MODE
SUBTITLE
AUDIO ANGLE
ENTER
RETURNON SCREEN
123
A-B
V.S.S.
456
789
SET UP
CANCEL
0
S
10
REPEAT
AUDIO
ENTER
B
TOP MENU
MENU
PLAY MODE
SUBTITLE
AUDIO ANGLE
ENTER
RETURNON SCREEN
123
AB
REPEAT
1
2·
ENTER
Hello
1
Î Digital
ENG
3/2.1ch
2
FRA
Bonjour
Î Digital
3/2.1ch
AUDIO
AUDIO
AUDIO
1
U
Vocal
ON
L R
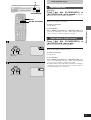
Advanced operations
»
A
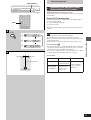
Changing soundtrack
[DVD]
Some DVDs have more than one soundtrack recorded on them, and
you can change soundtrack during play.
Press [AUDIO] during play to display the
current soundtrack.
The number changes each time you press the button.
³You can also use the cursor buttons [3, 4], or the numeric buttons
to change the soundtrack.
To clear the display
Press [ENTER].
For your reference
³You can only select languages or sound formats if they have been
recorded on the disc you are playing.
³If resume (á page 15) is canceled or if you stop play of an interac-
tive DVD, the soundtrack revert to the initial settings. (á page 29)
³Some discs allow changes to soundtrack only by using the disc’s
menus.
Switching vocals ON or OFF for Karaoke
»
B
discs
[DVD] [VCD]
1. Press [AUDIO] during play.
2. Press the cursor buttons [3, 4, 2, 1] or press [AUDIO] to
change the setting.
DVD Karaoke [2, 1]
³Solo ³Duet
–––: Vocal OFF –––: Vocal OFF
ON: Vocal ON 1r2: Vocal 1, 2 ON
V1: Vocal 1 only ON
V2: Vocal 2 only ON
³Choose “–––” for Karaoke.
³Choose “V1” or “V2” to duet with the player.
Video CD ([3, 4] or [AUDIO])
LR: Vocals (Vocals seem to come from the right)
L: No Vocals
R: Vocals (Vocals seem to come from both left and right)
³Choose “L” for Karaoke.
To clear the display
Press [ENTER].
For your reference
³Karaoke discs may show a menu after each track. Some will have a
menu that allows you to play all the tracks.
³Some discs require different operations to those described. Read
the disc’s instructions for details.
DVD
Video CD
Soundtrack being
played back
(“–” indicates a soundtrack
is not recorded.)
Cursor
buttons/
Numeric
buttons

20
Advanced Operations
A
2
TOP MENU
MENU
PLAY MODE
SUBTITLE
AUDIO ANGLE
ENTER
RETURNON SCREEN
123
A-B
V.S.S.
456
789
SET UP
CANCEL
0
S
10
REPEAT
ENTER
B
TOP MENU
MENU
PLAY MODE
SUBTITLE
AUDIO ANGLE
ENTER
RETURNON SCREEN
123
AB
REPEAT
2
1
SUBTITLE
C
TOP MENU
MENU
PLAY MODE
SUBTITLE
AUDIO ANGLE
ENTER
RETURNON SCREEN
123
A-B
V.S.S.
456
789
SET UP
CANCEL
0
S
10
REPEAT
I love you
1
ENG
ON
2
FRA
ON
Je t’aime
1
SUBTITLE
ANGLE
3
ANGLE
1
SUBTITLE
ENTER
Advanced operations
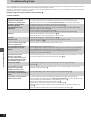
»
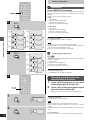
A
Changing subtitle language
[DVD]
Some DVDs have more than one subtitle language recorded on
them, and you can change subtitle language during play.
Press [SUBTITLE] during play to display
the current language number.
The number changes each time you press the button.
³You can also use the cursor buttons [3, 4] or the numeric buttons
to change the language number.
To clear the display
Press [ENTER].
»
B
To clear/display the subtitles
1. Press [SUBTITLE].
2. Press the cursor buttons [2, 1] to select “ON” or “OFF”.
Note
³In some cases, the subtitle language is not changed to the selected
one immediately.
³When a disc supporting closed captions is played, the subtitles and
closed captions may overlap each other on the TV monitor. In this
case, turn the subtitles off.
For your reference
³You can only select languages if they have been recorded on the
disc you are playing.
³If resume (á page 15) is canceled or if you stop play of an interac-
tive DVD, the subtitle languages revert to the initial settings
(á page 29).
³Some discs allow changes to subtitle languages only by using the
disc’s menus.
»
C
Viewing from another angle
[DVD]
Some DVDs allow you to view the same scene from different angles.
“ANGLE” lights on the FL display to indicate that the feature is
available.
Press [ANGLE] during play to display the
current angle number.
The number changes each time you press the button.
³You can also use the cursor buttons [3, 4] or the numeric buttons
to change the angle.
To clear the display
Press [ENTER].
For your reference
³You can only select angles if they have been recorded on the disc
you are playing.
³Some discs allow you to set angles before multi-angle scenes are
played.
³Some discs allow changes to angles only by using the disc’s
menus.
Cursor
buttons/
Numeric
buttons
Numeric
buttons
Subtitle language number being played back
(“––” indicates subtitles are not recorded)
Cursor
buttons/
Angle number being played back
Sayfa yükleniyor...
Sayfa yükleniyor...
Sayfa yükleniyor...
Sayfa yükleniyor...
Sayfa yükleniyor...
Sayfa yükleniyor...
Sayfa yükleniyor...
Sayfa yükleniyor...
Sayfa yükleniyor...
Sayfa yükleniyor...
Sayfa yükleniyor...
Sayfa yükleniyor...
Sayfa yükleniyor...
Sayfa yükleniyor...
Sayfa yükleniyor...
Sayfa yükleniyor...
Sayfa yükleniyor...
Sayfa yükleniyor...
Sayfa yükleniyor...
Sayfa yükleniyor...
-
 1
1
-
 2
2
-
 3
3
-
 4
4
-
 5
5
-
 6
6
-
 7
7
-
 8
8
-
 9
9
-
 10
10
-
 11
11
-
 12
12
-
 13
13
-
 14
14
-
 15
15
-
 16
16
-
 17
17
-
 18
18
-
 19
19
-
 20
20
-
 21
21
-
 22
22
-
 23
23
-
 24
24
-
 25
25
-
 26
26
-
 27
27
-
 28
28
-
 29
29
-
 30
30
-
 31
31
-
 32
32
-
 33
33
-
 34
34
-
 35
35
-
 36
36
-
 37
37
-
 38
38
-
 39
39
-
 40
40


Yamaha DVD-S796 Kullanım kılavuzu
- Kategori
- Dvd oynatıcılar
- Tip
- Kullanım kılavuzu
diğer dillerde
- español: Yamaha DVD-S796 Manual de usuario
- français: Yamaha DVD-S796 Manuel utilisateur
- italiano: Yamaha DVD-S796 Manuale utente
- svenska: Yamaha DVD-S796 Användarmanual
- čeština: Yamaha DVD-S796 Uživatelský manuál
- polski: Yamaha DVD-S796 Instrukcja obsługi
- Deutsch: Yamaha DVD-S796 Benutzerhandbuch
- português: Yamaha DVD-S796 Manual do usuário
- English: Yamaha DVD-S796 User manual
- dansk: Yamaha DVD-S796 Brugermanual
- русский: Yamaha DVD-S796 Руководство пользователя
- Nederlands: Yamaha DVD-S796 Handleiding
- română: Yamaha DVD-S796 Manual de utilizare
İlgili makaleler
-
Yamaha DV-S5270 Kullanım kılavuzu
-
-
-
-
-
-
-
-
Yamaha DVD-S80 Kullanım kılavuzu
-