Asus RT-AC66U B1 Hızlı başlangıç Kılavuzu
- Kategori
- Mikser / mutfak robotu aksesuarları
- Tip
- Hızlı başlangıç Kılavuzu

Quick Start Guide
RT-AC66U B1
Wireless-AC1750 Dual Band Gigabit
Router
EEU15861 / Revised Editon V7 / August 2019

Table of contents
English .............................................................................................3
Български ......................................................................................16
Hrvatski ........................................................................................... 29
Čeština .............................................................................................42
Eesti ..................................................................................................55
Magyar ............................................................................................68
Lietuvių ...........................................................................................81
Latviski ............................................................................................94
Polski ................................................................................................107
Русский ...........................................................................................120
Română ...........................................................................................133
Srpski ...............................................................................................146
Slovensky........................................................................................159
Slovenščina ....................................................................................172
Türkçe ..............................................................................................185
Українська .....................................................................................198

3
English
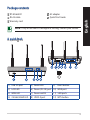
Package contents
RT-AC66U B1 AC adapter
RJ-45 cable Quick Start Guide
Warranty card
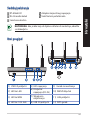
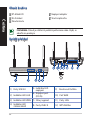
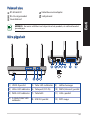
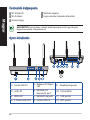
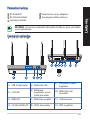
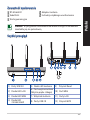
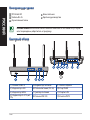
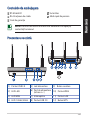
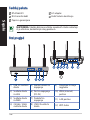
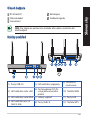
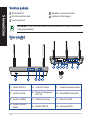
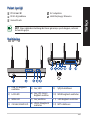
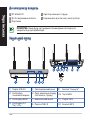
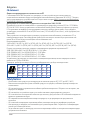
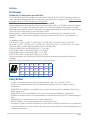
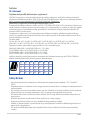
A quick look
1) USB 3.0 port 5) Power LED 9) Reset button
2) LAN LED 6) Power (DC-IN) port 10) WAN port
3) WAN LED 7) Power switch 11) LAN ports
4) 2.4GHz/5GHZ LED 8) USB 2.0 port 12) WPS button
NOTE: If any of the items is damaged or missing, contact your retailer.

4
English
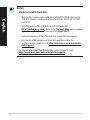
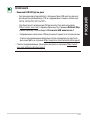
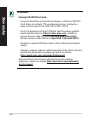
NOTES:
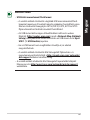
• USB External HDD/Flash disk:
•ThewirelessrouterworkswithmostUSBHDDs/Flashdisksupto
2TBandsupportsread-writeaccessforFAT16,FAT32,EXT2,EXT3,
andNTFS.
•TosafelyremovetheUSBdisk,launchthewebGUI
(http://router. asus.com), then in the Network Map page's upper
right corner, click the USB icon and click Eject USB 1.
•IncorrectremovaloftheUSBdiskmaycausedatacorruption.
•Forthelistoflesystemandharddiskpartitionsthatthe
wirelessroutersupports,visithttp://event.asus.com/networks/
disksupport
• Forthelistofprintersthatthewirelessroutersupports,visit
http://event.asus.com/networks/printersupport

5
English
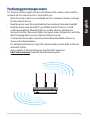
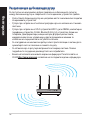
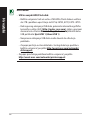
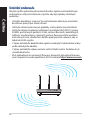
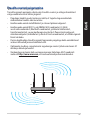
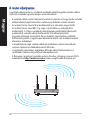
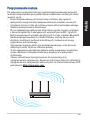
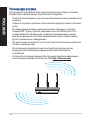
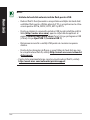
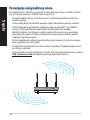
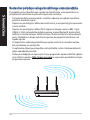
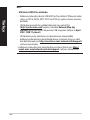
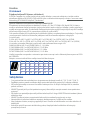
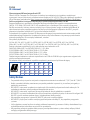
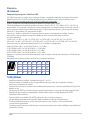
Positioning your wireless router
Forthebestwirelesssignaltransmissionbetweenthewirelessrouterandthe
networkdevicesconnectedtoit,ensurethatyou:
• Placethewirelessrouterinacentralizedareaforamaximumwirelesscoverage
forthenetworkdevices.
• Keepthedeviceawayfrommetalobstructionsandawayfromdirectsunlight.
• Keepthedeviceawayfrom802.11gor20MHzonlyWi-Fidevices,2.4GHz
computerperipherals,Bluetoothdevices,cordlessphones,transformers,
heavy-dutymotors,uorescentlights,microwaveovens,refrigerators,andother
industrialequipmenttopreventsignalinterferenceorloss.
• Toensurethebestwirelesssignal,orientthethreedetachableantennasas
shown in the drawing below.
• Foroptimumperformance,adjusttheinternalcoolingsystem.Refertotheuser
manual for details.
• Alwaysupdatetothelatestrmware.VisittheASUSwebsiteat
http://www.asus.comtogetthelatestrmwareupdates.
90
°
90
°

6
English
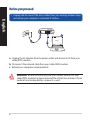
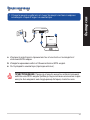
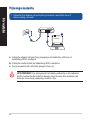
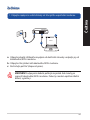
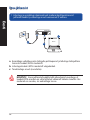
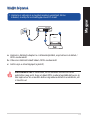
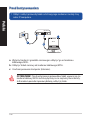
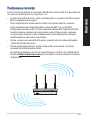
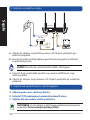
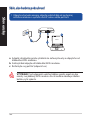
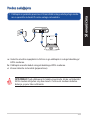
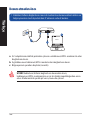
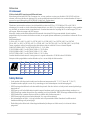
Before you proceed
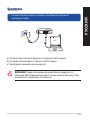
1. Unpluganddisconnectthewires/cablesfromyourexistingmodemsetup
and release your computer’s outmoded IP address.
a: Unplug the AC adapter from the power outlet and disconnect it from your
cable/ADSL modem.
b: Disconnect the network cable from your cable/ADSL modem.
c: Reboot your computer (recommended).
Modem
OFF!
a
b
c
d
a
b
c
d
a
b
c
d
WARNING! Before disconnecting the wires/cables, ensure that your
cable/ADSL modem has been turned o for at least two minutes. If your
modemhasabackupbattery,removeitaswell.

7
English
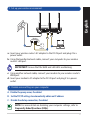
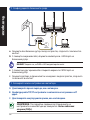
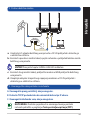
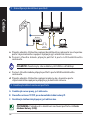
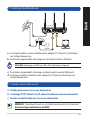
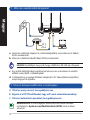
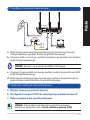
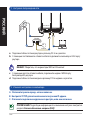
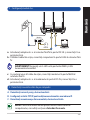
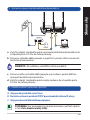
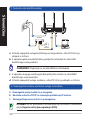
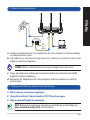
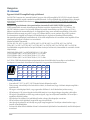
2. Setupyourwirelessenvironment.
a: Insert your wireless router’s AC adapter to the DC-IN port and plug it to a
power outlet.
b: Using the bundled network cable, connect your computer to your wireless
router’s LAN port.
IMPORTANT! Ensure that the WAN and LAN LEDs are blinking.
c: Using another network cable, connect your modem to your wireless router’s
WAN port.
d: Insert your modem’s AC adapter to the DC-IN port and plug it to a power
outlet.
3. Disable some settings on your computer.
A. Disable the proxy server, if enabled.
B. Set the TCP/IP settings to automatically obtain an IP address.
C. Disable the dial-up connection, if enabled.
NOTE:Formoredetailsondisablingyourcomputersettings,referto
Frequently Asked Questions (FAQs).
RT-AC66U B1
c
WAN
a
d
b
LAN
Internet
Modem

8
English
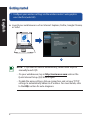
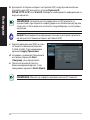
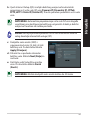
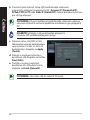
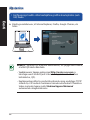
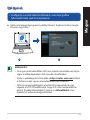
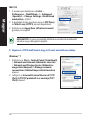
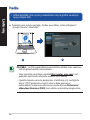
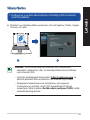
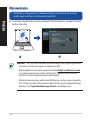
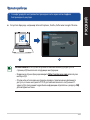
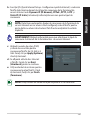
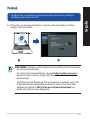
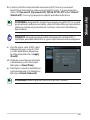
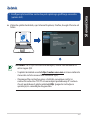
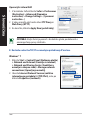
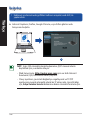
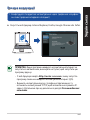
1. Congureyourwirelesssettingsviathewirelessrouter’swebgraphics
user interface (web GUI).
a: LaunchyourwebbrowsersuchasInternetExplorer,Firefox,GoogleChrome,
or Safari.
Getting started
a
b
c
d
a
b
c
d
NOTE: If QIS does not launch automatically, follow these steps to
manuallylaunchQIS:
•Onyourwebbrowser,keyinhttp://router.asus.com and run the
Quick Internet Setup (QIS) Wizard again.
•Disabletheproxysettings,dial-upconnection,andsetyourTCP/IP
settingstoautomaticallyobtainanIPaddress.Formoredetails,refer
to the FAQs section for auto-diagnosis.

9
English
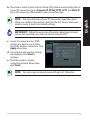
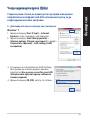
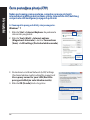
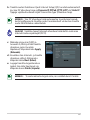
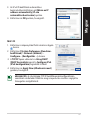
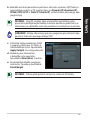
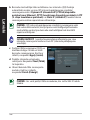
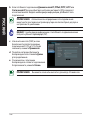
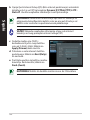
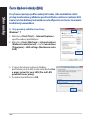
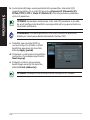
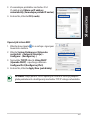
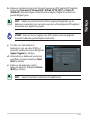
b: The wireless router’s Quick Internet Setup (QIS) feature automatically detects
if your ISP connection type is Dynamic IP, PPPoE, PPTP, L2TP, and Static IP.
Keyinthenecessaryinformationforyourconnectiontype.
IMPORTANT!ObtainthenecessaryinformationaboutyourInternet
connectiontypefromyourInternetServiceProvider(ISP).
NOTE: The auto-detection of your ISP connection type takes place
whenyoucongurethewirelessrouterforthersttimeorwhenyour
wireless router is reset to its default settings.
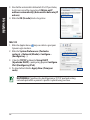
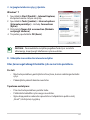
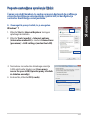
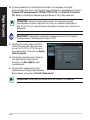
NOTE: You can assign a network name with up to 32 characters.
c: Assign the network name (SSID)
and security key for your 2.4GHz
and 5GHz wireless connection. Click
Apply when done.
d: Your Internet and wireless settings
are displayed. Click Next to
continue.
e: Read the wireless network
connection tutorial. When done,
click Finish.

10
English
English
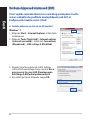
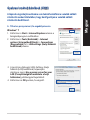
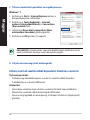
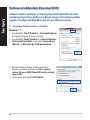
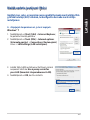
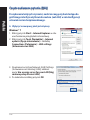
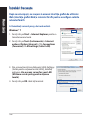
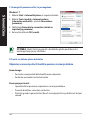
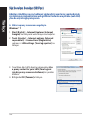
Frequently Asked Questions (FAQs)
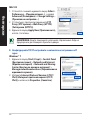
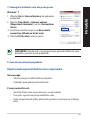
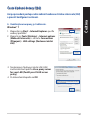
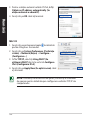
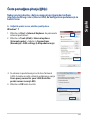
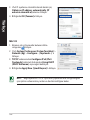
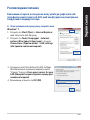
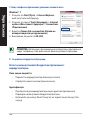
After following the steps, I still cannot access the wireless router’s web
graphics user interface (web GUI) to congure the wireless router settings.
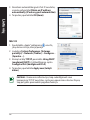
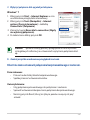
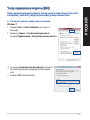
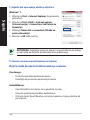
A. Disable the proxy server, if enabled.
Windows® 7
1. Click Start > Internet Explorer to launch the web
browser.
2. Click Tools > Internet options > Connections tab
> LAN settings.
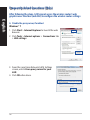
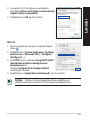
3. FromtheLocalAreaNetwork(LAN)Settings
screen, untick Use a proxy server for your
LAN.
4. Click OK when done.
English

11
English
English
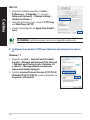
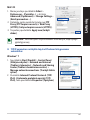
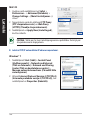
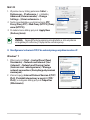
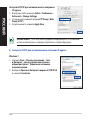
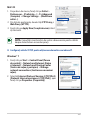
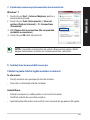
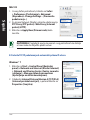
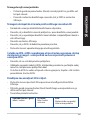
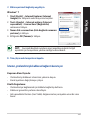
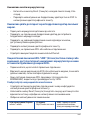
MAC OS
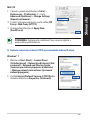
1. FromyourSafaribrowser,clickSafari >
Preferences > Advanced > Change Settings...
2. FromtheNetworkscreen,deselectFTP Proxy
and Web Proxy (HTTP).
3. Cllick Apply Now when done.
NOTE: Refer to your browser's help feature for details on disabling the
proxyserver.
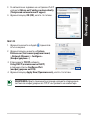
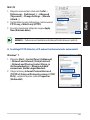
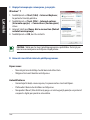
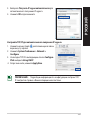
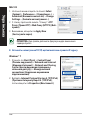
B. Set the TCP/IP settings to automatically obtain an IP address.
Windows® 7
1. Click Start > Control Panel > Network and
Internet > Network and Sharing Center >
Manage network connections.
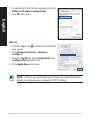
2. Select Internet Protocol Version 4 (TCP/IPv4),
then click Properties.
English

12
English
English
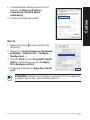
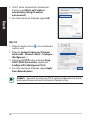
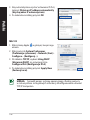
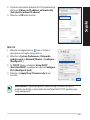
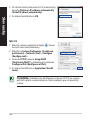
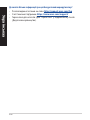
3. ToobtaintheiPv4IPsettingsautomatically,tick
Obtain an IP address automatically.
4. Click OK when done.
MAC OS
1. Click the Apple icon located on the top left of
your screen.
2. Click System Preferences > Network >
Congure...
3. FromtheTCP/IP tab, select Using DHCP in the
Congure IPv4 dropdown list.
4. Cllick Apply Now when done.
NOTE: Refer to your operating system’s help and support feature for
detailsonconguringyourcomputer’sTCP/IPsettings.
English

13
English
English
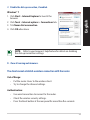
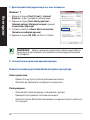
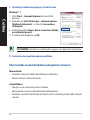
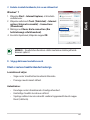
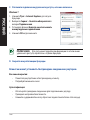
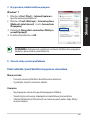
C. Disable the dial-up connection, if enabled.
D. Close all running web browsers.
NOTE: Refer to your browser's help feature for details on disabling
the dial-up connection settings.
Windows® 7
1. Click Start > Internet Explorer to launch the
browser.
2. Click Tools > Internet options > Connections tab.
3. Tick Never dial a connection.
4. Click OK when done.
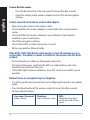
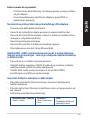
The client cannot establish a wireless connection with the router.
Out of Range:
• Puttherouterclosertothewirelessclient.
• Trytochangethechannelsettings.
Authentication:
• Usewiredconnectiontoconnecttotherouter.
• Checkthewirelesssecuritysettings.
• PresstheResetbuttonattherearpanelformorethanveseconds.
English

14
English
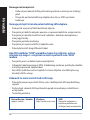
Cannot nd the router:
• PresstheResetbuttonattherearpanelformorethanveseconds.
• CheckthesettinginthewirelessadaptersuchasSSIDandencryption
settings.
Cannot access the Internet via wireless LAN adapter.
• Movetherouterclosertothewirelessclient.
• Checkwhetherthewirelessadapterisconnectedtothecorrectwireless
router.
• Checkwhetherthewirelesschannelinuseconformstothechannels
availableinyourcountry/area.
• Checktheencryptionsettings.
• CheckiftheADSLorCableconnectioniscorrect.
• RetryusinganotherEthernetcable.
If the ADSL “LINK” light blinks continuously or stays o, Internet access is
not possible - the Router is unable to establish a connection with the ADSL
network.
• Ensurethatallyourcablesareallproperlyconnected.
• DisconnectthepowercordfromtheADSLorcablemodem,waitafew
minutes, then reconnect the cord.
• IftheADSLlightcontinuestoblinkorstaysOFF,contactyourADSLservice
provider.
Network name or encryption keys are forgotten.
• Trysettingupthewiredconnectionandconguringthewirelessencryption
again.
• PresstheResetbuttonofthewirelessrouterformorethanveseconds.
• Factorydefaultsettings:
User name / Password:
admin / admin
IP address:
http://router.asus.com
SSID:
Check the rating label
on the back side of your
router

15
English
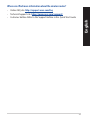
Where can I nd more information about the wireless router?
• OnlineFAQsite: http://support.asus.com/faq
• TechnicalSupportsite:https://www.asus.com/support/
• CustomerHotline:RefertotheSupportHotlineinthisQuickStartGuide

16
бъ лгарски
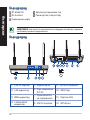
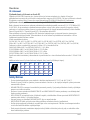
Бърз преглед
RT-AC66U B1 Адаптер за променлив ток
RJ-45 кабел Ръководство за бърз старт
Гаранционна карта
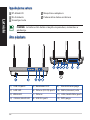
Бърз преглед
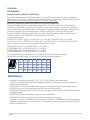
ЗАБЕЛЕЖКА: Ако някой от компонентите е повреден или липсва, свържете
се с Вашия търговски представител.
1) USB 3.0 портове 5) Индикатор на 9) Бутон за нулиране
2) LAN индикатор
6) Порт захранване
(DC-IN)
10) WAN Порт
3) WAN индикатор
7) Превключвател
на захранването
11) Портове LAN
4) 2.4GHz/5GHZ
индикатор
8) USB 2.0 портове 12) WPS бутон

17
бъ лгарски
ЗАБЕЛЕЖКИ:
• USB Външен хард / флаш диск:
•БезжичниятрутерработисповечетоUSBхарддисковеифлаш
дискове до 2 TB и поддържа достъп четене-писане за FAT16,
FAT32, EXT2, EXT3 и NTFS.
•ЗасигурноизключваненаUSBдискастартирайте
потребителскияинтерфейсотмрежатаGUI(http://router.
asus.com), след това на страница Network Map (Карта на
мрежата) в горния десен ъгъл щракнете иконата на USB и
щракнете Eject USB 1 (Изхвърляне на USB 1).
•НеправилнотоизважданенаUSBдискаможедапредизвика
повреждане на данните.
•Списъканасистемнитеидисковираздели,поддържаниот
безжичния рутер, можете да намерите на http://event.asus.
com/networks/disksupport
• Списъканапринтерите,поддържаниотбезжичниярутер,можете
да намерите на http://event.asus.com/networks/printersupport

18
бъ лгарски
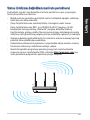
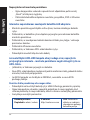
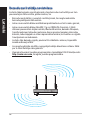
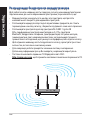
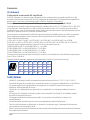
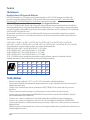
Разположение на безжичния рутер
Запостиганенамаксималнодобропредаваненабезжичнитесигнали
между безжичния рутер и свързаните с него мрежови устройства трябва:
• Дапоставитебезжичниярутернацентралномястозамаксималнопокритие
на мрежовите устройства.
• Рутерътдаеотдалеченотметалнипреградииданееизложеннаслънчева
светлина.
• РутерътдаеотдалеченотWi-Fiустройства802.11gили20MHz,компютърни
периферниустройства2.4GHz,Bluetooth(блутут)устройства,безжични
телефони,трансформатори,мощнимотори,флуоресцентнилампи,
микровълнови печки, хладилници и други промишлени машини за
избягване на смущенията или загубите на сигнала.
• Заосигуряваненамаксималнодобърсигналтритесвалящисеантенидасе
ориентират както е показано на схемата по-долу.
• Заоптималнадасерегулиравътрешнатаохлаждащасистема.Повече
подробности са дадени в ръководството на потребителя.
• Винагиизползвайтенай-новитеверсиинафърмуера.Посететесайтана
ASUS http://www.asus.comзасваляненапоследнитеверсиинафърмуера.
90
°
90
°

19
бъ лгарски
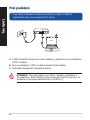
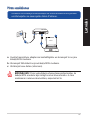
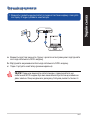
1. Откачете жиците и кабелите от съществуващата система с модем и
освободете стария IP адрес на компютъра.
Преди започване
а
: Изключете адаптера за променлив ток от контакта и го извадете от
кабелния/ADSL модем.
б
: Извадете мрежовия кабел от Вашия кабелен/ADSL модел.
в
: Рестартирайте компютъра (препоръчително).
Modem
OFF!
a
b
c
d
a
b
c
d
a
b
c
d
ПРЕДУПРЕЖДЕНИЕ: Преди да откачите жиците и кабелите вашият
кабелен или ADSL модем трябва да бъде изключен най-малко за две
минути. Ако модемът има поддържаща батерия, свалете и нея.

20
бъ лгарски
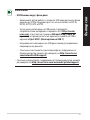
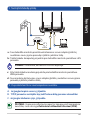
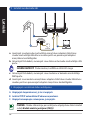
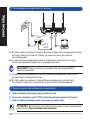
2. Конфигурирайтебезжичнатасреда.
а: Свържетесвоябезжиченрутерсвходазаправток,следкоетоговключетев
контакт.
б: Спомощтанамрежовкабел,свържетекомпютърасисLANпортана
безжичния рутер.
ВАЖНО! Уверете се, че WAN и LAN индикаторите мигат.
в: СпомощтанадругмрежовкабелсвържетемодемасисWANпортана
безжичния рутер.
г: Свържетеадаптеразапроменливтокнамодемасвходазаправток,следкоето
го
включете в контакт.
3. Блокирайте някои настройки на компютъра.
A.
Деактивирайте прокси сървъра, ако е активиран.
B.
Конфигурирайте TCP/IP настройките за автоматично получаване на IP
адрес.
C.
Деактивирайте комутируемата връзка, ако е активирана.
ЗАБЕЛЕЖКА: По-подробни сведения за блокирането на
настройките на компютъра ще намерите в Често задавани
въпроси (FAQs).
RT-AC66U B1
c
WAN
a
d
b
LAN
Internet
Modem
Sayfa yükleniyor...
Sayfa yükleniyor...
Sayfa yükleniyor...
Sayfa yükleniyor...
Sayfa yükleniyor...
Sayfa yükleniyor...
Sayfa yükleniyor...
Sayfa yükleniyor...
Sayfa yükleniyor...
Sayfa yükleniyor...
Sayfa yükleniyor...
Sayfa yükleniyor...
Sayfa yükleniyor...
Sayfa yükleniyor...
Sayfa yükleniyor...
Sayfa yükleniyor...
Sayfa yükleniyor...
Sayfa yükleniyor...
Sayfa yükleniyor...
Sayfa yükleniyor...
Sayfa yükleniyor...
Sayfa yükleniyor...
Sayfa yükleniyor...
Sayfa yükleniyor...
Sayfa yükleniyor...
Sayfa yükleniyor...
Sayfa yükleniyor...
Sayfa yükleniyor...
Sayfa yükleniyor...
Sayfa yükleniyor...
Sayfa yükleniyor...
Sayfa yükleniyor...
Sayfa yükleniyor...
Sayfa yükleniyor...
Sayfa yükleniyor...
Sayfa yükleniyor...
Sayfa yükleniyor...
Sayfa yükleniyor...
Sayfa yükleniyor...
Sayfa yükleniyor...
Sayfa yükleniyor...
Sayfa yükleniyor...
Sayfa yükleniyor...
Sayfa yükleniyor...
Sayfa yükleniyor...
Sayfa yükleniyor...
Sayfa yükleniyor...
Sayfa yükleniyor...
Sayfa yükleniyor...
Sayfa yükleniyor...
Sayfa yükleniyor...
Sayfa yükleniyor...
Sayfa yükleniyor...
Sayfa yükleniyor...
Sayfa yükleniyor...
Sayfa yükleniyor...
Sayfa yükleniyor...
Sayfa yükleniyor...
Sayfa yükleniyor...
Sayfa yükleniyor...
Sayfa yükleniyor...
Sayfa yükleniyor...
Sayfa yükleniyor...
Sayfa yükleniyor...
Sayfa yükleniyor...
Sayfa yükleniyor...
Sayfa yükleniyor...
Sayfa yükleniyor...
Sayfa yükleniyor...
Sayfa yükleniyor...
Sayfa yükleniyor...
Sayfa yükleniyor...
Sayfa yükleniyor...
Sayfa yükleniyor...
Sayfa yükleniyor...
Sayfa yükleniyor...
Sayfa yükleniyor...
Sayfa yükleniyor...
Sayfa yükleniyor...
Sayfa yükleniyor...
Sayfa yükleniyor...
Sayfa yükleniyor...
Sayfa yükleniyor...
Sayfa yükleniyor...
Sayfa yükleniyor...
Sayfa yükleniyor...
Sayfa yükleniyor...
Sayfa yükleniyor...
Sayfa yükleniyor...
Sayfa yükleniyor...
Sayfa yükleniyor...
Sayfa yükleniyor...
Sayfa yükleniyor...
Sayfa yükleniyor...
Sayfa yükleniyor...
Sayfa yükleniyor...
Sayfa yükleniyor...
Sayfa yükleniyor...
Sayfa yükleniyor...
Sayfa yükleniyor...
Sayfa yükleniyor...
Sayfa yükleniyor...
Sayfa yükleniyor...
Sayfa yükleniyor...
Sayfa yükleniyor...
Sayfa yükleniyor...
Sayfa yükleniyor...
Sayfa yükleniyor...
Sayfa yükleniyor...
Sayfa yükleniyor...
Sayfa yükleniyor...
Sayfa yükleniyor...
Sayfa yükleniyor...
Sayfa yükleniyor...
Sayfa yükleniyor...
Sayfa yükleniyor...
Sayfa yükleniyor...
Sayfa yükleniyor...
Sayfa yükleniyor...
Sayfa yükleniyor...
Sayfa yükleniyor...
Sayfa yükleniyor...
Sayfa yükleniyor...
Sayfa yükleniyor...
Sayfa yükleniyor...
Sayfa yükleniyor...
Sayfa yükleniyor...
Sayfa yükleniyor...
Sayfa yükleniyor...
Sayfa yükleniyor...
Sayfa yükleniyor...
Sayfa yükleniyor...
Sayfa yükleniyor...
Sayfa yükleniyor...
Sayfa yükleniyor...
Sayfa yükleniyor...
Sayfa yükleniyor...
Sayfa yükleniyor...
Sayfa yükleniyor...
Sayfa yükleniyor...
Sayfa yükleniyor...
Sayfa yükleniyor...
Sayfa yükleniyor...
Sayfa yükleniyor...
Sayfa yükleniyor...
Sayfa yükleniyor...
Sayfa yükleniyor...
Sayfa yükleniyor...
Sayfa yükleniyor...
Sayfa yükleniyor...
Sayfa yükleniyor...
Sayfa yükleniyor...
Sayfa yükleniyor...
Sayfa yükleniyor...
Sayfa yükleniyor...
Sayfa yükleniyor...
Sayfa yükleniyor...
Sayfa yükleniyor...
Sayfa yükleniyor...
Sayfa yükleniyor...
Sayfa yükleniyor...
Sayfa yükleniyor...
Sayfa yükleniyor...
Sayfa yükleniyor...
Sayfa yükleniyor...
Sayfa yükleniyor...
Sayfa yükleniyor...
Sayfa yükleniyor...
Sayfa yükleniyor...
Sayfa yükleniyor...
Sayfa yükleniyor...
Sayfa yükleniyor...
Sayfa yükleniyor...
Sayfa yükleniyor...
Sayfa yükleniyor...
Sayfa yükleniyor...
Sayfa yükleniyor...
Sayfa yükleniyor...
Sayfa yükleniyor...
Sayfa yükleniyor...
Sayfa yükleniyor...
Sayfa yükleniyor...
Sayfa yükleniyor...
Sayfa yükleniyor...
Sayfa yükleniyor...
Sayfa yükleniyor...
Sayfa yükleniyor...
Sayfa yükleniyor...
Sayfa yükleniyor...
Sayfa yükleniyor...
Sayfa yükleniyor...
Sayfa yükleniyor...
Sayfa yükleniyor...
Sayfa yükleniyor...
Sayfa yükleniyor...
Sayfa yükleniyor...
Sayfa yükleniyor...
Sayfa yükleniyor...
Sayfa yükleniyor...
Sayfa yükleniyor...
Sayfa yükleniyor...
Sayfa yükleniyor...
Sayfa yükleniyor...
Sayfa yükleniyor...
Sayfa yükleniyor...
Sayfa yükleniyor...
Sayfa yükleniyor...
Sayfa yükleniyor...
Sayfa yükleniyor...
Sayfa yükleniyor...
Sayfa yükleniyor...
Sayfa yükleniyor...
-
 1
1
-
 2
2
-
 3
3
-
 4
4
-
 5
5
-
 6
6
-
 7
7
-
 8
8
-
 9
9
-
 10
10
-
 11
11
-
 12
12
-
 13
13
-
 14
14
-
 15
15
-
 16
16
-
 17
17
-
 18
18
-
 19
19
-
 20
20
-
 21
21
-
 22
22
-
 23
23
-
 24
24
-
 25
25
-
 26
26
-
 27
27
-
 28
28
-
 29
29
-
 30
30
-
 31
31
-
 32
32
-
 33
33
-
 34
34
-
 35
35
-
 36
36
-
 37
37
-
 38
38
-
 39
39
-
 40
40
-
 41
41
-
 42
42
-
 43
43
-
 44
44
-
 45
45
-
 46
46
-
 47
47
-
 48
48
-
 49
49
-
 50
50
-
 51
51
-
 52
52
-
 53
53
-
 54
54
-
 55
55
-
 56
56
-
 57
57
-
 58
58
-
 59
59
-
 60
60
-
 61
61
-
 62
62
-
 63
63
-
 64
64
-
 65
65
-
 66
66
-
 67
67
-
 68
68
-
 69
69
-
 70
70
-
 71
71
-
 72
72
-
 73
73
-
 74
74
-
 75
75
-
 76
76
-
 77
77
-
 78
78
-
 79
79
-
 80
80
-
 81
81
-
 82
82
-
 83
83
-
 84
84
-
 85
85
-
 86
86
-
 87
87
-
 88
88
-
 89
89
-
 90
90
-
 91
91
-
 92
92
-
 93
93
-
 94
94
-
 95
95
-
 96
96
-
 97
97
-
 98
98
-
 99
99
-
 100
100
-
 101
101
-
 102
102
-
 103
103
-
 104
104
-
 105
105
-
 106
106
-
 107
107
-
 108
108
-
 109
109
-
 110
110
-
 111
111
-
 112
112
-
 113
113
-
 114
114
-
 115
115
-
 116
116
-
 117
117
-
 118
118
-
 119
119
-
 120
120
-
 121
121
-
 122
122
-
 123
123
-
 124
124
-
 125
125
-
 126
126
-
 127
127
-
 128
128
-
 129
129
-
 130
130
-
 131
131
-
 132
132
-
 133
133
-
 134
134
-
 135
135
-
 136
136
-
 137
137
-
 138
138
-
 139
139
-
 140
140
-
 141
141
-
 142
142
-
 143
143
-
 144
144
-
 145
145
-
 146
146
-
 147
147
-
 148
148
-
 149
149
-
 150
150
-
 151
151
-
 152
152
-
 153
153
-
 154
154
-
 155
155
-
 156
156
-
 157
157
-
 158
158
-
 159
159
-
 160
160
-
 161
161
-
 162
162
-
 163
163
-
 164
164
-
 165
165
-
 166
166
-
 167
167
-
 168
168
-
 169
169
-
 170
170
-
 171
171
-
 172
172
-
 173
173
-
 174
174
-
 175
175
-
 176
176
-
 177
177
-
 178
178
-
 179
179
-
 180
180
-
 181
181
-
 182
182
-
 183
183
-
 184
184
-
 185
185
-
 186
186
-
 187
187
-
 188
188
-
 189
189
-
 190
190
-
 191
191
-
 192
192
-
 193
193
-
 194
194
-
 195
195
-
 196
196
-
 197
197
-
 198
198
-
 199
199
-
 200
200
-
 201
201
-
 202
202
-
 203
203
-
 204
204
-
 205
205
-
 206
206
-
 207
207
-
 208
208
-
 209
209
-
 210
210
-
 211
211
-
 212
212
-
 213
213
-
 214
214
-
 215
215
-
 216
216
-
 217
217
-
 218
218
-
 219
219
-
 220
220
-
 221
221
-
 222
222
-
 223
223
-
 224
224
-
 225
225
-
 226
226
-
 227
227
-
 228
228
-
 229
229
-
 230
230
-
 231
231
-
 232
232


Asus RT-AC66U B1 Hızlı başlangıç Kılavuzu
- Kategori
- Mikser / mutfak robotu aksesuarları
- Tip
- Hızlı başlangıç Kılavuzu
diğer dillerde
- slovenčina: Asus RT-AC66U B1 Stručná príručka spustenia
- română: Asus RT-AC66U B1 Ghid de inițiere rapidă
İlgili makaleler
-
Asus RT-AC66U Kullanım kılavuzu
-
-
-
-
Asus RT-AX89X Kullanım kılavuzu
-
-
-
Asus RT-AX86U Pro Kullanım kılavuzu
-
-
Diğer belgeler
-
Mercusys Halo S12 (3-Pack) Kullanım kılavuzu
-
Linksys X1000 El kitabı
-
Huawei AX2 Wifi Kullanici rehberi
-
Linksys X6200 El kitabı
-
-
Panasonic CSXZ25XKEW Kullanma talimatları
-
Hama WLAN USB Stick Kullanma talimatları
-
Linksys WAG200G Kullanım kılavuzu
-
Rapoo 3710P Kullanım kılavuzu