
en
pt-PT
no-NO hu pl ru
uk
nl-NL da sv fi
de-DE fr-FR it-IT es-ES
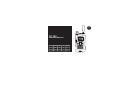
XT180
OWNER'S MANUAL


1
English
RF ENERGY EXPOSURE AND PRODUCT
SAFETY GUIDE FOR PORTABLE TWO-
WAY RADIOS
ATTENTION!
Before using this product, read the RF Energy Exposure and
Product Safety Guide that ships with the radio which contains
instructions for safe usage and RF energy awareness and
control for compliance with applicable standards and regulation.
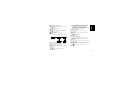
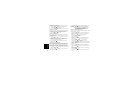
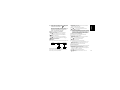
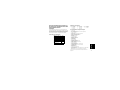
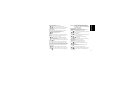
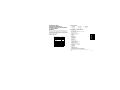
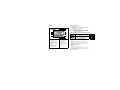
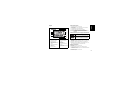
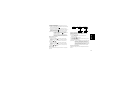
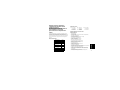
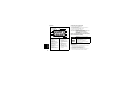
Package Contents
Frequency Chart
Features and Specifications
• 8 PMR Channels
• 121 Sub-Codes (38 CTCSS Codes & 83 DCS codes)
• Up to 10 km Range*
• Internal VOX Circuitry
•LED Torch
• 10 Selectable Call Tone Alerts
• Backlit LCD Display
• Roger Beep
•Up Timer
• Room Monitor
• Battery Charger
• Battery Level Meter
• Channel Monitor
• Channel Scan
• Dual Watch
• Keypad Lock
•Auto Power Off
• Auto Squelch Control
• Auto Repeat (Scrolling)
• Battery Save
• Battery Low Alert
• Battery Low Sleep
• Tone (On/Off)
• Direct Call (Caller ID Call)
•Group Call
• Silent Mode
•All Call
• Auto Channel Change
• IP Rating : IPX2
• Power Source: NiMH battery Pack / 4 AAA Alkaline batteries
• Battery Life: 16 Hours (under typical use conditions)
*Range may vary depending on environmental and/or topographical
conditions.
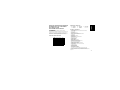
Package Content XT180
Radio 2
Belt clip 2
2-slot charging cradle 1
AC adaptor 1
Battery support
brackets
2
Rechargeable NiMH
battery pack
2
Headset 2
Owner’s manual 1
Ch. Freq. (MHz) Ch. Freq. (MHz) Ch. Freq. (MHz)
1 446.00625 4 446.04375 7 446.08125
2 446.01875 5 446.05625 8 446.09375
3 446.03125 6 446.06875

English
2
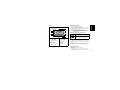
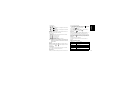
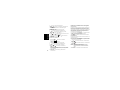
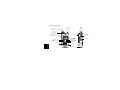
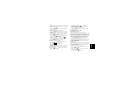
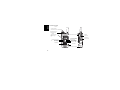
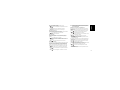
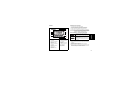
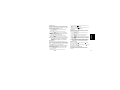
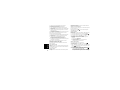
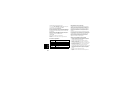
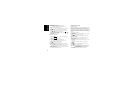
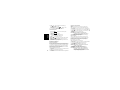
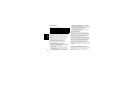
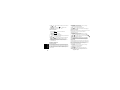
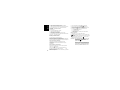
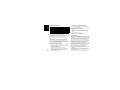
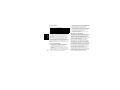
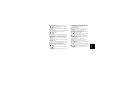
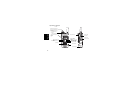
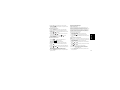
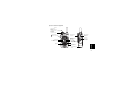
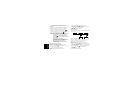
Control and Functions
Antenna
PTT
(Push-To-Talk)
Button
Headset jack
(Headset not included)
Up/Down Menu
Navigation Button
(Call) Button
MON (Monitor) Button
Speaker
Microphone
SEL/ (Select/Lock)
Button
GRP/MENU(Menu/
Group) Button
DC IN 9V Jack
Volume Knob with
Power SW
LED Torch
Button
Top Lanyard Bar
Bottom Lanyard Bar

3
English
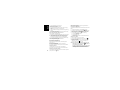
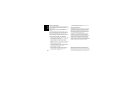
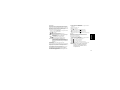
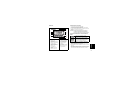
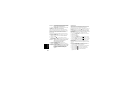
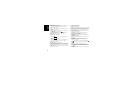
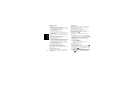
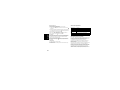
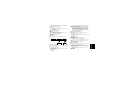
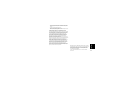
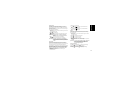
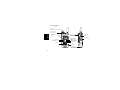
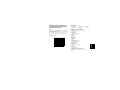
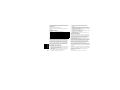
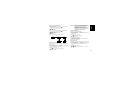
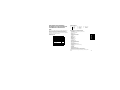
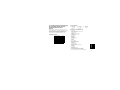
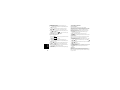
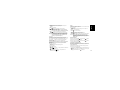
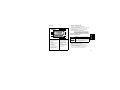
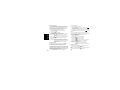
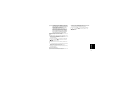
Display Installing the Battery
1. Make sure your radio is turned OFF.
2. To remove the battery compartment door, press the tab at
the bottom of the compartment door.
3. Install the NiMH batteries into the battery compartment.
4. Replace the battery compartment door.
Caution: Risk of explosion if battery is replaced by an
incorrect type. Dispose used batteries according
to the instructions.
Battery Level and Low Battery Alert
Battery Capacity Maintenance
1. Charge the batteries at least once every 3 months when not
in use.
2. Remove the battery from the radio after using for storage
purpose.
3. Store the batteries in temperatures between -20°C to 35°C
and in low humidity. Avoid damp conditions and corrosive
materials.
Charging the Radio
Direct Charging :
1. Make sure your radio is turned OFF.
2. Connect the AC adapter to the radio’s DC IN 9V. Connect
the other end of the AC adapter to a vehicle accessory
power outlet.
1. Silent Indicator
2. Transmit Indicator
3. Receive Indicator
4. Dual Watch Indicator
5. Auto Power Off
Indicator
6. Key Lock Indicator
7. Scan Indicator
8. Channel Indicator
9. Battery Level Meter
10.Group Indicator
11.VOX/Room Monitor
Indicator
12.Call Indicator
13.Sub-code
(Group ID/Code)
Indicator
14.Colon (for Up Timer)
2
3
4
5
1
6
7
8
9
10
11
12
13
14
Indicates that the battery is fully charged.
Blinks when battery is low; charge the radio
or replace batteries immediately.
(The alert tone sounds every 5 seconds for
30 seconds when the battery is low.)

English
4
3. Charge the battery pack for 14 hours.
Using the Charging Cradle :
1. Make sure your radio is turned OFF.
2. Connect the AC adapter to the DC IN 9V of the charging
cradle.
3. Place the charging cradle on a stable surface.
4. Place the radio in the charging cradle with the keypad facing
forward.
5. LED indicator will illuminate and remain illuminated as long
as the radio is in the charger.
Note: Charge the battery pack for 14 hours.
Using the Battery Support Bracket :
1. Remove the rechargeable NiMH battery pack from the radio.
2. Place the battery support bracket into the charging cradle.
3. Install the NiMH battery pack into the charging cradle.
Ensure that the charging contacts are correctly aligned.
4. LED indicator will illuminate and remain illuminated as long
as the radio is in the charger.
Note: Charge the battery pack for 14 hours.
Basic Radio Operations
Read this reference guide completely before attempting to
operate the unit.
Turning your Radio On/Off
To turn your radio ON, turn the rotary knob clockwise.
To turn your radio OFF, turn the rotary knob counterclockwise.
Adjusting the Volume
Increase volume by turning the rotary knob clockwise.
To decrease volume, turn the rotary knob counterclockwise.
Adjusting the Sound (Key Beeps)
Your radio emits a beep each time one of the buttons is pressed
(except the PTT and button).
Press and hold the button while turning the radio ON to
switch the sound ON/OFF.
Navigating through the Menu
Your radios has two Menu functions: Select Menu and Common
Menu.
1. To enter the Select Menu, press the SEL/ button.
2. To enter the Common Menu, press the MENU/GRP button.
3. Additional presses of the SEL/ button or MENU/GRP
button will advance you through the Menu.
4. To exit the Menu function, do one of the following :
a. Press the MENU/GRP button,
b. Press the PTT button
c. Wait 10 seconds until the unit automatically returns to
“Normal” mode.
Talking on Your Radio
1. Hold your radio 5–8 cm from your mouth.
2. Press and hold the PTT button while speaking. The
appears on the display.
3. Release the PTT button. You can now receive incoming
calls. When you do, the appears on the display. To
respond, repeat procedure from step 1.
Note: When you continue to transmit for 60 seconds, the
radio emits TX Time Out tone and the icon flashes.
The radio will stop transmitting.
In order to speak to someone, both your radios must
be set to the same channel and Sub-Code. Refer to
“Selecting a Channel and a Sub-Code” below.

5
English
Selecting a Channel and a Sub-Code
To select a Channel:
1. SEL/ button to enter Select Menu. Advance until the
Channel indicator blinks.
2. or to the required channel.
To select a Sub-code :
1. SEL/ button to enter Select Menu. Advance until the
Sub-code indicator blinks.
2. or to the required Sub-code.
3. Exit the Select Menu.
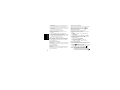
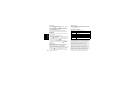
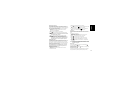
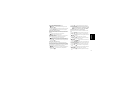
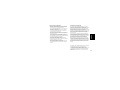
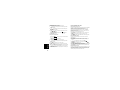
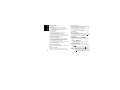
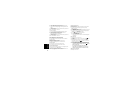
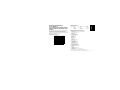
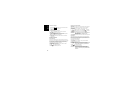
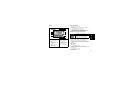
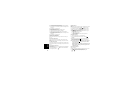
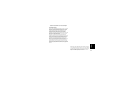
Select Menu
Your radio navigates through the Select Menu as follows:
Voice Operated Transmission (VOX)
Transmission is initiated by speaking into the microphone of
radio instead of the pushing the PTT button.
To select the VOX level:
1. MENU/GRP button to enter Common Menu. Advance and
select “VOX”.
2. SEL/ to select.
3. or to the desired VOX sensitivity level.
4. Exit the Select Menu.
Note: Level “N”(OFF) disables VOX. Levels 1-5 set the
sensitivity of the VOX circuit.Use level 1 in quiet
environments, and use level 5 in very noisy
environments. You can find the appropriate
sensitivity level by speaking into the microphone. If
the flashes, your voice is accepted.
Transmitting a Call Tone
Your radio is equipped with 10 selectable call tones .
To select a call tone:
1. MENU/GRP button to enter Common Menu. Advance to
“TONE”.
2. SEL/ to select.
3. or to the desired call tone.
4. Exit the Common Menu.
To transmit the selected call tone :
1. to transmit the selected call tone. The selected tone will
automatically be transmitted for a fixed length of time.
2. PTT to cancel Call Tone.
Auto Power Off
Auto Power Off feature allows you to set the time that the radio
turns off automatically.
1. MENU/GRP button to enter Common Menu. Advance until
“PWR” and the current Auto Power Off time blinks.
2. SEL/ to select.
3. or to select the time from ON, 1H, 2H, and 3H.
4. Exit the Menu.
Normal
Channel Sub-code
1 - 8 0 - 121

English
6
Common Menu
Your radio navigates through Common Menu as follows:
Group Menu
1. Press and hold MENU/GRP to enter GROUP MENU.
2. or to proceed to each menu (GRP/CODE/RING/ID).
3. SEL/ to select.
4. or to proceed to desired condition or number.
5. SEL/ to select.
6. MENU/GRP to exit.
Set Group Mode
1. Press and hold MENU/GRP to enter GROUP MENU.
2. SEL/ to control Group Mode.
3. or to “Y”. SEL/ to go to Group Menu and Group
Code Setting.
4. or to “N”. SEL/ to exit from Group Menu.
Up Timer Mode
Select the
Sensitivity
(1-5)
Normal
SCAN
2CH
(Dual Watch)
VOX
ROOM
(Room Monitor)
TONE
(Call Tone)
SLNT
(Silent)
TIME
(Up Timer)
PWR
(Power)
Select the
Channel and
Sub-Code
Dual Watch Mode
Off
1-5
Scan Mode
1 - 10
“N” or “Y”
Select the ON/
1H/2H/3H
Room Monitor Mode
Normal
“GRP”
(Group Mode)
“CODE”
(Group Code)
“RING”
(Ring Tone)
“ID”
(ID Setting)
“N” or “Y” 0 - 121 1-10
ID Number
1-16
ID Name
Up to 4
Characters
“Y”

7
English
Set Group Code
1. or to choose the Group Code.
2. SEL/ to complete Group Code setting.
3. The radio enters “Ring Tone Setting Menu”
4. MENU/GRP to back to Group Menu.
Set Ring Tone
The user can select the Ring Tone for a Direct Call. Ring Tones
are the same as Call Tones.
1. or to select a Ring Tone.
2. The selected Ring Tone sounds.
Set ID
Each radio in the group needs to be set with an ID. The user
can set an ID name of up to four (4) characters.
1. or to select an ID number.
2. If the ID is already taken, USED is seen. If USED is not
shown, then the ID is available.
3. SEL/ to advance to setting ID Name.
Set ID Name
The ID Name appears on the other radio’s display when you
make an All Call or a Direct Call. The ID Name will also on the
other radio’s display when they are placing a Direct Call. When
no ID name is set, the unit number appears.
1. or to select a character that will blink on the display.
2. SEL/ to select and move to the next character.
3. SEL/ to register the ID number and ID Name.
Note: The radio cancels selected ID Number and entered ID
Name, then exits from Group Menu when MENU/GRP
button is pressed.
Channel Setting in Group Mode
To set Auto Channel Change in Group Mode:
1. MENU/GRP to enter Group Mode.
2. SEL/ to enter Channel Setting.
3. or to “Auto Channel Change Setting”.
4. SEL/ to select.
A channel number will blink and “ALL” is seen.
5. or to select the channel.
6. SEL/ or to transmit Auto Channel Change command.
7. MENU/GRP to return to Channel Setting in Group Mode.
To set Manual Channel in Group Mode:
1. MENU/GRP to enter Group Mode.
2. SEL/ to enter Channel Setting.
3. or to “Manual Channel Setting”.
4. SEL/ to select.
A channel number will blink and “MY” is seen.
5. or to select the channel manually.
6. SEL/ to exit from Manual Channel setting.
7. MENU/GRP to return to Channel Setting in Group Mode.
Set All Call
1. MENU/GRP to enter Group Mode.
2. to enter All/ Direct Call Setting.
3. or to select All Call Transmission. “SYNC” is seen.
4. SEL/ or to exit this setting, and transmit All Call.
All Call Tone sounds. and blinks while transmitting.
5. MENU/GRP to exit.

English
8
Set Direct Call
1. MENU/GRP to enter Group Mode.
2. to enter All/ Direct Call Setting.
3. or to select an ID Number.
4. or SEL/ to transmit Direct Call Command.
The selected Call Tone sounds. The display shows TX
icon and CALL icon while transmitting.
5. MENU/GRP to go back to All/Direct Call setting.
Features on Your Radio
Channel Scan Mode
Enables your radio to scan for active channels. When activity is
detected, your radio lands (stays) on that channel for 2 seconds
(5 seconds for VOX ON without headset). To transmit on that
channel, press the PTT button. When activity on the landed
channel ends, your radio continues scanning other channels.
To turn the channel scan ON:
1. MENU/GRP to enter Common Menu. Advance to ”SCAN”.
2. SEL/ to turn ON channel scan.
3. MENU/GRP or PTT to turn OFF Scan mode.
Dual Watch Mode
Enables your to scan the current channel and another channel
alternately.
To set another channel and start Dual Watch:
1. MENU/GRP to enter Common Menu. Advance to “2CH”.
2. or to select the channel, then press SEL/ .
3. or to select the Sub-code, then press SEL/ .
4. The radio starts to Dual Watch.
Note: If you set the same channel and Sub-code as the
current channel, Dual Watch doesn’t work.
5. MENU/GRP to turn the Dual Watch mode OFF.
Room Monitor
Enables your radio to detect voice/noises (according to the
sensitivity level set) and transmit back to the listening radio
without pushing the PTT button. The monitoring radio is not
able to receive any transmissions in this mode.
To turn Room Monitor ON:
1. MENU/GRP to enter Common Menu. Advance to “ROOM”.
2. SEL/ to select.
3. or to the desired room monitor sensitivity level.
Note: Use level 1 in quiet environments. Use level 5 in very
noisy environments.
4. SEL/ to turn ON room monitor.
MENU/GRP to turn OFF Room Monitor.
Note: When the voice/noise in the monitored room
continues for more than 60 seconds, the monitoring
radio stop monitoring for 5 seconds, and resumes.
Silent Mode
Silent mode will mute all incoming calls. The backlight of the
radio blinks when there’s an incoming call. If the call is not
answered, the backlight turns off and the blinks until there is
no signal. The XT180 radio will vibrate when there is a missed
call.
The silent mode will be disabled for 15 seconds when you
transmit, receive or press any other buttons.
To turn silent mode ON:
1. MENU/GRP to enter Common Menu.
The ID Number for Direct Call
The ID Name

9
English
2. Select “SLNT”.
3. SEL/ to select.
4. to turn Silent Mode ON. “Y” is displayed on the Channel
Indicator. appears.
5. to turn Silent Mode OFF. “N” is displayed on the Channel
Indicator. disappears.
Up Timer
Enables your radio to time up to 59 minutes 59 seconds. You
can receive incoming calls in this mode.
To use up timer:
1. MENU/GRP to enter Common Menu. Advance to “TIME”.
2. SEL/ to select the Up Timer.
3. SEL/ to start the Up Timer.
4. SEL/ to pause the Timer.
SEL/ to ON/OFF the Timer.
5. MENU/GRP or PTT to stop or reset up timer.
Note: If a call is received, the ID Name will be indicated and
then the radio will return to timer mode and the Call
Icon will blink.
Key Lock
Press and hold SEL/ until /”LOCK” appears to lock the
keypad.
Press and hold SEL/ until /”UNLK” disappears to unlock
the keypad.
LCD Backlight
The LCD display will automatically illuminate for 10 seconds
after any button is pressed (except for PTT).
Monitor Mode
Enables you to listen for weak signals on the current channel.
To turn the Monitor Mode ON:
1. Press the MON button for brief listening. The icon blinks.
2. Press and hold the MON button for 2 seconds for continuous
listening. The icon continues to blink.
To turn the Monitor Mode OFF:
Press the MON, MENU/GRP or SEL/ button to return to
“Normal” mode. The icon stops blinking.
Roger Beep
Sounds to indicate the end of a PTT or VOX transmission. It
can be heard through the speaker when Key Beep is on. It
cannot be heard through the speaker if Key Beep is turned off.
Press and hold the button while turning the radio ON to turn
the Roger Beep ON. Repeat the step to turn Roger Beep OFF.
LED Torch
Your radio has a built-in LED Torch.
The LED Torch indicator will remain on until the button is
released.
Approved Accessories
NNTN8870_R Consumer Earbud
NNTN8868_R Consumer Headset
IXTN4011_ XTR Headset
IXPN4016_ UK Adapter
IXPN4017_ EU Adapter
IXNN4002_ NiMH Battery

English
10
Warranty Information
The authorized Motorola Solutions dealer or retailer where you
purchased your Motorola Solutions two-way radio and/or
original accessories will honour a warranty claim and/or provide
warranty service.
Please return your radio to your dealer or retailer to claim your
warranty service. Do not return your radio to Motorola
Solutions.
In order to be eligible to receive warranty service, you must
present your receipt of purchase or a comparable substitute
proof of purchase bearing the date of purchase. The two-way
radio should also clearly display the serial number. The
warranty will not apply if the type or serial numbers on the
product have been altered, deleted, removed, or made illegible.
What Is Not Covered By The Warranty
• Defects or damage resulting from use of the Product in other
than its normal and customary manner or by not following
the instructions in this user manual.
• Defects or damage from misuse, accident or neglect.
• Defects of damage from improper testing, operation,
maintenance, adjustment, or any alteration or modification of
any kind.
• Breakage or damage to aerials unless caused directly by
defects in material or workmanship.
• Products disassembled or repaired in such a manner as to
adversely affect performance or prevent adequate inspec-
tion and testing to verify any warranty claim.
• Defects or damage due to range.
• Defects or damage due to moisture, liquid or spills.
• All plastic surfaces and all other externally exposed parts
that are scratched or damaged due to normal use.
• Products rented on a temporary basis.
• Periodic maintenance and repair or replacement of parts
due to normal usage, wear and tear.
Copyright Information
The Motorola Solutions products described in this manual may
include copyrighted Motorola Solutions programs, stored
semiconductor memories or other media. Laws in the United
States and other countries preserve for Motorola Solutions,
certain exclusive rights for copyrighted computer programs,
including the exclusive right to copy or reproduce in any form,
the copyrighted Motorola Solutions programs.
Accordingly, any copyrighted Motorola Solutions computer
programs contained in the Motorola Solutions products
described in this manual may not be copied or reproduced in
any manner without express written permission of Motorola
Solutions. Furthermore, the purchase of Motorola Solutions
products shall not be deemed to grant either directly or by
implication, estoppel, or otherwise, any license under the
copyrights, patents or patent applications of Motorola Solutions,
except for the normal non-exclusive royalty free license to use
that arises by operation of law in the sale of a products.
MOTOROLA, MOTO, MOTOROLA SOLUTIONS and the
Stylized M logo are trademarks or registered trademarks of
Motorola Trademark Holdings, LLC and are used under license.
All other trademarks are the property of their respective owners.
© 2014 and 2016 Motorola Solutions, Inc. All rights reserved

1
Deutsch
HANDBUCH ZUR HF-
ENERGIESTRAHLUNG UND
PRODUKTSICHERHEIT FÜR TRAGBARE
FUNKGERÄTE
ACHTUNG!
Bevor Sie dieses Produkt verwenden, lesen Sie das Handbuch
zur HF-Energiestrahlung und Produktsicherheit, das im
Lieferumfang des Funkgeräts enthalten ist. Das Handbuch
enthält Anweisungen für die sichere Verwendung sowie
Informationen zum Gefahrenbewusstsein und zur
Risikovermeidung gemäß anwendbaren Normen und
Vorschriften.
Packungsinhalt
Frequenztabelle
Funktionen und technische Daten
• 8 PMR-Kanäle
• 121 Subcodes (38 CTCSS-Codes und 83 DCS-Codes)
• Bis zu 10 km Serie*
• Interne VOX-Schaltung
• LED-Taschenlampe
• 10 wählbare Ruftonwarnungen
• LCD-Anzeige mit Hintergrundbeleuchtung
• Roger-Signalton
•Up-Timer
• Raummonitor
• Akkuladegerät
• Akkustandanzeige
• Kanalüberwachung
• Kanalsuche
•Dual Watch
• Tastensperre
• Automatische Abschaltung
• Automatische Steuerung zur Rauschunterdrückung
• Automatische Wiederholung (Bildlauf)
• Akkusparfunktion
• Alarm für niedrigen Akkustand
• Standby für niedrigen Akkustand
• Ton (Ein/Aus)
• Direktanruf (Anrufer-ID-Anruf)
• Gruppenanruf
• Lautlosmodus
•Alle
• Automatischer Kanalwechsel
• IP-Bewertung: IPX2
• Stromversorgung: NiMH-Akkus/4 AAA-Alkalibatterien
• Akkubetriebsdauer: 16 Stunden (unter normalen
Nutzungsbedingungen)
* Reichweite kann je nach Umwelt- bzw. topografischen
Bedingungen unterschiedlich ausfallen.
Packungsinhalt XT180
Radio 2
Gürtelclip 2
Ladestation mit
2 Steckplätzen
1
AC-Adapter 1
Akkuhalterungen
2
Aufladbare NiMH-Akkus 2
Headset 2
Benutzerhandbuch 1
Kan. Freq. (MHz) Kan. Freq. (MHz) Kan. Freq. (MHz)
1 446.00625 4 446.04375 7 446.08125
2 446.01875 5 446.05625 8 446.09375
3 446.03125 6 446.06875

Deutsch
2
Steuerung und Funktionen
Antenne
Sprechtaste
(PTT)
Headset-Buchse
(Headset nicht im
Lieferumfang enthalten)
Menünavigationstaste
nach oben bzw. unten
Anruftaste
Monitortaste (MON)
Lautsprecher
Mikrofon
Auswahl- und
Sperrtaste (SEL/ )
Menü- und
Gruppentaste
(GRP/MENU)
DC-Eingangsbuchse
9 V
Lautstärkeregler
mit Power SW
Taste für LE D-
Taschenlampe
Oben Trageband Bar
Unten Trageband Bar

3
Deutsch
Display
Einlegen des Akkus
1. Vergewissern Sie sich, dass das Funkgerät auf AUS steht.
2. Drücken Sie zum Entfernen der Klappe des Batteriefachs
auf die Lasche unten am Batteriefach.
3. Setzen Sie die NiMH-Batterien in das Batteriefach ein.
4. Bringen Sie die Klappe des Batteriefachs wieder an.
Vorsicht: Bei falsch eingesetzten Akkus besteht
Explosionsgefahr. Entsorgen Sie gebrauchte
Akkus gemäß den Anweisungen.
Akkustandanzeige und Hinweis auf leere
Batterien
Aufrechterhaltung der Akkukapazität
1. Laden Sie die Akkus mindestens einmal alle drei Monate auf,
wenn sie nicht verwendet werden.
2. Zur Aufbewahrung entfernen Sie den Akku nach der
Verwendung aus dem Funkgerät.
3. Bewahren Sie die Akkus bei Temperaturen zwischen -20 °C
bis 35 °C und niedriger Luftfeuchtigkeit auf. Vermeiden Sie
Feuchtigkeit und Ätzstoffe.
Aufladen des Funkgeräts
Direktes Laden:
1. Vergewissern Sie sich, dass das Funkgerät auf AUS steht.
2. Schließen Sie das Netzteil an die Radio-DC IN 9V. Stecken
Sie das andere Ende des Netzteils in eine Fahrzeug-
Zubehör-Steckdose.
3. Laden Sie die Akkus 14 Stunden.
Unter Verwendung der Ladestation:
1. Vergewissern Sie sich, dass das Funkgerät auf AUS steht.
1. Lautlosanzeige
2. Übertragungsanzeige
3. Empfangsanzeige
4. Dual Watch-Anzeige
5. Automatische
Abschaltungsanzeige
6. Tastensperranzeige
7. Suchanzeige
8. Kanalanzeige
9. Akkustandanzeige
10.Gruppenanzeige
11.VOX/Raummonitor-
Anzeige
12.Anrufanzeige
13.Subcode
(Gruppen-ID/Code)-
Anzeige
14.Doppelpunkt (für Up-
Timer)
2
3
4
5
1
6
7
8
9
10
11
12
13
14
Zeigt an, dass der Akku vollständig geladen ist.
Blinkt, wenn Akku fast leer ist. Laden Sie das
Funkgerät auf, oder setzen Sie sofort einen
neuen Akku ein.
(Der Signalton ertönt alle 5 Sekunden
30 Sekunden lang, wenn der Akku fast leer ist.)

Deutsch
4
2. Schließen Sie den AC-Adapter an den DC-Eingang 9 V der
Ladestation an.
3. Legen Sie die Ladestation auf eine stabile Oberfläche.
4. Setzen Sie das Funkgerät mit der Tastatur nach vorne in die
Ladestation ein.
5. Die LED-Anzeige leuchtet dauerhaft auf, solange sich das
Funkgerät in der Ladestation befindet.
Hinweis: Laden Sie den Akku für 14 Stunden.
Verwenden der Akkuhalterung:
1. Entnehmen Sie die aufladbaren NiMH-Akkus aus dem
Funkgerät.
2. Setzen Sie die Akkuhalterung in die Ladestation ein.
3. Setzen Sie den NiMH-Akku in die Ladestation ein. Überprüfen
Sie, ob die Ladekontakte richtig ausgerichtet sind.
4. Die LED-Anzeige leuchtet dauerhaft auf, solange sich das
Funkgerät in der Ladestation befindet.
Hinweis: Laden Sie den Akku für 14 Stunden.
Grundlegende Funktionen des Funkgeräts
Lesen Sie diese Anleitung vollständig durch, bevor Sie das
Gerät in Betrieb nehmen.
Ein-/Ausschalten des Funkgeräts
Um das Funkgerät einzuschalten, drehen Sie den Drehknopf im
Uhrzeigersinn.
Um das Funkgerät auszuschalten, drehen Sie den Drehknopf
gegen den Uhrzeigersinn.
Anpassen der Lautstärke
Erhöhen Sie die Lautstärke durch Drehen des Drehknopfs im
Uhrzeigersinn.
Drehen Sie zum Verringern der Lautstärke den Drehknopf
gegen den Uhrzeigersinn.
Anpassen des Tons (Tastentöne)
Das Funkgerät gibt einen Signalton aus, sobald eine der Tasten
gedrückt wird (mit Ausnahme der PTT- und der -Taste).
Halten Sie beim Einschalten des Funkgeräts die -Taste
gedrückt. Dadurch wird der Ton ein- bzw. ausgeschaltet.
Navigieren durch das Menü
Das Funkgerät verfügt über zwei Menüfunktionen:
„Menüauswahl“ und „Allgemeines Menü“.
1. Drücken Sie zum Aufrufen von „Menüauswahl“ die Taste
SEL/ .
2. Drücken Sie zum Aufrufen von „Allgemeines Menü“ die
Tas te MENU/GRP.
3. Durch weiteres Betätigen der Taste SEL/ oder MENU/
GRP bewegen Sie sich im Menü fort.
4. Um die Menüfunktion zu verlassen, führen Sie einen der
folgenden Schritte aus:
a. Drücken Sie die Taste MENU/GRP.
b. Drücken Sie die Taste PTT.
c. Warten Sie 10 Sekunden lang, bis das Gerät
automatisch in den Modus „Normal“ zurückkehrt.
Sprechen auf dem Funkgerät
1. Halten Sie das Funkgerät 5 bis 8 cm von Ihrem Mund entfernt.
2. Halten Sie die Taste PTT gedrückt, während Sie sprechen.
Das Symbol erscheint auf dem Display.
3. Lassen Sie die Taste PTT los. Sie können jetzt eingehende
Anrufe annehmen. Dabei erscheint das Symbol auf dem
Display. Um zu antworten, wiederholen Sie Schritt 1.
Hinweis: Wenn Sie fortfahren und 60 Sekunden lang
übertragen, gibt das Funkgerät einen TX-
Zeitüberschreitungston aus, und das Symbol
blinkt. Das Funkgerät unterbricht die Übertragung.

5
Deutsch
Damit ein Gespräch möglich ist, müssen beide
Funkgeräte auf denselben Kanal und denselben
Subcode eingestellt sein. Lesen Sie bitte unten
unter „Auswählen eines Kanals und eines
Subcodes“ nach.
Auswählen eines Kanals und eines Subcodes
So wählen Sie einen Kanal aus:
1. Taste SEL/ zum Öffnen von „Menüauswahl“. Fahren Sie
fort, bis die Kanalanzeige blinkt.
2. oder , um zum gewünschten Kanal zu gelangen.
So wählen Sie einen Subcode aus:
1. Taste SEL/ zum Öffnen von „Menüauswahl“. Fahren Sie
fort, bis die Subcodeanzeige blinkt.
2. oder , um zum gewünschten Subcode zu gelangen.
3. Verlassen Sie die Menüauswahl.
Menüauswahl
Das Funkgerät navigiert folgendermaßen durch die Menüauswahl:
Sprachgesteuerte Übertragung (VOX)
Die Übertragung wird durch Sprechen in das Mikrofon des
Funkgeräts und nicht durch Drücken der Taste PTT ausgelöst.
So wählen Sie die VOX-Stufe aus:
1. Drücken Sie die Taste MENU/GRP, um „Allgemeines Menü“
aufzurufen. Fahren Sie fort, und wählen Sie „VOX“ aus.
2. SEL/ zur Auswahl.
3. oder , um zur gewünschten VOX-Empfindlichkeitsstufe
zu gelangen.
4. Verlassen Sie die Menüauswahl.
Hinweis: Stufe „N“ (AUS) deaktiviert VOX. Stufen 1 – 5 legen
die Empfindlichkeit der VOX-Schaltung fest.
Verwenden Sie Stufe 1 in ruhigen Umgebungen
und Stufe 5 in sehr lauten Umgebungen. Ermitteln
Sie die angemessene Empfindlichkeitsstufe, indem
Sie in das Mikrofon sprechen. Wenn das Symbol
blinkt, wird Ihre Stimme akzeptiert.
Übertragen eines Ruftons
Das Funkgerät verfügt über 10 auswählbare Ruftöne.
So wählen Sie einen Rufton aus:
1. Drücken Sie die Taste MENU/GRP, um „Allgemeines Menü“
aufzurufen. Gehen Sie bis „TON“.
2. SEL/ zur Auswahl.
3. oder , um zum gewünschten Rufton zu gelangen.
4. Verlassen Sie „Allgemeines Menü“.
So übertragen Sie den ausgewählten Rufton:
1. zum Übertragen des ausgewählten Ruftons. Der
ausgewählte Ton wird automatisch für einen festen Zeitraum
übertragen.
2. PTT zum Abbrechen des Ruftons.
Automatische Abschaltung
Mit der Funktion zum automatischen Abschalten können Sie
den Zeitpunkt einstellen, zu dem das Funkgerät automatisch
abgeschaltet wird.
1. Drücken Sie die Taste MENU/GRP, um „Allgemeines Menü“
aufzurufen. Gehen Sie bis Netz, und die aktuelle Zeit zum
automatischen Abschalten blinkt.
2. SEL/ zur Auswahl.
3. oder , um die Zeit aus EIN, 1 Stunde, 2 Stunden und
3 Stunden auszuwählen.
4. Verlassen Sie das Menü.
Normal
Kanal Subcode
1 – 8 0 – 121

Deutsch
6
Allgemeines Menü
Das Funkgerät navigiert folgendermaßen durch „Allgemeines Menü“:
Gruppenmenü
1. Drücken und halten Sie MENU/GRP gedrückt, um
„GRUPPENMENÜ“ aufzurufen.
2. oder , um mit den einzelnen Menüs fortzufahren
(GRP/CODE/RING/ID).
3. SEL/ zur Auswahl.
4. oder , um mit der gewünschten Bedingung oder
Nummer fortzufahren.
5. SEL/ zur Auswahl.
6. MENU/GRP zum Verlassen.
Festlegen des Gruppenmodus
1. Drücken und halten Sie MENU/GRP gedrückt, um
„GRUPPENMENÜ“ aufzurufen.
2. SEL/ zur Steuerung von „Gruppenmodus“.
Up-Timer-Modus
Wählen Sie die
Empfindlichkeit
(1-5)
Normal
SUCHE
2 Kanäle
(Dual Watch)
VOX
ROOM
(Room Monitor)
Ton
(Rufton)
SLNT
(Still)
Zeit
(Timer)
PWR
(Power)
Kanal und
Subcode
auswählen
Dual Watch-Modus
Aus
1 – 5
Suchmodus
1 – 10
„N“ oder
„J“
EIN/1 Std./
2 Std./3 Std.
auswählen
Raummonitormodus
Normal
"GRP"
(Group Modus)
"Code"
(Gruppencode)
"Ring"
(Klingelton)
"ID" (-ID-
Einstellung)
„N“ oder „J“ 0 – 121 1 – 10
ID Number
1-16
ID Namen
mit bis zu
4 Zeichen
„J“

7
Deutsch
3. oder auf „J“. SEL/ , um zu „Gruppenmenü“ und
„Gruppencodeeinstellung“ zu wechseln.
4. oder auf „N“. SEL/ zum Verlassen von
„Gruppenmenü“.
Einstellen des Gruppencodes
1. oder , um den Gruppencode auszuwählen.
2. SEL/ , um die Gruppencodeeinstellung vorzunehmen.
3. Das Funkgerät öffnet das Menü für Klingeltoneinstellungen.
4. MENU/GRP, um zum Gruppenmenü zurückzukehren.
Festlegen des Klingeltons
Der Benutzer kann den Klingelton für einen Direktanruf
auswählen. Klingeltöne und Ruftöne sind gleich.
1. oder , um einen Klingelton auszuwählen.
2. Der ausgewählte Klingelton ertönt.
Einstellen der ID
Für die einzelnen Funkgeräte der Gruppe ist eine ID einzurichten.
Der Benutzer kann einen ID-Namen mit maximal (4) Zeichen
festlegen.
1. oder , um eine ID-Nummer auszuwählen.
2. Wenn die ID bereits vergeben ist, wird VERWENDET
angezeigt. Wird VERWENDET nicht angezeigt, ist die ID
verfügbar.
3. SEL/ , um zur Einstellung des ID-Namens zu gelangen.
Einstellen des ID-Namens
Der ID-Name erscheint auf dem Display des anderen
Funkgeräts, wenn Sie einen Anruf des Typs „Alle“ oder
„Direktanruf“ tätigen. Der ID-Name wird auch auf dem Display
des anderen Funkgeräts angezeigt, wenn dort ein Direktanruf
getätigt wird. Wurde kein ID-Name festgelegt, wird die
Gerätenummer angezeigt.
1. oder , um ein Zeichen auszuwählen, das dann auf dem
Display blinkt.
2. SEL/ zum Auswählen und zum Wechseln zum nächsten
Zeichen.
3. SEL/ zum Registrieren der ID-Nummer und des ID-
Namens.
Hinweis: Das Funkgerät storniert die ausgewählte ID-
Nummer und den eingegebenen ID-Namen und
verlässt dann das Gruppenmenü, wenn die Taste
MENU/GRP gedrückt wird.
Kanaleinstellung im Gruppenmodus
So legen Sie den automatischen Kanalwechsel im
Gruppenmodus fest:
1. MENU/GRP zur Eingabe des Gruppenmodus.
2. SEL/ zur Eingabe der Kanaleinstellung.
3. oder zur Eingabe der Einstellung „Automatischer
Kanalwechsel“.
4. SEL/ zur Auswahl.
Eine Kanalnummer blinkt, und „ALLE“ wird angezeigt.
5. oder zur Auswahl des Kanals.
6. SEL/ oder zur Übertragung des Befehls zum
automatischen Kanalwechsel.
7. MENU/GRP zur Rückkehr zur Kanaleinstellung des
Gruppenmodus.
So stellen Sie den manuellen Kanal im Gruppenmodus ein:
1. MENU/GRP zur Eingabe des Gruppenmodus.
2. SEL/ zur Eingabe der Kanaleinstellung.
3. oder für „Manuelle Kanaleinstellung“.
4. SEL/ zur Auswahl.
Eine Kanalnummer blinkt, und „MEINE“ wird angezeigt.

Deutsch
8
5. oder zur manuellen Kanalauswahl.
6. SEL/ zum Verlassen der Einstellung „Manueller Kanal“.
7. MENU/GRP zur Rückkehr zur Kanaleinstellung des
Gruppenmodus.
Einstellen von „Alle“
1. MENU/GRP zur Eingabe des Gruppenmodus.
2. zur Eingabe der Einstellung „Alle/Direktanruf“.
3. oder , um die Einstellung „Übertragung für alle“
einzugeben. „SYNC“ wird angezeigt.
4. SEL/ oder , um diese Einstellung zu verlassen und die
Übertragung für „Alle“ einzustellen.
Signalton für „Alle“ ertönt. und blinkt während der
Übertragung.
5. MENU/GRP zum Verlassen.
Einstellen von „Direktanruf“
1. MENU/GRP zur Eingabe des Gruppenmodus.
2. zur Eingabe der Einstellung „Alle/Direktanruf“.
3. oder , um eine ID-Nummer auszuwählen.
4. oder SEL/ zum Übertragen des Befehls für
Direktanrufe.
Der ausgewählte Rufton ertönt. Auf dem Display werden
während der Übertragung das TX-Symbol und das ANRUF-
Symbol angezeigt.
5. MENU/GRP, um zur Einstellung „Alle/Direktanruf“
zurückzukehren.
Funktionen und Merkmale des Funkgeräts
Kanalsuchmodus
Ermöglicht, dass das Funkgerät nach aktiven Kanälen suchen
kann. Wenn Aktivität festgestellt wird, bleibt das Funkgerät
2 Sekunden lang auf diesem Kanal (5 Sekunden bei VOX EIN
ohne Headset). Drücken Sie zum Übermitteln auf diesem Kanal
die Taste PTT. Wenn die Aktivität auf dem gelandeten Kanal
endet, sucht das Funkgerät auf anderen Kanälen weiter.
So schalten Sie die Kanalsuche EIN:
1. Drücken Sie die Taste MENU/GRP, um „Allgemeines Menü“
aufzurufen. Gehen Sie bis „SUCHE“.
2. SEL/ , um die Kanalsuche auf EIN zu setzen.
3. MENU/GRP oder PTT zum Ausschalten des Suchmodus.
Dual Watch-Modus
Ermöglicht die abwechselnde Suche des aktuellen Kanals und
eines anderen Kanals.
So legen Sie einen anderen Kanal fest und starten Dual Watch:
1. Drücken Sie die Taste MENU/GRP, um „Allgemeines Menü“
aufzurufen. Gehen Sie bis „2K“.
2. oder , um den Kanal auszusuchen, und drücken Sie
dann SEL/.
3. oder , um den Subcode auszusuchen, und drücken Sie
dann SEL/.
4. Das Funkgerät beginnt mit Dual Watch.
Hinweis: Wenn Sie denselben Kanal und denselben
Subcode einstellen, funktioniert Dual Watch
nicht.
5. MENU/GRP zum Ausschalten des Dual Watch-Modus.
ID-Nummer für Direktanruf
ID-Name
Sayfa yükleniyor ...
Sayfa yükleniyor ...
Sayfa yükleniyor ...
Sayfa yükleniyor ...
Sayfa yükleniyor ...
Sayfa yükleniyor ...
Sayfa yükleniyor ...
Sayfa yükleniyor ...
Sayfa yükleniyor ...
Sayfa yükleniyor ...
Sayfa yükleniyor ...
Sayfa yükleniyor ...
Sayfa yükleniyor ...
Sayfa yükleniyor ...
Sayfa yükleniyor ...
Sayfa yükleniyor ...
Sayfa yükleniyor ...
Sayfa yükleniyor ...
Sayfa yükleniyor ...
Sayfa yükleniyor ...
Sayfa yükleniyor ...
Sayfa yükleniyor ...
Sayfa yükleniyor ...
Sayfa yükleniyor ...
Sayfa yükleniyor ...
Sayfa yükleniyor ...
Sayfa yükleniyor ...
Sayfa yükleniyor ...
Sayfa yükleniyor ...
Sayfa yükleniyor ...
Sayfa yükleniyor ...
Sayfa yükleniyor ...
Sayfa yükleniyor ...
Sayfa yükleniyor ...
Sayfa yükleniyor ...
Sayfa yükleniyor ...
Sayfa yükleniyor ...
Sayfa yükleniyor ...
Sayfa yükleniyor ...
Sayfa yükleniyor ...
Sayfa yükleniyor ...
Sayfa yükleniyor ...
Sayfa yükleniyor ...
Sayfa yükleniyor ...
Sayfa yükleniyor ...
Sayfa yükleniyor ...
Sayfa yükleniyor ...
Sayfa yükleniyor ...
Sayfa yükleniyor ...
Sayfa yükleniyor ...
Sayfa yükleniyor ...
Sayfa yükleniyor ...
Sayfa yükleniyor ...
Sayfa yükleniyor ...
Sayfa yükleniyor ...
Sayfa yükleniyor ...
Sayfa yükleniyor ...
Sayfa yükleniyor ...
Sayfa yükleniyor ...
Sayfa yükleniyor ...
Sayfa yükleniyor ...
Sayfa yükleniyor ...
Sayfa yükleniyor ...
Sayfa yükleniyor ...
Sayfa yükleniyor ...
Sayfa yükleniyor ...
Sayfa yükleniyor ...
Sayfa yükleniyor ...
Sayfa yükleniyor ...
Sayfa yükleniyor ...
Sayfa yükleniyor ...
Sayfa yükleniyor ...
Sayfa yükleniyor ...
Sayfa yükleniyor ...
Sayfa yükleniyor ...
Sayfa yükleniyor ...
Sayfa yükleniyor ...
Sayfa yükleniyor ...
Sayfa yükleniyor ...
Sayfa yükleniyor ...
Sayfa yükleniyor ...
Sayfa yükleniyor ...
Sayfa yükleniyor ...
Sayfa yükleniyor ...
Sayfa yükleniyor ...
Sayfa yükleniyor ...
Sayfa yükleniyor ...
Sayfa yükleniyor ...
Sayfa yükleniyor ...
Sayfa yükleniyor ...
Sayfa yükleniyor ...
Sayfa yükleniyor ...
Sayfa yükleniyor ...
Sayfa yükleniyor ...
Sayfa yükleniyor ...
Sayfa yükleniyor ...
Sayfa yükleniyor ...
Sayfa yükleniyor ...
Sayfa yükleniyor ...
Sayfa yükleniyor ...
Sayfa yükleniyor ...
Sayfa yükleniyor ...
Sayfa yükleniyor ...
Sayfa yükleniyor ...
Sayfa yükleniyor ...
Sayfa yükleniyor ...
Sayfa yükleniyor ...
Sayfa yükleniyor ...
Sayfa yükleniyor ...
Sayfa yükleniyor ...
Sayfa yükleniyor ...
Sayfa yükleniyor ...
Sayfa yükleniyor ...
Sayfa yükleniyor ...
Sayfa yükleniyor ...
Sayfa yükleniyor ...
Sayfa yükleniyor ...
Sayfa yükleniyor ...
Sayfa yükleniyor ...
Sayfa yükleniyor ...
Sayfa yükleniyor ...
Sayfa yükleniyor ...
Sayfa yükleniyor ...
Sayfa yükleniyor ...
Sayfa yükleniyor ...
Sayfa yükleniyor ...
Sayfa yükleniyor ...
Sayfa yükleniyor ...
Sayfa yükleniyor ...
Sayfa yükleniyor ...
Sayfa yükleniyor ...
Sayfa yükleniyor ...
Sayfa yükleniyor ...
Sayfa yükleniyor ...
Sayfa yükleniyor ...
Sayfa yükleniyor ...
Sayfa yükleniyor ...
Sayfa yükleniyor ...
Sayfa yükleniyor ...
Sayfa yükleniyor ...
Sayfa yükleniyor ...
Sayfa yükleniyor ...
Sayfa yükleniyor ...
Sayfa yükleniyor ...
Sayfa yükleniyor ...
Sayfa yükleniyor ...
Sayfa yükleniyor ...
Sayfa yükleniyor ...
Sayfa yükleniyor ...
Sayfa yükleniyor ...
Sayfa yükleniyor ...
Sayfa yükleniyor ...
Sayfa yükleniyor ...
Sayfa yükleniyor ...
Sayfa yükleniyor ...
Sayfa yükleniyor ...
-
 1
1
-
 2
2
-
 3
3
-
 4
4
-
 5
5
-
 6
6
-
 7
7
-
 8
8
-
 9
9
-
 10
10
-
 11
11
-
 12
12
-
 13
13
-
 14
14
-
 15
15
-
 16
16
-
 17
17
-
 18
18
-
 19
19
-
 20
20
-
 21
21
-
 22
22
-
 23
23
-
 24
24
-
 25
25
-
 26
26
-
 27
27
-
 28
28
-
 29
29
-
 30
30
-
 31
31
-
 32
32
-
 33
33
-
 34
34
-
 35
35
-
 36
36
-
 37
37
-
 38
38
-
 39
39
-
 40
40
-
 41
41
-
 42
42
-
 43
43
-
 44
44
-
 45
45
-
 46
46
-
 47
47
-
 48
48
-
 49
49
-
 50
50
-
 51
51
-
 52
52
-
 53
53
-
 54
54
-
 55
55
-
 56
56
-
 57
57
-
 58
58
-
 59
59
-
 60
60
-
 61
61
-
 62
62
-
 63
63
-
 64
64
-
 65
65
-
 66
66
-
 67
67
-
 68
68
-
 69
69
-
 70
70
-
 71
71
-
 72
72
-
 73
73
-
 74
74
-
 75
75
-
 76
76
-
 77
77
-
 78
78
-
 79
79
-
 80
80
-
 81
81
-
 82
82
-
 83
83
-
 84
84
-
 85
85
-
 86
86
-
 87
87
-
 88
88
-
 89
89
-
 90
90
-
 91
91
-
 92
92
-
 93
93
-
 94
94
-
 95
95
-
 96
96
-
 97
97
-
 98
98
-
 99
99
-
 100
100
-
 101
101
-
 102
102
-
 103
103
-
 104
104
-
 105
105
-
 106
106
-
 107
107
-
 108
108
-
 109
109
-
 110
110
-
 111
111
-
 112
112
-
 113
113
-
 114
114
-
 115
115
-
 116
116
-
 117
117
-
 118
118
-
 119
119
-
 120
120
-
 121
121
-
 122
122
-
 123
123
-
 124
124
-
 125
125
-
 126
126
-
 127
127
-
 128
128
-
 129
129
-
 130
130
-
 131
131
-
 132
132
-
 133
133
-
 134
134
-
 135
135
-
 136
136
-
 137
137
-
 138
138
-
 139
139
-
 140
140
-
 141
141
-
 142
142
-
 143
143
-
 144
144
-
 145
145
-
 146
146
-
 147
147
-
 148
148
-
 149
149
-
 150
150
-
 151
151
-
 152
152
-
 153
153
-
 154
154
-
 155
155
-
 156
156
-
 157
157
-
 158
158
-
 159
159
-
 160
160
-
 161
161
-
 162
162
-
 163
163
-
 164
164
-
 165
165
-
 166
166
-
 167
167
-
 168
168
-
 169
169
-
 170
170
-
 171
171
-
 172
172
-
 173
173
-
 174
174
-
 175
175
-
 176
176


Diğer dillerde
- español: Motorola XT180 El manual del propietario
- français: Motorola XT180 Le manuel du propriétaire
- italiano: Motorola XT180 Manuale del proprietario
- svenska: Motorola XT180 Bruksanvisning
- polski: Motorola XT180 Instrukcja obsługi
- Deutsch: Motorola XT180 Bedienungsanleitung
- português: Motorola XT180 Manual do proprietário
- English: Motorola XT180 Owner's manual
- dansk: Motorola XT180 Brugervejledning
- русский: Motorola XT180 Инструкция по применению
- suomi: Motorola XT180 Omistajan opas
- Nederlands: Motorola XT180 de handleiding
İlgili Makaleler
-
Motorola TLKR T7 El kitabı
-
-
Zebra T8 Walkie Talkie El kitabı
-
-
-
-
-
-
Vox T60 Walkie Talkie El kitabı
-
Motorola Talkie Walkie Twin Pack T62 Bleu Kullanım kılavuzu