Monster Huma H5 V3.2 Notebook Kullanım kılavuzu
- Tip
- Kullanım kılavuzu

01
EN
H5 V3.2
USER MANUAL
KULLANIM KILAVUZU
MANUAL DE USUARIO
MANUEL DE L’UTILISATEUR
MANUALE UTENTE
BENUTZERHANDBUCH

02
EN DE
02
USER MANUAL
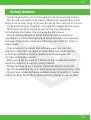
1 Safety Notices
2 Configuration information
3 Device overview
4 Basic operation
4.1 Boot
4.2 Shutdown
4.3 Standby
4.4 Restart
4.5 Get online
4.6 Connect to Bluetooth devices
4.7 Sign in with a Microsoft account
4.8 Start menu
4.9 Action center
H5 V3.2

03
EN
• Avoid dropping the unit on the ground or by other strong impact.
• Do not use in extreme cold, heat (<35celcius), excessively humid,
dusty environment, long-term use, do not let the machine in the sun.
• Try to avoid using in magnetic, strong electrostatic environment.
• Once water or other liquids to spill on the unit, should be
immediately shut down, the unit wipe dry before use.
• Do not use any cleaner or other liquid containing chemical
ingredients to clean the machine to avoid corrosion and moisture
damage, if absolutely necessary cleaning, use a soft, dry cloth or
paper towel.
• The company’s hardware and software were non-normal
operation, the machine repair or other data loss resulting from
unforeseen circumstances or delete is not responsible for,
nor bear the losses caused.
• When using the file card of T-Flash, do not remove the card to
avoid damage to the memory card or device.
• Please feel free to back up your important data to avoid loss.
• Do not disassemble the unit, otherwise it will lose warranty rights.
• Manual and related software updates at any time without notice,
and Quick Start Guide found discrepancies, please prevail in kind.
Safety Notices

04
EN
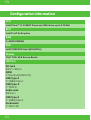
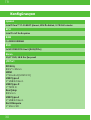
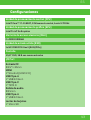
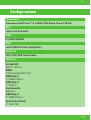
Display
I/0 Ports
15,6” FHD, 16:9 Narrow Border
DC Jack
Ø3.5*1.35mm
HDMI
1*Standart(HDMI 2.0)
USB Type-A
1*USB3.2 Gen1
USB Type-C
1*TBT4.0
Audio Jack
Ø3.5mm
USB Type-A
1*USB3.2 Gen1
Cardreader
1*Micro SD
Configuration information
CPU
GPU
RAM
SSD
Intel® Core™ i7-1165G7 Processor,12M Cache, up to 4.70 GHz
Intel® Iris® Xe Graphics
2 x DDR4 SODIMM
1x M2 2280 PCIE Gen4 (SATA/PCIe)

05
EN
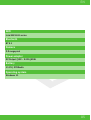
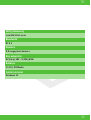
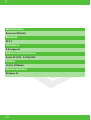
WIFI
Bluetooth
Camera
Power adapter
Battery
Operating system
Intel WiFi6 AX series
BT 5.1
2.0 megapixel
DC Output (19V - 3.42A) 65W
11.4V / 4700mAh
Windows 11

06
EN
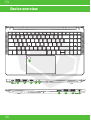
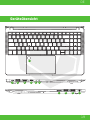
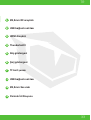
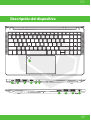
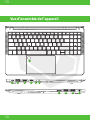
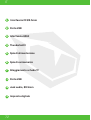
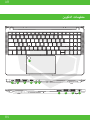
Device overview
11
1
7 8 9 10
2 3 4 5 6

07
EN
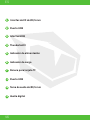
4
6
8-9
5
7
10
11
Thunderbolt
Charging Indıcator
USB Port
Fingerprint
Power Indıcator
TF Card Slot
3,5mm DC Interface
1
2
3
3,5mm DC Interface
USB Port
HDMI Interface

08
EN
4.1 Boot
Press the power button 3-5 seconds and release the seed.
(Note: There is no response when you press the power button,
the device may need to recharge).
4.4 Restart
Open the Start menu, click on the “Power” button, select “Restart” button.
4.2 Shutdown
1. Press 4 seconds to force shutdown.
2. Hit the Start menu, click on the “Power” button, select “Off”
4.3 Standby
In the power-on state Short press the power button to enter standby or wakes
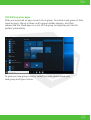
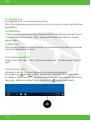
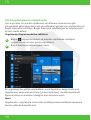
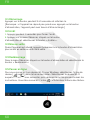
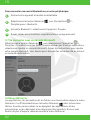
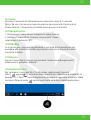
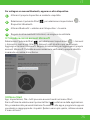
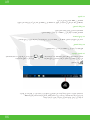
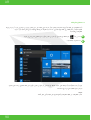
4.5 Get Online
To connect to a Wi- Fi network in Windows, select the Network icon ( or )
on the taskbar. Select the Wi-Fi network you want > Connect, then type the
password and follow the instructions. That’s it—you’re connected!
This icon will appear in the taskbar.

09
EN
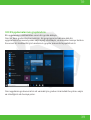
After you’re connected, you’re ready to set up email, browse the web, and do a
whole lot more online. If Wi- Fi isn’t available, or you just want the assurance of
a wired connection, the Ethernet cable is your friend—just connect your
PC to your router or modem, and then do your thing.
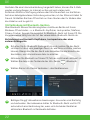
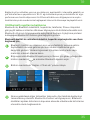
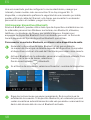
Turn on your Bluetooth audio device and make it discoverable.
The way you make it discoverable depends on the device. Check the
device or visit the manufacturer’s website to learn how.
Follow any more instructions that might appear. Otherwise, you’re done
and connected. Your Bluetooth device and PC will usually automatically
connect anytime the two devices are in range of each other with
Bluetooth turned on.
Turn on Bluetooth on your PC if it’s not on already.
To do this, on the taskbar, select action center >Bluetooth.
In action center, select Connect> the device name.
To connect a Bluetooth headset, speaker, or other audio device.
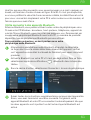
4.6 Connect to Bluetooth devices
Thanks to Bluetooth, you can use all sorts of wireless devices with your Win-
dows PC—Bluetoothheadphones, speakers, phones, fitness trackers—just to
name a few. Start by pairing your Bluetooth device with your PC. The way you do
this depends on the kind of Bluetooth you’re using.
1
4
2
3

10
EN
4.7 Sign in with a Microsoft account
Select the Start button, then select Settings > Accounts > Email
& app accounts. Under Accounts used by other apps, select Add a Microsoft
account. Follow the prompts to add your Microsoft account.
You may need to verify your identity by entering a confirmation code.
Turn on your device and make it discoverable.
Select the Start button, then select Settings >Devices>Bluetooth.
Turn on Bluetooth > select the device > Pair.
Follow any more instructions if they appear.
To connect a Bluetooth mouse, or other device.
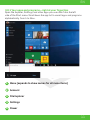
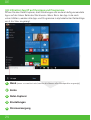
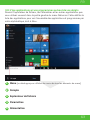
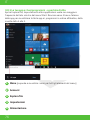
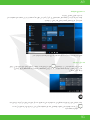
4.8 Start Menu
Apps, settings, files—they can all be found on the Start menu.
Just select the Start button on thetaskbar. Next, make it yours by pinning apps
and programs, or moving and regrouping tiles. If you need morespace, resize
the Start menu.
1
2
3
4

11
EN
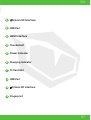
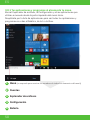
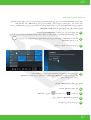
4.8.1 Your apps and programs—right at your fingertips
Open File Explorer, Settings, and other apps you use often from the left
side of the Start menu. Scroll down the app list to see all apps and programs
alphabetically, from A to Xbox.
3
5
File Explorer
Power
1
2
4
Menu (expands to show names for all menu items)
Account
Settings

12
EN
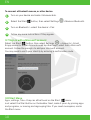
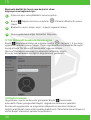
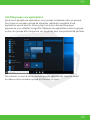
4.8.2 Organize your apps
To see live updates on what’s happening in your world—such as new email,
your next appointment, or the weekend weather. When you pin an app,
it’s added to the Start menu as a new tile.
Once you pin a new app, resize it. Press and hold (or right-click) the app tile,
select Resize, and then choose the tile size you want.
Drag and drop apps from the apps list to pin them to the Start menu as tiles.
Pin apps to Start.
Tip
Select the Start button, then press and hold (or right-click) the app
you want to pin.
Select Pin to Start.
1
2

13
EN
To give your new group a name, select the open space above your
new group and type a name.
4.8.3 Group your apps
After you’ve pinned an app, move it into a group. To create a new group of tiles,
move an app’s tile up or down until a group divider appears, and then
release the tile. Move apps in or out of the group to organize your tiles for
perfect productivity.

14
EN
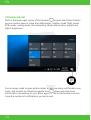
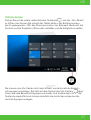
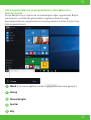
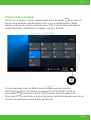
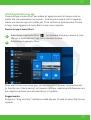
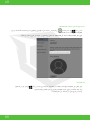
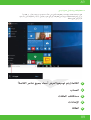
4.9 Action Center
Click in the lower right corner of the taskbar to open the “Action Center”,
you can quickly open or close the tablet mode, rotation mode, flight mode,
VPN, power-saving mode, the networking, Bluetooth,location, project and
adjust brightness.
You no longer need to open action center to see how many notifications you
have—the number on the action center icon shows you how many
notifications are waiting for you. Other apps pinned to the taskbar can also
show the number of notifications you’ve missed.

DE
15
DE
15
1 Sicherheitshinweise
2 Konfiguration
3 Geräteübersicht
4 Basisbetrieb
4.1 Hochfahren
4.2 Herunterfahren
4.3 Standby
4.4 Neu starten
4.5 Online gehen
4.6 Verbindung mit Bluetooth-Geräten
4.7 Anmeldung mit einem Microsoft-Konto
4.8 Startmenü
4.9 Info-Center
H5 V3.2
BENUTZERHANDBUCH

DE
16
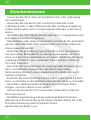
• Lassen Sie das Gerät nicht auf den Boden fallen oder anderweitig
hart aufschlagen.
• Verwenden Sie das Gerät nicht in extremer Kälte oder Hitze
(<35celcius) oder in übermäßig feuchter oder staubiger Umgebung.
Lassen Sie das gerät nicht zu lange eingeschaltet oder in der Sonne
stehen.
• Vermeiden Sie nach Möglichkeit den Gebrauch in magnetischer oder
stark elektrostatischer Umgebung.
• Sobald Wasser oder andere Flüssigkeiten auf dem Gerät verschüttet
werden, sollte das Gerät sofort abgeschaltet und vor dem Gebrauch
trocken gewischt werden.
• Verwenden Sie keine Reinigungsmittel oder andere Flüssigkeiten
mit chemischen Bestandteilen zur Reinigung des Geräts, um Korro-
sions- und Feuchtigkeitsschäden zu vermeiden. Sollte eine Reinigung
unbedingt erforderlich sein, verwenden Sie ein weiches, trockenes
Tuch oder Papiertuch.
• Das Unternehmen haftet nicht für unsachgemäße Verwendung von
Hard- und Software, die Reparatur des Geräts oder andere
Datenverluste, die durch unvorhergesehene Umstände oder durch
Löschen entstehen.
• Entfernen Sie während der Verwendung der T-Flash-Karte die Karte
nicht, um Schäden an der Speicherkarte oder dem Gerät zu vermeiden.
• Sie sollten unbedingt Sicherheitskopien Ihrer wichtigen Daten
anlegen, um einen Verlust zu vermeiden.
• Nehmen Sie das Gerät nicht auseinander, andernfalls verfällt der
Garantieanspruch.
• Die Bedienungsanleitung und die zugehörige Software können
jederzeit ohne Vorankündigung aktualisiert werden. Sollten Sie in der
Schnellstartanleitung Unstimmigkeiten finden,
wenden Sie sich bitte an uns.
Sicherheitshinweise

DE
17
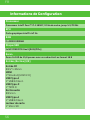
Bildschirm
I/0 Port
15,6” FHD, 16:9 Schmaler Rand
DC-Eingang
Ø3.5*1.35mm
HDMI
1*Standart(HDMI 2.0)
USB Typ-A
1*USB3.2 Gen1
USB Typ-C
1*TBT4.0
Audioausgang
Ø3.5mm
USB Typ-A
1*USB3.2 Gen1
Kartenleser
1*Micro SD
Informationen zur Konfiguration
Prozessor
GPU
RAM
SSD
Intel® Core™ i7-1165G7 Prozessor,12M Cache, bis zu 4.70 GHz
Intel® Iris® Xe Graphics
2 x DDR4 SODIMM
1x M2 2280 PCIE Gen4 (SATA/PCIe)

DE
18
WIFI (kabellos)
Bluetooth
Kamera
Netzteil
Batterie
Betriebssystem
Intel WiFi6 AX series
BT 5.1
2.0 megapixel Kamera
DC-Ausgang (19V - 3.42A) 65W
11.4V / 4700mAh
Windows 11

DE
19
Geräteübersicht
11
1
7 8 9 10
2 3 4 5 6

DE
20
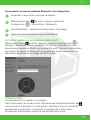
4
6
8-9
5
7
10
11
Thunderbolt4
Ladeanzeige
USB-Anschlüsse
Fingerabdrucksensor
Betriebsanzeige
Steckplatz für TF-Karte
Ø 3,5 mm-Audiobuchse
1
2
3
Ø 3,5 mm-Gleichstromanschluss
USB-Anschluss
HDMI-Anschluss
Sayfa yükleniyor...
Sayfa yükleniyor...
Sayfa yükleniyor...
Sayfa yükleniyor...
Sayfa yükleniyor...
Sayfa yükleniyor...
Sayfa yükleniyor...
Sayfa yükleniyor...
Sayfa yükleniyor...
Sayfa yükleniyor...
Sayfa yükleniyor...
Sayfa yükleniyor...
Sayfa yükleniyor...
Sayfa yükleniyor...
Sayfa yükleniyor...
Sayfa yükleniyor...
Sayfa yükleniyor...
Sayfa yükleniyor...
Sayfa yükleniyor...
Sayfa yükleniyor...
Sayfa yükleniyor...
Sayfa yükleniyor...
Sayfa yükleniyor...
Sayfa yükleniyor...
Sayfa yükleniyor...
Sayfa yükleniyor...
Sayfa yükleniyor...
Sayfa yükleniyor...
Sayfa yükleniyor...
Sayfa yükleniyor...
Sayfa yükleniyor...
Sayfa yükleniyor...
Sayfa yükleniyor...
Sayfa yükleniyor...
Sayfa yükleniyor...
Sayfa yükleniyor...
Sayfa yükleniyor...
Sayfa yükleniyor...
Sayfa yükleniyor...
Sayfa yükleniyor...
Sayfa yükleniyor...
Sayfa yükleniyor...
Sayfa yükleniyor...
Sayfa yükleniyor...
Sayfa yükleniyor...
Sayfa yükleniyor...
Sayfa yükleniyor...
Sayfa yükleniyor...
Sayfa yükleniyor...
Sayfa yükleniyor...
Sayfa yükleniyor...
Sayfa yükleniyor...
Sayfa yükleniyor...
Sayfa yükleniyor...
Sayfa yükleniyor...
Sayfa yükleniyor...
Sayfa yükleniyor...
Sayfa yükleniyor...
Sayfa yükleniyor...
Sayfa yükleniyor...
Sayfa yükleniyor...
Sayfa yükleniyor...
Sayfa yükleniyor...
Sayfa yükleniyor...
Sayfa yükleniyor...
Sayfa yükleniyor...
Sayfa yükleniyor...
Sayfa yükleniyor...
Sayfa yükleniyor...
Sayfa yükleniyor...
Sayfa yükleniyor...
Sayfa yükleniyor...
-
 1
1
-
 2
2
-
 3
3
-
 4
4
-
 5
5
-
 6
6
-
 7
7
-
 8
8
-
 9
9
-
 10
10
-
 11
11
-
 12
12
-
 13
13
-
 14
14
-
 15
15
-
 16
16
-
 17
17
-
 18
18
-
 19
19
-
 20
20
-
 21
21
-
 22
22
-
 23
23
-
 24
24
-
 25
25
-
 26
26
-
 27
27
-
 28
28
-
 29
29
-
 30
30
-
 31
31
-
 32
32
-
 33
33
-
 34
34
-
 35
35
-
 36
36
-
 37
37
-
 38
38
-
 39
39
-
 40
40
-
 41
41
-
 42
42
-
 43
43
-
 44
44
-
 45
45
-
 46
46
-
 47
47
-
 48
48
-
 49
49
-
 50
50
-
 51
51
-
 52
52
-
 53
53
-
 54
54
-
 55
55
-
 56
56
-
 57
57
-
 58
58
-
 59
59
-
 60
60
-
 61
61
-
 62
62
-
 63
63
-
 64
64
-
 65
65
-
 66
66
-
 67
67
-
 68
68
-
 69
69
-
 70
70
-
 71
71
-
 72
72
-
 73
73
-
 74
74
-
 75
75
-
 76
76
-
 77
77
-
 78
78
-
 79
79
-
 80
80
-
 81
81
-
 82
82
-
 83
83
-
 84
84
-
 85
85
-
 86
86
-
 87
87
-
 88
88
-
 89
89
-
 90
90
-
 91
91
-
 92
92


Monster Huma H5 V3.2 Notebook Kullanım kılavuzu
- Tip
- Kullanım kılavuzu
diğer dillerde
İlgili makaleler
Diğer belgeler
-
Acer AO756 Kullanım kılavuzu
-
Acer ICONIA W510-27602G06ASS El kitabı
-
Logitech T630 El kitabı
-
Acer Aspire V5-171 Kullanım kılavuzu
-
Acer ASPIRE V5-571P-323C4G75MASS El kitabı
-
ViewSonic VPAD10_APUS_01 Kullanım kılavuzu
-
Comelit 1454K Kullanım kılavuzu
-
Acer Aspire M3-581PTG Kullanım kılavuzu
-
Acer W700 Kullanım kılavuzu
-