
01
EN
M7 V3.1
USER MANUAL
KULLANIM KILAVUZU
BENUTZERHANDBUCH

EN
USER
MANUAL
TABLE OF CONTENT
CHAPTER 1 - Content ...................................................... 02
FCC Conditions ..........................................................................02
Safety Instructions ...................................................................04
CHAPTER 2 - Introductions ............................................ 07
Unpacking ...................................................................................07
Product Overview ......................................................................07
Top-open View ...........................................................................08
Front Side View ..........................................................................09
Right Side View ..........................................................................10
Left Side View ............................................................................11
Rear Side View ...........................................................................12
Bottom Side View ......................................................................13
How to Use the Keyboard ........................................................14
Windows Key ..............................................................................14
Quick Launch Keys ....................................................................14
Disable or Enable Touchpad ...................................................15
Enter Sleep Mode ......................................................................15
Switch Display ...........................................................................15
Use Multiple Monitors ..............................................................15
Adjust the Brightness Level of the Display .........................15
Adjust the Sound Level of the Speaker ................................16
Adjust the Brightness Level of the Keyboard Backlight LED ..16
Specifications ............................................................................16
CHAPTER 3 - How to Get Started ................................... 18
How to Use the Notebook Comfortably ...............................19
How to Manage Power Supply................................................19
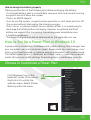
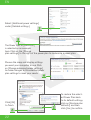
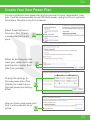
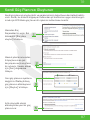
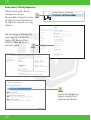
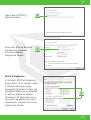
How to Set Up a Power Plan in Windows 10 .......................21
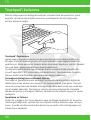
How to Use the Touchpad .......................................................24
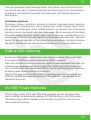
About HDD and SSD .................................................................25
About M.2 SSD Slot ..................................................................25
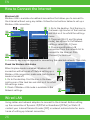
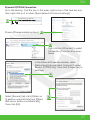
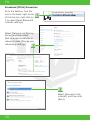
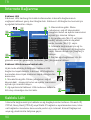
How to Connect the Internet ..................................................26
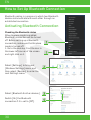
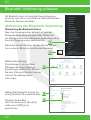
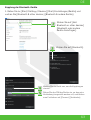
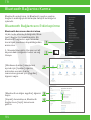
How to Set Up Bluetooth Connection ..................................30
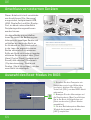
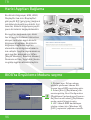
How to Connect External Devices .........................................32
How to Select Boot Mode in BIOS .........................................32
M7 V3.1

02
EN
CHAPTER 1
NOTICE
All marks and names mentioned may be trademarks of their respective owners.
No warranty as to accuracy or completeness is expressed or implied.
We reserves the right to make changes to this document without prior notice.
FCC Conditions
This device complies with part 15 of the FCC Rules. Operation is subject to the
following two conditions:
• This device may not cause harmful interference.
• This device must accept any interference received, including interference that
may cause undesired operation.
Content
FCC-B Radio Frequency Interference Statement
This equipment has been tested and found to comply with the limits for a Class
B digital device, pursuant to part 15 of the FCC rules. These limits are designed
to provide reasonable protection against harmful interference in a residential
installation. This equipment generates, uses and radiates radio frequency
energy, and, if not installed and used in accordance with the instructions, may
cause harmful interference to radio communications. However, there is no
guarantee that interference will not occur in a particular installation. If this
equipment does cause harmful interference to radio or television reception,
which can be determined by turning the equipment off and on, the user is en-
couraged to try to correct the interference by one or more of the following
measures:
• Reorient or relocate the receiving antenna.
• Increase the separation between the equipment and receiver.
• Connect the equipment into an outlet on a circuit different from that to which
the receiver is connected.
• The changes or modifications not expressly approved by the party responsible
for compliance could void the user’s authority to operate the equipment.
• Shield interface cables and AC power cord, if any, must be used in order to comply
with the emission limits.
NOTE

03
EN
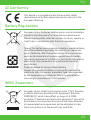
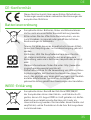
CE Conformity
Battery Regulations
WEEE Statement
This device is in compliance with the essential safety
requirements and other relevant provisions set out in the
European Directive.
European Union: Batteries, battery packs, and accumulators
should not be disposed of as unsorted household waste.
Please use the public collection system to return, recycle, or
treat them in compliance with the local regulations.
European Union: Under the European Union (“EU”) Directive
on Waste Electrical and Electronic Equipment, Directive
2002/96/ EC, which takes effect on August 13, 2005,
products of “electrical and electronic equipment” cannot be
discarded as municipal waste anymore and manufacturers
of covered electronic equipment will be obligated to take
back such products at the end of their useful life.
Taiwan: For better environmental protection, waste batteries
should be collected separately for recycling or special dis-
posal. California, USA: The button cell battery may contain
perchlorate material and requires special handling when
recycled or disposed of in California. For further information
please visit: http://www.dtsc.ca.gov/hazardouswaste/
perchlorate/
Safety Guideline for Using Lithium Battery
Danger of explosion if battery is incorrectly replaced. Re-
place only with the same or equivalent type recommended
by the equipment manufacturer. Discard used batteries
according to manufacturer’s instructions.

04
EN
Upgrade and Warranty
Acquisition of Replaceable Parts
Please note that certain components, such as memory modules, HDD, SSD,
ODD, and Bluetooth/WiFi combo card, etc., preinstalled in the product may be
upgradable or replaceable by user’s request depending on the models users
purchased.
For any further information on the product users purchased, please contact the
local dealer. Do not attempt to upgrade or replace any component of the prod-
uct if users do not understand the component location or how to assembly/
disassembly, since it may cause the product to be damaged. It is recommended
that you contact the authorized dealer or service center for product service
information.
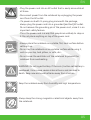
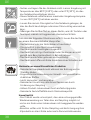
Read the safety instructions carefully and thoroughly. All cautions
and warnings on the equipment or user’s manual should be noted.
• Replacement of a battery with an incorrect type that can defeat
a safeguard.
• Disposal of a battery into fire or a hot oven, or mechanically
crushing or cutting of a battery, that can result in an explosion.
Leaving a battery in an extremely high temperature surrounding
environment that can result in an explosion or the leakage of
flammable liquid or gas.
• A battery subjected to extremely low air pressure that may
result in an explosion or the leakage of flammable liquid or gas.
Please be noticed that the acquisition of replaceable parts (or compatible
ones) of the product users purchased in certain countries or territories may be
fulfilled by the manufacturer within 5 years at most since the product has been
discontinued, depending on the official regulations declared at the time.
Safety Instructions

05
EN
• Plug the power cord into an AC outlet that is easily accessible at
all times.
• Disconnect power from the notebook by unplugging the power
cord from the AC outlet.
• If a power cord with 3-prong plug came with the package,
always plug the power cord into a grounded (earthed) AC outlet.
Do not remove the grounding pin of the power cord, since it is an
important safety feature.
• Place the power cord in a way that people are unlikely to step on
it. Do not place anything on top of the power cord.
• Always place the notebook on a stable, flat, hard surface before
setting it up.
• Do not lay the notebook on an unstable surface while using it,
such as your lap, bed, pillow , or sofa, etc...
• Do not cover the ventilators of the notebook to prevent the
notebook from overheating.
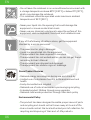
WARNING: Do not ingest battery. If the coin / button cell battery is
swallowed, it can cause severe internal burns and can lead to
death. Keep new and used batteries away from children.
Keep the notebook away from humidity and high temperature.
Always keep the strong magnetic or electrical objects away from
the notebook.

06
EN
If any of the following situations arises, get the equipment
checked by a service personnel:
• The power cord or plug is damaged.
• Liquid has penetrated into the equipment.
• The equipment has been exposed to moisture.
• The equipment has not worked well or you can not get it work
according to User’s Manual.
• The equipment was dropped and damaged.
• The equipment has obvious signs of breakage.
Green Product Features
• Reduced energy consumption during use and stand-by
• Limited use of substances harmful to the environment and
health
• Easily dismantled and recycled
• Reduced use of natural resources by encouraging recycling
• Extended product lifetime through easy upgrades
• Reduced solid waste production through take-back policy
Environmental Policy
• The product has been designed to enable proper reuse of parts
and recycling and should not be thrown away at its end of life.
• Users should contact the local authorized point of collection for
recycling and disposing of their end-of-life products.
• Never pour liquid into the opening that could damage the
equipment or cause an electrical shock.
• Never use any chemical substance to wipe the surface of this
equipment, such as keyboard, touchpad, and notebook case.
• Do not leave the notebook in an unconditioned environment with
a storage temperature above 60ºC (140ºF) or below 0ºC (32ºF),
which may damage the notebook.
• This notebook should be operated under maximum ambient
temperature of 35ºC (95ºF).

07
EN
Congratulations on becoming an user of this notebook, the finely designed
notebook. You will have a delightful and professional experience in using this
exquisite notebook. We are proud to tell users that this notebook is thoroughly
tested and certified by our reputation for unsurpassed dependability and
customer satisfaction.
First, unpack the shipping carton and check all items carefully. If any item
contained is damaged or missing, please contact your local dealer immediately.
Also, keep the box and packing materials in case you need to ship the unit in
the future. The package should contain the following items:
• Notebook
• Quick Start Guide
• AC/DC adapter and AC power cord
• Optional carry bag
This section provides the description of basic aspects of the notebook. It will
help you to know more about the appearance of this notebook before using it.
Please be aware that the figures shown here are for reference only.
CHAPTER 2
Introductions
Unpacking
Product Overview
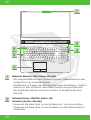
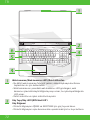
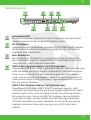
The figure of top-open view and description shown below will lead you to
browse the main operating area of your notebook.
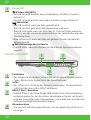
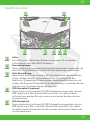
Top-open View

08
EN
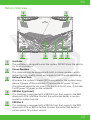
Webcam/ Webcam LED/ Internal Microphone
• This built-in webcam can be used for picture taking, video recording or
conferencing, and so on.
• Webcam LED indicator, next to the webcam, blinks when webcam
function is activated; LED goes out when this function is turned off.
• The built-in microphone and its function is the same with microphone.
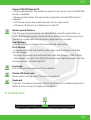
Power Button / Power LED/ GPU Mode LED
Power Button
• Use this button to turn the notebook power ON and OFF.
• Use this button to awake the notebook from the sleep state.

09
EN
Power LED/ GPU Mode LED
• Glowing white when the notebook power is turned on, and the UMA GPU
mode is selected.
• Glowing amber when the optionally supported discrete GPU mode is
selected.
• LED flashes when the notebook goes to the sleep state.
• LED goes off when the notebook is turned off.
Quick Launch Buttons
Use the quick launch buttons to activate the specific applications or
tools. The following quick launch buttons will only be functioning in the
operating system with the necessary applications installed.
User Defined
• Use this button to launch the User Defined application.
Print Screen
• A simple and quick method for users who need to capture multiple
screen images.
• Capture the screen and automatically save the image in PNG format.
• The image is stored in the [My Pictures/Screen Capture] folder and the
screen name is “Screen Capture”.
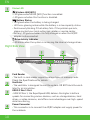
Touchpad
This is the pointing device of the notebook.
Status LED Caps Lock
Glows when the Caps Lock function is activated.
Keyboard
The built-in keyboard provides all the functions of a notebook keyboard.
Refer to How to Use the Keyboard for details.
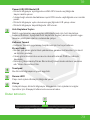
Front Side View

10
EN
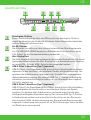
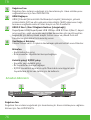
Right Side View
Status LED
Wireless LAN (WiFi)
• LED glows when WLAN (WiFi) function is enabled.
• LED goes out when this function is disabled.
Battery Status
• LED glows when the battery is being charged.
• LED turns glowing amber while the battery is in low capacity status.
• Continuously blinking if the battery fails. If the problem persists,
please contact your local authorized retailer or service center.
• Battery LED goes out when it is fully charged or when the AC/DC
adapter is disconnected.
Drive Activity Indicator
• LED blinks when the system is accessing the internal storage drives.
Card Reader
• The built-in card reader supports various types of memory cards.
Check the Specifications for details.
Ventilator
• The ventilator is designed to cool the system. DO NOT block the venti-
lator for air circulation.
USB 3.2 Gen 1 Port
• USB 3.2 Gen 1, the SuperSpeed USB, delivers the higher interface
speeds for connecting various devices, such as storage devices, hard
drives, or video cameras, and offers more advantages over high-speed
data transferring.
Power Connector
• This connector is to connect the AC/DC adapter and supply power for
the notebook.

11
EN
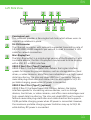
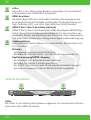
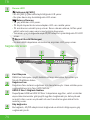
Left Side View
Kensington Lock
This notebook provides a Kensington lock hole, which allows users to
secure the notebook in place.
RJ-45 Connector
The Ethernet connector, with optionally supported transmitting rate of
10/100/1000/10000 megabits per second, is used to connect a LAN
cable for network connection.
Mini-DisplayPort
The Mini-DisplayPort is a miniaturized version of the DisplayPort, with
a suitable adapter, the Mini-DisplayPort may be used to drive displays
with a VGA, DVI or HDMI interface.
USB 3.2 Gen 1 Port (Type C) (optional)
USB 3.2 Gen 1, the SuperSpeed USB, delivers the higher interface
speeds for connecting various devices, such as storage devices, hard
drives, or video cameras, and offers more advantages over high-speed
data transferring. The slim and sleek USB Type C connector features
reversible plug orientation and cable direction and supports 5V/1.5A
portable charging power when AC power is connected.
USB 3.2 Gen 2 Port (Type C) (optional)
USB 3.2 Gen 2, the SuperSpeed USB 10Gbps, delivers the higher
interface speeds for connecting various devices, such as storage
devices, hard drives, or video cameras, and offers more advantages over
high-speed data transferring. The slim and sleek USB Type C connector
features reversible plug orientation and cable direction and supports
5V/3A portable charging power when AC power is connected. However,
the maximum portable charging power limitation may up to 5V/1.5A
while battery DC power is connected.

12
EN
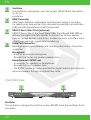
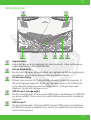
Rear Side View
Ventilator
The ventilator is designed to cool the system. DO NOT block the ventilator for air
circulation.
Ventilator
The ventilator is designed to cool the system. DO NOT block the ventila-
tor for air
circulation.
HDMI Connector
HDMI (High-Definition Multimedia Interface) technology is the indus-
try-leading interface and de-facto standard connecting high-definition
(HD) and ultra highdefinition (UHD) equipment.
USB 3.2 Gen 1/ Gen 2 Port (optional)
USB 3.2 Gen 1/ Gen 2, the SuperSpeed USB/ SuperSpeed USB 10Gbps,
delivers the higher interface speeds for connecting various devices,
such as storage devices, hard drives, or video cameras, and offers more
advantages over high-speed data transferring.
Audio Port Connectors
Make high quality sound blaster with stereo system and Hi-Fi function
supported.
Microphone
• Used for an external microphone.
• Connect the Center and woofer speakers here.
Headphone out/ S/PDIF-out
• A connector for speakers or headphones.
• Connect the Front speakers here.
• The S/PDIF connector is also provided for digital audio transmission to
external speakers through an optical fiber cable.

13
EN
Bottom Side View
Ventilator
The ventilator is designed to cool the system. DO NOT block the ventila-
tor for air circulation.
Stereo Speakers
This notebook may be equipped with built-in stereo speakers which
deliver the high quality sound, and supports the HD audio technology.
Battery Reset Hole
Whenever the system firmware (EC) is upgraded or the system hangs,
please 1) power off the notebook; 2) remove the AC power; 3) use a
straightened paperclip and insert it to this hole for 10 secs; 4) connect
the AC power; 5) power on the notebook.
SSD Slot 1 (optional)
This notebook is equipped with a SSD M.2 slot that supports the SSD
device with PCIe interface. Contact the authorized dealer or service
center for product service.
SSD Slot 2
This notebook is equipped with a SSD M.2 slot that supports the SSD
device with PCIe or SATA interface. Contact the authorized dealer or
service center for product service.

14
EN
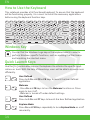
Windows Key
Quick Launch Keys
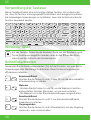
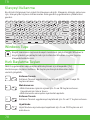
How to Use the Keyboard
This notebook provides a full functioned keyboard. To ensure that the keyboard
will be functioning properly, it is a must to install the necessary applications
before using the keyboard function keys.
You can find the Windows Logo key on the keyboard which is used to
perform Windows-specific functions, such as opening the Start menu
and launching the shortcut menu.
Use the [Fn] combination keys on the keyboard to activate the specific appli-
cations or tools. With the help of these keys, users will be able to do work more
efficiently.
User Defined
Press both Fn and F4 or F5 keys to launch the User Defined
application.
Webcam
• Press Fn and F6 keys to turn the Webcam function on. Press
again to turn it off.
• Webcam is turned off under default settings.
User Defined
Press both Fn and F7 keys to launch the User Defined application.
Airplane Mode
Press Fn and F10 keys repeatedly to turn Airplane Mode on or off
recurrently.
+
+
+
+

15
EN
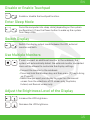
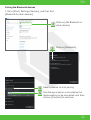
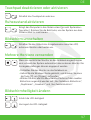
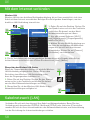
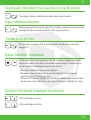
Disable or Enable Touchpad
Enter Sleep Mode
Switch Display
Use Multiple Monitors
Enable or disable the touchpad function.
Force the computer into sleep state (depending on the system
configuration). Press the Power button to wake up the system
from sleep state.
Switch the display output mode between the LCD, external
monitor and both.
If users connect an additional monitor to the notebook, the
system will automatically detect the external monitor connected.
Users will be allowed to customize the display settings.
• Connect the monitor to the notebook.
• Press and hold the Windows key, and then press [P] key to bring
up [Project].
• Select how you want your display to project on the second
screen from the selections of PC screen only, Duplicate,
Extend, and Second screen only.
+
+
+
+
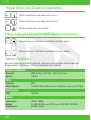
Adjust the Brightness Level of the Display
Increase the LCD brightness.
Decrease the LCD brightness.
+
+

16
EN
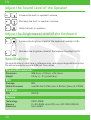
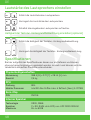
Adjust the Brightness Level of the Keyboard
Specifications
Increase the brightness level of the keyboard backlight LEDs.
Decrease the brightness level of the keyboard backlight LEDs.
The specifications listed here is reference only, and may change without notice.
The actual products sold are different from areas.
Decrease the built-in speaker’s volume.
Mute the built-in speakers.
+
+
+
+
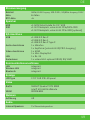
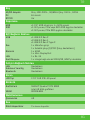
Physical Characteristic
CPU
Core Chip
Dimension 398,5mm x 272mm x 28,15mm
Package BGA
Mobile Processor Intel 9th Gen Coffee Lake-H Reftesh (Xeon) E-2276M
PCH CM246
Weight 2,6 kg +/- 5% (w/battery)
Technology DDR4, 2666
Memory 2 x SO-DIMM slots ECC/ non-ECC DDR4 SDRAM
Maximum Up to 64GB
Memory
Adjust the Sound Level of the Speaker
Increase the built-in speaker’s volume.
+

17
EN
AC/DC Adapter Input: 100-240V~, 50/60Hz Output: 19.5V~, 9.23A
Battery 6-cell
RTC Battery Yes
Power
I/O Port
Storage
Communication Port
Display
Video
Webcam
Audio
LAN Supported
Wireless LAN Supported
Bluetooth Supported
LCD Type 17.3” FHD IPS LED panel
Graphics NVIDIA® Quadro® RTX 3000
Intel HD UMA graphics
VRAM GDDR6 6GB
Resolution HD
Internal Speakers 2 x stereo speakers
USB x1 USB 3.2 Gen 2
x2 USB 3.2 Gen 1
x1 USB 3.2 Gen 2 Type C
Audio Connectors 1 x Mic-in
1 x Headphone-out (S/PDIF-Out supported)
Video Connectors 1 x HDMI
1 x Mini-DisplayPort
LAN 1 x RJ-45
Card Reader 1 x optionally supports SD3.0/ SD/ MMC
HDD x1 SATA interface for 2.5” HDD device
SSD x1 M.2 slot, supports PCIe or SATA SSD device
x1 M.2 slot, supports PCIe SSD device (optional)

18
EN
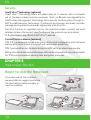
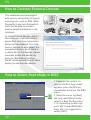
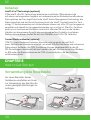
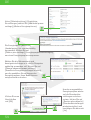
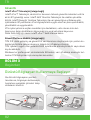
Begin to Use the Notebook
For a new user of this notebook,
we would like to suggest you follow
the illustrations below to begin to
use the notebook.
CHAPTER 3
How to Get Started
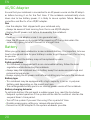
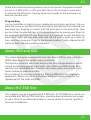
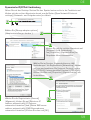
Security
Intel® vPro™Technology (optional)
Intel® vPro™ Technology offers an added layer of IT security with a complete
set of hardware-based security measures. Such as Remote manageability by
Intel® Active Management Technology, data security and encryption through In-
tel® Trusted Execution Technology, IT policies of businesses can be well-tailored,
managed and applied to wherever appropriate with vPro PCs.
The vPro function is suported only for the selected models, contact the local
retailers to learn the correct specifications of the product user purchased.
To find out more, see official Intel® vPro™ website.
Trusted Platform Module (optional)
TPM 2.0 is a hardware-based encryption device that collaborates with software
measures to form a more advanced and secure data protection.
TPM functionalities can be de/activated in BIOS settings where appropriate.
With professional versions of Windows, BitLocker is the default console available
for TPM communications serving data encryption purposes.
3
4
3
2
1

19
EN
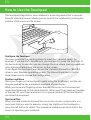
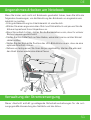
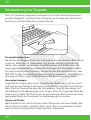
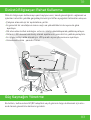
How to Use the Notebook Comfortably
If you are a beginner to the notebook, please read the following instructions to
assure your own safety, and make yourself comfortable during the operations.
• Good illumination is essential in the work area.
• Choose a chair and desk with good ergonomics and adjust their heights
according to your posture.
• Adjust the backrest to support your lower back comfortably when you are
sitting upright.
• Place your feet flat on the floor with your knees bent to a 90 degrees.
• Adjust the angle/position of the LCD panel to have an optimal view.
• Stretch and relax your body regularly. Always take a break after working for a
period of time.
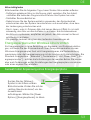
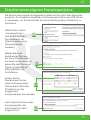
This section provides users basic safety precautions to take when using an AC/
DC adapter and battery power properly.
How to Manage Power Supply
Sayfa yükleniyor...
Sayfa yükleniyor...
Sayfa yükleniyor...
Sayfa yükleniyor...
Sayfa yükleniyor...
Sayfa yükleniyor...
Sayfa yükleniyor...
Sayfa yükleniyor...
Sayfa yükleniyor...
Sayfa yükleniyor...
Sayfa yükleniyor...
Sayfa yükleniyor...
Sayfa yükleniyor...
Sayfa yükleniyor...
Sayfa yükleniyor...
Sayfa yükleniyor...
Sayfa yükleniyor...
Sayfa yükleniyor...
Sayfa yükleniyor...
Sayfa yükleniyor...
Sayfa yükleniyor...
Sayfa yükleniyor...
Sayfa yükleniyor...
Sayfa yükleniyor...
Sayfa yükleniyor...
Sayfa yükleniyor...
Sayfa yükleniyor...
Sayfa yükleniyor...
Sayfa yükleniyor...
Sayfa yükleniyor...
Sayfa yükleniyor...
Sayfa yükleniyor...
Sayfa yükleniyor...
Sayfa yükleniyor...
Sayfa yükleniyor...
Sayfa yükleniyor...
Sayfa yükleniyor...
Sayfa yükleniyor...
Sayfa yükleniyor...
Sayfa yükleniyor...
Sayfa yükleniyor...
Sayfa yükleniyor...
Sayfa yükleniyor...
Sayfa yükleniyor...
Sayfa yükleniyor...
Sayfa yükleniyor...
Sayfa yükleniyor...
Sayfa yükleniyor...
Sayfa yükleniyor...
Sayfa yükleniyor...
Sayfa yükleniyor...
Sayfa yükleniyor...
Sayfa yükleniyor...
Sayfa yükleniyor...
Sayfa yükleniyor...
Sayfa yükleniyor...
Sayfa yükleniyor...
Sayfa yükleniyor...
Sayfa yükleniyor...
Sayfa yükleniyor...
Sayfa yükleniyor...
Sayfa yükleniyor...
Sayfa yükleniyor...
Sayfa yükleniyor...
Sayfa yükleniyor...
Sayfa yükleniyor...
Sayfa yükleniyor...
Sayfa yükleniyor...
Sayfa yükleniyor...
Sayfa yükleniyor...
Sayfa yükleniyor...
Sayfa yükleniyor...
Sayfa yükleniyor...
Sayfa yükleniyor...
Sayfa yükleniyor...
Sayfa yükleniyor...
Sayfa yükleniyor...
Sayfa yükleniyor...
-
 1
1
-
 2
2
-
 3
3
-
 4
4
-
 5
5
-
 6
6
-
 7
7
-
 8
8
-
 9
9
-
 10
10
-
 11
11
-
 12
12
-
 13
13
-
 14
14
-
 15
15
-
 16
16
-
 17
17
-
 18
18
-
 19
19
-
 20
20
-
 21
21
-
 22
22
-
 23
23
-
 24
24
-
 25
25
-
 26
26
-
 27
27
-
 28
28
-
 29
29
-
 30
30
-
 31
31
-
 32
32
-
 33
33
-
 34
34
-
 35
35
-
 36
36
-
 37
37
-
 38
38
-
 39
39
-
 40
40
-
 41
41
-
 42
42
-
 43
43
-
 44
44
-
 45
45
-
 46
46
-
 47
47
-
 48
48
-
 49
49
-
 50
50
-
 51
51
-
 52
52
-
 53
53
-
 54
54
-
 55
55
-
 56
56
-
 57
57
-
 58
58
-
 59
59
-
 60
60
-
 61
61
-
 62
62
-
 63
63
-
 64
64
-
 65
65
-
 66
66
-
 67
67
-
 68
68
-
 69
69
-
 70
70
-
 71
71
-
 72
72
-
 73
73
-
 74
74
-
 75
75
-
 76
76
-
 77
77
-
 78
78
-
 79
79
-
 80
80
-
 81
81
-
 82
82
-
 83
83
-
 84
84
-
 85
85
-
 86
86
-
 87
87
-
 88
88
-
 89
89
-
 90
90
-
 91
91
-
 92
92
-
 93
93
-
 94
94
-
 95
95
-
 96
96
-
 97
97
-
 98
98


diğer dillerde
- Deutsch: Monster M7 Benutzerhandbuch
- English: Monster M7 User manual
İlgili makaleler
-
Monster HUMA H5 V2.1 Kullanım kılavuzu
-
-
Monster Abra A5 Kullanım kılavuzu
-
Monster Abra A7 V14.1 Kullanım kılavuzu
-
Monster Tulpar T7 V20.3 Kullanım kılavuzu
-
-
Monster Huma H4 V1.1 Gaming Laptop Kullanım kılavuzu
-
Monster Aryond A32 V1.2 Kullanım kılavuzu
-
Diğer belgeler
-
Packard Bell DOT SC-001FR Kullanım kılavuzu
-
Acer Aspire 3811TZ Hızlı başlangıç Kılavuzu
-
Acer AO522 Hızlı başlangıç Kılavuzu
-
Acer Aspire V5-471PG Hızlı başlangıç Kılavuzu
-
Acer ASPIRE ONE D270-N261G326CR El kitabı
-
-
Acer AOD255E Hızlı başlangıç Kılavuzu
-
-
Dell Latitude 5404 Rugged Hızlı başlangıç Kılavuzu
-
Milwaukee L4BOLTHL Kullanım kılavuzu