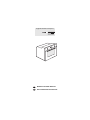
Whirlpool AKP 228/IX/03 Kullanici rehberi
- Kategori
- Fırınlar
- Tip
- Kullanici rehberi

(Apply the label from warranty here)
Kullanma ve bakım kılavuzu
User and maintenance manual
TR

TR2
SİZİN VE BAŞKALARININ GÜVENLİĞİ BÜYÜK ÖNEM TAŞIR
Bu kılavuz ve cihazda belirtilen güvenlik uyarıları okunmalı ve daima dikkate alınmalıdır.
Tüm güvenlik uyarıları mevcut potansiyel riskle ilgili spesifik bilgiler verir ve cihazın yanlış kullanımından kaynaklanabilecek yaralanma, hasar ve elektrik çarpması
riskinin nasıl azaltılabileceğini açıklar. Aşağıdaki talimatlara harfiyen uyun:
- Herhangi bir montaj işine başlanmadan önce, cihazın elektrik fişi prizden çekilmiş olmalıdır.
- Montaj ve bakım işleri kalifiye bir teknisyen tarafından, üreticinin talimatlarına ve yerel güvenlik yönetmeliklerine uygun şekilde yapılmalıdır. Kullanma
kılavuzunda özellikle belirtilmedikçe, cihazın hiçbir parçasını tamir etmeyin ve değiştirmeyin.
- Cihazın topraklanması kanunen zorunludur.
- Elektrik kablosu prize takıldığında, cihazı elektriğe bağlamak için yetecek bir uzunlukta olmalıdır.
- Montajın yürürlükteki emniyet yönetmeliklerine uyması için, en az 3 mm kontak mesafeli tüm kutuplu bir çatal anahtarı kullanılmalıdır.
- Uzatma kabloları veya çoklu prizler kullanmayın.
- Cihazın fişini çıkarmak için kablosundan çekmeyin.
- Elektrikli parçalar, montajdan sonra kullanıcının erişemeyeceği bir konumda olmalıdır.
- Cihaza vücudunuzun ıslak bir yeriyle dokunmayın ve cihazı çıplak ayaklıyken çalıştırmayın.
- Bu cihaz, sadece evde kullanım amacıyla yemek pişirmek için tasarlanmıştır. Başka hiçbir türde kullanıma izin verilmez (örn.: odayı ısıtma). Üretici, kumandaların
uygunsuz kullanımından veya hatalı ayarlanmasından kaynaklanan her türlü sorumluluğu reddeder.
- Bu cihaz, güvenliklerinden sorumlu kişi tarafından cihaz kullanımıyla ilgili talimat verilmedikçe veya gözetim sağlanmadıkça, fiziksel, duyusal veya zihinsel
yeterlilikleri az olan kişilerce (çocuklar dahil) veya deneyimi ve bilgisi olmayanlarca kullanılmamalıdır.
- Cihazın erişilebilir parçaları, kullanım sırasında çok fazla ısınabilir. Küçük çocukların cihazdan uzak tutulması ve cihazla oynamadıklarından emin olacak şekilde
gözetim altında tutulması gerekir.
- Kullanım sırasında ve sonrasında, cihazın ısınan parçalarına veya iç yüzeylerine dokunmayın - yanma riski vardır. Parçaları yeterince soğumadan, cihazın giysilerle
veya diğer yanabilir maddelerle temas etmesine izin vermeyin.
- Pişirme bittikten sonra cihaz kapağını açarken dikkatli olun, fırın kapağını tam açmadan sıcak havanın veya buharın azar azar çıkmasını bekleyin. Cihazın kapağı
kapalıyken, içindeki sıcak hava kontrol panelinin üzerindeki havalandırma deliklerinden dışarı verilir. Havalandırma deliklerini tıkamayın.
- Sıcak parçalara dokunmamak için dikkatli olarak, fırın tepsilerini ve aksesuarları fırın eldivenleriyle çıkarmaya özen gösterin.
- Yanıcı maddeleri cihazın içine veya yakınına koymayın: cihaz yanlışlıkla çalıştırılırsa yangın çıkabilir.
- Cihazın içinde, kapağı kapalı olan kavanozları veya kapları ısıtmayın ve pişirmeyin. İçerisinde oluşacak basınç kavanozun patlamasına neden olarak cihaza zarar
verebilir.
- Sentetik malzemeden yapılmış kaplar kullanmayın.
- Aşırı ısınan sıvı ve katı yağlar kolayca alev alabilir. Bol katı veya sıvı yağı olan yemekler pişirirken daima tetikte olun.
- Yemek kurutma işlemi sırasında cihazı asla gözetimsiz bırakmayın.
- Yemek pişirirken alkollü içecekler kullanılıyorsa (örn. rom, konyak, şarap), alkolün yüksek sıcaklıklarda buharlaştığını unutmayın. Bunun sonucunda alkolden
çıkan buharlar, elektrikli ısıtma parçasıyla temas edince alev alabilir.
Beyaz eşyaların atılması
- Bu cihaz geri dönüştürülebilir veya yeniden kullanılabilir malzemelerle üretilmiştir. Yerel atık imha yönetmeliklerine uygun olarak çöpe atılmalıdır. Cihazı
atmadan önce, elektrik kablosunu kesin.
- Elektrikli ev eşyalarının muameleleri, geri kazanımı ve geri dönüşümüyle ilgili ayrıntılı bilgi için ilgili yerel makamlarınızla, ev atıklarını toplama hizmetleriyle
veya cihazı satın aldığınız yer ile temasa geçin.
ÖNEMLİ GÜVENLİK TALİMATLARI
Bu tehlike işaretidir. Emniyetle ilgili konularda, kullanıcıları kendilerine ve başkalarına yönelik tehlikelere karşı uyarır.
Tüm güvenlik uyarılarının önünde tehlike işareti ve aşağıdaki terimler bulunur:
TEHLİKE
Önlenmezse mutlaka ağır yaralanmaya yol açacak tehlikeli bir durumu belirtir.
UYARI
Önlenmezse ağır yaralanmaya yol açabilecek olan tehlikeli bir durumu belirtir.

TR3
Fırının ambalajını açtıktan sonra, nakliye sırasında hasar görmemiş olduğundan ve fırın kapağının düzgün kapanıp açıldığından emin olun. Eğer bir sorun varsa, cihazı
satın aldığınız yeri veya en yakın servisi arayın. Herhangi bir hasar oluşmasını önlemek için, montaj aşamasında fırını sadece polistiren köpük kaidesinden çıkarın.
FIRININ KONULACAĞI YERİ HAZIRLAMA
• Fırına temas eden mutfak dolapları ısıya dayanıklı olmalıdır (en az 90ºC).
• Tüm dolap kesme işlerini fırını monte edileceği yere yerleştirmeden önce yapın ve tüm tahta kıymık ve talaşlarını dikkate temizleyin.
• Montajdan sonra, fırının alt kısmı artık erişilemiyor olmalıdır.
• Cihazın düzgün bir şekilde çalışması için, tezgâh ile fırının üst kenarı arasındaki asgari açıklık mesafesini tıkamayın.
ELEKTRİK BAĞLANTISI
Cihazın bilgi levhasında yazan voltaj ile elektrik şebekesi voltajının aynı olduğundan emin olun. Bilgi levhası fırının ön tarafındadır (kapak açıldığında görünür).
• Elektrik kablosunu değiştirme işleri (tip H05 RR-F 3 x 1,5 mm
2
) mutlaka kalifiye bir elektrikçi tarafından yapılmalıdır. Yetkili servisi arayın.
GENEL TAVSİYELER
Kullanmadan önce:
- Aksesuarların koruyucu karton ambalajlarını, filmlerini ve etiketlerini çıkarın.
- Aksesuarları fırından çıkarın ve koruyucu yağın ve yalıtım malzemelerinin kokusunu ve dumanını yok etmek için, fırını bir saat kadar 200°’de ısıtın.
Kullanım sırasında:
- Hasar verebileceğinden, kapağın üzerine ağır cisimler koymayın.
- Kapağa asılmayın ve tutacağına herhangi bir şey asmayın.
- Fırının içini alüminyum folyoyla kaplamayın.
- Sıcak bir fırının içerisine su dökmeyin; emaye kaplamasına zarar verebilir.
- Fırın kaplarını veya tepsileri fırının tabanında sürüklemeyin, aksi halde emaye kaplama zarar görebilir.
- Diğer cihazların elektrik kablolarının fırının sıcak kısımlarına dokunmadığından ve fırın kapağına sıkışmadığından emin olun.
- Fırını atmosferik maddelere maruz bırakmayın.
Ambalaj malzemesinin imhası
Ambalaj malzemesi %100 dönüştürülebilir niteliktedir ve ( ) geri dönüşüm simgesi ile işaretlenmiştir. Bu nedenle ambalajın çeşitli parçaları, çöplerin imhasına
yönelik yerel yönetmeliklere tümüyle uygun ve sorumlu bir şekilde atılmalıdır.
Ürünün imhası
- Bu cihaz, Atık Elektrik ve Elektronik Cihazlar (WEEE) ile ilgili 2002/96/EC Avrupa Yönergesine uygun olarak işaretlenmiştir.
- Bu ürünün doğru bir şekilde elden çıkarılmasını sağlamakla, çevre ve insan sağlığı üzerinde oluşabilecek potansiyel olumsuz sonuçları önleyebilirsiniz.
- Ürünün veya beraberindeki belgelerin üzerindeki simgesi, bu cihazın ev atığı gibi işlem göremeyeceğini, elektrik ve elektronik cihazların geri dönüşümünde
uzman olan bir toplama merkezine götürülmesi gerektiğini belirtir.
Enerji tasarrufu
- Fırını sadece yemek tarifinizde veya pişirme tablosunda özel olarak belirtilmişse önceden ısıtın.
- Isıyı çok iyi emdiklerinden dolayı koyu renk kaplamalı veya emaye pişirme kaplarını kullanın.
- Fırını ayarlanan pişirme süresinden 10-15 dakika önce kapatın. Uzun süreli pişirilmesi gereken yemekler, fırın kapatıldıktan sonra bile pişmeye devam eder.
- Yiyeceklerle temas edecek şekilde tasarlanmış olan bu fırın Avrupa Yönetmeliği ( ) no. 1935/2004’e uygundur ve “Düşük Voltaj” yönergesi 2006/95/CE
(73/23/CEE ve sonraki değişikliklerin yerine geçen) ve “EMC” 2004/108/CE koruma gerekliliklerine uygun bir şekilde tasarlanmış, üretilmiştir ve satılmıştır.
Fırın çalışmıyor:
• Elektrik olup olmadığını ve fişin takılı olup olmadığını kontrol edin.
• Sorunun devam edip etmediğini görmek için fırını kapatıp yeniden açın.
Kapak açılmıyor:
• Sorunun devam edip etmediğini görmek için fırını kapatıp yeniden açın.
• Önemli: kendi kendine temizlik sırasında fırının kapağı açılmayacaktır. Kilidi otomatik olarak açılıncaya kadar bekleyin (bkz. “Piroliz fonksiyonlu fırınlarda
temizlik devresi”).
Elektronik programlayıcı çalışmıyor:
• Eğer ekranda “ ” harfi ve arkasından bir rakam gösteriliyorsa, en yakın servisi arayın. Servise, “ ” harfinden sonra gelen rakamı söyleyin.
MONTAJ
ÇEVREYİ KORUMA
UYGUNLUK BEYANI
ARIZA GİDERME

TR4
Servisi aramadan önce:
1. “Arıza giderme” bölümündeki önerilerin yardımıyla sorunu kendi başınıza çözüp çözemeyeceğinize bakın.
2. Sorunun giderilip giderilmediğini görmek için, cihazı kapatıp açın.
Yukarıdaki kontrollere rağmen sorun hâlâ devam ediyorsa, en yakın yetkili servise başvurun.
Daima şunları belirtin:
• arızanın kısa bir açıklaması;
• fırının tipi ve modeli;
• ürün kodu; bunu fırının sağ iç tarafında (fırın kapağı açıldığında görünür) bulabilirsiniz (bilgi levhasında Service kelimesinden sonra gelen numara). Ürün kodu
ayrıca garanti kitapçığında da belirtilmiştir;
•açık adresiniz;
• telefon numaranız.
Eğer herhangi bir tamir gerekiyorsa, lütfen Yetkili Servise başvurun (orijinal yedek parçaların kullanıldığından ve tamiratın doğru yapıldığından emin olmak için).
NOT: ürününüzün Ticaret Bakanlığı tarafından amaçlanan ve beyan edilen ömrü (ürünün çalışması için gereken yedek parçaların piyasada bulunma süresi) 10 yıldır.
Fırının dışı
ÖNEMLİ: Sert veya aşındırıcı temizlik malzemeleri kullanmayın. Bu tür ürünlerden biri yanlışlıkla cihazla temas ederse, derhal nemli bir bezle
temizleyin.
• Fırın yüzeylerini nemli bir bezle silin. Eğer çok kirliyse, suya birkaç damla bulaşık deterjanı ilave edin. Kuru bir bezle silerek kurulayın.
Fırının içi
ÖNEMLİ: Sert süngerler, metal kazıma aletleri veya bulaşık teli kullanmayın. Bunlar zamanla emaye yüzeylere ve fırının cam kapağına hasar
verebilir.
• Her kullanımdan sonra fırının soğumasını bekleyin, ardından tercihen hâlâ hafif sıcakken temizleyerek, yemek artıkları (örn. çok şekerli yiyecekler) nedeniyle
biriken kir ve lekeleri temizleyin.
• Firmaya özel fırın deterjanları kullanın ve üreticinin talimatlarına harfiyen uyun.
• Cam kapağı uygun bir sıvı deterjanla temizleyin. Fırın kapağı, temizliği kolaylaştırmak amacıyla çıkarılabilir (bkz. BAKIM).
• En üstteki ızgara ısıtma elemanı (bkz. BAKIM) alçaltılarak (sadece bazı modellerde), fırının tavanı temizlenebilir.
NOT: su içeriği fazla olan yiyecekleri (örn. pizza, sebze, vb.) uzun süreli pişirirken, kapağın içinde ve contanın etrafında yoğuşma oluşabilir. Fırın
soğuyunca, kapağın iç tarafını bir bezle veya süngerle kurulayın.
Aksesuarlar:
• Kullanımdan hemen sonra aksesuarları deterjanlı suyun içine koyun, eğer hâlâ sıcaksa bunları fırın eldivenleriyle tutmayı unutmayın.
• Bir fırça veya sünger kullanılarak yemek artıkları kolayca çıkarılabilir.
Fırının arka duvarını ve katalitik yan panelleri (varsa) temizleme:
ÖNEMLİ: Katalitik yüzeye zarar verebilecek ve kendi kendini temizleme özelliğini bozabilecek aşındırıcı veya sert deterjanlar, sert fırçalar, bulaşık
telleri veya fırın spreyleri kullanmayın.
• Önce fırını içi boş olarak, fanlı fonksiyonda 200°C’de 1 saat kadar çalıştırın.
• Ardından, cihazın soğumasını bekleyin ve yemek artıklarını bir süngerle temizleyin.
SATIŞ SONRASI SERVİS
TEMİZLİK
UYARI
- Buharlı temizleme cihazları kullanmayın.
- Fırını sadece soğukken temizleyin.
- Temizlemeden önce elektrik fişini prizden çekin.

TR5
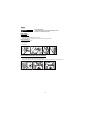
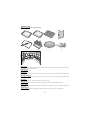
KAPAĞI ÇIKARTMA
Kapağı çıkartmak için:
1. Kapağı sonuna kadar açın.
2. Mandalları kaldırın ve gidebildiği kadar öne doğru itin (Şekil 1).
3. Kapağı sonuna kadar kapatın (A), kaldırın (B) ve çevirerek (C) serbest kalmasını sağlayın (D) (Şekil 2).
Kapağı geri takmak için:
1. Menteşeleri yuvalarına yerleştirin.
2. Kapağı sonuna kadar açın.
3. İki mandalı indirin.
4. Kapağı kapatın.
ÜST ISITMA ELEMANINI HAREKET ETTİRME (SADECE BAZI MODELLERDE)
1. Yan aksesuar tutucu ızgaraları çıkarın (Şekil 3).
2. Isıtma elemanını hafifçe dışarı doğru çekin (Şekil 4) ve aşağı indirin (Şekil 5).
3. Isıtma elemanını yeniden yerine yerleştirmek için, hafifçe kendinize doğru çekerek kaldırın, yan desteklerin üzerine oturduğundan emin olun.
BAKIM
UYARI
- Koruyucu eldiven kullanın.
- Aşağıdaki işlemleri yapmadan önce fırının soğuk olduğundan emin olun.
- İşlemlerden önce elektrik fişini prizden çekin.
Şek. 1 Şek. 2
Şek. 3 Şek. 4 Şek. 5

TR6
FIRIN LAMBASINI DEĞİŞTİRME
Arka lambayı (varsa) yenisiyle değiştirme:
1. Fırının elektrik fişini prizden çıkarın.
2. Lamba kapağını çevirerek çıkarın (Şekil 6), lambayı değiştirin (lamba tipiyle ilgili nota bakın) ve lamba kapağını çevirerek yerine geri takın (Şekil 7).
3. Fırının fişini tekrar prize takın.
NOT:
- Sadece 25-40W/230V tip E-14, T300°C akkor ampul kullanın.
- Ampuller yetkili servisimizden elde edilebilir.
ÖNEMLİ:
- Lamba kapağı yerine geri takılmadan fırını kullanmayın.
ELEKTRİK BAĞLANTISI İÇİN MONTAJLA İLGİLİ BÖLÜMÜ OKUYUN
1. Kontrol paneli
2. Üst ısıtma elemanı/ızgara
3. Soğutma sistemi (varsa)
4. Veri levhası (çıkarılmamalıdır)
5. Işık
6. Pişirme havalandırma sistemi (varsa)
7. Şiş (varsa)
8. Alt ısıtma elemanı (görünmez)
9. Kapak
10. Raf pozisyonları
11. Arka duvar
NOT:
- Pişirme sona erince, fırın kapatıldıktan sonra, soğutma fanı bir süre çalışmaya devam edebilir.
Şek. 6 Şek. 7
FIRIN KULLANMA TALİMATLARI
1
11
5
2
4
7
8
10
9
6
3

TR7
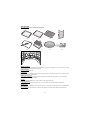
UYUMLU AKSESUARLAR
(fırınla birlikte verilen aksesuarlar için teknik bilgiler sayfasına bakın)
Damlama tepsisi (Şek. 1)
Sebzeli veya sebzesiz olarak et, tavuk ve balık pişirmek için tepsi olarak kullanılır, veya tel rafın altına yerleştirildiğinde yağ ve yiyecek parçalarını toplar. Yağ sıçramasını
ve duman oluşmasını önlemek için, damlama tepsisine biraz su koyun.
Pişirme tepsisi (Şek. 2)
Poğaça, kek ve pizza yapmak için kullanılır.
Tel ızgara (Şek. 3)
Izgara yapmak için veya kaplar, kek kalıpları ve diğer pişirme kaplarının altına konulacak bir destek olarak kullanılır. Herhangi bir seviyeye yerleştirilebilir. Tel ızgara,
eğimli kısmı alta veya üste gelecek şekilde konulabilir.
Katalitik yan paneller (Şek. 4)
Katalitik panellerin, yağ damlalarını emen özel mikro gözenekli bir emaye kaplaması vardır. Özellikle yağlı yemekleri pişirdikten sonra, bir otomatik temizleme
programını kullanmanızı tavsiye ederiz (bkz. TEMİZLİK).
Şiş (Şek. 5)
Şişi Şek. 9 çiziminde belirtildiği gibi kullanın. Ayrıca öneriler için “Kullanım önerileri ve ipuçları” bölümüne bakın.
Izgara Tepsi Seti (Şek. 6)
Set, bir tel ızgaradan (6a) ve emaye kaplı tepsiden (6b) oluşur. Bu set, tel ızgaranın (3) üzerine yerleştirilmeli ve Izgara fonksiyonu ile kullanılmalıdır.
Yağ filtresi (Şek. 7)
Sadece çok yağlı yemekleri pişirirken kullanın. Fırının iç arka duvarına, fanın karşısına asın. Bulaşık makinesinde yıkanabilir ve fan fonksiyonu ile birlikte kullanılabilir.
Sürme raflar (Şek. 8)
Bunlar tel ızgaraların ve damlama tepsilerinin pişirme sırasında kısmen dışarı çekilebilmesini sağlar. Tüm aksesuarlarla uyumludurlar ve bulaşık makinesinde
yıkanabilirler.
Şek. 1 Şek. 2 Şek. 3 Şek. 4
Şek. 5 Şek. 6 Şek. 7 Şek. 8
Şek. 9
6a
6b

TR8
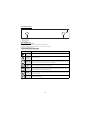
KONTROL PANELİNİN AÇIKLAMASI
1. Fonksiyon seçme düğmesi
2. Elektronik programlayıcı
3. Termostat düğmesi
FIRINI ÇALIŞTIRMA
Seçme düğmesini gereken fonksiyona çevirin.
Fırın lambası yanar. Termostat düğmesini saat yönünde çevirerek gerekli sıcaklık seviyesine ayarlayın.
Kırmızı termostat ışığı yanar, fırın seçilen sıcaklığa ulaşınca tekrar söner.
Pişirme bitince, düğmeleri “0” noktasına çevirin.
FONKSİYONLAR TABLOSU
FONKSİYON AÇIKLAMA
OFF -
LAMBA Fırın lambasını yakmak içindir.
ALT VE ÜSTTEN
Bir raf üzerinde herhangi türde bir yemek pişirmeye uygun bir fonksiyondur. Fırını gerekli sıcaklığa önceden ısıtın ve ayarlanan
sıcaklığa ulaşılınca yemeği fırına koyun. Pişirme için ikinci veya üçüncü rafı kullanmanızı tavsiye ediyoruz. Bu fonksiyon ayrıca
hazır dondurulmuş yiyeceklerin pişirilmesi için de uygundur; yiyecek ambalajında belirtilen talimatları yerine getirin.
KONVEKSIYONLU
İçi kremalı (tatlı veya tuzlu) kek veya pastaları tek bir seviye üzerinde pişirmek için kullanılır. Bu fonksiyon ayrıca iki seviye
üzerinde pişirmek için de uygundur. Gerekirse, yiyeceklerin daha eşit bir şekilde pişmesi için kapların yerlerini değiştirin.
IZGARA
Biftek, pirzola, şiş ve sosis ızgara yapmak, sebze graten pişirmek ve ekmek kızartmak için kullanılır. Fırını 3-5 dakika boyunca
önceden ısıtın. Pişirme sırasında fırın kapağı kapalı kalmalıdır. Et pişirirken yağ sıçramasını ve dumanları azaltmak için, damla
tepsisine (birinci seviyede) biraz su koyun. Pişirme sırasında eti çevirmenizi tavsiye ederiz.
TURBO IZGARA
Büyük parça etlerin ızgarasını yapmak için kullanılır (rozbif ve diğer rosto etler). Pişirme işlemi sırasında fırın kapağı kapalı
tutulmalıdır. Et pişirirken, birinci seviyeye yerleştirilmiş damlama tepsisine biraz su koymanızı öneririz. Böylece duman ve yağ
sıçramaları azalacaktır. Izgara sırasında eti ters çevirin.
BUZ ÇÖZME
Bu fonksiyon, yiyeceklerin buzunun oda sıcaklığında çözülmesini hızlandırmak için kullanılabilir. Kurumaması için, yiyeceği
ambalajıyla birlikte fırına koyun.

TR9
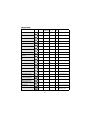
PİŞİRME TABLOSU
Yemek Fonksiyon Ön ısıtma Raf seviyesi
(alttan)
Sıcaklık
(°C)
Süre
(dak.)
Aksesuarlar
Mayalı kekler Evet 2 160-180 35-55 Tel ızgara + kek kalıbı
Kurabiye/tartlar Evet 3 170-180 15-40 Pişirme tepsisi
Profiterol çöreği Evet 3 180 30-40 Pişirme tepsisi
Milföy börekler/milföy galetalar Evet 3 180-200 20-30 Pişirme tepsisi
Beze Evet 3 90 120-130 Pişirme tepsisi
Kuzu / Dana / Sığır / Domuz Evet 2 190-200 90-110
Damlama tepsisi veya tel ızgara + ateşe
dayanıklı kap
Tavuk / Tavşan / Ördek Evet 2 190-200 65-85
Damlama tepsisi veya tel ızgara + ateşe
dayanıklı kap
Hindi / Kaz Evet 2 190-200 140-180
Damlama tepsisi veya tel ızgara + ateşe
dayanıklı kap
Fırında balık / kağıtta
(fileto, bütün)
Evet 2 180-200 50-60
Damlama tepsisi veya tel ızgara + ateşe
dayanıklı kap
Lazanya / Fırın makarna / Canelloni /
Pide
Evet 2 190-200 45-55 Tel ızgara + ateşe dayanıklı kap
Ekmek / Fokaçya Evet 2 190-230 15-50 Damlama tepsisi veya pişirme tepsisi
Pizza Evet 2 230-250 7-20 Damlama tepsisi veya pişirme tepsisi
Kızarmış ekmek Evet 4 200 2-5 Tel ızgara
Sebze graten Evet 3 200 15-20 Tel ızgara + ateşe dayanıklı kap
Izgara balık fileto ve biftek Evet 3 200 30-40 Tel ızgara + ateşe dayanıklı kap
Sosis-Sucuk / Şiş / Pirzola / Köfte Evet 4 200 30-50
Izgara + 1. rafta içine su konmuş damlama
tepsisi, eti pişirme süresinin yarısında ters
çevirin
Tartlar
(cheesecake, elmalı pay)
Evet 1 180-200 50-60
Damlama tepsisi veya tel ızgara + ateşe
dayanıklı kap
Et ve patatesli tartlar
(sebzeli tart, kiş loren)
Evet 1 180-200 35-55 Tel ızgara + kek kalıbı
Sebze dolmaları (domates, biber,
kabak, patlıcan)
Evet 2 180-200 40-60 Tel ızgara + ateşe dayanıklı kap
Et ve patatesli tartlar
(sebzeli tart, kiş loren)
Evet 1/ 3 180-190 45-55
Izgara + tepsi, pişirme süresinin yarısında
seviyeleri değiştirin
Pizza/Fokaçya Evet 1/3 230-250 12-30
Pişirme tepsisi + damlama tepsisi, pişirme
süresinin yarısında seviyeleri değiştirin

TR10
NOT: Pişirme süreleri ve sıcaklıklar 4 porsiyon için yaklaşık değerlerdir.
Kurabiye/tartlar - 1 /3 170-180 20-40
Pişirme tepsisi + damlama tepsisi, pişirme
süresinin yarısında seviyeleri değiştirin
Profiterol çöreği - 1/ 3 180 35-45
Pişirme tepsisi + damlama tepsisi, pişirme
süresinin yarısında seviyeleri değiştirin
Milföy börekler/milföy galetalar - 1/ 3 180-200 20-40
Pişirme tepsisi + damlama tepsisi, pişirme
süresinin yarısında seviyeleri değiştirin
Fırında tavuk - 2 200 55-65
Izgara + 1. rafta içine su konmuş damlama
tepsisi
Fırında patates - 3 200 45-55 Damlama tepsisi
Az pişmiş parça et - 3 200 30-40
Izgara + 1. rafta içine su konmuş damlama
tepsisi
Kuzu budu/İncik - 2 200 55-70 Izgara + damlama tepsisi
Yemek Fonksiyon Ön ısıtma Raf seviyesi
(alttan)
Sıcaklık
(°C)
Süre
(dak.)
Aksesuarlar

TR11
Pişirme tablosundan nasıl yararlanırsınız?
Tablo, yemekler için kullanılacak en uygun fonksiyonu ve yemeğin aynı anda bir veya birkaç seviyede mi pişirileceğini belirtir. Pişirme süreleri yemeğin fırına konulduğu andan itibaren
başlar, dolayısıyla ön ısıtma (gerekirse) hariç tutulmuştur. Pişirme sıcaklıkları ve süreleri sadece yol gösterme amaçlıdır, ve yemeğin miktarına ve kullanılan aksesuarlara göre
değişecektir. İlk başta önerilen en düşük değerleri kullanın, eğer yemek yeterince pişmezse o zaman yüksek değerlere geçin. Verilen aksesuarları kullanın ve koyu renkli metal kek
kaplarını ve fırın tepsilerini tercih edin. Ayrıca ateşe dayanıklı (pyrex) veya gre seramik kaplar da kullanabilirsiniz, ancak bunlarda pişirme süresinin biraz daha uzun olacağını
unutmayın. En iyi sonuçları elde etmek için, pişirme tablosunda aksesuar seçimi (cihazla birlikte verilenler) ve bunların hangi seviyeye konulacağına ilişkin tavsiyelere uyun. Su içeriği
fazla olan yiyecekleri pişirirken, fırını önceden ısıtın.
Birkaç yemeği aynı anda pişirme
“KONVEKSIYONLU” fonksiyonunu kullanarak (varsa), aynı pişirme sıcaklığını gerektiren farklı yemekleri aynı anda (örneğin: balık ve sebze), farklı raf seviyelerinde
pişirebilirsiniz. Daha az pişirme süresi gerektiren yemeği çıkarın, daha uzun süre gerektiren yemeği fırında tutmaya devam edin.
Tatlılar
- Konvansiyonel (standart) fonksiyonla tek bir raf üzerinde lezzetli tatlılar pişirebilirsiniz. Koyu renkli metal kek kalıpları kullanın ve bunları daima cihazla birlikte
verilen tel rafın üzerine koyun. Birden fazla raf üzerinde pişirmek için fanlı hava fonksiyonunu seçin ve kek kalıplarını raflar üzerinde dağınık yerleştirerek, sıcak
havanın en iyi şekilde dolaşmasına yardımcı olun.
- Kabaran bir kekin pişip pişmediğini anlamak için kekin ortasına tahta bir kürdan batırın. Eğer kürdan dışarıya temiz çıkarsa kekiniz pişmiş demektir.
- Eğer teflon kek kalıbı kullanıyorsanız kenarlarını yağlamayın, yoksa kek kenarlarda eşit şekilde kabarmayabilir.
- Eğer kek pişirme sırasında “çökerse”, bir dahaki sefere daha düşük bir sıcaklık ayarlayın. Ayrıca kek karışımındaki sıvı miktarını azaltabilir ve daha yavaş
karıştırabilirsiniz.
- Islak ve kremalı tatlılarda (cheesecake veya meyveli turtalar) “KONVEKSIYONLU” fonksiyonunu kullanın (varsa). Eğer kekin altı ıslaksa, rafı alçaltın ve iç dolgusunu
eklemeden önce kekin altına ekmek kırıntıları veya bisküvi kırıkları serpin.
Et
- Pişirilecek parça etin büyüklüğüne uygun olan herhangi bir fırın tepsisi veya ateşe dayanıklı (pyrex) kap kullanın. Pirzola türü etlerde, kabın içine biraz et suyu
eklemenizi ve lezzet katması için pişirme sırasında ara sıra bu suyu etin üzerinde gezdirmenizi öneririz. Et pişince, 10-15 dakika daha fırında bekletin veya
alüminyum folyoya sarın.
- Eti ızgarada pişirmek istediğinizde, her yerinin eşit oranda pişmesi için her yerinden eşit kalınlıkta kesmelisiniz. Çok kalın et parçalarının pişmesi daha uzun sürer.
Etin dışının yanmasını önlemek için, tel ızgaranın raf seviyesini düşürerek, eti ızgaradan daha uzağa alın. Eti, pişirme süresinin üçte ikisine geldiğinizde ters
çevirin.
Etin pişme sularını toplamak için, etin konulduğu ızgaranın hemen altına, içine yarım litre su konulmuş bir damlama tepsisi yerleştirin. Gerektikçe su ekleyin.
Şiş (sadece bazı modellerde)
Bu aksesuarı, büyük parça et ve tavukları eşit şekilde kızartmak için kullanın. Eti şiş çubuğunun üzerine yerleştirin, eğer tavuksa bir iple bağlayın, ve şişi fırının ön duvarındaki yuvaya
yerleştirmeden ve ilgili destek üzerine dayamadan önce, sağlam bir şekilde durduğundan emin olun. Dumanı önlemek ve pişme sularını toplamak için, birinci seviyeye, içine yarım litre
su konulmuş bir damlama tepsisi yerleştirmenizi öneririz. Şiş çubuğunun plastik bir tutacak yeri vardır. Bu parça pişirme başlamadan önce çıkarılmalı, pişirme bittikten sonra yemeği
fırından çıkarken elinizin yanmaması için tekrar kullanılmalıdır.
Pizza
Pizzanın altının çıtır çıtır olması için tepsileri hafifçe yağlayın. Pizza peynirini, pişirme süresinin üçte ikisine geldiğinizde pizzanın üzerine serpin.
Kabartma fonksiyonu (sadece bazı modellerde vardır)
Hamuru fırına koymadan önce üzerini nemli bir bezle kapatmak her zaman en iyisidir. Bu fonksiyonla hamurun kabarma süresi, oda sıcaklığına (20-25°C) göre üçte bir
oranında kısalmaktadır. 1 kilo pizza hamurunun kabarma süresi bir saat civarındadır.
KULLANIM ÖNERİLERİ VE İPUÇLARI

GB12
YOUR SAFETY AND THAT OF OTHERS IS VERY IMPORTANT
This manual and the appliance itself provide important safety warnings, to be read and observed at all times.
All safety warnings give specific details of the potential risk present and indicate how to reduce risk of injury, damage and electric shock resulting from improper use
of the appliance. Carefully observe the following instructions:
- The appliance must be disconnected from the power supply before carrying out any installation work.
- Installation and maintenance must be carried out by a qualified technician, in compliance with the manufacturer’s instructions and local safety regulations. Do
not repair or replace any part of the appliance unless specifically stated in the user manual.
- Regulations require that the appliance is earthed.
- The power cable must be long enough for connecting the appliance, once fitted in its housing, to the power supply socket.
- For installation to comply with current safety regulations, an all-pole disconnect switch with minimum contact gap of 3 mm must be utilized.
- Do not use multiple plug adapters or extension leads.
- Do not pull the power supply cable in order to unplug the appliance.
- The electrical components must not be accessible to the user after installation.
- Do not touch the appliance with any wet part of the body and do not operate it when barefoot.
- This appliance is designed solely for use as a domestic appliance for cooking food. No other type of use is permitted (e.g.: heating rooms). The Manufacturer
declines all responsibility for inappropriate use or incorrect setting of the controls.
- The appliance is not intended for use by persons (including children) with any physical, sensory or mental impairment, or without experience and knowledge of
the appliance, unless supervised or previously instructed in its use by those responsible for their safety.
- The accessible parts of the appliance may become very hot during use. Young children should be kept away from the appliance and supervised to ensure that they
do not play with it.
- During and after use, do not touch the heating elements or interior surfaces of the appliance - risk of burns. Do not allow the appliance to come into contact with
cloths or other flammable materials until all the components have cooled sufficiently.
- At the end of cooking, exercise caution when opening the appliance door, letting the hot air or steam exit gradually before accessing the oven. When the
appliance door is shut, hot air is vented from the aperture above the control panel. Do not obstruct the vent apertures.
- Use oven gloves to remove pans and accessories, taking care not to touch the heating elements.
- Do not place flammable materials in or near the appliance: a fire may break out if the appliance is inadvertently switched on.
- Do not heat or cook sealed jars or containers in the appliance. The pressure that builds up inside might cause the jar to explode, damaging the appliance.
- Do not use containers made of synthetic materials.
- Overheated oils and fats catch fire easily. Always remain vigilant when cooking foods rich in fat and oil.
- Never leave the appliance unattended during food drying.
- If alcoholic beverages are used when cooking foods (e.g. rum, cognac, wine), remember that alcohol evaporates at high temperatures. As a result, there is a risk
that vapours released by the alcohol may catch fire upon coming into contact with the electrical heating element.
Scrapping of household appliances
- This appliance is manufactured with recyclable or reusable materials. Dispose of it in accordance with local waste disposal regulations. Before scrapping, cut off
the power supply cable.
- For further information on the treatment, recovery and recycling of household electrical appliances, contact your competent local authority, the collection service
for household waste or the store where you purchased the appliance.
IMPORTANT SAFETY INSTRUCTIONS
This is the danger symbol, pertaining to safety, which alerts users to potential risks to themselves and others.
All safety warnings are preceded by the danger symbol and the following terms:
DANGER
Indicates a hazardous situation which, if not avoided, will cause serious injury.
WARNING
Indicates a hazardous situation which, if not avoided, could cause serious injury.

GB13
After unpacking the oven, be sure that it has not been damaged during transport and that the oven door closes properly. In the event of problems, contact the dealer
or your nearest After-sales Service. To avoid any damage, only remove the oven from its polystyrene foam base at the time of installation.
PREPARING THE HOUSING UNIT
• Kitchen units in contact with the oven must be heat resistant (min 90°C).
• Carry out all cabinet cutting work before fitting the oven in the housing and carefully remove all wood chips and sawdust.
• After installation, the bottom of the oven must no longer be accessible.
• For correct appliance operation, do not obstruct the minimum gap between the worktop and the upper edge of the oven.
ELECTRICAL CONNECTION
Be sure the power voltage specified on the appliance dataplate is the same as the mains voltage. The dataplate is on the front edge of the oven (visible when the door
is open).
• Power cable replacement (type H05 RR-F 3 x 1.5 mm
2
) must be carried out by a qualified electrician. Contact an authorized service centre.
GENERAL RECOMMENDATIONS
Before use:
- Remove cardboard protection pieces, protective film and adhesive labels from accessories.
- Remove the accessories from the oven and heat it at 200° for about an hour to eliminate the smell and fumes from the insulating materials and protective grease.
During use:
- Do not place heavy objects on the door as they could damage it.
- Do not cling to the door or hang anything from the handle.
- Do not cover the inside of the oven with aluminium foil.
- Do not pour water into the inside of a hot oven; this could damage the enamel coating.
- Do not drag pots or pans across the bottom of the oven as this could damage the enamel coating.
- Be sure that the electrical cables of other appliances do not touch hot parts of the oven or become trapped in the door.
- Do not expose the oven to atmospheric agents.
Disposal of packing material
The packing material is 100% recyclable and is marked with the recycle symbol ( ). The various parts of the packing must therefore be disposed of responsibly and
in full compliance with local authority regulations governing waste disposal.
Scrapping the product
- This appliance is marked in compliance with European Directive 2002/96/EC, Waste Electrical and Electronic Equipment (WEEE).
- By ensuring this product is disposed of correctly, you will help avoid potential negative consequences for the environment and human health, which could
otherwise be caused by inappropriate waste handling of this product.
- The symbol on the product or on the accompanying documentation indicates that it should not be treated as domestic waste but must be taken to an
appropriate collection centre for the recycling of electrical and electronic equipment.
Energy saving
- Only pre-heat the oven if specified in the cooking table or your recipe.
- Use dark lacquered or enamelled baking moulds as they absorb heat far better.
- Switch the oven off 10/15 minutes before the set cooking time. Food requiring prolonged cooking will continue to cook even once the oven is switched off.
- This oven, which is intended to come into contact with foodstuffs, complies with European Regulation ( ) n.1935/2004 and has been designed, manufactured
and sold in conformity with the safety requirements of the “Low Voltage” directive 2006/95/CE (which replaces 73/23/CEE and subsequent amendments), the
protection requirements of “EMC” 2004/108/CE.
The oven does not work:
• Check for the presence of mains electrical power and if the oven is connected to the electrical supply.
• Turn off the oven and restart it to see if the fault persists.
The door will not open:
• Turn off the oven and restart it to see if the fault persists.
• Important: during self-cleaning, the oven door will not open. Wait until it unlocks automatically (see paragraph “Cleaning cycle of ovens with pyrolysis
function”).
INSTALLATION
SAFEGUARDING THE ENVIRONMENT
DECLARATION OF CONFORMITY
TROUBLESHOOTING GUIDE

GB14
The electronic programmer does not work:
• If the display shows the letter “ ” followed by a number, contact your nearest After-sales Service. Specify in this case the number that follows the letter “ ”.
Before calling the After-Sales Service:
1. See if you can solve the problem yourself with the help of the suggestions given in the “Troubleshooting guide”.
2. Switch the appliance off and back on again it to see if the fault persists.
If after the above checks the fault still occurs, get in touch with the nearest After-sales Service.
Always specify:
• a brief description of the fault;
• the type and exact model of the oven;
• the service number (number after the word Service on the rating plate), located on the right hand edge of the oven cavity (visible when the oven door is open).
The service number is also indicated on the guarantee booklet;
• your full address;
• your telephone number.
If any repairs are required, please contact an authorised After-sales Service (to guarantee that original spare parts will be used and repairs carried out correctly).
N.B.: the determined and declared life of your product by the ministry of trade ( the availability of the spare parts for the product to function ) is 10 years.
Oven exterior
IMPORTANT: do not use corrosive or abrasive detergents. If any of these products unintentionally comes into contact with the appliance, clean
immediately with a damp cloth.
• Clean the surfaces with a damp cloth. If it is very dirty, add a few drops of washing up detergent to the water. Finish off with a dry cloth.
Oven interior
IMPORTANT: do not use abrasive sponges or metallic scrapers or scourers. Over time, these can ruin enamelled surfaces and the oven door glass.
• After every use, allow the oven to cool then clean it preferably while it is still warm in order to remove built-up dirt and stains caused by food residues (e.g. food
with a high sugar content).
• Use proprietary oven detergents and follow the manufacturer’s instructions to the letter.
• Clean the door glass with a suitable liquid detergent. The oven door can be removed to facilitate cleaning (see MAINTENANCE).
• The top heating element of the grill (see MAINTENANCE) can be lowered (some models only) to clean the roof of the oven.
N.B.: during prolonged cooking of foods with a high water content (e.g. pizza, vegetables, etc.) condensation may form on the inside of the door
and around the seal. When the oven is cold, dry the inside of the door with a cloth or sponge.
Accessories:
• Soak the accessories in water with washing up detergent immediately after use, handling them with oven gloves if still hot.
• Food residues can be easily removed using a brush or sponge.
Cleaning the rear wall and catalytic side panels of the oven (if present):
IMPORTANT: do not use corrosive or abrasive detergents, coarse brushes, pot scourers or oven sprays which could damage the catalytic surface and
ruin its self-cleaning properties.
• Operate the oven empty with the fan-assisted function at 200°C for about one hour
• Next, leave the appliance to cool down before removing any food residue with a sponge.
AFTER-SALES SERVICE
CLEANING
WARNING
- Do not use steam cleaning equipment.
- Clean the oven only when it is cool.
- Disconnect power before servicing.

GB15
REMOVING THE DOOR
To remove the door:
1. Open the door fully.
2. Lift the catches and push them forwards as far as they will go (fig. 1).
3. Close the door as far as it will go (A), lift it up (B) and turn it (C) until it is released (D) (fig. 2).
To refit the door:
1. Insert the hinges in their seats.
2. Open the door fully.
3. Lower the two catches.
4. Close the door.
MOVING THE TOP HEATING ELEMENT (SOME MODELS ONLY)
1. Remove the side accessory holder grilles (Fig. 3).
2. Pull the heating element out a little (Fig. 4) and lower it (Fig. 5).
3. To reposition the heating element, lift it up, pulling it slightly towards you, be sure it comes to rest on the lateral supports.
MAINTENANCE
WARNING
- Use protective gloves.
- Ensure the oven is cold before carrying out the following operations.
- Disconnect power before servicing.
Fig. 1 Fig. 2
Fig. 3 Fig. 4 Fig. 5

GB16
REPLACING THE OVEN LAMP
To replace the rear lamp (if present):
1. Disconnect the oven from the power supply.
2. Unscrew the lamp cover (Fig. 6), replace the lamp (see note for lamp type) and screw the lamp cover back on (Fig. 7).
3. Reconnect the oven to the power supply.
N.B.:
- Only use 25-40W/230V type E-14, T300°C incandescent lamps.
- Lamps are available from our After-sales Service.
IMPORTANT:
- Do not use the oven until the lamp cover has been repositioned.
FOR ELECTRICAL CONNECTION, SEE THE PARAGRAPH ON INSTALLATION
1. Control panel
2. Upper heating element/grill
3. Cooling system (if present)
4. Dataplate (not to be removed)
5. Light
6. Baking ventilation system (if present)
7. Turnspit (if present)
8. Lower heating element (not visible)
9. Door
10. Position of shelves
11. Rear wall
N.B.:
- At the end of cooking, after the oven has been switched off, the cooling fan may continue to run for a while.
Fig. 6 Fig. 7
INSTRUCTIONS FOR OVEN USE
1
11
5
2
4
7
8
10
9
6
3

GB17
COMPATIBLE ACCESSORIES
(for the accessories supplied with oven refer to the tech fiche)
Drip-tray (Fig. 1)
For collecting fat and bits of food when placed under the wire shelf, or as a plate for cooking meat, chicken and fish, etc., with or without vegetables. Pour a little water
into the drip-tray to avoid spatters of fat and smoke.
Baking tray (Fig. 2)
For baking biscuits, cakes and pizzas.
Wire shelf (Fig. 3)
For grilling food or as a support for pots, cake tins and other cooking receptacle. It can be placed on any available level. The wire shelf can be inserted with its curvature
facing up or down.
Catalytic side panels (Fig. 4)
These panels have a special microporous enamel coating that absorbs fat spatters. It is advisable to do an automatic cleaning cycle after cooking particularly fatty food
(see CLEANING).
Turnspit (Fig. 5)
Use the turnspit as indicated on Fig. 9. Also check “Recommended use and tips” section for advice.
Grill Pan Set (Fig. 6)
The set comprises a wire shelf (6a) and an enamelled recipient (6b). This set must be placed on the wire shelf (3) and used with the Grill function.
Grease filter (Fig. 7)
Use only for particularly greasy cooking. Hook it on the rear wall of the oven compartment, opposite the fan. It can be cleaned in a dishwasher and used with the fan-
assisted function.
Sliding shelves (Fig. 8)
They allow the wire shelves and drip-trays to be pulled half out during cooking. Suitable for all the accessories, they can be cleaned in a dishwasher.
Fig. 1 Fig. 2 Fig. 3 Fig. 4
Fig. 5 Fig. 6 Fig. 7 Fig. 8
Fig. 9
6a
6b

GB18
CONTROL PANEL DESCRIPTION
1. Function selector knob
2. Electronic programmer
3. Thermostat knob
HOW TO OPERATE THE OVEN
Turn the selector knob to the required function.
The oven light switches on. Turn the thermostat knob clockwise to the required temperature.
The red thermostat led lights up, switching off again when the oven reaches the selected temperature.
At the end of cooking, turn the knobs to “0”.
FUNCTION DESCRIPTION TABLE
FUNCTION DESCRIPTION
OFF -
LAMP To switch on the oven light.
CONVENTIONAL
Function suitable for cooking any type of dish on one shelf. Preheat the oven to the required temperature and place the food in it
when the set temperature is reached. It is advisable to use the second or third shelf for cooking. This function is also suitable for
cooking frozen convenience foods; follow the instructions on the food packaging.
CONVECTION
BAKE
To bake cakes with liquid filling (sweet or savoury) on a single level. This function is ideal also for cooking on two levels. If
necessary, switch the positions of the dishes to cook food more evenly.
GRILL
To grill steak, kebabs and sausages, to cook vegetables au gratin and to toast bread. Preheat the oven for 3-5 min. During cooking
the oven door must remain closed. When cooking meat, pour a little water into the drip tray (on the first level) to reduce smoke
and fat spatters. Ideally the meat should be turned during cooking.
TURBOGRILL
To grill large joints of meat (roast beef and other roast meats). The oven door must be kept closed during the cooking cycle. When
cooking meat, it is advisable to pour water in the drip-tray placed on the first level. This will reduce smoke and spattering of fat.
Turn the meat during grilling.
DEFROSTING
This function can be used to speed up the thawing of food at room temperature. The food should be placed in the oven in its
wrapping to avoid it from drying out.

GB19
COOKING TABLE
Recipe Function Preheating Shelf
(from bottom)
Temperature
(°C)
Time
(min)
Accessories
Leavened cakes Yes 2 160-180 35-55 Wire shelf + cake tin
Biscuits/Tartlets Ye s 3 170-180 15-40 Baking tray
Choux buns Ye s 3 180 30-40 Baking tray
Vols-au-vent / Puff pastry crackers Ye s 3 180-200 20-30 Baking tray
Meringues Ye s 3 90 120-130 Baking tray
Lamb / Veal / Beef / Pork Ye s 2 190-200 90-110 Drip tray or wire shelf + pyrex dish
Chicken / Rabbit / Duck Ye s 2 190-200 65-85 Drip tray or wire shelf + pyrex dish
Turkey / Goose Yes 2 190-200 140-180 Drip tray or wire shelf + pyrex dish
Baked fish / en papillote
(fillet, whole)
Ye s 2 180-200 50-60 Drip tray or wire shelf + pyrex dish
Lasagne / Baked pasta / Cannelloni /
Flans
Ye s 2 190-200 45-55 Wire shelf + pyrex dish
Bread / Focaccia Ye s 2 190-230 15-50 Drip tray or baking tray
Pizza Ye s 2 230-250 7-20 Drip tray or baking tray
Toast Ye s 4 200 2-5 Wire shelf
Vegetable gratin Ye s 3 200 15-20 Wire shelf + pyrex dish
Grilled fish fillets and steaks Ye s 3 200 30-40 Wire shelf + pyrex dish
Sausages / Kebabs / Spare ribs /
Hamburgers
Ye s 4 200 30-50
Grill + drip tray with water on 1st
shelf, turn halfway through cooking
Filled pies
(cheesecake, strudel, apple pie)
Ye s 1 180-200 50-60 Drip tray or wire shelf + pyrex dish
Meat & potato pies
(vegetable pie, quiche lorraine)
Ye s 1 180-200 35-55 Wire shelf + cake tin
Stuffed vegetables (tomatoes,
peppers, courgettes, aubergines)
Ye s 2 180-200 40-60 Wire shelf + pyrex dish
Meat & potato pies
(vegetable pie, quiche lorraine)
Ye s 1/ 3 180-190 45-55
Grill +pan, switch levels halfway
through cooking
Pizzas/Focaccia Yes 1/3 230-250 12-30
Baking tray+drip tray, switch levels
halfway through cooking

GB20
N.B.: cooking times and temperatures are approximate for 4 portions.
How to read the cooking table
The table indicates the best function to use for any given food, to be cooked on one or more shelves at the same time. Cooking times start from the moment food is placed in the oven,
excluding pre-heating (where required). Cooking temperatures and times are purely for guidance and will depend on the amount of food and type of accessory used. Use the lowest
recommended values to begin with and, if the food is not cooked enough, then move on to higher values. Use the accessories supplied and preferably dark coloured metal cake tins
and oven trays. You can also use pans and accessories in pyrex or stoneware, but bear in mind that cooking times will be slightly longer. To obtain best results, follow the advice given
in the cooking table for the choice of accessories (supplied) to be placed on the various shelves. When cooking food that contains lots of water, preheat the oven.
Cooking different foods at the same time
Using the “CONVECTION BAKE” function (if present), you can cook different foods which require the same cooking temperature at the same time (for example: fish and
vegetables), using different shelves. Remove the food which requires less cooking time and leave food which requires longer cooking time in the oven.
Desserts
- Cook delicate desserts with the conventional function on one shelf only. Use dark coloured metal cake tins and always position them on the wire shelf supplied. To
cook on more than one shelf, select the forced air function and stagger the position of the cake tins on the shelves, aiding optimum circulation of the hot air.
- To check whether a raising cake is cooked, insert a wooden toothpick into the centre of the cake. If the toothpick comes out clean, the cake is ready.
- If using non-stick cake tins, do not butter the edges as the cake may not rise evenly around the edges.
- If the cake “sinks” during cooking, set a lower temperature the next time, perhaps reducing the amount of liquid in the mixture and mixing more gently.
- For sweets with moist fillings (cheesecake or fruit pies) use the “CONVECTION BAKE” function (if present). If the base of the cake is soggy, lower the shelf and
sprinkle the bottom of the cake with breadcrumbs or biscuit crumbs before adding the filling.
Meat
- Use any kind of oven tray or pyrex dish suited to the size of the piece of meat being cooked. For roast joints, it is best to add some stock to the bottom of the pan,
basting the meat during cooking for added flavour. When the roast is ready, let it rest in the oven for another 10-15 minutes, or wrap it in aluminium foil.
- When you want to grill meat, choose cuts with an even thickness all over in order to achieve uniform cooking results. Very thick pieces of meat require longer
cooking times. To avoid the meat from burning on the outside, lower the position of the wire shelf, keeping the food farther away from the grill. Turn the meat
two thirds of the way through cooking.
To collect the cooking juices it is advisable to place a drip-tray with half a litre of water directly under the grill on which the meat is placed. Top-up when necessary.
Turnspit (only in some models)
Use this accessory to evenly roast large pieces of meat and poultry. Place the meat on the spit rod, tying it with string if chicken, and check that it is secure before inserting the rod in the
seat located on the front wall of the oven and resting it on the respective support. To avoid smoke and to collect cooking juices, it is advisable to place a drip-tray with half a litre of water
on the first level. The rod has a plastic handle which must be removed before starting to cook, and used at the end of cooking to avoid burns when taking the food out of the oven.
Pizza
Lightly grease the trays to ensure the pizza has a crispy base. Scatter the mozzarella over the pizza two thirds of the way through cooking.
Rising function (present only in specific models)
It is always best to cover the dough with a damp cloth before placing it in the oven. Dough proving time with this function is reduced by approximately one third
compared to proving at room temperature (20-25°C). Proving time for a 1 Kg batch of pizza dough is around one hour.
Biscuits/Tartlets - 1 /3 170-180 20-40
Baking tray+drip tray, switch levels
halfway through cooking
Choux pastry - 1/ 3 180 35-45
Baking tray+drip tray, switch levels
halfway through cooking
Vols-au-vent / Puff pastry crackers - 1/ 3 180-200 20-40
Baking tray+drip tray, switch levels
halfway through cooking
Roast chicken - 2 200 55-65
Grill + drip tray with water on
1st level
Roast potatoes - 3 200 45-55 Drip tray
Roast Beef underdone - 3 200 30-40
Grill + drip tray with water on
1st level
Leg of lamb/Knuckle - 2 200 55-70 Grill + drip tray
RECOMMENDED USE AND TIPS
Recipe Function Preheating Shelf
(from bottom)
Temperature
(°C)
Time
(min)
Accessories
Sayfa yükleniyor...
-
 1
1
-
 2
2
-
 3
3
-
 4
4
-
 5
5
-
 6
6
-
 7
7
-
 8
8
-
 9
9
-
 10
10
-
 11
11
-
 12
12
-
 13
13
-
 14
14
-
 15
15
-
 16
16
-
 17
17
-
 18
18
-
 19
19
-
 20
20
-
 21
21


Whirlpool AKP 228/IX/03 Kullanici rehberi
- Kategori
- Fırınlar
- Tip
- Kullanici rehberi
diğer dillerde
- English: Whirlpool AKP 228/IX/03 User guide
Diğer belgeler
-
KitchenAid KOHCS 60601 Kullanici rehberi
-
KitchenAid KOHSP 60601 Kullanici rehberi
-
KitchenAid KOHCC 60600 Kullanici rehberi
-
KitchenAid KOHCP 60600 Kullanici rehberi
-
KitchenAid KOTSSB 60600 Kullanici rehberi
-
KitchenAid KOASS 60600 Kullanici rehberi
-
KitchenAid KOTSP 60600 Kullanici rehberi
-
KitchenAid KOLSS 60600 Kullanici rehberi
-
Candy FMBC A896S E0 Kullanım kılavuzu
-
Zanussi ZOB35712WK Kullanım kılavuzu